
TRX 3500 - Talkie Walkie BRENNENSTUHL - Free user manual and instructions
Find the device manual for free TRX 3500 BRENNENSTUHL in PDF.

| Product Type | PMR 446 Walkie-talkie |
| Brand | Brennenstuhl |
| Model | TRX 3500 |
| Number of Channels | 8 PMR 446 channels |
| Maximum Range | up to 5 km in open field |
| Power Supply | 3 AAA alkaline batteries (per device) |
| Display | LCD with backlight |
| Main Functions | Automatic squelch, Roger Beep, automatic channel search, key lock, power saving mode, call alert |
| Belt Clip | Yes, included |
| Package Contents | 2 walkie-talkies, user manual |
| Frequency | 446 MHz (PMR band) |
| Transmission Power | 500 mW (max. according to PMR standard) |
| Modulation Type | FM |
| Volume Adjustment | 8 levels |
| Maintenance | Clean with a dry cloth, avoid moisture |
| Safety | Do not mix old and new batteries, observe polarity |
| Repairability | Not user-serviceable, contact customer service |
Frequently Asked Questions - TRX 3500 BRENNENSTUHL
User questions about TRX 3500 BRENNENSTUHL
0 question about this device. Answer the ones you know or ask your own.
Ask a new question about this device
Download the instructions for your Talkie Walkie in PDF format for free! Find your manual TRX 3500 - BRENNENSTUHL and take your electronic device back in hand. On this page are published all the documents necessary for the use of your device. TRX 3500 by BRENNENSTUHL.
USER MANUAL TRX 3500 BRENNENSTUHL
GB Operating Instructions....8
Please read the entire user guide before using the devices. Do not throw away the user guide. Include the user guide if you give the devices to someone else.
1.1. Intended Use
This product is a walkie-talkie as defined by European Public Mobile Radio (PMR) standard 446. It is suitable for communicating within a range of up to 5 km (open air). The range may be smaller depending upon the weather and the surroundings. The range can be affected by:
• buildings, dense trees or foliage,
• hilly or mountainous terrain,
• a low battery charge level.
The longest range can be achieved in flat, open areas with no obstacles.
1.2. Scope of Delivery
You should see the following components when you unpack your PMR device:
• two 8-channel PMR walkie-talkies with belt clips,
• the user guide.
2. OVERVIEW
2.1. Controls

2.2. Displays
8 Channel number: a user-selected channel between 1 and 8
Battery level
SC Displays if automatic channel search has been activated
Displays if key lock has been activated
TX Displays when a signal is being transmitted
RX Displays when a signal is being received
Shows the current volume setting
3. OPERATION
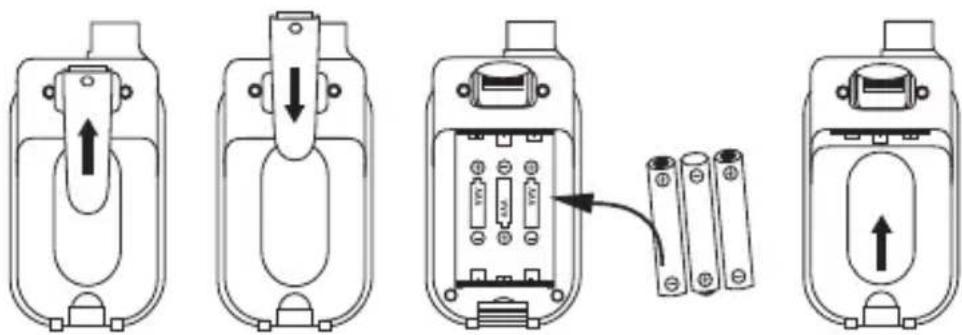
3.1. Belt Clips
Removing the Belt Clip
• Pull the belt clip locking mechanism away from the walkie-talkie (PMR).
- Push the belt clip upwards while pulling the belt clip locking mechanism, as shown in Fig. 1.
Attaching the Belt Clip
- Push the belt clip into the slot, as illustrated in Fig. 2.
• You will hear a ,click' when the belt clip snaps into place.
3.2. Inserting the Batteries
The PMR walkie-talkie requires 3 AAA alkaline batteries.
- Unlock and remove the cover of the battery compartment.
- Insert 3 AAA alkaline batteries. Make sure the positive and negative ends are facing the correct direction, as shown in Fig. 3.
- Replace the battery compartment cover. See Fig. 4.
• Only use batteries of the same type and brand in your PMR walkie-talkies.
• Do not mix old and new batteries.
- Remove the batteries if you will not be using the devices for a long time.
CAUTION!
- Incorrect positioning of the batteries may damage the batteries as well as the device.
• There is a danger of explosion if the wrong type of battery is used. - Dispose of used batteries according to the instructions.
3.3. Battery Indicator
The PMR walkie-talkie detects the battery level and displays it as follows:
- Battery is full or almost full: [■■■] displays without blinking
• Battery is low or empty: blinks continuously
Note
- To ensure good communication the batteries should be replaced as soon as the 'low battery' symbol is displayed.
4. OPERATION
4.1. Switching the PMR Walkie-Talkie ON and OFF
To Switch ON
- Press and hold the ⏻ (On/Off) button. A specific beep is heard. The active channel is displayed on the LCD screen.
To Switch OFF
- Press and hold the ⏻ (On/Off) button. A specific beep is heard and the LCD screen goes dark.
4.2. Call Button (Ring Tone)
The CALL button can be used to send a ring tone to other users on the same channel.
- Press and release the 📄 (Call) button. The device sends a 2-second ring tone to the other device if it is tuned to the same channel and is within transmission range.
4.3. Adjusting the Speaker Volume
There are 8 volume levels, with the current volume setting being displayed on the LCD screen.
- To adjust the speaker volume, press the (UP) button to increase the volume or the (DOWN) button to lower it. The volume symbol will be displayed on the LCD screen as a set of bars that either increase or decrease in size.
4.4. Receiving a Call
The device is always in receive mode as long as it is switched on and is not transmitting. When a signal is received on the currently selected channel the signal reception symbol 'RX' displays on the LCD screen.
4.5. Transmitting (Sending)
- Press and hold the PTT button to transmit a voice signal. The LCD screen displays the signal transmission symbol 'TX'.
- Hold the device in a vertical position, with the microphone at a distance of 5 cm from your mouth. Speak into the microphone in a normal voice while pressing the the PTT button.
- Release the PTT button when you are finished transmitting.
Note
- In order for others to receive your transmission they must be on the same channel. See section "Changing the Channel" for more information.
- If you do not release the PTT and/or the CALL button the PMR walkie-talkie will not be able to receive a transmission.
4.6. Roger Beep
The Roger beep is a sound that is transmitted automatically as soon as the PTT button is released. The beep tells the receiving party that you have finished transmitting.
4.7. Changing the Channel
The PMR walkie-talkie has 8 available channels.
The following steps are used to change the channel:
- First press the MENU (Menu) button. The symbol for channel '1' starts to blink on the LCD screen.
- With the channel symbol still blinking, press the ▲ or ▼ button to select the desired channel. The channel changes in the order from 1 to 8 or in the reverse order.
- Press the MENU (Menu) button again to confirm your setting and return to stand-by mode.
Note
- After approx. 5 seconds without input from the keyboard the device will automatically leave channel setting mode and return to stand-by mode.
4.8. Automatic Channel Search
Your PMR walkie-talkie can scan the 8 channels automatically for activity. This allows you to find other active PMR walkie-talkies without having to manually change the channel.
- Press and hold the MENU and the ▲ buttons simultaneously to start automatic channel search. SC is displayed on the LCD screen.
If a signal is detected the unit will stay on that channel for as long as the signal is received. The search is resumed as soon as the signal ends.
- While a signal is being received: Press the PTT key to end channel search and speak over the selected channel, or press the ▲ or the button to continue searching for a channel.
- Press the MENU button to end automatic channel search and return to stand-by mode.
5. ADDITIONAL FEATURES
5.1. Auto Squelch
Your PMR walkie-talkie is equipped with an automatic squelch feature to filter out weak transmissions and undesirable channel noise.
You can temporarily deactivate auto squelch to search the active channel for weaker signals. This allows you to use the maximum available range, however, it will also cause the device to pick up background noise.
Deactivating Auto Squelch
- Press and hold the ▲ and the ▼ buttons simultaneously.
The receive symbol 'RX' appears on the display.
The PMR walkie-talkie opens the currently active channel to all signals.
- Press the button to reactivate auto squelch.
5.2. Key Lock
When key lock is on you can still transmit (TX), send a call (ring tone) over the currently active channel or switch the device ON/OFF, however, you will not be able to adjust the volume or change the channel.
Locking the Keys
- In stand-by mode, press and hold the MENU button until the OT symbol appears on the LCD screen.
Unlocking the Keys
- In stand-by mode, press and hold the MENU button again until the ON symbol appears on the LCD screen.
5.3. LCD Screen Backlighting
The walkie-talkie comes with a backlit LCD screen. Backlighting is activated briefly when a button is pushed (all except the PTT button) and turns off automatically afterwards.
5.4. Power-Saver Mode
Your PMR walkie-talkie has a circuit that was specifically developed to extend the life of your batteries. The unit automatically switches to power-saver mode after 4 hours of inactivity.
The power-saver function does not limit the ability of the PMR walkie-talkie to receive transmissions. If a signal is detected the device automatically returns to full power mode.
6. DISPOSAL

Do not dispose of electronic devices in the rubbish bin!
According to Directive 2012/19/EC of the European Parliament and of the Council on waste electrical and electronic equipment and its transposition into national law, used electronic devices must be collected separately and recycled in an environmentally sound way. Contact your local authorities for information on where to take your used device for recycling.
Improper disposal of batteries and rechargeable batteries can harm the environment!
Batteries and rechargeable batteries do not belong in the household rubbish bin.
They may contain toxic heavy metals and must be treated as hazardous waste.
Take your used batteries and rechargeable battery packs to a communal collection point.
7. DECLARATION OF CONFORMITY
The manufacturer's declaration of conformity is included with the product.
The declaration of conformity can also be found at the following link:
For more information please visit the Service/FAQ section on our homepage, www.brennenstuhl.com.
FR
Illustration 1 Illustration 2 Illustration 3 Illustration 4