
Pocket Lunch - Chair CHICCO - Free user manual and instructions
Find the device manual for free Pocket Lunch CHICCO in PDF.
| Product type | Folding high chair for children |
| Brand | Chicco |
| Model | Pocket Lunch |
| Recommended age | From 6 to 36 months |
| Maximum child weight | 15 kg |
| Product weight | Approximately 6 kg |
| Folded dimensions | Not specified, compact |
| Safety harness | 5-point harness with rigid crotch strap |
| Tray | Removable and adjustable to 3 positions, with integrated rigid crotch strap |
| Backrest recline | Adjustable to 3 positions |
| Footrest | Foldable (rotates downward) |
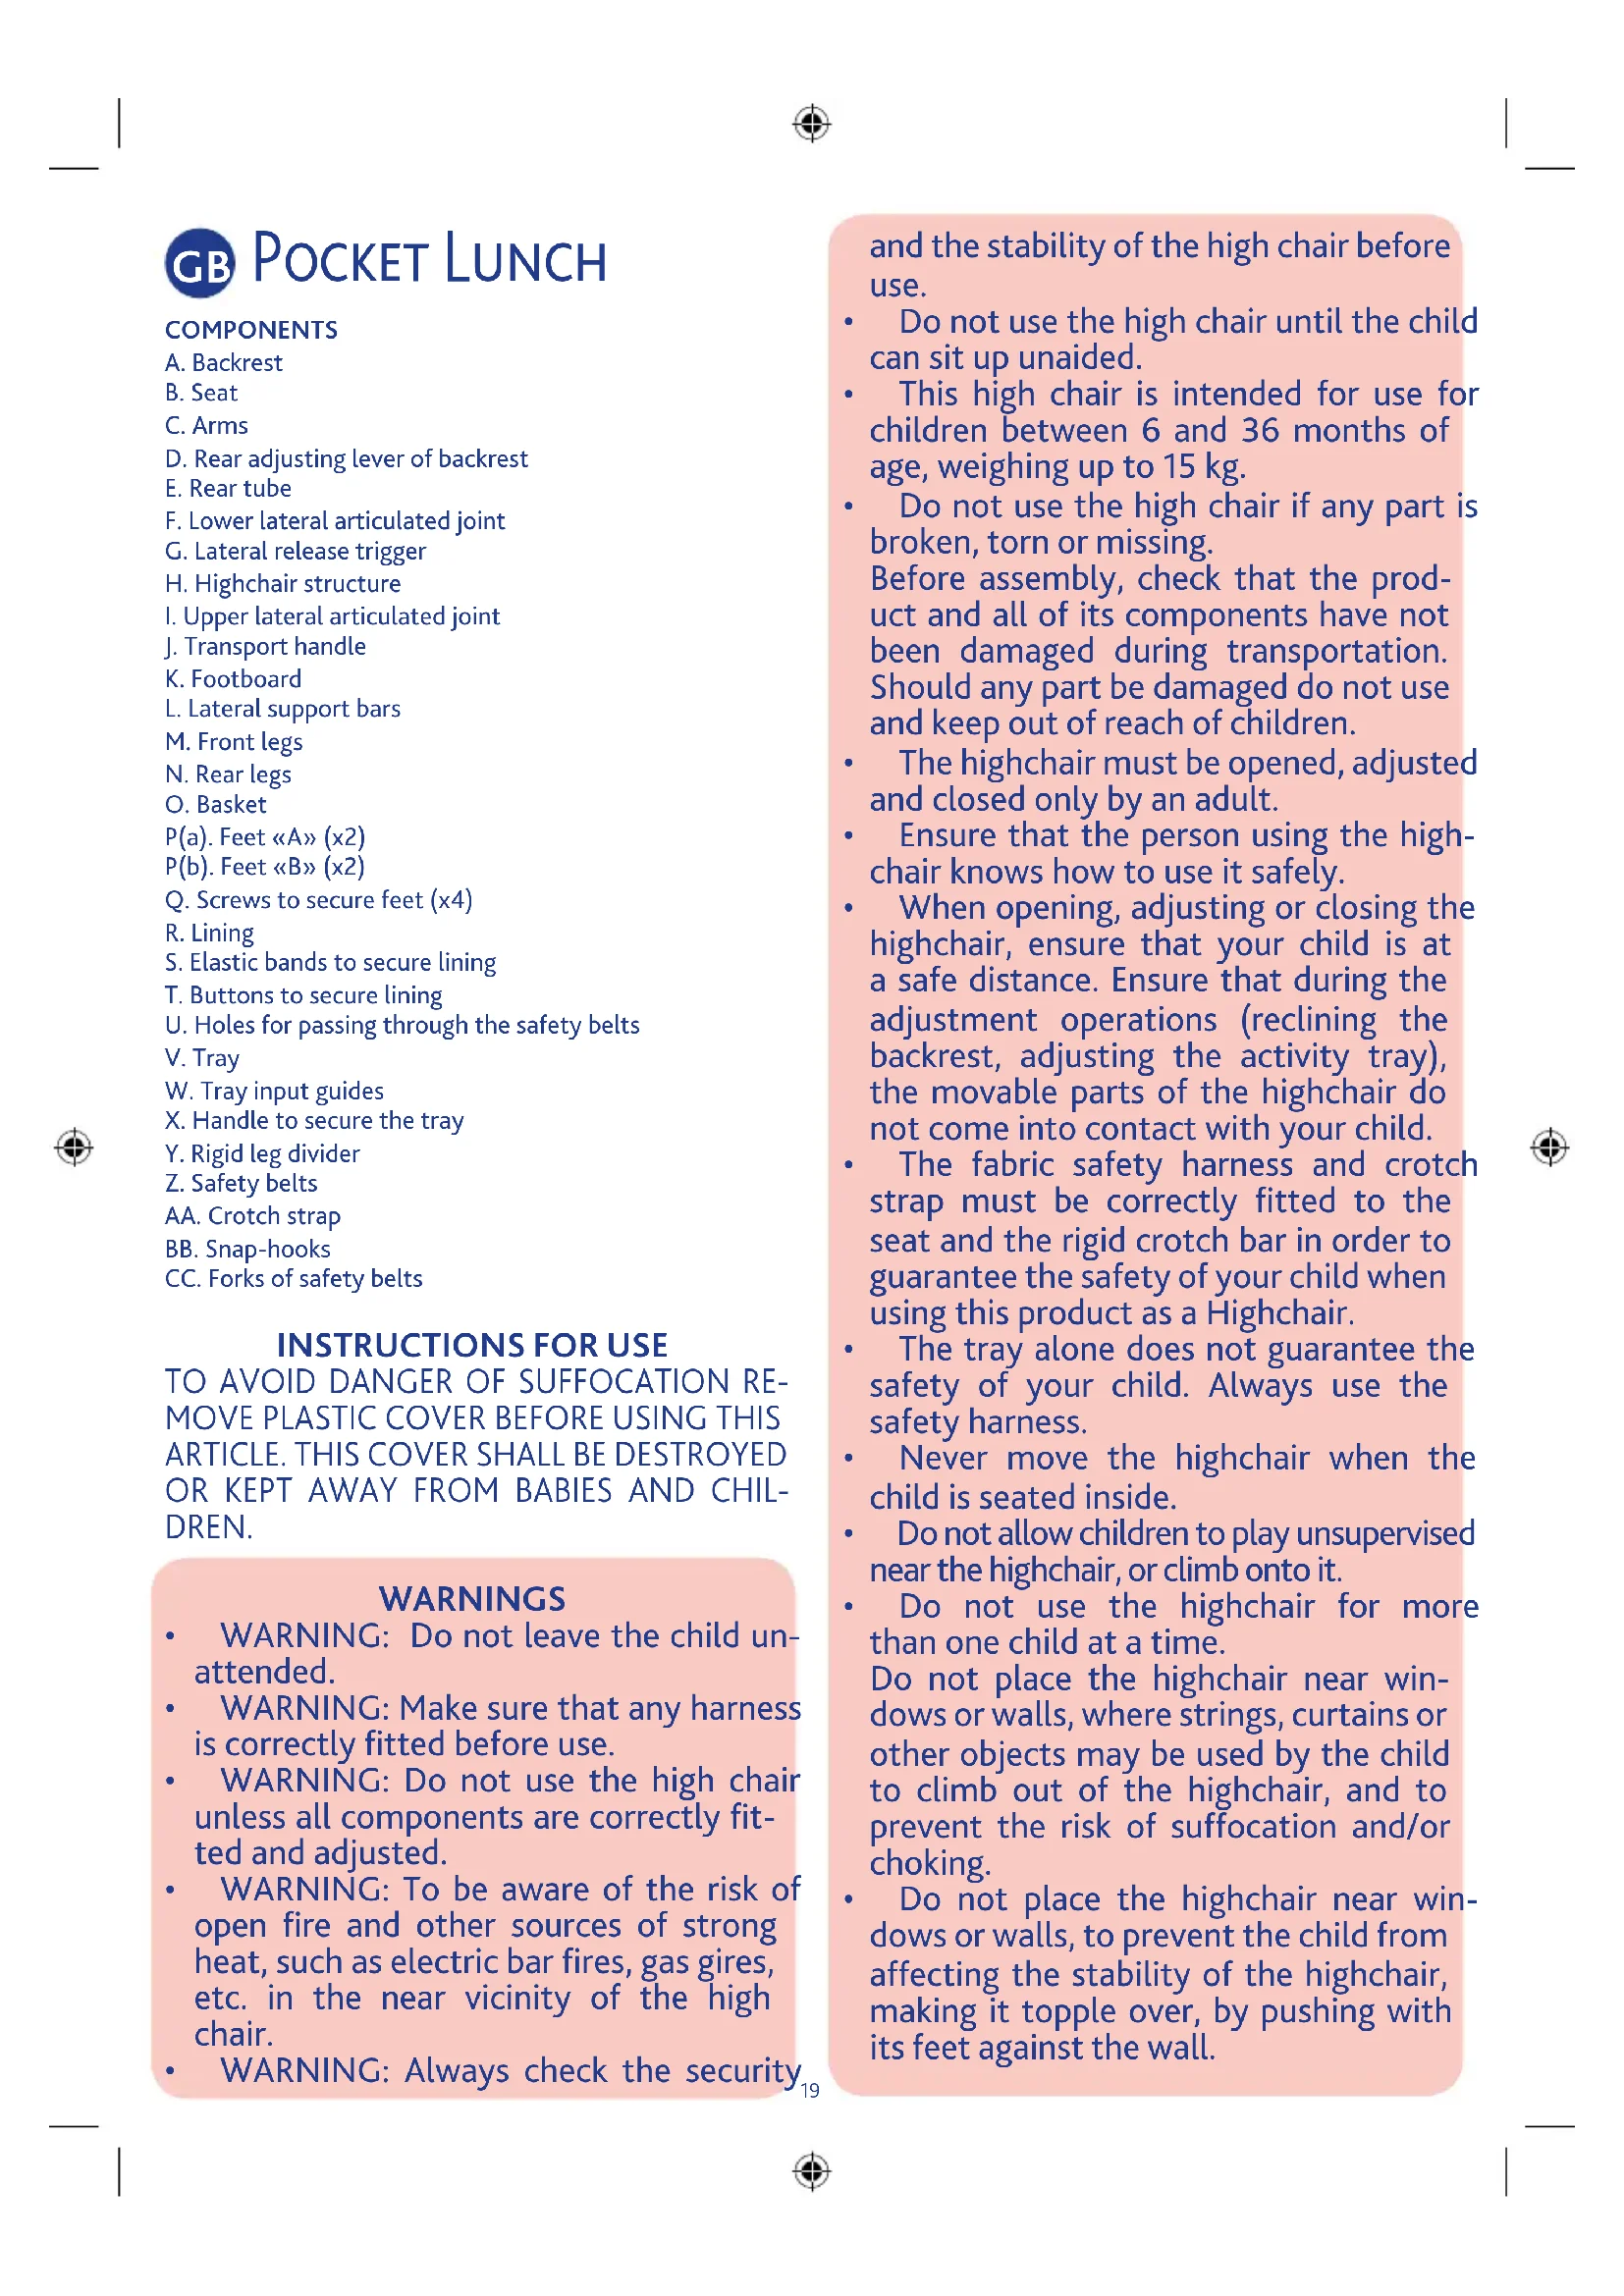
| Basket | Removable, maximum capacity 3 kg |
| Upholstery | Padded, removable and washable |
| Legs | 4 fixed legs (A and B), screwed, not removable after assembly |
| Folding | Yes, with side release triggers, stays upright when folded |
| Carrying handle | Integrated on the rear tubular structure |
| Upholstery care | Clean with water and mild soap; do not put in dishwasher |
| Plastic parts care | Damp cloth, no abrasive products |
| Lubrication | Silicone oil for moving parts if necessary |
| Safety | Do not leave child unattended, do not move with child, check locks before use |
Frequently Asked Questions - Pocket Lunch CHICCO
User questions about Pocket Lunch CHICCO
0 question about this device. Answer the ones you know or ask your own.
Ask a new question about this device
Download the instructions for your Chair in PDF format for free! Find your manual Pocket Lunch - CHICCO and take your electronic device back in hand. On this page are published all the documents necessary for the use of your device. Pocket Lunch by CHICCO.
USER MANUAL Pocket Lunch CHICCO
natural_image
Illustration of a mesh mesh structure with labeled point O, no text or symbols present


natural_image
Illustration of hands using a tool to adjust or install a small electronic device (no text or symbols visible)
natural_image
Illustration of a person using a handheld device to lift a purple chair (no text or symbols visible)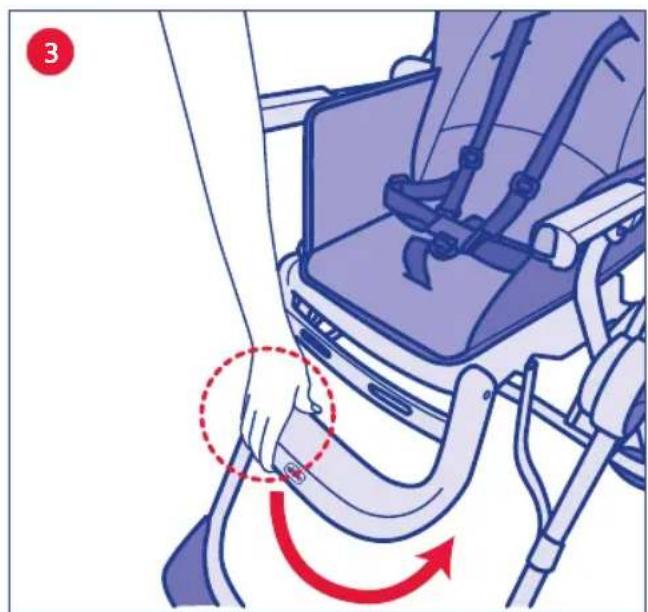
natural_image
Illustration of a hand adjusting a seatbelt device inside a vehicle (no text or symbols visible)
natural_image
Illustration of a folding chair with red diagonal lines indicating crossed legs (no text or symbols)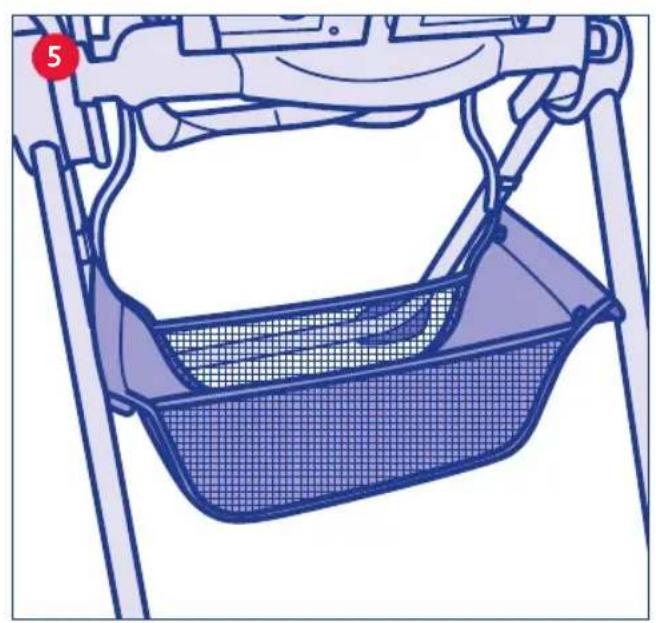
natural_image
Line drawing of a bicycle seatbelt frame with handle and seat, no text or symbols present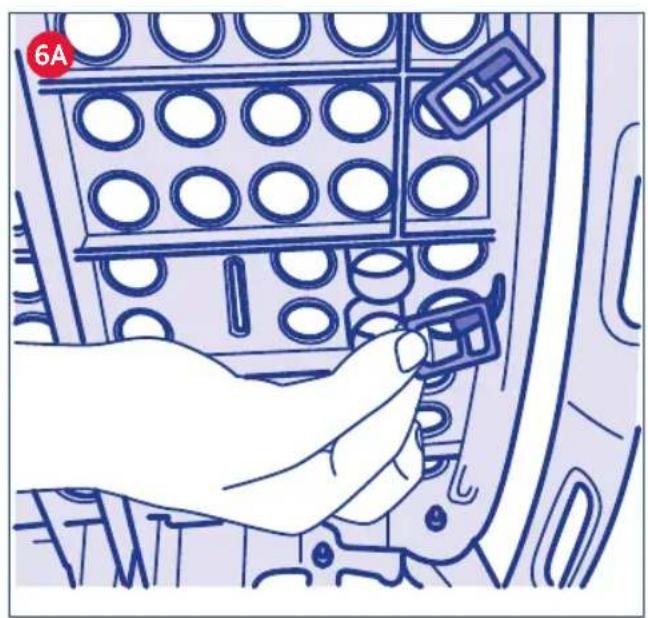
natural_image
Hand inserting a small component into a car interior panel (no text or symbols visible)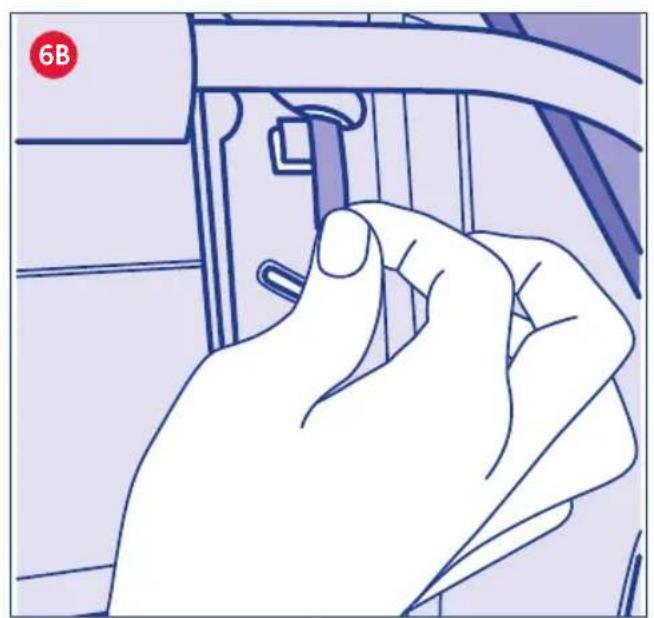
natural_image
Hand inserting a component into a device panel (no text or symbols visible)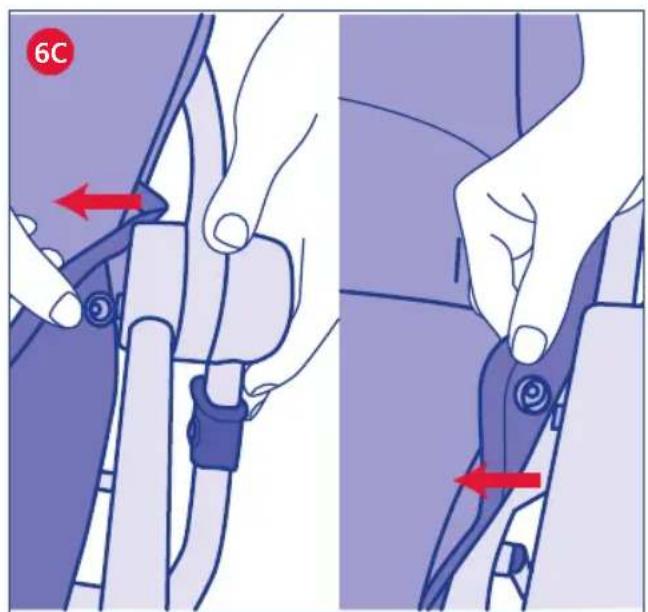


natural_image
Illustration of a hand holding a blue object with a curved line, no text or symbols present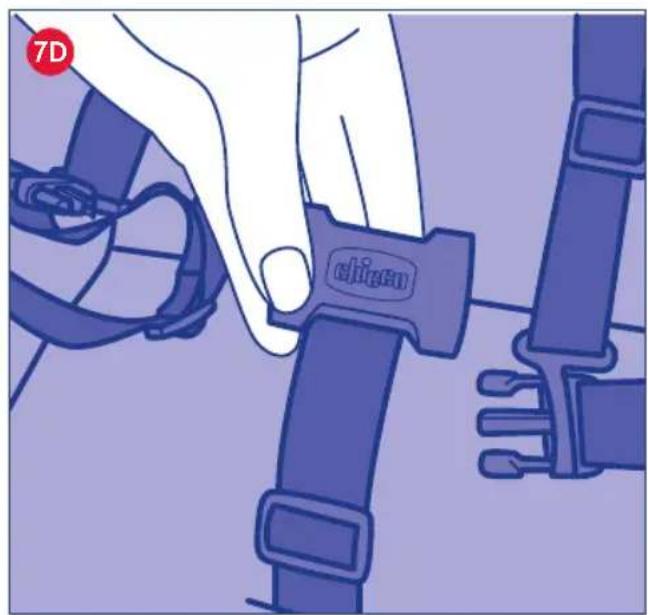
natural_image
Illustration of a hand adjusting a blue belt buckle (no text or symbols visible)

natural_image
Illustration of a person's seatbelt with two blue straps and a central buckle (no text or symbols)
natural_image
Illustration of a purple helmet with two red dashed circles highlighting the eyes (no text or symbols)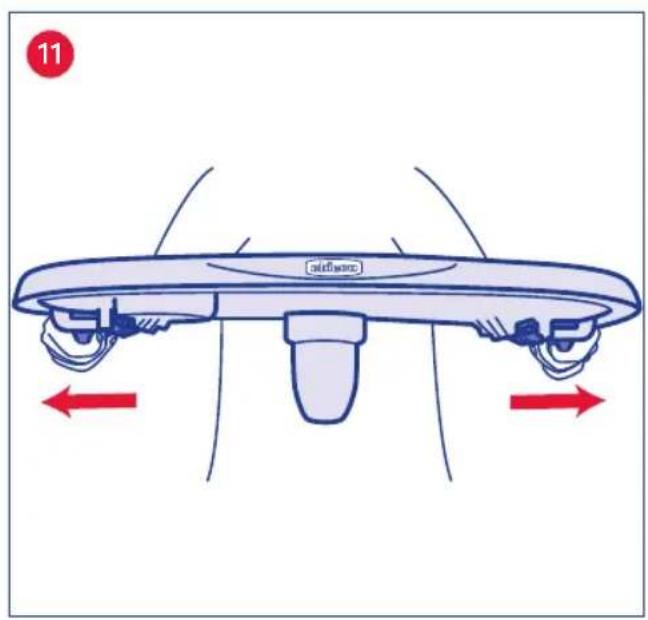
natural_image
Illustration of a person adjusting a bicycle seatbelt with a red arrow indicating rotation (no text or symbols)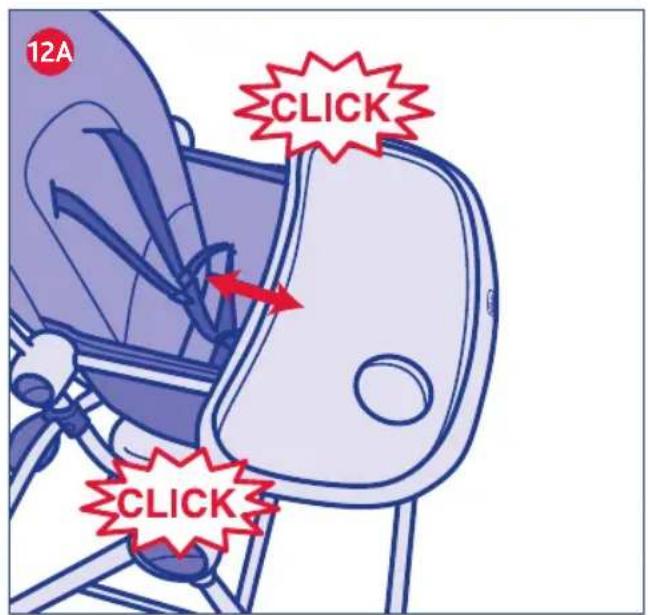

natural_image
Illustration of hands operating a bicycle seatbelt mechanism, showing mechanical components and a red arrow indicating rotation (no text or symbols)
natural_image
Illustration of a quadruped robot with a red circular motion indicator showing movement (no text or symbols)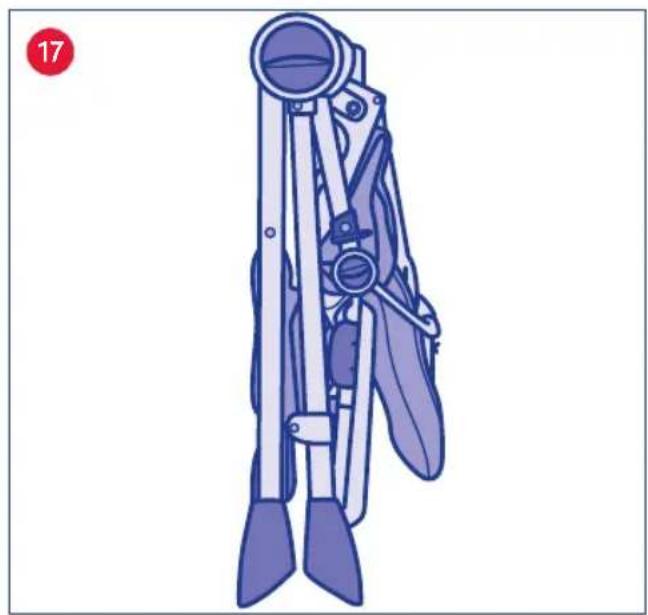
natural_image
Illustration of a blue and purple foldable tool with metal arms and handle (no text or symbols)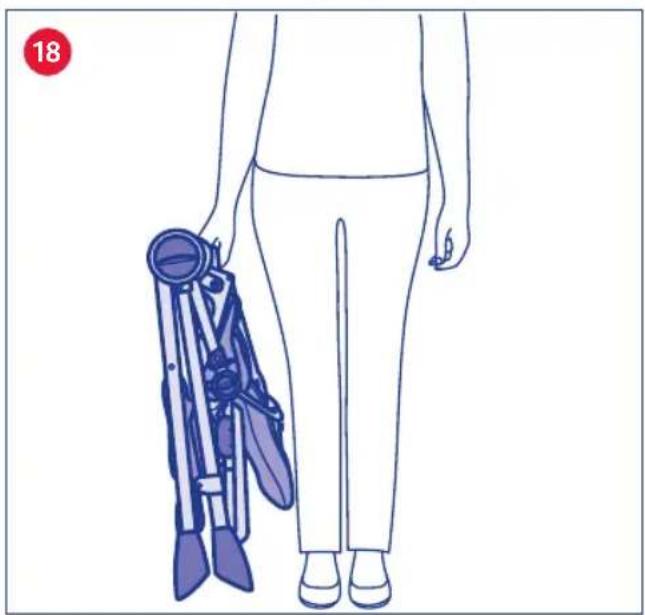
natural_image
Line drawing of a person holding a blue bicycle tilter (no text or symbols)POCKET LUNCH
COMPONENTI
A. Schienale
B. Seduta
C. Braccioli
D. Rear adjusting lever of backrest
E. Rear tube
F. Lower lateral articulated joint
G. Lateral release trigger
H. Highchair structure
I. Upper lateral articulated joint
J. Transport handle
K. Footboard
L. Lateral support bars
M. Front legs
N. Rear legs
O. Basket
P(a). Feet «A» (x2)
P(b). Feet «B» (x2)
Q. Screws to secure feet (x4)
R. Lining
S. Elastic bands to secure lining
T. Buttons to secure lining
U. Holes for passing through the safety belts
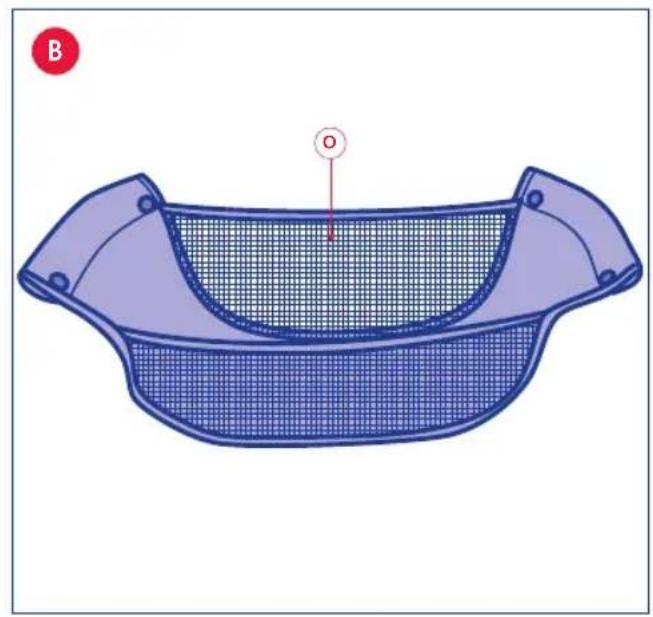
V. Tray
W. Tray input guides
X. Handle to secure the tray
Y. Rigid leg divider
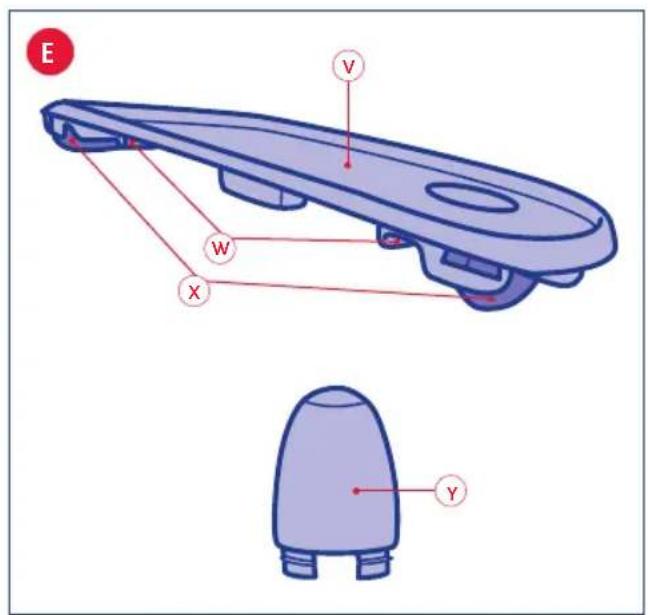
Z. Safety belts
AA. Crotch strap
BB. Snap-hooks
CC. Forks of safety belts
INSTRUCTIONS FOR USE
TO AVOID DANGER OF SUFFOCATION REMOVE PLASTIC COVER BEFORE USING THIS ARTICLE. THIS COVER SHALL BE DESTROYED OR KEPT AWAY FROM BABIES AND CHILDREN.
WARNINGS
- WARNING: Do not leave the child unattended.
- WARNING: Make sure that any harness is correctly fitted before use.
- WARNING: Do not use the high chair unless all components are correctly fitted and adjusted.
- WARNING: To be aware of the risk of open fire and other sources of strong heat, such as electric bar fires, gas gires, etc. in the near vicinity of the high chair.
• WARNING: Always check the security
and the stability of the high chair before use.
- Do not use the high chair until the child can sit up unaided.
- This high chair is intended for use for children between 6 and 36 months of age, weighing up to 15 kg.
- Do not use the high chair if any part is broken, torn or missing.
Before assembly, check that the product and all of its components have not been damaged during transportation. Should any part be damaged do not use and keep out of reach of children.
- The highchair must be opened, adjusted and closed only by an adult.
- Ensure that the person using the high-chair knows how to use it safely.
- When opening, adjusting or closing the highchair, ensure that your child is at a safe distance. Ensure that during the adjustment operations (reclining the backrest, adjusting the activity tray), the movable parts of the highchair do not come into contact with your child.
- The fabric safety harness and crotch strap must be correctly fitted to the seat and the rigid crotch bar in order to guarantee the safety of your child when using this product as a Highchair.
- The tray alone does not guarantee the safety of your child. Always use the safety harness.
- Never move the highchair when the child is seated inside.
- Do not allow children to play unsupervised near the highchair, or climb onto it.
- Do not use the highchair for more than one child at a time.
Do not place the highchair near windows or walls, where strings, curtains or other objects may be used by the child to climb out of the highchair, and to prevent the risk of suffocation and/or choking.
- Do not place the highchair near windows or walls, to prevent the child from affecting the stability of the highchair, making it topple over, by pushing with its feet against the wall.
• Always place the highchair on a horizontal, stable surface. Never place the highchair near stairs or steps or carpets.
- Bags or weights must not be placed on the activity tray or hung on the high-chair frame, as they might affect the stability of the highchair.
- If the highchair is left exposed to direct sunlight for a long time, allow it to cool before placing your child in it.
- Do not leave the highchair under the sun for a long time: prolonged exposure to direct sunlight may cause the fabric cover to fade.
- When it is not used, the highchair must be kept away from the reach of children. Never use the highchair without its cover.
- Do not use accessories, spare parts, or any component not supplied or approved by the manufacturer.
- WARNING: Before use, ensure that all the safety devices are correctly fitted and working. In particular, ensure that the highchair is locked in the open position.
- WARNING: The feet must not be removed after they have been assembled to the frame.
- Do not overload the storage basket. Maximum weight 3 kg.
- Do not open or close the highchair with the child sitting in it.
- WARNING: IMPORTANT FOR YOUR CHILD'S SAFETY - Always fix the rigid crotch strap to the activity tray before fitting the tray to the Highchair. Once the rigid crotch strap has been fixed, it must never be removed.
ADVICE FOR CLEANING AND MAINTENANCE
Cleaning and maintenance operations must be carried out by adults only.
Cleaning
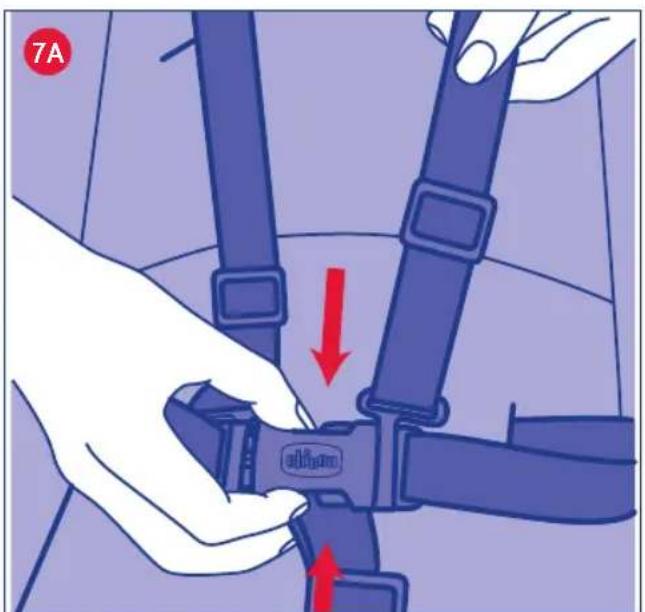
Clean the fabric seat lining with a cloth using water or neutral detergent. To remove the lining from the highchair: release the elastic bands that secure the lining under the seat: on the front, sides and on the upper part of the backrest (Figures 6A-6B). Release the side press stud fasteners secured to the arms (fig. 6C). Unhook the safety harness belts and crotch strap (Figures 7A-7B) then remove them from the lining, passing them through the specific slots (Figures 7C-7D). Repeat the operations in reverse order to reposition the lining on the highchair.
Clean the plastic parts with a cloth and water. Never wash the tray in the dishwasher. Never use abrasive detergents or solvents. In case of contact with water, dry the metal parts in order to avoid the formation of rust.
Maintenance
Store the Highchair in a dry place. Lubricate the moving parts with dry silicon oil, if needed.
INSTRUCTIONS FOR USE
HIGHCHAIR ASSEMBLY/ OPENING
WARNING: carry out these operations, paying attention that your child and any other children are standing at a safe distance. Make sure that during these operations, the moving parts of the highchair do not come into contact with the child's body.
Before using the highchair, secure the feet to the structure.
WARNING: Do not use the highchair until all feet are assembled.
-
Secure the 4 feet to the highchair's legs, paying attention to match letters A and B present on the feet, with letters A and B printed on the highchair's legs. Letter A is present on the left front foot and on the right rear foot. Letter B is present on the right front foot and on the left rear foot (see fig. 1A).
-
Secure all 4 feet using the 4 screws included inside the packaging (fig. 1B).
-
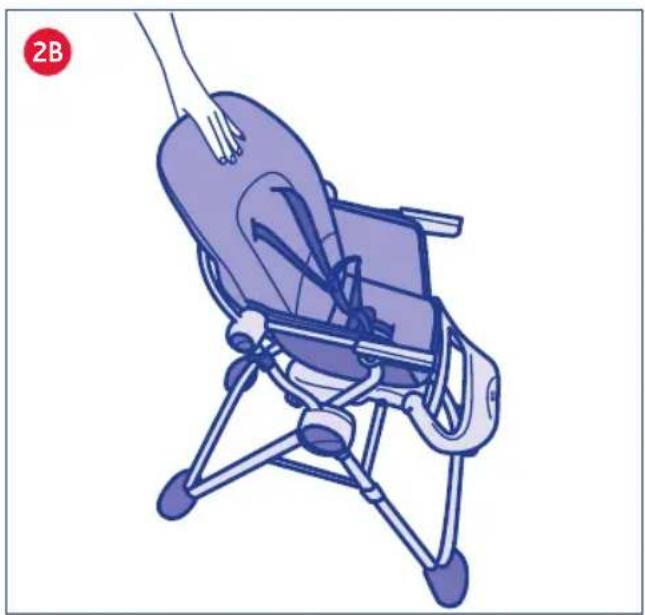
Open the highchair using the tubular structure on the rear of the backrest and rotate it anti-clockwise, pulling it upward until hearing a click, for opening (figures 2A-2B).
-
Rotate the footboard downward until hearing a snap, for locking (fig. 3).
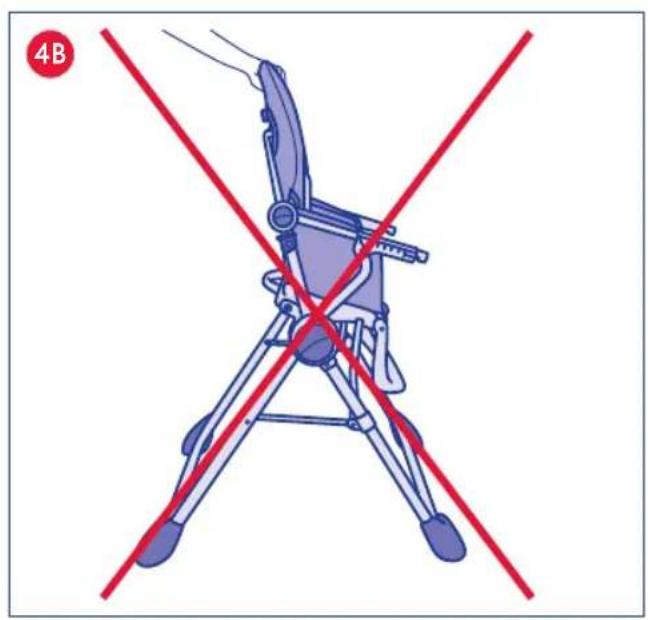
WARNING! Before use, make sure that all safety mechanisms are properly locked in place: always check proper fastening and locking on both sides of the structure (see fig. 4A). WARNING! Never use the product if the safety mechanisms are fastened and locked in place (see figure 4B).
- Secure the basket to the structure, as shown in figure (fig. 5). Do not store objects exceeding 3 kg in the basket. Now the highchair is ready to accommodate the child.
WARNING: Never move the highchair with the child inside.
LINING
The highchair's lining is padded; it can be removed and washed.
- If you want to remove the lining from the highchair, please follow the instructions in the paragraph "Advice for Cleaning and Maintenance"
WARNING: Never use the highchair without the lining.
SAFETY BELTS
The highchair is equipped with a 5-point safety harness.
-
Unfasten the safety belts as indicated in figure (fig. 8)
-
Position the child in the highchair, and strap him inside using the belts (fig. 9). The safety belts can be adjusted in two different height positions. Remove the lining from the
highchair, referring to the instructions in the paragraph "Advice for Cleaning and Maintenance", move the belts to the required height, passing them through the specific slots on the backrest (fig. 10) and reposition the lining on the highchair. The belts must be positioned in the slots at the same height and not at different heights.
WARNING: It is essential to use the safety belts with the crotch strap to ensure the child's safety. WARNING: The tray alone does not ensure the safe retention of the child. Always use the safety belts!
TRAY POSITIONING/ ADJUSTMENT
Before using the tray, secure the rigid leg divider underneath. WARNING: IMPORTANT FOR THE CHILD'S SAFETY – never position the tray on the highchair without securing first, the rigid leg divider on it. Once assembled, this must never be removed again.
The tray can be adjusted in 3 different positions.
- By holding the tray, pull the fastening handles outwards (fig. 11)
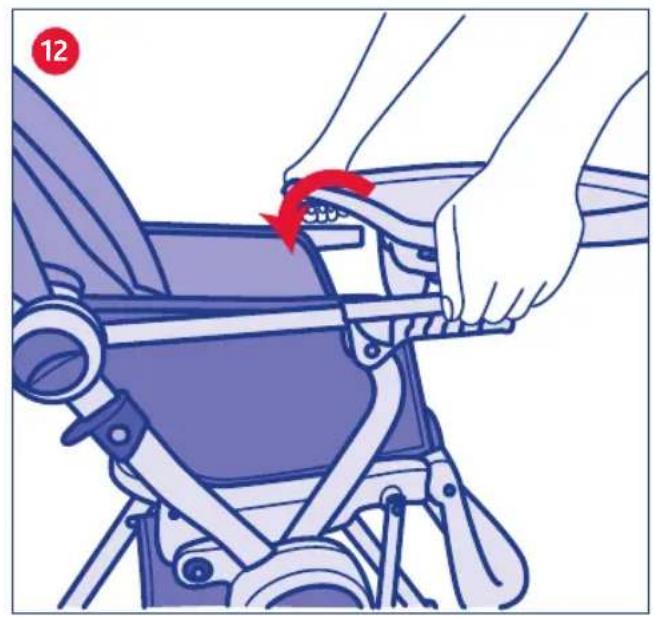
- Position the tray on the highchair structure, introducing the arms in to the specific guides (fig. 12)
- The 3 positions in which the tray can be adjusted are identified by relative symbols on the highchair arms. Adjust the tray until reaching the required position and release the handles. If the tray does not automatically fasten to the arms, slightly move it until hearing a double click, for locking. WARNING: Before use, always make sure that the tray is properly secured to the highchair arms (fig. 12A)
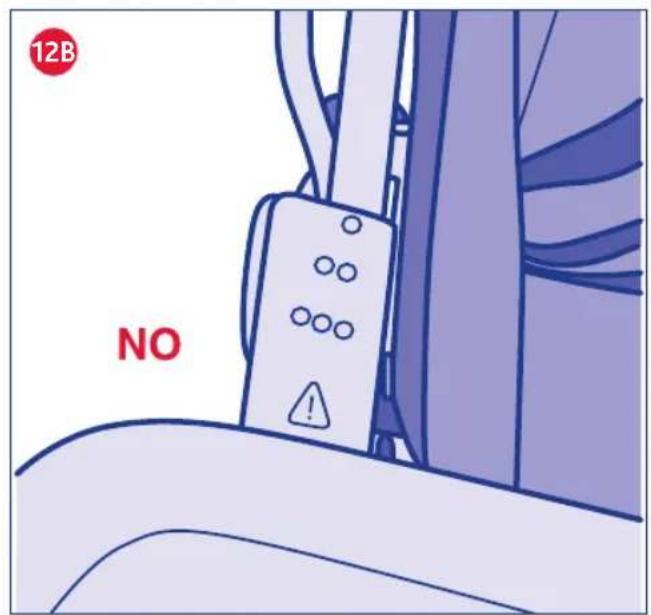
WARNING: Never leave the tray in a position in which the hazard marks are visible on the highchair arms: IT IS NOT SAFE! (see fig. 12B). - To remove the tray, pull the two fastening handles outward and lift it (fig. 13).
ADJUSTING THE BACKREST INCLINATION
The highchair's backrest can be reclined in 3 positions.
14. To adjust the backrest's inclination, push the button located on the rear downward, recline the backrest until the desired position and release the button; the backrest will lock automatically and you will hear a click, for locking. The operation can also be carried out with the child sat inside the highchair, but it may be difficult (fig. 14).
FOLDING THE HIGHCHAIR
WARNING: Carry out these operations, paying attention that your child and any other children are standing at a safe distance. Make sure that during these operations, the moving parts of the highchair do not come into contact with the child's body.
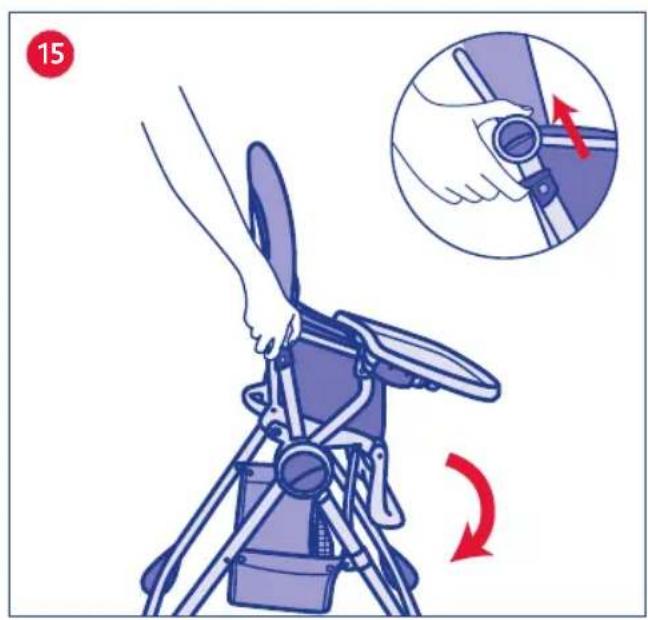
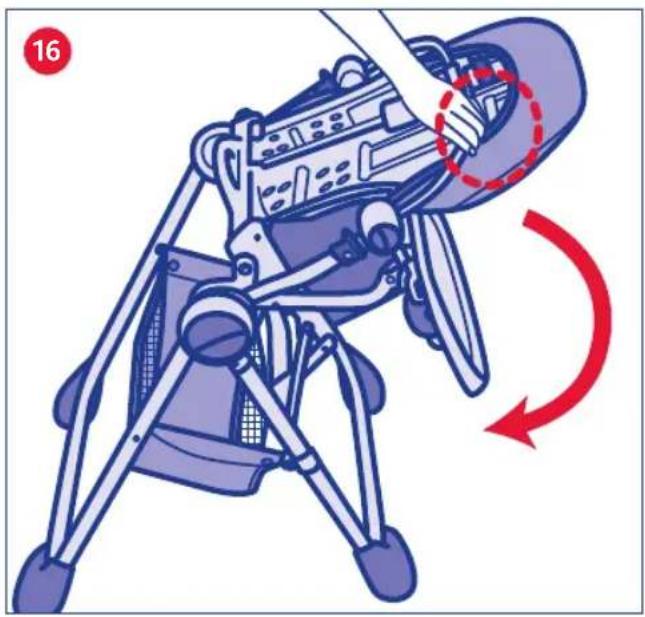
15. After positioning the backrest in vertical position, grab and pull the two triggers on the side of the highchair structure upward at the same time, and slightly push the highchair forward, as shown in figure (fig. 15). Once the locking mechanism is released, grab the tubular structure on the rear and rotate it until the highchair is completely folded, as shown in figure (Fig. 16).
The highchair stands by itself, once folded. The previously
described folding operations can be carried out without the need to remove the tray and basket from the highchair. To further reduce the size of the highchair, it is possible to release the footboard, by rotating it anti-clockwise.
WARNING: When opening the highchair, please remember to reposition the footboard, referring to paragraph 'Highchair assembly/ opening'.
WARNING: When reopening the highchair, make sure that the basket does not obstruct the footboard when rotating the structure.

POCKET LUNCH
COMPONENTES
RÅD FÖR RENGÖRING OCH SKÖTSEL
ARTSANA UK Ltd. Prospect Close - Lowmoor Road Business Park Kirkby In Ashfield Nottinghamshire - Ng17 7Lf England U.K. 01623 750870 (office hours) www.chicco.co.uk

ARTSANA SPAIN S.A.U. C/Industria 10 Pol. Industrial Urtinsa Apartado De Correos 212 - E 28923 Alcorcon (Madrid)-Spain 902 117 093 www.chicco.es

ARTSANA PORTUGAL S.A. Rua Humberto Madeira, 9 2730-097 Queluz De Baixo Barcarena Portugal 21 434 78 00 800 20 19 77 www.chicco.pt

ARTSANA BELGIUM N.V. Temselaan 5 B-1853 Strombeek - Bever Belgium +32 23008240 www.chicco.be

ARTSANA TURKEY BEBEK VE SAĞLIK ÜRÜNLERİ A.Ş. İçerenköy Mh. Erkut Sk. No:12 Üner Plaza K:12 Ataşehir İstanbul - Turkey 0214 444 2444 www.chicco.com

ARTSANA POLAND Sp.zo.o. Aquarius, Ul. Połczyńska 31 A 01-377 Warszawa +48 22 290 59 90 www.chiccopolska.pl


Brand : CHICCO
Model : Pocket Lunch
Category : Chair