DH131 - Humidifier DELONGHI - Free user manual and instructions
Find the device manual for free DH131 DELONGHI in PDF.
| Product type | Dehumidifier |
| Brand | DeLonghi |
| Model | DH131 |
| Dimensions (W x H x D) | 570 x 550 x 300 mm |
| Tank capacity | 6 litres |
| Power supply | 220-240 V ~ 50 Hz |
| Power consumption | Not specified |
| Airflow (speeds) | 2 speeds (low and high) |
| Adjustable hygrostat | Yes, from 20% to 80% RH + CONTINUOUS position |
| Dehumidification function | Yes, with 3-minute start-up delay |
| Tank control system | Yes, indicator light for full, missing, or incorrectly positioned tank |
| Continuous drainage | Possible via hose (supplied, 2 m) |
| Air filter | Washable, clean weekly |
| Body cleaning | With damp cloth (water only) |
| Grounding | Mandatory for safety |
| Anti-freeze protection | Not specified |
| Supplied accessories | Drain hose (2 m), rubber cap |
| Spare parts | Air filter, tank, drain hose |
| Transport | Carrying handle, wheels |
| Weight | Not specified (estimated ~15 kg) |
Frequently Asked Questions - DH131 DELONGHI
User questions about DH131 DELONGHI
0 question about this device. Answer the ones you know or ask your own.
Ask a new question about this device
Download the instructions for your Humidifier in PDF format for free! Find your manual DH131 - DELONGHI and take your electronic device back in hand. On this page are published all the documents necessary for the use of your device. DH131 by DELONGHI.
USER MANUAL DH131 DELONGHI
Instructions for use
Mode d'emploi
Gebrauchsanweisung
Some Notes On Humidity
Air always naturally contains a certain amount of water in the form of water vapour which determines its degree of humidity. Nevertheless, the air's ability to retain water vapour is limited and depends on the temperature: the higher the temperature the greater the amount of water that can be contained in the air. Absolute humidity (A.H.) indicates the amount of water vapour contained in 1kg of air and is expressed in grams. Relative humidity (R.H.) is the relationship between the amount of water contained in 1kg of air and the maximum amount able to be contained at those atmospheric conditions, expressed as a percentage.
In other words, we can imagine the air of a particular environment at a certain temperature as a container of a fixed capacity, for example 10 litres. If we imagine half filling it with water we can say that the container is 50% full (relative humidity), and that the amount of water contained is 5 litres (absolute humidity). When the container is completely full we say that it is "saturated", that is, that we are in the presence of 100% relative humidity. With an increase in the temperature it is as if we increased the capacity of the container. Thus the air at 20^ is like a 10-litre container while the air at 30^ is like a 20-litre container.
It is the level of relative humidity which determines an environment's degree of comfort. Experts have established that the optimum conditions, both for the human organism and for preserving objects, vary between 40^ and 60^ relative humidity. It is thus advisable to keep environments within these parameters.
Read this instruction booklet carefully before installing and using the appliance. In this way, you will obtain the best possible results and maximum operating safety.
Presentation
The dehumidifier is an appliance which removes the humidity from the air, allowing the relative humidity to be controlled and thus enabling a room to become an area of comfort and wellbeing. It is a compact appliance fitted with wheels and handles, and is thus easy to move around. It's use is advisable in all rooms where there are problems of excess humidity, such as bathrooms, laundries, kitchens, basement rooms, cellars, etc..
Electrical connection (U.K. only)
A) If your appliance comes fitted with a plug, it will incorporate a 13 Amp fuse. If it does not fit your socket, the plug should be cut off from the mains lead, and an appropriate plug fitted, as below.
WARNING: Very carefully dispose of the cut off plug after removing the fuse: do not insert in a 13 Amp socket elsewhere in the house as this could cause a shock hazard.
With alternative plugs not incorporating a fuse, the circuit must be protected by a 15 Amp fuse.
If the plug is a moulded-on type, the fuse cover must be re-filled when changing the fuse using a 13 Amp Asta approved fuse to BS 1362. In the event of losing the fuse cover, the plug must NOT be based until a replacement fuse cover can be obtained from your nearest electrical dealer. The colour of the correct replacement fuse cover is that as marked on the base of the plug.
B) If your appliance is not fitted with a plug, please follow the instructions provided below:
WARNING - THIS APPLIANCE MUST BE EARTHED
IMPORTANT
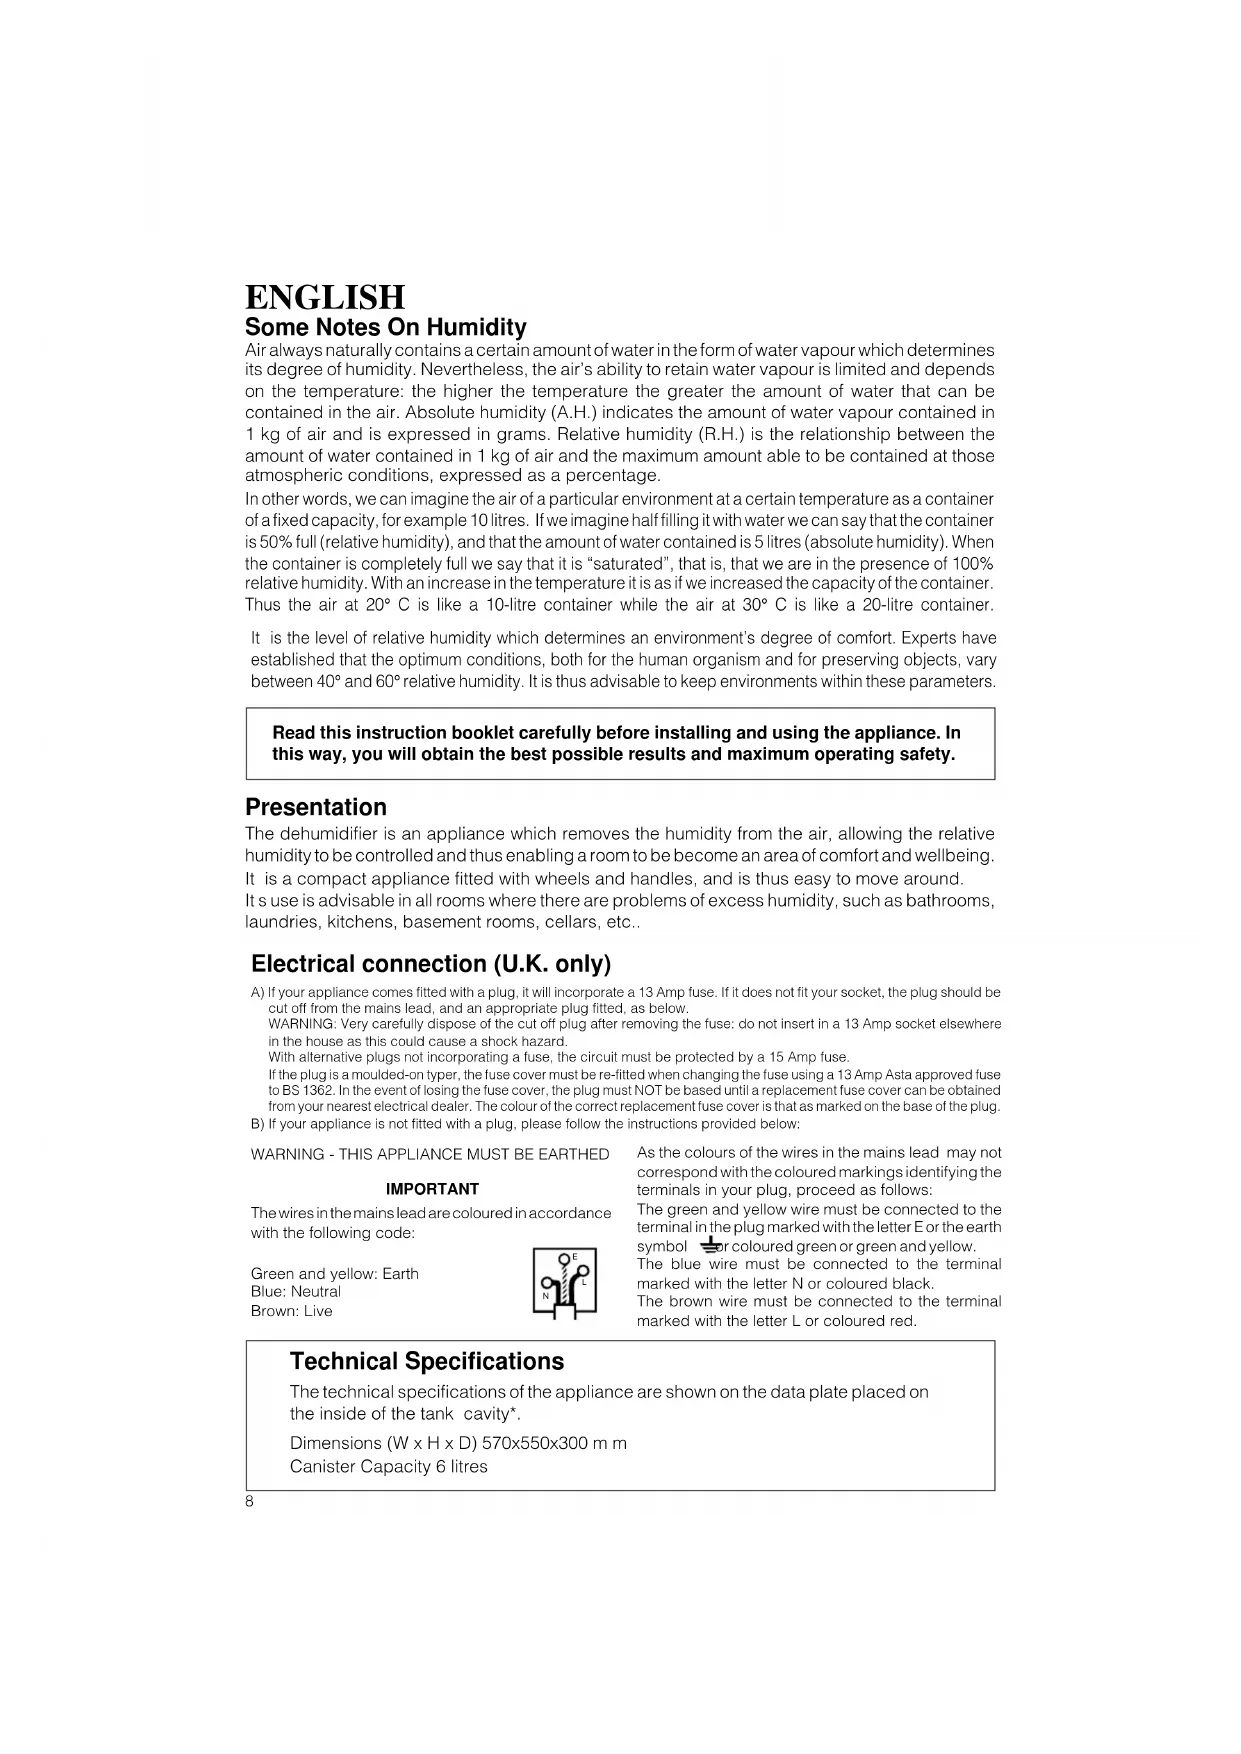
The wires in the mains lead are coloured in accordance with the following code:
Green and yellow: Earth
Blue: Neutral
Brown: Live
As the colours of the wires in the mains lead may not correspond with the coloured markings identifying the terminals in your plug, proceed as follows:
The green and yellow wire must be connected to the terminal in the plug marked with the letter E or the earth symbol or coloured green or green and yellow.
The blue wire must be connected to the terminal marked with the letter N or coloured black.
The brown wire must be connected to the terminal marked with the letter L or coloured red.
Technical Specifications
The technical specifications of the appliance are shown on the data plate placed on the inside of the tank cavity*.
Dimensions (W× H× D) 570x550x300 m m
Canister Capacity 6 litres
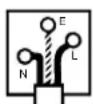
Description
- Control panel
- Control panel cover
- Air outlet grille
- Lifting handle
- Air intake grille
- Air filter
- Tank access panel
- Tank
Accessories
condensation discharge tube 1 (2 m.)

rubber cap 1
Some Notes On I
Air always naturally cont its degree of humidity. N on the temperature: the contained in the air. Abs: 1 kg of air and is expre amount of water contain atmospheric conditions In other words, we can container of a fixed cap say that the container is litres (absolute humidity that we are in the prese With an increase in the t air at 20^ is like a 10-1
It is the level of relative have established that th objects, vary between 40 these parameters.
Read this instructions by will obtain the best poss
Presentation
The dehumidifier is an a humidity to be controlled It is a compact applian It's use is advisable in all.
laundries, kitchens, bas
Technical Specification:
The technical specific the canister cavity*.
Dimensions W x H x D Canister Capacity
Technical Assistance Keep the list of the Serv Authorised Centre imme
- Control panel
- Control panel c
- Air outlet grille
- Lifting handle
- Air intake grille
- Air filter
9
Installation
Place the appliance in the room that you wish to dehumidify.
It is essential to leave a space of at least 50~cm around the appliance in order to ensure adequate ventilation.
The condensation can be discharged in one of two ways:
A) Discharge into the canister
The condensation generated by the dehumidifier can be collected directly in the canister which is located inside the appliance (fig. 1).
The canister has a capacity of over 6 litres. It is easy to extract when it needs to be emptied. It has an ergonomic form and is equipped with a handle which makes it easy to carry and to empty.

B) Continuous External Discharge
If you need to have the appliance working for a long period of time but are unable to empty the canister repeatedly, you can allow the condensation to discharge into a water drain.
To do this all you have to do is to arrange the canister and the hose supplied as follows:
1) Remove the rubber stopper from the canister spout.
2) Make a hole on the inside of the canister spout. We recommend using a drill with a fine bit Fig. 2.
3) Attach the rubber hose to the spout.
You can pass the hose through the panel door, taking advantage of the fact that the canister spout has been lined up opposite it. To achieve this all you need do is to make a hole in the plastic with a cutter following the groove marked as a guide (fig. 3).
WARNING: Check that the hose does not have to go "uphill", or the water could be left inside the canister.
Keep hold of the rubber stopper: it can be used for plugging the canister spout if the canister is used for discharging in the future.
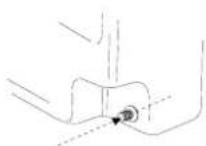
Fig. 2
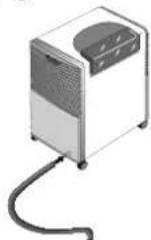
Fig. 3

Tank Control System
The dehumidifier is equipped with an exclusive intelligent device which checks that the appliance is working properly.
A warning lamp placed on the control panel comes on to warn the user when:
- the tank is full empty the tank
- the tank is missing put the tank back into position
- the tank is badly positioned position it correctly
- you are using the continuous discharge and there is a blockage in the hose or the hose goes "uphill" a) empty the tank; b) remove the blockage or get round the "uphill"
Once the cause has been removed, the warning lamp goes off and the appliance starts working again.
Electrical connections
Before connecting the appliance to the power supply, check the following:
- The mains power supply must correspond to the power supply shown on the rating plate.
- The power socket and the electrical circuit must be adequate to bear the required load.
- The power socket must match the plug. If not, have the plug replaced by qualified personnel.
The power socket must be adequately earthed.
The manufacturer declines any responsibility for failure to comply with these safety regulations. The appliance is manufactured in accordance with EEC Directive EN 55014 relative to the suppression of radio interference.
Wait for an hour before switching the dehumidifier on after it has been transported.
Description of the controls
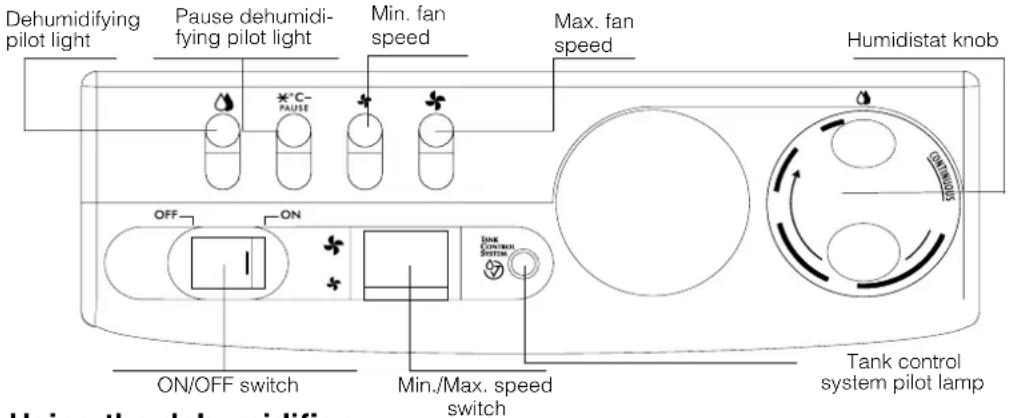
Using the dehumidifier
1) Plug the appliance into the power socket. The pilot lamp lights to show that the appliance is switched on.
2) Press the ON/OFF switch.
3) Check that the "Tank control system" pilot lamp is off (see the previous page).
4) Turn the humidistat knob in an anticlockwise direction to the CONTINUOUS position: the dehumidifier pilot lamp will come on to signal that the appliance has started to work.
5) Choose the maximum or minimum fan speed (shown on the corresponding pilot lamp).
6) To switch off the appliance, turn the humidistat in an anticlockwise direction to the minimum setting.
To guarantee maximum life and efficiency, the appliance will only really begin dehumidifying three minutes after being switched on, when the "pause" signal lamp goes off.
Some Users' Tips
Significant relative humidity values are shown on the humidistat. In particular, by positioning the knob between 60^ and 40^ (or between 2 and 3) you will set the appliance up to guarantee that it will automatically maintain comfortable conditions. For maximum comfort, we recommend selecting the minimum fan speed. At first the dehumidifier will absorb large quantities of humidity and will continue to do so until the relative humidity has been reduced. From this point onwards, the appliance will absorb less humidity: this does not mean that the dehumidifier is not working properly but rather that the humidity in the air has diminished and that the appliance will continue to maintain the desired level of humidity efficiently. In cellars and basements, however, it will not be necessary to lower the level of relative humidity very much, e.g. in order to conserve foodstuffs: regulate the humidistat to a setting between 80% and 60% (or between 2 and 1). It is advisable to have the maximum fan speed in order to get the room quickly to the desired level of humidity. In laundries and in all areas where you need to reach the lowest levels of humidity quickly the maximum speed should be selected. Set the humidistat between 40% and 20% (or between 3 and 5) relative humidity, or to CONTINUOUS setting if you want the appliance to continue dehumidifying until a new setting is made.
Maintenance
Always remove the plug from the power socket before performing any cleaning or maintenance operations.
Cleaning the cabinet
- Clean the appliance using a damp cloth and dry using a dry cloth.
- Do not use jets of water, petrol, methylated spirits or solvents to clean the appliance.
- Never spray the appliance with insecticides or similar products as they may spoil its appearance.
Cleaning the air filter
- As a rule the filter should be cleaned weekly.
- In order to remove the air filter, open the canister panel, remove the canister and extract the filter by pulling it downwards (fig. 4).
- Use a vacuum cleaner to remove the dust that builds up on the filter. If the filter is very dirty, wash it in warm water and rinse several times.
The temperature of the water should not exceed 40^
After washing the filter, allow it to dry completely before putting it back in the appliance.
If the appliance is not used for long periods
- Disconnect the plug from the power socket and empty the canister.
- Clean the filter and put it back in.
- Protect the appliance from dust by covering it with a plastic bag.
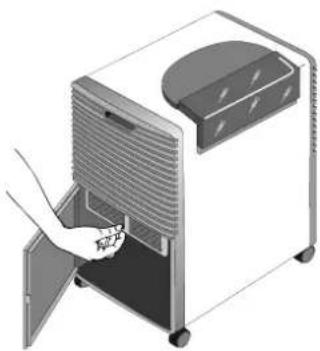
Fig. 4
Warnings
- The appliance has been designed to dehumidify domestic living areas and should not be used for other purposes.
- The appliance must only be used by adults: do not allow children to play with it.
- Do not install the appliance in rooms where the air may contain gas, oil, or sulphur, or where it is near heat sources.
- The appliance must be efficiently earthed. Have the electrical installation checked by a qualified electrician.
Always disconnect the appliance from the power socket before carrying out any cleaning or maintenance. - The power cable for this appliance must not be replaced by the user. In the event of damage to the cable, or if it needs to be replaced, contact only a Service Centre authorised by the manufacturer.
- Avoid using extension leads for the electrical power cable.
- Always remove the plug from the socket before performing cleaning or maintenance operations.
- Do not pull the electrical power cable when you want to move the appliance.
- Empty the canister of condensation water before transporting the appliance.
- When it is being transported the appliance must remain in a vertical position or be rested on its side.
- Wait for at least an hour before switching the appliance on again after it has been transported.
- Do not rest heavy or hot objects on the appliance.
- Remember to clean the air filter at least once a week.
- It is dangerous to modify or in any way alter the appliance.
- For any repair work, always contact only Service Centres authorised by the manufacturer: you will be entitled to repairs carried out with original spare parts. Repairs carried out by unqualified staff can be dangerous. They also invalidate the guarantee.
Troubleshooting
Before calling your local authorized Service Centre, check the following:
| Problem Cause | Solution | |
| The dehumidifier does not switch on | ·the appliance is not plugged in (the main supply pilot lamp is off) ·the humidistat is set to the minimum position | ·Plug the appliance in. ·adjust the humidistat to the desired position |
| The tank control system pilot lamp is switched on | ·the tank is missing. ·the tank is not in position ·the tank is full ·continuous discharge; a blockage in the hose or an "uphill" prevent the water from flowing out. | ·empty the tank ·position the tank correctly ·empty the tank ·empty the tank and remove the cause. |
| Pilot lamp switched on | ·the appliance has just come on. ·The temperature in the room is too low: a safety device periodically stops the appliance from working. | ·Wait for three minutes; the appliance will begin to dehumidify. ·It is normal for the appliance not to dehumidify in certain conditions. |
| The appliance works but the humidity in the room is not reduced | ·the room is too big ·too many sources of humidity in the room (e.g. boiling saucepans, etc.) |