
DEC 21 - Humidifier DELONGHI - Free user manual and instructions
Find the device manual for free DEC 21 DELONGHI in PDF.


| Product Type | Humidifier |
| Brand | DeLonghi |
| Model | DEC 21 |
| Dimensions (HxWxD) | 35 x 25 x 20 cm |
| Weight | 2.5 kg |
| Power Supply | 220-240 V, 50/60 Hz |
| Power Consumption | 25 W |
| Water Tank Capacity | 2.5 L |
| Coverage Area | Up to 30 m² |
| Noise Level | < 35 dB |
| Mist Output | Adjustable, up to 200 ml/h |
| Humidification Type | Ultrasonic |
| Filter | Demineralization cartridge (optional) |
| Functions | Automatic shut-off, adjustable mist, night mode |
| Cleaning | Weekly cleaning recommended; descale periodically |
| Safety Features | Auto shut-off when tank empty, overheat protection |
| Spare Parts | Available: filters, water tank, nozzles |
| Repairability Index | 7.5 / 10 |
Frequently Asked Questions - DEC 21 DELONGHI
User questions about DEC 21 DELONGHI
0 question about this device. Answer the ones you know or ask your own.
Ask a new question about this device
Download the instructions for your Humidifier in PDF format for free! Find your manual DEC 21 - DELONGHI and take your electronic device back in hand. On this page are published all the documents necessary for the use of your device. DEC 21 by DELONGHI.
USER MANUAL DEC 21 DELONGHI
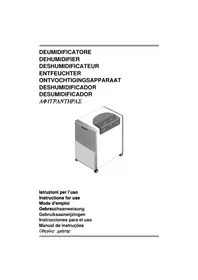
Dehumidifier
DeLonghi
Living innovation

| Accessory | |
 | condensate drain hose (2 m.) |
 | rubber bung |
 DehumidifierLiving Innovation DehumidifierLiving Innovation | 2 |
Living innovation
Thank you for choosing this dehumidifier. To get the very best out of your dehumidifier it is advisable to read these instructions before using the appliance. By doing so you will obtain optimum results and maximum safety.
Electrical connections
Before plugging the appliance into the power socket, check that:
- The mains power supply corresponds to the power supply indicated on the rating plate.
- The power socket and electrical circuit are adequate for the appliance.
- The power socket matches the plug. If this is not the case, have the plug replaced by a qualified electrician;
- The power socket must be adequately earthed. Failure to respect this safety rule absolves the manufacturer from all liability. This appliance is manufactured in compliance with EEC standard EN 55014 on the suppression of radio interference. The cable must be replaced by approved service personnel only.
Installation
I) Positioning
Position your dehumidifier wherever your condensation or damp problem is. A clear area of at least 50cm must be left at the front and back of the dehumidifier to ensure adequate ventilation. Do not place the dehumidifier next to a radiator or other heat source as this will reduce its performance.
For ongoing usage we suggest positioning in a hallway or on a landing. Please remember to keep internal doors ajar to allow air circulation.
Before using your dehumidifier for the first time, it should be stood upright for 24hrs prior to use. When moving it from room to room it is advisable to wait an hour before using it again.
2) Water Collection
The water collected (condensate) can be drained in one of two ways:
A) Draining into the tank
The condensate can be drained directly into the tank located inside the appliance).
The tank can be easily removed and has a handle making it simple to carry and empty. (fig. 1).
B) Continuous external draining
If the appliance is to be operated for long periods of time but you are unable to empty the tank, you are recommended to use the continuous drain facility.
- Drill the inside of the drain spout using a small drill bit. (Fig. 2).
- Fasten the rubber hose to the spout. For models without drain hoses supplied, we suggest you purchase a rubber hose around 2m long, with an internal diameter of 9.5 mm.
- Make sure that the hose is not higher than the spout (Fig. 3), otherwise water will remain in the tank; also check that the hose is not twisted. N.B: Keep the rubber bung. You will need it to plug the hose or close the spout if you revert to draining into the tank (see point A).

fig. 1

fig. 2

fig. 3
Dehumidifier

Living innovation
Controls

Tank control system
This dehumidifier is fitted with a special device to ensure correct operation.
A red indicator light on the control panel comes on to warn the user when:
- the tank is full empty the tank
- the tank is missing replace the tank
- the tank is in the wrong position position the tank correctly
- in continuous drain: the hose is obstructed or placed too high above the drain spout remove the obstruction.
Once the cause has been eliminated, the light goes out and the appliance resumes operation.

Dehumidification light
This switches on when the machine is dehumidifying. The light remains on only when the appliance is effectively dehumidifying; if the humidity in the room is already low enough, the light will be off.

Dehumidification standby/low temperature ation light
The light comes on in the following two cases:
1) To signal a delay of around 3 minutes in the start-up of the appliance. This is due to a safety device which protects the compressor. 2) To signal low temperature operation. When the room temperature is too low, the electronic low temperature operation device is activated. This device allows the appliance to operate by alternating dehumidification cycles and fan only cycles. This is to avoid the formation of ice. For frequent use in cold environments, it is recommended to heat the room at the same time. This allows the dehumidifier to operate in conditions that ensure better performance and faster dehumidification.

Heating light
This switches on when the machine is heating. The light remains on only when the appliance is effectively heating; if the temperature in the room is already high enough, the light will be off.
How to dehumidify
How to dehumidify
1) Plug the appliance into a mains socket.
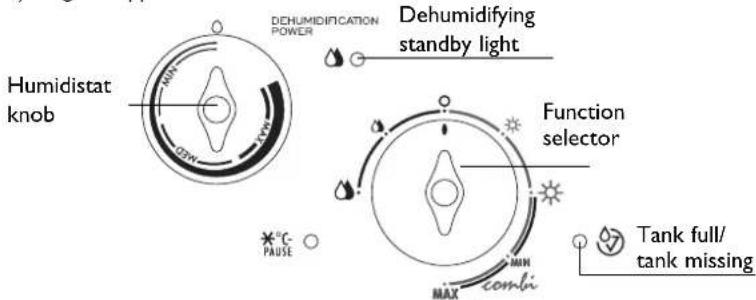
2) Check that the "tank full/tank missing" light is off, if not place the tank in the correct position or empty it if necessary. 3) To easily select the right humidity level, we suggest you operate as follows:
Use the function selector to choose ⚙ (for maximum dehumidifying power) or ⚙ (for minimum dehumidifying power).
Turn the humidistat clockwise as far as it will go to the MAX position.
(The dehumidification standby light *°C -PAUSE comes on for the first 3 minutes after which the appliance starts dehumidifying).
Leave the unit on this setting until signs of excess moisture (e.g. condensation on windows) decrease.
At this point select ⚙ or ⚙ and slowly turn the humidistat knob anti-clockwise until the dehumidification light switches off.
The dehumidifier will then keep the humidity at the selected level automatically.
How to heat
1) Plug the appliance into a mains socket. 2) It is possible to adjust the room temperature by turning the thermostat knob on one of the available positions (MIN-MED-MAX). If you wish to heat the room, set the thermostat to the temperature level desired.
3) Select the economy (★ = 1250 W) or maximum (★ = 2000 W) heating level on the function selector.
To easily select the right temperature level, we suggest you operate as follows:
Turn the thermostat to position MAX. When the temperature in the room has reached the required level, slowly turn the thermostat knob anticlockwise until the heating light goes out.
The thermostat will then keep the temperature in the room at the

fig. 4
Combined mode (dehumidifying + heating)
1) Plug the appliance into a mains socket. 2) Check that the "tank full/no tank" warning light is off. 3) Select maximum (combi MAX) or minimum (combi MIN) power level. Consequently the electrical power will be 1030 W or 1530 W. 4) It is possible to adjust the desired room humidity and temperature (°C) by turning the humidistat and the thermostat (see chapters "How to dehumidify" and "How to heat").
Note: The appliance only stops completely when the level of humidity set is reached. If the tank is full, the full tank warning light comes on and the refrigerant circuit stops; however, the heating function will continue to work.
Maintenance
Always remove the plug from the power socket before performing any cleaning or maintenance operations. For safety reasons, never wash the dehumidifier using a water jet.
Cleaning the cabinet
- Clean the appliance using a damp cloth, then dry with a dry cloth.
- Never use petrol, alcohol, or solvents to clean the appliance.
- Never spray the appliance with insecticides or similar. These could cause the paint to flake or plastic parts to warp.
Cleaning the permanent air filter
Your dehumidifier is fitted with a permanent air filter. If the filter is dirty, air circulation is compromised and the efficiency of the dehumidifying and air purifying functions decreases. It is therefore good practice to clean the filter at regular intervals.
The frequency depends on the duration and conditions of operation. If the unit is used constantly or on a regular basis, you are recommended to clean the filter once a week.
- Remove the air filter, by pulling it as shown in fig. 5.
- Use a vacuum cleaner to remove dust accumulations from the filter. If the filter is very dirty, wash in warm water and rinse several times. The temperature of the water should not exceed 40°C. After washing the filter, allow to dry completely before replacing it.
If the appliance is not used for long periods
- Unplug from the mains socket and empty the tank. • Clean and reposition the filter. • Cover the appliance so that dust does not build up.
Accessories available for your dehumidifier
Castors: a kit of 4 castors to allow you to wheel your dehumidifier from room to room, is available to order. Wall mounting brackets: a set of brackets to wall mount your dehumidifier is available to order.
Contact De' Longhi 01933 442040 to order your accessories.
Problem solving
Check the following points before calling your Service Centre
| PROBLEM POSSIBLE CAUSES SOLUTION | ||
| The dehumidifier doesn't work for about 3 minutes from turning on | ·the appliance's safety device has intervened | ·wait for 3 minutes |
| The appliance does not work in dehumidifying mode (indicator light off) | ·the appliance is not plugged in·t here is no current·the humidistat is on minimum·the tank is full of water·the tank is incorrectly positioned | ·plug into the mains·check the power supply·turn the humidistat to the max.·empty the tank·firmly place the tank in the correct position |
| The appliance operates in dehumidifying mode (light on) but the humidity is not reduced | ·filter clogged·the temperature or humidity of the home is too low·r oom too large·too many sources of humidity in room (boiling pots etc.) | ·clean the filter·in certain conditions, it is normal for the appli-ance not to dehumidify (in these cases the room being dehumidi-fied should also be heated) |
| The appliance does not operate in heating mode (light off) | ·the appliance is not plugged in·t here is no current·the thermostat is set to minimum | ·plug into the mains·check the power supply·set the thermostat to the required position |
| The appliance operates in heating mode (light off) but does not heat | ·the area is too big·t here are open win-dows·the electrical resistor protective device has cut in | ·close the windows·to reset, turn the appliance off for sever-al minutes, eliminate the cause of the over-heating then turn on again |
Technical Characteristics
DEC21
Power supply voltage See rating label
Absorbed power dehumidifying only "
Maximum absorbed power
Maximum absorbed current
Defrosting device: yes
Humidistat: yes
Fan speeds: 2
Air filter: yes
Purifying filter: no / yes
Dimensions LxHxD: 570x360x300 mm
Tank capacity: 4 litres
Operating limits:
Heating
Dehumidifying
- temperature
Max. 27°C
2° - 32°
• relative humidity
Max. 90%
30 - 95%
Brief note on humidity
Air always contains a certain amount of water in the form of water vapour.
This amount of moisture is commonly known as the humidity.
The capacity of the air to hold water vapour increases with the temperature. This is why in our homes, as soon as the temperature decreases, the vapour contained in the air condenses, as is evident on the colder surfaces in the room, such as the windows, walls etc.
The purpose of a dehumidifier is to remove the excess moisture from the air, to control condensation within the home.
Experts have established that the optimum environmental conditions for our well being and to preserve objects are obtained between 40% and 60% relative humidity. Below these levels the air can feel too dry and may cause skin complaints and even static electric shocks.
If temperatures in the home are lower than 10°C for prolonged periods low level heating will be necessary to allow the condensate to evaporate into the air before dehumidification can take place.
The air will however be slightly warmed by the dehumidifier as the dry air leaving the dehumidifier is about 1°C higher than normal room temperature.
Important
- Use this appliance only as described in this instruction manual. As with any electrical appliance, whilst the instructions aim to cover as many eventualities as possible caution and common sense should be applied when operating your appliance.
- This appliance is designed to dehumidify domestic rooms and must not be used for other purposes.
- Do not use in the vicinity of baths, showers, sinks, swimming pools, etc.
- In the case that the power cable becomes damaged, this must be substituted only by specialised personnel authorised by the manufacturer.
- It is dangerous to modify or alter the characteristics of the appliance in any way.
- If the appliance requires repair, always contact a Technical Service Centre authorised by the manufacturer. Always insist on original spare parts. Repairs carried out by unauthorised personnel may be dangerous and invalidate the guarantee.
- This appliance must be used exclusively by adults. Do not allow children to play with the appliance.
- The appliance must be connected to an efficient earth installation. Have your electrical circuit checked by a qualified electrician.
- The use of extension leads is not recommended, however if it is necessary then follow carefully the extension lead's instructions, and most importantly ensure that the extension lead is correctly rated in accordance with the heater being used and NEVER overloaded.
- Before cleaning or maintenance operations, always unplug the appliance from the mains.
- Do not move the appliance by pulling the power cable.
- Do not install the appliance in rooms containing gas, oil or sulphur. Do not install near sources of heat.
- Do not use the appliance on inclined surfaces.
- Keep the unit at least 50 cm away from inflammable substances (alcohol etc) or pressurised containers (eg. aerosol cans).
- Do not rest heavy or hot objects on top of the appliance.
- Clean the air filter regularly.
- Always transport the appliance upright or resting on one side. Remember to drain the tank before moving the appliance. Wait at least 1 hour after transporting the appliance before starting it
- R134a is a refrigerant that complies with the EEC environmental standards; nonetheless, the refrigerant circuit on the machine should not be perforated. At the end of its working life, take the appliance to a recycling centre for disposal of the refrigerant.
- The materials used for packaging can be recycled. You are therefore recommended to dispose of them in special differentiated waste collection containers.
- The appliance must be installed in conformity with the relevant national legislation.
- Do not use the appliance outdoors.
- Do not obstruct the air intake or outlet.
Technical assistance
Keep the list of Technical Service Centres and identify the Centre nearest you.
Electrical requirements
Before using this appliance ensure that the voltage indicated on the product corresponds with the main voltage in your home, if you are in any doubt about your supply contact your local electricity company.
The flexible mains lead is supplied connected to a B.S. 1363 fused plug having a fuse of 13 amp capacity. Should this plug not fit the socket outlets in your home, it should be cut off and replaced with a suitable plug, following the procedure outlined below.
Note: Such a plug cannot be used for any other appliance and should therefore be properly disposed of and not left where children might find it and plug it into a supply socket - with the obvious consequent danger.
N.B. We recommend the use of good quality plugs and wall sockets that can be switched off when the machine is not in use.
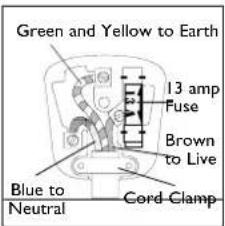
Important: the wires in the mains lead fitted to this appliance are coloured in accordance with the following code:
As the colours of the wires in the mains lead of this appliance may not correspond with the coloured markings identifying the terminals in your plug, proceed as follows:
The wire which is coloured green and yellow must be connected to the terminal in the plug which is marked with the letter E or by the earth symbol ⊥ or coloured green or green and yellow.
The wire which is coloured blue must be connected to the terminal which is marked with the letter N or coloured black.
The wire which is coloured brown must be connected to the terminal which is marked with the letter L or coloured red.
When wiring the plug, ensure that all strands of wire are securely retained in each terminal. Do not forget to tighten the mains lead clamp on the plug. If your electricity supply point has only two pin socket outlets, or if you are in doubt, consult a qualified electrician.
Should the mains lead ever require replacement, it is essential that this operation be carried out by a qualified electrician and should only be replaced with a flexible cord of the same size.
After replacement of a fuse in the plug, the fuse cover must be refitted. If the fuse cover is lost, the plug must not be used until a replacement cover is obtained. The colour of the correct replacement fuse cover is that of the coloured insert in the base of the fuse recess or elsewhere on the plug. Always state this colour when ordering a replacement fuse cover.
Only 13amp replacement fuses which are asta approved to B.S. 1362 should be fitted.
This appliance conforms to the Norms EN 55014 regarding the suppression of radio interference.
Warning - this appliance must be earthed


6-08-2003
18:02
Page 12



- DEHUMIDIFIER
- DELONGHI
- ELECTRICAL CONNECTIONS
- INSTALLATION
- POSITIONING
- WATER COLLECTION
- DRAINING INTO THE TANK
- CONTINUOUS EXTERNAL DRAINING
- CONTROLS
- TANK CONTROL SYSTEM
- DEHUMIDIFICATION LIGHT
- DEHUMIDIFICATION STANDBY/LOW TEMPERATURE ATION LIGHT
- HEATING LIGHT
- HOW TO DEHUMIDIFY
- HOW TO HEAT
- COMBINED MODE (DEHUMIDIFYING + HEATING)
- MAINTENANCE
- CLEANING THE CABINET
- CLEANING THE PERMANENT AIR FILTER
- IF THE APPLIANCE IS NOT USED FOR LONG PERIODS
- ACCESSORIES AVAILABLE FOR YOUR DEHUMIDIFIER
- PROBLEM SOLVING
- TECHNICAL CHARACTERISTICS
- DEC
- HEATING
- DEHUMIDIFYING
- BRIEF NOTE ON HUMIDITY
- IMPORTANT
- TECHNICAL ASSISTANCE
- ELECTRICAL REQUIREMENTS
Brand : DELONGHI
Model : DEC 21
Category : Humidifier