Arnova 7C G3 - Tablet ARCHOS - Free user manual and instructions
Find the device manual for free Arnova 7C G3 ARCHOS in PDF.

Frequently Asked Questions - Arnova 7C G3 ARCHOS
User questions about Arnova 7C G3 ARCHOS
0 question about this device. Answer the ones you know or ask your own.
Ask a new question about this device
Download the instructions for your Tablet in PDF format for free! Find your manual Arnova 7C G3 - ARCHOS and take your electronic device back in hand. On this page are published all the documents necessary for the use of your device. Arnova 7C G3 by ARCHOS.
USER MANUAL Arnova 7C G3 ARCHOS
Before using your ARNOVA for the first time, completely charge the battery!

Charging the Battery
- Connect the supplied power cable to the ARNOVA and to a wall outlet. The ARNOVA device will start charging.
- Press the Power button to turn on the device.

Installation Wizard
The first time you start up your ARNOVA, the installation wizard will bring you through a few screens to help you set up the principal settings: language, country, time, etc.
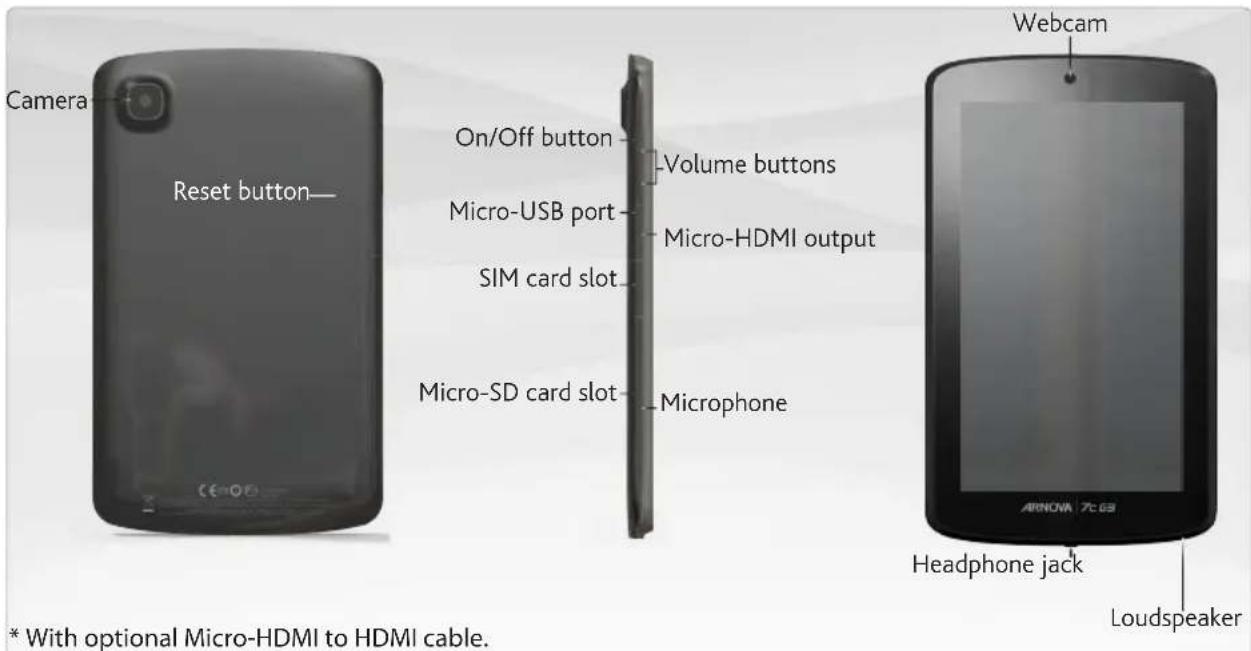
DESCRIPTION OF THE TABLET
IMPORTANT:
Your device is frozen. You can turn it off. Press the ON/OFF button for 10 seconds or press the reset button.

CONNECTING TO A 3G NETWORK

Your ARNOVA is equipped with a SIM card slot. Any standard SIM card can be inserted. There is no provider restriction. Note that the ARNOVA will only have signal if you are in an area covered by your 3G provider's 3G or EDGE network.
Inserting your SIM card
Important: Before inserting a SIM card, you must turn off the device.
- Switch off the device.
- Insert the SIM card in the SIM card slot.
- Turn on the device.
- A Pin number may be requested. Enter the SIM card pin number and tap OK.
Your device will attempt to connect to the 3G network of your provider.
Note: If your device does not connect to your 3G provider's network
- Contact your 3G provider to obtain the connection parameters.
- On your device, tap Settings.
-
Select Wireless & networks > More... > Mobile networks.
-
In Network operators, select your operator.
In Access Point Names, select the correct access point name and enter the exact connection parameters.

CONNECTING TO THE WIFI NETWORK

For this procedure to work, you need to be in a WiFi zone that will allow you to connect to it. Every time the ARNOVA is in range of a network that you have already configured once, it will attempt to make a connection.
How to configure a WiFi network
From the status bar, at the bottom right hand of the screen, you can access the WiFi settings quickly.
- Touch the time in the status bar. The status dashboard is displayed.
- Touch the time in the status dashboard. The setting dashboard is displayed below.
- Touch WiFi to open the WiFi settings.
- If the WiFi is off, slide the WiFi switch to the On position. Once the WiFi is on, the ARNOVA will scan for available WiFi networks. Secured networks are indicated with a Lock icon. If the device finds a network that you connected to previously, it connects to it.
- Touch the network you want to connect to.
- Enter the required network information* and touch Connect. We recommend that you select Show password in order to be able to see the characters you are typing.
Your ARNOVA will attempt to establish a connection to that WiFi access point.
- For free access WiFi points, there is no need to enter any special information. For secured networks, you will need a key (a series of numbers and/or letters) of the type WEP, WPA, or WPA2. To obtain the exact connection parameters required, contact the Internet service provider.

Touch for text search
Your ARNOVA device is equipped with a capacitive touchscreen. Use your fingertip to navigate.
These are default AndroidTM applications (Web Browser, Email, etc.). Tap on an icon to open the corresponding application. You can customize the Home screen by adding/ removing shortcuts and widgets, changing the wallpaper etc. See next page.
The navigation bar displays the Back, Home and Recent Apps buttons.
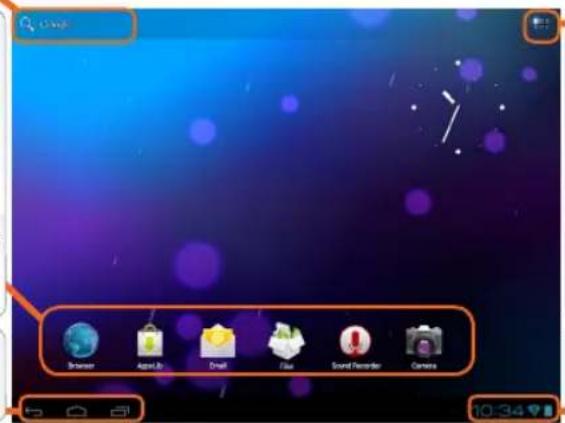
All apps button
Tap on this icon to reveal all the Android™ applications and widgets installed on your ARNOVA (games, various tools, etc.). You can copy them onto the Home screen. You can get more Android™ applications from AppsLib

The status bar displays notifications and system icons.
Main Touchscreen buttons

The Back button - to go back to your previous screen.

The Search button - to type terms to search your tablet and the web.

The Home button - to return to the main screen.

The All apps button - to find all your apps and widgets.

The Recent Apps button - to navigate among your apps. - to remove a thumbnail from the list, swipe it left or right.

CUSTOMIZING YOUR TABLET
The extended Home screen
Navigate between different home screen panels by swiping left and right.


Customizing the Home screen panels
- To change your wallpaper, hold your finger on the screen at an empty location, then choose from the list.
Arranging & working with apps
- To move a Home screen item, touch and hold your finger onto it until the positioning gridlines appear, then slide it to the desired location, and release your finger.
- To remove a Home screen item, touch and hold it, slide your finger towards the top of the screen and drop it over the Remove icon. Removing an item from the All apps screens will uninstall the item.
Zoom: In some apps (such as
Browser, and Gallery) you can zoom in and out by placing two fingers on the screen at once and pinching them together (to zoom out) or spreading them apart (to zoom in).

Creating application folders: you can combine several application icons in a folder. Drop one app icon over another on a Home screen and the two icons will be combined.


Changing the Settings
Tap on Settings and choose a menu among these categories: Wireless & networks, Device, Personal, System.
Adding more applications with APPSLIB : with the ARNOVA connected to the Internet, tap on the AppsLib icon This online library has thousands of applications to download and use.

CUSTOMIZING YOUR TABLET
Add widgets
- Widgets are like windows into your apps. They're available from an All Apps tab for you to move onto your Home screens.
To see your widgets:
- Touch the All Apps icon on your Home screen.
- Touch Widgets at the top of the screen.
-
From the main Widgets screen, you can:
-
move between screens: Swipe left or right.
- drag a widget to a Home screen. Touch and hold the widget's icon, slide your finger where you want to place it and lift your finger. You may be asked to make further choices before the widget activates. If there isn't room where you have dropped it, the widget won't be added to the Home screen.
Use the lock screen
To protect personal information, you can adjust your tablet's lock settings:
- From the Home or All Apps screen, touch the Settings icon.
- Scroll down and touch Security.
- Touch Screen lock.
- Touch the type of lock you'd like to use. After you set a lock here, a lock screen is displayed whenever your screen wakes up, requesting the pattern, PIN or other specified key.
Extend the life of your battery
- If you aren't using WiFi, select the Settings app to turn it off.
- Turn down screen brightness and set a shorter Sleep timeout: Settings > Device > Display.
- If you don't need it, turn off automaticyncing for all apps: Settings > Personal > Accounts & sync. Note that this means you need to sync manually to collect messages, email, and other recent information, and won't receive notifications when updates occur.

REGISTER YOUR TABLET
On the web at http://arnovatech.com/register
We recommend that you take a few minutes to register it (http://arnovatech.com/register). This will allow you to get access to ARNOVA technical support (http://arnovatech.com/support).

NEED HELP?

On our Website: see the Frequently Asked Questions section on http://arnovatech.com/faq

Contact our Technical Support Team: visit http://arnovatech.com/support for e-mail support. Please register your product before contacting Technical Support (see Register your Product).
As we are often updating and improving our products, your device's software may have a slightly different appearance or modified functionality than presented in this Quick Start Guide.
GO!
PREMIÈRE UTILISATION
ANPASSEN IHRES PRODUKTES
ANPASSEN IHRES PRODUKTES
Widgets hinzufugen
PERSONALISEER UW PRODUCT
PERSONALISEER UW PRODUCT
Widgets toevoegen
National restrictions
This device is intended for home and office use in all EU countries (and other countries following the EU directive 1999/5/EC) without any limitation except for the countries mentioned below:
Country Restriction ReasonRemark
Bulgaria None General authorization required for outdoor
use and public service
France Outdoor use limited
to 10mW e.i.r.p.
within the band
2454-2483.5 MHz
Military Radiolocation use. Refarming of the
2.4 GHz band has been ongoing in recent
years to allow current relaxed regulation. Full
implementation planned 2012
Italy None If used outside of own premises, general
authorization is required.
Luxembourg None General authorization required for network
and service supply (not for spectrum)
Norway Implemented This subsection does not apply for the
geographical aera within a radius of 20~km
from the centre of Ny-Alesund
Russian Federation None Only for indoor applications
Note: Frequency 2454-2483.5MHZ are restricted to indoor use in France.
Consult the declaration of conformity on http://www.arnovatech.com/products/declaration_conformity.html
Charging specifications
Adaptor Model: HNC050200X; Input:100-240V; 50/60Hz; Output: 5.0V, 2.0A; Operation Temperature: 0^ 40^ .
Relative Humidity: 10% 90%
Open Source Software Offer
The software bundled with this product includes software files subject to certain open source license requirements. Such open source software files are subject solely to the terms of the relevant open source software license. Such open source software is provided on an "AS IS" basis to the maximum extent permitted by applicable law.
For the open source files contained herein, please access "Open source license" section located at: Settings\About tablet\Legal information on the device for the relevant copyright and licensing terms. You may obtain a copy of Apache License, Version 2.0 at http://www.apache.org/licenses/License-2.0. You may also obtain a copy of GNU General Public License, Version 2 at the Free Software Foundation, INC, 51 Franklin Street, Fifth Floor, Boston, MA 02110-1301, USA.
Until the date that is three years after our last shipment of this product, you may obtain a copy of the source code corresponding to the binaries for any GPL-Licensed file by contacting ARNOVA customer service at http://www.arnovatech.com and ARNOVA will send you a link to such source code or will provide instructions to get the source on a physical medium.
This offer is valid to anyone in receipt of this information.