KSO 5666 M - Oven Montiss - Free user manual and instructions
Find the device manual for free KSO 5666 M Montiss in PDF.
Frequently Asked Questions - KSO 5666 M Montiss
User questions about KSO 5666 M Montiss
0 question about this device. Answer the ones you know or ask your own.
Ask a new question about this device
Download the instructions for your Oven in PDF format for free! Find your manual KSO 5666 M - Montiss and take your electronic device back in hand. On this page are published all the documents necessary for the use of your device. KSO 5666 M by Montiss.
USER MANUAL KSO 5666 M Montiss
- During use hot steam will escape from the appliance, keep a distance to prevent burns.
You must regularly inspect the steam exhausts of the appliance to be sure that they are not blocked.
Attention:
- Hot steam will escape from the oven when you open the door. So be extremely carefully in order to prevent burns!

Vorsicht:
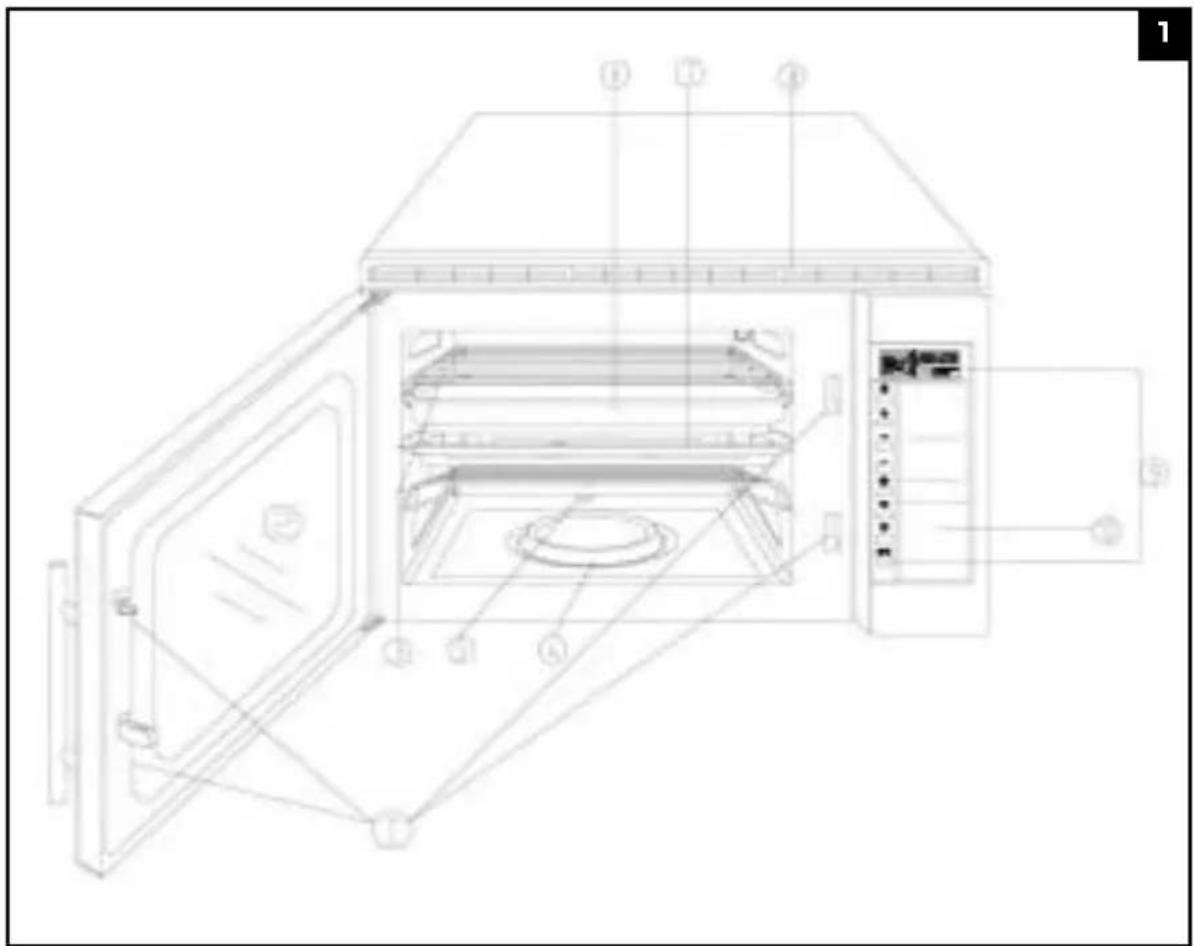
| 1. Safety lock door For a safe | closing of the door |
| 2. Inspection window The rubber on the inside of the inspection window provides a good and safe closing | |
| 3. Grates For placing the accessories and ingredients | |
| 4. Heat plate For evaporating the water | |
| 5. Water pipe For pouring water on the heat plate | |
| 6. Food drawer For placing your ingredients on | |
| 7. Oil drawer For collecting water (or oil) | |
| 8. Air ventilation For discharging superfluous steam | |
| 9. Control panel For a detailled, see caption “Description Control panel” | |
| 10. Water reservoir For the production of steam | |
SAFETY INSTRUCTIONS
- Please read these safety instructions carefully before use.
- This appliance is only intended for domestic use.
- Only use this appliance for what it is intended, as described in these instructions for use.
- Do not submerge the appliance in water or in a different fluid.
- Only use the power cable that is supplied with the appliance.
- Do not disconnect the plug by pulling the power cable from the power socket. In order to take the plug from the power socket, you take the plug and carefully plug it from the power socket.
- Keep the appliance outside the reach of children. Close supervision is required when the appliance is used in the vicinity of children. Never let children use the appliance.
- You must fill the water reservoir until the maximum level before use. When the steam oven is used, the water reservoir must always be at the proper place in the appliance.
- ATTENTION: the steam oven is very hot during and after use! When you open the door, steam will escape from the oven. So always do this carefully, and keep children out of reach from the steam oven.
- If a problem should arise with the water circulation, a "no water" symbol will appear in the display and you will hear a sound signal. This may be because one of the following reasons:
a. The water reservoir is empty.
b. The water reservoir has not been placed in the correct way.
After the above-mentioned problems have been solved, you must close the door. The steam oven will automatically start the program set by you.
- Never use the steam oven when it is empty. This in order to prevent damage to the appliance.
- Use oven gloves or a tea towel to take dishes from the oven and to prevent burns.

- Do not keep food in the steam oven.
- Baby food must always be stirred and the temperature must be inspected before you feed the baby.
- Never try to repair the appliance yourself. Repairs must be only carried out by qualified persons.
- Never use the steam oven if the door or the door locking system is damaged.
- Never heat any liquid or ingredients in closed kitchen accessories. They may explode!
- Regularly check whether the appliance is intact. Do not use the appliance if the cord of the appliance is damaged.
INSTALLATION
- Remove the packing.
- Check whether the appliance is not damaged. If you see any damage to the appliance, please contact us immediately.
- The net weight of the steam oven is about 10.8kg . The appliance must be placed on a stable, solid and flat underground.
- The steam oven must be used in a room with sufficient air current.
- When you place the appliance in a corner, it must be placed horizontally and you must closely check the location.
- Do not place anything on the oven. Always keep a space of 20 cm free above the oven.
- Always keep 5cm from the sides of the oven free and at least 10 cm at the back of the oven.
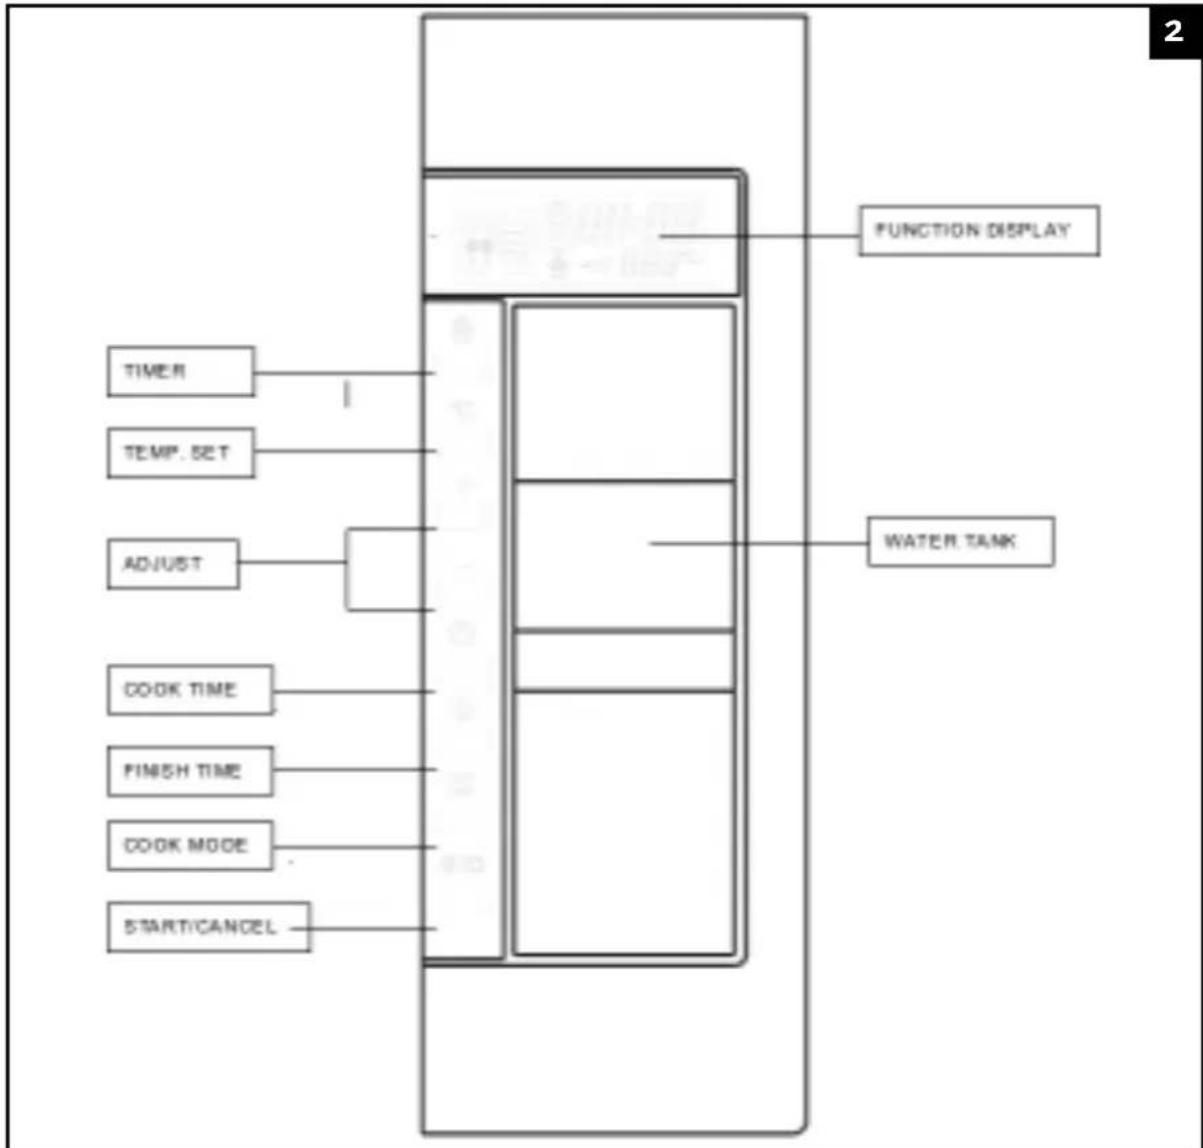
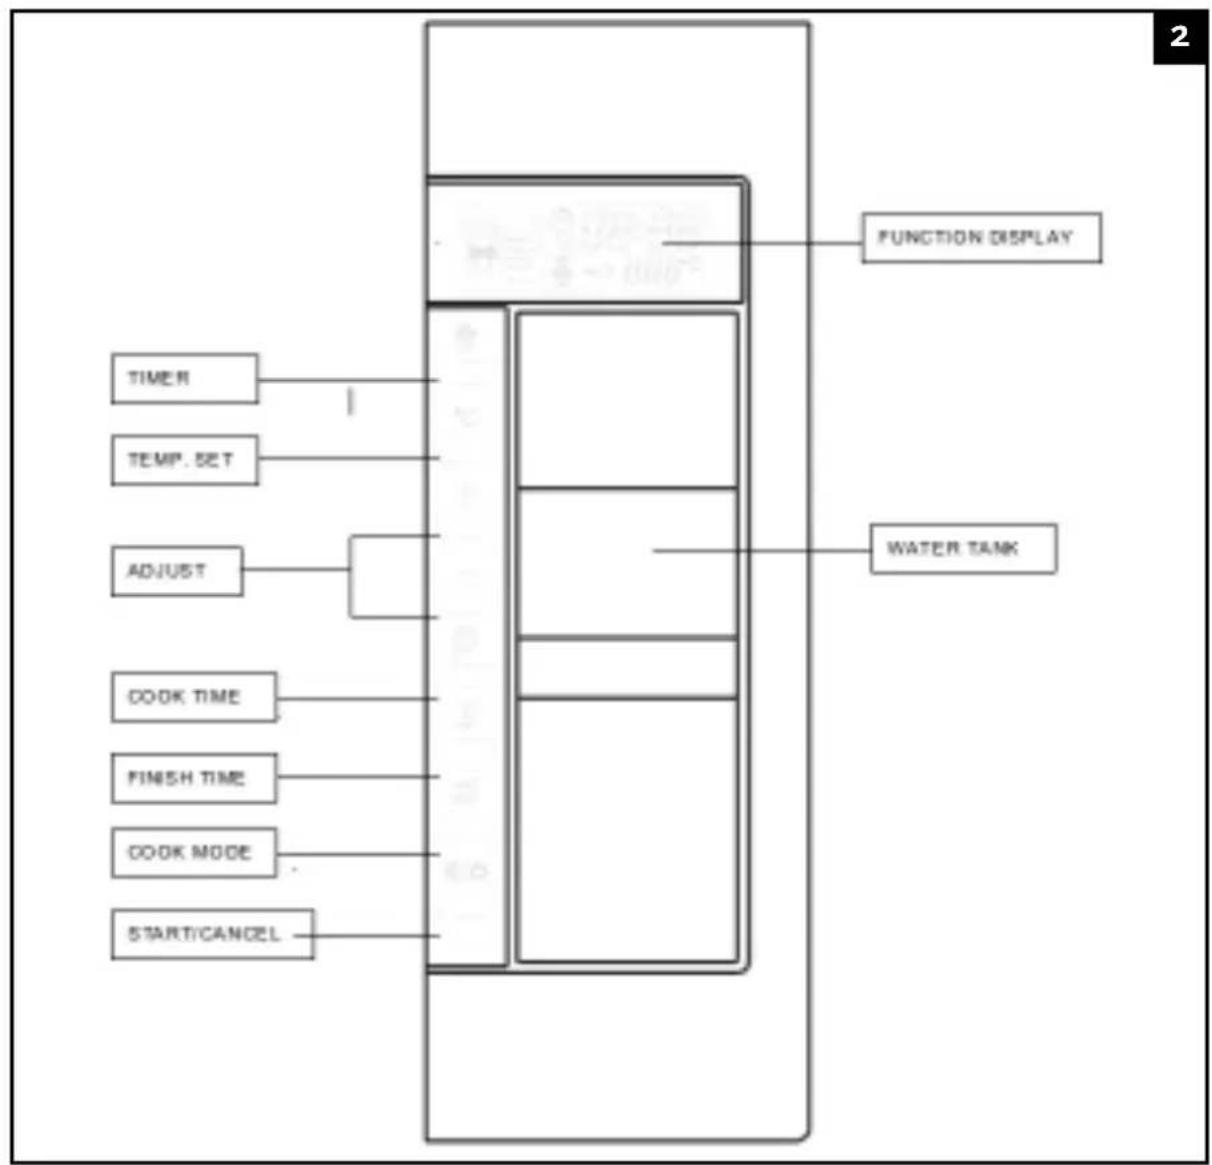
DESCRIPTION CONTROL PANEL (illustration 2)
- TIMER: timer
- TEMP. SET: temperature setting
- ADJUST: +/- keys for adjusting time, temperature.
- COOKING TIME: adjusting the cooking time.
- FINISH TIME: when you press this key, the finish time display of the dish to be cooked will appear.
- COOKING MODE: select correct cooking program.
- START/CANCEL: activate the cooking program selected by you. End of cooking selected by you program.
- WATER TANK: water reservoir.
- FUNCTION DISPLAY: the functions are stated on the display.
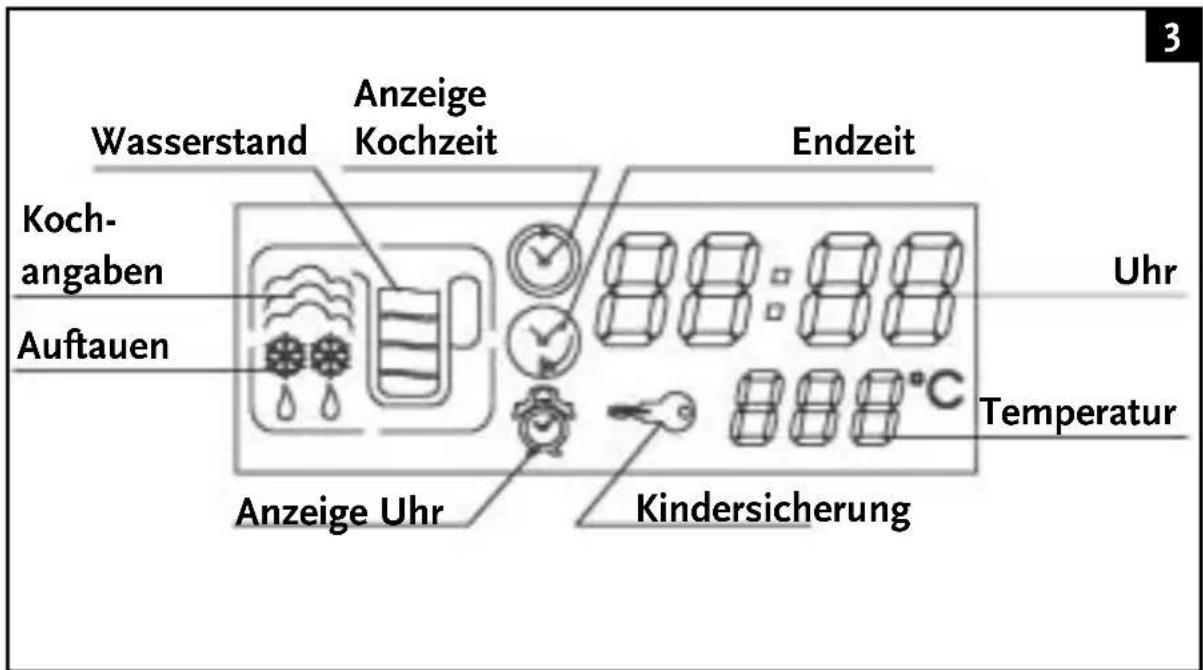
DESCRIPTION DISPLAY (illustration 3)
CONTROL OPTIONS
The principle of the steam oven
The water flows through the water pipe. Steam is produced because the water subsequently comes into contact with the heat plate. It is absolutely not necessary to add water to the ingredients or pour water in the food drawer. For an optimal use of the steam oven, it is best to use the supplied accessories. Every time you use the appliance, you must first fill the removable water reservoir with sufficient water.
Automatic memory
When a cooking program is finished, the word "End" will appear in the display and a sound signal will be heard every two seconds if you do not open the door or do not press any key.
Adjusting the clock
When you switch on the steam oven, you will see "12:00" on the display. If you want to change the clock, carry out the following steps:
- Press the keys and simultaneously during 3 seconds, and the time will begin to flash.
- Use the "+" and/or "-" keys in order to set the clock correctly.
- Press on the key to confirm the time, the clock will begin to tick.
Remark: when you press the "+" / "-" keys longer, you can select the time faster.
Example: 8 hours 30 minutes
- Press the keys and simultaneously during 3 seconds, and the time will begin to flash.
-
Press the "+" or "-" keys for a longer time for a faster selection of the time, until you see 08.30 hours on the display.
-
Press on to confirm the time. The clock has been set.
Steaming and defrosting
Maximum time for defrosting is 60 minutes.
- Press the key "°C" once, the display will then show "10:00", "55°C", and the water level.
- If necessary, press the keys "+" of "-", to select the temperature. Remark: when setting the temperature, the temperature always increases or decreases by 5^ . The maximum temperature to be set is 100^
- Press the key in order to set the preparation time, for this use the "+"/ "-" keys Remark: the standard time for defrosting is 10 minutes, temperature: 55^ - 65^.
- Press for confirmation. Press once and the actual finish time will appear on the display.
A. During the preparations, you can press once, the cooking time will begin to flash, which can be changed by using the "+"/ "-" keys. The time can be changed by 5 minutes and at most up to 60 minutes.
B. When a cooking program has started, but the oven is not filled with steam, press, once, and the steam oven will go to the stand-by stand. When a program has been in
operation for some time and the oven is full of steam, press once, and the oven will count downwards after 03:00 minutes. The steam will slowly disappear.
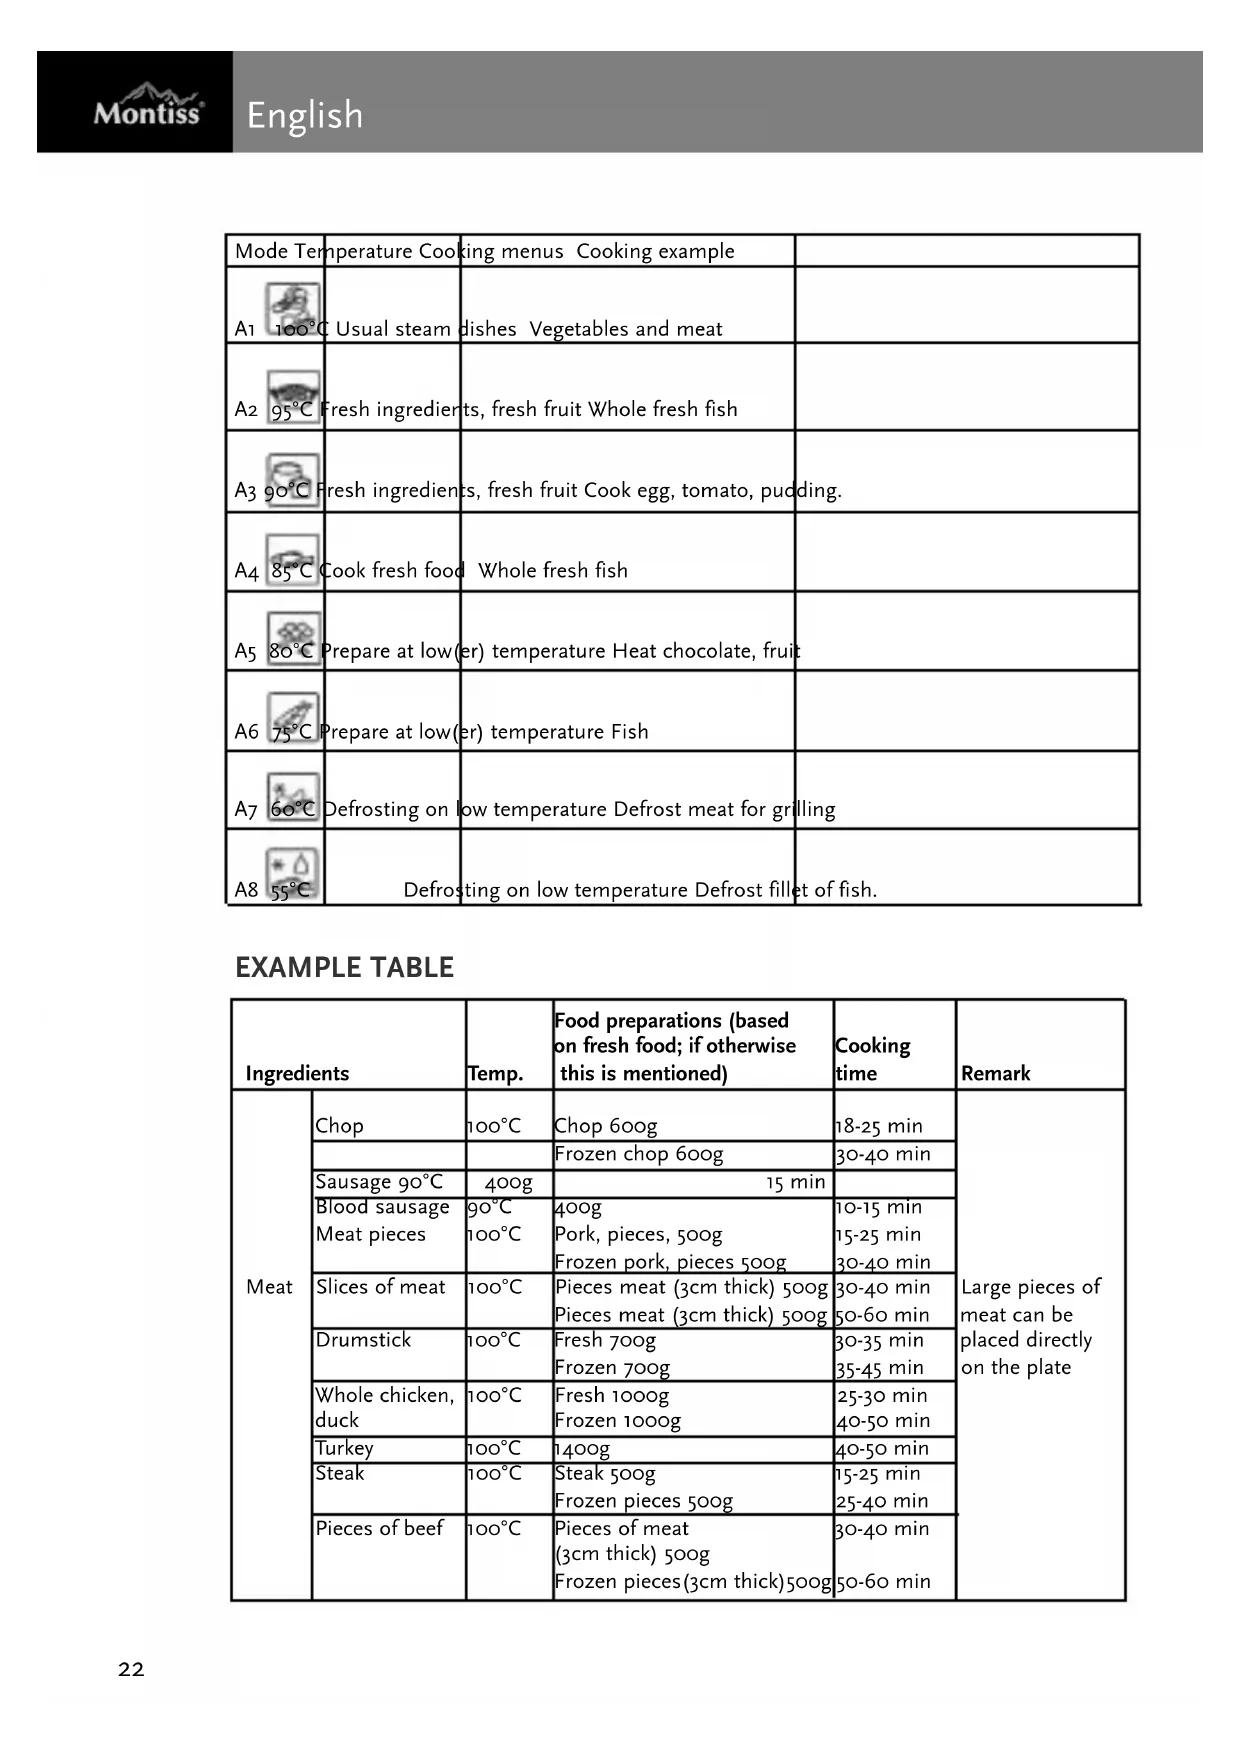
| Mode Temperture Cooking menus Cooking example |
| A1 100°C Usual steam dishes Vegetables and meat |
| A2 95°C Fresh ingredients, fresh fruit Whole fresh fish |
| A3 90°C Fresh ingredients, fresh fruit Cook egg, tomato, pudding. |
| A4 85°C Cook fresh food Whole fresh fish |
| A5 80°C Prepare at low(er) temperature Heat chocolate, fruit |
| A6 75°C Prepare at low(er) temperature Fish |
| A7 60°C Defrosting on low temperature Defrost meat for grilling |
| A8 55°C Defrosting on low temperature Defrost fillet of fish. |
EXAMPLE TABLE
| Ingredients | Temp. | Food preparations (based on fresh food; if otherwise this is mentioned) | Cooking time | Remark | |
| Meat | Chop | 100°C | Chop 600g | 18-25 min | Large pieces of meat can be placed directly on the plate |
| Frozen chop 600g | 30-40 min | ||||
| Sausage 90°C | 400g | 15 min | |||
| Blood sausage Meat pieces | 90°C | 400g | 10-15 min | ||
| 100°C | Pork, pieces, 500g | 15-25 min | |||
| Frozen pork, pieces 500g | 30-40 min | ||||
| Slices of meat | 100°C | Pieces meat (3cm thick) 500g | 30-40 min | ||
| Pieces meat (3cm thick) 500g | 50-60 min | ||||
| Drumstick | 100°C | Fresh 700g | 30-35 min | ||
| Frozen 700g | 35-45 min | ||||
| Whole chicken, duck | 100°C | Fresh 1000g | 25-30 min | ||
| Frozen 1000g | 40-50 min | ||||
| Turkey | 100°C | 1400g | 40-50 min | ||
| Steak | 100°C | Steak 500g | 15-25 min | ||
| Frozen pieces 500g | 25-40 min | ||||
| Pieces of beef | 100°C | Pieces of meat (3cm thick) 500g | 30-40 min | ||
| Frozen pieces (3cm thick) 500g | 50-60 min | ||||
| Ingredients Temp. this | is mentl | Food preparations (based on fresh food; if otherwise Cooinged) time Remark | Cooking | ||
| Vegetables and fruit | Celery 100°C F | fresh, pieces, 400g 15-20 min Difference Frozen, pieces, 400g 20-25 min | in in amount of | cooking times. Cooking time because of form, size and freshness of ingredients. Before | |
| Cauliflower 100°C Roses | 300g 18-22 min ingredients Cut into pieces, 300g 20-25 m | in requires | |||
| Radish 100°C Thin slices | 500g 18-20 min Frozen pieces, 500g | different 25-30 min | |||
| Fresh peas | 300g | 15-20 min | |||
| Pumpkin | 100°C Square blocks, 500g 15-20 min Frozen blocks, 500g | may differ 25-30 min | |||
| Potatoes | 100°C Cut into slices, 300g Frozen slices, 300g | 15-20 min 25-30 min | |||
| Spinach | 100°C Fresh Frozen | 15 min 25 min | |||
| Mushrooms | 100°C Cut into thin slices, 300g Frozen, in thin slices 300g | 13-18 min 20 min | |||
| Apple, pear, peach | 90°C Peeled, 1-3 items | 10-15 min | |||
| Compote | 95°C Peeled fruit, 500g | 20-25 min | |||
| Eggs | Fresh eggs at room temperature | 100°C Use plate | 10min (soft) 12min (medium) 14min (hard) | 3 eggs in 100g cold water, add some garnering, if necessary | |
| Shell fish | Shrimps | 90°C Fresh 500g Frozen 500g | 12-16 min 20-25 min 2-3c | Pieces fish long. Take care that the fish is After it is ready, it is easy to skin the fish. | |
| Crab | 95°C 600g | 20-25 min | |||
| Crucian carp | 85°C Whole piece (500g) Frozen whole pieces (500g) | 18-20 min 30-35 min fresh | |||
| Carp | 85°C Whole (1000g) Whole, frozen (1000g) | 22-28 min 40-45 min | |||
| Trout | 100°C Whole (1kg) Whole (300g) | 18-25 min 13-15 min | |||
| Rice Rice | Rice 100g | 100°C Add water 150g, on glass plate | 25 min | ||
| Rice 200g | 100°C Add water 250g, on glass plate | 30 min | |||
| Rice 300g | 100°C Add water 400g, on glass plate | 35 min | |||
| De-fros-ting | Whole chicken (1kg) | 60°C - 18°C Frozen, place on plate | 25 min Set a low temperature in defrosting food, less time, stand time longer to keep food fresh. | ||
| Drumstick (1kg) | 60°C | ||||
| Pork (700g) | 60°C | 35 min | |||
| Shrimps (700g) | 55°C | 20 min | |||
| Fish (700g) | 55°C | 20 min | |||
| 25 min | |||||
CLEANING AND MAINTENANCE
ATTENTION: never use strong cleansing agents, petrol, abrasive of caustic agents to clean any component of the steam oven.
- Take the plug from the power socket and always let the steam oven cool down completely before you start to clean.
- Keep the cavity in a constant clean state. When splashing occurs in the cavity, wipe with wet cloth, if very dirty, use soft cleaning agent, and do not use an abrasive cleaning agent.
- Heat plate must be kept clean. Do not use any strong cleansing agents, petrol, abrasive or caustic agents.
- Wash the water pipe once a month. Remove the water pipe and clean it well.
- Clean the discharge chute by lifting it, wipe it clean and place it back.
- Keep the locking system of the door constantly clean. Use a soft, wet cloth, clean it and dry it with a soft, dry cloth.
- If the control panel is wet, wipe it dry with a soft, dry cloth, do not use any aggressive agents for cleaning. Check that the door of the steam oven is open in order to prevent activation of the oven.
- If the appliance has not been used for a long time, take the plug from the power socket and place it in a dry and well-ventilated room.
- If you have any problems, please contact us. Never try to repair the appliance yourself.
- Always take the plug from the power socket before you change a lamp. Technical specifications of the lamp: 8W, 230V and VDE fitting.
SOLVING PROBLEMS
| Problems Possible causes | Possible solution | |
| The display does - Over not light up correctly. ted | is not connected - Check thcct correctly to the electricity grid. -Power cable is defect. - P | at the steam oven is connec- grid. Please contact us. |
| Lamp does not work - Lamp | amp does not comply - Replace lamp. with conditions. -Lamp is not in contact with power supply. | -Connect the feeder cable correctly. -Replace the fuse. |
| During use of the steam oven, water and/or condense is leakingfrom the door of the oven. | - Door does not close . - P correctly - Door lock is defect. | please contact us. |
ERROR MESSAGES
| Code | Analyse Solution | |
| E-1 Overheating protection: more than 150°C Stop to let the appliance cool down. | ||
| E-2 Cavity low temperature protection: Please contact cooking 3 min. 40°C appliance apart yourself! | ||
| E-3 Heat plate protection: more than 200°C. | ||
| E-4 Heating plate: after 3 min. Switch off the appliance in order to Cooking, temp. less 40°C let it cool down. | ||
| E-5 Heat plate sensor protection Please contact us. Never take | ||
| E-6 Heating plate sensor short cut protection components of the appliance apart | ||
| E-7 Cavity open circuit protection yourself. | ||
| E-8 Cavity sensor short cut protection | ||
| E-9 Signal malfunction protection after 30-40 sec. Check whether the water reservoir has No signal checked been placed correctly and whether there is sufficient water in the tank. | ||
TECHNICAL DETAILS
| Model number: | KSO5666M |
| Power: | 2000W |
| Nominal tension: | 220-240V |
| Frequency: | 50 Hz |
| Contents: | 22 L |
Montiss is a registered brand name of:
Van den Berg Products BV
Platinawerf 2of
6641 TL Beuningen
The Netherlands
www.vdbergproducts.com
YOUR GUARANTEE CARD
This guarantee card covers your device for a period of 24 months as from the date of purchase as to service charges and replacement of parts on condition that you have used the device correctly as described in the directions for use. This guarantee card does not prejudice the national legislation that may exist in the country of purchase in the field of guarantee obligations. Guarantee is granted and parts are available in all countries where the product is officially sold.
This device is only intended for domestic use. Damage and / or malfunctions by industrial use are excluded from guarantee.
You can not make use of the guarantee if:
- You do not possess a valid proof of purchase or this has been changed or made illegible in any way;
- The service form has not been filled in clearly and completely;
- The model or serial number on the product has been changed, removed, deleted or made illegible;
- Repairs have been executed by unauthorized repair workshops or unauthorized persons:
- The damage can be blamed on a cause that is alien to the device, such as: fire damage, water damage, transport damage, atmospheric discharges, insufficient or improper maintenance:
- The device requires adjustments to let it function in another country than for which it has been designed, approved, released and produced, as well as if a defect occurs as a result of such a change and/or adjustment.
- The device has not been used according to the directions for use that are supplied with the product.
Should your device not function properly despite our careful quality control, then you can appeal to our service. To appeal to our service we request you to send us a clearly completed service form.
For us to be able to guarantee a quick settlement, we advise you to use the service form at our website: www.montiss.com. Going by your service form we shall contact you as soon as possible.
To prevent any inconveniences, we advise you to carefully read the directions for use prior to contacting us.
DAS PRODUKT