PESG 120 A1 - Welding machine PARKSIDE - Free user manual and instructions
Find the device manual for free PESG 120 A1 PARKSIDE in PDF.
| Product type | Welding machine |
| Brand | Parkside |
| Model | PESG 120 A1 |
| Intended use | Manual arc welding with coated electrodes |
| Mains power supply | 230 V ~ 50 Hz |
| Welding current | 40 - 80 A |
| No-load voltage | 48 V |
| Power consumption | 4 kVA at 80 A |
| Electrode diameters | 1.6 mm / 2.0 mm / 2.5 mm |
| Recommended current per electrode | 40 A (1.6 mm), 55 A (2.0 mm), 80 A (2.5 mm) |
| Duty cycle | 217 s (1.6 mm), 116 s (2.0 mm), 64 s (2.5 mm) at 40°C |
| Protection | IP21S |
| Insulation class | H |
| Weight | 10.6 kg |
| Mains cable | H07RN-F 3x1.0 mm² |
| Welding cable | H01N2-D 1x10 mm² |
| Thermal protection | Yes, with indicator lamp |
| Included accessories | Electrode holder, ground clamp, welding shield, chipping hammer/brush, welding and protective glass |
| Storage temperature | 5°C to 30°C |
| Country of origin | Not specified, but German brand |
Frequently Asked Questions - PESG 120 A1 PARKSIDE
User questions about PESG 120 A1 PARKSIDE
0 question about this device. Answer the ones you know or ask your own.
Ask a new question about this device
Download the instructions for your Welding machine in PDF format for free! Find your manual PESG 120 A1 - PARKSIDE and take your electronic device back in hand. On this page are published all the documents necessary for the use of your device. PESG 120 A1 by PARKSIDE.
USER MANUAL PESG 120 A1 PARKSIDE
Operation and Safety Notes
Original operating instructions
IAN 85053

DE AT CH
Before reading, unfold the page containing the illustrations and familiarise yourself with all functions of the device.
GB Operation and Safety Notes Page 42


1
-3


-4
DE/AT/CH
Inhaltsverzeichnis
Subject to change without notice
Archive-File/Record: NAPP007057
Documents registrar: Daniel Protschka
Wiesenweg 22, D-94405 Landau/Isar
DE/AT/CH
17. Garantieurkunde
2006/42/EC
Annex IV
Notified Body:
Notified Body No.:
Reg.No.:
2000/14/EC_2005/88/EC
Noise measured: LWA = dB (A); guaranteed LWA = dB (A)
Annex V
Annex VI
P=KW:1/2-Q=cm
Notified Body:
Notionaluy.
2006/28/EC
Emission No.
Standard references: EN 60974-1; EN 60974-6; EN 60974-10
Subject to change without notice
Archive-File/Record: NAPR007057
Documents registrar: Daniel Protschka
Wiesenweg 22, D-94405 Landau/Isar
FR/CH
17. Bon de garantie
Chere Cilente, Cher Client
2006/42/EC
Annex IV
Notified Body:
Notified Body No.:
Reg.No.:
2000/14/EC_2005/88/EC
Noise measured: LWA = dB (A); guaranteed LWA = dB (A)
Annex V
Annex VI
P = KW; L/0 = cm
Notified Body:
2006/12/5
2006/28/EC 二、投票权征集人
Emission No.
Standard references: EN 60974-1; EN 60974-6; EN 60974-10
Yu Feng Quing/Product-Management/Weichselgartner/General-Manager
First CE:06
Art-No.:15.490.58 I-No.:11012
Subject to change without notice
Archive-File/Record: NAPR007057
Documents registrar: Daniel Protschka
Wiesenweg 22, D-94405 Landau/Isar
IT/CH
- Introduction 44
- Safety information 44
- Layout and items supplied 46
- Proper use 47
- Symbols and technical data 47
- Assembling the welding screen 48
- Welding preparations 48
- Welding 48
- Overheating guard 49
- Transport 49
- Maintenance 49
- Storage 49
- Ordering replacement parts 49
- Disposal and recycling 49
15.Circuit diagram. 51
16.Declaration of conformity 52 - Warranty certificate 53
The reprinting or reproduction by any other means, in whole or in part, of documentation and papers accompanying products is permitted only with the express consent of the iSC GmbH.
Subject to technical changes
GB


Read and follow the operating instructions and safety information before using for the first time.
-43-
GB
1.Introduction
Congratulations on your new purchase. You have decided in favor of a high-quality product. The operating instructions are a part of this product. They contain information of importance for your safety, for the use of the product and for its disposal. Before you use the product, acquaint yourself with all the information concerning its operation and safety. Use the product only as described and only for the listed areas of application. If you hand on the product to other people, give them all the documentation as well.
2.Safetyinformation
Please note
Warning!
Use this equipment only for the purpose for which it is designed, as described in these instructions: Manual arc welding with coated electrodes. Handling this system incorrectly may be hazardous for persons, animals and property and may result in burning buildings, electric shocks, eye injuries, etc. The user of this system is responsible for his/her own safety and for the safety of others. Read these operating instructions and follow all the information.
- Repairs and/or maintenance work must be left strictly to qualified personnel.
Only use the welding cables supplied (H07RN-F 3x1.0 mm² / H01N2-D 1x10 mm²). - Ensure that the equipment is looked after properly.
To ensure that sufficient air can be drawn in through the ventilation slits, the equipment should not be constricted or placed next to a wall while it is operating. Make sure that the equipment is correctly connected to the mains supply (see 5.). Do not subject the mains lead to any tensile stress. Unplug the equipment before you change its position. - Check the condition of the welding cables, the electrode holder and the earth terminals; wear on the insulation and the live parts may result in dangerous conditions and reduce the
quality of the welding work.
Arc welding generates sparks, molten metal particles and smoke, so the following is required: Remove all inflammable substances and/or materials from the working area.
Ensure that there is adequate ventilation.
- Do not weld on tanks, vessels or pipes that have contained inflammable liquids or gases. Avoid all direct contact with the welding circuit; the idling voltage between the electrode holder and the earth terminal may be dangerous.
- Do not store or use the equipment in wet or damp conditions or in the rain.
- Protect your eyes with specially designed goggles (DIN level 9-10), which you can attach to the supplied welding screen. Wear gloves and dry safety clothing that are not contaminated by any oil or grease to ensure that your skin is not exposed to ultraviolet radiation from the arc.
Do not use this welder to defrost pipes.
Make sure that the equipment is set up so it stands firmly. If the equipment is set up on an angled surface, it may need to be secured by tying or blocking the wheels.
Hazard!
The radiation from the arc can damage your eyes and cause burns on skin.
Arc welding generates sparks and droplets of molten metal; the welded workpiece may start to glow and will remain very hot for a relatively long period of time. Never touch the workpiece with bare hands.
Arc welding releases vapors that may be harmful. Every electric shock is potentially fatal.
Do not approach the arc within a radius of 15 m unprotected.
- Protect yourself (and others around you) against the possible hazardous effects of the arc.
- Warning: depending on the mains connection conditions at the connection point of the welding set, other consumers connected to the mains may suffer faults.
GB
Warning!
If the supply mains and circuits are overloaded, other consumers may suffer interference during the welding work. If you have any doubts, contact your electricity supply company.
Sources of danger during arc welding
Hazard!
Arc welding results in a number of sources of danger. It is therefore particularly important for the welder to comply with the following rules so as not to place himself or others in danger and to avoid endangering people and equipment.
Have all work on the mains voltage system, for example on cables, plugs, sockets, etc., performed only by trained electricians. This particularly applies to configuring intermediate cables.
If an accident occurs, disconnect the welding power source from the mains immediately.
If electric touch voltages occur, switch off the welding set immediately and have it checked by an expert.
Always check for good electrical contacts on the welding current side.
- Wear insulating gloves on both hands for welding. These offer protection from electric shocks (idling voltage in the welding circuit), harmful radiation (heat and UV radiation) and from glowing metal and slag spatter.
- Wear firm, insulated footwear. Your shoes must also be suitable to protect you in wet conditions. Open-toed footwear is not suitable since falling droplets of glowing metal will cause burns.
- Wear suitable clothing, do not wear synthetic clothes.
Do not look into the arc with unprotected eyes, use only a welding screen with the proper safety glass in compliance with DIN standards. In addition to light and heat, which may cause dazzling and burns, the arc also gives off UV radiation. Without proper protection, this invisible ultraviolet radiation causes very painful conjunctivitis, which will only be noticeable several hours later. In addition, UV radiation will cause harmful sunburn-type
symptoms on unprotected parts of the body.
- Personnel or assistants in the vicinity of the arc must also be notified of the dangers and provided with the required protection; if necessary install safety walls.
- Ensure adequate ventilation for welding, particularly in small rooms since the process causes smoke and harmful gases.
- Do not carry out any welding work on tanks that have been used to store gases, fuels, mineral oil or the like, even if they have been empty for a lengthy period of time, since any residue will result in a danger of explosion.
Special regulations apply in areas where there is a potential risk of fire and/or explosion.
Welds that are exposed to large stresses and must comply with safety requirements may only be completed by specially trained and approved welders. Examples of such welds include pressure vessels, rails, trailer hitches, etc.
Notes:
It must be noted that the protective conductor in electrical systems or equipment may be destroyed by the welding current in the event of negligence, for example if the earth terminal is placed on the welding set casing to which the protective conductor of the electrical system is connected. The welding work is completed on a machine with a protective conductor connection. It is therefore possible to weld on the machine without having connected the earth terminal to it. In this case the welding current will flow from the earth terminal through the protective conductor to the machine. The high welding current may cause the protective conductor to melt.
The fuses on the supply cables to the mains sockets must comply with the relevant regulations (VDE 0100). To comply with these regulations, only fuses or circuit breakers suitable for the cross-section of the cables may be used (for earthing contact sockets max. 13 A fuses or 13 A circuit breakers). The use of too high a fuse may result in the cable burning and fire damage to the building.
GB
Constricted and wet areas
Caution!
When working in constricted, wet or hot areas, use insulating supports and intermediate layers as well as slip-on gloves made of leather or other non-conductive materials to insulate your body against the floor, walls, conductive parts of the equipment and the like.
If you use small welding transformers for welding in places with an increase electrical risk, for example in constricted areas with conductive walls, (tanks, pipes, etc.), in wet areas (which make work clothes wet) and in hot areas (perspiration on work clothes), the output voltage of the welding set when idling must not exceed 42 V (effective value). Therefore, the equipment may not be used for these purposes because its output voltage is higher than this.
Safety clothing
Caution!
While working, the welder must protect his entire body from radiation and burns by wearing suitable clothing and a face guard.
- Slip-on gloves made of a suitable material (leather) must be worn on both hands. They must be in perfect condition.
Suitable aprons must be worn to protect clothing from sparks and burns. A safety suit and, if necessary, head protection must be worn if required by the type of work in question, e.g. overhead welding.
The safety clothing used as well as all accessories must comply with the directive on "personal safety equipment".
Protection from radiation and burns
Caution!
- Provide information about the risk to eyes at the working site in the form of a poster with the wording "Caution - do not look at the flames". Workplaces are to be screened off wherever possible so that personnel in the vicinity are protected. Unauthorized persons
are to be kept away from the welding work.
The walls in the immediate vicinity of stationary workplaces may not have a light color or a sheen. Windows up to head height are to be protected against radiation passing through them or reflecting off them, for example by coating them with a suitable paint.
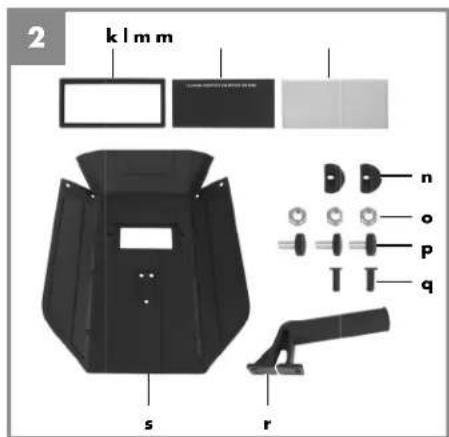
3. Layout and items supplied
3.1 Layout (Fig. 1)
1.Carryhandle
2. Welding current scale
3. ON/OFF switch
4. Earth terminal
5. Electrode holder
6. Adjustment wheel for welding current
7. Warning lamp for overheating
8. Welding screen
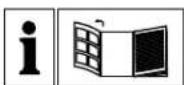
9. Wire brush / slag hammer
k Safety glass frame
Welding glass
m Safety glass
n Safety glass retaining bushes
Nuts for handle
p Screws for handle
q Safety glass retaining pins
r Handle
s Welding screen frame
3.2 Items supplied
- Open the packaging and take out the equipment with care.
- Remove the packaging material and any packaging and/or transportation braces (if available).
Check to see if all items are supplied.
Inspect the equipment and accessories for transport damage.
If possible, please keep the packaging until the end of the guarantee period.
GB
Important!
The equipment and packaging material are not toys. Do not let children play with plastic bags, foils or small parts. There is a danger of swallowing or suffocating!
4. Properuse
The electric welder can be used to weld various metals using the appropriate coated electrodes.
The equipment is to be used only for its prescribed purpose. Any other use is deemed to be a case of misuse. The user / operator and not the manufacturer will be liable for any damage or injuries of any kind caused as a result of this.
The equipment is to be used only for its prescribed purpose. Any other use is deemed to be a case of misuse. The user / operator and not the manufacturer will be liable for any damage or injuries of any kind caused as a result of this.
Please note that our equipment has not been designed for use in commercial, trade or industrial applications. Our warranty will be voided if the machine is used in commercial, trade or industrial businesses or for equivalent purposes.
5. Symbols and technical data
EN 60974-6
European standard for arc welding sets and welding power supplies with limited on time (part 6).
S
Symbol for welding power supplies which are suitable for welding in environments with increased electrical danger.
50Hz
Alternating current and rated frequency value [Hz]
U。
Rated idling voltage [V]
40A/19.6V-80A/21.2V
Maximum welding current and the corresponding standardized operating voltage [A/V]
0
Electrode diameter [mm]
1
Welding current [A]
+
Average load time [s]
T
Average reset time [s]
D
1\~50Hz
Line input; number of phases, the alternating current symbol and the rated frequency value

Do not store or use the equipment in wet or damp conditions or in the rain. Use the equipment only indoors.
U,
Line voltage [V]
1
Highest rated value of the line current [A]
1.
Effective value of the highest line current [A]
IP 21S
Protection type
H
Insulation class

Electrode holder connection

Ground terminal connection
GB
Mains connection: 230 V ~ 50 Hz
Welding current (A) at cos = 0.73 ..40-80
0 (mm) 1,6 2,0 2,5
- 40 .55 .80
t.(s) 217 116 64
t. (s) 1450 1381 1351
ldling voltage (V): 48
Power input: .4 kVA at 80 A cos = 0.73
Fuse(A): 13
Weight: 10.6 kg
The welding times apply for an ambient temperature of 40^
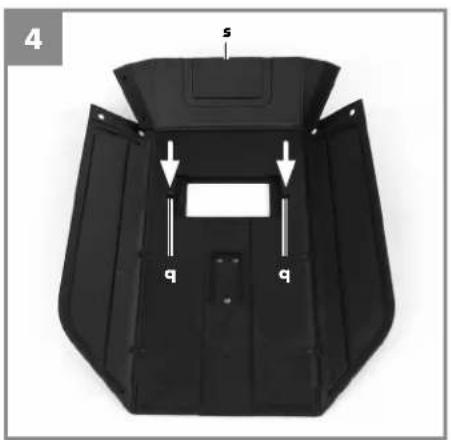
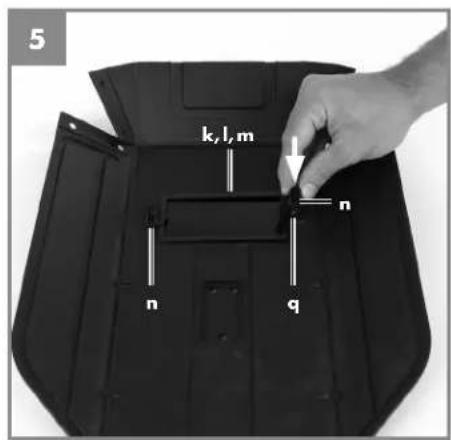
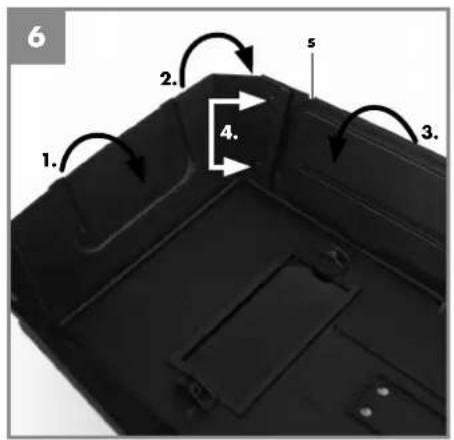
6. Assembling the welding screen
(Fig. 3-9)
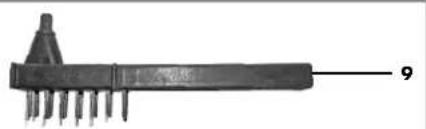
- Place the welding glass (I) and the transparent safety glass (m) over it in the frame for the safety glass (k) (Fig. 3).
Press the safety glass retaining pins (q) into the holes in welding screen frame (s) from the outside. (Fig. 4) - Place the frame for the safety glass (k) with the welding glass (l) and transparent safety glass (m) from the inside into the recess in the welding frame (s), press the safety glass retaining bushes (n) onto the safety glass retaining pins (q) until they engage to secure the frame for the safety glass (k). The transparent safety glass (m) must be on the outside. (Fig. 5)
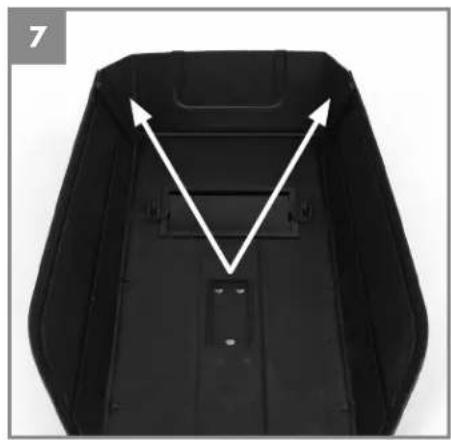
- Bend the top of the welding screen frame (s) inwards (Fig. 6/1) and fold down the top corners (Fig. 6/2). Now bend the outer sides of the welding screen frame (s) inwards (Fig. 6/3) and connect them by pressing the top corners and outer sides together. When the retaining pins engage, you should be able to hear 2 clear clicks on each side (Fig. 6/4).
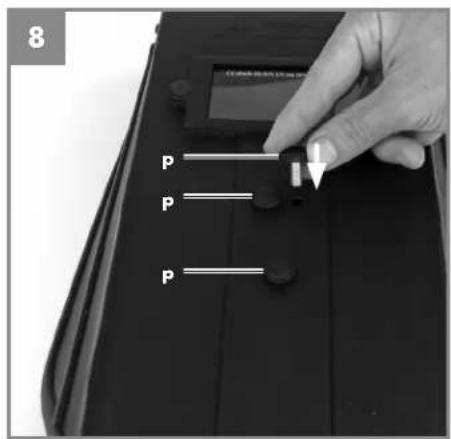
- When the top corners of the welding screen are connected as shown in Figure 7, place the screws for the handle (p) from the outside through the three holes in the welding screen. (Fig. 8)
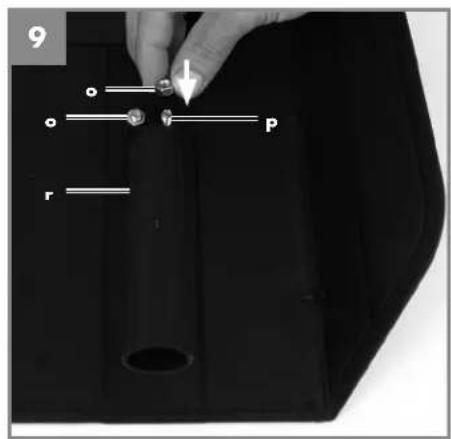
- Turn over the welding screen and place the
handle (r) over the threads on the three screws for the handle (p). Secure the handle (r) to the welding screen using the three nuts for the handle (o). (Fig. 9)
7. Welding preparations
Connect the earth terminal (4) direct to the part to be welded or to the support on which the part is resting. Ensure that the earth terminal is in direct contact with the part to be welded. You should therefore avoid coated surfaces and/or insulated materials. The electrode holder cable has a special clamp (electrode holder (5)) at one end, which is used to secure the electrode. The welding screen (8) must be used at all times for welding. It protects your eyes from the radiation emitted by the arc and nevertheless enables you to watch the welding process.
8.Welding
After you have made all the electrical connections for the power supply and for the welding circuit, you can proceed as follows: Insert the unsheathed end of the electrode into the electrode holder (5) and connect the earth terminal (4) to the part you wish to weld. Ensure that a good electric contact is made.
Switch on the welding set at the ON/OFF switch (3) and set the welding current using the setting wheel (6) to suit the electrode you wish to use.
Hold the welding screen in front of your face and rub the tip of the electrode on the part you wish to weld as if you were striking a match. This is the best method of igniting the arc.
Check on a test part that you have the correct electrode and current strength.
Electrode ( mm) .. .Welding current (A)
1.6 40
2 55
2.5 80
GB
Important!
Do not dab the workpiece with the electrode since it could be damaged, making it more difficult to ignite the arc.
As soon as the arc has ignited, attempt to keep it a distance from the workpiece equivalent to the diameter of the electrode. This distance should be kept as constant as possible during the welding process. The angle of the electrode in the direction in which you are working should be 20/30^ .
Important!
Always use tongs to remove spent electrodes and to move parts that you have just welded. Please note that the electrode holder (5) must always be put down so that it is insulated after you have completed the welding work. Do not remove the slag until the weld has cooled. If you want to continue a weld after an interruption, the slag from your initial attempt must first be removed.
9.Overheating guard
The welding set is fitted with an overheating guard that protects the welding transformer from overheating. If the overheating guard trips, the control lamp (7) on your set will be lit. Allow the welding set to cool for a time.
10. Transport
Before transporting the welder you must fi rst disconnect the power plug and remove the ground terminal from the workpiece. Then wind up the cable properly. Now you can carry the welder to a different place by the carry handle (1).
11. Maintenance
Remove dust and dirt from the equipment at regular intervals. Cleaning is best carried out with a fine brush or a cloth.
12.Storage
Store the equipment and accessories out of children's reach in a dark and dry place at above freezing temperature. The ideal storage temperature is between 5 and 30^ . Store the electric tool in its original packaging.
13. Ordering replacement parts
Please quote the following data when ordering replacement parts:
Type of machine
Article number of the machine
Identification number of the machine
For our latest prices and information please go to www.isc-gmbh.info
14. Disposal and recycling
The unit is supplied in packaging to prevent its being damaged in transit. This packaging is raw material and can therefore be reused or can be returned to the raw material system.
The unit and its accessories are made of various types of material, such as metal and plastic. Defective components must be disposed of as special waste. Ask your dealer or your local council.
GB

For EU countries only
Never place any electric power tools in your household refuse.
To comply with European Directive 2002/96/EC concerning old electric and electronic equipment and its implementation in national laws, old electric power tools have to be separated from other waste and disposed of in an environment-friendly fashion, e.g. by taking to a recycling depot.
Recycling alternative to the return request:
As an alternative to returning the equipment to the manufacturer, the owner of the electrical equipment must make sure that the equipment is properly disposed of if he no longer wants to keep the equipment. The old equipment can be returned to a suitable collection point that will dispose of the equipment in accordance with the national recycling and waste disposal regulations. This does not apply to any accessories or aids without electrical components supplied with the old equipment.
-50
GB

15.Circuit diagram
-51
GB
16. Declaration of conformity
Noise measured: LWA = dB (A); guaranteed LWA = dB (A)
Annex V
Annex VI
P=KW:1/Q=cm
Notified Body:
No.
2006/28/EC
Emission No.
Standard references: EN 60974-1; EN 60974-6; EN 60974-10
Subject to change without notice
Archive-File/Record: NAPP007057
Documents registrar: Daniel Protschka
Wiesenweg 22, D-94405 Landau/Isar
GB
17. Warranty certificate
Dear Customer,
All of our products undergo strict quality checks to ensure that they reach you in perfect condition. In the unlikely event that your device develops a fault, please contact our service department at the address shown on this guarantee card. Of course, if you would prefer to call us then we are also happy to offer our assistance under the service number printed below. Please note the following terms under which guarantee claims can be made:
- These guarantee terms cover additional guarantee rights and do not affect your statutory warranty rights. We do not charge you for this guarantee.
- Our guarantee only covers problems caused by material or manufacturing defects, and it is restricted to the rectification of these defects or replacement of the device. Please note that our devices have not been designed for use in commercial, trade or industrial applications. Consequently, the guarantee is invalidated if the equipment is used in commercial, trade or industrial applications or for other equivalent activities. The following are also excluded from our guarantee: compensation for transport damage, damage caused by failure to comply with the installation/assembly instructions or damage caused by unprofessional installation, failure to comply with the operating instructions (e.g. connection to the wrong mains voltage or current type), misuse or inappropriate use (such as overloading of the device or use of non-approved tools or accessories), failure to comply with the maintenance and safety regulations, ingress of foreign bodies into the device (e.g. sand, stones or dust), effects of force or external influences (e.g. damage caused by the device being dropped) and normal wear resulting from proper operation of the device. This applies in particular to rechargeable batteries for which we nevertheless issue a guarantee period of 12 months. The guarantee is rendered null and void if any attempt is made to tamper with the device.
- The guarantee is valid for a period of 3 years starting from the purchase date of the device. Guarantee claims should be submitted before the end of the guarantee period within two weeks of the defect being noticed. No guarantee claims will be accepted after the end of the guarantee period. The original guarantee period remains applicable to the device even if repairs are carried out or parts are replaced. In such cases, the work performed or parts fitted will not result in an extension of the guarantee period, and no new guarantee will become active for the work performed or parts fitted. This also applies when an on-site service is used.
- In order to assert your guarantee claim, please send your defective device postage-free to the address shown below. Please enclose either the original or a copy of your sales receipt or another dated proof of purchase. Please keep your sales receipt in a safe place, as it is your proof of purchase. It would help us if you could describe the nature of the problem in as much detail as possible. If the defect is covered by our guarantee then your device will either be repaired immediately and returned to you, or we will send you a new device.
Of course, we are also happy offer a chargeable repair service for any defects which are not covered by the scope of this guarantee or for units which are no longer covered. To take advantage of this service, please send the device to our service address.

-54

-55

-56-

-57


IAN:85053 PESG 120A1
Einhell Germany AG
Wiesenweg 22
D-94405 Landau/Isar