Comfortcam 99501 - Surveillance Camera TREBS - Free user manual and instructions
Find the device manual for free Comfortcam 99501 TREBS in PDF.

| Technical Features | TREBS Comfortcam 99501 surveillance camera with HD resolution, night vision, motion detection, and two-way audio. |
|---|---|
| Usage | Ideal for indoor and outdoor monitoring, compatible with smartphones for remote access. |
| Maintenance and Repair | Regular lens cleaning recommended, firmware updates via the app. |
| Security | Data encryption, configurable security alert options. |
| General Information | Easy installation, customer support available for technical assistance. |
Frequently Asked Questions - Comfortcam 99501 TREBS
User questions about Comfortcam 99501 TREBS
0 question about this device. Answer the ones you know or ask your own.
Ask a new question about this device
Download the instructions for your Surveillance Camera in PDF format for free! Find your manual Comfortcam 99501 - TREBS and take your electronic device back in hand. On this page are published all the documents necessary for the use of your device. Comfortcam 99501 by TREBS.
USER MANUAL Comfortcam 99501 TREBS
natural_image
Three white wireless device devices: two with antenna units labeled 'TREOS' and one with a wireless router (no visible text beyond labels)GB) Manual digital wireless color camera set with USB receiver and record function
NL)
text_image
2010/01/06 14:13:21 1 2 3 4 Snapshot Detect 3 Web Server Setup Playback 2010-01-06 5 14:13:21 Stand by 192.168.1.116 6text_image
Camera Settings System Setting Basic Settings Image Adjust Recording Motion Detect Alert Settings Channel Name Office Note 1 Text Display Channel Information Date and Time Channel Number Date Channel Name Time Week Font Size Small Text Color ... Background Transparent Watermark Path ... Transparency Preview Transparent Opaque Confirm Apply Canceltext_image
Camera Settings System Basic Settings Image Adjust Recording Motion Detect Alert Settings Setting Image Adjustment Source Adjustment Brightness Saturation 2 Gamma AC Frequency 50 Hz 40 Hz Flip Horizontal Flip Vertical Rotate Counter-Clockwise Clockwise Rotation Angle Confirm Apply Canceltext_image
Camera Settings Basic Settings Image Adjust Recording Motion Detect Alert Settings Setting Image Quality 640X480 Quality Low High Surveillance Mode Schedule Based Triggered 1 2 Schedule Based 3 Add New schedule Edit schedule Delete schedule Confirm Apply Canceltext_image
Camera Settings System Setting Basic Settings Image Adjust Recording Motion Detect Alert Settings Preview 1 Refresh View Detection Settings Full Area Detection Custom Detection Add New Area Delete Area Delete All Areas Test Detection 2 Sensitivity High 3 Confirm Apply Canceltext_image
Camera Settings System Setting Basic Settings Image Adjust Recording Motion Detect Alert Settings Vibration Alert Enable Vibrate Window 1 Message Alert Enable There is motion detected. 2 Sound Alert Enable Test Default Sound 1 Default Sound 2 Default Sound 3 Custom E-mail Alert Enable Email Subject Message 4 Attach Picture Confirm Apply Canceltext_image
Date from 2010/01/06 00:00:00 to 2010/01/06 23:59:59 Channel ○ in ○ CH01 ○ CH02 ○ CH03 ○ CH04 Query Record List 2010-01-06 13-48-54 CH01.xmv Delete File Open Folder Start intelligent search 1X 2X 4X 8X 16X 5 6text_image
Camera Settings System Setting Basic Settings Image Adjust Recording Motion Defect Alert Settings Channel Name Office Note 1 Text Display Channel Information Date and Time Channel Number Date Channel Name Time Week Font Size Small Text Color ... Background Transparency Watermark Path Transparency Preview Transparent Opaque Confirm Apply Canceltext_image
Camera Settings System Basic Settings Image Adjust Recording Motion Detect Alert Settings Setting Image Adjustment Source Adjustment Brightness Saturation 2 Gamma AC Frequency ○ 防松 ○ 切松 Flip Horizontal Flip Vertical Rotate ○ Counter-Clockwise ● Clockwise Rotation Angle 1 Confirm Apply Canceltext_image
Camera Settings Basic Settings Image Adjust Recording Motion Detect Alert Settings Setting Image Quality 640x480 Quality 1 Low High Surveillance Mode Schedule Based Triggered 2 Schedule Based 3 Add New schedule Edit schedule Delete schedule Confirm Apply Cancel1. Bildqualität
text_image
Camera Settings System Basic Settings Image Adjust Recording Motion Detect Alert Settings Preview 1 Refresh View Detection Settings Full Area Detection Custom Detection Add New Area Delete Area Delete All Areas Test Detection 2 Sensitivity High 3 Confirm Apply Canceltext_image
Camera Settings System Setting Basic Settings Image Adjust Recording Motion Detect Alert Settings Vibration Alert Enable Vibrate Window 1 Message Alert Enable There is motion detected. 2 Sound Alert Enable Test Default Sound 1 Default Sound 2 Default Sound 3 Custom E-mail Alert Enable Email Subject Message 4 Attach Picture Confirm Apply Canceltext_image
Date from 2010/01/06 00:00:00 to 2010/01/06 23:59:59 Channel ○ in ○ CH01 ○ CH02 ○ CH03 ○ CH04 Query Record List 2010-01-06 13-48-54 CH01.xmv Delete File Open Folder Start intelligent search 1X 2X 4X 8X 16X 5 6text_image
2010/01/06 14:13:21 1 2 3 4 Snapshot Detect 3 Web Server Setup Playback 2010-01-05 5 14:13:21 Stand by 192.165.1.116 6text_image
Camera Settings System Setting Basic Settings Image Adjust Recording Motion Detect Alert Settings Channel Name Office Note 1 Text Display Channel Information Date and Time Channel Number Date Channel Name Time Week Font Size Small Text Color ... Background Transparent Watermark Path ... Transparency Preview Transparent Opaque Confirm Apply Canceltext_image
Camera Settings System Setting Basic Settings Image Adjust Recording Motion Detect Alert Settings Image Adjustment Source Adjustment Brightness Saturation 2 Gamma AC Frequency 50 Hz 60 Hz Flip Horizontal Flip Vertical Rotate Counter-Clownwise Clockwise Rotation Angle Confirm Apply Canceltext_image
Camera Settings Basic Settings Image Adjust Recording Motion Detect Alert Settings Setting Image Quality 640X480 Quality Low High Surveillance Mode Schedule Based Triggered 1 2 Schedule Based 3 Add New schedule Edit schedule Delete schedule Confirm Apply Canceltext_image
Camera Settings System Basic Settings Image Adjust Recording Motion Detect Alert Settings Setting Preview 1 Refresh View Detection Settings Full Area Detection Custom Detection Add New Area Delete Area Delete All Areas Test Detection 2 Sensitivity High 3 Confirm Apply Canceltext_image
Camera Settings System Setting Basic Settings Image Adjust Recording Motion Detect Alert Settings Vibration Alert Enable Vibrate Window 1 Message Alert Enable There is motion detected. 2 Sound Alert Enable Test Default Sound 1 Default Sound 2 Default Sound 3 Custom E-mail Alert Enable Email Subject Message 4 Attach Picture Confirm Apply Canceltext_image
Date from 2010/01/06 00:00:00 to 2010/01/06 23:59:59 Channel ○ in ○ CH01 ○ CH02 ○ CH03 ○ CH04 Query Record List 2010-01-06 13-48-54 CH01.xmv Delete File Open Folder Start intelligent search 1X 2X 4X 8X 16X 5 6Thank you for purchasing this wireless network video recording system. Please review these instructions carefully before attempting to operate the unit.
Product Features
• 2.4GHz Digital wireless technology
• Interference free, secure and private signal.
- System expandable up to 4 cameras with quad function.
- Snapshot and Trigger & Scheduled recording.
- Camera with night vision.
Package Contents
Please check and identify all parts before proceeding with the installation.
- Wireless USB receiver
- Wireless Camera
- Power Adapter
• CD - User Manual
- Mounting Hardware
System Requirements
| Device | Minimum | Recommended |
| CPU | Pentium 4 2.0G or above | Pentium 4 3.0 or above |
| RAM | 512MB or more | 1G or more |
| Network | Ethernet | Ethernet |
| Resolution | 800 x 600 (24 bits) | 1024 x 768 (24 bits) |
| Network Camera | 2 or more | 2 or more |
| OS | Windows 2000 | Windows XP or 7 |
| Windows Media Player | WMP 9 | WMP 9 or above |
Check and make sure you can use the product on your computer.
Install USB camera
-
Install the software enclosed CD.
-
Connect the camera to the power outlet with the adapter in the package, turn on the power switch
-
Connect the USB receiver to your PC and then run application software, you will see the main operation window of this product.
Main Window
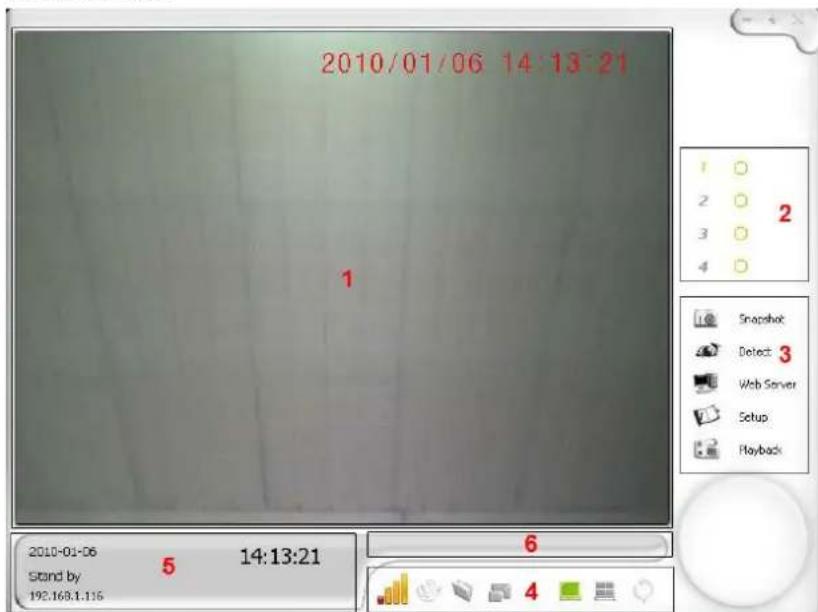
text_image
2010/01/06 14:13:21 1 2 3 4 Snapshot Detect Web Server Setup Playback 2010-01-06 5 14:13:21 Stand by 192.168.1.116 6-
Display Area: This area shows the image from the camera or playback. You can choose to view in single channel or 4-channel quad mode.
-
Channel Status: This area shows the status of one specific camera.
: This icon means the camera is detecting.
: This icon means the camera is in standby mode.
: This icon means the camera is recording.
-
Operation menu: You can operate as below.
-
Snapshot: Take a picture and save it.
- Detect: Switch between active and standby mode.
- Web Server: Activate remote network surveillance mode.
- Setup: Enter setting interface.
-
Playback: Playback recorded files.
-
Camera/Display control: You can operate as below.
: Signal strength
: Pair up the camera and receiver, select a channel and press Pair button on the camera head within 10 seconds.
: Open a snapshot
: Adjust the size of display area
: Single channel display
: Quad display
- Channel Information: This area shows the information of the channel in use.
- Message Alert display area
System

text_image
System Settings Language Support Language English 1 Storage Location Record C:\Program Files\Mars\WirelessG .... Default Free disk space 011478.06(MB), Total Space 014205.88(MB) Snapshot C:\Program Files\Mars\WirelessG .... Default Free disk space 011478.06(MB), Total Space 014205.88(MB) Mail Server SMTP E-mail Account 2 Password Test Web Service IP Address 192,165,1,116 Web Server Port 7788 Account user Password 3 Startup Options Start Detecting Start Web Server 3 Recurring Recording Enable 10 Recurring Ratio (%) 6 MNS Server Port 8080 Channel Enable web address https://192.168.1.116.7788/ MNS Address (engs://192.168.1.116.0300) web address (engs://192.168.1.116.7788/download time) Confins Apply Cancel- Language: Current language in use.
- Mail server: The mail server which the alert email will be sent from. Another words, the e-mail address from the computer which connected to USB receiver.
-
Startup options: Automatically startup when the system boots, includes:
-
Activate surveillance: Enter surveillance mode when the viewer runs.
-
Activate Web server: Activate Web server when the viewer runs.
-
Recurring Recording: New files will be overwritten on previous ones to save disk.
- Storage Location: The path that the records and snapshots will be saved.
-
Web Server: You can set below items.
-
Web Server Port: Designate a port for the Viewer (default 7788, you should open a port in your router, refer to instruction manual on how to open a port)
- Web Server Account: Default as User
- Web Server Password: Set your Web Server password
- MMS Server Port: The port for Microsoft Media Server
- MMS Server Channel: Decide whether or not to start MMS
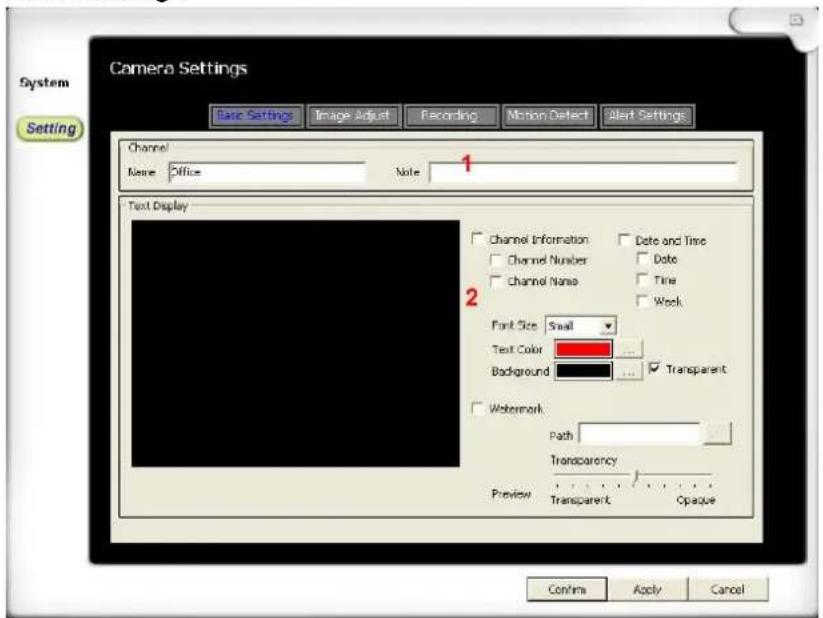
Basic Settings
text_image
Camera Settings System Setting Base Settings Image Adjust Recording Motion Detect Alert Settings Channel Name Office Note 1 Text Display Channel Information Date and Time Channel Number Date Channel None Time Work Font Size Small Text Color... Background Transparent Watermark Path Transparency Preview Transparent Opaque Confins Apply Cancel- Name & Note: Customize camera name and description
-
Text Display: You can choose the information to be displayed on the screen.
-
Channel Information: Decide whether or not to display channel number and name
- Date Time: Decide whether or not to display Date, Time and/or Week
- Font Size: Adjust font size
- Fore color: Choose the color the texts
- Background: Background color of the texts
- Watermark: Decide whether or not to display customized watermark on the screen
Image Adjust

text_image
Camera Settings System Setting Basic Settings Image Adjust Recording Motion Detect Start Settings Image Adjustment Source Adjustment Brightness Saturation 2 Gamma AC Frequency 50 Hz 60 Hz Flip Horizontal Flip Vertical Rotate Counter-Clodwise Clockwise Rotation Angle 1 Confirm Apply Cancel-
Adjust the image in the following ways:
-
Flip Horizontal
- Flip Vertical
-
Rotate
-
Adjust the image quality:
-
Brightness
- Saturation
- Gamma
Recording Settings
text_image
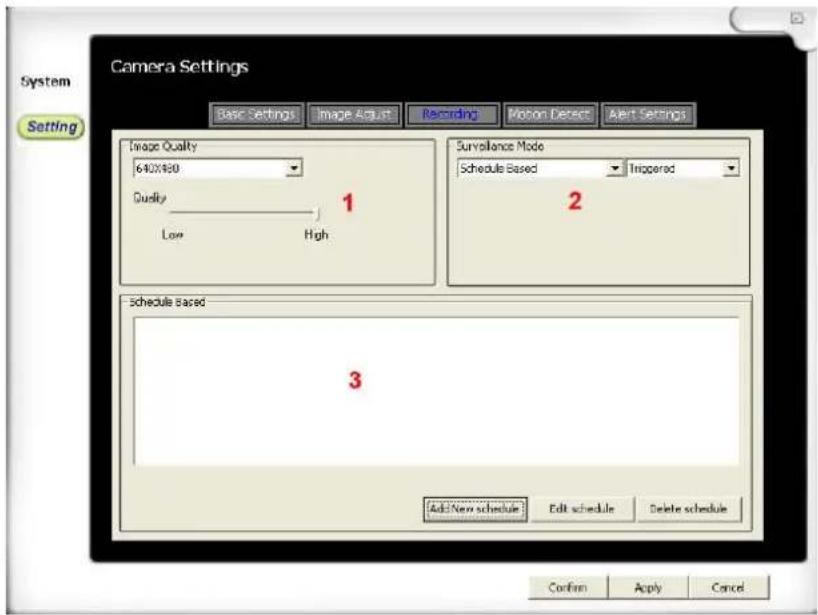
Camera Settings System Setting Basic Settings Image Adjust Recording Motion Detect Alert Settings Image Quality 640X180 Quality Low High Surveillance Mode Schedule Based Triggered 2 Schedule Based 3 Add New schedule Edit schedule Delete schedule Confirm Apply Cancel1. Image Quality
- Resolution: Set the resolution of the image
- Quality: Set the image quality from Low to High
2. Surveillance Mode
Option 1:
- Schedule Based: enter view mode and records during preset time.
- Record during detecting: Allow to record in view mode.
- View Only: System will not record but only survey.
Option 2:
- Full-time: Records constantly. After you setup this mode, once you click the Detect button in live video, it will start to record until you click again to stop.
- Triggered: Records only when there is motion detected.
3. Scheduled Base: When option 1 is set as Scheduled Base, you can:
- Add new schedule
- Edit schedule
- Delete schedule
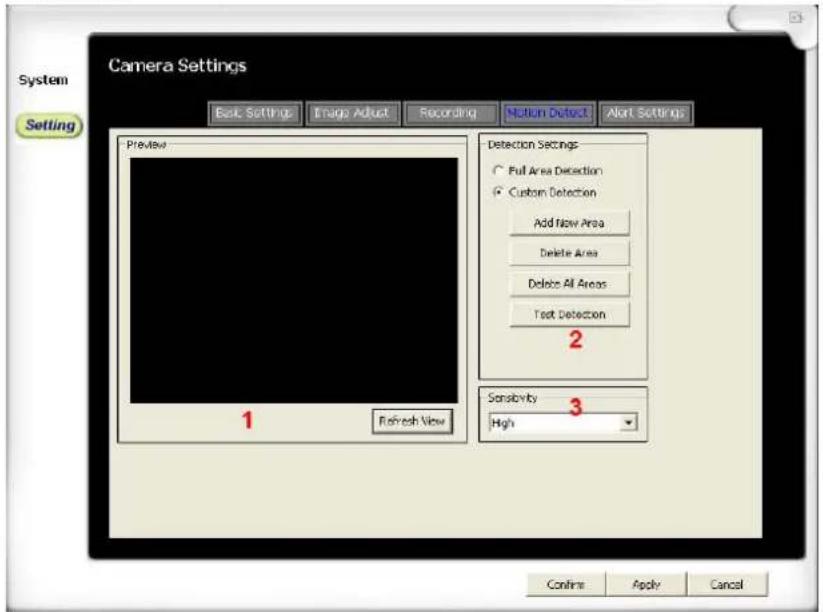
Motion Detection
When the recording is set as Triggered, you can set the detection areas and detection sensitivity.
text_image
Camera Settings System Setting Back Settings Image Adjust Recording Motion Detect Alert Settings Preview Detection Settings Full Area Detection Custom Detection Add New Area Delete Area Delete All Areas Text Detection 2 1 Refresh View Sensitivity High 3 Confine Apply Cancel- Preview: Click Refresh View to refresh the image.
-
Set Detection areas: Set detection areas on preview image.
-
Full Area Detection: Detect all areas.
- Custom Detection: Detect customized areas.
- Add New Area: Click and drag to add new areas.
- Delete Area: Click the area you want to delete.
- Delete All Areas
-
Test Detection: Move the objects, when the motion is detected, the color of the area changes. Then the test succeeds.
-
Sensitivity: Adjust motion detection sensitivity. (Tip: In order to make it more sensitive, you can add more detection areas)
Alert Settings
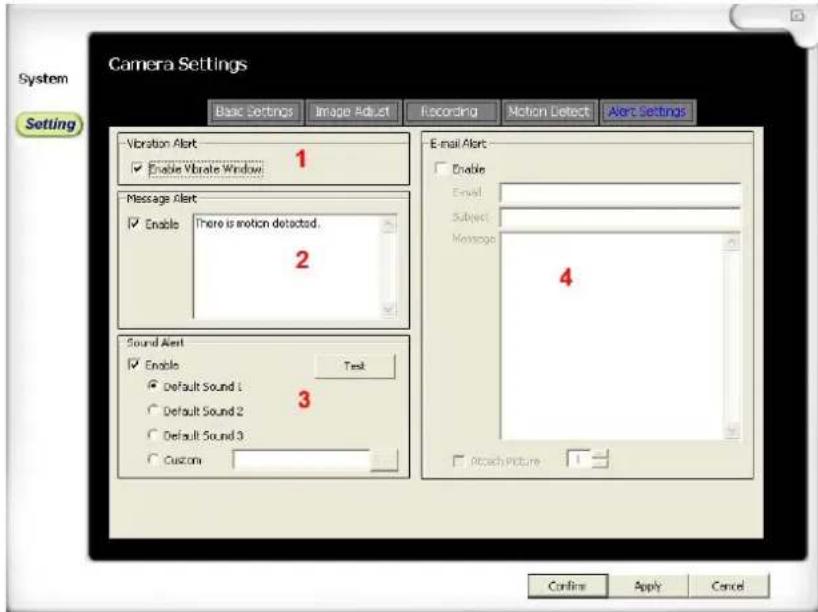
When the recording is set as Triggered, You can set the alert notice as below:
text_image
System Setting Camera Settings Basic Settings Image Adjust Recording Motion Detect Alert Settings Vibration Alert Enable Vibrate Window Message Alert Enable There is motion detected. 2 Sound Alert Enable Test Default Sound 1 Default Sound 2 Default Sound 3 Custom E-mail Alert Enable Email Subject Message 4 Attach Picture Conline Apply Cancel- Vibration Alert: When it detects motion, viewer window will vibrates.
- Message Alert: When it detects motion, main window pops up with a preset text message.
- Sound Alert: When it detects motion, a preset alert tone will be played.
- E-mail Alert: When it detects motion, an E-mail will be sent to preset mailbox.
Playback

text_image
Date from 2010/01/06 00:00:00 to 2010/01/06 23:59:59 Channel ○ 4 in ○ CH01 ○ CH02 ○ CH03 ○ CH04 Query Record List 2010-01-06 13:40:54 CH01 wray 3 Delete File Open Folder Start intelligent search 1X 2X 4X 8X 16X 4 5 6- Playback Display
- Time and Channel Query: Filter the records in Record List according to the terms, such as time and channel.
- Record List: You can choose to playback or delete a file here.
- Video Tracker: Indicating the slide progress.
-
Playback controls: (from left to right)
-
Play/Pause
- Stop
- Previous slip
- Back forward
- Forward
- Next slip
-
Playback Speed (1x, 2x, 4x, 8x, 16x)
-
Snapshot: Click the camera icon to take a snapshot. Click file icon to open the snapshot file.
Specifications
| Receiver | |
| Frequency Range | 2.400GHz~2.478GHz |
| Date Rate | 2Mbps |
| Receiving Sensitivity | -81dB |
| Demodulation Type | GFSK with FHSS |
| Resolution | 640x240 / 12FPS MAX |
| Power Requirement | USB power |
| Power Consumption | 130mA Max |
| Operating Temp Range | 14°F ~ 104°F / -10° ~ 40°C |
| Operating Humidity | <85% RH |
| Camera(s) | |
| Transmit Frequency Range | 2.400GHz~2. 478GHz |
| Date Rate | 2Mbps |
| Transmitting Power | 15dBM(TYP) |
| Modulation Type | GFSK with FHSS |
| Transmitting Distance | 100m (Line of Sight) |
| Image Sensor Type | 1/5” Color CMOS Image Sensor |
| Effective Pixels | H:640 V:480 |
| Image Processing | Motion JPEG |
| Lens | 4.9mm/F2.8 |
| Viewing Angle (Diagonal) | 60° |
| Minimum Illumination | 2.5 LUX (IR Off), 0 LUX (IR On) |
| IR LED / Night Vision Range | 8 LEDs / 840nm 5m (with IR LED) |
| Power Requirement | 5V DC ±5% |
| Power Consumption | 280mA (without Night Light), 360mA (with |
| Operating Temperature | 14°F ~ 104°F / -10°C ~ 40°C |
| Operating Humidity | <85% |
Warranty
This product carries two years warranty limited to the repair or replacement of this product only and does not extend to consequential or incidental damage to other products that may be used with this unit.