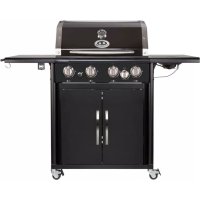
USER MANUAL Australia 425 G Outdoorchef
AUSTRALIAN BARBECUE MANUAL
AUSTRALIA 315 G I AUSTRALIA 325 G I AUSTRALIA 415 G I AUSTRALIA 425 G I AUSTRALIA 455 G

Please read these instructions carefully before using your OUTDOORCHEF Gas Barbecue.

MODE D'EMPLOI
20
(Australia 315 G / AUSTRALIA 325 G / AUSTRALIA 415 G / AUSTRALIA 425 G / AUSTRALIA 455 G)
(Australia 325 G / Australia 425 G / Australia 455 G)
Please read these instructions carefully before using your OUTDOORCHEF gas barbecue.
IMPORTANT:
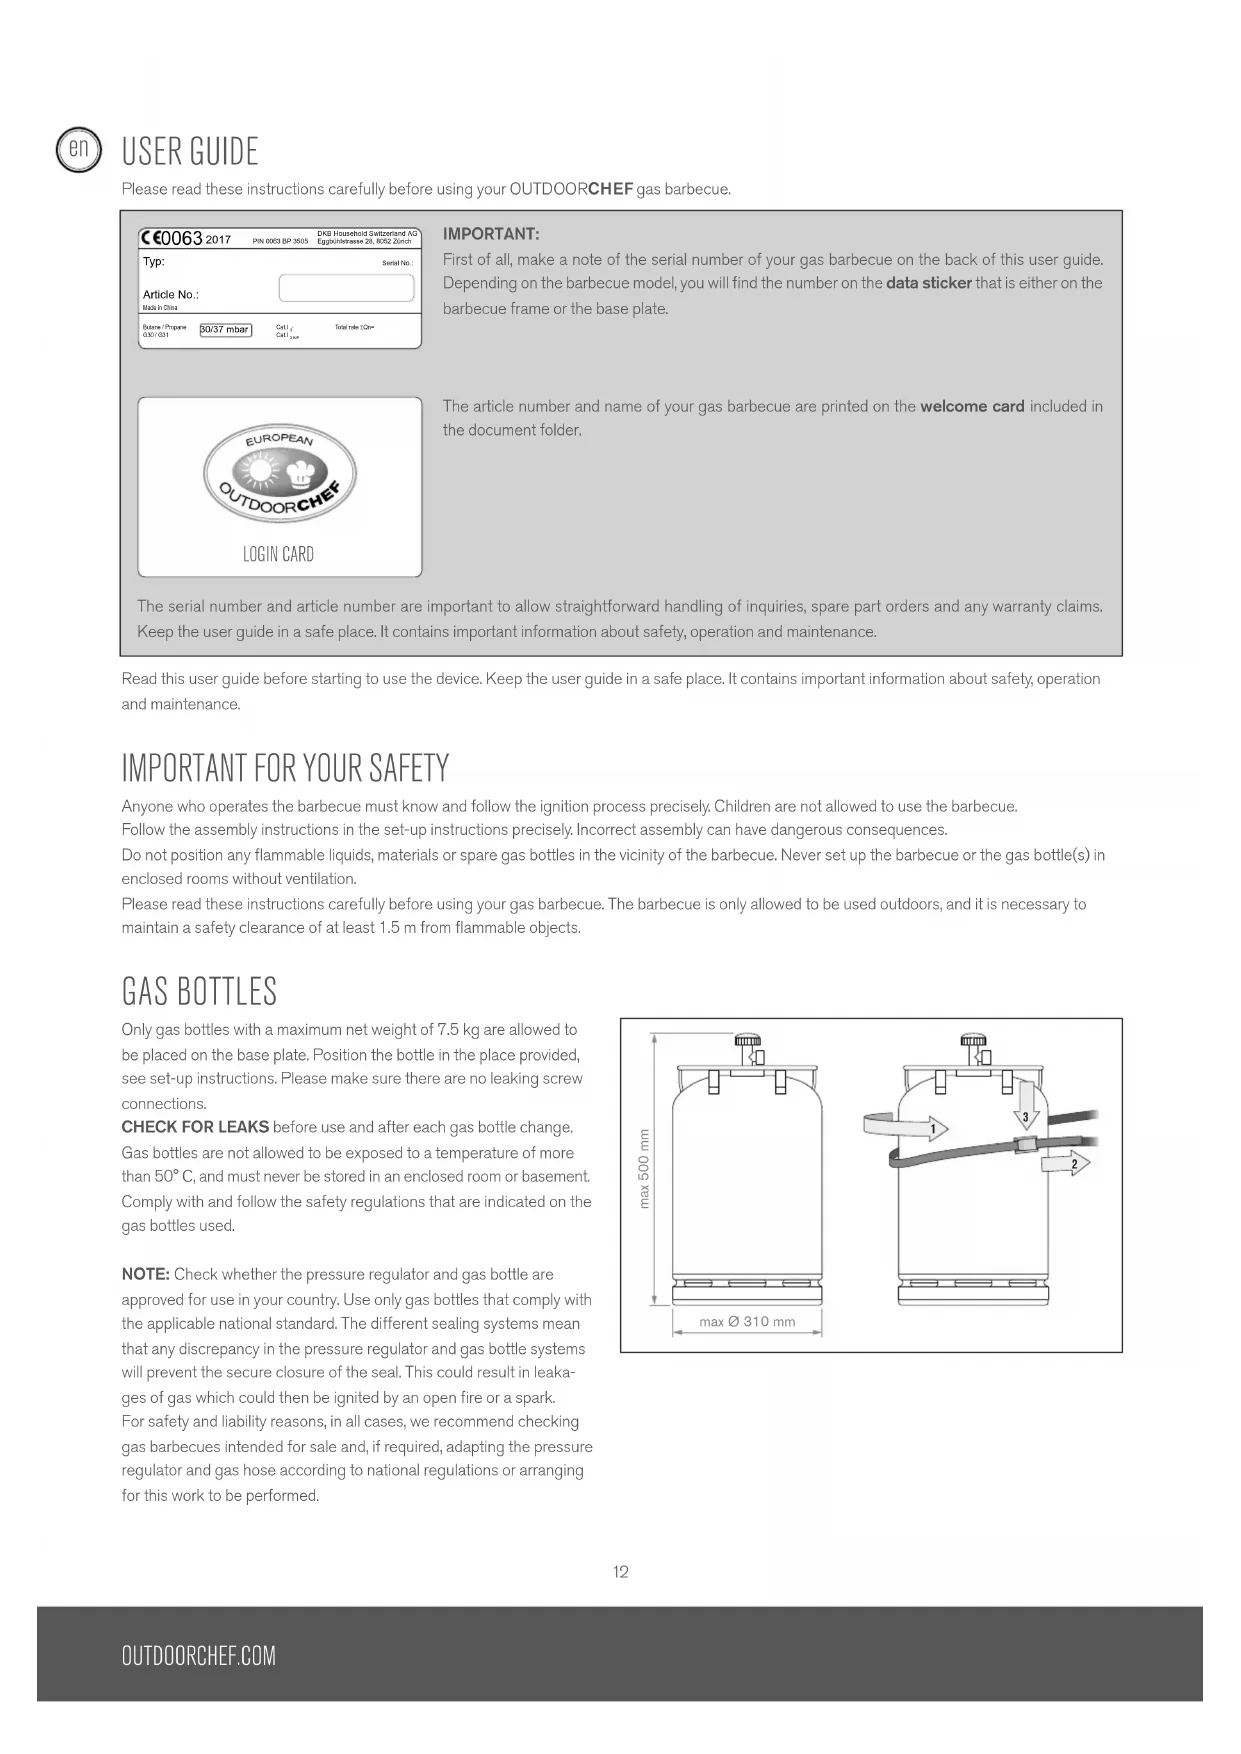
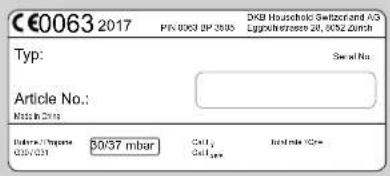
First of all, make a note of the serial number of your gas barbecue on the back of this user guide. Depending on the barbecue model, you will find the number on the data sticker that is either on the barbecue frame or the base plate.

The article number and name of your gas barbecue are printed on the welcome card included in the document folder.
The serial number and article number are important to allow straightforward handling of inquiries, spare part orders and any warranty claims. Keep the user guide in a safe place. It contains important information about safety, operation and maintenance.
Read this user guide before starting to use the device. Keep the user guide in a safe place. It contains important information about safety, operation and maintenance.
IMPORTANT FOR YOUR SAFETY
Anyone who operates the barbecue must know and follow the ignition process precisely. Children are not allowed to use the barbecue.
Follow the assembly instructions in the set-up instructions precisely. Incorrect assembly can have dangerous consequences.
Do not position any flammable liquids, materials or spare gas bottles in the vicinity of the barbecue. Never set up the barbecue or the gas bottle(s) in enclosed rooms without ventilation.
Please read these instructions carefully before using your gas barbecue. The barbecue is only allowed to be used outdoors, and it is necessary to maintain a safety clearance of at least 1.5 m from flammable objects.
GAS BOTTLES
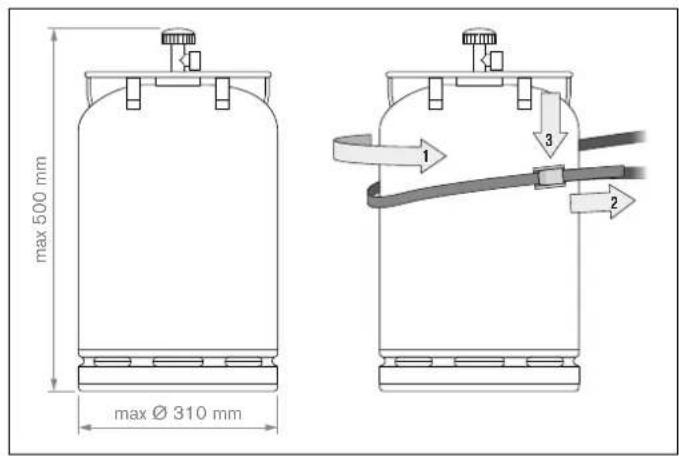
Only gas bottles with a maximum net weight of 7.5 kg are allowed to be placed on the base plate. Position the bottle in the place provided, see set-up instructions. Please make sure there are no leaking screw connections.
CHECK FOR LEAKS before use and after each gas bottle change.
Gas bottles are not allowed to be exposed to a temperature of more than 50°C, and must never be stored in an enclosed room or basement. Comply with and follow the safety regulations that are indicated on the gas bottles used.
NOTE: Check whether the pressure regulator and gas bottle are approved for use in your country. Use only gas bottles that comply with the applicable national standard. The different sealing systems mean that any discrepancy in the pressure regulator and gas bottle systems will prevent the secure closure of the seal. This could result in leakages of gas which could then be ignited by an open fire or a spark. For safety and liability reasons, in all cases, we recommend checking gas barbecues intended for sale and, if required, adapting the pressure regulator and gas hose according to national regulations or arranging for this work to be performed.
SAFETY NOTES
This user guide must be kept by the owner and be close at hand at all times.
Take the barbecue into operation in accordance with the INSTRUCTIONS FOR LIGHTING chapter.
Use outdoors only. Read the instructions before using the appliance. WARNING: accessible parts may be very hot. Keep young children away. This appliance must be kept away from flammable materials during use. Do not move the appliance during use. Turn off the gas supply at the gas cylinder after use. Never use the barbecue under a canopy. Do not push appliances with castor wheels over uneven surfaces or steps. Make sure the drip drawer is always fully closed and engaged during use. Wear protective gloves when you touch hot parts. After grilling, always turn the gas regulating knob to the off position and close the gas supply at the gas bottle. When changing the gas bottle, make sure that the gas regulating knob is in the off position and the gas supply is closed at the gas bottle. IMPORTANT: No sources of ignition are permitted to be in the vicinity. After connecting a new gas bottle, check the connection parts in accordance with the instructions in CHECKING FOR LEAKS. If you suspect that parts are leaking, turn the gas regulating knob to the off position and close the gas supply at the gas bottle. Have the parts that carry gas checked at a specialist gas equipment retailer. Renew the gas hose immediately if it is damaged or displays signs of wear. The hose must be free from kinks and must not have any cracks. Do not forget to switch off the gas regulating knob and the gas supply before you remove the hose. Renew the hose and the gas pressure regulator after it has been in use for 3 years from the date of purchase. Make sure that the gas pressure regulator and the hose are in accordance with the corresponding EN standards. The recommended length of the gas hose is 90 cm and it must not be longer than 150 cm. Never block the air intake slots in the housing or the air slots in the lid. The ventilation openings in the gas bottle compartment must never be closed or covered. Do not modify the appliance. Contact a specialist if you suspect there is a malfunction. The barbecue is supplied with the appropriate gas hose and gas pressure regulator. It is essential to keep the gas hose away from the hot outside surfaces of the barbecue. The hose is not allowed to be twisted. On barbecue models that have a hose guide, it is essential for the hose to be secured in this guide. The hose and regulator are in accordance with the particular national regulations and EN standards. Contact a specialist gas equipment retailer if full power is not achieved and you suspect there may be a blockage in the gas supply. Only use the barbecue on firm, secure ground. Never place the barbecue on wooden floors or other flammable surfaces while it is in use. Keep the barbecue away from flammable materials. In devices with granite work surfaces, avoid exposing the surface to a temperature shock. Do not store the barbecue in the vicinity of highly inflammable liquids or materials. If you store the barbecue indoors over winter, it is essential for the gas bottle to be removed. It should always be stored in a well ventilated location which is inaccessible to children. Before using the barbecue, make sure you select a location that affords the greatest possible protection against the wind. When the barbecue is not in use, and once it has cooled down fully, protect it against the effects of the weather using a cover. Covers can be purchased from your barbecue retailer. Remove the cover after heavy rain in order to avoid condensation build-up.
CHECKING FOR LEAKS
WARNING: No sources of ignition are permitted to be in the vicinity during the leak test. This also includes smoking. Never check for leaks with a burning match or a naked flame, and always do this task outdoors.
- The gas regulating knob must be in the position.
- Open the gas supply at the bottle and brush a soap solution comprising 50% liquid soap and 50% water onto all parts that carry gas (connection at the gas bottle / gas pressure regulator / gas hose / gas inlet / connection on the valve). You can also use a leak spray.
- Bubbles forming in the soap solution indicate there are leaks. IMPORTANT: Do not use the barbecue before all leaks have been eliminated. Close the gas supply at the gas bottle.
- Eliminate the leaks by retightening the connections if possible, or else renew the defective parts.
- Repeat steps 1 and 2.
- Contact your specialist gas equipment retailer if the leaks cannot be eliminated.
NOTE: Carry out the CHECK FOR LEAKS each time after the gas bottle is connected or changed, and also at the start of the barbecue season.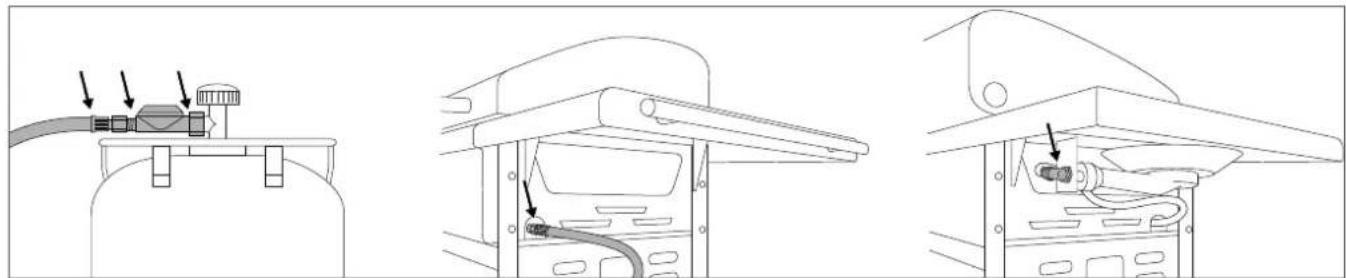
Heat settings and lighting
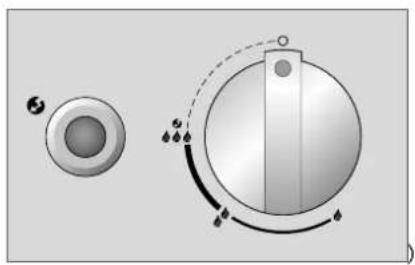
Off position : Low power
Medium power
Full power
Ignition
: Igniter
BEFORE FIRST USE
- Clean all parts that come into contact with foodstuffs.
- Check all parts that carry gas, as described in the CHECKING FOR LEAKS chapter. Also do this if your gas barbecue was delivered already assembled by the retailer.
- Let the barbecue burn for about 20-25 minutes at the setting.
- Make sure that the drip collector tray has been pushed in fully. This also applies to normal use of the barbecue.
INSTRUCTIONS FOR LIGHTING
NOTE: It is not always necessary to use all burners. This depends on the type of cooking and the amount of food.
IGNITING THE MAIN BURNERS
(Australia 315 G / AUSTRALIA 325 G / AUSTRALIA 415 G / AUSTRALIA 425 G / AUSTRALIA 455 G)
- Make sure that all connections between the gas hose, the gas pressure regulator and the gas bottle are firmly tightened. (Follow the instruction in the CHECKING FOR LEAKS chapter.)
- Open the barbecue lid. CAUTION: Never light the barbecue when the lid is closed.
- Open the gas supply at the gas bottle.
- Press the gas regulating knob and turn it anticlockwise to the setting. Press the black ignition button and hold it until the spark catches and the gas is burning.
- If the gas does not light within 3 seconds, set the gas regulating knob to Wait 2 minutes to allow the uncombusted gas to dissipate. Then repeat points 2 to 4.
- If it is not possible to light the barbecue after 3 attempts, check the causes (as described in the TROUBLESHOOTING section).
- The burners must be taken into operation from left to right.
(Australia 325 G / Australia 425 G / Australia 455 G)
- Make sure that all connections between the gas hose, the gas pressure regulator and the gas bottle are firmly tightened. (Follow the instructions in the CHECKING FOR LEAKS chapter.)
- Remove the granite cover from the side burner in the AUSTRALIA 455 G and place it in the holder provided under the right-hand side shelf, or open the cover plate at the side burner in the AUSTRALIA 325 G or AUSTRALIA 425 G.
- CAUTION: Never light the barbecue when the granite cover or the cover plate is closed.
- Open the gas supply at the gas bottle.
- Press the gas regulating knob marked SIDE BURNER and turn it anticlockwise to the setting. Press the ignition button and hold it until the spark catches and the gas is burning.
- If the gas does not light within 3 seconds, set the gas regulating knob to off. Wait 2 minutes to allow the uncombusted gas to dissipate. Then repeat points 2 to 4.
- If it is not possible to light the side burner after 3 attempts, search for the causes (as described in the TROUBLESHOOTING section).
- Do not cover the side burner with the granite cover until it has completely cooled down (only AUSTRALIA 455 G model), and do not close the cover plate until it has completely cooled down (only AUSTRALIA 325 G or AUSTRALIA 425 G models).
IGNITING THE INFRARED BURNER (POWER BURNER OF THE AUSTRALIA 455 G)
CAUTION: Do not use the infrared burner when the lid is closed.
- Make sure that all connections between the gas hose, the gas pressure regulator and the gas bottle are firmly tightened. (Follow the instructions in the CHECKING FOR LEAKS chapter.)
- Open the barbecue lid. CAUTION: Never ignite the barbecue with the lid closed, and never place the griddle over the infrared burner. The results could be discolouration of the lid and deformation of the griddle.
- Open the gas supply at the gas bottle.
- Press the gas regulating knob marked POWER BURNER and turn it anticlockwise to the setting. Press the ignition button and hold it until the spark catches and the gas is burning.
- If the gas does not light within 3 seconds, set the gas regulating knob to Wait 2 minutes to allow the uncombusted gas to dissipate. Then repeat points 2 to 4.
- If it is not possible to light the infrared burner after 3 attempts, search for the causes (as described in the TROUBLESHOOTING section).
THE AUSTRALIAN BARBECUE SYSTEM FROM OUTDOORCHEF
Australia is famous for its magnificent barbecues. The A-LINE from OUTDOORCHEF is equally magnificent. It offers high-quality and reliable products. A large working area is provided on a robust, easily manoeuvrable chassis. The indestructible cast-iron burners store the heat and distribute it evenly within the grilling chamber. Thanks to an integrated thermometer, it is possible to check the temperature at any time, while flame hoods specially developed for this barbecue system protect the food to be grilled against flare-ups.
DIRECT HEAT INDIRECT HEAT For direct grilling and cooking: Place the food to be grilled over the switched-on burners.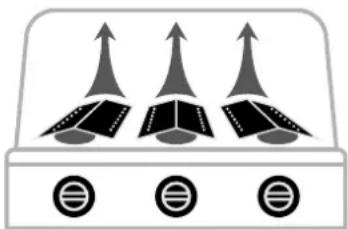
For indirect grilling, cooking and baking: Place the food to be grilled in the middle, close the lid and only ignite the two outer burners.
INSTRUCTIONS FOR USING THE AUSTRALIAN BARBECUE WITH GAS
It couldn't be simpler:
- Preheat the barbecue with its lid closed for about 10-15 minutes at the setting.
- Place the food to be grilled on the grilling rack or the griddle and adjust the temperature as required
- RECOMMENDATION: Only use one burner if there is only a small amount of food to be grilled. Grilling with the lid closed reduces the grilling time and gas consumption.
- After grilling, always set the gas regulating knob to the position. Then close the gas supply at the gas bottle. The bottle tap must be closed even on empty bottles.
GRILLING WITH THE INFRARED BURNER

- Preheat the barbecue with its LID OPEN for about 5 minutes at the
- Place the food to be grilled on the grilling rack. The infrared burner is suitable for flash-grilling.
- CAUTION: Do not use the infrared burner with the lid closed, and do not place the griddle over the infrared burner. The results could be discolouration of the lid and deformation of the griddle.
- After grilling, always set the gas regulating knob to the position. Then close the gas supply at the gas bottle. The bottle tap must be closed even on empty bottles.
The right accessories make your OUTDOORCHEF even more enjoyable. Give free rein to your creativity and flair for experimentation.
You can find all the accessory products for your barbecue at OUTDOORCHEF.COM
AFTER GRILLING
- Set the gas regulating knob of each burner to
- Close the gas supply at the gas bottle.
- Allow the barbecue to cool down fully and clean it.
- Protect the barbecue with the corresponding cover.
CLEANING
Only very minor cleaning is required between uses of the barbecue, because most of the grease either evaporates or is gathered in the collecting tray. For cleaning the grilling rack and the griddle, use a barbecue brush with brass bristles (not steel bristles).
For more thorough cleaning, use the OUTDOORCHEF BARBECUE CLEANER.
Alternatively, you can use a nylon kitchen sponge and soapy water in order to remove all loose residues.
Remove the grilling rack and the griddle, and clean the cast-iron burners.
There is no need to clean the infrared burner, because the grease vaporises immediately during grilling.
At the end, you can pull out the collecting tray, empty it and clean it with the OUTDOORCHEF BARBECUE-CLEANER.
If you want, you can switch on the barbecue and let it operate for a few minutes at stage (insert graphic 3 flames) with the lid open.
USING THE OUTDOORCHEF BARBECUE-CLEANER
IMPORTANT: The barbecue is not allowed to be operating while the OUTDOORCHEF BARBECUE-CLEANER is being used. Wear gloves to protect your hands and, if possible, glasses to shield your eyes. Thoroughly spray the barbecue or accessories while they are still slightly warm, and allow the product to work for 15-30 minutes. Spray dirty surfaces again, thoroughly rinse with water and allow to dry.
WARNING: The OUTDOORCHEF Barbecue Cleaner should not be used on powder-coated surfaces.
MAINTENANCE
Regular maintenance of your barbecue will ensure it functions correctly. At least twice a year, check all parts that carry gas; also check them after long periods of storage. Spiders and other insects can cause blockages that must be cleared before use.
If the barbecue is regularly pushed across uneven ground, check from time to time whether all screws are still tight.
If you have not used the barbecue for a long period, you should carry out a CHECK FOR LEAKS before using it again. If you have any doubts, please contact your gas supplier or the retailer.
To prevent damage due to corrosion, oil all metal parts before lengthy storage.
Following lengthy storage, and at least once a year during the barbecue season, you should check the gas hose for cracks, kinks and other damage. A damaged gas hose must be renewed immediately, as described in the SAFETY NOTES chapter.
To allow you to enjoy using your barbecue for as long as possible, protect it from the effects of the weather using a suitable OUTDOORCHEF cover once it has cooled down completely.
Remove the cover after rain in order to prevent condensation build-up. Covers can be purchased from your barbecue retailer.
TROUBLESHOOTING
The burner does not light:
- Check if the gas supply is open at the gas bottle.
- Make sure there is enough gas in the bottle.
- Check if sparks are passing between the electrode and the burner.
No spark:
- Make sure that the battery has been inserted correctly (in barbecues with electric ignition). The distance between the burner and electrode is only allowed to be 5-8 mm.
- Check whether the cables of the electric ignition and the electrode are plugged in and firmly connected.
- Insert a new battery (type AA, LR02, 1.5 volts) in the electric ignition (in barbecues with electric ignition).
Please contact the retailer if you cannot get the barbecue to operate with reference to the measures above.
CONSUMER WARRANTY
1. Warranty and relation to other rights of the purchaser
As a private end user (consumer) purchasing this OUTDOORCHEF product from an authorized dealer, you are eligible to receive a manufacturer's warranty from DKB Household Switzerland AG ("DKB").
The manufacturer's warranty entitles you to assert warranty claims against the warranty provider in accordance with this agreement. The warranty claims exist in addition to your other contractual or statutory rights. These other rights are not excluded or restricted by this warranty. Therefore, you can also assert other contractual or statutory claims against the respective obligated parties. Thus for example, claims asserted under the Product Liability Act are not affected by this guarantee.
As the purchaser, you may in particular also assert contractual warranty claims against the seller. The reversal of the purchase contract, for example, can only be pursued against the seller, but not against DKB under this warranty.
2. Participants and warranty conditions
The warranty provider is DKB. All end customers who purchase a new product from an authorized dealer for private purposes are eligible for the warranty. Proof of purchase shall be the purchase receipt. A purchase for private use means the product is purchased by a person for purposes which are, for the most part, not associated with either their commercial or their independent vocational activities.
If it becomes recognised that a warranty claim must be made, said warranty claim must be asserted against the warranty provider within two months. Otherwise, the warranty claim will be excluded. For obvious defects, this limitation period begins upon receipt of the product. DKB therefore recommends that you check the product for defects immediately upon receipt.
3. Scope
The warranty is valid from the date of purchase and is granted in the following cases, provided that no exclusion of facts exists pursuant to Paragraph 4:
- 3 years on the enamelled kettle (bottom part and lid) against corrosion perforation
- 3 years on the enamelled barbecue grid against corrosion perforation or burn-through
- 3 years on all stainless steel parts against corrosion perforation or burn-through
- Faults in the enamel coating prior to first use
- 2 years on all remaining manufacturing/material defects
Imperfections which are not considered to be defects include functionally insignificant and reasonable irregularities, differences in the colour of enamelling and minor defects such as production-related support points at the lower edge of the lid or on the suspensions.
In a warranty case, DKB will exchange and replace, at the purchaser's request, either the damaged/defective parts or the entire product. As far as is reasonable, an exchange can be made for a similar model of a newer design, e.g. for a successor model. Insofar as the functionality of the product is not affected by a defect and to an extent reasonable for you as the customer, appropriate financial compensation can be offered to you in lieu of repair.
During the processing of a warranty claim (verification and possibly replacement) the purchaser shall not be entitled to assert a claim for a replacement or other compensation against DKB. Undertaking warranty services does not mean that the warranty period is extended or restarted. Exchanged parts become the property of DKB. The warranty period will only start again if the product is replaced.
Any further claims against the warranty provider are not covered by this warranty. However, this does not restrict or exclude your claims on other legal grounds (see also Section 1 above).
4. Exclusion
The warranty shall not apply in the following cases:
- Normal wear and tear resulting from normal (intended) use, especially to general wear parts such as funnel, flame cover, burner, thermometer, ignition and battery, electrode, ignition cable, gas hose, gas pressure regulator, heating element, reflector, aluminium protection foil, barbecue grid or charcoal grate and basket, lighting grate and charcoal/drip pan.
- Damage to the enamel from the use of utensils and other devices, provided that the error did not already demonstrably exist before first use.
- Defects and/or damage due to misuse, improper use, in particular due to not following the instruction manual, safety instructions or operating/maintenance instructions (for example, use of outdoor equipment indoors, damage resulting from incorrect installation, improper cleaning of the enamelled surface of the funnel or grill bars, failure to perform a leakage test to the extent recommended in the operating instructions, use of harmful chemicals, unintended use, etc.). Defects and/or damages that are remedied through intervention or repair by persons other than those authorized by DKB.
- Defects and/or damage caused by destructive weather influences (e.g. hail or lightning). Defects and/or damage due to vandalism or due to intentional or negligent damage to the extent that this was not caused by DKB. Defects and/or damages incurred during transport to the buyer, unless the transport was arranged by the warranty provider. Defects and/or damage due to force majeure. Defects and/or damage due to wear caused by professional use for commercial purposes (e.g. use in a hotel or restaurant).
5. Processing of warranty claims
In the event of a warranty claim please contact us or one of our authorized dealers (a dealer directory is available at www.outdoorchef.com) as soon as possible and tell us your address and, if possible, the product/product part, sales receipt information, serial number and item number (both can be found on the data sticker on your barbecue; see the first section of the instruction manual). Please describe the defect and, if possible, also send us a photo of it. In order to verify your warranty claim, you will need to return the product to us or your local dealer (bring-in warranty). Once your warranty claim has been verified, we will reimburse the necessary and required transport and shipping costs, otherwise we will send the product back to you at your expense.
The registered brand OUTDOORCHEF is represented by the following enterprise:
DKB Household Switzerland AG | Eggbühlstraße 28 | Postfach | 8052 Zürich, Switzerland | www.dkbrands.com
AUSTRALIA 315 G/AUSTRALIA 325 G
CE 0063
Gas Propane/butane 30/31
Total power 11.7 kW
Propane 546 g/h
Nozzle (28-30/37 mbar) 0.78 mm / Marking: BD
Nozzle (50 mbar) 0.68 mm / Marking: AD
Gas pressure Butane 28 mbar
Propane 37 mbar
Maximum permitted gas bottles Butane max. 7.5 kg
on the barbecue frame Propane max. 7.5 kg
AUSTRALIA 415 G/AUSTRALIA 425G
CE 0063
Gas Propane/butane 30/31
Total power 16.80 kW / 21.0 kW
Propane 1165 g/h
Nozzle (28-30/37 mbar) 0.98 mm / Marking: BK
Nozzle (50 mbar) 0.88 mm / Marking: AH
Gas pressure Butane 28 mbar
Propane 37 mbar
Maximum permitted gas bottles Butane max. 7.5 kg
on the barbecue frame Propane max. 7.5 kg
AUSTRALIA 455 G
CE 0063
Gas Propane/butane 30/31
Total power 22.8 kW
Propane 862 g/h
Nozzle (28-30/37 mbar) 0.98 mm / Marking: BK
Nozzle (50 mbar) 0.88 mm / Marking: AH
Gas pressure Butane 28 mbar
Propane 37 mbar
Maximum permitted gas bottles Butane max. 7.5 kg
on the barbecue frame Propane max. 7.5 kg
SIDE BURNER (AUSTRALIA 325 G/Australia 425 G/Australia 455 G)
CE 0063
Gas Propane/butane 30/31
Power 4.20 kW
Propane 116 g/h
Nozzle (28-30/37 mbar) 0.98 mm / Marking: BK
Nozzle (50 mbar) 0.85 mm / Marking: AG
Gas pressure Butane 28 mbar
Propane 37 mbar
INFRARED BURNER (AUSTRALIA 455 G)
CE 0063
Gas Propane/butane 30/31
Power 6.0 kW
Propane 418 g/h
Nozzle (28-30/37 mbar) 1.16 mm / Marking: BP
Nozzle (50 mbar) 1.00 mm / Marking: AP
Gas pressure Butane 28 mbar
Propane 37 mbar
CATEGORIES
13 B/P (30 mbar)
1383/PR (50 mbar)
13+ (28/30/37 mbar)
Electric ignition
A battery (type AAA, LR02, 1.5 volts) is required for operating the electric ignition.
Note on the temperature display
The thermometer display is subject to a +/- 10% fluctuation.
Web page
More information, tips and tricks, recipes and all kinds of useful information about OUTDOORCHEF products can be found at OUTDOORCHEF.COM
(see also the first section of these INSTRUCTIONS FOR USE).
(type 11, LR02, 1.5 volts).
Indications concerning the thermometer
(Australia 315 G / AUSTRALIA 325 G / AUSTRALIA 415 G / AUSTRALIA 425 G / AUSTRALIA 455 G)
(Australia 325 G / Australia 425 G / Australia 455 G)
ELECTRIC IGNITION
(Australia 315 G / AUSTRALIA 325 G / AUSTRALIA 415 G / AUSTRALIA 425 G / AUSTRALIA 455 G)
(Australia 325 G / Australia 425 G / Australia 455 G)
(Australia 315 G / AUSTRALIA 325 G / AUSTRALIA 415 G / AUSTRALIA 425 G /
AUSTRALIA 455 G)
(Australia 325 G / Australia 425 G / Australia 455 G)
Nozzle (50 mbar) 0.88 mm / marketing: AH
Gas pressure Butane 28 mbar
Propane 37 mbar
Max. gas cylinders allowed Butane max. 7.5 kg
on the grill stand Propane max. 7.5 kg
SIDEBURNER
(AUSTRALIA 325 G/AUSTRALIA 425 G/AUSTRALIA 455 G)
CE 0063
Gas Propane/butane 30/31
Power 4.20 kW
Propan 116 g/h
Nozzle (28-30/37 mbar) 0.98 mm / marking: BK
Nozzle (50 mbar) 0.85 mm / marking: AG
Gas pressure Butane 28 mbar
Propane 37 mbar
INFRARED BRAYER (AUSTRALIA 455 G)
CE 0063
Gas Propane/butane 30/31
Power 6.0 kW
Propane 418 g/h
Nozzle (28-30/37 mbar) 1.16 mm / marking: BP
Nozzle (50 mbar) 1.00 mm / marking: AP
Gas pressure Butane 28 mbar
Propane 37 mbar
CATEGORIES
13 B/P (30 mbar)
1383/PR (50 mbar)
13+ (28/30/37 mbar)
Electric ignition
To operate the electric ignition, a battery (type AAA, LR02, 1.5 Volt) is required.
Reference regarding temperature display
(Australia 315 G / AUSTRALIA 325 G / AUSTRALIA 415 G / AUSTRALIA 425 G / AUSTRALIA 455 G)
LIGHTING THE MAIN BURNER (AUSTRALIA 315 G / AUSTRALIA 325 G / AUSTRALIA 415 G / AUSTRALIA 425 G / AUSTRALIA 455 G)
- Check that all connections between the gas hose, gas pressure regulator, and gas cylinder are properly tightened. (Follow the instructions in the TIGHTNESS CHECK chapter).
- Open the grill lid. CAUTION: Do not light the grill with the lid closed.
- Open the gas supply on the gas cylinder.
- Press the gas regulator knob and turn it counterclockwise. Press and hold the black ignition button until you get a spark that ignites the gas.
- If the gas does not ignite within 3 seconds, turn the gas regulator knob to the off position. Wait 2 minutes so that the gas can dissipate. Then repeat steps 2 to 4.
- If after the third attempt it is still not possible to light the grill, check possible causes (see the TROUBLESHOOTING section).
- The burners must be activated from left to right.
LIGHTING THE SIDE BURNER (AUSTRALIA 325 G/AUSTRALIA 425 G/AUSTRALIA 455 G)
- Check that all connections between the gas hose, the gas pressure regulator, and the gas cylinder are properly tightened. (Follow the instructions in the chapter TIGHTNESS CHECK).
- Remove the granite lid from the side burner on the AUSTRALIA 455 G, and place it in the holder under the side table. If you are using the AUSTRALIA 325 G or AUSTRALIA 425 G, remove the cover plate from the side burner.
- CAUTION: Do not light the grill while the granite lid/cover plate is in place.
- Open the gas supply on the gas cylinder.
- Press the gas control knob labeled SIDE BURNER, and turn it counterclockwise to the 'ignite' position. Press and hold the ignition button until you get a spark that ignites the gas.
- If the gas does not ignite within 3 seconds, turn the gas control knob to the 'off' position. Wait 2 minutes so that the unignited gas can dissipate. Then repeat steps 2 to 4.
- If after the third attempt it is still not possible to start the side burner, check possible causes (see the section TROUBLESHOOTING).
- When the side burner has cooled down completely, cover it with the granite lid (only for the AUSTRALIA 455 G model) or the cover plate (for the AUSTRALIA 325 G or AUSTRALIA 425 G models).
LIGHTING THE INFRARED BURNER (POWER BURNER ON AUSTRALIA 455 G)
(Australia 315 G / AUSTRALIA 325 G / AUSTRALIA 415 G / AUSTRALIA 425 G / AUSTRALIA 455 G)
DKB Household Switzerland AG | Eggbühlstraße 28 | Postfach | CH-8052 Zurich Switzerland | www.dkbrands.com
AUSTRALIA 315 G/AUSTRALIA 325 G
CE 0063
Gas Propane/butane 30/31
(Australia 315 G / AUSTRALIA 325 G / AUSTRALIA 415 G / AUSTRALIA 425 G / AUSTRALIA 455 G)
- Make sure that all connections between the gas hose, the gas pressure regulator and the gas cylinder are securely fastened. (Follow the instructions in the LEAK TEST section).
- Open the lid of the grill. WARNING: Never light the grill with the lid closed.
- Turn off the gas at the gas cylinder.
- Press in the gas control knob and turn it counterclockwise to the setting. Press the black ignition button and hold it in until the spark ignites and the gas lights.
- If the gas does not ignite within three seconds, turn the gas control knob to the off position and wait two minutes for the unburned gas to dissipate. Then repeat steps 2 to 4.
- If the grill cannot be ignited after three attempts, check the causes (as described in the TROUBLESHOOTING section).
- Use the burners from left to right.
LIGHTING THE SIDE BURNER
(Australia 325 G / Australia 425 G / Australia 455 G)
- Make sure that all connections between the gas hose, the gas pressure regulator and the gas cylinder are securely fastened. (Follow the instructions in the LEAK TEST section).
- Remove the griddle from the side burner on the AUSTRALIA 455 G and place it in the designated holder under the right side shelf of the grill, or open the protective cover on the side burner on the AUSTRALIA 325 G or AUSTRALIA 425 G.
- WARNING: Never light the grill with the griddle or protective cover in place.
- Turn off the gas at the gas cylinder.
- Press in the gas control knob marked "SIDE BURNER" and turn it counterclockwise to the setting. Press the ignition button and hold it in until the spark ignites and the gas lights.
- If the gas does not ignite within three seconds, set the gas control knob to the off position for two minutes while the unburned gas evaporates. Then repeat steps 2 to 4.
- If the side burner cannot be ignited after three attempts, check the causes (as described in the TROUBLESHOOTING section).
- Do not close the side burner with the cast iron lid (only on AUSTRALIA 455 G) or the warming rack (on AUSTRALIA 325 G and AUSTRALIA 425 G) before the grill has cooled completely.
IGNITING THE INFRARED BURNER (POWER BURNER ON AUSTRALIA 455 G)
WARNING: Do not use the infrared burner if the lid is closed.
- Make sure all connections between the gas hose, gas regulator, and gas cylinder are securely fastened. (Follow the instructions in the LEAK TEST section).
- Open the grill lid. WARNING: Never light the grill or place the grill plate over the infrared burner with the lid closed. This could cause damage to the grill lid and deformation of the grill plate.
- Turn off the gas at the gas cylinder.
- Press in the gas control knob marked "POWER BURNER" and turn it counterclockwise to the setting. Press the ignition button and hold it in until a spark ignites and the gas burns.
- If the gas does not ignite within three seconds, set the gas control knob to the off position for two minutes while the unburned gas evaporates. Then repeat steps 2 to 4.
- If the infrared burner cannot be ignited after three attempts, check the causes (as described in the TROUBLESHOOTING section).
THE AUSTRALIAN GRILL SYSTEM FROM OUTDOORCHEF
Australia is known for its great grilling culture. The A-LINE from OUTDOORCHEF is no exception when it comes to grilling. It offers high quality and reliable products. The work surface is large and stands on sturdy wheels that are easy to steer. The cast iron burners retain heat well and distribute it evenly over the grill surface. The built-in thermometer measures the temperature evenly and precisely, and the specially designed spark guard protects the grilled food from burning due to fat drippings.