WBS 20 - Microphone JBSYSTEMS - Free user manual and instructions
Find the device manual for free WBS 20 JBSYSTEMS in PDF.

| Product Type | UHF wireless microphone system (receiver, beltpack, and lavalier microphone) |
| Brand | JBSYSTEMS |
| Model | WBS 20 |
| Frequency band | UHF 863-865 MHz |
| Modulation type | FM |
| Synthesizer | PLL, 16 selectable channels |
| Reception | Diversity (better stability) |
| Receiver power supply | 12 V DC to 18 V DC via power adapter |
| Transmitter power supply | 2 AA batteries (alkaline or rechargeable Ni-MH) per transmitter |
| Receiver audio outputs | Balanced XLR and unbalanced 6.3 mm jack |
| Output levels | Microphone (-20 dB) or Line (0 dB) selectable |
| Squelch adjustment | Adjustable to avoid interfering noise |
| Range | Up to 4-5 systems usable simultaneously |
| Operating temperature | Maximum 45°C |
| Maintenance and cleaning | Soft, slightly damp cloth; avoid volatile products |
| Safety | Indoor use only; do not expose to moisture |
| Repairability | No user-serviceable parts |
| Package contents | WB-10 receiver, WBP-20 beltpack, lavalier microphone, windscreen, clip, jack-jack cable, power adapter |
| General information | Compliant with European standards, R&TTE |
Frequently Asked Questions - WBS 20 JBSYSTEMS
User questions about WBS 20 JBSYSTEMS
0 question about this device. Answer the ones you know or ask your own.
Ask a new question about this device
Download the instructions for your Microphone in PDF format for free! Find your manual WBS 20 - JBSYSTEMS and take your electronic device back in hand. On this page are published all the documents necessary for the use of your device. WBS 20 by JBSYSTEMS.
USER MANUAL WBS 20 JBSYSTEMS
Copyright © 2011 by BEGLEC n.v.
Hofveld 2c - B1702 Groot-Bijgaarden - Belgium
Reproduction or publication of the content in any manner, without express permission of the publisher, is prohibited.

Version: 1.0

THE POWER SOURCE FOR DJ'S


EN- DISPOSAL OF THE DEVICE
Dispose of the unit and used batteries in an environment friendly manner according to your country regulations.
FR-DECLASSER L'APPAREIL
Thank you for buying this JB Systems ^※ product. To take full advantage of all possibilities, please read these operating instructions very carefully.
FEATURES
This unit is radio-interference suppressed. This appliance meets the requirements of the current European and national guidelines. Conformity has been established and the relevant statements and documents have been deposited by the manufacturer.
UHF wireless microphone system
WMS-10; including WMiC-10 hand microphone
WBS-20: including WBP-20 belt-pack and javalier microphone
- Belt-pack and hand microphone can both be used with rechargeable batteries!
- Bell-pack input with line/mic switch: can be used as guitar bell-pack!
Diversity reception for better stability and avoid signal dropouts
- Adjustable squelch for stable reception, free from unwanted noise.
Tone squelch for improved reliability.
16 selectable frequencies via PLL synthesizer: up to 4 to 5 sets can be used together
Antennas on front panel for easy rack mounting
- Optional RP-WMIC' 19' adapter available for rack mounting of 1 or 2 receivers
Balanced XLR and unbalanced jack output
Frequency range: 863-865MHz (free use in most European countries)
BEFORE USE
- Before you start using this unit, please check if there's no transportation damage. Should there be any, do not use the device and consult your dealer first.
- Important: This device left our factory in perfect condition and well packaged. It is absolutely necessary for the user to strictly follow the safety instructions and warnings in this user manual. Any damage caused by mishandling is not subject to warranty. The dealer will not accept responsibility for any resulting defects or problems caused by disregarding this user manual.
- Keep this booklet in a safe place for future consultation. If you sell the fixture, be sure to add this user ma
nual. To protect the environment, please try to recycle the packing material as much as possible.
Check the contents:
Check that the carton contains the following items:
- User manual
1x WB-10 diversity receiver
1x monq jack/jack cable
-1x mains DC power adapter
- WMS-10 system 1xWMIC-10 wireless mic
WBS-20 system 1x WBS-20 belt pack + Lavalier mic + windscreen + tie-clip
ENGLISH OPERATION MANUAL
SAFETY INSTRUCTIONS:

CA
PICK OF 15 FOTDCHQ
RISK OF ELECTRICS DO NOT OPEN

CAUTION: To reduce the risk of electric shock, do not remove the top cover. No user-serviceable parts inside Refer servicing to qualified service personnel only.
The lightning flash with arrowhead symbol within the equilateral triangle is intended to alert the use or the presence of un-insulated "dangerous voltage" within the product's enclosure that may be of sufficient magnitude to constitute a risk of electric shock.
The exclamation point within the equilateral triangle is intended to alert the user to the presence of important operation and maintenance (servicing) instructions in the literature accompanying this appliance.

This symbol means:indoor use only
This symbol means: Read instructions
This symbol means: Safely Class II appliance
To prevent fire or shock hazard, do not expose this appliance to rain or moisture.
- To avoid condensation to be formed inside, allow the unit to adapt to the surrounding temperatures when bringing it into a warm room after transport. Condense sometimes prevents the unit from working at full performance or may even cause damages.
This unit is for indoor use only.
- Don't place metal objects or spill liquid inside the unit. No objects filled with liquids, such as vases, shall be placed on this appliance. Electric shock or malfunction may result. If a foreign object enters the unit, immediately disconnect the mains power.
No naked flame sources, such as lighted candles, should be placed on the appliance.
Prevent use in dusty environments and clean the unit regularly
- Keep the unit away from children.
- Inexperienced persons should not operate this device.
Maximum save ambient temperature is 40^ . Don't use this unit at higher ambient temperatures.
Always unplug the unit when it is not used for a longer time or before you start servicing.
- The electrical installation should be carried out by qualified personal only, according to the regulations for electrical and mechanical safety in your country.
- Check that the available voltage is not higher than the one stated on the rear panel of the unit.
The Mains socket inlet shall remain operable for disconnection from the mains.
- In order to avoid a hazard, the unit shall only be used with the AC-adaptor delivered with it. If the AC-adaptor is damaged, a same model adaptor shall be used only.
No user serviceable parts inside.
- In the event of serious operating problems, stop using the appliance and contact your dealer immediately
- Please use the original packing when the device is to be transported.
Due to safety reasons it is prohibited to make unauthorized modifications to the unit.
- Take out the battery from transmitter, if the appliance has been not used for a longer period. This will avoid the damage resulting from a defective leaking battery.
ECC STATEMENT
This device complies with part 15 of the FCC rules. Operation is subject to the following two conditions:
This device may not cause harmful interference
This device must accept any Interference received, including interference that may cause undesired operation.
The changes or modifications not expressly approved by the party responsible for compliance could void the user's authority to operate the equipment.
IMPORTANT NOTE: To comply with the FCC RF exposure compliance requirements, no change to the antenna or the device is permitted. Any change to the antenna or the device could result in the device exceeding the RF exposure requirements and void user's authority to operate the device.
ENGLISH OPERATION MANUAL
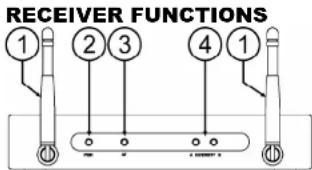
- Antennas: Fixed-length UHF antennas permanently mounted on the front panel. Put these in vertical position during use.
- Power Indicator: The indicator LED lights when the receiver is ready to operate. 3. 4F Indicator: The indicator light to indicate that an active signal is present.
- AF Indicator: The Indicator lights to indicate that an audio signal is received.
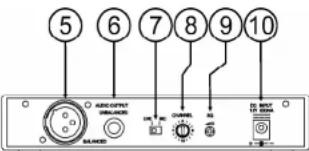
- Diversity AC B indicators: These LEDs light to show which antenna currently receives the RF Signal. 5. Balanced Output: 3-pin XLR connector provides balanced low-impedance output. If your audio mixer is equipped with a balanced input, it's better to connect the receiver using this XLR-output. Don't forget to set the micline switch (7) in the desired position.
- Unbalanced Output: Unbalanced 6.3mm mono jack audio output. Can be used to connect a guitar amplifier or any other unbalanced audio mixer input. Don't forget to set the micline switch (7) in the desired position.
- MicLine Switch: used to select the output level of the XLR balanced connector or 6.3mm unbalanced phone jack. It can be set for microphone (-20dB) or line-level (0dB).
- Channel Selector: Use this rotary switch to choose one of the 16 available channels. Note that the selected channel on the receiver should always be identical to that of the transmitter (hand mic or belt).
- Squelch Adj.: to prevent unwanted and disturbing noises, the squelch mutes the audio output of the receiver when the detected RF-signals of the are too weak. With the squelch control you can determine the minimum RF-signal level before audio output is not suppressed anymore. Setting the squelch too high will reduce the range (max. distance) of the system. The squelch is already set in the factory so normally you don't need to change it. If you should adapt the squelch level for any reason, please set it in minimum before turning the receiver on and then slowly adjust using trial and error method.
- DC IN: DC input connector for the supplied AC adapter.
HANDHELD MICROPHONEFUNCTIONS
-
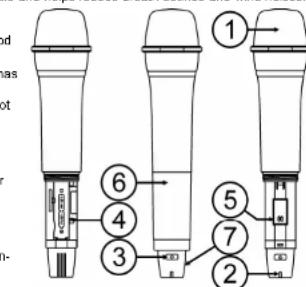
Grille: Protects the unidirectional microphone capsule and helps reduce breath sounds and wind noises.
-
Low Battery LED: this LED indicates the battery life status. When the transmitter is switched ON,
-
LED is permanently on: the battery is still in good condition.
LED flashes quickly: indicates that the battery has insufficient power and should be changed soon. -
LED fails to light: the battery is either dead or not positioned correctly. You should correct the positioning or change the battery.
-
On/off Switch: press this button several seconds to turn transmitter power on/off.
-
Battery Compartment: Insert two AA rechargeable or dry (Alkaline) batteries into the compartment. Make sure that the polarity of batteries is correct.
- Channel Selector: Use this rotary switch to choose one of the 16 available channels. Note that the selected channel on the receiver should always be identical to that of the transmitter.
- Battery Cover: unscrew it gently and slide it down to open the battery compartment or have access to the channel selector (5).
- Antenna: Built-in high gain helical antenna
ENGLISH OPERATION MANUAL
BELT PACK FUNCTIONS
-
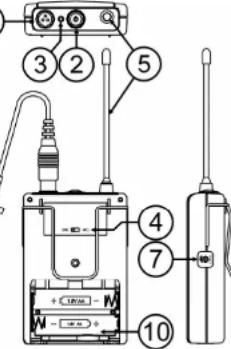
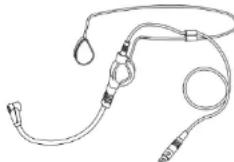
Mini XLR Connector: The included electret lavalier microphone (or optional headset) is inserted into
-
On/Off Switch: press this button several seconds to turn transmitter power on/off
- Low Battery LED: this LED indicates the battery life status. When the transmitter switched ON:
LED is permanently on: the battery is still in good condition.
- LED flashes quickly: indicates that the battery has insufficient power and should be changed soon.
- LED fails to light: the battery is either dead or not positioned correctly. You should correct the positioning or change the battery.
-
MICLINE switch: used to change the sensitivity or the mini XI R-input (1):
-
MIC: use this position when a headset or laybarter microphone is connected.
LINE: use this position when a line level unit (guitar, instrument, audio player,...) is connected. -
Antenna: Permanently connected helical antenna.
-
Channel Selector: Use this rotary switch to choose one of the 16 available channels. Note that the selected channel on the receiver should always be identical to that of the transmitter.
- Gain control: first set the desired input level to mic or line (4). After this you can further fine-tune the input sensitivity to avoid signal overload (distortion).
- Lavaleri Microphone: unidirectional condenser type, this discretely worn mic can be used to amplify all kinds of sounds. (ex: enhance the voice of a teacher or speaker). This lavaler mic is made from 300 microphones (model code: 427) and 300 microphone" (order code: 427), often used for aerobics etc.
- Tie Clip: used to clip the lavalier on the tie or lapel of a person.
- Battery Compartment: Insert two AA rechargeable or dry (Alkaline) batteries into the compartment. Make sure that the power supply is turned off.
- Battery Cover: unscrew it gently and slide it down to open the battery compartment or have access to the channel selector (5).
INSTALLATION GUIDELINES:
Install the receiver in a ventilated location where it will not be exposed to high temperatures or humidity.
- Placing and using the unit for long periods near heat-generating sources such as amplifiers, spotlights, etc. will affect its performance and may even damage the unit.
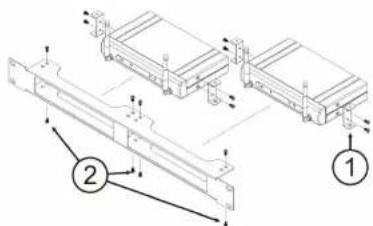
- The unit can be mounted in 19-inch racks: for this purpose a special 19^ adapter (RP-WMIC) is available, see below.
- When installed in a booth or flight case, please make sure to minimize shocks and vibrations during transport.
- To avoid condensation to be formed inside, allow the unit to adapt to the surrounding temperatures when bringing it into a warm room after transport. Condense sometimes prevents the unit from working at full performance.
- Also check the extra notes in the chapter 'SETUP and CONNECTIONS'
ENGLISH OPERATION MANUAL
INSTALLING THE RECEIVER:
Standalone: You can use the receiver standalone; just put both antennas in vertical position and connect the receiver as described in the chapter "connections".
In a 19^ rack: you can install one or two receivers in a 19^ rack, using an optional "RP-WMIC" adapter:
-
Install 2 pieces ear short racks on both side sides of recess
-
Install the receiver inside the 19^ metal rack adapter by screwing the ear short racks.
SETUP AND CONNECTIONS
Some important notes before we start!
- One receiver can only be used with one transmitter (handheld mic I bell pack). Using 2 or more transmitters simultaneously with the same receiver is impossible: this will result in a lot of interference and trouble!
- Receiver and transmitter should always use the same channel setting (frequency)!
The distance between receiver and transmitter should at least be 1 meter. - To minimize interferences install the receiver away from big metal surfaces/objects. TV and other wireless appliances.
Try to minimize the number of obstructions (thick concrete walls, big metal objects,...) in the path between the transmitter and receiver. - Up to 4 or 5 transmitters can be used simultaneously on condition that each has its own receiver!
RECEIVER - AUDIO CONNECTIONS
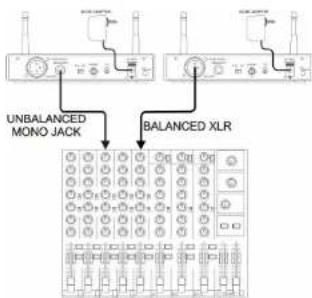
First determine which audio inputs are available on your mixer, next decide how to connect the receiver.
- To a balanced MIC-input of the audio mixer: close the gain of the mixer input and set the micline switch on the receiver (7) to MIC. Use an XLR/XLR cable to connect the receiver "XLR-output (5)". Switch the transmitter (hand mic/belt pack) on and bring the input gain of the mixer slowly up.
To a balanced LINE-input of the audio mixer: close the gain of the mixer input and set the micline switch on the receiver (7) to LINE. Use an XLR/XLR cable to connect the receiver "XLR-output (5)". Switch the transmitter (hand mic/belt pack) on and bring the input gain of the mixer slowly up.
To an unbalanced MIC-input of the audio mixer: close the gain of the mixer input and set the micline switch on the receiver (7) to MIC. Use the supplied JACK/JACK cable to connect the receiver "JACK-output (6)". Switch the transmitter (hand mic/belt pack) on and bring the input gain of the mixer slowly up.
To an unbalanced LINE-input of the audio mixer
or hifi stereo set: close the gain of the mixer input and set the mic/line switch on the receiver (7) to LINE. Use the supplied JACK/JACK cable to connect the receiver "JACK-output (6)". Switch the transmitter (hand mic/bell pack) on and bring the input gain of the mixer slowly up.
NOTE: never use the balanced and unbalanced outputs together, this will results in signal loss and increased noise.
ENGLISH OPERATION MANUAL
WIRELESS HAND MIC-SETUP
- Switch the Receiver on and select a channel
- Open the battery compartment and insert two AA batteries (alkaline or fully charged Ni-MH type).
- Select exactly the same frequency channel (5) as on the receiver.
- Press the power switch (3) for some seconds: one of the diversity LEDs (4) on the receiver should be lit to indicate that the RF-signal of the transmitter is captured.
- Speak through the mic; the AF indicator (3) will flash to the rhythm of your voice.
- While checking the system, walk around to check if you encounter any dead spots (no reception): in these cases, try to change the position of the receiver.
BELT PACK-SETUP
- Switch the Receiver on and select a channel.
- Open the battery compartment and insert two AA batteries (alkaline or fully charged Ni-MH type).
- Select exactly the same frequency channel (6) as on the receiver.
- Connect the lavafier microphone or optional headset mic and put the MIC/LINE switch (4) on the belt pack to MIC.
- Alternatively you can also connect a line audio signal (ex. Guitar), in that case you should put the MIC/LINE switch (4) on the belt pack to LINE.
- Press the power switch (2) for some seconds: one of the diversity LEDs (4) on the receiver should be lit to indicate that the RF-signal of the transmitter is captured.
- Speak through the mic: the AF indicator (3) will flash to the rhythm of your voice.
If needed, you can still fine-tune the audio level with the gain knob (7).
While checking the system, walk around to check if you encounter any dead spots (no reception): in these cases, try to change the position of the receiver.
SEVERAL SETS WORKING TOGETHER - SETUP NOTES
Even if the transmitters and receiver have 16 channels, you cannot use 16 wireless systems together: depending on the situation you will be able to use maximum 4 or 5 sets together.
While setting up more than one system, you should choose different channels for each set. It's important that you never choose consecutive channels. Instead try to divide the channels evenly over the 16 possibilities:
Example1: mic1 = CH1 - mic2 = CH3 - mic3 = CH5 - mic4 = CH7
Example2: mic1 = CH1 ~ mic2 = CH3 ~ mic3 = CH14 ~ mic4 = CH16
Example3:mic1 CH9 mirc2 = CH11 mirc3 = CH14 mirc4 = CH16 Example4:mic1 CH1 mirc2 CH5 mirc3 CH11 mirc4 = CH16
-
First setup one system and leave it switched on. (see above for more information)
-
Setup the second system and check if it interferes with the first one (unwanted buzz noises etc.). In case of interferences, select another channel for your 2" set and try again until everything works well and leave the set switched on.
For the 3 set, just repeat what you did for set2 until all 3 sets can work together.
TROUBLESHOOTING
Problem
No sound Check the power supply of the microphone and receiver.
- Check that the transmitter and receiver are tuned to the same channel (frequency).
Check if the hi-fi appliance or audio mixer is switched on and the receiver output is
connected to audio desired input. Mixer: is the gain open?
- Check if the transmitter is too far away from the receiver or SQUEELCH control is set too high.
- Check if the receiver is located near a large metal object or if there are large obstructions (ex. large metal object or thick wall) between transmitter and receiver.
Sound interference Check the antenna location.
- When using 2 or more microphone sets simultaneously, make sure that the selected channels don't interfere: select another channel pair on one of the sets.
- Check whether the interference comes from other wireless microphones, TV, radio, PC, etc.
Distortion Check if the receiver volume level is set too high or too low.
- Check if the mic/line switch and gain volume on the belt pack are correct.
- Check if the interference comes from other wireless microphones, TV, radio, PC, etc.
ENGLISH OPERATION MANUAL
CLEANING THE APPLIANCE:
Clean by wiping with a polished cloth slightly dipped with water. Avoid getting water inside the unit. Do not
use volatile liquids such as benzene or thinner which will damage the unit.
DECLARATION OF CONFORMITY
RECEIVER: R&TTE Declaration of Conformity
We, Baglac Nv,declare under our sole responsibility that the product
Brand:JB Systems
Product Group: Wireless Receiver
Model
Meets the essential requirements as described in the R&TTE directive, based on the following standards applied:
EN300422-2:9122(2008-03)EN571655-1:12345(2008-03)
EN301489-01V1.8.1(2008-04)
EN301489-09V1.4.1(2007-11)
Full test reports and other relevant information remain at the disposal of the Control Agencles at our head office:
Beglecc NV - t Hofveld 2c - B1702 Grbot-Bijsarden - Belgium
Credible date: July 7, 2019
Grob-Bilgander, July 25th 2009
For Bejec Nv,
C


WIRELESS HAND MICRO:R&TTE Declaration of Conformity
We, Degtec NV,declare under our sole responsibility that the product
Brand:JB Systems
Product Group: Wireless Transmitters
Maein:W
Meats the assaral requirements as described in the RATTE directive, based on the following standards applied
EN300422-2:V1.2.2(2008-03)
EN301489-01V1.8.1(202B-04)
EN301489-08V1.A.1(2007-11)
EN500852002+A1:2006+A1:2008
Full test reports and other relevant information remain at the disposal of the Control Agencles at our head office
Beglec NV T Holveld 2c B1702 Groot-Bogaarden Belgium
Groot-Bilgearden, July 25th 2009
For Beglec NV, VOOR BEGLEC NY
Lnc Dc E
Director


WIRELESS BELT PACK: R&TTE Declaration of Conformity
We, Seglec NV, declare under our sole responsibility that the product
Brand:J
Product Group: Wireless Transmission
Model: WBP-20
Meets the essential requirements as described in the R&TTE directive, based on the following standards applied:
EN300422-2:V1.2(20B-03)
EN301489-01V1.8.1(2006-04)
EN361489-09V1.4.1(2007-11)
EN 800852002+A1:2006+A11:2006
Full test reports and other relevant information remain at the disposal of the Control Agencies at our head office
Beglae NV - t Hofvald 2c - B1702 Groot-Bilgaarden - Belgium
Groot-Bijgearden, July 25th 2009
For Boglc NV, VOOR BEGLIC NY
Lg De Bov


NOTE:
WMS-10 wireless set contains: 1pc WMIC-10 + 1pc WR-10
WBS-20 wireless set contains: 1pc WBP-20 + 1pc WR-10
ENGLISH OPERATION MANUAL
SPECIFICATIONS
RECEIVER
Carrier Frequency Range:
Frequency Stability:
Receiving Sensitivity
Image and Spurious Rejection:
Modularity Modularity
Modulation of
Receiver type:
IF Frequency:
Tone Signal:
2
S/N ratio
AF Response:
THD:
Power Supply:
Audio Output:
Current supply:
HANDHELD MIC / BELT PACK TRANSMITTER
Carrier Frequency Range:
RF Power Output
Oscillation Mode:
Frequency Stability:
Frequency Stability: Maximum Deviation
Maximum Deviation
Spurious Emission:
T.H.D.
Microphone Capsule:
Tone Signal:
Battery:
m - 1 0 ;
Current consumption:
UHF band
+0.005%
@5:V6Nl#tio
2014年/6月27日星期五
80 dB minimum
50dB
EM
PM
PLL synthesized, switching diversity
15:243.95MHz-2 10.7MHz
32.768KHz
014B@30kHz deviation & 60-XY antenna input
90Hz至15kHz(1/3D)
80A2 to 15kA2(+3dB)
Less than 1,0% (at 1kHz)
DC 12V ~ 18V
Balanced & unbalanced outputs (Mic. = -20dB / Line = 0dB)
139mA=19mA
UHF band
10mW (max.)
PLI synthesized, 16Channel selectable.
+0.005%
2011年1月16日
±20kHZ with limiting compression
60dB below carrier frequency 1.0% + 4.1%
<1.0% (at 1KHZ)
Handheld: uni-directional dynamic
Layalier: uni-directional electrical condenser unit
32.768 kHz
PG 2V(7x1.5)(AA size,alluring battery)OP
DC 3V (2x1.5VA size alkaline batteries) OR DC 4A (1/2x1.5A zinc phosphate battery)
DC 2.4V (2x1,2V AA size rechargeable battenes) 100mA-10mA@2V
120HA=10HA@3V
Every information is subject to change without prior notice.
You can download the latest version of this user manual on our website: www.beglec.com
FRANCAIS MODE D'EMPLOI
MODE D'EMPLOI
Nousyouremarcionsd'avoichetécdeproultJBSystems 4. Veuliezleirecmeode meploitrés attentivementafaindepuovolexploretdouteslespotibilitiesdecepatrail.
EN VOUS INSCRIVANT POUR LA LETTRE D'INFORMATION VOUS SEREZ TOUJOURS TENU AU COURANT DES DERNIERES NOUVELLES CONCERNANT NOS PRODUITS: NOVUEAUTÉS, ACTIONS SPECIÉS, JOURNÉES PORTES OUVERTES, ETC. SURFEZ SUR: WWW.BEGLEC.COM
CHARACTERISTIQUES
Rejection image or parasite
Selectivity
2458, @ 20k12 (Deviation) @ 60pV (Entire antenna)
de 60 H2 a 15 KH2 (13 GB)
18/44 WMS-10 + WBS-20 Wireless system
NEDERLANDS HANDLEIDING
WMS-10 system 1x WMIC-10 draadloze microfoon
WBS-20 system 1x WBS-20 belt pack ^+ Lavalier microfoon ^+ windschem ^+ dasklem
VEILIGHEIDSVOORSCHRIFTEN:

CAUTION
RISK OF ELECTRIC SE

11702 GooB-BinggaiGeng
Gross-Biasedp.25 July 2009
Voor Begec NY.
L
Directors
ALIEMIRI BENOIN
DRAADLOZE HANDMICROFOON:R&TTE conformiteitverklaring
Wii verklaen oder once eisen venerntworselflied dat het prodct.
Mark:JB Systems
Productos: Pssioy zond
Mate n:WM/C-10
GraB-BiJaardan, 25 Jul 2009 VOOR INELGXN
Voor Begec Nv.
L
Director
31 + u + 4q = 1 + u + uq dH
Loo De Penee
Aegemnglge Bostnade
DRAADLOZE BELT PACK:R&TTE conformiteitverklaring
Gron-Bjgaarden, 25 Jul 2009
Voor Begec N
Luc De Baeuw
Director
VOOR BEGILC NY
31 + u + 4q = 1 + u + uq dH
1
Liu De Chen
Algebraic Number Theory
NOTA:
Frequencytestabltet:
0.005%2.516.074.398.07
@5μV SIR verhouding >80dB
minimum 80 dB
50dB
M
PM 1
PLL synthesized, switching diversity
1st:243.95MHz\~2nd:10.7MHz
32.768KHz
94dB. @ 30kHz pfwijkna & 6Dv npnne npnnn
- @ 20KZ AWJIKG & 60V antenna ingang
80H2 to 15KH2 (±30B)
Minder dan 1.0% (op 1kHz)
DG 12V-18V
Symmetrisch & asymmetrisch (Mic = -20dB / Line = 0dB)
172mA-10mA
130mA= 10mA
HANDMICROFOON / BELT PACK ZENDER
PI L synthesized, 16 kanaole
PCL synlized, to Kanlen
0.005%
-20kHz
Handmicrofcon: uni-directional dynamics
Handicloob: dir-directional dynamics
Lavantir. 11-15000000000000000000000000000000000000000000000000000
32,786 KH2DQ 10
DC3V(2x1,5VAAalkalinebatterijen)OF
DC 2.4V (2x 1.2V AA herlaadbare batterijen)
120mA= 10mA @3V
EN 30148408V1.1[2007-11]
EN3014901V19.1[2008-04]
EN3140049V12.1[967.1]