
G310 - Sharpener BUFFALO - Free user manual and instructions
Find the device manual for free G310 BUFFALO in PDF.
Frequently Asked Questions - G310 BUFFALO
User questions about G310 BUFFALO
0 question about this device. Answer the ones you know or ask your own.
Ask a new question about this device
Download the instructions for your Sharpener in PDF format for free! Find your manual G310 - BUFFALO and take your electronic device back in hand. On this page are published all the documents necessary for the use of your device. G310 by BUFFALO.
USER MANUAL G310 BUFFALO
Electric Knife Sharpener
NL Elektrische messenslijper
Cleaning, Care & Maintenance 3
Empty Magnetic Catch Plate 4
Troubleshooting 4
Technical Specifications 4
Electrical Wiring 5
Compliance 5
NL
Inhoudsopgave
Veiligheidstips 6
Inleiding 6
Verpakkingsinhoud 6
Bediening 7
Specifications techniques 14
Raccordement electrique 15
Conformité 15

Inhalt
- Position on a flat, stable surface.
- A service agent/qualified technician should carry out installation and any repairs if required. Do not remove any components on this product.
- Consult Local and National Standards to comply with the following:
Health and Safety at Work Legislation
BS EN Codes of Practice
Fire Precautions
- IEE Wiring Regulations
Building Regulations
- DO NOT place hands near sharpening channels when in use.
- DO NOT sharpen scissors or any blade that does not fit freely in the sharpening channels.
- DO NOT place wet blades in the sharpening slots.
DO NOT immerse the appliance in water. - DO NOT attempt to sharpen blades thicker than 3mm .
- Suitable for indoor use only.
- Always switch off and disconnect the power supply to the appliance when not in use.
- Keep all packaging away from children. Dispos of the packaging in accordance to the regulations of local authorities.
- If the power cord is damaged, it must be replaced by an BUFFALO agent or a recommended qualified technician in order to avoid a hazard.
Introduction
Please take a few moments to carefully read through this manual. Correct maintenance and operation of this machine will provide the best possible performance from your BUFFALO product.
Pack Contents
The following is included:
- BUFFALO electric knife sharpener
- Instruction manual
BUFFALO prides itself on quality and service, ensuring that at the time of packaging the contents are supplied fully functional and free of damage.
Should you find any damage as a result of transit, please contact your BUFFALO dealer immediately.
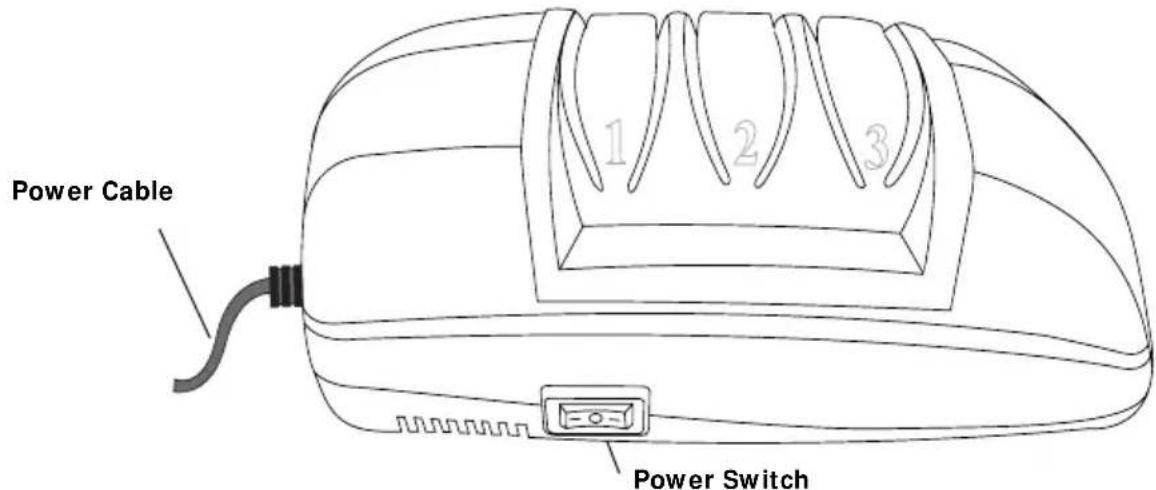
Operation

Note: The BUFFALO Knife Sharpener automatically adjusts to accommodate varying thicknesses of blade.
Sharpening Tips
- Apply light pressure to the blade when sharpening for best results.
- Pull the blade in a single, smooth motion.
- To sharpen the tip of the blade, pull the handle up at the end of the pulling motion.
- Always alternate between the left and right slots of any sharpening stage.
- Always keep the blade level.

Note: Ensure that knife blades are clean and dry before sharpening.
Sharpening Stage I
Use for blades with a very blunt edge.

Note: Stage 1 is NOT suitable for serrated blades.
-
Connect the sharpener to a mains power supply.
-
Turn the power switch to 'I' (left or right).
-
Hold the handle of the knife firmly and place the blade hilt in the left sharpening slot of Stage 1.
-
Apply enough pressure for the knife to make contact with the sharpening wheel.
-
Pull the blade back to the tip in a smooth motion. Do not twist or rock the blade.
-
Repeat this process for the right sharpening slot of Stage 1.

Note: As a guide, each pull for a 6 inch blade should take 2-3 seconds. An 8 inch blade should take 4 seconds and longer blades 6+ seconds.
Sharpening Stage 2

Note: Stage 2 is NOT suitable for serrated blades.
Use for blades that are slightly dull, or as the next step after Sharpening Stage 1.
- Repeat steps 3-6, using Sharpening Stage 2.
- Visually examine the blade edge. If it is still slightly blunt then one edge may appear rough.
Sharpening Stage 3
Use for serrated blades or to achieve a razor sharp edge after stages 1 and 2.
- Repeat steps 3-6, using Sharpening Stage 3.

Note: 1-2 pulls on each side of Stage 3 is normally sufficient, though more pulls will achieve a finer edge.
Serrated Blades
I. Hold the handle of the knife firmly and place the blade hilt in the left sharpening slot of Stage 3.
2. Apply enough pressure for the knife to make contact with the sharpening wheel.
3. Pull the blade back to the tip in a smooth motion. Do not twist or rock the blade.
4. Repeat this process for the right sharpening slot of Stage 3.
5. 5 to 10 alternating pulls should be sufficient to achieve a sharp edge.

Note: If the serrated blade is very blunt, one quick pull in both slots of Sharpening Stage 2 can be used prior to Stage 3.

WARNING: Excessive use of Stage 2 can damage the serrations of your blade.
Cleaning, Care & Maintenance
- Always turn off and disconnect the appliance from the power supply before cleaning.
- Use soapy water and a damp cloth to clean the exterior of the appliance.
- Dry thoroughly after cleaning.
Empty Magnetic Catch Plate
The BUFFALO Knife Sharpener features a magnetic catch plate that collects any metal filings created as a result of the sharpening process.
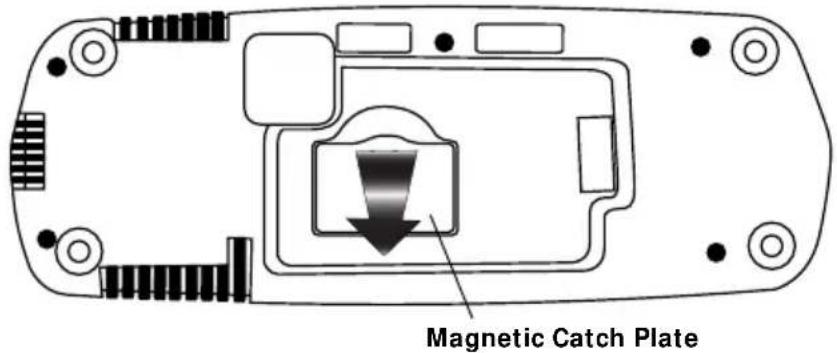
To empty the magnetic catch plate:
- Turn off and disconnect the appliance from the power supply.
- Turn the appliance over to expose the bottom.
- Remove the catch plate and wipe clean with a damp paper towel.
- Shake out any remaining filings from the appliance and replace the catch plate.
Troubleshooting
| Fault Probable Cause Action | ||
| The unit is not working | The unit is not switched on Check the unit is plugged in correctly and switched on | |
| Plug and lead are damaged Call BUFFALO agent or qualified technician | ||
| Fuse in the plug has blown Replace the plug fuse | ||
| Power supply Check power supply | ||
| Internal wiring fault Call BUFFALO agent or qualified technician | ||
| The knife is not sharpening | Insufficient pressure applied to the knife | Apply more pressure to the knife |
| Sharpening wheels are worn Call BUFFALO agent or qualified technician | ||
Technical Specifications
| Model | Voltage | Power | Current | Weight | Dimensions h x w x d mm |
| G310 | 230V 50Hz | 80W | 0.35A | 2kg | 110 x 330 x 110 |
Electrical Wiring
This appliance is supplied with a 3 pin, moulded, BS1363 plug and lead, with a 13 amp fuse as standard.
The plug is to be connected to a suitable mains socket.
This appliance is wired as follows:
Live wire (coloured brown) to terminal marked L
- Neutral wire (coloured blue) to terminal marked N
- Earth wire (coloured green/yellow) to terminal marked E
This appliance must be earthed, using a dedicated earthing circuit.
If in doubt consult a qualified electrician.
Electrical isolation points must be kept clear of any obstructions. In the event of any emergency disconnection being required they must be readily accessible.
Compliance
BUFFALO parts have undergone strict product testing in order to comply with regulatory standards and specifications set by international, independent, and federal authorities.
BUFFALO products have been approved to carry the following symbol:

Veiligheidstips
Specifications techniques
| Modèle | Tension Puissance Courant | Poids | Dimensions h x l x p mm | |
| G310 | 230V 50Hz | 80W | 0,35A | 2kg |
| 110 x 330 x 110 | ||||
BUFFALO Telephone Helpline: +44 (0)845 146 2887
BUFFALO, Fourth Way, Avonmouth, United Kingdom, BS11 8TB