Go! Evolution - Car seat Foppapedretti - Free user manual and instructions
Find the device manual for free Go! Evolution Foppapedretti in PDF.
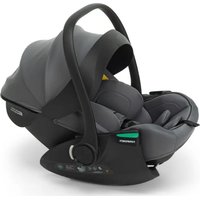
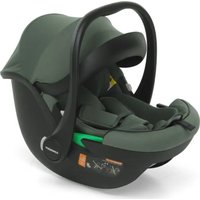
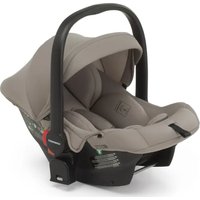
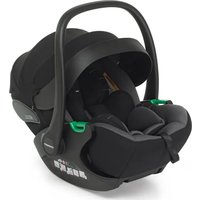
| Product Type | Child car seat, Group 0-1 (0-18 kg) |
| Brand | Foppapedretti |
| Model | Go! Evolution |
| Dimensions (approx.) | Height: 65 cm, Width: 45 cm, Depth: 40 cm |
| Weight (approx.) | 5.5 kg |
| Power supply | Not applicable (restraint device) |
| Regulatory compliance | Approved according to UN/ECE R44/04 regulation |
| Rear-facing use | For children from 0 to 10 kg (from birth to about 1 year) |
| Forward-facing use | For children from 9 to 18 kg (from about 1 to 4 years) |
| Installation | On seat equipped with an approved 3-point safety belt |
| Recline adjustment | Yes, via lever under the front of the seat |
| Safety harness | 5-point harness, height adjustable on 4 positions |
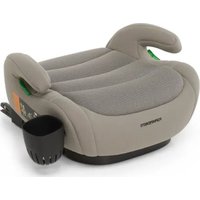
| Reducer cushion | Included for newborns |
| Pillow | Included for comfort |
| Care and cleaning | Removable cover, clean with damp sponge and soapy water. Do not machine wash, do not use bleach, do not iron, do not tumble dry |
| Safety precautions | Do not use on seat with front airbag. Always fasten the harness. Check regularly for wear |
| Spare parts available | Covers, harnesses, buckle, cushions and accessories available from consumer service |
| Accessories supplied | Blue locking clip (rear-facing), red locking clip (forward-facing), belt guides |
| General information | Manual available in French and other languages. Free download at notice-facile.com |
Frequently Asked Questions - Go! Evolution Foppapedretti
User questions about Go! Evolution Foppapedretti
0 question about this device. Answer the ones you know or ask your own.
Ask a new question about this device
Download the instructions for your Car seat in PDF format for free! Find your manual Go! Evolution - Foppapedretti and take your electronic device back in hand. On this page are published all the documents necessary for the use of your device. Go! Evolution by Foppapedretti.
USER MANUAL Go! Evolution Foppapedretti
GB CAR SEAT - Assembly instructions
Complies with ECE R44-04
E ASIENTO DE COCHE - Manual de instrucciones
Conforme a la Norma ECE R44-04
Thank you for purchasing this Group 0-1 car seat. If you require assistance with this product or if you wish to change an accessory, please contact our customer service department (see details on reverse).
SAFETY INSTRUCTIONS
PLEASE READ THESE INSTRUCTIONS CAREFULLY BEFORE BEGINNING THE INSTALLATION. IF THE SEAT IS NOT INSTALLED CORRECTLY, YOUR CHILD'S SAFETY MAY BE AT RISK. DO NOT USE THIS CHILD SEAT ON A PASSENGER SEAT Fitted WITH AN AIR BAG!
The seat may be installed in a front-facing or rear-facing position with a 3-point safety belt to UN/ECE No.16 standard or equivalent. Do not use it on side-facing or rear-facing seats. Always remember to fasten and correctly adjust the child's harness and never start the car without first checking that the seat is properly fixed to the passenger seat as shown in these instructions. It is important to check that the straps of the seat belt are fully tightened and that the harness lap strap is positioned as low as possible to support your child's pelvis. Check that the seat belt and harness straps are not twisted. For maximum protection, there must be no slack between the car seat and the passenger seat. Please refer to the method recommended in these instructions. The seat must not be modified in any way and no elements should be added. It is recommended that you replace this car seat if it has been subjected to a severe impact following an accident or in case of wear. You should regularly check that the harness is not showing signs of wear; check in particular the harness points, the seams and the adjustment devices.
Never leave your child unattended in the seat. Check that no part of the seat is trapped in the door or in a fold-down passenger seat. If your car has a fold-down rear seat, check that it is correctly locked in the vertical position. Direct exposure to the sun increases the temperature inside vehicles. For this reason, you are advised to cover the child's car seat when not in use in order to prevent the elements, in particular the fixations, from getting hot and burning the child. Do not use your car seat without its cover and only replace it with a cover that has been recommended by the manufacturer. In an emergency, the child must be able to be freed quickly. The buckle, which can be easilyopened, must therefore not be covered. Teach your child not to play with the buckle. Always remember to check that there are no scraps of food or other remains in either the harness buckle or the central adjuster. Luggage and other heavy or sharp objects must be fixed down in the car. Objects that are not attached may injure a child in the event of an accident. In winter, make sure that the child is not wearing over-bulky clothes.
YOUR GROUP 0-1 CAR SEAT (1)
This seat is classified as group 0/1 for children from 0 to 18kg (birth to 4 years approx.)
- Shell + cover
- Harness + shoulder pad (x2)
- Adjuster (x2)
- Adjustment strap (x2)
- Harness buckle
- Base
- Blue lock-off clip (for rearward facing use only)
- Infant reducer cushion
- Pillow
- Diagonal belt guides (x2 - for rearward facing use only)
- Red belt lock-off (x2 - for diagonal belt (forward facing use only)
- Lap belt guides (x2 - for forward facing use only)
- Lap belt guides (x2 - for rearward facing use only)
- Seat reclining lock
ADJUSTING THE HARNESSES
Make sure that the harness of your car seat is adapted to the height of your child before starting to install the seat in your car. The harnesses can be adjusted to 4 different heights and must be positioned as close as possible to your child's shoulders (2).
- The two lower positions are ONLY intended for use in group 0, for a child weighing from 0 to 10kg in a rear-facing position. If your child's shoulders are between two levels in a rear-facing configuration, choose the lower of the two.
- The two upper positions are ONLY intended for use in group 1, for a child weighing from 9 to 18kg in a front-facing position. If your child's shoulders are between two levels in front-facing configuration, choose the higher of the two.
To adjust the height of the harnesses, remove the upper section of one of the harness straps by pivoting the metal anchor located behind the back rest and then pulling it through the slots of the shell and cover (3). Repeat the operation on the upper section of the second strap.
Feed the ends of the harness straps through the slots at identical level in both the cover and the shell, according to the chosen configuration:
- For a rear-facing configuration (Gr. 0, from 0 to 10kg ), the harnesses are fed through one of the two lower positions and then up to the third position to be secured inside the shell (4) (5). Make sure that the metal anchor is correctly positioned and that the ends
of the harness straps are not twisted.
IMPORTANT: Whichever of the two lower positions you have chosen, make sure that the metal anchors of the harnesses are well secured through the slots of the third position of the shell.
- For a front-facing position (Gr. 1, from 9 to 18kg ), the harnesses are fed through one of the two upper positions and are secured directly behind the position chosen, at the back of the shell (6) (7). Make sure that the metal anchor is correctly positioned and that the ends of the harness straps are not twisted.
THE CORRECT TYPE OF SAFETY BELT TO USE WITH YOUR CAR SEAT
Your car seat must ONLY be installed on a passenger seat fitted with a 3-point safety belt. NEVER install your car seat on a passenger seat fitted with a 2-point safety belt! (i - 0-10 kg) (i - 9-18kg).
REARWARD FACING USE (0 - 10 kg)
DO NOT USE THIS CHILD SEAT ON A PASSENGER SEAT Fitted WITH AN AIR BAG!
When used rearward facing, the child seat must be in the fully reclined position.
Pull lap and diagonal sections of the car seat belt until fully extended and feed both through the space between the shell and the base. Fasten the seat belt.
Thread the lap section through the guides located at the front of the base (8).
Thread the diagonal strap through the two upper guides located on the back of the seat shell (9).
Tighten the seat belt by pulling first on the lap section, then on the diagonal one (10).
Check that there are no kinks or twists in the seat belt.
Lock the 2 sections of the belt with the blue lock-off clip. The lock-off should be positioned against the buckle of the seat belt (11).
Do not use the red lock-off for the rearward facing installation. Always keep the seat in the most reclined position.
FORWARD FACING USE (9-18 kg)
Fully recline the seat. Pull lap and diagonal sections of the car seat belt until fully extended and feed both through the space between the shell and the base. Fasten the seat belt (12).
Thread the lap section through the guides located below the red lock-off clips. Open the red lock-off clip next to the buckle, then route the diagonal section of the belt through the open lock-off clip (13).
Push the child seat right down into the car seat, and tighten both sections of the seat belt by pulling the belt in the direction shown (14).
Close the lock-off across the diagonal belt (15).
Check that there are no kinks or twists in the seat belt.
HARNESS BUCKLE
To fasten the harness, bring the two shoulder straps together (16) (17) and insert them into the buckle; you should hear a "click" (18). To release the harness, press the buckle's red button (19).
FITTING THE HARNESS
- To tighten the harness: Pull on the adjusting straps positioned on the harness. You do not need to press on the adjuster buttons (20).
IMPORTANT: A correctly adjusted harness is essential for your child's protection. There should not be more than finger's width between the harness and your child.
- To loosen the harness: Press on the adjuster buttons positioned on the upper section of the harness, grasp the lower section and pull simultaneously (21).
RECLINING YOUR CHILD SEAT
Push the adjustment lever located under the front of the seat upwards, then pull or push the base towards or away from you (22).
STORAGE OF THE INSTRUCTION MANUAL
Store this instruction manual, depending on the model of your vehicle, either in the pouch provided, or by slipping it into between the shell and the cover of the seat.
MAINTENANCE ADVICE
All the material parts can be removed. Slight stains can be removed using a damp sponge soaked in soapy water or it can be washed by hand at 30^ in soapy water. Do not use bleach, do not iron, do not machine wash, and do not tumble dry.
WARNING
- This car seat is a "Universal" child restraint system. It has been approved in accordance with regulation N°44/04, and is suitable for general use in vehicles and is compatible with the majority (some exceptions) of vehicle seats.
- It is more likely that the seat is perfectly compatible if the vehicle manufacturer states that its vehicles are suitable for taking "Universal" child restraint systems.
- This restraint system is classified as "Universal" in accordance with the strictest approval
criteria, whereas earlier models do not correspond to these new provisions.
- It can only be adapted to vehicles with 3-point safety belts that are either fixed or
have a roller mechanism and that have been approved compliant with the UN/ ECE N° 16 or other equivalent standards.
- If in doubt, contact the manufacturer or retailer of the restraint system.