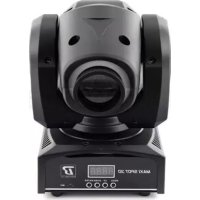
Super Babybar - Effect machine BOOMTONEDJ - Free user manual and instructions
Find the device manual for free Super Babybar BOOMTONEDJ in PDF.

| Product type | LED effect projector |
| Brand | BOOMTONEDJ |
| Model | Super Babybar |
| Light source | 5 x 8W QUAD RGBW LEDs |
| Beam angle | 20-40° |
| Power consumption | 40W |
| Power supply | AC 100V-240V 50-60Hz |
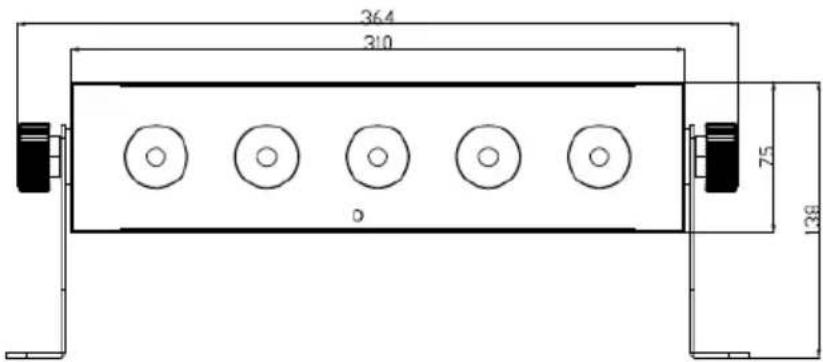
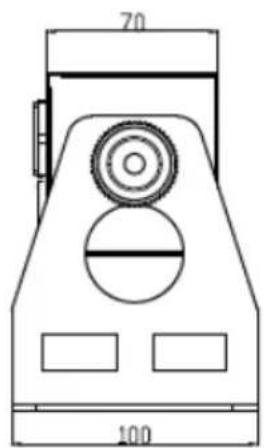
| Dimensions (L x W x H) | 364.6 x 100 x 138 mm |
| Weight | 3 kg |
| DMX channels | 4 or 8 channels |
| Control modes | Auto, Audio, DMX512, Master/Slave |
| Remote control | Infrared included |
| Display | Digital display with 4 buttons (Menu, Up, Down, Enter) |
| Microphone | Built-in for sound-activated mode |
| Max ambient temperature | 40°C |
| Protection | Must be installed with sturdy clamp and safety cable |
| Maintenance | Regular cleaning of lenses with soft cloth and glass cleaner |
| Safety | Do not look directly into the beam, do not use in damp environments |
| Included accessories | Power cable, remote control, user manual |
| Standards | EN 2014/30/EU, EN 2011/65/EU, EN 2014/35/EU |
Frequently Asked Questions - Super Babybar BOOMTONEDJ
User questions about Super Babybar BOOMTONEDJ
0 question about this device. Answer the ones you know or ask your own.
Ask a new question about this device
Download the instructions for your Effect machine in PDF format for free! Find your manual Super Babybar - BOOMTONEDJ and take your electronic device back in hand. On this page are published all the documents necessary for the use of your device. Super Babybar by BOOMTONEDJ.
USER MANUAL Super Babybar BOOMTONEDJ
Please read the instrucons carefully which includes important informaon about the installaon, operaon and maintenance.
- Please keep this User Manual for future consultaon. If you sell the xture to another user, be sure that they also receive this instrucon booklet.
- Unpack and check carefully there is no transportaon damage before using the xture.
It's important to ground the yellow/green conductor to earth in order to avoid electric shock. - Disconnect main power before servicing and maintenance.
Maximum ambient temperature is Ta : 40^ . Don't operate it where the temperature is higher than this. - In the event of serious operang problem, stop using the xture immediately. Never try to repair the xture by yourself. Repairs carried out by unskilled people can lead to damage or malfuncon. Please contact the nearest authorized technical assistance center. There are no user serviceable parts inside the xture.
- Do not connect the device to any dimmer pack.
- To prevent or reduce the risk of electrical shock or re, do not expose the xture to rain or moisture.
- Do not look directly at the LED light beam while the xture is on.
- Do not touch any wire during operaon.
- The unit should be mounted via its screw holes on the bracket. Always ensure that the unit is rmly xed to avoid vibraon and slipping while operang. Always ensure that the structure to which you are aching the unit is secure and is able to support a weight of 10 mes of the unit's weight. Also always use a safety cable that can hold 12 mes of the weight of the unit when installing the xture.
- The equipment must be xed by professionals. And it must be xed at a place where is out of the touch of people and has no one pass by or under it.
2- Unit Descripon
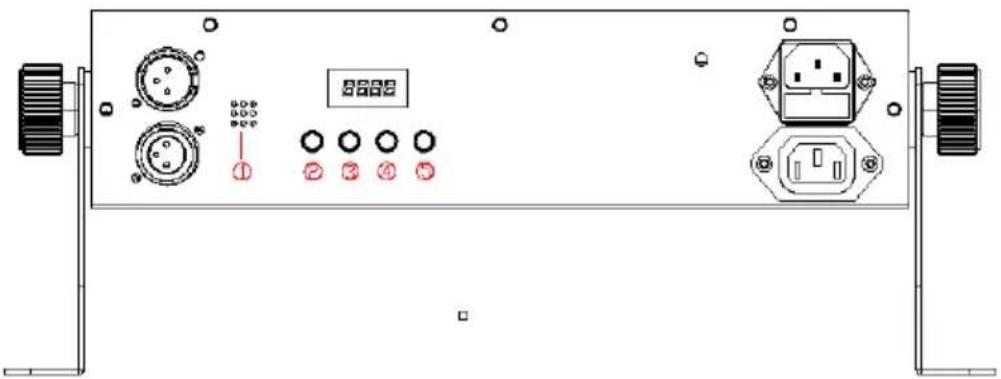
| -1- | Microphone for sound detection mode |
| -2-Menu | To select function |
| -3-Up | Increase parameter |
| -4-Down | Decrease parameter |
| -5-.Enter | Validation |
3- Technical Specicaons
4 or 8 channel with optional RGBW mixing
- 4 push buttons with 4 Digital LED Display
- Auto, sound Activated, DMX512, Master/Slave,
- IR REMOTE control
Light source: 5PCS 8W Ultra Bright LEDs RGBW QUAD
Bulb angle: 20-40 degree
Power consumption: 40W
Power input: AC100V-240V 50-60Hz
Dimensions:L364xW100xH138mm
Weight: 3kg
This BoomToneDJ fixture is complying with European standards: EN 2014/30/EU, EN 2011/65/EU, EN 2014/35/EU.
4- Funcon MODE
(1)Black Out Turn on /off
(2)Auto Auto show
(3)Sound Sound active
(4) Strobe Only JUMP, and
Static color mode(The corresponding button isR/G/B/A/UV/W, 1~9), this button has effectivity.
(5) Gradual change mode/Jump change mode switch
(6) sound sensitivity adjust
(7) R Red dimmer in the dimming mode
(8) G Green dimmer in the dimming mode
(9) B Blue dimmer in the dimming mode
(10) R/G/B/A/UV/W /1~9 the device show the same color as the button's color when in the monochromatic mode
(11) W White dimmer in the dimming mode
(12) + Increase parameter(include strobe speed adjust,sound sensitivity adjust,color select,adjust the brightness of R,G,B,W Gradual change speed adjust,jump change speed adjust).
(13) — Reduce parameter(include strobe speed adjust,sound sensitivity adjust,color select,adjust the brightness of R,G,B,W Gradual change speed adjust,jump change speed adjust).
(14) 0 Function switch(Dimming mode and monochromatic mode)
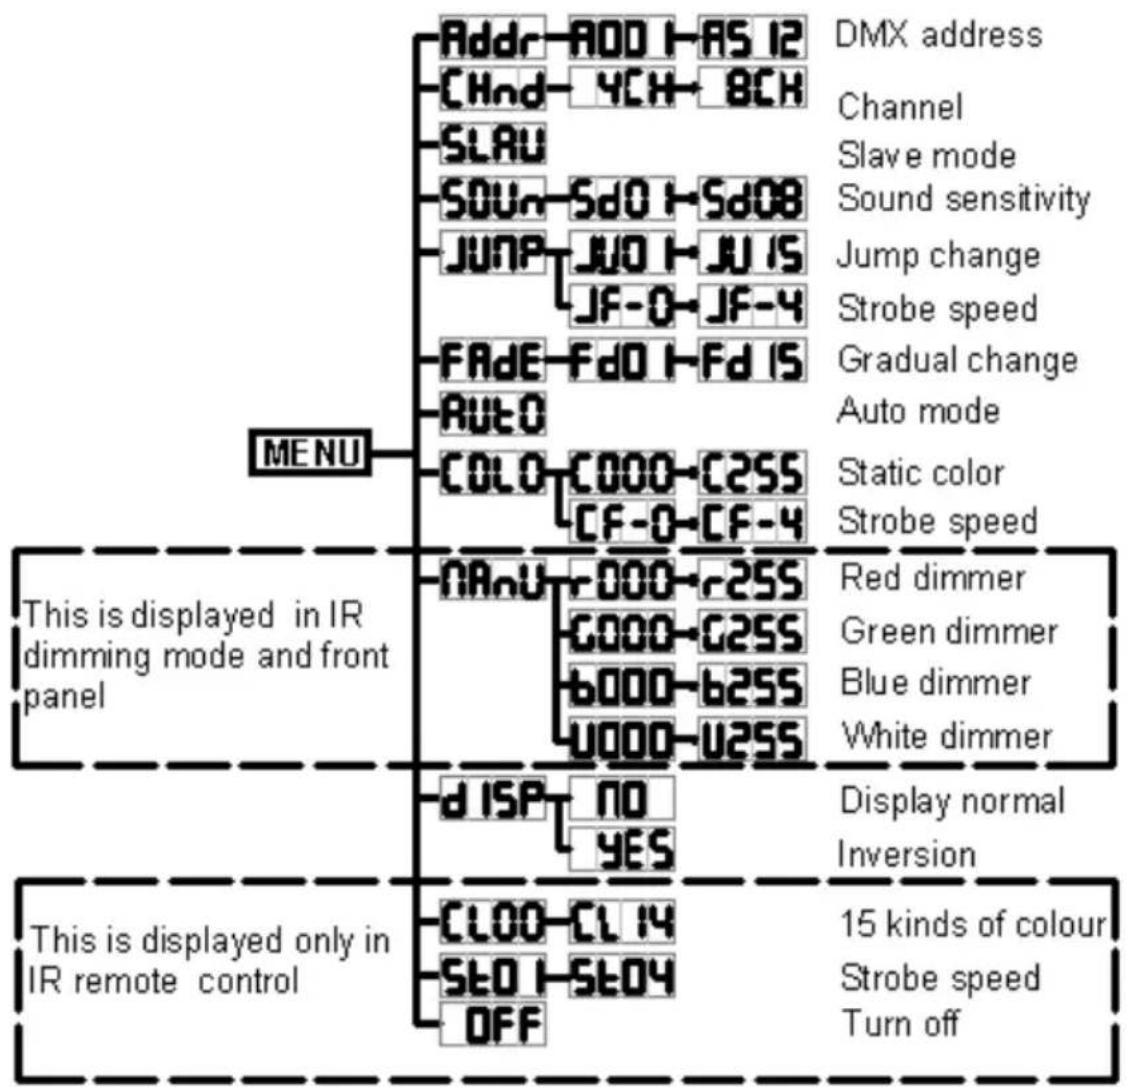
Using universal DMX controller to control the units, you have to set DMX address from 1 to 512 channel so that the units can receive DMX signal.
Press the MENU, then find Addr, press ENTER, when the 1 is showing on the display. Pressing
ENTER. Use DOWN and UP button change the DMX512 address.
DMX Protocole
4 channels Mode:
| Channel | Value | Function |
| CH1 | 0-255 | RED dimmer |
| CH2 | 0-255 | GREEN dimmer |
| CH3 | 0-255 | BLUE dimmer |
| CH4 | 0-255 | WHITE dimmer |
8 channels Mode:
| Channel | Value | Function |
| CH1 | 0-255 | Master dimmer |
| CH2 | 0-255 | RED dimmer |

| CH3 | 0-255 | GREEN dimmer |
| CH4 | 0-255 | BLUE dimmer |
| CH5 | 0-255 | WHITE dimmer |
| CH6 | 0-255 | Strobe speed ajustable (0: strobe off) for the static color and jump speed mode. In the gradual change mode, the seventh channel does not work. |
| CH7 | 0-255 | Static color,Jump speed,Gradual speed or sound sensitivity |
| CH8 | 0-59 | Custom control by DMX512 |
| 60-119 | Static mode | |
| 120-179 | Jump change mode | |
| 180-239 | Gradual change mode | |
| 240-255 | Sound mode |
DMX 512 Connecon
The DMX 512 is widely used in intelligent lighngs and with a maximum of 512 channels.
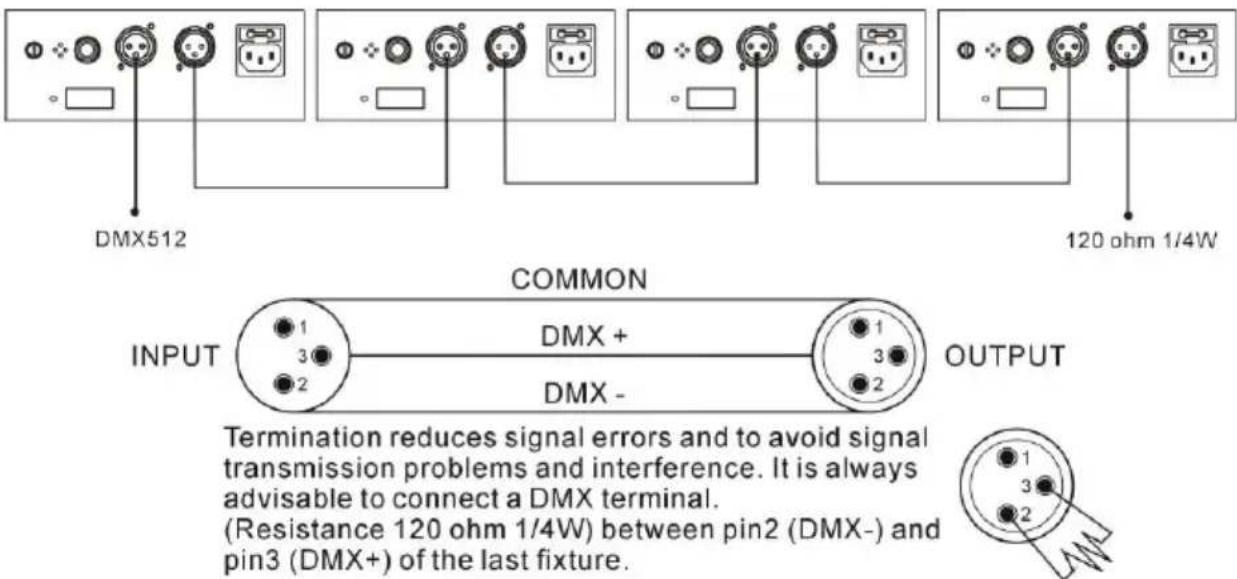
- If you using a controller with 5 pins DMX output, you need to use a 5 to 3 pin adapter-cable.
- At last unit, the DMX cable has to be terminated with a terminator. Solder a 120 ohm 1/4W resistor between pin 2(DMX-) and pin 3(DMX+) into a 3-pin XLR-plug and plug it in the DMX-output of the last unit.
- Connect the unit together in a 'daisy chain' by XLR plug from the output of the unit to the input of the next unit. The cable cannot be branched or split to a 'Y' cable. DMX512 is a very high-speed signal. Inadequate or damaged cables, solder joints or corroded connectors can easily distort the signal and shut down the system.
- Each lighng unit needs to have an address set to receive the data sent by the controller. The address number is between 0-511 (usually 0 & 1 are equal to 1).
5. Troubleshoong
Following are a few common problems that may occur during operaon. Here are some suggesons for easy troubleshoong:
- The xture does not work, no light
Check the connecn of power and main fuse.
Measure the mains voltage on the main connector.
-
Not responding to DMX controller
-
DMX LED should be on. If not, check DMX connectors, cables to see if link properly.
- If the DMX LED is on and no response to the channel, check the address sengs and DMX polarity.
○ If you have intermittent DMX signal problems, check the pins on connectors or on PCB of the xture or the previous one.
Try to use another DMX controller. -
Check if the DMX cables run near or run alongside to high voltage cables that may cause damage or interference to DMX interface circuit.
-
Some fixtures don't respond to the easy controller
-
You may have a break in the DMX cabling.
-
Check the LED for the response of the master/ slave mode signal.
-
No response to the sound
Make sure the xture does not receive DMX signal.
- Check microphone to see if it is good by tapping the microphone.
6. Fixture Cleaning
The cleaning of internal must be carried out periodically to optimize light output. Cleaning frequency depends on the environment in which the xture operates: damp, smoky or particularly dirty surrounding can cause greater accumulaon of dirt on the xture's opcs.
- Clean with so cloth using normal glass cleaning uid.
- Always dry the parts carefully.
- Clean the external opcs at least every 20 days. Clean the internal opcs at least every 30/60 days

BoomToneDJ.com
www.boomtonedj.com