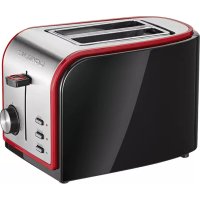
TA 3690 - Toaster CLATRONIC - Free user manual and instructions
Find the device manual for free TA 3690 CLATRONIC in PDF.
| Brand | Clatronic |
| Model | TA 3690 |
| Product type | Toaster |
| Power supply | 220-240 V ~, 50/60 Hz |
| Power consumption | 850 W |
| Protection class | I |
| Net weight | Approx. 1.06 kg |
| Browning setting | 6 levels, from 1 (light) to 6 (dark) |
| Additional functions | Defrost, reheat, cancel |
| Included accessory | Rolling support for rolls |
| Capacity | 1 to 2 slices of bread |
| Automatic bread lift | Yes |
| Crumb tray | Yes, removable |
| Power cord length | Approx. 0.8 m (estimated) |
| Care and cleaning | Clean exterior with a damp cloth; removable crumb tray; do not immerse |
| Safety | Automatic shut-off, overheat protection, do not use with an external timer |
| Repairability | Do not repair yourself; contact an authorized technician; power cord replaceable by manufacturer |
| Recommended use | Household use only, not professional |
| Storage | In a dry place, out of reach of children, after cooling |
Frequently Asked Questions - TA 3690 CLATRONIC
User questions about TA 3690 CLATRONIC
0 question about this device. Answer the ones you know or ask your own.
Ask a new question about this device
Download the instructions for your Toaster in PDF format for free! Find your manual TA 3690 - CLATRONIC and take your electronic device back in hand. On this page are published all the documents necessary for the use of your device. TA 3690 by CLATRONIC.
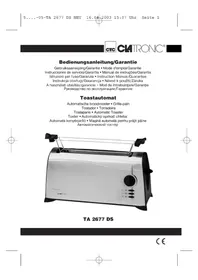
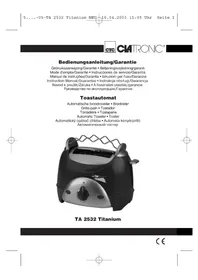
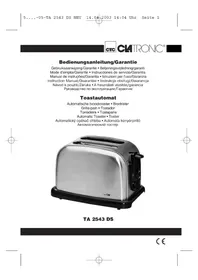
USER MANUAL TA 3690 CLATRONIC
Behuizing, broodjesrek
Boitier, support roulant
Thank you for choosing our product. We hope you will enjoy using the appliance.
Symbols in these Instructions for Use
Important information for your safety is specially marked. It is essential to comply with these instructions in order to avoid accidents and prevent damage to the appliance:

WARNING:
This warns you of dangers to your health and indicates possible injury risks.

CAUTION:
This refers to possible hazards to the appliance or other objects.

NOTE: This highlights tips and information.
General Notes
Read the operating instructions carefully before putting the appliance into operation and keep the instructions including the warranty, the receipt and, if possible, the box with the internal packing. If you give this appliance to other people, please also pass on the operating instructions.
- The appliance is designed exclusively for private use and for the envisaged purpose. This appliance is not fit for commercial use.
- Do not use it outdoors. Keep it away from sources of heat, direct sunlight, humidity (never dip it into any liquid) and sharp edges. Do not use the appliance with wet hands. If the appliance is humid or wet, unplug it immediately.
- When cleaning or putting it away, switch off the appliance and always pull out the plug from the socket (pull the plug itself, not the lead) if the appliance is not being used and remove the attached accessories.
- Do not operate the appliance without supervision. If you leave the room you should always turn the appliance off. Remove the plug from the socket.
- The appliance and the mains lead have to be checked regularly for signs of damage. If damage is found the appliance must not be used.
- Use only original spare parts.
- In order to ensure your children's safety, please keep all packaging (plastic bags, boxes, polystyrene etc.) out of their reach.

WARNING:
Do not allow small children to play with the foil. There is a danger of suffocation!
Special Safety Information for this Appliance
- Always watch the appliance while it is being used!

WARNING:
Very dry bread can start to burn when being toasted!
- The metal parts get hot. Danger of burns!
- Do not insert forks, knives or other objects in the toasting slot.
- Do not insert your fingers into the toasting slots (danger of burns).
- Do not set up the appliance next to inflammable objects (e.g. curtains, wood, etc.).!
- Do not operate the appliance with an external timer or separate remote control system.
-
Do not repair the appliance by yourself. Always contact an authorized technician. If the supply cord is damaged, it must be replaced by the manufacturer, its service agent or similarly qualified persons in order to avoid a hazard.
-
This appliance can be used by children aged from 8 years and above and persons with reduced physical, sensory or mental capabilities or lack of experience and knowledge if they have been given supervision or instruction concerning use of the appliance in a safe way and understand the hazards involved.
Children shall not play with the appliance. - Cleaning and user maintenance shall not be made by children unless they are older 8 years and supervised.
- Keep the appliance and its cord out of reach of children less than 8 years.

CAUTION:
This appliance is not intended to be immersed in water during cleaning. Please observe the instructions that we have included for you in the chapter "Cleaning".
Notes on Use
Before Initial Use

CAUTION:
In order to remove the protective layer on the heating coil you should operate the appliance approximately three times when it is empty. Please select the maximum level of browning.

NOTE:
Any smoke or smells produced during this procedure are normal. Please ensure sufficient ventilation.
Mains Lead
Unwind the required mains lead from the base. Pass the cord through the cable guide at the back of the appliance.
Electrical Connection
Check whether the mains voltage that you want to use, corresponds with that of the appliance. You will find the information about it on the rating plate.
Operation
- Connect the device only to a correctly installed safety socket.
-
Adjust the degree of browning on the selector switch as required between the lightest level 1 to the darkest level 6. If you are not sure start with a lower setting.
-
Insert the slices of bread in the toasting slot and lower the slide with the lever until it snaps into place. The indicator lamp of the button lights up.
- The appliance starts the toasting. When the set level of browning is reached, the appliance switches off automatically. The slide pops up automatically.

WARNING:
There is a danger of burns when removing small slices of bread!
Special Functions
To use the desired special function, press the relevant key, after pressing down the lever.

NOTE:
Warming or thawing:
The relevant LED indicates the function.

Thawing
To thaw and toast deep-frozen bread.

Warming To warm bread already toasted.

Stop To stop toasting in process.
Roll Rack (Removable)
Want to warm up or toast some rolls?
Place the roll rack onto the toasting slot.
CAUTION:
- Do not overload the roll rack! Place a maximum of one roll on the roll rack!
- Set the browning control to level 3 at maximum.
- Wait for one minute between two toasting cycles.
- Never coat the roll with fat or butter. Fat could drip down and ignite!
WARNING: Danger of burns!
Let the roll rack cool down before storing it again.
Storage
WARNING:
As the housing and the metal parts become hot during operation, allow the appliance to cool down before putting it away.
- Clean the appliance as described and allow to dry completely. We recommend to keep the appliance in the original packaging if the appliance will not be used for long periods.
- Always keep the appliance out of the reach of children in a dry, well ventilated place.
Mains Cable Take-Up Appliance
The mains cable can be wound up on the base.
Cleaning
WARNING:
- Pull the mains plug out of the mains socket before you clean the appliance and allow the appliance to cool down.
- Do not immerse the appliance in water! Doing so may result in an electric shock or fire.
CAUTION:
- Do not use any wire brush or other abrasive objects.
- Do not use abrasive or aggressive cleaners.
Housing, Roll Rack
Only use a slightly damp cloth to clean the outside of the appliance.
Crumb Tray
The crumb tray is located on the opposite side to the carriage lever.
- Pull the crumb tray out by the handle, remove the small pieces of bread and push the tray back in place.
Troubleshooting
| Problem Possible cause Solution | ||
| The appliance does not function. | The appliance has no power supply. | Test the socket with another appliance. |
| Plug in the mains plug correctly. | ||
| Check the main circuit breaker. | ||
| The appliance is faulty. | Contact our service center or a specialist. | |
| Problem Possible cause Solution | ||
| The bread is too dark. | The toaster setting was too high. | Select a lower toaster setting. |
| The bread is too light. | The toaster setting was too low. | Select a higher toaster setting. |
| The toasting slots no longer rise. | A slice of bread is trapped in the slot. | Disconnect the plug from the socket! Allow the appliance to cool down! |
| Free the slice of bread with an insulated object, e. g. a wooden stick. If necessary turn the toaster over so that the slice of bread falls out. |
Technical Data
Model: TA 3690
Power supply: 220 - 240 V~, 50 / 60 Hz
Power consumption: 850 W
Protection class: I
Net weight: approx. 1.06 kg
The right to make technical and design modifications in the course of continuous product development remains reserved.
This appliance has been tested according to all relevant current CE guidelines, such as electromagnetic compatibility and low voltage directives, and has been constructed in accordance with the latest safety regulations.
Disposal
Meaning of the "Dustbin" Symbol
Protect our environment: do not dispose of electrical equipment in the domestic waste.
Please return any electrical equipment that you will no longer use to the collection points provided for their disposal.
This helps avoid the potential effects of incorrect disposal on the environment and human health.
This will contribute to the recycling and other forms of reutilisation of electrical and electronic equipment.
Information concerning where the equipment can be disposed of can be obtained from your local authority.
Instrukcja obslugi
CTC Clatronic Sp. zo.o.
Ul. Brzeska 1
45-960 Opole
Usuwanie
IpeDynpexKaetobnacHocTINdIg3OpOBbI INBO3MOK-HOMPNCKeIPOUeyHnItpaBMbl.

BHIMAHINE:
Yka3bIbaeT Ha BO3MOxKHyO ONaCHOCTb IIN3dJIINN IN dpynx OKpyKaIOxN ppeDMETOB.

IPIMEUYAHJ:JaetcoBteuHnHOpMaunIO.
06üne 3ameuahnna
Ipeed hauanom 3KcNlyataun npnbopa BHmatebH O npountaTe npnnaeMyIO HCTpykUIO NO 3KcNlyaTaN IN COxpaHNTe ee B HaDeXHom MeCTe, BMeCTe C rapaHTNHBIM TaHOOM, KaccOBbIM YekOM I, NO BO3MOXHOCTN, KAPTOHHO KO6KOc C ynaKoBOuHbIM MaTePnAnOM. Ecn daTe KoMy-Ni60 NOnNoB3ObaTbCra np6OpOM, O6BaTeNbHO daTe B npndaHy dAnHyIO HCTpykUIO NO 3KcNlyaTaun.
ПользунТecь пиборм TOлько чаТьIMобра3OMип
НаЗнayehи. Пибор He п徳нЗнayeh Дя КСМерчe-
СКОTO ИСПЛБЗВАИ.
He noIb3yIeTcB npIbOp mO tKpbItbIM He6OM. PpeOxpaHnIe npIbOp OT xapbl, npIbIX cOnHeuHbIX nyuei, BnaXHoCTN (Hn B KOem Cnyae He nOrpyKaTe erO B BOdy) n ydApOB 06 octpIe yrIbI. He npIkaCaiTeCB K npIbOp BnaXHbIMn pykAMn. Ecn npIbOp yBaJaxHnICn IIN HAoK, TyT Xe BblBe BNkY u3 po3ETKn.
- Pocne 3KcPnyaTaUIM, MoTataKe npHaJnEeXHocTeN, HCTKE INI NIOLOMKe pnp60pa Bcerda BbIHMaHTe BNJKy n3 po3ETKN (TARHTe 3a BNJKY, a He 3a KaBeJIb).
He octabJrTe BkIoueHHbIe 3JIeKTPonpnp6Opbl6e3 npICMOtpa.BbIXoJa n3 NOMeUeHnB CcERda BbIKIOuaTe np6Op.BbIHbTe WTeKepe n3 po3eTkn.
- Pn6bOp n Ka6eBcTeBOro nHTaHnHa Heo6xOIMOp peryIpaH0 o6CneDobAtb Ha hAInuHne CteNoB NOBpeKdEHH. Pn6OBnApUKeHH NOBpeKdEHH NoIb3OBAbCra Pn6bOpom 3aIpeuaetc.
- IcnoIb3yIte ToIbKO opnHaHaJIbHbIe 3aIuaCTN.
- V3 coo6paXeHn 6e3oNaChOCT nIaIeTe He octabTnIte IeKAtb yNakOBky (IInaCTIKOBbie MeuKN, KapTOH, NeHONlact n T.D.) 6e3 npICMOTpa.

PENEYNPEXKDEHNE:
He nO3BOJnIe TeTm IrpTaB c NOnIaTIneHOBOI nJIeHKo. Onachocb ydyuBa!
CneuaNbHbIe Tpe6oBaHn8 6e3OpaCHocTn IJRA 3TOrO np6opa
He octablan Te np6op 6e3 na3opa!

ПЕДУПЕЖДЕНЕ:
CnIshkom cyxoi xne6 moXeT KpOme npOyeRo hauatb ropeTB!
- Metanlneckne yactn harpebaotc. Onachoctb oXorob!
- Пожалуноста, He opудуITE BHyTpN TocTepa BnJIkAmN, HOxamN nII N T.I.
He cyuTe paIbUb I B waxTy TocTepa (OnacHocTb oXorOB).
He yctaHabnBaIte np6op B6JIn3n JleKOBocPnaMeHReMbIX npedMeTOB (Haepmep: rapdInhbl, dpeBO n T.d.).
He ynpabnayte yctpoBcTBOM C NOMObBHeHHeTo TaMepa nIOTdEJIbHOcCTeMbI dNCTaHcNOHHOro ynpabJeHnA.
He nbitaTeCb cAmOCToTeIbHO OTPeMOHTnPOBaTb yCTpoNCTBO. O6aTeIbHO CBXInTECb C aBTOpIN3OBaHHbIM MaCTepOM. PnIOBpeKdEHN CTeBOrO shHpa, BO n36exKaHne ONaCHOCTn IopaJxHnA JJIeKTPnueCKm TOKOM, sHyp CJIeDyET 3aMeHnTb y IN3rOToBtEJIa, cepBnCHOrO pPeDcTaBtEJIa INI dpyrNX KBaIIuΦnUPOBAHHbIX JnU.
- 3TO yCTPOIcTBO MOKET NcNoJIb3OBaTbCSdTeBIMn C8 JETN IIODbMn C OrpaHnueHHbIMN cH3UeCKIMN, Ocra3aTeJIbHbIMN IN YMCTBeHHbIMN cNoCObHOCTaMn, a TaKKe IIOdbMn 6e3 ONbITaN 3HaHn, ecNI OHn HaxoJATc POnPcMOTpOM nIN 6blnn pOHNCTpykTIpoBaHbI O6 NcNoJIb3OBaHmN yCTPOIcTBa 6e3OJaCHbIM M6pa3OM n IOHMaHT BO3MOXHbIe yrPo3bl.
-Детам He pa3pewaetcngpataC yctpoiCTBOM.
- Chstka n obcnykubahne He doJxHO BbIOnHrTbcra DeTbMn, 3a NcKlouehem Detey Ctapwe 8 letn nohna6JIOdeHnem B3pocblix.
- PacnojaraTe neyb n ceTeBOi shHyp BHe DocraeMOCTn deTei MnaDwe 8 let.

BHIMAHNE:
3TO yCTPOIcTBO He npedHa3NaueHO dIg NOrpyKeHnB BOy BBo BpeM yNCTKn. IoxaIyncta, cJeDyIe yka3aHnM, pa3MeIeHHbIM B pa3dene "Ucmka".
PpimueaHnno nncnoB3OBaHnna PpeepnepBbIM noB3OBaHnem

BHIMAHINE:
MecToHAMOTKcTeBOrOwhypa
CetBoI shHyp HamaTbIaBcTcHa npncnocobJeHne Ha HxKHe Yactn np60pa.
UncTka

ПЕДУПЕЖДЕНЕ:
- Перацдои чьтков Вынмайт e BnIky n3 pO3eTKI n daIte npn60py octbITb.
He norgykaite npnbop B Body! Nocne 3toro Bo3nkaet pck Bo3ropaHnI ydapa 3JIeKTPnueCKIM TOKOM.

BHIMAHINE:
He npimehnIte npoBOIOUHbIe 1eTKn ININ npedMeTbIC abpa3NHBbIM NOKpbITnEM.
He nCnoJIb3yIte IJRA YNCTKN CINbHO MOIOUne cpeDCTBA NnN NaCTbl.
gglgglgglgglgglgglgglgglgglgglgglgglgglgglgglgglgglgglgglgglgglgglgglgglgglgglgglgglgglgglgglgglgglgglgglgglgglgglgglgglgglgglgglgglgglgglgglgglgglgglg
aLdAullulld
4
.
.4b05gj 366
jdo,
joo joo ool all ao 000
Ciiitai
JglgjI jIgdlge jdgd
aalg
S AOB = S COD + S BOC - S BOC
1,2,3,4,5,6
aaiiabblb61g5jg aiol aaybjy jgljll pduwly dolcll cld
jlll jab y
8 j 15 y p d a 1y Jb
.
.
3
1
1
一
一
1
1
一
一
GARANTIEKARTE
warranty card · garantiekaart · carte de garantie · scheda di garanzia · tarjeta de garantia · cartao de garantia · garantiokt · karta gwarancyjna · zaručni list · kartica jamstva · carte de garantie · fapaunnoHa Kapta · zaručnly list · garancijski list · garanciajegy · rapaHTHmHΦOpMynp · fapaHTnHbI TANOH
TA 3690
24 Monate Garantie gemäß Garantieerklarung - 24 months warranty according to warranty declaration - 24 maanden garantie volgens garantieverklarung - 24 mois de garantie selon la déclaration de garantie - 24 messi de garanzia seconde la dichiarazione di garanzia - 24 meses de garantia de acordo con la déclaration de garantia - 24 manedors garanti
1 henhold til garantibetingelsene - 24 misiace gwarancj na podstawie owiadzcnia gwarancyjneo - zaruka 24 mesi ci podle prohlaseni o zaruke - 24 mjeseco jamstvo
u skladu s jamstvenom déclaracionj - 24 luni garantie conform déclaratie de garantie - 24 mecui rapaHUNB CHOTETCTBME C rapaHUNOHATA DEKnapauN - 24-mesacna
zaruka podla vyhlasenia o zaruke - 24-mesece narcagica, skladno z garancjsko izavoj - 24 honap garancia a garanciafeleteteleken be leirtak szerint - rapaHTNI HA 24 micRII BIDNOIOI ZAI npo rapaHTIO - rapaHTNI 24 mecui corncho 3AHHHBM
rapaHTMIIMnpaBnAM -
Kaufdatum, Handlertempel, Unterschied - date of purchase, dealer stamg, signature - aankoipdatum, dealerstempel, handelsbeking - date d'achat, tampon du concessionaire, signature - data de acquisto, tambro del rivenditori, firma - fecha de compra, selle del distribuidos, firma - data de compra, carinbo do distribuidor, assinatura - kapsdate, forhandlertempel, signatur - data zakupu, piezecr spredawcy, podisp - datum zakupenl, raziko proezeje, podisp - datum kupovine, big trovica, potisp - datum de achutzie, tamplia kumzerului, semnatura - da na noxymara, llevar - na Ipojanaia, Iogmnc - datum nikupu, pehtaia obchodnika/ preadjucipi, podisp - datum nukaku, big trovica, podisp - vassaris distuma, kereskebd behegyzole, alalras - daa npdoanbni, nevatka npdoanba, ngmnc - Daa npnopepenien, ilraam npdoanaia, Iogmnc -

CAtRONICINTERNATIONAL GMBH
www.clatronic-germany.de