TA 2677 - Toaster CLATRONIC - Free user manual and instructions
Find the device manual for free TA 2677 CLATRONIC in PDF.
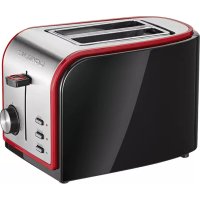
| Product type | Toaster |
| Brand | Clatronic |
| Model | TA 2677 |
| Power supply | 230 V, 50 Hz |
| Power | Approx. 850 W |
| Dimensions (approx.) | 30 x 20 x 20 cm |
| Weight (approx.) | 1.5 kg |
| Number of slots | 2 |
| Browning control | Thermostat from 1 (light) to 7 (dark) |
| Special functions | Defrost, reheat, emergency stop (STOP) |
| Roll warming rack | Yes, removable |
| Crumb tray | Yes, removable |
| Automatic shut-off | Yes, when the browning level is reached |
| Cool-touch exterior | Yes (Cool Touch) |
| Child safety | Not specific, recommended to keep out of reach |
| Cleaning | Exterior: damp cloth; crumb tray: empty and replace |
| Available spare parts | Crumb tray, roll warming rack |
| Warranty | 24 months, wear parts and accessories: 6 months |
Frequently Asked Questions - TA 2677 CLATRONIC
User questions about TA 2677 CLATRONIC
0 question about this device. Answer the ones you know or ask your own.
Ask a new question about this device
Download the instructions for your Toaster in PDF format for free! Find your manual TA 2677 - CLATRONIC and take your electronic device back in hand. On this page are published all the documents necessary for the use of your device. TA 2677 by CLATRONIC.
USER MANUAL TA 2677 CLATRONIC
General Safety Instructions
- Read the operating instructions carefully before putting the appliance into operation and keep the instructions including the warranty, the receipt and, if possible, the box with the internal packing.
- The appliance is designed exclusively for private use and for the envisaged purpose. This appliance is not fit for commercial use. Do not use it outdoors (except if it is designed to be used outdoors). Keep it away from sources of heat, direct sunlight, humidity (never dip it into any liquid) and sharp edges. Do not use the appliance with wet hands. If the appliance is humid or wet, unplug it immediately. Do not put it in water.
- When cleaning or putting it away, switch off the appliance and always pull out the plug from the socket (pull on the plug, not the cable) if the appliance is not being used and remove the attached accessories.
- Never leave the appliance unsupervised. To protect children from the dangers posed by electrical appliances, make sure that the cable is hanging low and that children do not have access to the appliance.
- Check the appliance and the cable for damage on a regular basis. Do not use the appliance if it is damaged.
- Do not try to repair the appliance on your own. Always contact an authorized technician. To avoid the exposure to danger, always have a faulty cable be replaced only by the manufacturer, by our customer service or by a qualified person and with a cable of the same type.
- Use only original spare parts.
- Pay careful attention to the following "Special Safety Instructions".
Special safety information for this unit
- Always watch the unit while it is being used! (Very dry bread can start to burn when being toasted!)
- The metal parts get hot. DANGER OF BURNS!
- Do not insert forks, knives or other objects in the toasting slot
- Do not set up the unit next to inflammable objects (e.g. curtains, wood, etc.)
Before Initial Use
In order to remove the protective layer on the heating coil you should operate the machine approximately three times when it is empty. Please select the maximum level of browning. Any smoke or smells produced during this procedure are normal. Please ensure sufficient ventilation.
Operation
- Only connect the unit to a properly installed and earthed power socket (230 volts, 50 Hz).
- To set the browning level, turn the selector clockwise to the preferred level starting from the lightest - level 1 - to the darkest - level 7. If you are not sure start with a lower setting. (The black mark on the selector indicates the setting).
- Insert the slices of bread in the toasting slot and lower the slide with the lever until it snaps into place.
- The appliance starts the toasting. When the set level of browning is reached, the appliance switches off automatically. The slide pops up automatically.
- The appliance has a heat-insulated „cool-touch“ housing. The metal parts become hot during use. Leave the toaster to cool before putting it away.
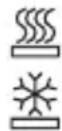
To sue special functions press the relevant key after lowering the lever. Heating or thawing: the relevant LED indicates the function.

Thawing: to thaw and toast deep-frozen bread.

Warming: to warm bread already toasted.

STOP: to stop toasting in advance.
Removable
toasting grid: for the toasting of bread rolls
Cleaning
- Pull the mains plug out of the mains socket before you clean the unit and allow the unit to cool down.
- Only use a slightly damp cloth to clean the outside of the unit.
- Do not use abrasive or aggressive cleaners.
- Remove the crumb tray from the slot, remove the crumbs and insert the tray again.
This appliance conforms with the CE directives for radio interference suppression and low-voltage safety and has been built to meet current safety requirements. Subject to technical changes without prior notice!
Guarantee
The device supplied by our Company is covered by a 24 month guarantee starting on the date of purchase (receipt).
During the life of the guarantee any fault of the device or its accessories *) ascribable to material or manufacturing defects will be eliminated free of charge by repai
GB
ring or, at our discretion, by replacing it. The guarantee services do not entail an extension of the life of the guarantee nor do they give rise to any right to a new guarantee!
Proof of the guarantee is provided by the proof of purchase. Without proof of purchase no free replacement or repair will be carried out.
If you wish to make a claim under the guarantee please return the entire machine in the original packaging to your dealer together with the receipt.
*) Accessories are subject to the legally envisaged guarantee obligation (6 months) and do not entitle to the free replacement of the entire device. Then please contact out hotline. All damaged glass or fractures to plastic parts are subject to a charge.
Defects to consumables or parts subject to wearing (e.g. motor pistons, kneading blades, drive shafts, spare remote control, spare toothbrushes, saw blades, etc.) as well as cleaning, maintenance or the replacement of said parts are not covered by the guarantee and hence are to be paid!
The guarantee lapses in case of unauthorized tampering.
After the expiry of the guarantee
After the expiry of the guarantee repairs can be carried by the competent dealer or repair service against the payment of the ensuing costs.
Ipeed nepBbIM noJb30BaHHeM
Дя удалени зашитно сма Зс HarpeBaTeьного олем enta ero HeobxOIMTO prn pa3a nporpeTB. BbIbePte Дя 3TORO MaKcMaJIbHyIO TemnepaTpy. Повлени ЛergOTO dbIMA И NOCTOPOHero 3anaxa рп nToJ npuIeDype raBlenie HOpMaJIbHoe.
ObecneyTe DOCTaTOHyIO BEHTNJRAIQU IOMeJIeHnI.
3Kcnpnyatau/npa60tbI
- BkIIOuAte npn6op TOnbKO B pO3eTKy C 3aUHTbIMN KOHTaTAMN (230B,50 ) , yCTaHOBJIeHHyO B COOTBeTCTBmC npeDnicaHnmaMn.
2.ДЯperylnipOBKuZBETA NOJXapNBaHnY yCTaHOBnTe NepeKNoOaTeJIb, BpaUaERo N0 YacBOoCtpeJIke,B OJHO n3 NpOJOKeHn 1-7,OT CBeTlORo Do TEMHOrO.BcIyuae HeyBepENHOCTn,HaunHaIe C NEPBOrO NpOJOKeHnA. (YePha MeTKa Ha NpeKNoUaTeJe yKa3bIBAe TBbIbpaHHoe NpOJOKeHne). - BCTaBbTe KycOueK (Kn) XLe6a B Na3 (bl) TocTepa N, HaxaB Ha pbUar, ONyCTuTe CaJaa3Kn BHN3, Do INx ΦHcCaunn.
- TocTe npHaHaet noJxapnBaTb xIe6. KaK ToJIbKO OH noJxapnTCa Do yCTaHOBJIeHHOrO LBeTa, TocTe p aBTOMaTnueCKn BbIKJIouHTcR. CaJa3Kn aBTOMaTnueCKn BbIEyT HabePx.
- Kopnyc пибopa теллонзолюван "Cool-Touch". Ho tak кak BO Время paBOTbI MeTJIINueCKne yapCTN CINbHO HArpeBaIOcR,ДaITe TOCTepy OCTbITb,перд Tem КAK erO y6paTb.
YTO6bI BOCNoJIb3OBAtBcR IOnOJIHInTeJbHbIM CepBnCOM HaXMMte, NocJe ONyCKaHncaJ3OK, Ha COOTBeTCTByIOUiyIO KHONKy:
Pa3OrpeBaHne nI npa3MopaxnBaHne. CoOTBeTCTBHyIOUaJ KOHTpOJIbHaJ IaMNoUka CnHaN3uPyET o6 aKTUBN3aUIN peXIMa.
Pa3MopaxnBaHne:Ja pa3MopaxnBaHnI nocJeDyUoJero noJxapnBaHn rny60Ko3amOpoxeHHoro xJe6a.
Pa3orpeBaHne:ДЯ pa3orpeBaHnpaHee nOJxapeHHoro xIe6a.

CTON(STOP):ДЯпөддөрмehнго ВыкюченяTOCTepa.
CbeMHna HacaKa: IJI NOJXapINBaHn6bIOnueK.
Yxod 3a npnbopom
- Пара Кождои ChstКоь Вынмай Te BnIky n3 po3eTKn n daite npi6opy OCTbITb.
-Дячсткпprибopa chapyки пььзутecь влжно Тряпков.
He nCnoJb3yIte IJy NCTKn CInbHOMOIOUne Cpe,DCTBA JIN NaCTbl. - BbITaHInTe BbIDBnXHoI aIcIK IJIa KPOWeK, NOTaHyB 3a Ja3bYOk, ydaJIInTe OCTaTKxJle6a n 3aDbNHBte erO o6paTHo.
RUS
3TOT npn60p COOTBETCTBye TnpKeTnBaM CE no NCKpo3aunTe n TexHnke 6e3ONaCHOCTn Dn Hn3KOBOLbTHbIX np6oPoB; OH CKOHCTpyuPObaH B COOTBETCTBn C HOBeuSHmN PpeDnucAHmN NO TexHnke 6e3ONaCHOCTn. Mbl OCTaBnaem 3a co6o NapBO Ha TexHnueckne n3MeHeHnra!
TapaHTnHoe 06a3aTeJbCTBO
Ha npoandaHbIe HAMn n3dennia daetc 24-x mecaHna rapaHTn, hauHna C daTbN pOKyn (kaccobbl YeK).
Bo Bpemra rapaHTM MbI 6ecnlaTHO yCTpaHREM BCE HeIOCTaTKN 3dJIIN I npHaJdxKHOCTe K HIM, BO3HNIKUHe NO npuHHe DeΦeKTHbIX MaTePnaJIOB INI NIO BVHe 3aBOJa-N3rOToBInTeJI, PyTEM peMOHTA INI, Ha HAWe YCMOTpeHne, NyTem 3aMeHbI N3dJIIN. rapaHTnHbI peMOHT He ydJIINReT cPok rapaHTM IN He BO3o6HOBJrEe!
Kaccobbyuek yBnreTcra rapaHTnHbIM TaHOHOM. Be3 Hero HeBO3MOXeH 6ecnlaTHbI peMOHT nIu 3aMeHa n3dEIny.
B clyuae BO3HKnHOBXnna npnteH3n NO rapaHTn, npeIbYBNTe N3dJIne B IIOJHOKOMnJIeKTAuIN, C opUNHaJIbHOy yNaKOBOKoN KACCOBbIM YeKOM TOpROBOI TOKe, npOJaBWeN 3TO N3dJIne.
*) Ha npinadaeXHOCTn daetcTOJbKO npedncaHHb 3aKOH cpoK rapaHTn (6 MecaeB), IV defeKTbI He ABJIOTc npuHoiN dJa 6ecnlaTHoN 3aMeHb IBCero n3deJInr. B 3TOM clyuae CBxntecb C hAmn no ropryemy npOBody! KOMneHcaunpa36nTBIX CTekJAAHHbIX n3dEInn nnCLOMaHHbIX pIaCTMaCCOBBX DeTaeJe npOBODTcR, KaK npabIno, 3a onNaTy!
DeΦeKtBi N3HaUHbAembIX npHnAdJIeXHOCTe INI TpyxNcJ DeTalei (HaNPmep KOHTaKTBHe Ie TKN MOTOPOB, CMEcNTeJIbHbIE KpIOKNI, pnpBOdHbIE peMHNI, 3aNaCHbIe NylbTbi ynpabJIeHnI, 3aNaChbIe 3y6HbIe IeTKN, NIIbHbIe NOJOTHa IN T.I.) a TaKxe YnCTKa, TexO6cIyXuBaHne INI 3aMeHa TpyxNcJ DeTalei He IONaDAIoT NOI rapaHTIO, IN OToTMy npoBOdTcR 3a OTdeJIbHyIO ONlaTy!
TapaHTnA TepaETcP np BCKpbITn N3dJIeN NOCTOpHHMn JIuCaMn.
Pocne rapaHTn
IocJe OKOHaHnIcPoka rapaHTn, pemOHT n3deJI npOn3BOJNTc 3a OnlaTy, COOTBeTCTByIOUIMM MaCTepCKIMN IIN NpHKTaMn CepBnCHOrO O6ClyXnBaHnI.
Technische Daten
Modell: TA 2677 DS