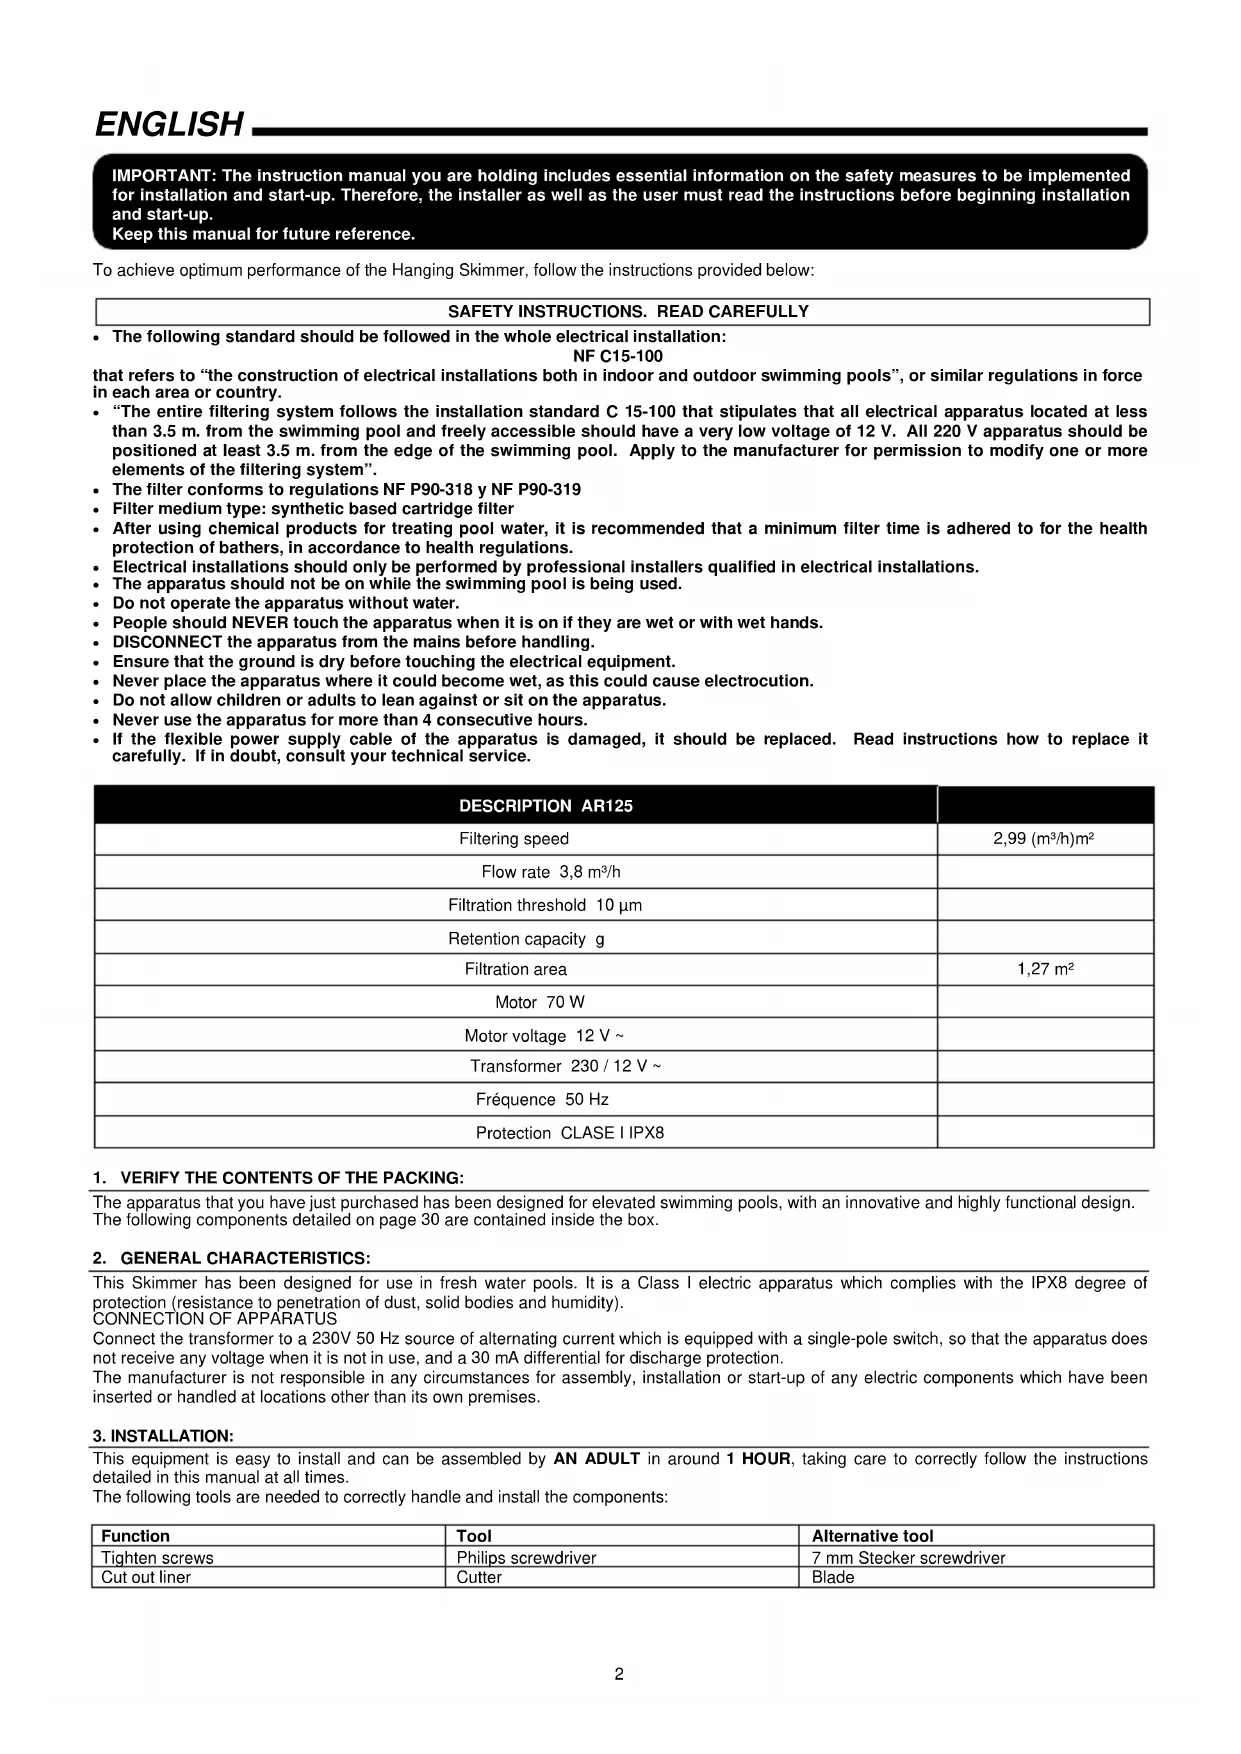
USER MANUAL AR125 GRE
IMPORTANT: The instruction manual you are holding includes essential information on the safety measures to be implemented for installation and start-up. Therefore, the installer as well as the user must read the Instructions before beginning Installation and start-up.
Keep this manual for future reference.
To achieve optimum performance of the Hanging Skimmer, follow the instructions provided below:
SAFETY INSTRUCTIONS. READ CAREFULLY
The following standard should be followed in the whole electrical installation:
NF C15-100
that refers to "the construction of electrical installations both in indoor and outdoor swimming pools", or similar regulations in force in each area or country.
- "The entire filtering system follows the installation standard C 15-100 that stipulates that all electrical apparatus located at less than 3.5m from the swimming pool and freely accessible should have a very low voltage of 12V . All 220V apparatus should be positioned at least 3.5m from the edge of the swimming pool. Apply to the manufacturer for permission to modify one or more elements of the filtering system".
The filter conforms to regulations NF P90-318 y NF P90-319
Filter medium type: synthetic based cartridge filter
- After using chemical products for treating pool water, it is recommended that a minimum filter time is adhered to for the health protection of bathers, in accordance to health regulations.
- Electrical installations should only be performed by professional installers qualified in electrical installations.
- The apparatus should not be on while the swimming pool is being used.
- Do not operate the apparatus without water.
People should NEVER touch the apparatus when it is on if they are wet or with wet hands.
- DISCONNECT the apparatus from the mains before handling.
- Ensure that the ground is dry before touching the electrical equipment.
- Never place the apparatus where it could become wet, as this could cause electrocution.
- Do not allow children or adults to lean against or sit on the apparatus.
- Never use the apparatus for more than 4 consecutive hours.
- If the flexible power supply cable of the apparatus is damaged, it should be replaced. Read instructions how to replace it carefully. If in doubt, consult your technical service.
| DESCRIPTION AR125 | |
| Filtering speed | 2,99 (m3/h)m2 |
| Flow rate 3,8 m3/h | |
| Filtration threshold 10 μm | |
| Retention capacity g | |
| Filtration area | 1,27 m2 |
| Motor 70 W | |
| Motor voltage 12 V ~ | |
| Transformer 230 / 12 V ~ | |
| Fréquence 50 Hz | |
| Protection CLASE | IPX8 | |
1. VERIFY THE CONTENTS OF THE PACKING:
The apparatus that you have just purchased has been designed for elevated swimming pools, with an innovative and highly functional design.
The following components detailed on page 30 are contained inside the box.
2. GENERAL CHARACTERISTICS:
This Skimmer has been designed for use in fresh water pools. It is a Class I electric apparatus which complies with the IPX8 degree of protection (resistance to penetration of dust, solid bodies and humidity).
CONNECTION OF APPARATUS
Connect the transformer to a 230V 50 Hz source of alternating current which is equipped with a single-pole switch, so that the apparatus does not receive any voltage when it is not in use, and a 30 mA differential for discharge protection.
The manufacturer is not responsible in any circumstances for assembly, installation or start-up of any electric components which have been inserted or handled at locations other than its own premises.
3. INSTALLATION:
This equipment is easy to install and can be assembled by AN ADULT in around 1 HOUR, taking care to correctly follow the instructions detailed in this manual at all times.
The following tools are needed to correctly handle and install the components:
| Function | Tool | Alternative tool |
| Tighten screws | Philips screwdriver | 7 mm Stecker screwdriver |
| Cut out liner | Cutter | Blade |
PRIOR TO INSTALLATION
Before installing the Skimmer in the swimming pool, site the pool such that the stamp marking the Skimmer position faces the prevailing winds (see Fig. 2) so that the winds help convey the dirt remaining on the pool surface toward the Skimmer mouth.
Follow the mounting instructions for the pool sheeting and liner carefully.
The Skimmer must be installed on the outside and high part of the pool wall.
The device is intended to collect the surface water, leaving large impurities in the prefilter basket and letting small ones pass through so they are retained in the cartridge filter.
DO NOT PLACE CHEMICALS IN THE BASKET OR THROUGH THE FILTER. THIS WILL DAMAGE THE MATERIALS OF THE DEVICE AND LIMIT ITS EFFICIENCY.
4. ASSEMBLY:
The Skimmer body houses the filtering element or cartridge filter. The bottom of the body also houses the motor and the turbine that circulate the water, which is collected at the top through the Skimmer mouth and is returned through the lower valve once it is filtered.
4.1. RUCKSACK SKIMMER INSTALLATION
4.1.1. PRE-ANCHORING THE RETURN NOZZLE OF THE BACKPACK SKIMMER (Fig.2)
The filtered water flows through this nozzle into the pool again and the filtering cycle is then finished.
Start filling the pool with water, stopping at around 4 cm. from the lower edge of the return valve opening.
Mark the opening with a felt-tip pen and cut a cross in the centre of the opening using a cutter (BLADE), without going over the pre-cut hole.
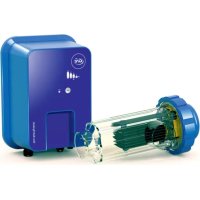
Insert the friction ring and one of the joints ( Fig. 2) in the return nozzle. From inside the pool, insert the return nozzle with the friction ring and the joint through the cut. The pieces of liner that stick out through the outer part of the pool should be cut cleanly and neatly.
4.1.2. ANCHORING THE BACKPACK SKIMMER BODY
Cut out the liner using a cutter (blade) following marked line (the liner must not be pulled from any point at this time).
Install the double joint of the Skimmer, clamping the plate and the liner (No. 7 Fig. 3).
Place the flap opening in the skimmer (Fig. 5) and pre-install the skimmer in the pool by tightening the 2 short screws (No. 8 Fig. 3) from inside the pool. These screws should cross through the liner, the double joint and the swimming pool plate and should finally match up with the holes of the skimmer (Fig. 3).
4.1.3. ANCHORING THE RETURN NOZZLE
From outside the pool, insert the other joint (Fig. 2) in the threaded part of the return nozzle that sticks out.
Screw the return nozzle well into the backpack Skimmer body using the spanner (No. 13 Fig. 2)
4.1.4. ANCHORING THE FRAME OF THE BACKPACK SKIMMER
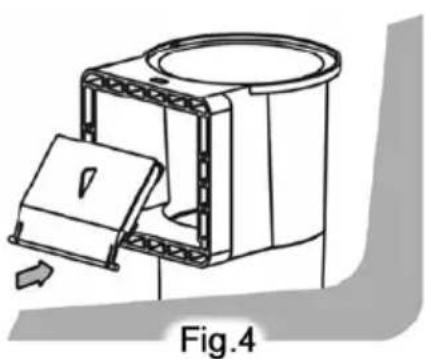
From inside the pool, place the frame of the backpack Skimmer (No. 9 Fig. 3) on the joint, without the trim cover of the frame. Place the 10 long screws (No. 8 Fig. 3) through the frame crossing through the liner, tighten them just a little to ensure that it fits properly. Do not fully tighten them at first, start gradually one by one in the order indicated (Fig. 4) until they are fully tightened.
4.1.5. FINAL DETAILS
Place the trim cover (No. 9 fig. 3) taking care to place the level marks in the correct position. Insert the filtering cartridge with the threaded end facing downwards, and screw into position. Place the pre-filter basket on the upper part inside the backpack Skimmer, and finally the backpack Skimmer cover, which is placed in position by turning it.
Finish filling the pool until the water reaches the level between the maximum and minimum marks of the backpack Skimmer opening.
Do not place the suction cover. Only use when the pool floor cleaner is to be used.
4.2. ELECTRICAL CONNECTION
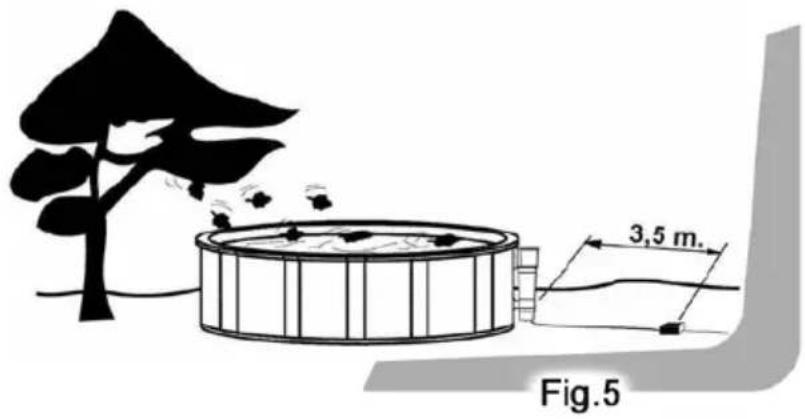
Place the transformer at a minimum distance of 3.5m from the edge of the pool (Fig. 1). Connect the transformer to a 230V and 50Hz alternate current source with earth connection. It is essential to use an omnipolar switch for the filter to be without voltage while not in use, and a 30mA differential switch for discharge protection. (Not supplied. They can be purchased from electrical stores).
Check the operation of the motor by placing your hand in front of the return nozzle to check that water is flowing out.
FILTERING:
The Skimmer is designed to suction and retain impurities suspended in the pool water. After initial filtering treatment (until the swimming pool water is clean), the whole volume of the pool should be recirculated once a day.
The filtering cartridge (No. 4) inside the Skimmer is the element that cleans the water. It consists of a fabric with a very fine mesh that retains the dirt.
Frequency in cleaning the filter cartridge (No. 4) depends on the amount of dirt, the number of filtering hours and the volume of the swimming pool. When it is observed that the amount of water returned inside the pool decreases, the filtering cartridge should be cleaned and
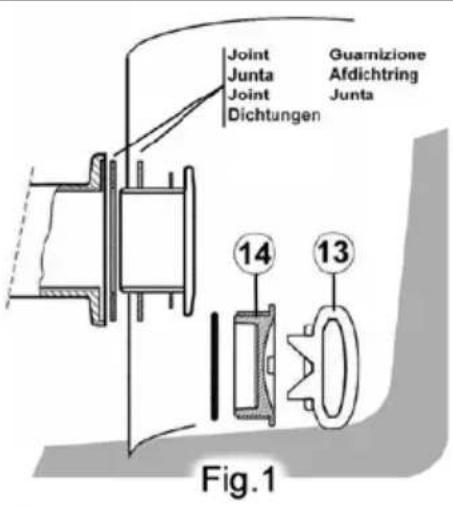

Fig.2
replaced if necessary. Filtering needs depend on the volume in ^3 of water in the pool in relation to the m^3 /hr of flow of the apparatus. Turn the motor off for at least 2 hours between operation intervals.
Volume of swimming pool in m³ = hours required
The aforementioned off time should be followed in the initial filtering treatment. It is recommended to increase the filtering time as the water temperature of the pool increases.
NEVER PLACE CHEMICAL PRODUCTS IN THE BASKET OR CARTRIDGE, AS THIS WILL DAMAGE THE MATERIALS OF THE APPARATUS AND REDUCE ITS EFFECTIVENESS.
DO NOT USE FLOCCULANT!
5. OPERATION
The cartridge inside the backpack Skimmer is the element that cleans the water. It consists of a fabric with a very fine mesh that retains the dirt.
Frequency in cleaning the cartridge depends on the periods of use of the filter, the environment, trees, pollen, insects and how often the pool is used, which are factors that determine the level of dirt of the pool.
When it is observed that the amount of water returned to the pool decreases, the cartridge should be cleaned (see section 6.1. Cleaning the cartridge).
To maintain the pool water in good condition, chemical products must also be used as recommended by the manufacturer (chlorine, anti-algae products, etc.).
The life span of the backpack filter will be longer if it is used for maximum periods of 4 hours. Daily filtering needs depend on the volume of water in the swimming pool in relation to the 3.8m^3/hr flow of the backpack Skimmer.
Leave the motor off for at least 2 hours between each operation period.
6. MAINTENANCE:
6.1. CLEANING THE CARTRIDGE
Disconnect the apparatus from the power supply.
Remove the cover and the basket.
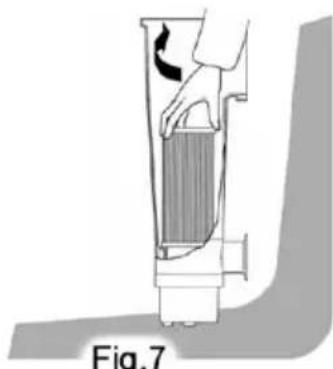
Unscrew the cartridge from its position and remove it from inside the backpack Skimmer (Fig. 7).
Place the cartridge under a jet of water from a low-pressure garden hose, until it is clean (Fig. 6).
Insert the cartridge with the threaded end facing downwards and screw it back into place.
Place the pre-filter basket and cover back into place.
6.2. CLEANING THE FLOOR OF THE SWIMMING POOL
The backpack Skimmer can be used to clean the floor of the swimming pool, with one of the following or "Triangular" floor cleaner + adapter cover / AR-2062.

To acquire these products, enquire at your dealers or the After-sales Service of the swimming pool manufacturer. Always use original spare parts.
A hose that is longer than necessary to reach all points of the pool will hinder its use. Cut the excess length of hose. Ensure that rubber terminals do not leak.
6.2.1. CONNECTING THE FLOOR CLEANER
Disconnect the apparatus from the power supply.
Place the suction cover accessory inside the Skimmer with the inlet facing downwards and without removing the basket.
Prime the hose
From INSIDE THE POOL pass the end of the hose through the Skimmer flap opening and taking care not to let air in, connect it to the suction cover inlet. Connection will be easier if the suction cover is held at a slant.
Then place it into position horizontally inserting more hose. TAKE CARE NOT TO DAMAGE THE SKIMMER FLAP OPENING WHILE PERFORMING THIS OPERATION.
THE WATER LEVEL OF THE SKIMMER SHOULD BE AT MAXIMUM AND ABOVE THE JOINT BETWEEN THE COVER AND THE HOSE TO PREVENT AIR FROM ENTERING.
Start-up the backpack Skimmer and proceed to clean the floor of the swimming pool.
6.2.2. PRIMING THE FLOOR CLEANER HOSE:
Slowly place the floor cleaner inside the pool with a pole and the hose connected vertically, letting it fill with water and keeping the rest of the hose out of the water.
Gradually place the hose in the water in lengths of 50~cm , which should be immersed as they fill with water. When the end is reached, the hose should be full of water and totally immersed.
If the hose is not fully primed, the floor cleaner will not be able to suction and the water treatment apparatus may be damaged if used empty.
USE:
It is imperative to ensure that the intake ports are not blocked.
- It is recommended to stop filtering while performing maintenance of the filtration system.
- The filter should be monitored regularly to check it is not clogged.
- Prevent access to the pool in the case of damage to the filtration system(s).
7. ELECTRICAL COMPONENTS
To guarantee electrical safety, the equipment is provided with an electrical unit that is protected against the inlet of water. If a cable or any of the components are damaged, the whole electrical unit should be changed.
None of the components of this electrical unit should be handled, as it would affect the safety of the equipment.
REPLACING THE ELECTRICAL UNIT
If a cable or a component of the electrical unit is damaged, proceed as follows:
- Disconnect the apparatus from the mains.
- Unscrew the 3 screws of the bottom cover and remove it.
- Unscrew the 3 screws that hold the motor and remove the electric/motor unit.
- Place the new electric/motor unit by tightening the 3 screws to the body of the skimmer and place the bottom cover by tightening the 3 corresponding screws
8. WINTER MONTHS - MAINTENANCE WHEN OUT OF USE
To preserve the equipment properly during the winter months or when it is not used for long period of time, proceed as follows:
Empty the water from the pool until 4cm under the lower edge of the backpack skimmer frame (No. 9 Fig 3)
Insert the O-ring (Fig. 2) in the winter plug (No. 14 Fig. 2) and screw the plug to the return nozzle from inside the pool, using the spanner (No. 13 Fig. 2). Remove the cartridge, dry it and store it.
It is recommended to use this occasion to visually check the condition of the cable and other electrical components and replace if necessary. To do this, see section ELECTRICAL COMPONENTS.
| PROBLEMS CAUSE SOLUTION | |
| The backpack skimmer does not filter, but does put water in the swimming pool. | The cartridge is not positioned correctly. | Position it correctly and screw into place |
| The cartridge is worn through use | Replace with a new one |
| The filter does not let water flow in the return nozzle | The filter is dirty through use | Clean the cartridge as indicated in section 6.1. Cleaning the cartridge. |
| Faulty electrical connection | Check the connection |
| Check the filter cable |
If you cannot solve the problem, contact the swimming pool manufacturer at the number indicated in the instructions.

In order to reduce the amount of waste of electric and electronic apparatus, to reduce the danger of components, to encourage the reuse of apparatus, to assess waste and to set up a suitable waste treatment system, with the aim of improving the efficiency of environmental protection, a set of rules has been established applicable to the manufacture of the product and other rules regarding the correct environmental treatment when these products become waste. It is also intended to improve the environmental practices of all agents involved in electrical and electronic goods, including manufacturers, distributors, users and particularly those directly involved in the treatment of waste derived from these apparatus.
Since August 13^th , 2005, there are two ways of disposing of this apparatus:
- if you purchase a new equivalent apparatus or which has the same functions as the one you wish to dispose of, you can hand it over, free of charge, to the distributor when making your purchase, or
- you can take it to local collection points.
We shall cover waste treatment costs.
The apparatus are labelled with a symbol of a "crossed-out waste container". This symbol means that the apparatus is subject to selected waste collection, different from general waste collection.
Our products are designed and manufactured with top-quality, environmental-friendly materials and components, which can be reused and recycled. In spite of this, several parts of this product are not biodegradable and therefore it should not be left in the environment. For the correct recycling of this product, please completely detach the electrical motor from the rest of the filtration equipment.
GUARANTEE CERTIFICATE
1. GENERAL TERMS
1.1. In accordance with these provisions, the seller guarantees that the GRE product corresponding to this guarantee ("the Product") is in perfect condition at the time of delivery.
1.2. The Guarantee Term for the Product is two (2) years from the time it is delivered to the purchaser.
1.3. In the event of any defect in the Product that is notified by the purchaser to the seller during the Guarantee Term, the seller will be obliged to repair or replace the Product, at his own cost and wherever he deems suitable, unless this is impossible or unreasonable.
1.4. If it is not possible to repair or replace the Product, the purchaser may ask for a proportional reduction in the price or, if the defect is sufficiently significant, the termination of the sales contract.
1.5. The replaced or repaired parts under this guarantee, will not extend the guarantee period of the original Product, but will have a separate guarantee.
1.6. In order for this guarantee to come into effect, the purchaser must provide proof of the date of purchase and delivery of the Product.
1.7. If, after six months from the delivery of the Product to the purchaser, he notifies a defect in the Product, the purchaser must provide proof of the origin and existence of the alleged defect.
1.8. This Guarantee Certificate is issued without prejudice to the rights corresponding to consumers under national regulations.
2. INDIVIDUAL TERMS
2.1. This guarantee covers the products referred to in this manual.
2.2. This Guarantee Certificate will only be applicable in European Union countries.
2.3. For this guarantee to be effective, the purchaser must strictly follow the Manufacturer's instructions included in the documentation provided with the Product, in cases where it is applicable according to the range and model of the Product.
2.4. When a time schedule is specified for the replacement, maintenance or cleaning of certain parts or components of the Product, the guarantee will only be valid if this time schedule has been followed.
3. LIMITATIONS
3.1. This guarantee will only be applicable to sales made to consumers, understanding by "consumer", a person who purchases the Product for purposes not related to his professional activities.
3.2. The normal wear resulting from using the product is not guaranteed. With respect to expendable or consumable parts, components and/or materials, such as batteries, light bulbs, etc. the stipulations in the documentation provided with the Product, will apply.
3.3. The guarantee does not cover those cases when the Product; (I) has been handled incorrectly; (II) has been repaired, serviced or handled by non-authorised people or (III) has been repaired or serviced not using original parts.
In cases where the defect of the Product is a result of incorrect installation or start-up, this guarantee will only apply when said installation or start-up is included in the sales contract of the Product and has been conducted by the seller or under his responsibility.
1.ÜBERPRÜFEN SIE DEN INHALT DES PACKSTÜCKES:
The products listed above are in compliance with:
Machinery Directive 89/392/EEC.
Electromagnetic Compatibility Directive
2004/108/EEC.
Low Voltage Directive 2006/95/EEC.
Electrical and Electronic Equipment Directive (RoHS)
2002/95/EEC
European Standard EN 60335-2-41 and all its
modifications.
Los produits arriba enumerated se hallan conformes con:
MANUFACTURAS GRE, S.A.