
Aquatimer Chronograph 3768 - Wristwatch IWC - Free user manual and instructions
Find the device manual for free Aquatimer Chronograph 3768 IWC in PDF.

| Product type | Wristwatch |
| Brand | IWC |
| Model | Aquatimer Chronograph 3768 |
| Movement | Mechanical, self-winding |
| Power reserve | Approximately 44 hours |
| Water resistance | 30 bar (300 meters) |
| Crystal | Sapphire, hardness 9 on the Mohs scale |
| Main functions | Hours, minutes, seconds, date, day of the week, chronograph (seconds, minutes, hours up to 12h), cumulative time measurement, internal rotating bezel for diving |
| Crown | Screw-in, positions X (normal), 0 (winding), 1 (date/day adjustment), 2 (time adjustment) |
| Bracelet/Strap | Interchangeable (patented system), metal, adjustable by links |
| Luminous elements | Dial, hands and markers on internal bezel |
| Maintenance | Rinse with fresh water after diving, overhaul every 5 years, annual water resistance check |
| Safety | Protection against magnetic fields (soft iron inner case), screw-in crown, unidirectional rotating bezel |
| Case materials | Stainless steel, bronze, red/gray gold, platinum, titanium, titanium aluminide, ceramic, carbon (depending on version) |
| General information | Manual available in multiple languages, 138 pages |
Frequently Asked Questions - Aquatimer Chronograph 3768 IWC
User questions about Aquatimer Chronograph 3768 IWC
0 question about this device. Answer the ones you know or ask your own.
Ask a new question about this device
Download the instructions for your Wristwatch in PDF format for free! Find your manual Aquatimer Chronograph 3768 - IWC and take your electronic device back in hand. On this page are published all the documents necessary for the use of your device. Aquatimer Chronograph 3768 by IWC.
USER MANUAL Aquatimer Chronograph 3768 IWC
MANUAL DE INSTRUÇÕES

bar
| Category | Value | |---|---| | Category 1 | 0 | | Category 2 | 0 | | Category 3 | 0 | | Category 4 | 0 | | Category 5 | 0 | | Category 6 | 0 | | Category 7 | 0 | | Category 8 | 0 | | Category 9 | 0 | | Category 10 | 0 | | Category 11 | 0 | | Category 12 | 0 | | Category 13 | 0 | | Category 14 | 0 | | Category 15 | 0 | | Category 16 | 0 | | Category 17 | 0 | | Category 18 | 0 | | Category 19 | 0 | | Category 20 | 0 | | Category 21 | 0 | | Category 22 | 0 | | Category 23 | 0 | | Category 24 | 0 | | Category 25 | 0 | | Category 26 | 0 | | Category 27 | 0 | | Category 28 | 0 | | Category 29 | 0 | | Category 30 | 0 | | Category 31 | 0 | | Category 32 | 0 | | Category 33 | 0 | | Category 34 | 0 | | Category 35 | 0 | | Category 36 | 0 | | Category 37 | 0 | | Category 38 | 0 | | Category 39 | 0 | | Category 40 | 0 | | Category 41 | 0 | | Category 42 | 0 | | Category 43 | 0 | | Category 44 | 0 | | Category 45 | 0 | | Category 46 | 0 | | Category 47 | 0 | | Category 48 | 0 | | Category 49 | 0 | | Category 50 | 0 | | Category 51 | 0 | | Category 52 | 0 | | Category 53 | 0 | | Category 54 | 0 | | Category 55 | 0 | | Category 56 | 0 | | Category 57 | 0 | | Category 58 | 0 | | Category 59 | 0 | | Category 60 | 0 | | Category 61 | 0 | | Category 62 | 0 | | Category 63 | 0 | | Category 64 | 0 | | Category 65 | 0 | | Category 66 | 0 | | Category 67 | 0 | | Category 68 | 0 | | Category 69 | 0 | | Category 70 | 0 | | Category 71 | 0 | | Category 72 | 0 | | Category 73 | 0 | | Category 74 | 0 | | Category 75 | 0 | | Category 76 | 0 | | Category 77 | 0 | | Category 78 | 0 | | Category 79 | 0 | | Category 80 | 0 | | Category 81 | 0 | | Category 82 | 0 | | Category 83 | 0 | | Category 84 | 0 | | Category 85 | 0 | | Category 86 | 0 | | Category 87 | 0 | | Category 88 | 0 | | Category 89 | 0 | | Category 90 | 0 | | Category 91 | 0 | | Category 92 | 0 | | Category 93 | 0 | | Category 94 | 0 | | Category 95 | 0 | | Category 96 | 0 | | Category 97 | 0 | | Category 98 | 0 | | Category 99 | 0 | | Total (Total) | -11.5%
bar
| Category | Value | |---|---| | Category 1 | 0 | | Category 2 | 0 | | Category 3 | 0 | | Category 4 | 0 | | Category 5 | 0 | | Category 6 | 0 | | Category 7 | 0 | | Category 8 | 0 | | Category 9 | 0 | | Category 10 | 0 | | Category 11 | 0 | | Category 12 | 0 | | Category 13 | 0 | | Category 14 | 0 | | Category 15 | 0 | | Category 16 | 0 | | Category 17 | 0 | | Category 18 | 0 | | Category 19 | 0 | | Category 20 | 0 | | Category 21 | 0 | | Category 22 | 0 | | Category 23 | 0 | | Category 24 | 0 | | Category 25 | 0 | | Category 26 | 0 | | Category 27 | 0 | | Category 28 | 0 | | Category 29 | 0 | | Category 30 | 0 | | Category 31 | 0 | | Category 32 | 0 | | Category 33 | 0 | | Category 34 | 0 | | Category 35 | 0 | | Category 36 | 0 | | Category 37 | 0 | | Category 38 | 0 | | Category 39 | 0 | | Category 40 | 0 | | Category 41 | 0 | | Category 42 | 0 | | Category 43 | 0 | | Category 44 | 0 | | Category 45 | 0 | | Category 46 | 0 | | Category 47 | 0 | | Category 48 | 0 | | Category 49 | 0 | | Category 50 | 0 | | Category 51 | 0 | | Category 52 | 0 | | Category 53 | 0 | | Category 54 | 0 | | Category 55 | 0 | | Category 56 | 0 | | Category 57 | 0 | | Category 58 | 0 | | Category 59 | 0 | | Category 60 | 0 | | Category 61 | 0 | | Category 62 | 0 | | Category 63 | 0 | | Category 64 | 0 | | Category 65 | 0 | | Category 66 | 0 | | Category 67 | 0 | | Category 68 | 0 | | Category 69 | 0 | | Category 70 | 0 | | Category 71 | 0 | | Category 72 | 0 | | Category 73 | 0 | | Category 74 | 0 | | Category 75 | 0 | | Category 76 | 0 | | Category 77 | 0 | | Category 78 | 0 | | Category 79 | 0 | | Category 80 | 0 | | Category 81 | 0 | | Category 82 | 0 | | Category 83 | 0 | | Category 84 | 0 | | Category 85 | 0 | | Category 86 | 0 | | Category 87 | 0 | | Category 88 | 0 | | Category 89 | 0 | | Category 90 | 0 | | Category 91 | 0 | | Category 92 | 0 | | Category 93 | 0 | | Category 94 | 0 | | Category 95 | 0 | | Category 96 | 0 | | Category 97 | 0 | | Category 98 | 0 | | Category 99 | 0 | | Total (Total) | -11.5%- 5 -
BEDIENUNGSANLEITUNG
Deutsch
-27-
OPERATING INSTRUCTIONS
English
- 49 -
MODE D'EMPLOI
Français
-71-
ISTRUZIONI D'USO
Italiano
-93-
MANUAL DE INSTRUÇÕES
Português
natural_image
Mechanical assembly diagram showing a valve or actuator with a numbered arrow indicating direction (no text or symbols present)natural_image
Pure electrical circuit lines without any symbolsnatural_image
Pure electrical circuit lines without any symbols| EDELSTAHL | niedrig ● ● ● ● ● hoch niedrig | ● ● ● ● ● hoch niedrig | ● ● ● ● ● hoch niedrig |
| BRONZE | niedrig ● ● ● ● ● hoch niedrig | ● ● ● ● ● hoch niedrig | ● ● ● ● ● hoch niedrig |
| ROTGOLD/WEISSGOLD | niedrig ● ● ● ● ● hoch niedrig | ● ● ● ● ● hoch niedrig | ● ● ● ● ● hoch niedrig |
| PLATIN | niedrig ● ● ● ● ● hoch niedrig | ● ● ● ● ● hoch niedrig | ● ● ● ● ● hoch niedrig |
| TITAN | niedrig ● ● ● ● ● hoch niedrig | ● ● ● ● ● hoch niedrig | ● ● ● ● ● hoch niedrig |
| TITANALUMINID | niedrig ● ● ● ● ● hoch niedrig | ● ● ● ● ● hoch niedrig | ● ● ● ● ● hoch niedrig |
| KERAMIK (ZIRKONOXID) | niedrig ● ● ● ● ● Hoch niedrig | ● ● ● ● ● Hoch niedrig | ● ● ● ● ● Hoch niedrig |
| CARBON | niedrig ● ● ● ● ● Hoch niedrig | ● ● ● ● ● Hoch niedrig | ● ● ● ● ● Hoch niedrig |
WEITERE INFORMATIONEN UNTER WWW.IWC.COM/CASE-MATERIALS
—Welcome to the small circle of individuals
who, if we are to be absolutely precise, demand slightly more of a watch than absolute precision. Appreciation of a watch is more than mere appreciation of the correct time. It is enthusiasm for an ingenious idea. For the interplay between precision and imagination. Between time and timelessness. Between boundaries and infinity. Between laws to which the entire world is subject, and taste, which cannot be dictated to anyone. That is why, since 1868, we have been devoting rather more of our time to watches that must not only run with absolute precision but which also, with every passing second, exert a fascination with the great achievements of master craftsmanship: a fascination with new inventions of a technical, material or formal nature, even if they are concealed in minute details that are perhaps not even visible. You are now the owner of a beautiful new example of this IWC tradition. We would like to congratulate you on your choice and send you our best wishes for the time you will spend with your watch, which perhaps cannot be described with any greater accuracy than it is here.
IWC MANAGEMENT
THE TECHNICAL REFINEMENTS OF THE AQUATIMER CHRONOGRAPH
Your IWC watch shows you the time in hours, minutes and seconds, together with the date and the day. You can use the integrated chronograph to measure any period of time up to 12 hours in seconds, minutes and hours. Stop times can be added together. The dive time is read off on the internal rotating bezel, which for safety reasons can only be turned anticlockwise. The mechanical movement with automatic winding has a power reserve of approximately 44 hours when fully wound. Your watch is water-resistant 30 bar and protected by a sapphire glass of hardness grade 9 on Mohs' scale. To ensure that this extraordinary watch continues to perform faultlessly in the future, it is essential to observe a few important operating instructions.
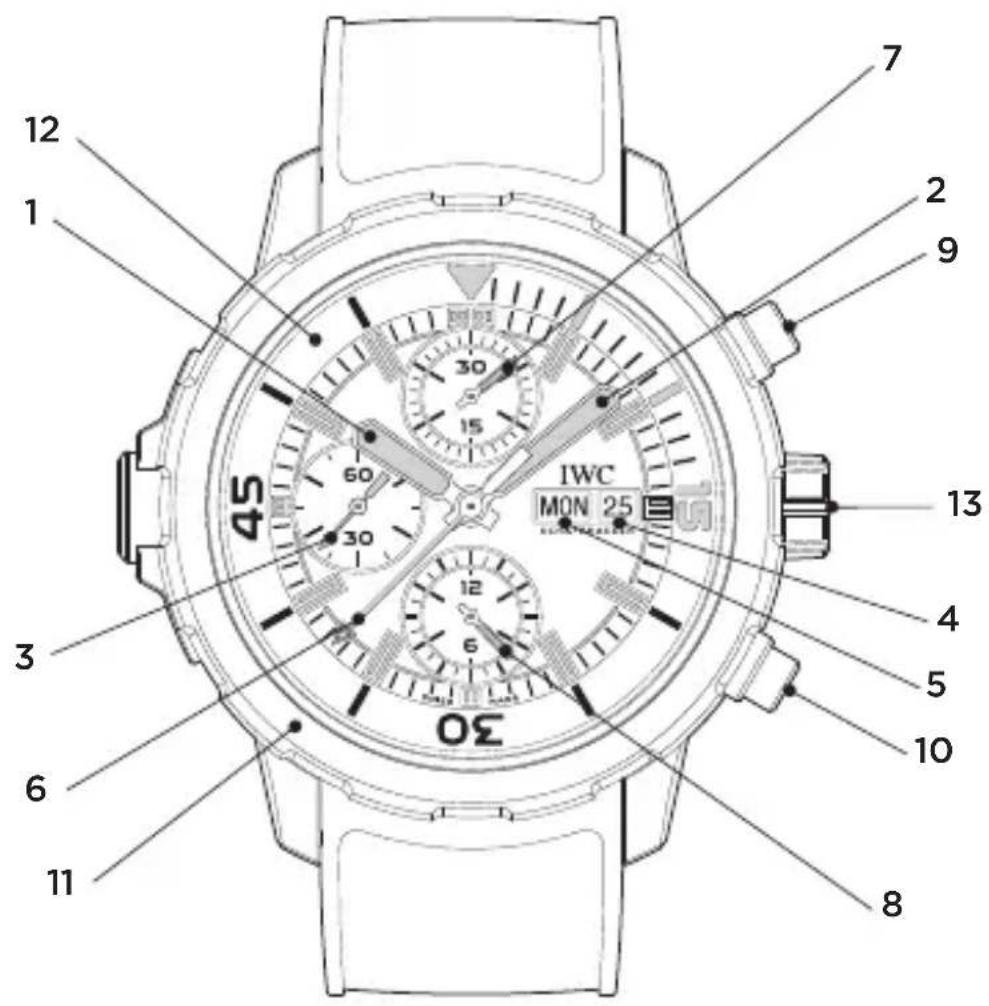
1 Hour hand
2 Minute hand
3 Small seconds hand
4 Date display
5 Day display
6 Chronograph seconds hand
Minute counter 7
Hour counter 8
Start/stop push-button 9
Reset push-button 10
External rotating bezel 11
Internal rotating bezel 12
Screw-in crown 13
FUNCTIONS OF THE CROWN

X - Normal position (screwed in)
0 - Winding position
1 — Date and day setting
2 - Time setting
NORMAL POSITION
This watch has a screw-in crown. Screwing the crown in to its normal position (X) prevents the inadvertent adjustment of the time or date and also acts as a double seal to prevent water from seeping into the case. To release the crown, unscrew it by turning it to the left, where it automatically assumes position 0, the winding position. By depressing the crown in position X and turning it to the right at the same time, it is screwed down firmly again and secured.
Important: Although the watch is water-resistant in positions 0, 1 and 2, the crown should always be screwed in again for normal use (position X). The crown must not be moved or used for any purpose whatsoever while under water.
WINDING POSITION
With the crown in the winding position (0), you can also wind the automatic movement by hand. A few revolutions of the crown are enough to start the movement. However, it is better to wind the watch by turning the crown through approximately 20 revolutions as this will ensure maximum accuracy. The crown must always be in position X when you are wearing your watch.
DATE AND DAY SETTING
If a month has fewer than 31 days, you will need to set the date manually to the first day of the following month. Release the screw-in crown and pull it out to position 1. You can now set the date by turning the crown to the right, and the day by turning it to the left (direct advance). You should not use the rapid-advance function between 8 p.m. and 2 a.m. because the movement automatically advances the date and the day during this period.
TIME SETTING
Pull out the crown to position 2. This will stop the movement. To set the time accurately to the second, it is best to stop the movement as the seconds hand passes 60. Now move the minute hand a few minute strokes beyond the time to be set. Then position the minute hand by moving it gently backwards until it is exactly above the correct minute stroke. This ensures that the minute hand begins to move immediately when you restart the movement. To start the seconds hand, push in the crown to position 0. When setting the time, please be aware of the date change, which always takes place at 12 midnight. If this change has already taken place at 12 noon, you must move the hands forwards by 12 hours.
Important: Although the watch is water-resistant in positions 0, 1 and 2, the crown should always be screwed in again for normal use (position X).
SETTING YOUR WATCH CORRECTLY
To set your watch correctly, proceed as follows:
- Release the crown by turning it to the left.
- Wind the movement (approximately 20 revolutions of the crown).
- Pull out the crown to position 1.
- Turn the crown to the right to advance the date display in steps. Set the display to yesterday's date.
- Turn the crown to the left to advance the day display in steps. Set the display to yesterday's day.
- Pull out the crown to position 2. This will stop the movement. To set the time accurately to the second, it is best to stop the movement as the seconds hand passes 60.
- Turn the hands forwards until the date display changes to today's date. The hands will now be positioned between 12 midnight and 1 a.m.
-
Now turn the hands forwards to the current time. If you are setting the watch in the afternoon, you must turn the hands past 12 (noon) again. Now move the minute hand a few minute strokes beyond the time to be set. Then position the minute hand by moving it gently backwards until it is exactly above the correct minute stroke. This ensures that the minute hand begins to move immediately when you restart the movement.
-
Push the crown back to position 0 to start the movement.
- Now push the crown to position X and secure it by simultaneously turning it to the right.
Important: Although the watch is water-resistant in positions 0, 1 and 2, the crown should always be screwed in again for normal use (position X).
READING THE TIME IN THE DARK
The dial, the hour, minute and seconds hands, as well as the markings on the internal rotating bezel of your watch have luminescent elements that allow you to read the time effortlessly even in total darkness. The two luminescent elements at 12 o'clock serve as a reference point.
READING THE CHRONOGRAPH
Chronograph seconds hand: The scale for the central chronograph seconds hand runs around the edge of the dial.
Minute counter: The 30-minute scale with a slow jumping hand is situated on the subdial at 12 o'clock. This hand makes two complete revolutions in one hour.
Hour counter: The 12-hour scale with short lines for the 30-minute indication and with a continuous hand is situated on the sub-dial at 6 o'clock.
USING THE CHRONOGRAPH
Start: To start the chronograph, press the start/stop push-button.
Stop: To stop the chronograph, press the start/stop push-button again.
Reset: Press the reset push-button. This will reset all the chronograph hands to zero.
Aggregate time recording: You can add stop times together by pressing the start/stop push-button again after the first measurement instead of the reset push-button.
MARKING THE START OF A DIVE
The triangle on the internal rotating bezel can be aligned with the minute hand by turning the external rotating bezel. The desired point in time (for example the time of entering the water at the start of the dive) can be set in this way. You can read off the elapsed time (for example the duration of the dive) on the internal rotating bezel. For safety reasons, the internal rotating bezel can only be rotated in an anticlockwise direction. The rotating bezel is indexed audibly and perceptibly in one-minute steps, and it is also legible in the dark thanks to the luminescent markings.
If you are planning to use the watch to time dives, you should be a certified open water diver and have the water-resistance of your watch checked regularly by an IWC service centre.
CHANGING BETWEEN DIFFERENT TYPES OF BRACELET OR STRAP
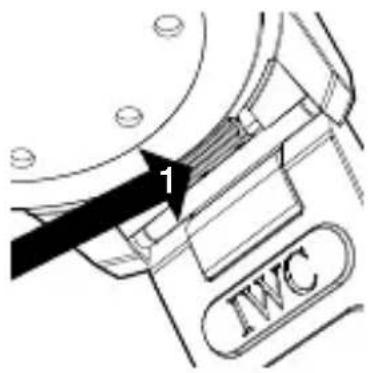
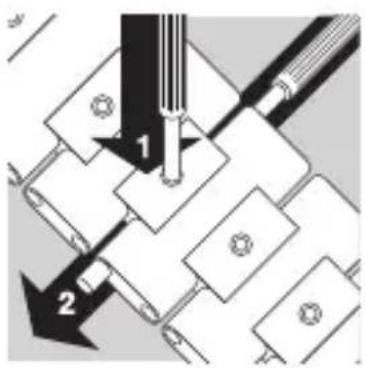
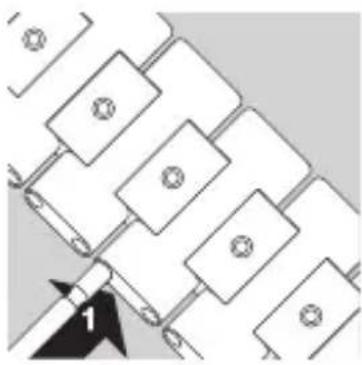
Your Aquatimer Chronograph comes with a patented IWC bracelet quick-change system that enables you to change the bracelet or strap quickly and simply, without the use of tools. To remove the bracelet or strap, use your thumbnail to firmly push the retaining lever (1) located on the underside of the horns outwards.
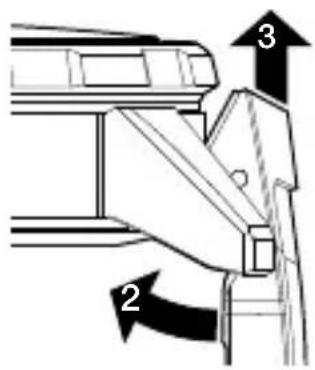
Tilt the bracelet or strap inwards (2) and move it upwards away from the case (3).
natural_image
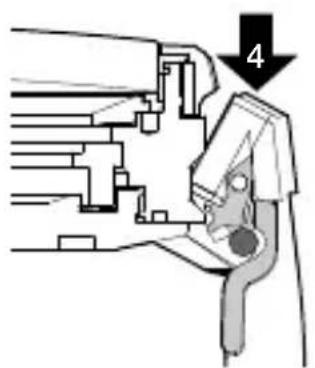
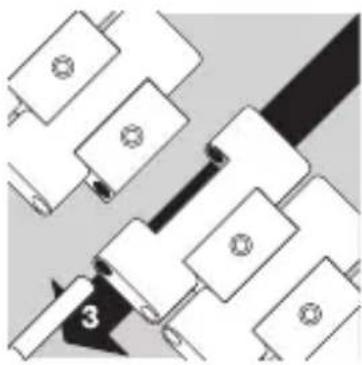
Technical diagram of a mechanical assembly with a numbered arrow indicating a specific part (no text or symbols present)To attach the bracelet or strap, hook the notch of the horns from above into the spring pin of the case (4).

Now return the bracelet or strap to its original position (5) while simultaneously pressing it down into the horns to snap it into place (6).
Once you have heard and felt that the bracelet or strap has clicked into place, you can be sure that the bracelet or strap is safely secured.
When using the rubber strap, please be aware that the strap with the buckle should be attached to the 12 o'clock position on the case.
When attaching a metal bracelet, you can use the IWC logo on the clasp as a marker to ensure you align the bracelet correctly. You can then attach the upper end of the bracelet to the 6 o'clock position on the case – both the IWC logo on the dial and the clasp should now be facing in the same direction.
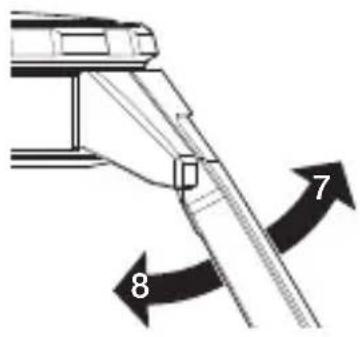
After changing the strap, please ensure that it is securely attached by pulling both sides up (7) and down (8) firmly.
ADJUSTING AND SETTING THE METAL BRACELET
The metal bracelet has been designed so that you can comfortably adjust it to the size of your wrist. You can make this adjustment yourself by removing or adding individual bracelet links.
TAKING THE BRACELET APART
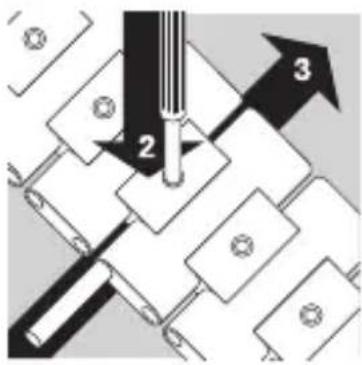
Open the folding clasp by pressing the buttons on the side. Lay the bracelet face down on a firm base. To avoid scratching the bracelet and base, place a cloth underneath the bracelet. Using the special tool provided, you can now push down the fixing bolt at the desired point of separation (1)
and at the same time, slide the hinged link with the help of the second tool about 3 millimetres sideways (2).
natural_image
Pure electrical circuit lines without any symbolsPull the protruding hinged link out of the bracelet (3). The bracelet is now separated.
DETERMINING HOW MANY LINKS TO REMOVE
Place the watch around your wrist with the folding clasp closed, and use the overlap to estimate the number of surplus bracelet links you can now remove as described below. If you need to take out several links, we recommend removing the same number of links from each side of the bracelet if possible, to ensure that the clasp can be worn more or less in the centre of the wrist.
REMOVING INDIVIDUAL LINKS AND ATTACHING THE BRACELET
natural_image
Pure electrical circuit lines without any symbolsRepeat steps 1 to 3 at the distance from the first point of separation you have just determined. Remove the unnecessary links and reassemble the shortened bracelet.
Slide the hinged link into the bracelet sideways (1).
Using the special tool provided, you can now push down the fixing bolt (2) and at the same time, slide the hinged link back into the bracelet until it lies flush (3).
The fixing bolt must be aligned with the upper edge of the securing link. It is important that you check that the hinged link
is sitting correctly.
Keep the surplus links and separating tool in a safe place for use in any adjustments at another time.
INFORMATION ABOUT MAGNETIC FIELDS
As a result of the ever greater prevalence in recent years of very strong magnets made from rare-earth alloys (for example neodymium-iron-boron) – these are found in objects such as loud-speakers, jewellery and fasteners on mobile-phone cases and handbags – mechanical watches are increasingly likely to come into contact with such magnets and be magnetized. This can lead to the watch rate being permanently affected, a problem that can only be resolved by a process of demagnetization carried out by a specialist. We recommend that you keep your watch away from such magnets.
Watches with a soft-iron inner case provide a higher level of protection against magnetic fields and far exceed the requirements of DIN standard 8309. Nevertheless, it is still possible for the watch movement to be magnetized in the close proximity of very strong magnets. We therefore recommend that watches with a soft-iron inner case also be kept away from direct contact with strong magnets.
Should there be a sudden change in the precision of your time-piece, please contact an authorized IWC Official Agent to have your watch checked for magnetism.
WATER-RESISTANCE
The water-resistance of IWC watches is stated in bar and not in metres. Metres, which are often used elsewhere in the watch industry to indicate water-resistance, cannot be equated with dive depth because of the test procedures that are frequently used. Water-resistance shown in metres provides no indication as to actual use of the watch in the presence of moisture and wetness, and in or under water. Recommendations for use in connection with the water-resistance of your watch can be found on the Internet at www.iwc.com/water-resistance. Your authorized IWC Official Agent will also be pleased to provide you with information.
To ensure that your watch continues to function perfectly, you should have it checked by an IWC service centre at least once a year. Your watch should also be tested after exposure to unusually harsh conditions. If the tests are not carried out as stipulated, or if the watch is opened by unauthorized persons, IWC will accept no warranty or liability claims.
Recommendation: Your authorized IWC Official Agent must carry out a water-resistance test whenever your IWC watch is opened and serviced.
CLEANING THE WATCH AFTER DIVING
After diving – and especially after diving in seawater – you should rinse your watch under running tap water. This will prevent salt incrustation on the case, bracelet or strap and clasp or buckle. You should also clean the wet area of the SafeDive system by rinsing water through the holes on the protective bow on the left-hand side of the case.
SERVICING YOUR AQUATIMER CHRONOGRAPH
Although the parts in this watch are all manufactured from top-quality materials, a number of components are subject to natural wear and tear. It is particularly important to ensure that the points at which wear occurs are always well lubricated and that oil contaminated by metal abrasion is regularly removed. For this reason, we recommend that you have your watch serviced approximately every five years. Please contact an authorized IWC Official Agent or send your watch directly to the IWC Customer Service Department in Schaffhausen.
CASE MATERIALS
| CASE MATERIAL | SCRATCH-RESISTANCE | BREAKING STRENGTH WEIGHT | |
| STAINLESS STEEL | low ● ● ● ● ● high low | ● ● ● ● ● high low | ● ● ● ● ● high |
| BRONZE | low ● ● ● ● ● high low | ● ● ● ● ● high low | ● ● ● ● ● high |
| RED GOLD/WHITE GOLD | low ● ● ● ● ● high low | ● ● ● ● ● high low | ● ● ● ● ● high |
| PLATINUM | low ● ● ● ● ● high low | ● ● ● ● ● high low | ● ● ● ● ● high |
| TITANIUM | low ● ● ● ● ● high low | ● ● ● ● ● high low | ● ● ● ● ● high |
| TITANIUM ALUMINIDE | low ● ● ● ● ● high low | ● ● ● ● ● high low | ● ● ● ● ● high |
| CERAMIC(ZIRCONIUM OXIDE) | low ● ● ● ● ● high low | ● ● ● ● ● high low | ● ● ● ● ● high |
| CARBON | low ● ● ● ● ● high low | ● ● ● ● ● high low | ● ● ● ● ● high |
FURTHER INFORMATION AT WWW.IWC.COM/CASE-MATERIALS
Effective from January 2014. Technical specifications subject to change.
Poussoir start-stop 9
natural_image
Abstract geometric pattern with overlapping rectangles and a black arrow labeled '3' (no text or symbols)natural_image
Pure electrical circuit lines without any symbolsnatural_image
Technical diagram of a mechanical assembly with a numbered arrow indicating a specific part (no text or symbols present)natural_image
Pure electrical circuit lines without any symbolsnatural_image
Pure electrical circuit lines without any symbolsnatural_image
Mechanical assembly diagram showing a valve or actuator with a numbered arrow indicating part 4 (no text or symbols present)natural_image
Pure electrical circuit lines without any symbolsnatural_image
Pure electrical circuit lines without any symbolsnatural_image
Mechanical assembly diagram showing a valve or actuator with a numbered arrow indicating part 4 (no text or symbols present)natural_image
Pure electrical circuit lines without any symbolsRemova agora o pino articulado que sobressai da bracelet (3). Agora a bracelet está separada.
natural_image
Pure electrical circuit lines without any symbolsBranch of Richemont International SA
Baumgartenstrasse 15
CH-8201 Schaffhausen
Switzerland
Phone +41 (0)52 635 65 65
Fax +41 (0)52 635 65 01
info@iwc.com
www.iwc.com
© Copyright 2014
IWC Schaffhausen, Branch of Richemont International SA Printed in Switzerland

FSC
www.fsc.org
MIX
Paper from
responsible sources
FSC® C016687

bar
| Category | Value | |---|---| | Category 1 | 100 | | Category 2 | 100 | | Category 3 | 100 | | Category 4 | 100 | | Category 5 | 100 | | Category 6 | 100 | | Category 7 | 100 | | Category 8 | 100 | | Category 9 | 100 | | Category 10 | 100 | | Category 11 | 100 | | Category 12 | 100 | | Category 13 | 100 | | Category 14 | 100 | | Category 15 | 100 | | Category 16 | 100 | | Category 17 | 100 | | Category 18 | 100 | | Category 19 | 100 | | Category 20 | 100 | | Category 21 | 100 | | Category 22 | 100 | | Category 23 | 100 | | Category 24 | 100 | | Category 25 | 100 | | Category 26 | 100 | | Category 27 | 100 | | Category 28 | 100 | | Category 29 | 100 | | Category 30 | 100 | | Category 31 | 100 | | Category 32 | 100 | | Category 33 | 100 | | Category 34 | 100 | | Category 35 | 100 | | Category 36 | 100 | | Category 37 | 100 | | Category 38 | 100 | | Category 39 | 100 | | Category 40 | 100 | | Category 41 | 100 | | Category 42 | 100 | | Category 43 | 100 | | Category 44 | 100 | | Category 45 | 100 | | Category 46 | 100 | | Category 47 | 100 | | Category 48 | 100 | | Category 49 | 100 | | Category 50 | 100 | | Category 51 | 100 | | Category 52 | 100 | | Category 53 | 100 | | Category 54 | 100 | | Category 55 | 100 | | Category 56 | 100 | | Category 57 | 100 | | Category 58 | 100 | | Category 59 | 100 | | Category 60 | 100 | | Category 61 | 100 | | Category 62 | 100 | | Category 63 | 100 | | Category 64 | 100 | | Category 65 | 100 | | Category 66 | 100 | | Category 67 | 100 | | Category 68 | 100 | | Category 69 | 100 | | Category 70 | 100 | | Category 71 | 100 | | Category 72 | 100 | | Category 73 | 100 | | Category 74 | 100 | | Category 75 | 100 | | Category 76 | 100 | | Category 77 | 100 | | Category 78 | 100 | | Category 79 | 100 | | Category 80 | 100 | | Category 81 | 100 | | Category 82 | 100 | | Category 83 | 100 | | Category 84 | 100 | | Category 85 | 100 | | Category 86 | 100 | | Category 87 | 100 | | Category 88 | 100 | | Category 89 | 100 | | Category 90 | 100 | | Category 91 | 100 | | Category 92 | 100 | | Category 93 | 100 | | Category 94 | 100 | | Category 95 | 100 | | Category 96 | 100 | | Category 97 | 100 | | Category 98 | 100 | | Category 99 | 100 | | Total (Total) |


- BEDIENUNGSANLEITUNG
- OPERATING INSTRUCTIONS
- MODE D'EMPLOI
- ISTRUZIONI D'USO
- MANUAL DE INSTRUÇÕES
- —Welcome to the small circle of individuals
- THE TECHNICAL REFINEMENTS OF THE AQUATIMER CHRONOGRAPH
- FUNCTIONS OF THE CROWN
- NORMAL POSITION
- WINDING POSITION
- DATE AND DAY SETTING
- TIME SETTING
- SETTING YOUR WATCH CORRECTLY
- READING THE TIME IN THE DARK
- READING THE CHRONOGRAPH
- USING THE CHRONOGRAPH
- MARKING THE START OF A DIVE
- CHANGING BETWEEN DIFFERENT TYPES OF BRACELET OR STRAP
- ADJUSTING AND SETTING THE METAL BRACELET
- TAKING THE BRACELET APART
- DETERMINING HOW MANY LINKS TO REMOVE
- REMOVING INDIVIDUAL LINKS AND ATTACHING THE BRACELET
- INFORMATION ABOUT MAGNETIC FIELDS
- WATER-RESISTANCE
- CLEANING THE WATCH AFTER DIVING
- SERVICING YOUR AQUATIMER CHRONOGRAPH
Brand : IWC
Model : Aquatimer Chronograph 3768
Category : Wristwatch