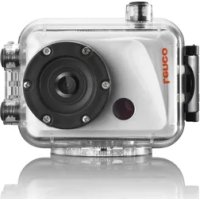
Sportcam500 - Camcorder LENCO - Free user manual and instructions
Find the device manual for free Sportcam500 LENCO in PDF.


| Product type | Sports camcorder with Wi-Fi |
| Brand | Lenco |
| Model | Sportcam500 |
| Dimensions (without external screen) | 60 x 43 x 36 mm |
| Dimensions (with external screen) | 60 x 43 x 48 mm |
| Power supply | Rechargeable lithium battery 3.7 V, 1000 mAh |
| Screen | Removable 1.8-inch LCD + digital screen |
| Photo resolution | 10 M (3648x2736), 8 M, 5 M, 3 M, VGA |
| Video resolution | Full HD 1080p (30 fps), HD 720p (30/60 fps) |
| Lens | 120° wide angle, F2.1, f=3.68 mm |
| Digital zoom | 4x |
| Storage | MicroSD/MicroSDHC card up to 32 GB |
| Connectivity | Wi-Fi, Micro USB, HDMI, infrared remote control |
| Special functions | Webcam mode, face/smile detection, loop recording, silent mode |
| Display languages | English, German, Spanish, Dutch, French, Czech, Hungarian |
| Auto power off | 1, 3, 5 minutes or off |
| Compatibility | Windows XP SP3+, Android, iOS |
| Box contents | Camera, battery, USB cable, external screen, remote control, bike mount, waterproof case |
| Safety | Use only the supplied battery, do not open the device, avoid moisture |
| Maintenance | Clean with a soft, dry cloth |
| Warranty | Compliant with European legislation, contact the retailer |
| Certifications | CE, Directive 1999/5/EC |
| After-sales service | Lenco contact: Germany 0900-1520530, France 03-81484280 |
Frequently Asked Questions - Sportcam500 LENCO
User questions about Sportcam500 LENCO
0 question about this device. Answer the ones you know or ask your own.
Ask a new question about this device
Download the instructions for your Camcorder in PDF format for free! Find your manual Sportcam500 - LENCO and take your electronic device back in hand. On this page are published all the documents necessary for the use of your device. Sportcam500 by LENCO.
USER MANUAL Sportcam500 LENCO
natural_image
Line drawing of a camera with lens and circular body (no text or symbols)www.lenco.com
ThankyouforpurchasingourWi-FiCamera.PleasereadthisUser's Manualcarefullyinordertoobtainthebestperformanceoftheproduct andextenditsservicelife.
KeyFeatures
●WIFI,Photos,VideoRecording,1080PHDVideos(30fps)
●1000mahExternalPowerSupply
●MicroUSBport+MicroSDcardslot+HDMIPort
- PCCamera
●888DigitalScreen/1.8inchRemovableScreen
●4XDigitalZoom
●InfraredRemoteControl
-120°Wide-anglelens
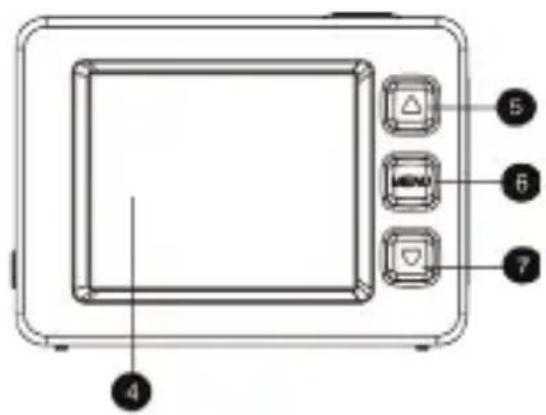
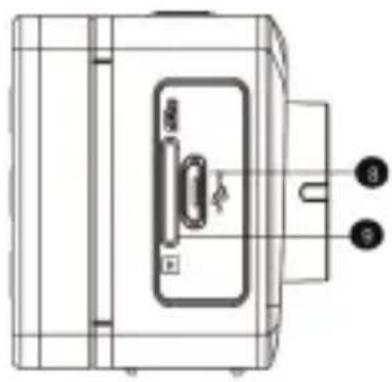
Appearance & Buttons
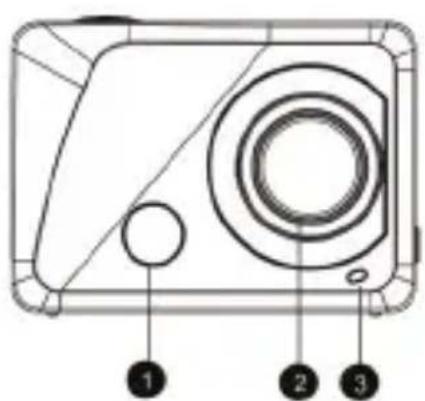
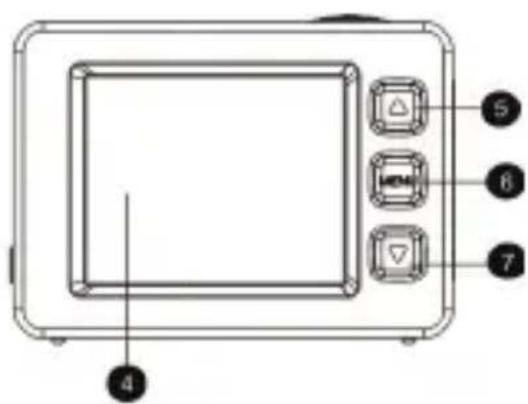
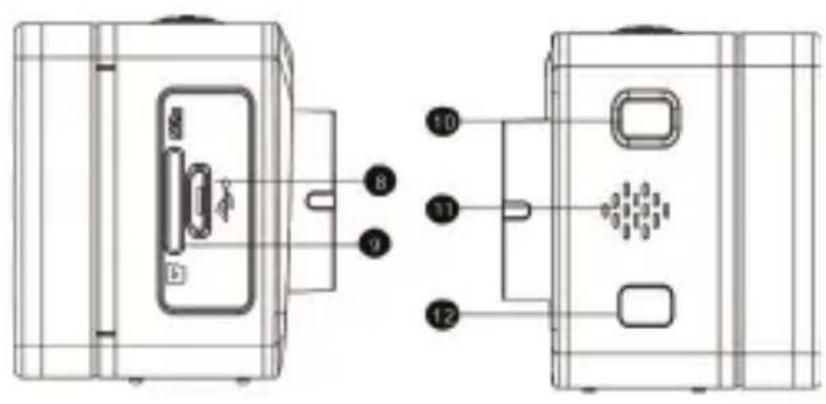
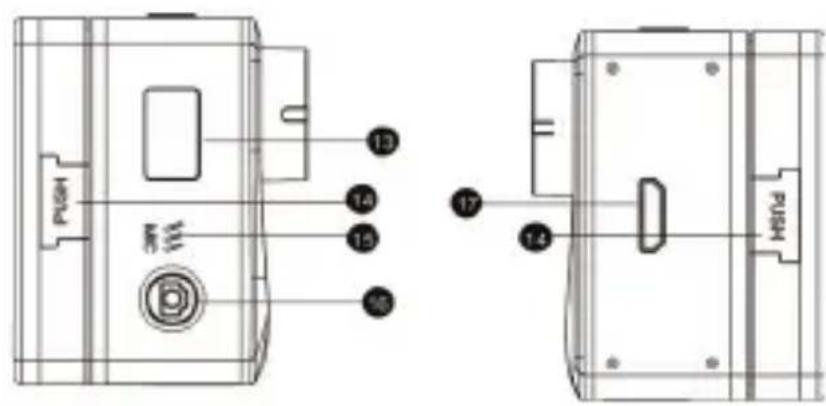
-
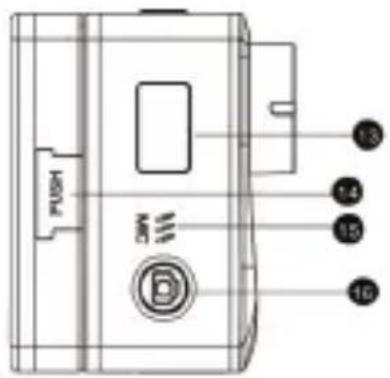
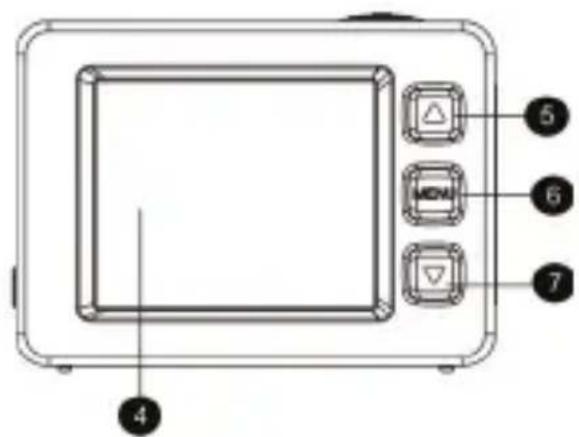
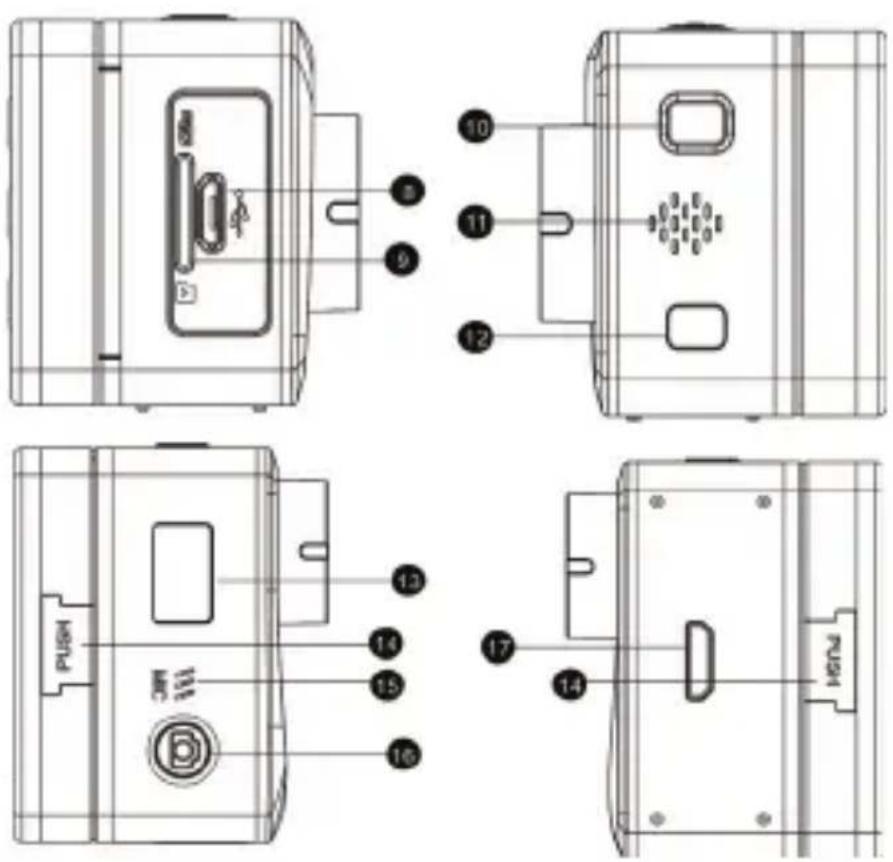
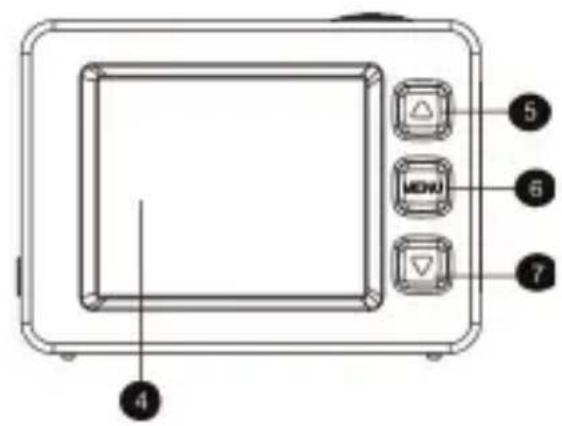
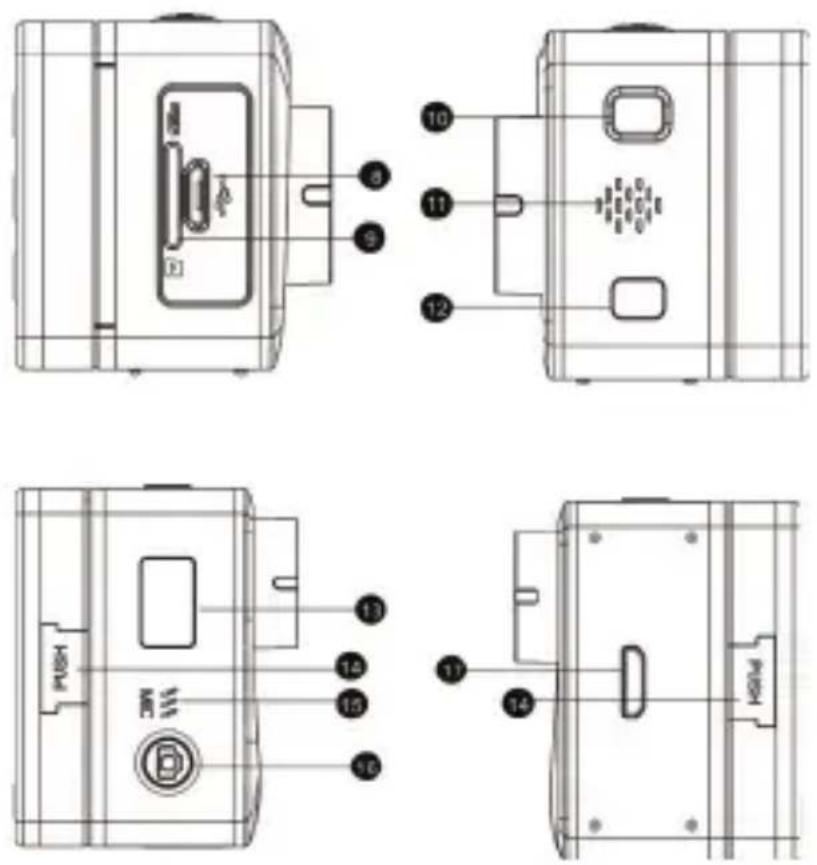
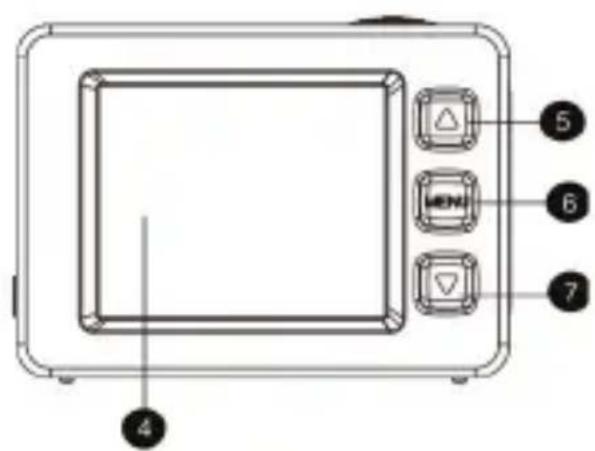
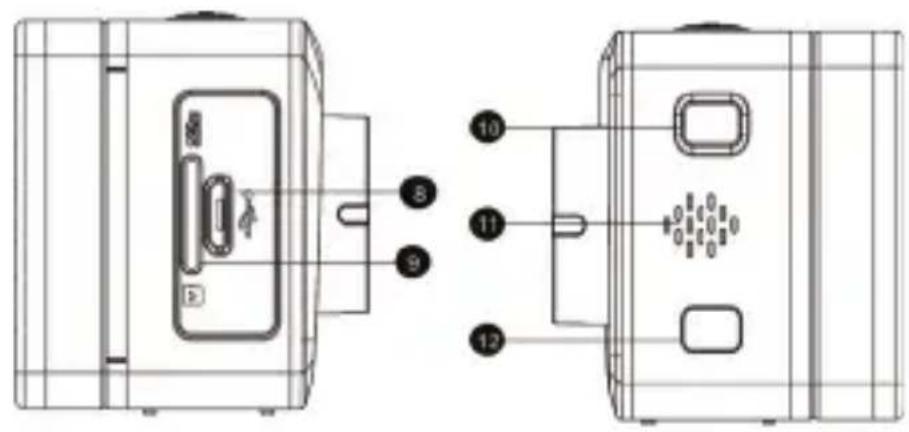
Infrared remotecontrollamp 10. Power/Modebutton
-
Lens11. Speaker
3.Indicatorlight12.WIFIkey
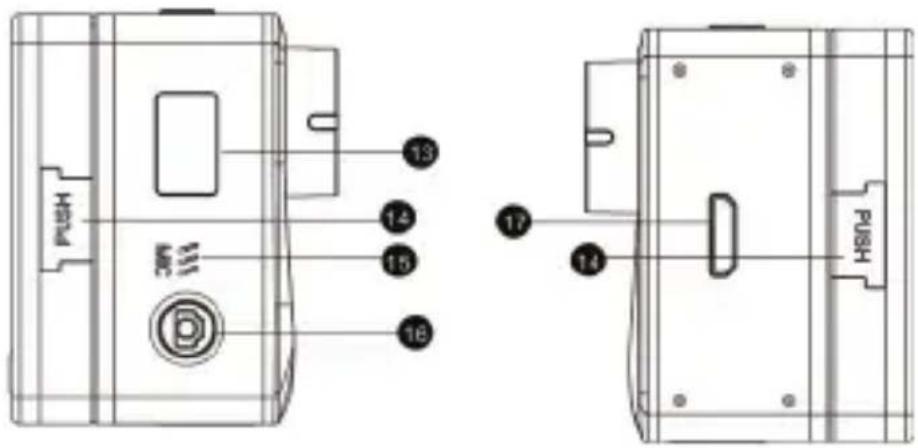
4.1.8''LCDdisplay13.
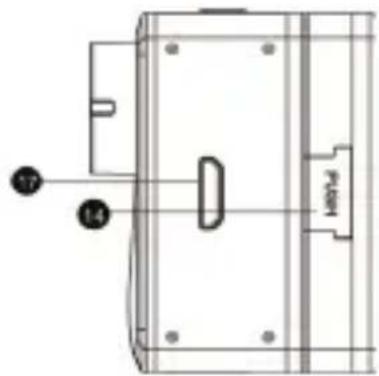
5.Upkey14.DoublePushkey
6.Menukey15.Microphone
7.Downkey16.Shutter/OKbutton
- MicroUSBport17. HDMIport
9.MicroSDcardslot
888DigitalScreen
IntroductionofLocalLCDStatus
When the Camerastartsup, LCD will show the following information:
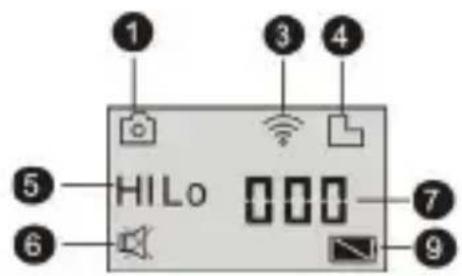
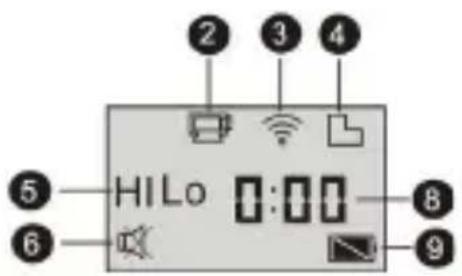
- PhotoMode
- VideoMode(bydefault)
- Wi-Filcon(itappearsuponthestart-up)
4.TFCardIcon(itappearsuponloading) - ResolutionIcon:
Underthephotomode,HImeans10MillionPixels(3648x2736);underthevidcomode,itmeans
FullHDvideos(1920x1080,30fps);
Underthephotomode,LOmeans0.3MillionPixels(640x480);underthevideomode,itmeans
720Pvideos(1280x720,30fps);
Under the photo mode, HILO means 3 Million Pixels (2048x1536)/ 5 Million Pixels (2592x1944)
/ 8 Million Pixels (3264x2448); under the video mode can HILO appear, indicating 720P videos (1280x720,60fps).
6. Silent Mode: When the Camera is under the Silent Mode, it will appear; the Silent Mode is not enabled by default;
7. PhotoCounter: Whenthenumberofphotosexceeds999, itwillonlyreveal999;
8. VideoTimer: It will merely show hours and minutes;
9.PowerIcon:Itwillindicatethecurrentpowerstatus.
Note:
- AboveiconswillchangeaccordingtoyourCamera'sstatus.OperatingModeDiagram
- Photomode, thedefault5M and 8M. If need to changepixel, please enter themenu
Settingstoselectit. Whenthemodescrollonecycle, the set of pixels will be restored to default pixels.
WhentheCamerastartsup, press the Power/ Mode Key to enter the following modes in turn:
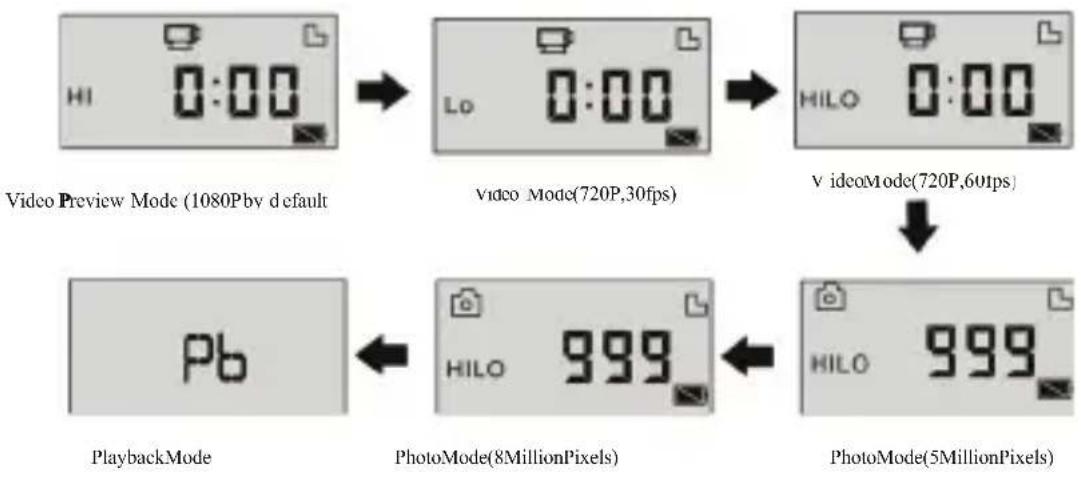
flowchart
graph TD
    A["Video Preview Mode (1080Pbv default)"] --> B["Video Mode(720P,30fps)"]
    B --> C["Video Mode(720P,60fps)"]
    C --> D["PhotoMode(5MillionPixels)"]
    D --> E["PhotoMode(8MillionPixels)"]
    E --> F["PlaybackMode"]
    F --> G["Pb"]
Under the Video Mode, press the Shutter Button to start recording, and the Indicator Light will turn greenandflicker;presstheShutterButtonagaintostoprecording;(undertheVideoMode,presstheShutterButtonforawhiletoTurnOn/OfftheSilentMode);
Under the Photo Mode, press the Shutter Button to start taking photos. press the Shutter Button for a whiletoTurnOn/OfftheSilentMode);
UsageoftheWi-FiCamera
I.BeforeyoustarttousetheCameraforthefirsttime,please:
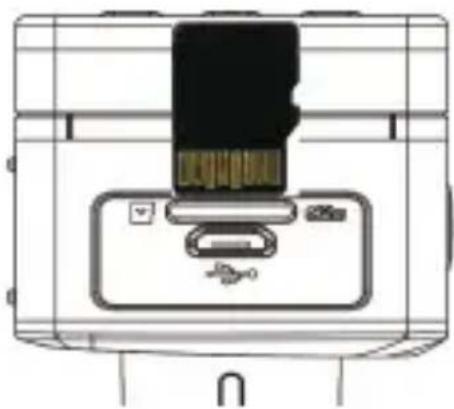
1.FirstlyinsertonemicroSDcardormicroSDHCcardasfollow;
natural_image
Technical line drawing of a device with internal components and no visible text or symbolsClass4oraboveSDHCcardisrecommended;undertheprofessionalvideorecordingmode,Class 10Cardisrecommended.PleaseshutdowntheCamerabeforeyourinsertorpulloutanycard.
Note: The first if cameracan't poweron, pleasereinstalling battery, Check whether the battery is well connected or if the wrong battery.
2. Assemble the Battery
Pleasefirstlypressthe“PUSHKey”oftheexternalscreenonthetwosidesatthesametime,and thentakedowntheexternalscreen.
Step1: Removethebatterycovertotheunlockingposition, andthentakedownit;
Step2: Pleaseinsertthebatteryintothecasetowardstheindicateddirection;
Step3: Assemble the battery cover in its original position to fast the battery.
3. ChargetheBattery
Therechargeablelithiumbatteryisremovable. WhentheCameraispoweredoff, itcanbecharged throughconnectingitwiththecomputerviatheUSBcable;duringthechargingprocess,the
Indicator Light will turn red, and it will be off when the Camera is fully charged. The charging process may last for 2 to 4 hours.
II.VideoMode:
- Start-up: press the Power key 🎨 for 3s and then release it; LCD (Black & White Screen) will show“ON”.TheBuzzerwillsoundforonce.
2. VideoRecording
Beforeyouconductvideorecording,pleaseverifywhethertheCameraisundertheVideoMode;if
the icon ☐ does not show itself on the screen, please keep pressing the icon 📊 till it appears on thescreen.
Start:PressandreleasetheShutterButton,andtheicon willappearonthescreen;theIcon
RECandthegreenindicatorlightwillflicker,meaningthatvideorecordingbegins;
Stop: Press and release the Shutter Button, and the icon will appear on the screen; the indicator lightwillbeoff,andvideorecordingstops.
Note: AboveiconswillchangeaccordingtoyourCamera'sstatus.
Themaximumsizeforavideoisabout4GB.
III.VideoModeandPhotoModeoftheExternalScreen
- Under the Video Mode, press the Shutter Button to start recording, and the LED Light will turn greenandflicker;presstheShutterButtonagaintostoprecording;
UnderthePhotoMode, presstheShutterButtontostarttakingphotos.
- AdvancedOperation
VideoModeandPhotoMode
PresstheShutterButtontostartrecording, andpressitagaintostop;
PresstheShutterButtontotakeaphoto;
Whenanexternalscreenhasbeenconnected,presstheUpKeyandDownKeytoconductdigital zoomundertheVideoModeandthePhotoMode.
3. VideoRecordingDisplayScreen
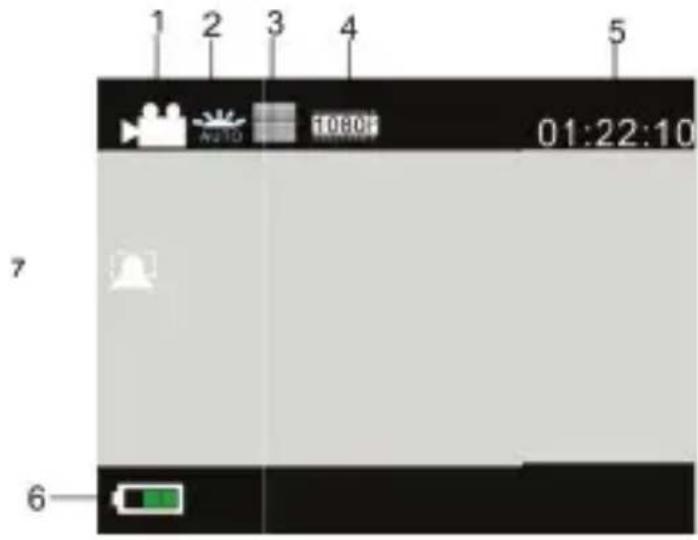
| No. | NameoftheIconRemark | |
| 1 | VideoModeTheCameraisundertheVideoMode. | |
| 2 | WhiteBalanceTheCameraiscurrentlyundertheAutoWhiteBalanceMode. | |
| 3 | QualityThecurrentvideoisofthebestquality. | |
| 4 | 1080PltmeansthecurrentResolution. | |
| 5 | TimeforRecordingItmeansthctimeleftforvideorecording. | |
| 6 | PowerStatusItshowsthecurrentpowerstatus. | |
| 7 | FacedetectionAccordingtothecurrentopenfacedetection | |
4. PhotoDisplayScreen
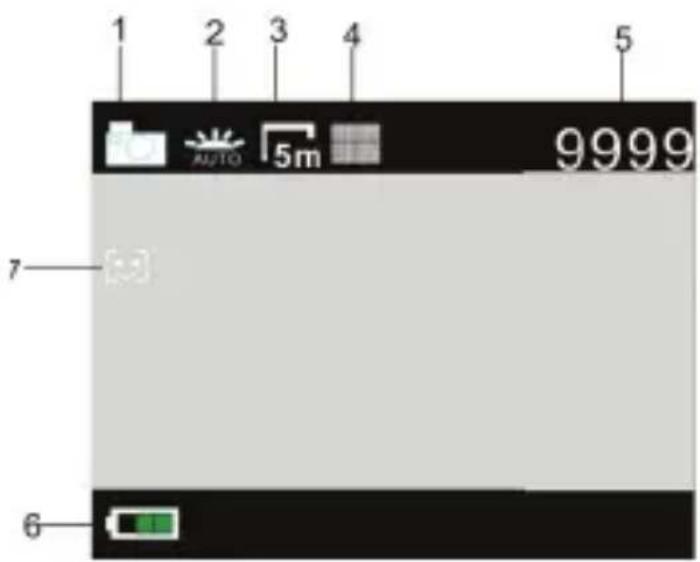
| No.NameoftheIconRemark | |
| 1PhotoModeTheCameraisunderthePhotoMode. | |
| 2WhiteBalanceTheCameraiscurrentlyundertheAutoWhiteBalance Mode. | |
| 3PictureSizeItmeansthecurrentResolution. | |
| 4QualityThecurrentvideoisofthebestquality. | |
| 5LimitofPhotosItmeansthelimitofphotoswhichcanbesuccessfullytaken. | |
| 6PowerStatusItshowsthecurrentpowerstatus. | |
| 7SmileDetectAccordingtothecurrentopensmiledetection | |
IV. Menu Mode Settings when An External Screen is Connected
1.MenuSettings
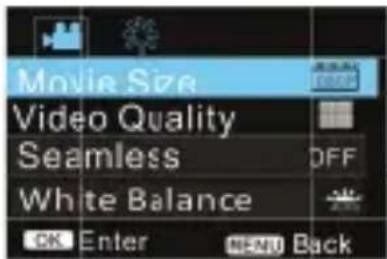
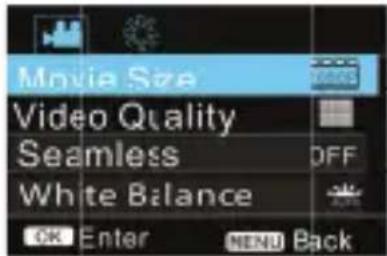
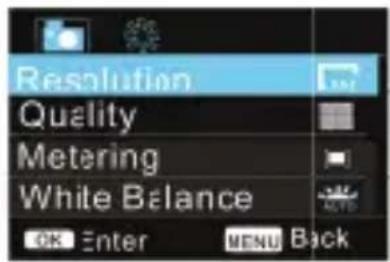
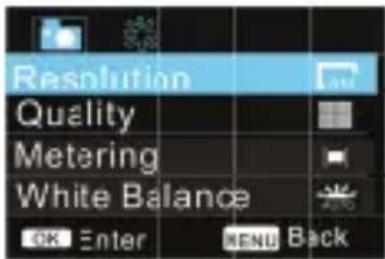
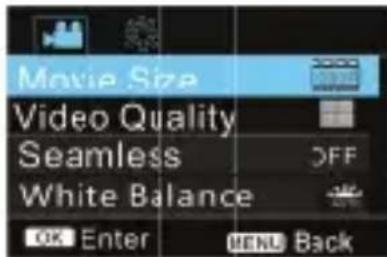
Under the Photo Mode, Video Mode or Playback Mode, press the Menu Key to open the Menu; then press the Up Key or the Down Key to select the Menu; press the Shutter Button to enter the Submenu; the chosen option will be highlighted with the background color; press the Up Key or the Down Key again to select the secondary Submenu, and press the Shutter Button for Confirmation; presstheMenuKeytoquit.
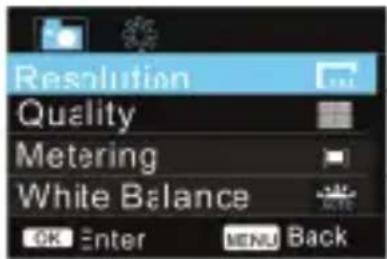
VideoMode
PhotoMode
1.1 Invideomodemenu,settingSeamlessmenucanbeusedfordrivingrecordfunction
This seamless function can be started and stopped manually by selecting Seamless incamera mode, select the desired filelen g thand push record button. When connect camera with charger the camera will power on automatically and start recording (Pleasemake sure MicroSDcardis inserted ), according to setting time it will save a video g ment, then start to record then next video g ment. Whentestora g cardis full, the earliest se g ment of video will be deleted to release the corresponding space for continuous/loo p recording.
Note: Seamlesstime can choose 1 minute, 3 minutes, 5 minutes.
2. SystemMenuSettings
PresstheMenuKeytoopentheMenu;pressthePowerKeytoenterMainMenuSettings. Then, pleasepresstheUpKeyortheDownKeytoselecttheMenu,andpresstheShutterButtontoenter theSubmenu;presstheUpKeyortheDownKeyagaintoselectthesecondarySubmenu,andpress theShutterButtonforConfirmation;toleavethesystemmenu,presstheMenuKey.
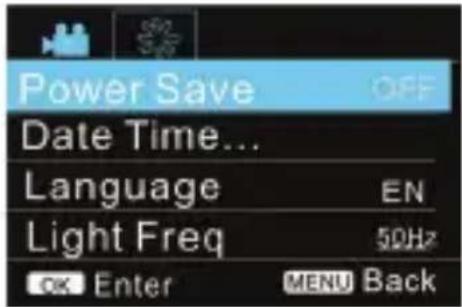
SystemMode
3.PlaybackModeSettings
PressthePowerKeytoswitchtothePlaybackMode;youcanviewPhotos/video,andplaytherecordedvideos.
ViewPhotos:PresstheUpKeyortheDownKeytoselectaphoto/video;
View Videos: Press the Up Key or the Down Key to select a photo/video; press the Shutter Button to playtherecordedfile, and pressitagaintostopplaying.
4. Menus Settings under the Playback Mode
PresstheMenuKeytoopenthePlaybackMainMenu; presstheUpKeyortheDownKeytoselect the Menu; press the Shutter Button to enter the Submenu, and then press the Up Key or the Down Key again to select the secondary Sub-menu; finally, press the Shutter Button for Confirmation;
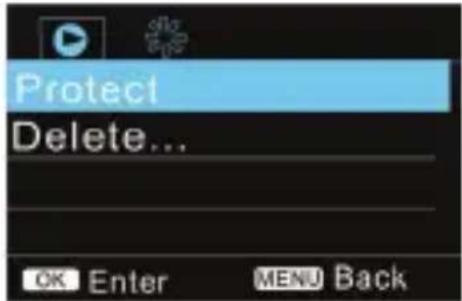
PlaybackMode
V.ConnectionwiththeHDTV
- Connect the Camerawith the HDTV through a HDMI cable (optional)
If you need transfer photos and voices from the Camerato the HDTV, please insert the universal terminal of the HDMI cable into the HDMI port of the Camera, and the other terminal (output terminal) into the HD input port of the HDTV as follow:
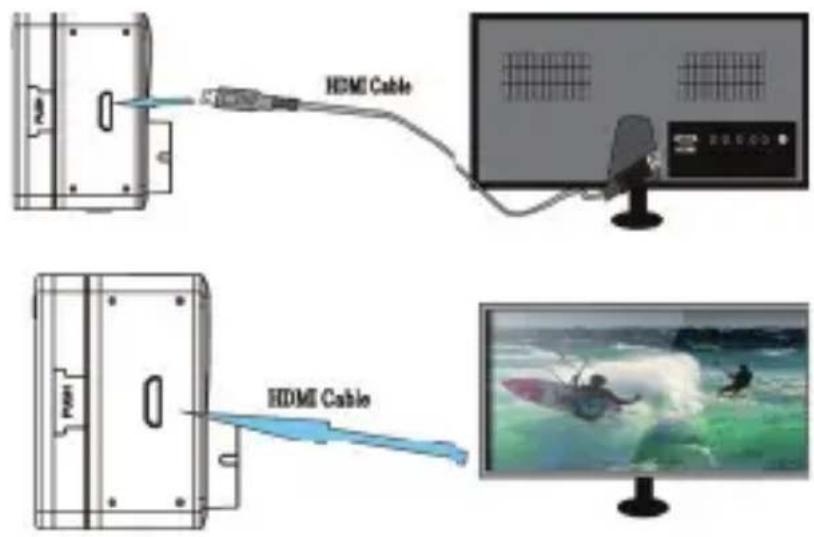
Note: Pleasefirstlystoprecordingvideosbeforeyouinsert/pullouttheHDMIcable.
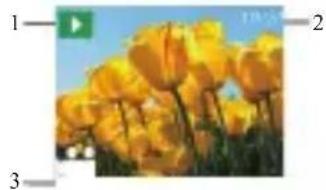
- WhentheCameraisconnectedwiththeHDTV,itwillenterthePlaybackMode,andtheDisplay Screenwillplayvideosasfollow:
natural_image
Close-up of yellow tulips in a field under a blue sky, with no visible text or symbols.| No. | Nameofthe Icon | Remark |
| 1 | PlaybackModeThe | CameraisunderthePla ybackMode. |
| 2 | NumberofFilesYouarewatching the 19thvideofileoutofthetotal31files. | |
| 3 | videoIconItmeansthatthecurrentfileisarecordedvideofile. | |
- Under the Playback Mode, please press the Up Key and the Down Ket to select a photo or video; thenpresstheShutterButtonontoplaythephotoorvideo;pressitagaintostop.
4.UnderthePlaybackMode, press theMenuKeyto lockapicture and delete the picture. Press the Up Key and the Down Key to choose between Delete and Format; press the Shutter Button for confirmation, and then enter the Submenu; press the Up Key and the Down Key to choose YES or NO; press the Shutter Button for confirmation to quit.
VI. ConnecttoPC
I. Please firstly power on your Camera, and then connect it to PC through inserting the USB cable intotheUSBportonyourPC. Afterthat, theCamerawillautomaticallyentertheMSDCMode, and youcanviewphotosorvideos/soundrecordingfilesonyourPCscreen.

Note: During the downloading process, pleased on to disconnect the USB cable or insert pull out the storage and cardiac case of dataloss.
UndertheMSDCMode(

Mode),presstheShutterButtontoswitchtothePCCamera
Mode(Mode).Uponthesuccessfulconnection,theLCDoftheCamerawillshow
"PCCAM":
Atthemoment,youcanenablethepreviewpictureoftheCamerabymeansofrelatedapplication programs;presstheShutterButtonagaintogobacktotheMSDCMode.
Tips:ThePCCAMModecanbeenabledbythewindowsXP(SP3)systemwithoutanyDeviceDriver.
Tips: WhentheCamerahasbeenconnectedtoPC, itwillentertheMSDCMode. In the windowsoperatingsystem, MyComputerwillshowtwoRemovableDisks. OneistheTFCard which has contained all photos and videos recorded by the Camera; another one istoload the system file information, and one filenameed SSID_PW. CFG has been saved within it to record the Camera's APID number and its password. The User can only view the said information and cannot alter, delete or format any of them.
II. Webcamerafunctions
When the camera power on, press power key to enter after connecting the computer camera model; OrintheSettingsmenuUSBoptioninselectedUVCH264formatintothecamera.
Note: IncaseofPCCAM, version1 is XPsp3 or the above.
VII.RemoteControlApplication
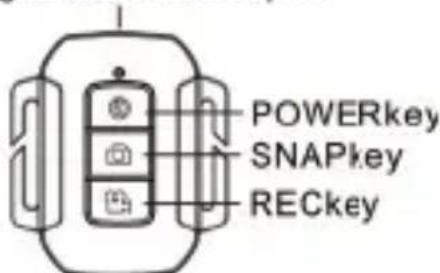
I. Introduction of Keys
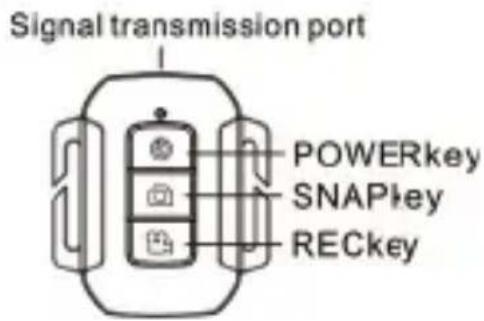
KeysontheRemoteControllerareasfollow:
II.Instructions
ItispossiblefortheUsertoconductvideorecording, takeaphotoandtoshuttheCameradown without touching it. Please point the signal transmitting port of the Remote Controller at the Infrared RayLampoftheCamera, andpressdifferentkeysfordifferentfunctions.

Note: Wifiallowsdatatransferovershortdistanceswithin20meters.Anywallsorceilingmay reducethestrengthoftheWificonnectivity.Therefore,trytolocatetheunitand/oraccess pointwithinthisdistanceandavoidanyobstacles.
III. Remotecontrollerbatteryreplacement
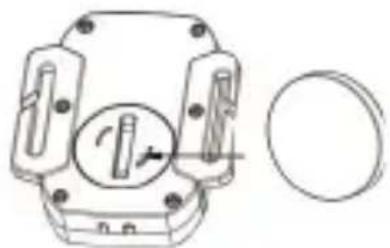
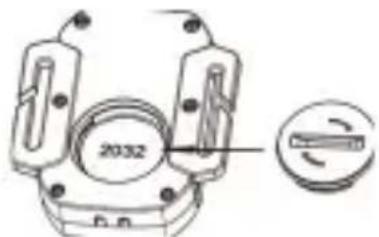
When the remote control battery is low, need to replace the battery, please be careful to open the batterydoorwithacoin,avoidscratchingthebatterydoor.
When replacing the battery, put a coin inside the groove in them middle of the battery cover, to unscrew battery cover according to direction and replace old battery (when put the new battery, pleasnot the positive and negative pole), then put the battery cover and screwtill tighten.
natural_image
Technical line drawing of a mechanical component with a circular end and internal features (no text or symbols)(Picture 1, open the battery cover)
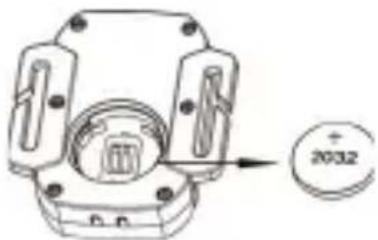
(Picture 2, take out the battery)
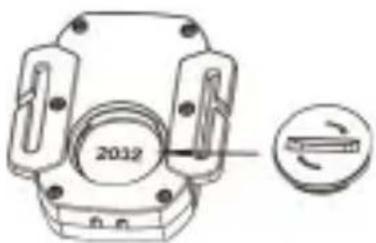
natural_image
Technical diagram of a mechanical component with a circular part labeled '2012' and a circular inset showing a curved arrow (no readable text or symbols)(Picture 3, in the battery)
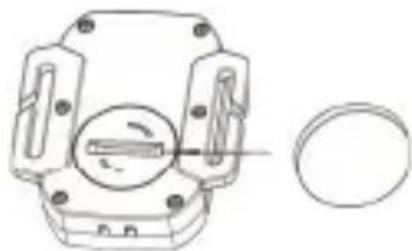
natural_image
Technical line drawing of a mechanical component with a circular inset showing internal components (no text or symbols)(picture 4, close the battery cover)
VIII.APP(forAndroidandiOSSystem)
I.HowtoObtaintheAPPInstallationProgram
- FortheAndroidSystem, you can search "SYMAGIX" in the Play Store to obtain corresponding installation programs, and then you can install them according to the indicated steps or through
scanningthetwo-dimensionalcode

- For the IOSSystem, you can search "SYMAGIX" in the APP Store to obtain corresponding installation programs, and then you can install them according to the indicated steps or through
scanningthetwo-dimensionalcode

II. Camera WIFI and System Applications Android Applications
- Please install the SYMAGIX application program (provided by the Supplier or the Internet) for

theAndroidmobilephoneortabletPC,andthentheDisplayScreenwillshowtheIcon;
-
InsertaStorageCardintotheCameraandthenpoweriton.PresstheWIFIkeytoconductWIFI connection, and the Screen of the Camera will show the WIFI signal Icon with the external screen revealingWIFIConnecting.
-
Enable the WIFI function of the Android mobile phone cortable PC, and try to find the APName "Lenco Sportcam-500_WIFI"; please conduct connection between them till the system reveals a successful connection;
if you are conducting WIFI connection for the first time, please input the password: 1234567890.
- TapandenabletheApplicationProgramIcon ontheAndroidmobilephoneortabletPC; youcandirectlyviewthepreviewpicturetransmittedbytheCamera(seethefollowingpicture), and thenconductrelevantoperations.
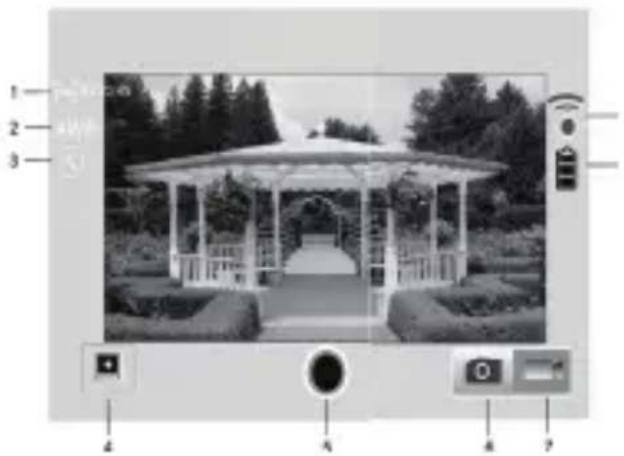
-
Resolution
-
WhiteBalance
-
Settings(EnterSettingsMenu)
4.EnterthePlaybackMode
5.ShutterButton
6.PhotoMode
- VideoMode
8.Wi-FiSignalIcon
- Camera'sBatteryStatusIcon
IOSApplications
- Please install the SYMAGIX application program (provided by the Supplier or the Internet) for
theIOSmobilephoneortabletPC,andthentheDisplayScreenwillshowtheIcon

-
InsertaStorageCardintotheCameraandthenpoweriton.PresstheWIFIkeytoconductWIFI connection, and the Screen of the Camera will show the WIFI signal Icon with the external screen revealingWIFIConnecting.
-
Enable the WIFI function of the IOS mobile phone or tablet PC, and try to find the AP Name WDV8277SA_WIFI; please conduct connection between them till the system reveals as successful connection;
if you are conducting WIFI connection for the first time, please input the password: 1234567890.
- TapandenabletheApplicationProgramIcon

ontheIOSmobilephoneortabletPC;you
candirectlyviewthepreviewpicturetransmittedbytheCamera(see thefollowingpicture),andthenconductrelevantoperations.
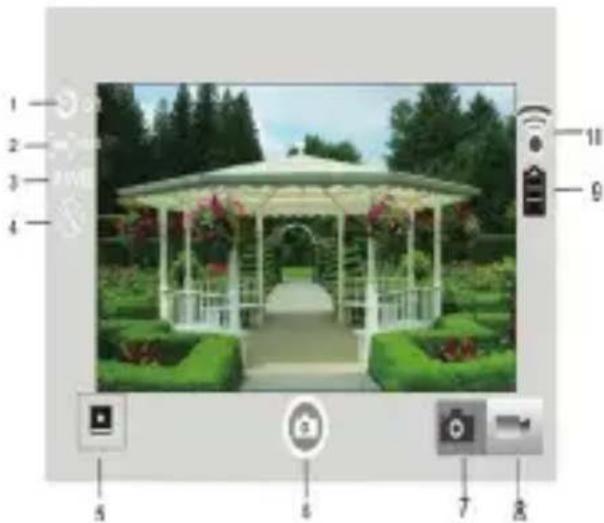
- SettheSelf-Timer
2.PicturePixel
- WhiteBalance
4.Settings(EnterSettingsMenu)
5.EnterthePlaybackMode
6.ShutterButton
7.PhotoMode
-
VideoMode
-
Camera's Battery Status Icon
10.Wi-FiSignalIcon
Notes:
-
If you need to record videos or download pictures using your mobile phone or tablet PC, please insert one TF card for your camera;
-
When the Camerahasbeensuccessfully connected with your mobile phone or tablet PC, the WIFI Indicator Lightwillbeon.
IX.HowtousetheBikemount/water proofshellaccessories.
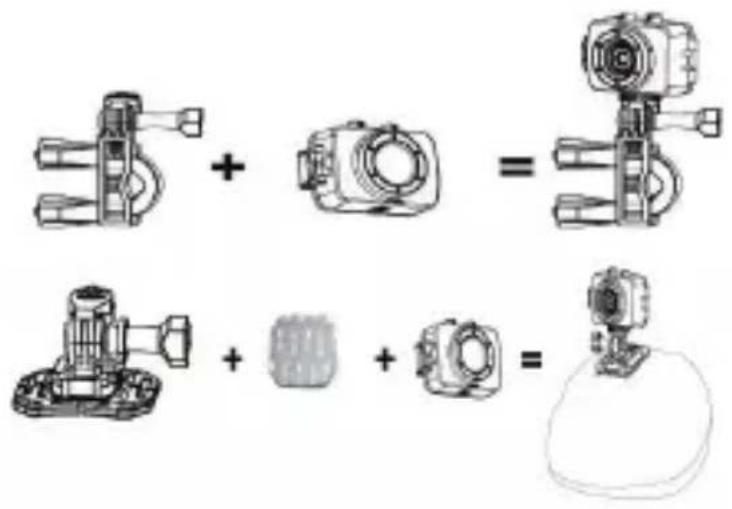
Notes: WaterproofcaseisIPX8
Technical Parameters
| ImageSensor5MillionImageSensor | |
| FunctionModesVideoMode,PhotoModeandPlaybackMode | |
| LensF2.1,f=3.68mm | |
| DigitalZoom4 X | |
| LCDDisplayScreen1.8inchLCDScreen | |
| PhotoDefinition Ratio | 10M(3648x2736),8M(3264x2448),5M(2592x1944 ),3M(2048x1536)VGA(640x480) |
| VideoDefinition Ratio | FHD(1920x108030fps),HD(1280X72030fps),HD(1280X72060fps) |
| StorageMediaTFCard(32GBatmost) | |
| FileFormats | Videos(MOV);H.264CompressedFormat;Photos(JPG) |
| USBPortUSB2.0Port | |
| PowerSupplyExternal3 | 7Vrechargeablelithiumbattery1000mAh. |
| LanguageEnglish/German | Spanish/Dutch/French/Czech/Hungarian |
| AutoShut-down1minute | 3minutes/5minutes/OFF |
| Dimension | 60x43x36mm(notincludingtheexternalScreen);60x43x48mm(includingtheexternalscreen); |
Note:
Theproductdesignspecificationismadebasedonupdatedinformationwhen compilingthisproductmanual.Thespecificationissubjecttochangewithout furthernotice.Theproductissubjecttotheractualcamera.
This product operates at 2400 - 2483.5 MHz and is designated on y to be used inside an normal household environment. This product is suited for this purpose within all EU counties.
Hereby,STLGrou p BV, Ankerkade 20 NL 5928 PL Venlo, declares that this productisincom pliance with the essential requirementsandotherrelevant provisionsofDirective1999/5/EC.
The declaration of conformity may be consulted at
https://lencosupport.zendesk.com/forums/22413161-CE-Documents
Serviceandsupport
Forinformation:www.lenco.com
Forsupport:http://lencosupport.zendesk.com
Lencohelpdesk:
Germany 0900-1520530 (Localchar ges)
The Netherlands 0900-23553626 (Localcharges + 1 ctp/min)
Belgium02-6200115 (Localchar ges)
France03-81484280 (Localchar ges)
Thehel pdeskisaccessiblefromMonda y tillFrida y from9AMtill6PM.
Whencontacting Lenco, youwillalwa is be asked for the model and serial number of your product.
The serial number can be found on the back of the device. Please write down the serial number below:
Model: Sportcam-500
Serialnumber:
Lenco offers service and warranty in accordance to European law, which means that in case of repairs (both during and after the warrant y period) you should contact your local dealer.
Importantnote: It is not possible to send product that need the p airsto Lencodirectly.
Important note: If this unit is opened or accessed by a non-official service center in any way, the warranty expires.
This device is not suitable for professional use. In case of professional use, all warranty obligations of the manufacturer will be voided.
CAUTION:
RISK OF EXPLOSION IF BATTERY IS REPLACED BY AN INCORRECT TYPE.
DISPOSE OF USED BATTERIES ACCORDING TO THE INSTRUCTIONS

Products with the CE marking comply with the EMC Directive (2004/108/EC) and the Low Voltage Directive (2006/95/EC) issued by the Commission of the European Community.

This symbol indicates that there are an electrical product or battery should not be disposed of as general household waste in Europe. To ensure the correct waste treatment of the product and battery, please dispose them in accordance to any applicable local laws of requirement for disposal of electrical equipment or batteries. In so doing, you will help to conserve natural resources and improve standards of environmental protection in treatment and disposal of electrical waste (Waste Electrical and Electronic Equipment Directive).
®Allrightsreserved
Lenco
natural_image
Line drawing of a camera with lens and circular head (no text or symbols)www.lenco.com
natural_image
Technical line drawing of a mechanical device with internal components and mounting points (no text or symbols)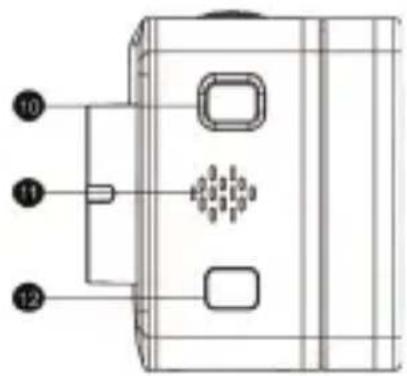
natural_image
Technical line drawing of a device with a black component inserted into a housing (no text or symbols)VideomodusFotomodus
Wiedergabemodus
natural_image
Close-up of yellow tulips against a blue sky background, with numbered arrows and a play button in corner (no text or symbols on the flower image itself)II.Anleitung
natural_image
Technical line drawing of a mechanical component with circular base and internal components (no text or symbols)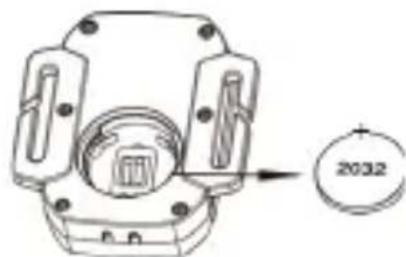
natural_image
Technical line drawing of a mechanical component with a circular part labeled '2032' (no readable text or symbols beyond label)natural_image
Technical line drawing of a mechanical component with a circular base and a circular inset showing a rotating knob (no text or symbols)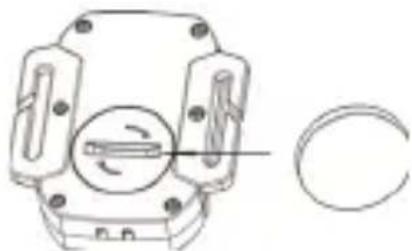
natural_image
Technical line drawing of a mechanical component with no visible text or symbolsnatural_image
Landscape photo of a gazebo with white railings and flower beds, surrounded by manicured gardens (no text or symbols visible)uflösung
Weißabgleich
natural_image
Simple line drawing of a trash bin with crossed lines indicating no text or symbols (no readable text or labels)natural_image
Line drawing of a camera with lens and circular body (no text or symbols)www.lenco.com
natural_image
Diagram of a printer device with a black cover and paper clip, showing internal components (no text or symbols)Modovídeo
Modofoto
Modoreproducción
V.ConexiónconHDTV
natural_image
Close-up of yellow tulips against a blue sky background, with no visible text or symbols.II.Instrucciones
natural_image
Technical line drawing of a mechanical component with circular end (no text or symbols)natural_image
Technical line drawing of a mechanical component with a circular inset showing polarity (no text or symbols)natural_image
Technical line drawing of a mechanical component with a circular part labeled '2032' and a circular inset showing a rotating knob (no text or symbols beyond the label)natural_image
Technical line drawing of a mechanical component with no visible text or symbolsnatural_image
Exterior view of a modernist garden pavilion with arched entrance and surrounding manicured gardens (no signage or text)natural_image
Simple line drawing of a trash bin with crossed lines indicating no text or symbols (no readable text or labels)natural_image
Line drawing of a camera with lens and circular head (no text or symbols)www.lenco.com
natural_image
Diagram of a device with a black object inserted into a container, showing internal components and no visible text or symbols.Mode Vidéo
ModePhoto
ModeLecture
natural_image
Close-up of yellow tulips in a field under a blue sky, with numbered arrows and a play button (no text or symbols on the image itself)Signal transmission port
TouchePOWER
ToucheSNAP
ToucheREC
II. Modeopératoire
Récepteurinfrarouge
natural_image
Technical line drawing of a mechanical component with circular features and a pointer (no text or symbols)natural_image
Technical line drawing of a mechanical component with a circular inset showing a 2032 model (no text or symbols present)( Image 2, retirez la pile )
natural_image
Technical line drawing of a mechanical component with a circular inset showing a rotating shaft (no text or symbols)( Image 4, refermez le couvercle )
- Résolution
2.Balancedesblancs
natural_image
Exterior view of a modern gazebo surrounded by manicured gardens and shrubs, with no visible text or symbols on the structure itself.Fiche technique
natural_image
Line drawing of a camera with lens and circular body (no text or symbols)www.lenco.com
- Infraroodlampje 10. Power/Modus
- Lens 11. Luidspreker
- Indicatorlampje 12. WIFI
4.1,8"LCD-display13.
5.Omhoog14.Dubbeledruktoets
6.Menu15.Microfoon
7.Omlaag16.Sluiter/OK - MicroUSB-poort17. HDMI-poort
- MicroSD-kaartsleuf
888Digitaalscherm
natural_image
Diagram of a device with a black object inserted into a container, showing internal components and no visible text or symbols.Videomodus
Fotomodus
Afspeelmodus
natural_image
Close-up of yellow tulips against a blue sky background, labeled with numbers 1, 2, and 3 (no text or symbols on the image itself)| POWERkeyPower | |
| SNAPkeyFotonemen | |
| RECkeyOpnemen |
II.Instructies
natural_image
Technical line drawing of a mechanical component with circular end (no text or symbols)natural_image
Technical line drawing of a mechanical component with a circular inset showing polarity and number 2032 (no text or symbols on the main diagram)natural_image
Technical line drawing of a mechanical component with a circular feature labeled '2032' and a small inset showing a curved arrow (no text or symbols beyond the label)natural_image
Technical line drawing of a mechanical component with circular end (no text or symbols)- Dezelfontspannerinstellen
2.Fotoresolutie - Witbalans
- Instellingen(openinstellingenmenu)
5.Openafspeelmodus
6.Sluiter-toets
7.Fotomodus
8.Videomodus
9.Batterij-icoontje
10.Wi-Fi-icoontje
Opmerkingen:
Opmerking:DewaterbestendigebehuizingisIPX8
Technische parameters
| Beeldsensor5-megapixel | beeldsensor |
| FunctiemodiVideomodus,fotomodusenafspeelmodus | |
| LensF2,1,f=3,68mm | |
| Digitaalzoomen4 X | |
| LCD-d1,8inchLCD-scherm | |
| Fotoresolutie | 10M(3648x2736),8M(3264x2448),5M(2592x1944 ),3M(2048x1536)VGA(640x480) |
| VideoresolutieFHD(1920x108030fps),HD(1280X72030fps),HD(1280X72060fps) | |
| OpslagmediaMicroSD-kaart(max.32GB) | |
| Bestandsformaten | Video's(MOV);H.264gecomprimeerdformaat;Foto's(JPG) |
| USB-poortUSB2.0-poort | |
| Voeding | Extern3,7Voplaadbarelithiumbatterij1000mAh. |
| Taal | Engels/Duits/Spaans/Nederlands/Frans/Tsjechisch/Hongaars |
| Automatischuitschakelen | 1minuut/3minuten/5minuten/UIT |
| Afmetingen | 60x43x36mm(exclusiefexternscherm);60x43x48mm(inclusiefexternscherm) ; |
Opmerking:
https://lencosupport.zendesk.com/forums/22413161-CE-Documents

- ThankyouforpurchasingourWi-FiCamera.PleasereadthisUser's Manualcarefullyinordertoobtainthebestperformanceoftheproduct andextenditsservicelife.
- KeyFeatures
- Appearance & Buttons
- IntroductionofLocalLCDStatus
- Note:
- UsageoftheWi-FiCamera
- I.BeforeyoustarttousetheCameraforthefirsttime,please:
- Assemble the Battery
- ChargetheBattery
- II.VideoMode:
- VideoRecording
- III.VideoModeandPhotoModeoftheExternalScreen
- VideoRecordingDisplayScreen
- PhotoDisplayScreen
- Menu Mode Settings when An External Screen is Connected
- 1.MenuSettings
- Invideomodemenu,settingSeamlessmenucanbeusedfordrivingrecordfunction
- SystemMenuSettings
- 3.PlaybackModeSettings
- Menus Settings under the Playback Mode
- V.ConnectionwiththeHDTV
- ConnecttoPC
- Webcamerafunctions
- VII.RemoteControlApplication
- Introduction of Keys
- II.Instructions
- Remotecontrollerbatteryreplacement
- VIII.APP(forAndroidandiOSSystem)
- I.HowtoObtaintheAPPInstallationProgram
- Camera WIFI and System Applications Android Applications
- IOSApplications
- Notes:
- IX.HowtousetheBikemount/water proofshellaccessories.
- Notes: WaterproofcaseisIPX8
- Serviceandsupport
- Lencohelpdesk:
- CAUTION:
- Lenco
- II.Anleitung
- V.ConexiónconHDTV
- II.Instrucciones
- Modeopératoire
- II.Instructies
- Opmerkingen:
- Opmerking:
Brand : LENCO
Model : Sportcam500
Category : Camcorder