DMX7018DABS - Radio KENWOOD - Free user manual and instructions
Find the device manual for free DMX7018DABS KENWOOD in PDF.

Frequently Asked Questions - DMX7018DABS KENWOOD
User questions about DMX7018DABS KENWOOD
0 question about this device. Answer the ones you know or ask your own.
Ask a new question about this device
Download the instructions for your Radio in PDF format for free! Find your manual DMX7018DABS - KENWOOD and take your electronic device back in hand. On this page are published all the documents necessary for the use of your device. DMX7018DABS by KENWOOD.
USER MANUAL DMX7018DABS KENWOOD
ÉCRAN AVEC RÉCEPTEUR
MODE D'EMPLOI
JVCKENWOOD Corporation
Digital Audio Broadcasting

Bluetooth®


Made for

iPhone | iPod

Works with
Apple CarPlay
android
auto
Contents
Before Use 4
Precautions....4
How to read this manual ....4
Basic Operations 5
Functions of the Buttons on the Front Panel ...5
Turning on the Unit 5
Initial Settings......6
Adjusting the volume 7
Touch screen operations ....7
HOME screen descriptions....8
Source selection screen descriptions......8
Source control screen descriptions ....10
Popup menu 11
List screen 12
APPS-Android Auto™/Apple CarPlay 13
Apple CarPlay Operation....13
Android Auto™ Operation....14
iPod/iPhone 15
Preparation....15
iPod/iPhone Basic Operation....15
Search Operation....16
USB 17
Connecting a USB device 17
USB Basic Operation....17
Search Operation....19
Radio 20
Radio Basic Operation 20
Memory Operation....21
Selecting Operation 21
Traffic Information 22
Radio Setup 22
DAB 23
DAB Basic Operation 23
Storing Service in Preset Memory 24
Selecting Operation ....24
Traffic Information 25
DAB Setup....26
Bluetooth Control 27
Information for using Bluetooth ^® devices.....27
Register from the Bluetooth device....28
Bluetooth Setup....28
Playing Bluetooth Audio Device....29
Using Hands-Free Unit....31
Other External Components 35
View Camera 35
External audio/video players—AV-IN ....36
Setting Up 37
Monitor Screen Setup....37
System Setup 37
User Interface Setup....38
Special Setup 38
Display Setup....39
AV Setup 40
Controlling Audio 41
Speaker/ X'over setup....41
Controlling General Audio 42
Equalizer Control....43
Volume Offset....44
Sound Effect....44
Listening Position/ DTA 45
Remote control 46
Functions of the Remote control Buttons .....46
Connection/Installation 47
Before Installation....47
Installing the unit....48
Troubleshooting 52
Problems and Solutions....52
Error Messages....52
Appendix 53
Playable Media and Files....53
Specifications....54
About this Unit....56
Before Use
Precautions
⚠️ WARNINGS
To prevent injury or fire, take the following precautions:
• To prevent a short circuit, never put or leave any metallic objects (such as coins or metal tools) inside the unit.
- Do not watch or fix your eyes on the unit's display when you are driving for any extended period.
- If you experience problems during installation, consult your KENWOOD dealer.
Precautions on using this unit
- When you purchase optional accessories, check with your KENWOOD dealer to make sure that they work with your model and in your area.
- You can select language to display menus, audio file tags, etc. See User Interface Setup (P.38).
- The Radio Data System or Radio Broadcast Data System feature won't work where the service is not supported by any broadcasting station.
Protecting the monitor
- To protect the monitor from damage, do not operate the monitor using a ball point pen or similar tool with the sharp tip.
Cleaning the unit
- If the faceplate of this unit is stained, wipe it with a dry soft cloth such as a silicon cloth. If the faceplate is stained badly, wipe the stain off with a cloth moistened with neutral cleaner, then wipe it again with a clean soft dry cloth.
NOTE
- Applying spray cleaner directly to the unit may affect its mechanical parts. Wiping the faceplate with a hard cloth or using a volatile liquid such as thinner or alcohol may scratch the surface or erase screened print.
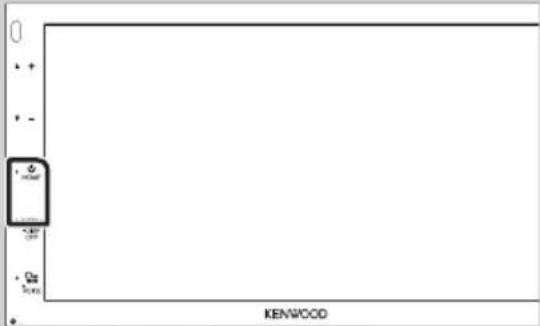
How To Reset Your Unit
- If the unit or the connected unit fails to operate properly, reset the unit.1 Press the

text_image
KENWOOD KENWOOD KENWOODReset button
NOTE
- Disconnect the USB device before pressing the
button. Pressing the button with the USB device connected can damage the data stored in the USB device. For how to disconnect the USB device, see Disconnect the USB device (P.17). - When the unit is turned on after resetting, the Initial SETUP screen appears. See Initial setup (P.6).
How to read this manual
- The screens and panels shown in this manual are examples used to provide clear explanations of the operations.
For this reason, they may be different from the actual screens or panels used, or some display patterns may be different.
- Indication language: English indications are used for the purpose of explanation. You can select the indication language from the [SETUP] menu. See User Interface Setup (P.38).
Basic Operations
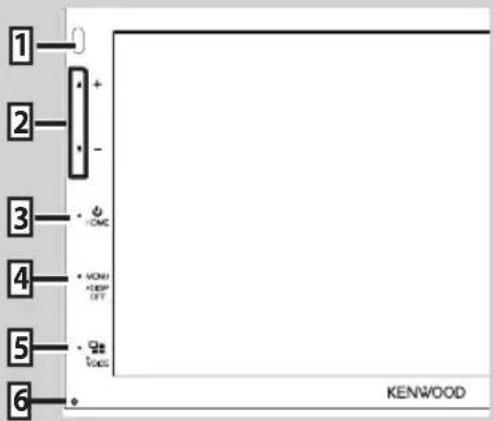
Functions of the Buttons on the Front Panel
text_image
1 2 3 4 5 6 - OMC - VON - OFF - ONC KENWOODNOTE
- The panels shown in this guide are examples used to provide clear explanations of the operations. For this reason, they may be different from the actual panels.
| Name• Motion | |
 | Remote Sensor• Receives the remote control signal. |
 | ▼, ▲(Volume)• Adjusts volume.The volume will go up until 15 when you keep pressing ▲. |
 | HOME• Displays the HOME screen (P.8).• Pressing for 1 second turns the power off.• When the power off, turns the power on. |
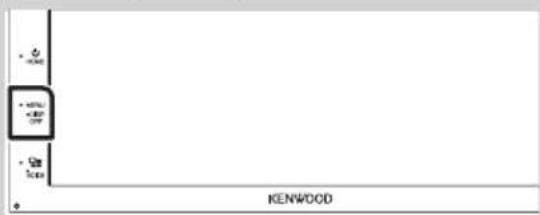
| [44WH] | MENU• Displays the popup menu screen.• Pressing for 1 second turns the screen off. |
| [22A9] |  • Displays the APP (CarPlay/ Android Auto) screen.• Pressing for 1 second displays the Voice Recognition screen (P.32). • Displays the APP (CarPlay/ Android Auto) screen.• Pressing for 1 second displays the Voice Recognition screen (P.32). |
| [42BX] | Reset• If the unit or the connected unit fails to operate properly, the unit returns to initial settings when this button is pressed. |
Name
- Motion
Remote Sensor
▼, ▲(Volume)
HOME
MENU
Reset
Turning on the Unit
The method of turning on is different depending on the model.
1 Press the [HOME] button.
text_image
KENWOODThe unit is turned on.
●To turn off the unit:
1 Press the [HOME] button for 1 second.
NOTE
- If it is your first time turning the unit on after installation, it will be necessary to perform Initial setup (P.6).
Basic Operations
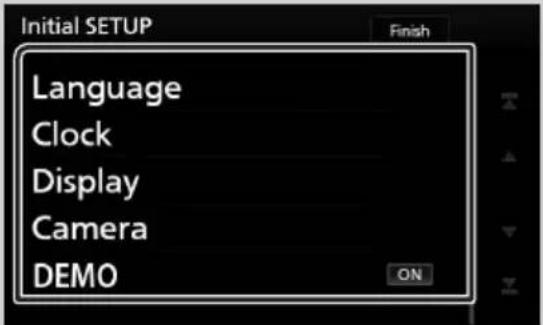
Initial Settings
Initial setup
Perform this setup when you use this unit first time.
1 Set each item as follows.
text_image
Initial SETUP Language Clock Display Camera DEMO FinishLanguage
Select the language used for the control screen and setting items. Default is "British English(en)".
① Touch [Language].
② Touch [Language Select].
③ Select the desired language.
④ Touch].
For detailed operation, see User Interface Setup (P.38).
Clock
Adjusts clock.
For detailed operation, see Calendar/clock settings (P.7).
■Display
Set the image on the screen.
① Touch [Display.
② Touch [Background].
③ Select the image.
④ Touch [←].
For detailed operation, see Display Setup (P39).
Camera
Set the parameters for the camera.
① Touch [Camera].
② Set each item and touch [G].
For detailed operation, see Camera Setup (P35).
DEMO
Set the demonstration mode. Default is "ON".
① Touch [DEMO] and set ON or OFF.
2 Touch [Finish].
![KENWOOD DMX7018DABS - Touch [Finish]. - 1](/content/2026/02/418450/images/09784ee2e05c9a54f2b05829b02e3cb2ea1fecbfe8fe2ce10f682ce1f6fca712.jpg)
text_image
Initial SETUP Language Clock Display Camera DEMO Finish ONNOTE
• These settings can be set from the SETUP menu. See Setting Up (P.37).
Calendar/clock settings
1 Press the [MENU] button.
▶ Popup menu appears.
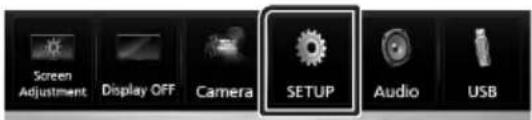
2 Touch [SETUP].
![KENWOOD DMX7018DABS - Touch [SETUP]. - 1](/content/2026/02/418450/images/478e55109a2b4d6f987710bfb98ee029fb48e2a9cdc92d37704e4014c603ffbf.jpg)
text_image
Screen Adjustment Display OFF Camera SETUP Audio USB▶ SETUP Menu screen appears.
3 Touch [User Interface].
![KENWOOD DMX7018DABS - Touch [User Interface]. - 1](/content/2026/02/418450/images/33d2d6089aad211ef825e26768e84834b749bc933035819fc4cb2e01ef2658ae.jpg)
text_image
SETUP AV Display User Interface Camera Special Bluetooth▶ User Interface screen appears.
4 Touch [Clock Adjust].
![KENWOOD DMX7018DABS - Touch [Clock Adjust]. - 1](/content/2026/02/418450/images/3c6a2418715eda47c668c1c614c0a6227ec610461ef5e2e8bba2ca248f1e562c.jpg)
text_image
User Interface Beep OFF Language British English(en) Steering Remote Controller Clock Adjust5 Adjust the date, then adjust the time.
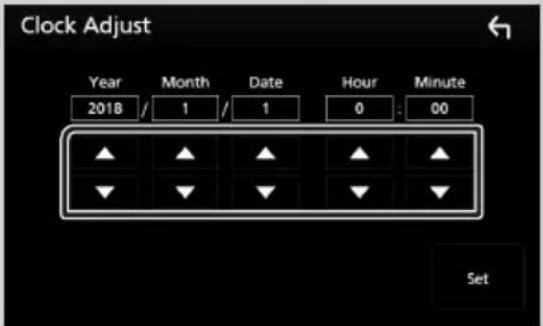
text_image
Clock Adjust Year Month Date Hour Minute 2018 / 1 / 1 0 : 00 Set6 Touch [Set].
NOTE
- Deactivate [RDS CT] before adjusting the clock. See Radio Setup (P.22).
Adjusting the volume
To adjust the volume (0 to 40),
Press [▲] to increase, and press [▼] to decrease.
Holding [▲] increases the volume continuously to level 15.
natural_image
Simple diagram with a rectangular box containing three symbols (two plus, one minus) and no text or labelsTouch screen operations
To perform operations on the screen, you need to touch, touch and hold, flick or swipe to select an item, display setting menu screen or to change the page, etc.
●Touch
Touch the screen gently to select an item on the screen.

natural_image
Simple line drawing of a hand cursor clicking a button (no text or symbols)●Touch and hold
Touch the screen and keep your finger in place until the display changes or a message is displayed.

natural_image
Hand cursor icon pressing a circular button (no text or symbols)●Flick
Slide your finger quickly to the left or right on the screen to change the page.

You can scroll the list screen by flicking the screen up/down.
●Swipe
Slide your finger up or down on the screen to scroll the screen.

Basic Operations
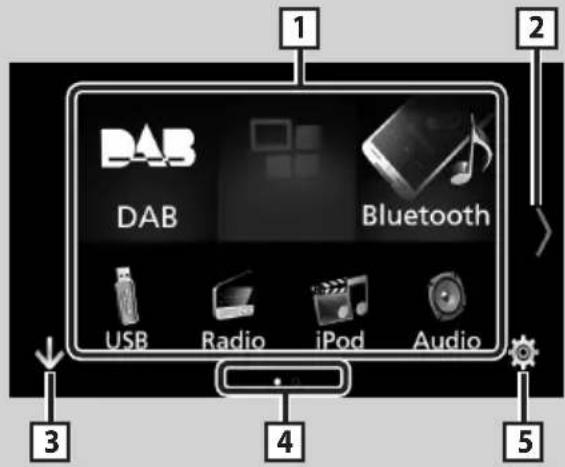
HOME screen descriptions
Most functions can be performed from the HOME screen.
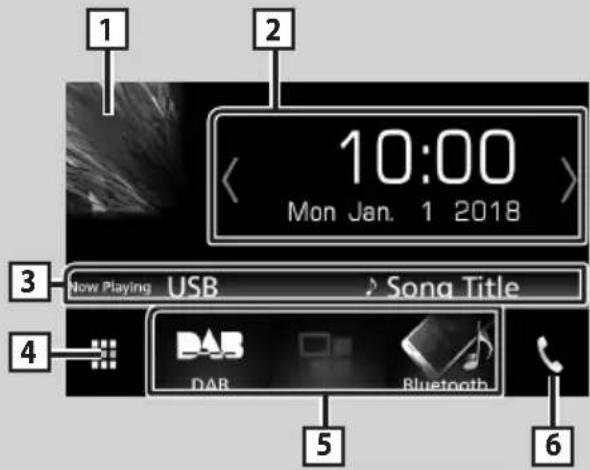
text_image
1 2 10:00 Mon Jan. 1 2018 3 Now Playing USB > Song Title 4 DAB Bluetooth 5 61 • Displays the control screen of current source.
2
- Widget
- You can change the widget by touching
[1/>] or flicking left or right on the widget area.
- Touch the widget to display the detailed screen.
3 • Current source information
4 • Displays the source selection screen. (P.9)
5 • Short-cut playback source icons (P.9)
6 • Displays the Hands Free screen. (P31)
- When connecting as Apple CarPlay or Android Auto, it works as a phone provided in Apple CarPlay or Android Auto.
Display the HOME
1 Press the [HOME] button.
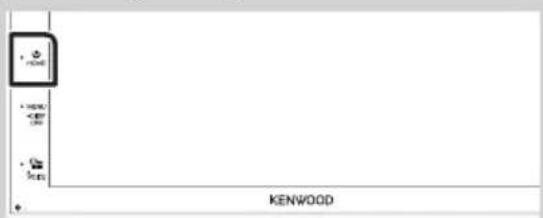
text_image
KENWOODHOME screen appears.
Source selection screen descriptions
You can display all playback sources and options on the source selection screen.
text_image
DAB DAB Bluetooth USB Radio iPod Audio1 • Changes the playback source. For playback sources, see P.9.
2 • Changes the page. (Touch 📋/}). You can also change the page by flicking left or right on the screen.
3 • Returns to previous screen.
4 • Page indication
5 • Displays the SETUP Menu screen. (P.37)
Select the playback source
1 Touch upon the HOME screen.
From the screen, you can select the following sources and functions.
 | • Switches to the Android Auto/ Apple CarPlay screen from the connected iPhone/Android device. x1 (P.13) |
 | • Switches to the Radio broadcast. (P.20) |
 | • Switches to the DAB broadcast. (P.23) |
 | • Plays a Bluetooth audio player. (P.27) |
 | • Plays an iPod/iPhone. (P.15) |
 | • Plays files on a USB device. (P.17) |
 | • Switches to an external component connected to the AV-IN input terminal. (P.36) |
 | • Displays the Audio screen. (P.41) |
 | • Puts the unit in standby. (P.10) |
* When iPhone compatible with CarPlay is connected, [Apple CarPlay] is displayed. When an Android device compatible with Android Auto is connected, [Android Auto] is displayed.
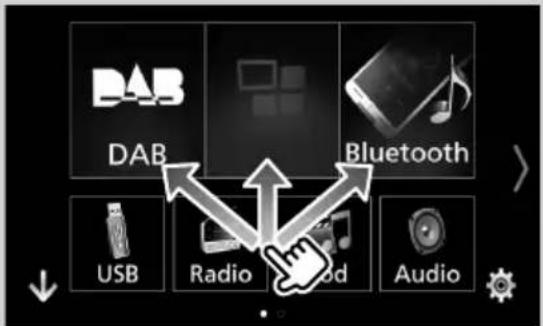
To select the playback source on the HOME screen
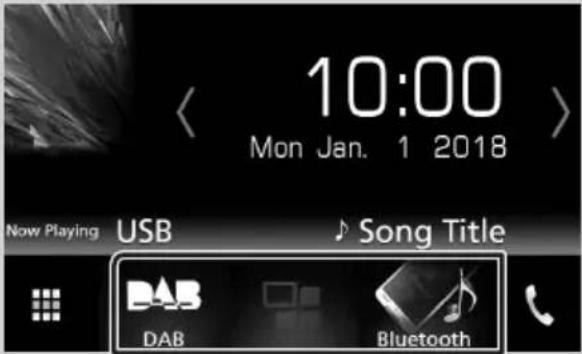
text_image
10:00 Mon Jan. 1 2018 Now Playing USB Song Title DAB DAB BluetoothThe 3 items displayed on the source selection screen as the large icons are shown on the HOME screen.
You can change items displayed on this area by customizing the source selection screen. (P.10)
To select the playback source on the source control screen
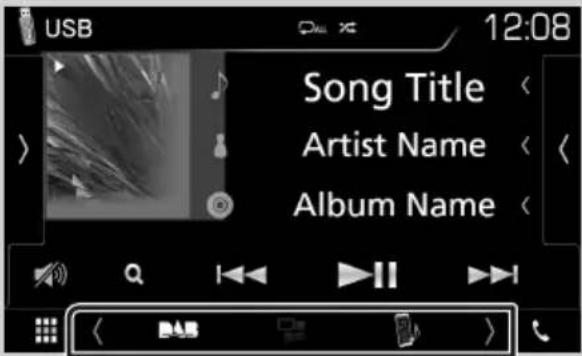
text_image
USB 12:08 Song Title Artist Name Album NameDisplay source selection buttons by touching 1/2 or flicking left or right on the source control screen, then select a playback source.
Basic Operations
Put the unit in standby
1 Touch upon the HOME screen.
2 Touch [STANDBY].
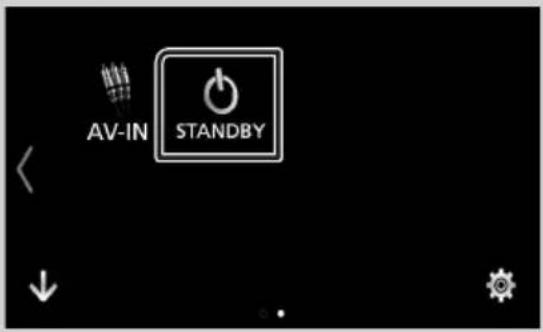
text_image
AV-IN STANDBYCustomize Short-cut buttons on HOME screen
You can arrange the position of the source icons as you like.
1 Touch 📄 on the HOME screen.
2 Touch and hold the icon which you want to move to go into the customizing mode.
3 Drag it where you want to move.
text_image
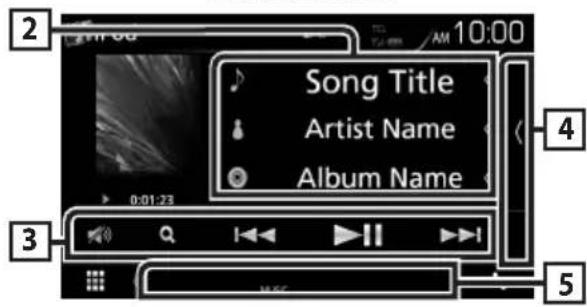
DAB Bluetooth USB Radio AudioSource control screen descriptions
There are some functions which can be operated from most screens.
Indicators
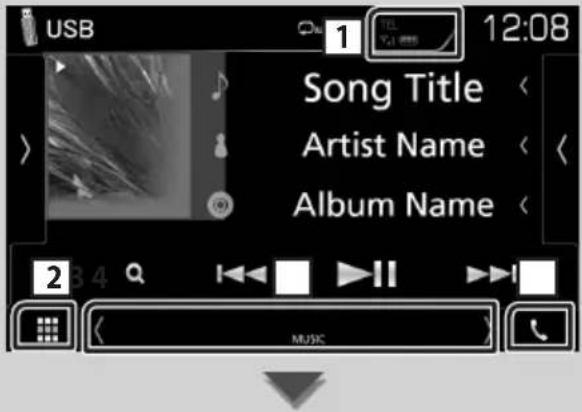
text_image
USB 1 TEL 12:08 Song Title Artist Name Album Name 2 3 4 MUSICShort-cut buttons


Connected Bluetooth device information.


Displays all sources.

Secondary screen
• [1] : The Secondary screen changes every time you touch it. You can also change the Secondary screen by flicking left or right on the screen.
- Indicators: Displays the current source condition and so on.
- ATT: The attenuator is active.
- LOUD: The loudness control function is on.
- Short-cut buttons: The source changes to the one you have set as a short-cut. For the short-cut setting, refer to Customize Short-cut buttons on HOME screen (P.10).


Touch to display the Hands Free screen. (P.31)
When connecting as Apple CarPlay or Android Auto, it works as a phone provided in Apple CarPlay or Android Auto.
Popup menu

Press the [MENU] button.
text_image
HOME TOTAL KENWOOD KENWOOD▶ Popup menu appears.

Touch to display the popup menu.

text_image
Screen Adjustment Display OFF Camera SETUP Audio USB 1 DAB 2 Bluetooth 3The contents of the menu are as follows.
| • Displays the Screen Adjustment screen. (P.37) | |
| • Turns the display off. (P.12) | |
| • Displays the view camera. (P.35) | |
| • Displays the SETUP Menu screen. (P.37) | |
| • Displays the Audio Control Menu screen. (P.41) | |
| • Displays the control screen of current source. Icon feature differs depending on the source. | |
| • Close the popup menu. | |
| • See HOME screen descriptions (P.8). |
Basic Operations
Turn off the screen
1 Select [Display OFF] on the pop-up menu.
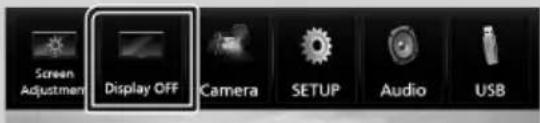
text_image
Screen Adjustment Display OFF Camera SETUP Audio USB●To turn on the screen
1 Touch the display.
List screen
There are some common function keys in the list screens of most sources.
text_image
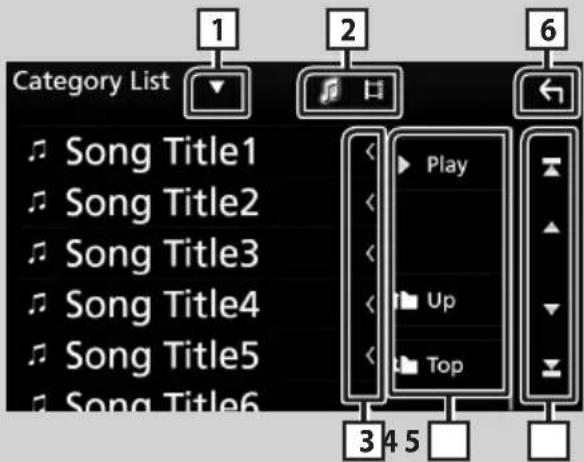
Category List 1 2 6 Song Title1 Song Title2 Song Title3 Song Title4 Song Title5 Song Title6 Play Up Top 3 4 5
Displays list type selection window.

Displays music/movie file list.

Scrolls the displayed text.

Keys with various functions are displayed here.
- Play : Plays all tracks in the folder containing the current track.
• Up Top gives to the upper hierarchy.
5 ] Page scroll
You can change the page to display more items by pressing [▲]/[▼].
• [T]/[E]: Displays the top or bottom page.

Returns to previous screen.
NOTE
- Buttons which cannot be activated from the list screen are not displayed.
APPS-Android Auto™/Apple CarPlay
Apple CarPlay Operation
CarPlay is a smarter, safer way to use your iPhone in the car. CarPlay takes the things you want to do with iPhone while driving and displays them on the screen of the product. You can get directions, make calls, send and receive messages, and listen to the music from iPhone while driving. You can also use Siri voice control to make it easier to operate iPhone.
For details about CarPlay, visit https://ssl.apple.com/ios/carplay/.
Compatible iPhone devices
You can use CarPlay with the following iPhone models.
- iPhone 7 Plus
- iPhone 7
- iPhone SE
- iPhone 6s Plus
- iPhone 6s
- iPhone 6 Plus
- iPhone 6
- iPhone 5s
- iPhone 5c
- iPhone 5

Preparation
1 Connect iPhone using KCA-iP103 via USB terminal. (P.51)
When iPhone compatible with CarPlay is connected to the USB terminal, the Bluetooth smartphone currently connected is disconnected.
2 Unlock your iPhone.
Operation buttons and available Apps on the home screen of CarPlay
You can use the Apps of the connected iPhone.
The items displayed and the language used on the screen differ among the connected devices.
To enter CarPlay mode, touch [Apple CarPlay] icon in the source selection screen. (P.9)
text_image
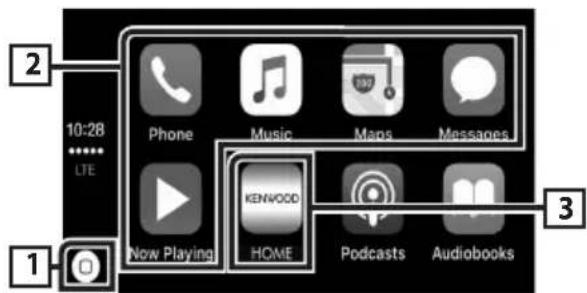
10:28 LTE Phone Music Maps Messages New Playing KENWOOD HOME Podcasts Audiobooks
• Displays the home screen of CarPlay.
- Touch and hold to activates Siri.
2 Application buttons
Starts the application.
3 [HOME]
Exits the CarPlay screen and displays the Home screen.
To exit the CarPlay screen
1 Press the [HOME] button.

Use Siri
You can activate Siri.
1 Press the 📄 button for 1 second.

text_image
Press for 1 second KENWOOD2 Talk to Siri.
To deactivate
1 Press the 📄 button.
Switch to the Apple CarPlay screen while listening to another source
1 Press the 📄 button.

text_image
• MCC • C# KenwoodNOTE
- If sound is output using Apple CarPlay when the Apple CarPlay screen is displayed, the source is switched to Apple CarPlay.
Android Auto™ Operation
Android Auto enables you to use functions of your Android device convenient for driving. You can easily access route guidance, make calls, listen to music, and access convenient functions on the Android device while driving.
For details about Android Auto, visit https://
www.android.com/auto/ and https://support.google.com/androidauto.
Compatible Android devices
You can use Android Auto with Android devices of Android version 5.0 (Lollipop) or later.
NOTE
- Android Auto may not be available on all devices and is not available in all countries or regions.

Preparation
1 Connect an Android device via USB terminal. (P.51)
To use the hands-free function, connect the Android device via Bluetooth.
When an Android device compatible with Android Auto is connected to the USB terminal, the device is connected via Bluetooth automatically, and the Bluetooth smartphone currently connected is disconnected.
2 Unlock your Android device.
Operation buttons and available Apps on the Android Auto screen
You can perform the operations of the Apps of the connected Android device.
The items displayed on the screen differ among the connected Android devices.
To enter Android Auto mode, touch [Android
Auto] icon in the source selection screen.
(P.9)
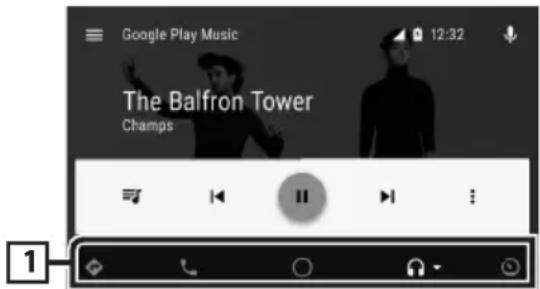
text_image
Google Play Music 12:32 The Balfron Tower Champs1 Application/information buttons
Starts the application or displays information.
To exit the Android Auto screen
1 Press the [HOME] button.
![KENWOOD DMX7018DABS - Press the [HOME] button. - 1](/content/2026/02/418450/images/7436df06692acfd5b4fc05f74533fbd858d3876e73865c28b1d5f7921c972484.jpg)
Using voice control
1 Press the 📄 button for 1 second.

text_image
Press for 1 second KENWOODTo cancel
1 Press the 📄 button.
Switch to the Android Auto screen while listening to another source
1 Press the 📄 button.
text_image
• KENWOOD • ### ### KenWOODNOTE
- If sound is output using Android Auto when the Android Auto screen is displayed, the source is switched to Android Auto.
iPod/iPhone
Preparation

Connectable iPod/iPhone
The following models can be connected to this unit.
Made for
- iPhone 7 Plus
- iPhone 7
- iPhone SE
- iPhone 6s Plus
- iPhone 6s
- iPhone 6 Plus
- iPhone 6
- iPhone 5s
- iPhone 5c
- iPhone 5
- iPod touch (6th generation)
- iPod touch (5th generation)
NOTE
- By connecting your iPod/iPhone to this unit with an optional accessory iPod connection cable KCA-iP103, you can supply power to your iPod/ iPhone as well as charge it while playing music. However, the power of this unit must be on.
- If you start playback after connecting the iPod, the music that has been played by the iPod is played first.

Connect iPod/iPhone
Preparation
- Connect an iPod/iPhone with the KCA-iP103 (optional accessory) while CarPlay is not connected.
- With a CarPlay-capable iPhone, turn off CarPlay by operating the iPhone at functional setup before connecting iPhone. For details of the setup method, contact the manufacturer of the terminal.
- Only one iPod/iPhone can be connected.
1 Connect the iPod/iPhone using KCA-iP103. (P.51)
2 Press the [HOME] button.
3 Touch
4 Touch [iPod]. (P.9)
●To disconnect the iPod/iPhone connected with the cable:
1 Detach the iPod/iPhone.
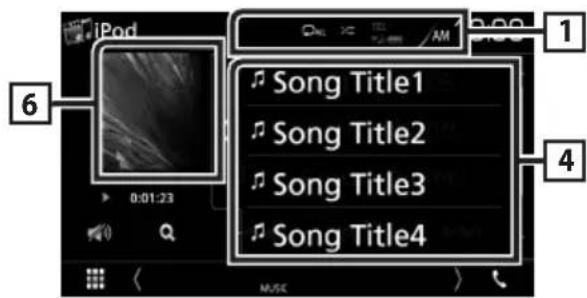
iPod/iPhone Basic Operation
Control screen
text_image
2 10:00 Song Title Artist Name Album Name 4 3 0:01:23 MASC 5Open the drawer
text_image
iPod 1 Song Title1 Song Title2 Song Title3 Song Title4 0:01:23 MUSIC
• [O]: Repeats the current track/album. Each time you touch the key, repeat mode switches in the following sequence;
Song repeat (☐), All songs repeat (☐)
• 📧 ] : Randomly plays all tracks in current album. Each time you touch the key, random mode switches in the following sequence;
Song random ( ✉_), Random off ( ✉)
2 Track information
• Displays the information of the current file.
- Touch to display the category list screen. See Category search (P.16).
3 [Operation keys
• Q]: Searches track/file. For details on search operation, see Search Operation (P.16).
- [▶▶] : Searches the previous/next track/file. Touch and hold to fast forward or fast backward.
• [▶II] : Plays or pauses.
• : Touch to attenuates/restores the sound.
4 Content list
Touch on the right side of the screen to display the Content list. Touch again to close the list. Displays the playing list. When you touch a track/file name on the list, playback will start.
5 Indicator Items
• MUSIC: Identifies the music file.
6 Artwork/ Play mode indicator/ Playing time
The jacket of the currently playing file is displayed.
- ▶, ▶▶, etc.: Current play mode indicator
The meanings of each icon are as follows;
▶ (play), ▶▶ (fast forward), ◀◀ (fast backward), ■ (pause).
Search Operation
You can search music files by the following operations.
1 Touch [Q].
2 Touch [▼].

text_image
Category List Albums3 Select the list type.

text_image
Category List Link SearchNOTE
- For operations in the list screen, see List screen (P.12).
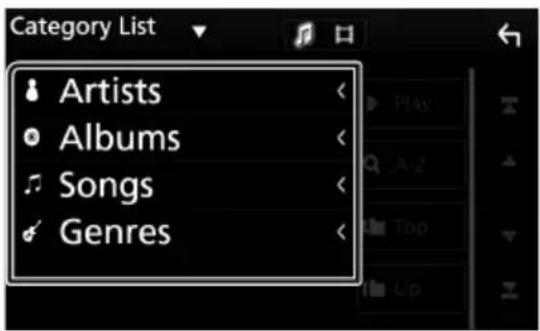
Category search
You can search a file by selecting category.
1 Touch [Category List].
2 Touch the desired category.
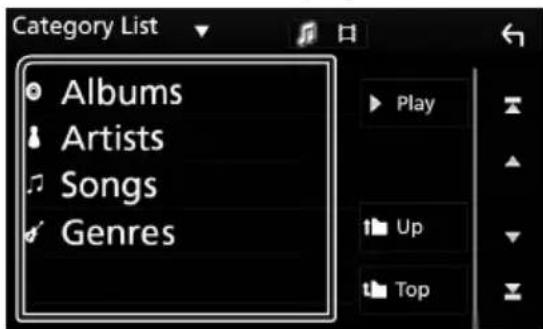
text_image
Category List Albums Artists Songs Genres Play Up TopThe list corresponding to your selection appears.
3 Touch to select desired item in the list. Repeat this step until you find the desired file.
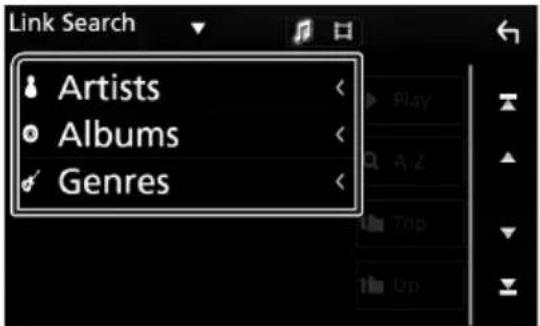
Link search
You can search a file of same artist/album/genre/composer as the current track.
1 Touch [Link Search].
2 Touch the desired tag type. You can select from artist, album, genre and composer.
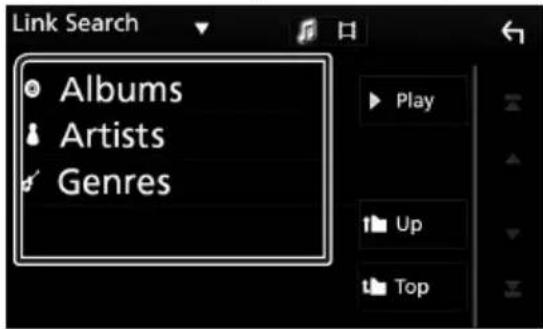
text_image
Link Search Albums Artists Genres Play Up TopThe list corresponding to your selection appears.
3 Touch desired item from the content list.
USB
Connecting a USB device
1 Connect the USB device with the USB cable. (P.50)
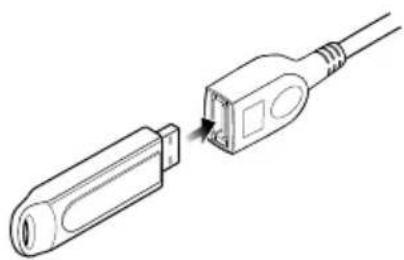
natural_image
Line drawing of a USB cable connector with a connector inserted into a socket (no text or symbols)2 Press the [HOME] button.
3 Touch
4 Touch [USB]. (P.9)
Disconnect the USB device
1 Press the [HOME] button.
2 Touch a source other than [USB].
3 Detach the USB device.
Usable USB device
You can use a mass-storage-class USB device on this unit.
The word "USB device" appearing in this manual indicates a flash memory device.
●About file system
The file system should be the one of the following.
• FAT16 • FAT32 • NTFS
NOTE
• Install the USB device in the place where it will not affect safe driving.
- You cannot connect a USB device via a USB hub and Multi Card Reader.
• Take backups of the audio files used with this unit. The files can be erased depending on the operating conditions of the USB device.
We shall have no compensation for any damage arising from any erased data.
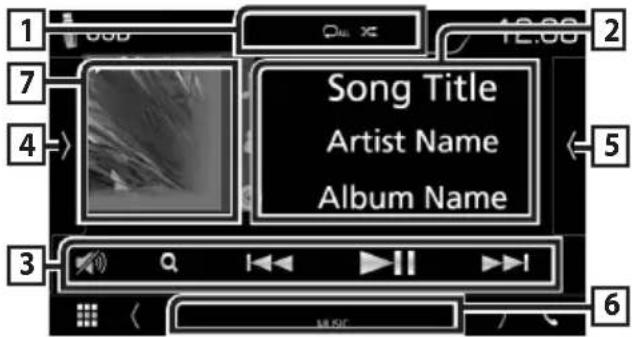
USB Basic Operation
Most functions can be controlled from the source control screen and playback screen.
Control screen
text_image
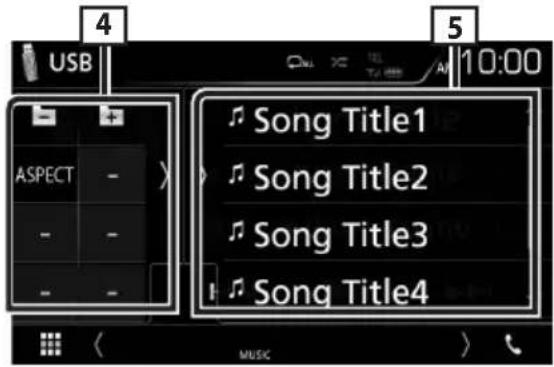
1 2 3 4 5 6 7 Song Title Artist Name Album NameOpen the drawer
text_image
4 USB ASPECT - - - - - Music 5 10:00 Song Title1 Song Title2 Song Title3 Song Title41 [F]
• [O]: Repeats the current track/folder. Each time you touch the key, repeat mode switches in the following sequence;
File repeat ( 🔍 ), Folder repeat ( 🔍 ) Repeat all ( 🔍 )
- [✗]: Randomly plays all tracks in current folder. Each time you touch the key, random mode switches in the following sequence;
File random ( ), Random off ( )
- When a high-resolution source is played, its format information is displayed.
2 Track information
Displays the information of the current file.
Only a file name and a folder name are displayed if there is no tag information.
3 [Operation keys
• Q]: Searches track/file. For details on search operation, see Search Operation (P.19).
- [◀◀] [▶▶▶] : Searches the previous/next track/file.
Touch and hold to fast forward or fast backward.
• [▶]II : Plays or pauses.
• : Touch to attenuates/restores the sound.
4 Function panel
Touch on the left side of the screen to display the function panel. Touch again to close the panel.
- [−] [+]: Searches previous/next folder.
- Aspect: Select screen mode.
Full: Changes the aspect ratio of video and displays fully on the screen.
Normal: Display with 4:3 ratio.
Auto: Displays video fully on vertical or horizontal with no ratio change.
5 Content list
Touch on the right side of the screen to display the Content list. Touch again to close the list. Displays the playing list. When you touch a track/file name on the list, playback will start.
6 Indicator Items
• VIDEO: Identifies the video file.
• MUSIC: Identifies the music file.
7 Artwork/ Play mode indicator/ Playing time
The jacket of the currently playing file is displayed.
- ▶, ▶▶, etc.: Current play mode indicator The meanings of each icon are as follows; ▶ (play), ▶▶ (fast forward), ◀◀ (fast backward), ■ (pause).
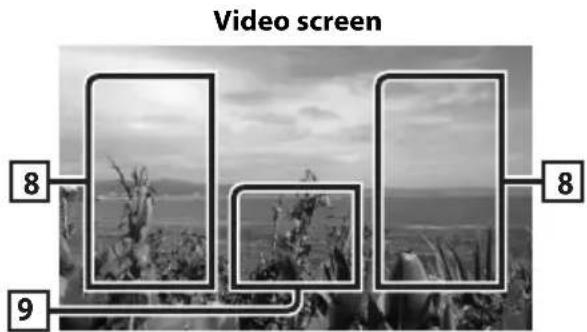
text_image
Video screen 8 8 98 Searching file area (Video file only)
Touch to search the next/previous file.
9 Key display area (Video file only)
Touch to display the control screen.
Search Operation
You can search music or video files by the following operations.
1 Touch [Q].
2 Touch [▼].

text_image
Category List Song Title13 Select the list type.

text_image
Category List Link Search Folder ListNOTE
- For operations in the list screen, see List screen (P.12).

Category search
You can search a file by selecting category.
1 Touch [Category List].
2 Select whether you search by audio files or video files.
3 Touch the desired category.
text_image
Category List Artists Albums Songs GenresThe list corresponding to your selection appears.
4 Touch to select desired item in the list. Repeat this step until you find the desired file.

Link search
You can search a file of same artist/album/genre as the current track.
1 Touch [Link Search].
2 Touch the desired tag type. You can select from artist, album and genre.
text_image
Link Search Artists Albums GenresThe list corresponding to your selection appears.
3 Touch desired item from the content list.

Folder search
You can search a file according to hierarchy.
1 Touch [Folder List].
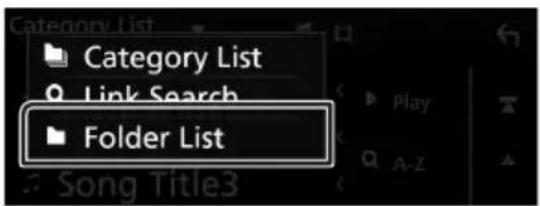
text_image
Category List Link Search Folder List2 Touch the desired folder.
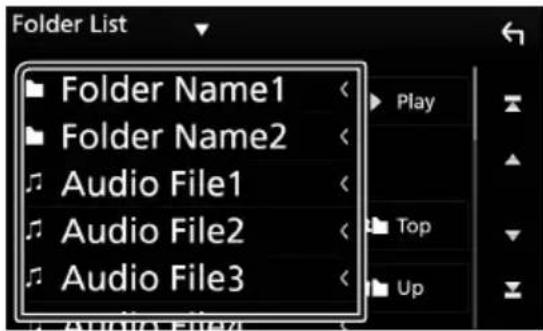
text_image
Folder List Folder Name1 Folder Name2 Audio File1 Audio File2 Audio File3 Play Top UpWhen you touch a folder its contents are displayed.
3 Touch to select desired item in the list. Repeat this step until you find the desired file.
Radio
Radio Basic Operation
Most functions can be controlled from the source control screen.
To enter Radio source, touch [Radio] icon in the source selection screen. (P.9)
Control screen
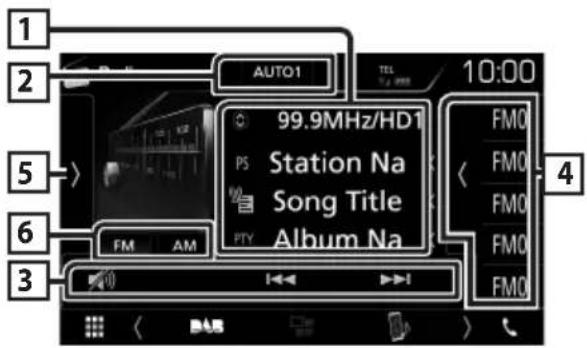
text_image
1 2 5 6 3 AUTO1 99.9MHz/HD1 PS Station Na Song Title Album Na FTY FM AM 10:00 FMO FMO FMO FMO FMO 4Open the drawer
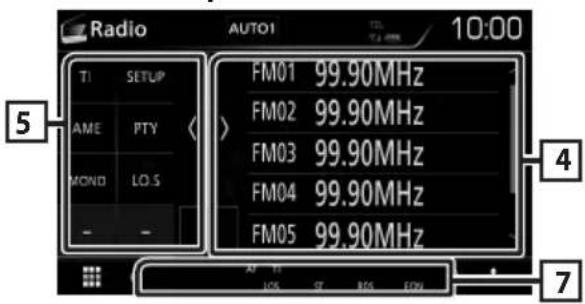
text_image
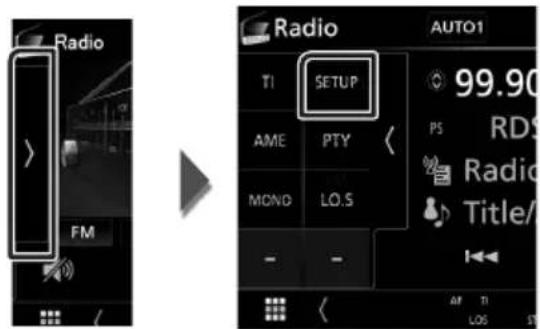
Radio AUTO1 10:00 TI SETUP AME PTY MONO LO.S FM01 99.90MHz FM02 99.90MHz FM03 99.90MHz FM04 99.90MHz FM05 99.90MHz 5 4 71 Information display
Displays the information of the current station: Frequency
Touching Ⓐ allows you to switch between Content A and Content B.
Content A: PS name, Radio Text, PTY Genre Content B: Radio Text plus, Title Artist
Preset#: Preset number
2 Seek mode
Switches the seek mode in the following sequence; [AUTO1], [AUTO2], [MANUAL].
• [AUTO1]: Tunes in a station with good reception automatically.
- [AUTO2]: Tunes in stations in memory one after another.
- [MANUAL]: Switches to the next frequency manually.
3 Operation keys
- [I◄◄] [►►I]: Tunes in a station. The method of frequency switching can be changed (see 2 in table).
• : Touch to attenuates/restores the sound.
4 Preset list
- Touch on the right side of the screen to display the Preset list. Touch again to close the list.
• Recalls the memorized station. - When touched for 2 seconds, stores the current receiving station in memory.
5 Function panel
Touch on the left side of the screen to display the function panel. Touch again to close the panel.
• TI] (FM only): Sets the traffic information mode on. For details, see Traffic Information (P.22).
- [SETUP: Displays the TUNER SETUP screen. For details, see Radio Setup (P.22).
- [AME]: Presets stations automatically. For details, see Auto memory (P.21).
- [PTY] (FM only): Searches a program by setting program type. For details, see Search by program type (P.21).
• [MONO] (FM only): Select the Monaural reception.
- [LO.S] (FM only): Turns the Local Seek function on or off.
6 [FM] [AM]
Switches the band.
7 Indicator Items
- ST: A stereo broadcast is being received.
• MONO: The forced monaural function is on. - AF: The AF search function is on.
- LOS: The Local Seek function is on.
- RDS: Indicates the state of the Radio Data System station when the AF function is on. White: Radio Data System is being received. Orange: Radio Data System is not being received.
• TI: Indicates the reception state of traffic information.
White: TP is being received.
Orange: TP is not being received.
Memory Operation

Auto memory
You can store stations with good reception in memory automatically.
1 Touch desired band key.
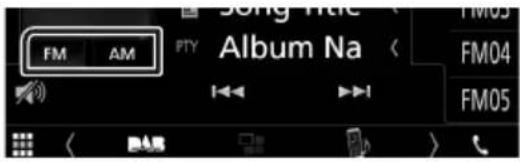
text_image
FM AM PTY Album Na FM05 FM04 FM052 Touch ▶ ] on the left side of the screen. Touch [AME].
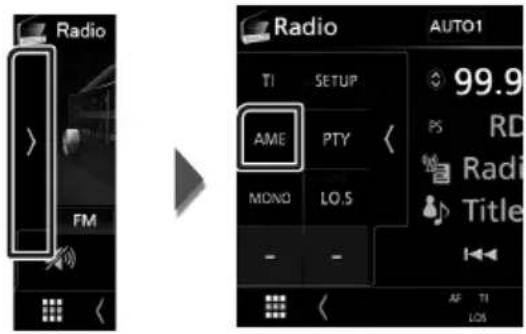
text_image
Radio FM Radio AUTO1 TI SETUP AME PTY MONO LO.5 99.9 PS RD Radio Title - - - AF TI LOAAuto memory starts.

Manual memory
You can store the current receiving station in memory.
1 Select a station you wish to store in memory.
2 Touch [FM#] (#:1-24) or [AM#] (#:1-12) in which you want to store the station for 2 seconds until a beep sounds.
Selecting Operation

Preset select
You can list and select memorized station.
1 Touch [K] on the right side of the screen. Select a station from the list.
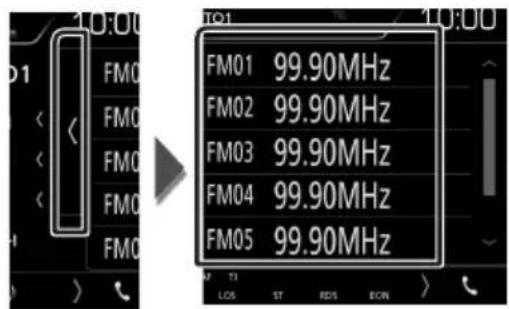
text_image
FM01 99.90MHz FM02 99.90MHz FM03 99.90MHz FM04 99.90MHz FM05 99.90MHzSearch by program type (FM only)
You can tune to a station with a specific program type when listening to FM.
1 Touch ▶] on the left side of the screen. Touch [PTY].
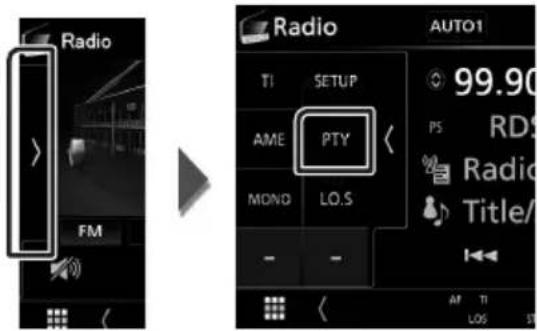
text_image
Radio FM Radio AUTO1 TI SETUP AME PTY P5 RDS MDND LO.S Radio Title/ - - - AF TI LOS▶ PTY Search screen appears.
2 Select a program type from the list.
3 Touch [Search].
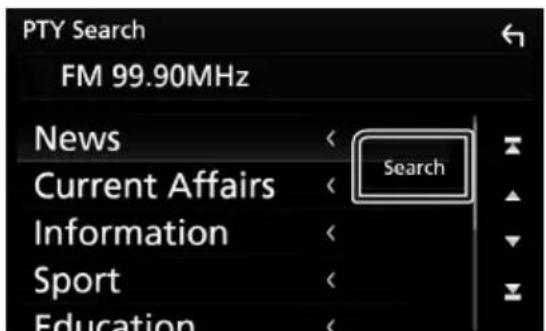
text_image
PTY Search FM 99.90MHz News Current Affairs Information Sport Education SearchYou can search a station of the selected program type.
Traffic Information (FM only)
You can listen and watch the traffic information automatically when a traffic bulletin starts. However, this feature requires a Radio Broadcast Data System that includes the TI information.
1 Touch ▶] on the left side of the screen. Touch [TI].
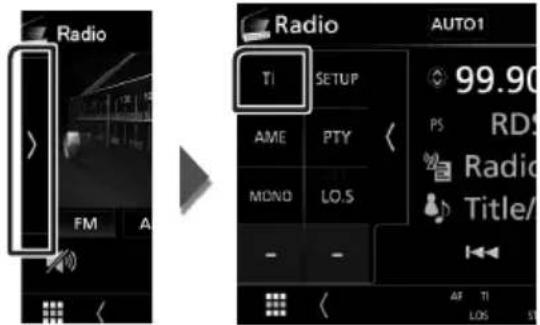
text_image
Radio FM A Radio T1 SETUP AME PTY MDND LO.S AUTO1 99.90 PS RDS Radio Title/ - - - AF T1 LOS 1V▶ Traffic information mode is set.

When the traffic bulletin starts
The Traffic Information screen appears automatically.

text_image
TI Radio Traffic InformationRadio Setup
You can set tuner related parameters.
1 Touch ▶ ] on the left side of the screen. Touch [SETUP].
text_image
Radio FM Radio T1 SETUP AME PTY MOND LO.S AUTO1 99.90 PS RDS Radio Title/ - - - AF T1 LOS ST▶ Radio SETUP screen appears.
2 Set each item as follows.
AF
When station reception is poor, automatically switches to the station that is broadcasting the same program over the same Radio Data System network. Default is "ON".
RDS CT
Synchronizing the Radio Data System station time data and this unit's clock.
"ON" (Default), "OFF"
DAB (DMX7018DABS)
DAB Basic Operation
Most functions can be controlled from the source control screen.
To enter DAB source, touch [DAB] icon in the source selection screen. (P.9)
Control screen
text_image
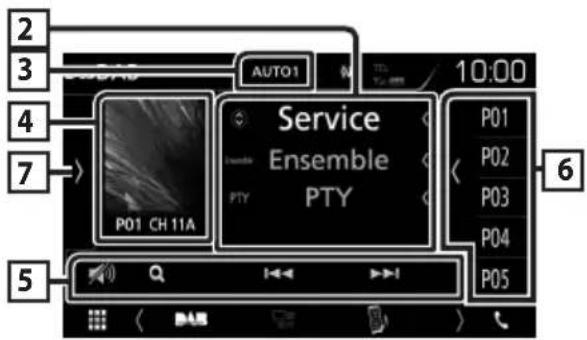
2 3 4 7 5 AUTO1 10:00 Service Ensemble PTY P01 P02 P03 P04 P05 6Open the drawer
text_image
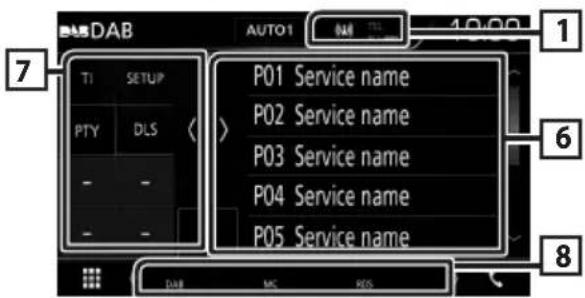
DAB AUTO1 1:00 1 7 TI SETUP P01 Service name P02 Service name PTY DLS P03 Service name - - P04 Service name - - P05 Service name 6 8 DA8 MC RES1 Indicator display
Displays the received signal strength.
2 Information display
Displays the information of the current station: Service Name
Touching 📋 allows you to switch between Content A, Content B and Content C.
Content A: Ensemble name, PTY Genre
Content B: Song Title, Artist Name, DLS
Content C: Now Playing, Next Program, Audio Quality
3 Seek mode
Switches the seek mode in the following sequence; [AUTO1], [AUTO2], [MANUAL].
• [AUTO1]: Tunes in a ensemble with good reception automatically.
- [AUTO2]: Tunes in ensemble in memory one after another.
- [MANUAL]: Switches to the next ensemble manually.
4 Artwork area
The picture data is displayed if available from current content.
Touch to switch between the Control and Information screen.
P#: Preset number
CH#: Channel display
5 Operation keys
- [Q]: Displays the Service List screen. For details on search operation, see Service search (P.25).
- [I◄◄◄] [►►►I]: Tunes in a ensemble, service, and component. The seek mode switching can be changed. (see 3 in table).
• : Touch to attenuates/restores the sound.
6 Preset list
- Touch on the right side of the screen to display the Preset list. Touch again to close the list.
• Recalls the memorized service. - When touched for 2 seconds, stores the current service in memory.
7 Function panel
Touch on the left side of the screen to display the function panel. Touch again to close the panel.
• [TI]: Sets the traffic information mode on. For details, see Traffic Information (P.25).
- [SETUP]: Displays the DAB SETUP screen. For details, see DAB Setup (P.26).
- [PTY] (Live mode only): Searches a program by setting program type. For details, see Search by program type (P.24).
- [DLS]: Display the Dynamic Label Segment screen.
8 Indicator Items
• DAB: Digital Radio is being received.
• RDS: Radio Data System is being received.
• MC: Receiving service is displayed.
White: Primary Component is received.
Orange: Secondary Component is received.
Storing Service in Preset Memory
You can store the current receiving service in memory.
1 Select a service you wish to store in memory.
2 Touch [←] on the right side of the screen.
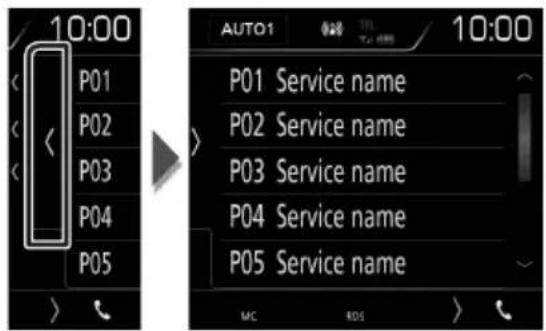
text_image
10:00 P01 P02 P03 P04 P05 AUTO1 10:00 P01 Service name P02 Service name P03 Service name P04 Service name P05 Service name MC RDS3 Touch [P#] (#:1-10) in which you want to store the station for 2 seconds until a beep sounds.
Selecting Operation
Search by program type
You can tune to a station with a specific program type when listening to Digital Radio.
1 Touch ▶] on the left side of the screen. Touch [PTY].
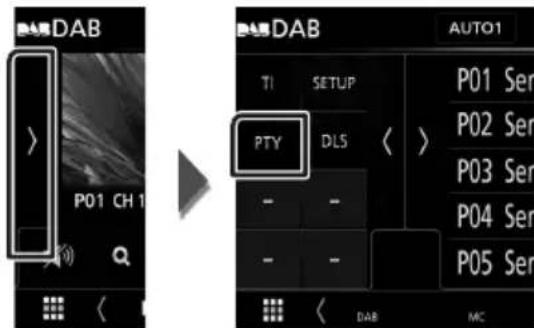
text_image
DAB P01 CH 1 PTY DLS AUTO1 TI SETUP P01 Sen P02 Sen P03 Sen P04 Sen P05 Sen - - - - - - - DAB MC▶ PTY Search screen appears.
2 Select a program type from the list.
3 Touch [Search].
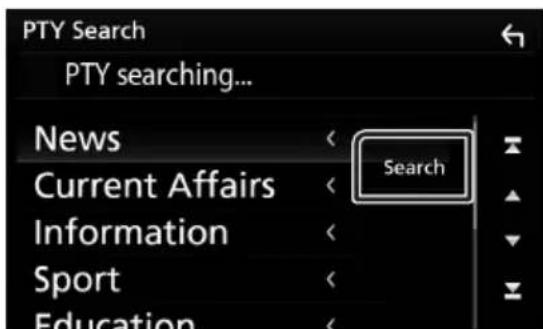
text_image
PTY Search PTY searching... News Current Affairs Information Sport Education SearchYou can search a station of the selected program type.

Service search
You can select a service from a list of all services received.
1 Touch [Q].
![KENWOOD DMX7018DABS - Touch [Q]. - 1](/content/2026/02/418450/images/a3801dfbd9b75587a98f027594d01e5f918f1f5c9a9695a168c44d06616fa6bb.jpg)
text_image
Mobile phone status bar screenshot showing navigation icons and control buttons2 Select the desired content from the list.
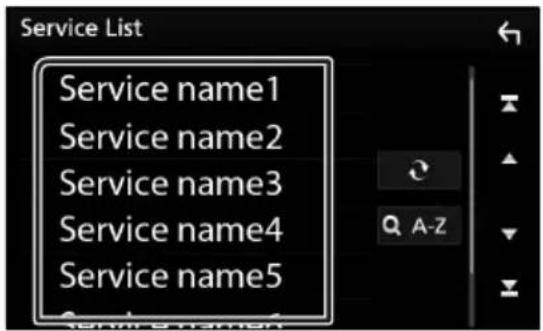
text_image
Service List Service name1 Service name2 Service name3 Service name4 Service name5 A-Z
Touch and hold to find the latest service list.
[QA-Z]
Displays the keyboard screen.
Jump to the letter you entered (alphabet search).
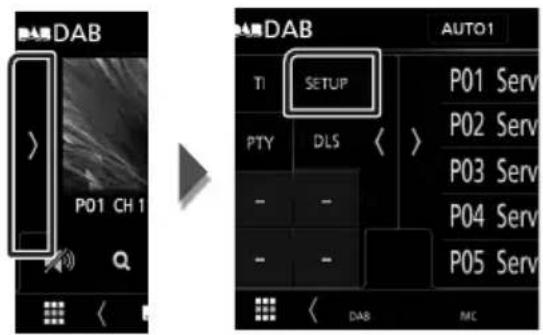
Traffic Information
You can listen and watch the traffic information automatically when a traffic bulletin starts. However, this feature requires a Digital Radio that includes the TI information.
1 Touch ▶] on the left side of the screen. Touch [TI].
![KENWOOD DMX7018DABS - Touch ▶] on the left side of the screen. Touch [TI]. - 1](/content/2026/02/418450/images/61e0c3ac7d8759fcd67de7851c3547e68f68432484c37d86826fd8276354eada.jpg)
text_image
DAB P01 CH 1 T1 SETUP PTY DL5 - - - DAB MC AUTO1 P01 Serv P02 Serv P03 Serv P04 Serv P05 Serv▶ Traffic information mode is set.
![KENWOOD DMX7018DABS - Touch ▶] on the left side of the screen. Touch [TI]. - 2](/content/2026/02/418450/images/002106396848dc699c22a0991ae3508fcaaaa239edc13458da25606f99a21c01.jpg)
When the traffic bulletin starts
The Traffic Information screen appears automatically.

text_image
TI DAB Road Traffic flashDAB Setup
You can set Digital Radio related parameters.
1 Touch ▶ ] on the left side of the screen. Touch [SETUP].
text_image
DAB P01 CH 1 SETUP AUTO1 TI SETUP P01 Serv PTY DLS PTY DLS P02 Serv P03 Serv P04 Serv P05 Serv - - - - - - - - - DAB MC▶ DAB SETUP screen appears.
2 Set each item as follows.
[Priority]
If the same service is provided by Digital Radio during Radio Data System reception, automatically switches to Digital Radio. If the same service is provided by Radio Data System when reception of the service being provided by Digital Radio becomes poor, automatically switches to Radio Data System.
■[Announcement Select]
Switches to the set Announcement service. For details, see Announcement setup (P.26).
■[Related Service]
When you select ON, the unit switches to a related service (if exists) when a DAB service network is not available. Default is "OFF".
Antenna Power
Sets power supply to the Digital Radio antenna. Set to "ON" when the Digital Radio antenna in use is equipped with a booster. Default is "ON".

Announcement setup
When the service for which ON is selected starts, switches from any source to Announcement to receive it.
1 Touch [Announcement Select] in the DAB SETUP screen.
The Announcement Select screen appears.
2 Touch each Announcement list and set on or off.

text_image
Announcement Select News flash OFF TRansport flash OFF Warning / Service OFF Area Weather flash OFF Event announcement OFFNOTE
- The volume setting during reception of Announcement service is automatically stored. The next time the Announcement service is received, this unit recalls the volume setting automatically.
Bluetooth Control
Using the Bluetooth function, various functions can be used: listening to the audio file, making/receiving a call.
Information for using Bluetooth® devices

Bluetooth®
Bluetooth is a short-range wireless radio communication technology for mobile devices such as mobile phones, portable PCs, and other devices.
Bluetooth devices can be connected without cables and communicate with each other.
NOTE
- While driving, do not perform complicated operations such as dialing numbers, using the phone book, etc. When you perform these operations, stop your car in a safe place.
- Some Bluetooth devices may not connect to this unit depending on the Bluetooth version of the device.
- This unit may not work for some Bluetooth devices.
- Connecting conditions may vary depending on your environment.
- For some Bluetooth devices, the device is disconnected when the unit is turned off.
About the cell-phone and Bluetooth audio player
This unit conforms to the following Bluetooth specifications:
Version
Bluetooth Ver. 4.1
Profile
Cell-phone:
HFP (Hands Free Profile)
SPP (Serial Port Profile)
PBAP (Phonebook Access Profile)
Audio player:
A2DP (Advanced Audio Distribution Profile)
AVRCP (Audio/Video Remote Control Profile)
Sound codec
SBC, AAC
NOTE
- The units supporting the Bluetooth function have been certified for conformity with the Bluetooth Standard following the procedure prescribed by Bluetooth SIG.
• However, it may be impossible for such units to communicate with your cell-phone depending on its type.
Register from the Bluetooth device
It is necessary to register the Bluetooth audio player or cell-phone to this unit before using the Bluetooth function.
You can register up to 7 Bluetooth devices.
NOTE
- Up to 7 Bluetooth devices can be registered. If an attempt is made to register the 8th Bluetooth device, the Bluetooth device connected on the earliest date will be deleted to register the 8th one.
- This unit is compatible with the Apple Easy Pairing function. When an iPod touch or iPhone is connected to this unit, an authentication dialog appears. Performing operation for authentication on this unit or iOS smartphone registers the smartphone as a Bluetooth device.
1 Turn on the Bluetooth function on your smartphone/cell-phone.
2 Search the unit ("DMX****") from your smartphone/cell-phone.
3 Operate your smartphone/cell-phone according to the displayed messages.
■Confirm the request on the smartphone/cell-phone.

■If a PIN code is required, enter the PIN code ("0000").
When data transmission and connection have completed, the Bluetooth connection icon appears on the screen.
Bluetooth Setup
1 Press the [MENU] button.
▶ Popup menu appears.
2 Touch [SETUP].
text_image
Screen Adjustment Display OFF Camera SETUP Audio USB▶ SETUP Menu screen appears.
3 Touch [Bluetooth].
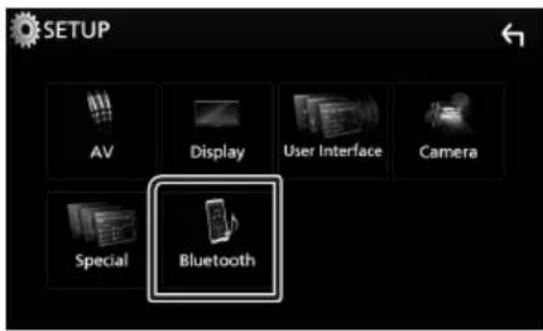
text_image
SETUP AV Display User Interface Camera Special BluetoothBluetooth SETUP screen appears.
See the following section for each setting.
- Connect the Bluetooth device (P.29)

Connect the Bluetooth device
1 Touch [Select Device] in the Bluetooth SETUP screen.
![KENWOOD DMX7018DABS - Touch [Select Device] in the Bluetooth SETUP screen. - 1](/content/2026/02/418450/images/611bb8b23db265738fe71aebc193455f97a0fd4a41baef44ea85ce0a70fc38cf.jpg)
text_image
Bluetooth Setup Select Device > Device Name DMX ***** PIN Code 0000 Device Address 00:11:22:33:44:552 Touch the device name you want to connect.
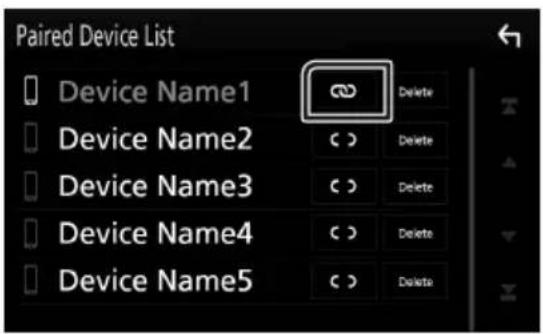
text_image
Paired Device List Device Name1 Device Name2 Device Name3 Device Name4 Device Name5 Delete Delete Delete Delete DeleteNOTE
- If the icon is lighted, it means that the unit will use that device.
To delete the registered Bluetooth device
1 Touch [Delete].
![KENWOOD DMX7018DABS - Touch [Delete]. - 1](/content/2026/02/418450/images/c079b0965eb9bb432905bda908b5f390898f87ba661e44e4a5e01f7d8cf86676.jpg)
text_image
Paired Device List Device Name1 Device Name2 Device Name3 Device Name4 Device Name5 Delete Delete Delete Delete Delete2 Touch [Delete].
▶ Confirmation message appears.
3 Touch [Yes].
Playing Bluetooth Audio Device
Most function can be controlled from the source control screen.
To enter Bluetooth source, touch [Bluetooth] icon in the source selection screen. (P.9)

Bluetooth basic operation
Control screen

text_image
1 5 Bluetooth Device name 10:00 4 Song title Artist name Album name 2 3
Device name/


- Connected device name.
- Repeats the current track/folder. Each time you touch the key, repeat mode switches in the following sequence; File repeat ( ), Folder repeat ( ), All songs repeat ( ) Repeat off ( )
- Randomly plays all tracks in current folder. Each time you touch the key, random mode switches in the following sequence; All random ( ), Random off ( )
• Operations and display indications may differ according to their availability on the connected device.
2 Information display \*
Displays the name of the track information.
3 [Operation keys \*
• [Q]: Searches file. See File search (P.30).
- [I◄◄] [►►I]: Searches the previous/next content. Touch and hold to fast forward or fast backward.
• [▶]: Plays.
• [Ⅲ]: Pauses.
• : Touch to attenuates/restores the sound.
4 Function panel
Touch on the left side of the screen to display the function panel. Touch again to close the panel.
- BT DEVICE CHANGE] : Selects the device to connect via Bluetooth audio (A2DP) or APP (SPP). See Connect the Bluetooth audio (P.30).
5 Play mode indicator/ Playing time
▶, II: Current play mode indicator The meanings of each icon are as follows; ▶ (play), ▶▶ (fast forward), ◀◀ (fast backward), II (pause).
* These items appear only when the audio player which supports AVRCP profile is connected.
NOTE
- If the operation keys do not appear, operate from the player.
- Depending on your cell-phone or audio player, audio may be heard and controlled but text information may not appear.
- If the volume is too low, raise it on your cell-phone or audio player.

Connect the Bluetooth audio
Selects the device to connect via Bluetooth audio (A2DP) or APP (SPP).
1 Touch on the left side of the screen. Touch [BT DEVICE CHANGE].
![KENWOOD DMX7018DABS - Touch on the left side of the screen. Touch [BT DEVICE CHANGE]. - 1](/content/2026/02/418450/images/765aa76c1814a49a687b98924e9c8ace633cba1344950a388f638d03b4bc1b59.jpg)
text_image
Bluetooth 0:01:23 Bluetooth Device name S A AI2 Touch the device name you want to connect.
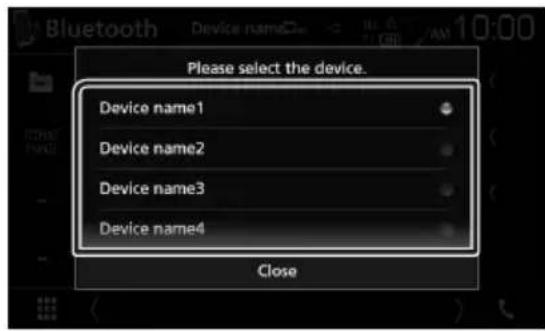
text_image
Please select the device. Device name1 Device name2 Device name3 Device name4 Close3 Touch [Close].
![KENWOOD DMX7018DABS - Touch [Close]. - 1](/content/2026/02/418450/images/22356ded418ee2e6c5d754d0b72f7dafcf3cd5a31299fcd6df3c231f4b99a3e8.jpg)
File search
1 Touch [Q].
2 Touch the desired file or folder.
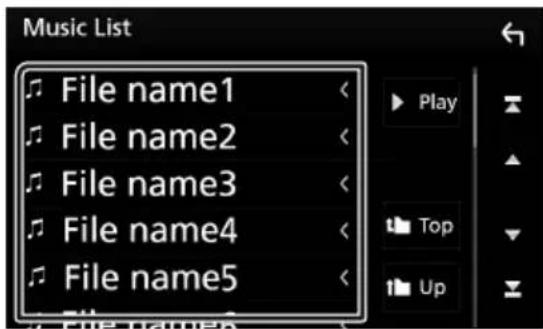
text_image
Music List File name1 File name2 File name3 File name4 File name5When you touch a folder its contents are displayed.
3 Touch desired item from the content list.
▶ Playback starts.
NOTE
- For operations in the list screen, see List screen (P.12).
Using Hands-Free Unit
You can use telephone function by connecting the Bluetooth telephone to this unit.
NOTE
- While Apple CarPlay or Android Auto is being connected, Bluetooth Hands-Free function and two Bluetooth devices connections cannot be used. Only Apple CarPlay or Android Auto Hands-Free function can be used.

Make a call
1 Touch [t].
![KENWOOD DMX7018DABS - Touch [t]. - 1](/content/2026/02/418450/images/53e992534fd50a1f20ce5a4e8bac205cad22e0495612bb84c7a97b1951474081.jpg)
text_image
DAB Bluetooth MUSIC▶ Hands Free screen appears.
NOTE
- If your mobile phone supports PBAP, you can display the phone book and call lists on the touch panel screen when the mobile phone is connected.
- Phone book: up to 1000 entries - Up to 20 entries including dialed calls, received calls, and missed calls
2 Select a dialing method.

text_image
Device name1 Please enter a phone number. 1 2 3 4 5 6 7 8 9 * 0/+ #• [ ] Call using call records
• [图标]: Call using the phonebook
• [★]: Call using the preset number
• [ ]: Call by entering a phone number
• [图标]: Voice Recognition (P.32)
●Bluetooth SETUP
1) Touch

Bluetooth SETUP screen appears.
NOTE
- The status icons such as battery and antenna displayed may differ from those displayed on the cell-phone.
- Setting the cell-phone in the private mode can disable the hands-free function.
Call using call records
1 Touch

2 Select the phone number from the list.
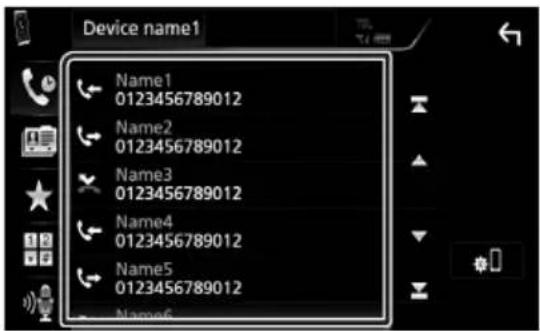
text_image
Device name1 Name1 0123456789012 Name2 0123456789012 Name3 0123456789012 Name4 0123456789012 Name5 0123456789012 Name6Call by entering a phone number
1 Touch

2 Enter a phone number with number keys.
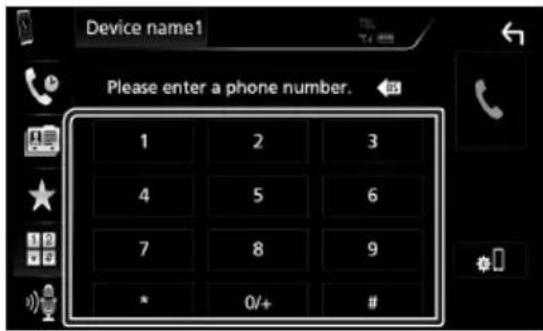
text_image
Device name1 Please enter a phone number. 1 2 3 4 5 6 7 8 9 * 0/+ #3 Touch

Call using the preset number
1 Touch

2 Touch the Name or phone number.
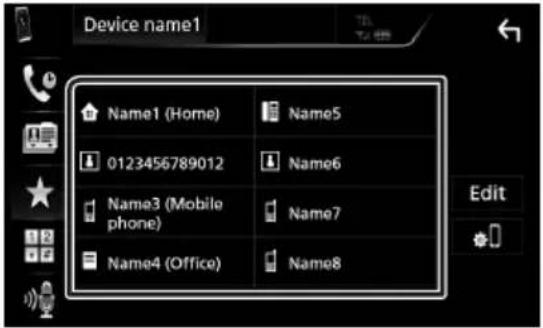
text_image
Device name1 Name1 (Home) Name5 0123456789012 Name6 Name3 (Mobile phone) Name7 Name4 (Office) Name8 EditCall using the phonebook
1 Touch

2 Select the person you want to call from the list.
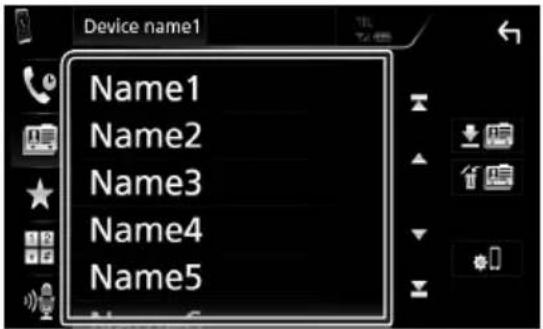
text_image
Device name1 Name1 Name2 Name3 Name4 Name53 Select the phone number from the list.
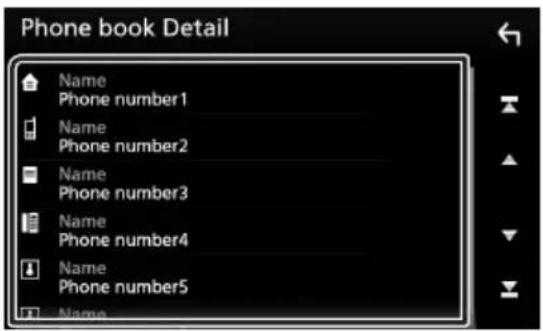
text_image
Phone book Detail Name Phone number1 Name Phone number2 Name Phone number3 Name Phone number4 Name Phone number5 NameNOTE
- If no Phonebook has been downloaded, touching [Download Phonebook Now] will start downloading the Phonebook.
Voice Recognition
You can access the voice recognition function of the cell-phone connected to this unit. You can search the cell-phone phonebook by voice. (The functionality depends on the cell-phone.)
1 Press the 📄 button for 1 second.

text_image
Press for 1 second KENWOOD▶ Voice Recognition screen appears.
2 Start speaking.
NOTE
- You can use voice recognition function by touching [icon] on the Hands Free screen.

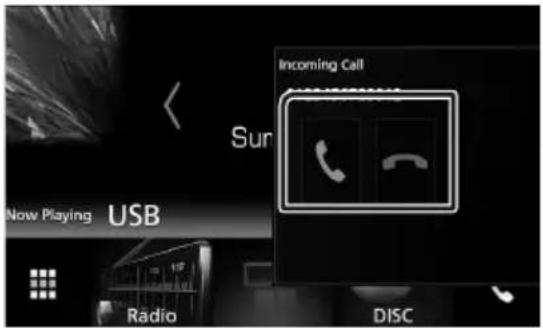
Receive a call
1 Touch [icon] to answer a phone call or [icon] to reject an incoming call.
text_image
Now Playing USB Radio Sur Incoming Call DISCNOTE
- While monitoring the view camera, this screen does not appear even if a call comes in. To display this screen, press the [TEL] button or return the shift knob of car to the driver position.
To end call
1 While talking, touch


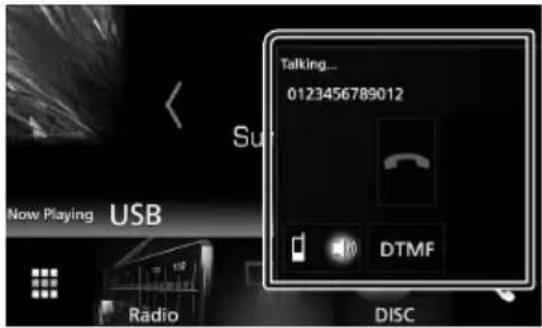
Operations during a call
text_image
Talking... 0123456789012 Now Playing USB Radio DISC DTMF●Adjust the receiver volume
Press the [▼] or [▲] button.

natural_image
Pure electrical circuit lines without any symbols●Output the dial tone
Touch [DTMF] to display the tone input screen. You can send tones by touching desired keys on the screen.
●Switching the speaking voice output
Touching 📄/ 📋 each time switches the speaking voice output between cell-phone and speaker.
- Call-waiting
When you receive a call while talking on another call, you can answer the newly received call by touching 📄. The current call is on hold. Each time you touch 📄, the caller will change. When you touch 📄, the current call will end and switch to the call in hold.
Bluetooth Control

Phone number preset
You can register frequently used phone numbers to this unit.
1 Touch

2 Touch [Edit].
![KENWOOD DMX7018DABS - Touch [Edit]. - 1](/content/2026/02/418450/images/e191d176b04736a0c9bca2796898d234a7c7c0977e9c11277614695086976762.jpg)
text_image
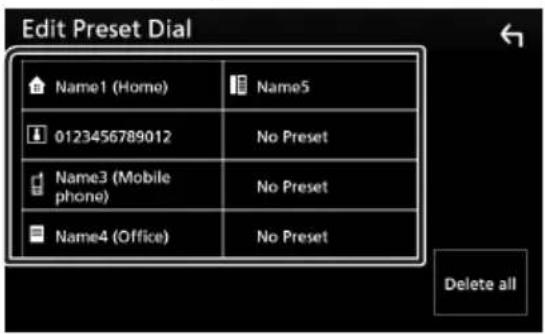
Device name1 Name1 (Home) 0123456789012 Name3 (Mobile phone) Name4 (Office) Name5 Name6 Name7 Name8 Edit3 Select where to preset.
text_image
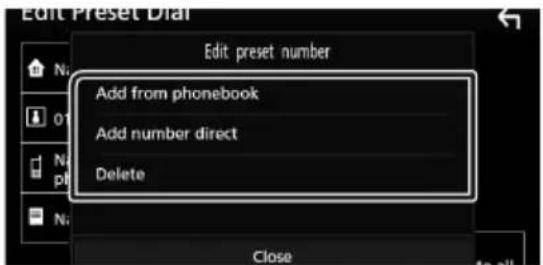
Edit Preset Dial Name1 (Homo) Name5 0123456789012 No Preset Name3 (Mobile phone) No Preset Name4 (Office) No Preset Delete all4 Select how to preset.
text_image
Edit Preset Dial Edit preset number Add from phonebook Add number direct Delete Close■[Add number from phonebook]
Select the number to preset from the phonebook. See Call using the phonebook (P.32).
■[Add number direct]
Enter the telephone number directly and touch [SET]. See Call by entering a phone number (P.31).
[Delete]
To delete a preset number, touch [Delete] and then touch [OK] on the confirmation screen.
![KENWOOD DMX7018DABS - [Delete] - 1](/content/2026/02/418450/images/557f5dfde1fc2c27bcd217274248556f6f7ca2937ab7ab5ee1e76d3528639709.jpg)
Phonebook transfer
You can transfer the phonebook in your Bluetooth smartphone via PBAP.
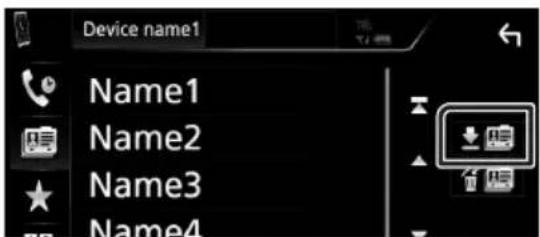
1 Touch

2 Touch

text_image
Device name1 Name1 Name2 Name3 Name4The phonebook data transmission starts.
NOTE
- If the Phonebook contains more than 1000 entries, Phonebook data cannot be transferred.
Phonebook deletion
1 Touch

▶ Confirmation message appears.
2 Touch [Yes].
Other External Components
View Camera
NOTE
• To connect a camera, see P.50.
• To use a rear view camera, a REVERSE lead connection is required. (P.50)
- The rear view screen is displayed when you shift the gear to the reverse (R) position.

Display the camera screen
1 Press the [MENU] button.
▶ Popup menu appears.
2 Touch [Camera].
![KENWOOD DMX7018DABS - Touch [Camera]. - 1](/content/2026/02/418450/images/83bda79cf07220042ac31233e0d74fffdd3db7da8b3226d12b7a218e95700619.jpg)
text_image
Screen Adjustment Display Off Camera SETUP Audio USB▶ View camera screen appears.
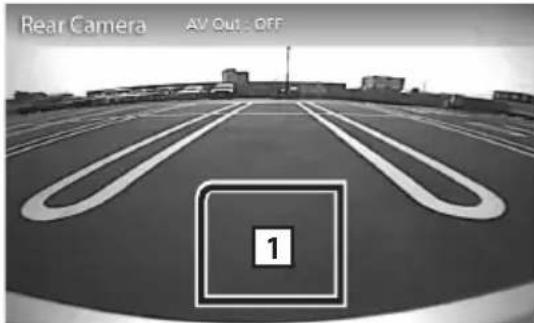
3 Adjust each item as follows.
text_image
Rear Camera AV Out - Off 11 Camera off
Touch to exit the camera screen.

Camera Setup
1 Press the [MENU] button.
▶ Popup menu appears.
2 Touch [SETUP].
▶ SETUP Menu screen appears.
3 Touch [Camera].
![KENWOOD DMX7018DABS - Touch [Camera]. - 1](/content/2026/02/418450/images/75baeecb6bb721cdc52eec9994175b13e3dce9618072e7cff303dd249fbd9bfb.jpg)
text_image
AV Display User Interface Camera▶ Camera screen appears.
4 Set each item as follows.
Parking Guidelines
You can display parking guidelines to enable easier parking when you shift the gear to the reverse (R) position.
Default is "ON".
■Guidelines SETUP
If you select [ON] for [Parking Guidelines], adjust the parking guidelines. See To adjust the parking guidelines (P.36).
To adjust the parking guidelines
NOTE
• Install the rear view camera in the appropriate position according to the instructions supplied with the rear view camera.
- When adjusting the parking guidelines, make sure to use the parking brake to prevent the car from moving.
1 Touch [ON] of [Parking Guidelines] in the Camera screen. (P.35)
2 Touch [Guidelines SETUP] in the Camera screen.
3 Adjust the parking guidelines by selecting the ✕ mark.
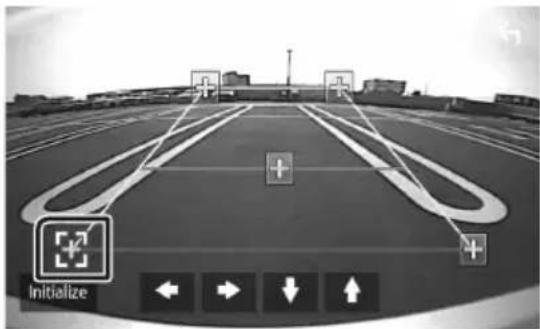
text_image
Initialize4 Adjusting the position of the selected mark.
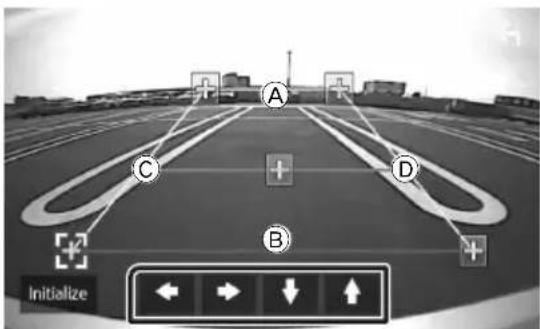
text_image
A C D B InitializeMake sure that Ⓐ and Ⓑ are horizontally parallel, and that Ⓓ and Ⓛ are the same length.
NOTE
- Touch [Initialize] and after touch [Yes] to set all the 🧑 marks to the initial default position.
External audio/video players—AV-IN
1 Connect an external component to the AV-IN input terminal. (P.50)
2 Select [AV-IN] as the source. (P.9)
3 Turn on the connected component and start playing the source.
Setting Up
Monitor Screen Setup
You can adjust image quality in video screen.
1 Press the [MENU] button.
▶ Popup menu appears.
2 Touch [Screen Adjustment].
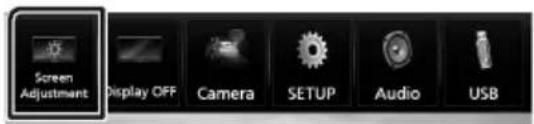
text_image
Screen Adjustment Display OFF Camera SETUP Audio USB▶ Screen Control screen appears.
3 Adjust each item as follows.

text_image
Screen Adjustment Initialize Contrast Brightness Colour Tint - 0 + - 0 + - 0 +■Contrast / Brightness / Colour / Tint
Adjusts each item.
NOTE
- Adjusting items are different depending on the current source.
System Setup
NOTE
• Each operation in this section can be started from the multi function menu.
1 Press the [MENU] button.
▶ Popup menu appears.
2 Touch [SETUP].
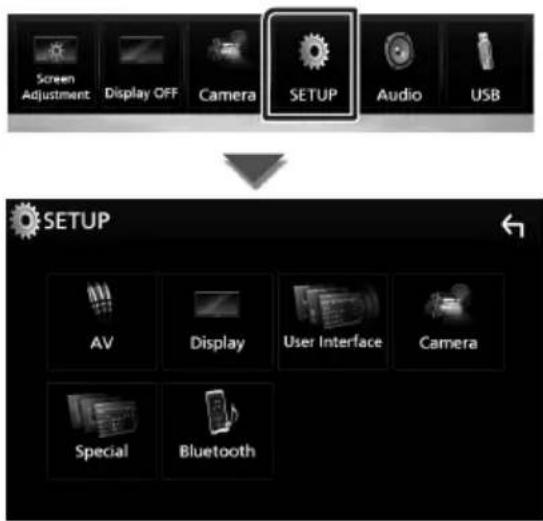
text_image
Screen Adjustment Display OFF Camera SETUP Audio USB SETUP AV Display User Interface Camera Special BluetoothSee the following section for each setting.
- Set up AV (P.40)
- Set up display (P.39)
- Set up the user interface (P.38)
- Set up camera (P.35)
- Set up special (P.38)
- Set up Bluetooth (P.28)
User Interface Setup
You can setup user interface parameters.
1 Press the [MENU] button.
▶ Popup menu appears.
2 Touch [SETUP].
▶ SETUP screen appears.
3 Touch [User Interface].
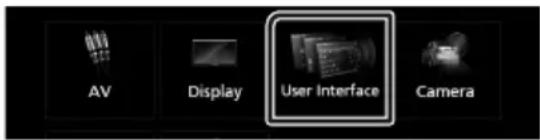
text_image
AV Display User Interface Camera▶ User Interface screen appears.
4 Set each item as follows.
Beep
Turns the key touch tone on or off.
Default is "OFF".
Language
Selects a language.
■Steering Remote Controller
Sets the desired function in the steering remote controller. (Contact your KENWOOD dealer for details.)
Clock Adjust
Adjust the date and time manually. (P.7)
Special Setup
You can setup Special parameters.
1 Press the [MENU] button. ➢ Popup menu appears.
2 Touch [SETUP]. ▶ SETUP screen appears.
3 Touch [Special].

text_image
Special Bluetooth▶ Special screen appears.
4 Set each item as follows.
DEMO
Set the demonstration mode. Default is "ON".
■Software Information
Check the software version of this unit. (P.38)
■Open Source Licenses
Displays the open source licenses.
■Initialize
Touch [Initialize] and then touch [Yes] to set all the settings to the initial default settings.
Software Information
Check the software version of this unit.
1 Touch [Software Information] in the Special screen.
2 Confirm the software version.
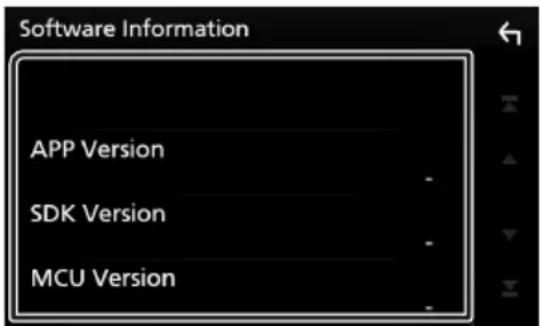
text_image
Software Information APP Version SDK Version MCU VersionDisplay Setup
1 Press the [MENU] button.
▶ Popup menu appears.
2 Touch [SETUP].
▶ SETUP screen appears.
3 Touch [Display].
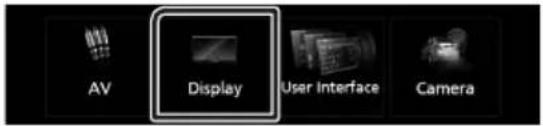
text_image
AV Display User Interface Camera▶ Display screen appears.
4 Set each item as follows.
Dimmer
Select dimmer mode.
OFF: The display and buttons do not dim.
ON: The display and buttons dim.
SYNC (Default): Turns the dimmer function on or off when the vehicle light control switch is turned on or off.
■Screen Adjustment
Displays the Screen Adjustment screen. (P.37)
Background
Changing background image or color. (P.39)
Change background image or color
1 Touch [Background] in the Display screen.
2 Select an image.
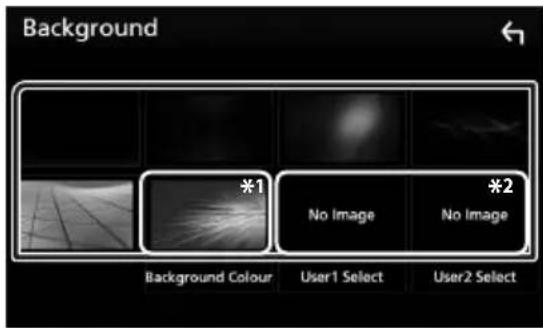
text_image
Background *1 No Image *2 No Image Background Colour User1 Select User2 Select*1 Select a background color in advance.
*2 Select an original image in advance.
To select background color
1 Touch [Background Color] in the Background screen.
2 Select a background color.
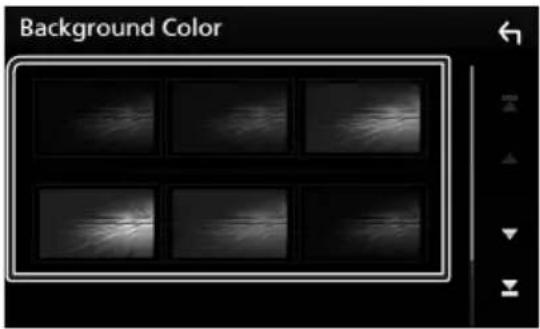
text_image
Background ColorSetting Up
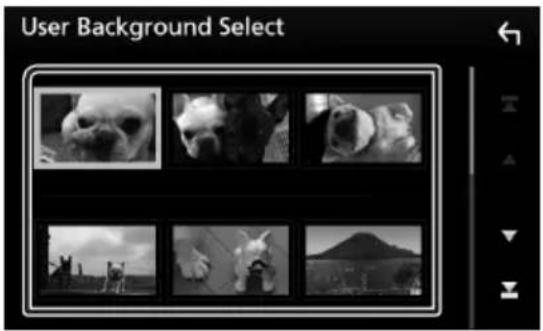
To register original image
You can load an image from the connected USB device and set it for the background image.
Before operating this procedure, it is necessary to connect the device which has the image to load.
1 Touch [User1 Select] or [User2 Select] in the Background screen.
2 Select the image to load.
text_image
User Background Select3 Touch [Enter].

text_image
User Background Memory File Name EnterThe selected image is loaded and the display returns to the Background screen.
NOTE
- Touching [O] rotates counter clockwise.
- Touching [O] rotates clockwise.
- Picture files: JPEG (.jpg, .jpeg), PNG (.png), BMP (.bmp)
AV Setup
You can set AV parameters.
1 Press the [MENU] button.
▶ Popup menu appears.
2 Touch [SETUP].
▶ SETUP screen appears.
3 Touch [AV].
text_image
AV Display User Interface CameraAV screen appears.
4 Set each item as follows.
AV-OUT
Specify whether to output the current source signal from the AV OUTPUT terminal.
"ON"/"OFF" (Default)
NOTE
• Images can be output only from the AV IN and USB (video file) source.
- If display of the rear view camera image is selected when the AV-IN source is being played, no image is output from the AV OUTPUT terminal.
CarPlay Sidebar
Select the position of the control bar (left or right) shown on the touch panel.
"Left" (Default)/ "Right"
NOTE
- The setting is available when an iPhone is disconnected.
■AV Color Adjust
You can adjust image quality in video screen. (P37)
NOTE
- Adjusting items are different depending on the current source.
Controlling Audio
NOTICE
• Each operation in this section can be started from the multi function menu.
You can adjust the various settings such as audio balance or subwoofer level.
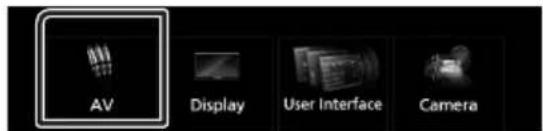
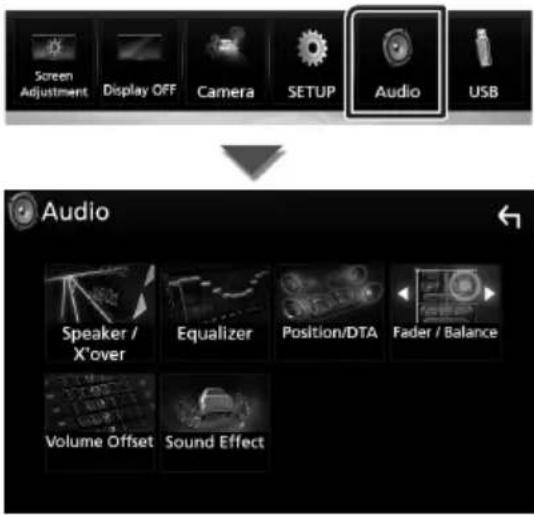
1 Press the [MENU] button.
▶ Popup menu appears.
2 Touch [Audio].
text_image
Screen Adjustment Display OFF Camera SETUP Audio USB Audio Speaker / X'over Equalizer Position/DTA Fader / Balance Volume Offset Sound EffectSee the following section for each setting.
- Set up speaker/ X'over (P.41)
• Controlling equalizer (P.43) - Set listening position/ DTA (P.45)
- Controlling general audio (Fader / Balance) (P.42)
- Set volume offset (P.44)
- Set sound effect (P.44)
Speaker/ X'over setup
1 Press the [MENU] button.
▶ Popup menu appears.
2 Touch [Audio].
▶ Audio screen appears.
3 Touch [Speaker/X'over].

text_image
Speaker / X'over Equalizer Position/DTA Fader / Balance4 Select a car type.
You can setup the car type and speaker network, etc.
If your car type is selected, the Delay Time Alignment is set automatically (for timing adjustment of sound output for each channel) to have the highest surround effects.

text_image
Speaker Select Car Type Compact Speaker 10 cm5 Touch the speaker (①) you wish to adjust and set each item (②) as follows.
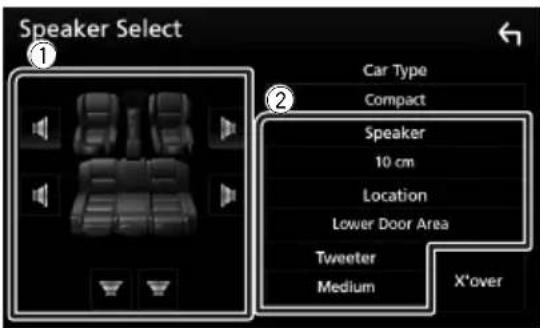
text_image
Speaker Select ① Car Type Compact Speaker 10 cm Location Lower Door Area Tweeter Medium X'overSpeaker
You can select a speaker type and its size to get the best sound effects.
When the speaker type and size are set, the speaker crossover network is set automatically.
■Location (Only for Front, Rear)
Select the speaker position you have fixed.
Controlling Audio
■Tweeter (Only for Front)
You can set the tweeter when you are selecting front speakers.
None, Small, Medium, Large
X'over
Displays the speaker crossover setup screen.
You can adjust the crossover setup that was set automatically when you selected the speaker type.
For details, see Crossover network setup (P.42)

Crossover network setup
You can set a crossover frequency of speakers.
1 Touch [X'over].
![KENWOOD DMX7018DABS - Touch [X'over]. - 1](/content/2026/02/418450/images/532f1a7ed4717b9071c72a9dd78b53231f38890c7166769ad55860faee3a94f5.jpg)
text_image
Lower Door Area Tweeter Medium X'over2 Touch the speaker to set.

text_image
X'over Front Rear Subwoofer HPF FREQ3 Set each item as follows.
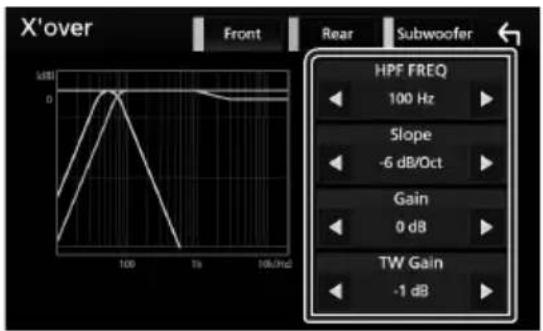
text_image
X'over Front Rear Subwoofer HPF FREQ 100 Hz Slope -6 dB/Oct Gain 0 dB TW Gain -1 dBHPF FREQ
High Pass Filter adjustment. (When front or rear speaker is selected on Speaker Select screen)
LPF FREQ
Low Pass Filter adjustment. (When subwoofer is selected on Speaker Select screen)
Slope\*
Sets a crossover slope.
Gain
Adjusts the front speaker, rear speaker, or subwoofer level.
■TW (Tweeter) Gain ^2*
Adjusts the tweeter level. (When front is selected on Speaker Select screen)
■Phase Inversion ^3*
Sets the phase of subwoofer output.
Check [Phase Inversion] to shift the phase 180 degrees. (When subwoofer is selected on Speaker Select screen)
*1 Only when "LPF FREQ"/"HPF FREQ" is set to a mode other than "Through" in [X'over].
*2 Only when "Tweeter" is set to "Small", "Medium", "Large" in [Speaker Setup].
*3 Only when "Subwoofer" is set to a mode other than "None" in [Speaker Setup].
Controlling General Audio
1 Press the [MENU] button.
▶ Popup menu appears.
2 Touch [Audio].
▶ Audio screen appears.
3 Touch [Fader / Balance].

text_image
Speaker / X'over Equalizer Position/DTA Fader / Balance4 Set each item as follows.
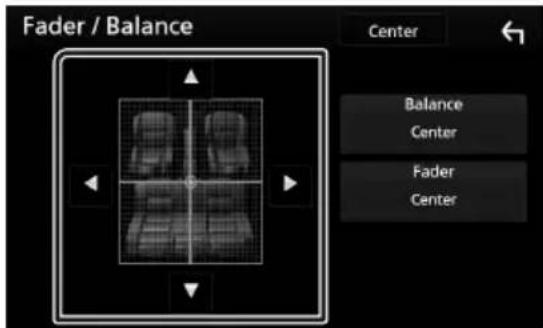
text_image
Fader / Balance Center Balance Center Fader CenterFader / Balance
Adjust the volume balance around the touched area.
[◀] and [▶] adjust the right and left volume balance.
[▲] and [▼] adjust the front and rear volume balance.
[Center]
Clear the adjustment.
Equalizer Control
You can adjust equalizer by selecting the optimized setting for each category.
1 Press the [MENU] button.
▶ Popup menu appears.
2 Touch [Audio].
▶ Audio screen appears.
3 Touch [Equalizer].
![KENWOOD DMX7018DABS - Touch [Equalizer]. - 1](/content/2026/02/418450/images/d22a41f1adcf05ce78dc8b99f3417c368f7d0e4d7b0339dfe26bad7106e77804.jpg)
text_image
Speaker / X'over Equalizer Position/DTA Fader / Balance4 Touch the screen and set the Graphic Equalizer as desired.

text_image
Graphic Equalizer USB ALL SRC 62.5 100 160 250 400 630 1k 1.6k 2.5k 4k 6.3k 10k 16k Preset Select Bass EXT SW Level Initialize Memory ON OFF 0■Gain level (dotted frame area)
Adjust the gain level by touching the each frequency bar.
You can select frequency bar and adjust its level by [▲], [▼].
■Preset Select
Displays the screen to recall the preset equalizer curve.
■Memory
Saves the adjusted equalizer curve from "User1" to "User4".
■Initialize
The current EQ curve returns to flat.
ALL SRC
Apply the adjusted equalizer to all sources.
Touch [ALL SRC] and then touch [OK] on the confirmation screen.
■Bass EXT (Bass Extend Settings)
When turned on, the frequency lower than 62.5 Hz is set to the same gain level as 62.5 Hz.
SW Level
Adjusts the subwoofer volume. This setting is not available when subwoofer is set to "None". See Speaker/X'over setup (P.41).

Recall the EQ curve
1 Touch [Preset Select].
2 Select EQ curve.
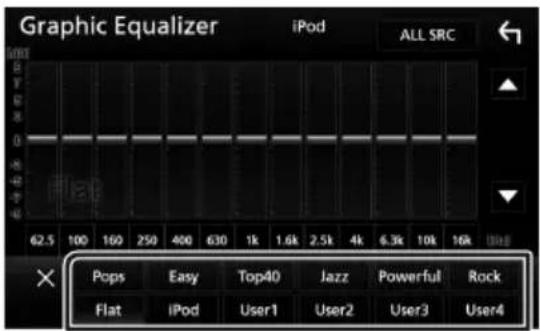
text_image
Graphic Equalizer iPod ALL SRC Pops Easy Top40 Jazz Powerful Rock Flat iPod User1 User2 User3 User4NOTE
- [iPod] is available only during iPod source.

Save the EQ curve
1 Adjust the EQ curve.
2 Touch [Memory].
3 Select where to save.

text_image
Graphic Equalizer USB ALL SRC Breset Storage User1 User2 User3 User4 CloseControlling Audio
Volume Offset
Finely adjust the volume of the current source to minimize the difference in volume between different sources.
1 Press the [MENU] button.
▶ Popup menu appears.
2 Touch [Audio].
▶ Audio screen appears.
3 Touch [Volume Offset].

text_image
Volume Offset Sound Effect4 Touch [+] or [-] to adjust the level.
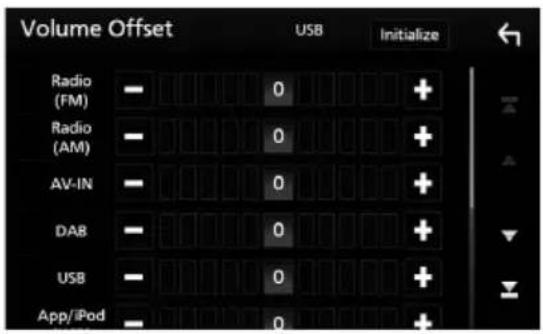
text_image
Volume Offset USB Initialize Radio (FM) - 0 + Radio (AM) - 0 + AV-IN - 0 + DAB - 0 + USB - 0 + App/iPod -0■Initialize
Returns to the initial settings.
* If you have increased the volume first, then reduced the volume using the "Volume Offset", the sound generated if you suddenly switch to another source may be extremely loud.
Sound Effect
You can set sound effects.
1 Press the [MENU] button. ➢ Popup menu appears.
2 Touch [Audio].
Audio screen appears.
3 Touch [Sound Effect].

text_image
X'over Volume Offs Sound Effect4 Set each item as follows.
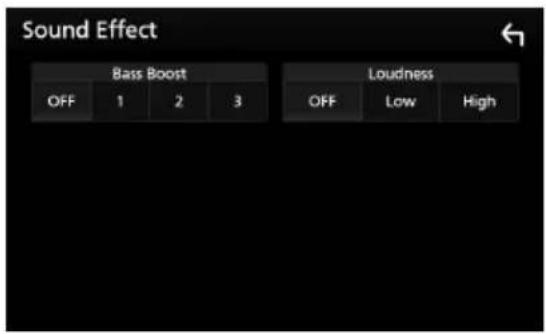
text_image
Sound Effect Bass Boost OFF 1 2 3 Loudness OFF Low High■Bass Boost
Sets the amount of bass boost among "OFF"/"1"/"2"/"3".
Loudness
Sets the amounts of boost of low and high tones.
"OFF", "Low", "High"
Listening Position/ DTA
Adjust the sound delay time as nearer speakers to the selected seat have more delay time, so that the sound from each speaker arrive a listener at the same time.
1 Press the [MENU] button.
▶ Popup menu appears.
2 Touch [Audio].
▶ Audio screen appears.
3 Touch [Position/DTA].

text_image
Speaker / X'over Equalizer Position/DTA Reader / Balance4 Select listening position from [Front R] (Right front), [Front L] (Left front), [Front All] (All front), and [All].
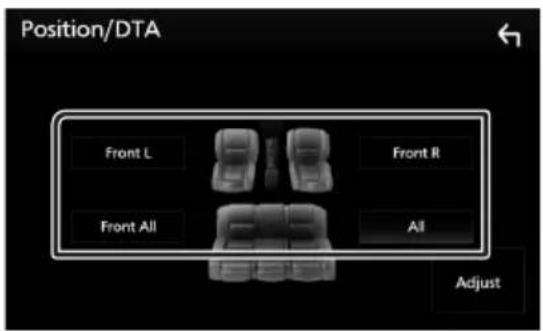
text_image
Position/DTA Front L Front R Front All All AdjustPosition DTA control
You can fine-adjust your listening position.
1 Touch [Adjust].
2 Touch [Delay].
3 Touch [◀] or [▶] to adjust the delay time of the selected speaker.
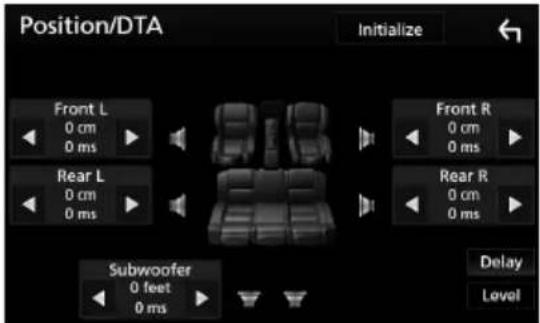
text_image
Position/DTA Initialize Front L 0 cm 0 ms Rear L 0 cm 0 ms Subwoofer 0 feet 0 ms Front R 0 cm 0 ms Rear R 0 cm 0 ms Delay Level4 Touch [Level].
5 Touch [◀] or [▶] to adjust the sound level of the selected speaker.
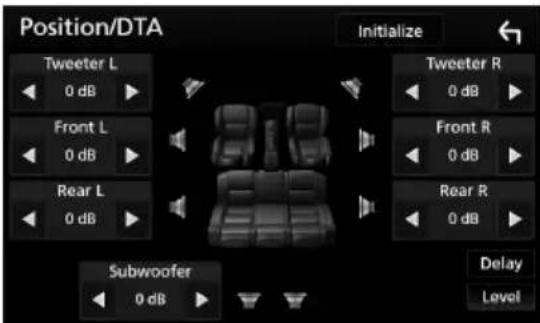
text_image
Position/DTA Initialize Tweeter L 0 dB Front L 0 dB Rear L 0 dB Subwoofer 0 dB Tweeter R 0 dB Front R 0 dB Rear R 0 dB Delay LevelNOTE
- To return to the initial setting of Delay and Level, touch [Initialize] and [YES] in the confirmation screen.
Remote control
This unit can be operated using the remote control KNA-RCDV331 (optional accessory).

Switch the operation mode
Turn its operation mode switch to "DVD."

text_image
KENWOOD Audi DVD TV NAVFunctions of the Remote control Buttons
- Aim the remote control directly at the remote sensor on the faceplate.
- DO NOT expose the remote sensor to bright light (direct sunlight or artificial lighting).
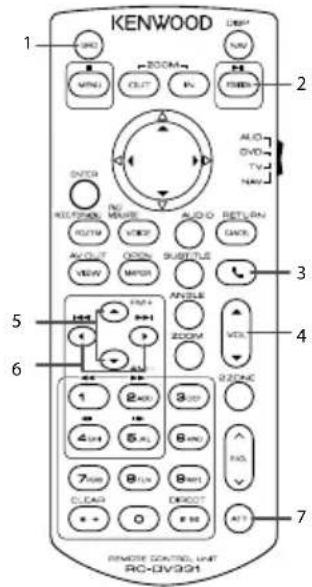
text_image
KENWOOD 1 2 3 4 5 6 7 REMOTE CONTROL UNIT RC-0V391| 1 SRC | Switches to the source to be played. |
| 2 ▶II | Plays or pauses. |
| 3 📞 | When a call comes in, answers the call. |
| 4 VOL ▲▼ | Adjusts the volume. |
| 5 FM+AM- | Selects the folder to be played.During tuner source, select FM/AM band to be received. |
| 6 |◀◀▶◀| | Selects the track or file to be played.During tuner source, switches to broadcast stations received by the unit. |
| 7 ATT | Mutes/restores the sound |
| - Other | Not used. |
Connection/Installation
Before Installation
Before installation of this unit, please note the following precautions.
▲ WARNINGS
- If you connect the ignition wire (red) and the battery wire (yellow) to the car chassis (ground), you may cause a short circuit, that in turn may start a fire. Always connect those wires to the power source running through the fuse box.
- Do not cut out the fuse from the ignition wire (red) and the battery wire (yellow). The power supply must be connected to the wires via the fuse.
CAUTION
• Install this unit in the console of your vehicle. Do not touch the metal part of this unit during and shortly after the use of the unit. Metal part such as the heat sink and enclosure become hot.
NOTE
- Mounting and wiring this product requires skills and experience. For best safety, leave the mounting and wiring work to professionals.
- Make sure to ground the unit to a negative 12V DC power supply.
- Do not install the unit in a spot exposed to direct sunlight or excessive heat or humidity. Also avoid places with too much dust or the possibility of water splashing.
- Do not use your own screws. Use only the screws provided. If you use the wrong screws, you could damage the unit.
- If the power is not turned ON ("There is an error in the speaker wiring. Please check the connections." is displayed), the speaker wire may have a short-circuit or touched the chassis of the vehicle and the protection function may have been activated. Therefore, the speaker wire should be checked.
- If your car's ignition does not have an ACC position, connect the ignition wires to a power source that can be turned on and off with the ignition key. If you connect the ignition wire
to a power source with a constant voltage supply, such as with battery wires, the battery may be drained.
- If the console has a lid, make sure to install the unit so that the front panel will not hit the lid when closing and opening.
- If the fuse blows, first make sure the wires aren't touching to cause a short circuit, then replace the old fuse with one with the same rating.
• Insulate unconnected wires with vinyl tape or other similar material. To prevent a short circuit, do not remove the caps on the ends of the unconnected wires or the terminals. - Connect the speaker wires correctly to the terminals to which they correspond. The unit may be damaged or fail to work if you share the wires or ground them to any metal part in the car.
- When only two speakers are being connected to the system, connect the connectors either to both the front output terminals or to both the rear output terminals (do not mix front and rear). For example, if you connect the connector of the left speaker to a front output terminal, do not connect the connector to a rear output terminal.
• After the unit is installed, check whether the brake lamps, blinkers, wipers, etc. on the car are working properly. - Mount the unit so that the mounting angle is 30^ or less.
- Do not press hard on the panel surface when installing the unit to the vehicle. Otherwise scars, damage, or failure may result.
- Reception may drop if there are metal objects near the Bluetooth antenna.
text_image
0 + - - - x = 1.5 y = 0.5 z = 0.2 x = 0.1 x = 0.05 x = 0.02 x = 0.01 KENWOODBluetooth antenna unit
Supplied accessories for installation
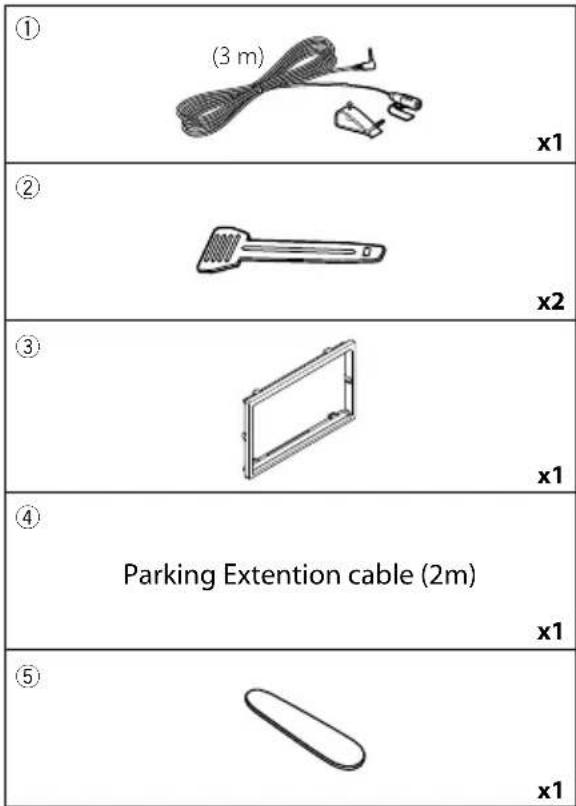
text_image
① (3 m) x1 ② x2 ③ x1 ④ Parking Extention cable (2m) x1 ⑤ x1Installation procedure
1) To prevent a short circuit, remove the key from the ignition and disconnect the terminal of the battery.
2) Make the proper input and output wire connections for each unit.
3) Connect the ISO connector to the unit.
4) Install the unit in your car.
5) Reconnect the terminal of the battery.
6) Perform the Initial Setup.
See Initial setup (P.6).
Installing the unit
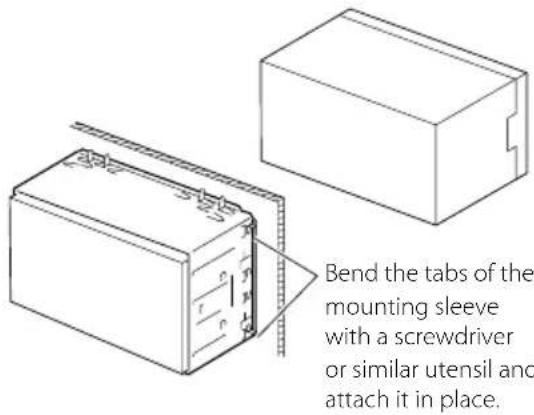
text_image
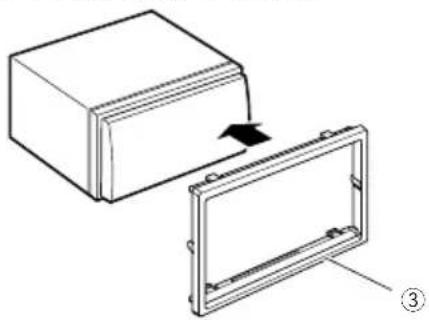
Bend the tabs of the mounting sleeve with a screwdriver or similar utensil and attach it in place.Trim plate
1) Attach accessory ③ to the unit.
natural_image
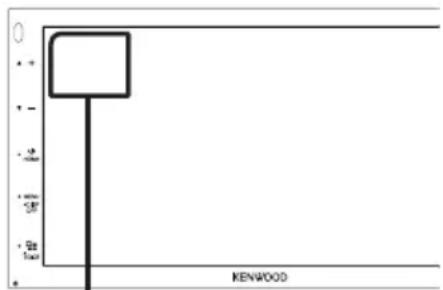
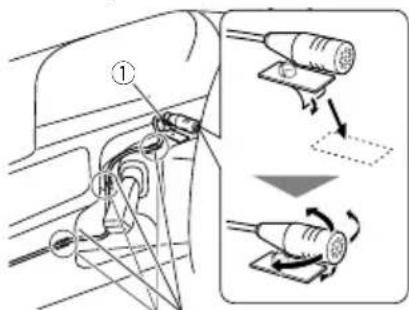
Diagram showing a box being placed into a frame, with an arrow indicating the direction of movement (no text or symbols present)Microphone unit
1) Check the installation position of the microphone (accessory ①).
2) Clean the installation surface.
3) Remove the separator of the microphone (accessory ①), and stick the microphone to the place shown below.
4) Wire the microphone cable up to the unit with it secured at several positions using tape or other desired method.
5) Adjust the direction of the microphone (accessory ①) to the driver.
text_image
Diagram illustrating car engine components with labeled parts and directional arrows indicating motion or assembly.Fix a cable with a commercial item of tape.
NOTE
- Swap the clips if necessary.
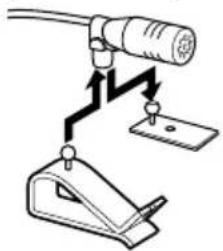
natural_image
Diagram of a mechanical device with a cylindrical component and mounting base (no text or symbols)
Removing the trim plate
1) Use the extraction key (accessory ⑤ to lever out the four tabs (two on the left part, two on the right part).
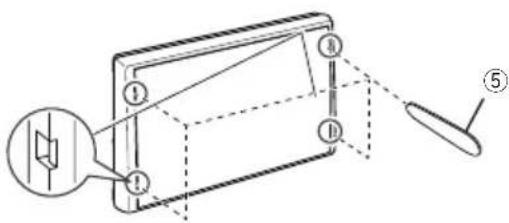
text_image
Technical diagram of a mechanical assembly with labeled components and an inset speaker icon2) Pull the trim plate forward.
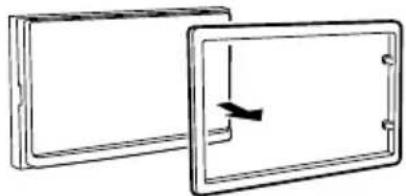
natural_image
Simple line drawing of two rectangular panels with a vertical arrow indicating direction (no text or symbols)
Removing the unit
1) Remove the trim plate by referring to step 1 in "Removing the trim plate".
2) Insert the extraction key (accessory ②) deeply into the slot as shown. (The protrusion at the tip of the extraction key must face toward the unit.)
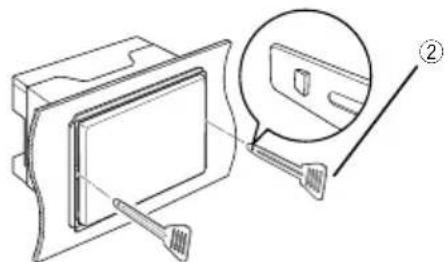
natural_image
Technical line drawing of a mechanical component with an inset showing a close-up view of a slot (no text or symbols present)3) With the inserted extraction key secured, insert the other extraction key into the slot.
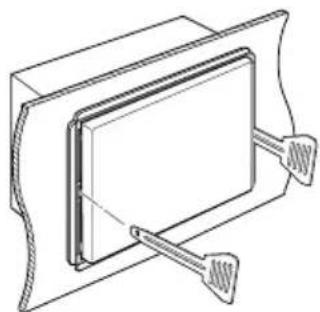
natural_image
Technical line drawing of a mechanical component with mounting flanges (no text or symbols)4) Pull out the unit halfway.
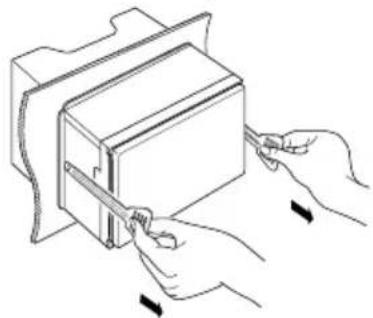
natural_image
Line drawing of hands using a tool to adjust or install a rectangular object (no text or symbols present)NOTE
- Be careful to avoid injury from the catch pins on the extraction key.
5) Pull the unit all the way out with your hands, being careful not to drop it.
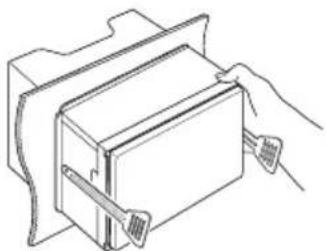
natural_image
Line drawing of a hand inserting a component into a housing (no text or symbols)
Connecting wires to terminals

text_image
Light Blue/Yellow (Steering remote control wire) STEERING WHEEL REMOTE INPUT To steering remote To use the steering wheel remote control feature, you need an exclusive remote adapter (not supplied) matched to your car. Light Green (Parking sensor wire) Accessory ④:Parking Extention cable PRK SW For best safety, be sure to connect the parking sensor. Connect to the vehicle's parking brake detection switch harness. Purple/White (Reverse sensor wire) REVERSE Connect to vehicle's reverse lamp harness when using the optional rear view camera. Connect to vehicle's reverse lamp harness when using the optional rear view camera. Connector B Connector A Fuse (15A) ISO Connector FRONT OUTPUT/AROZ CAMIN VIDEO/AROZ ANT DAB Subwoofer Preout CAP USB terminal[1] (1 m) 5V---1.5A Cap USB device[2] MIC Accessory ① Bluetooth Microphone FM/AM antenna Φ 6.5 mm (maximum) DAB antenna CX-DAB1[3] DMX7018DABS only. CAUTION Use of a CX-DAB1 (optional accessory) as a DAB antenna is recommended. When using a commercially available DAB antenna, the diameter of the SMB connector must be Φ6.5 mm or less.[1] USB maximum power supply current: DC 5 V = 1.5 A
[2] Sold separately
[3] Optional accessory
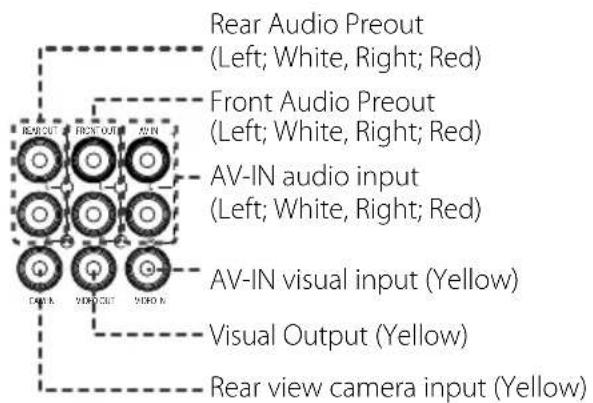
text_image
Rear Audio Preout (Left; White, Right; Red) Front Audio Preout (Left; White, Right; Red) AV-IN audio input (Left; White, Right; Red) AV-IN visual input (Yellow) Visual Output (Yellow) Rear view camera input (Yellow)
ISO Connector function guide
| Pin Color and function | ||
| A-4 Yellow Battery | ||
| A-5 Blue/White [1] | Power Control | |
| A-6 Orange/Green/White Illumination | ||
| A-7 Red Ignition (ACC) | ||
| A-8 Black Earth (Ground) | Connection | |
| B-1/ B-2 Purple (+)/Purple/Black (-) | Rear Right | |
| B-3/ B-4 Gray (+)/Gray/Black (-) | Front Right | |
| B-5/ B-6 White (+)/White/Black (-) | Front Left | |
| B-7/ B-8 Green (+)/Green/Black (-) | Rear Left | |
[1] Max. 300mA, 12V
- Speaker Impedance: 4-8 Ω

CAUTION
Before you connect the commercially available ISO connectors to the unit, check the following condition:
• Make sure that the pin assignment of the connector matches with the KENWOOD unit.
• Take extra notice of the power wire.
- In case battery wire and ignition wire are not corresponding then change them accordingly.
- In case the car does not have an ignition wire, use a commercially available interface.

Connecting an iPod/iPhone/roid
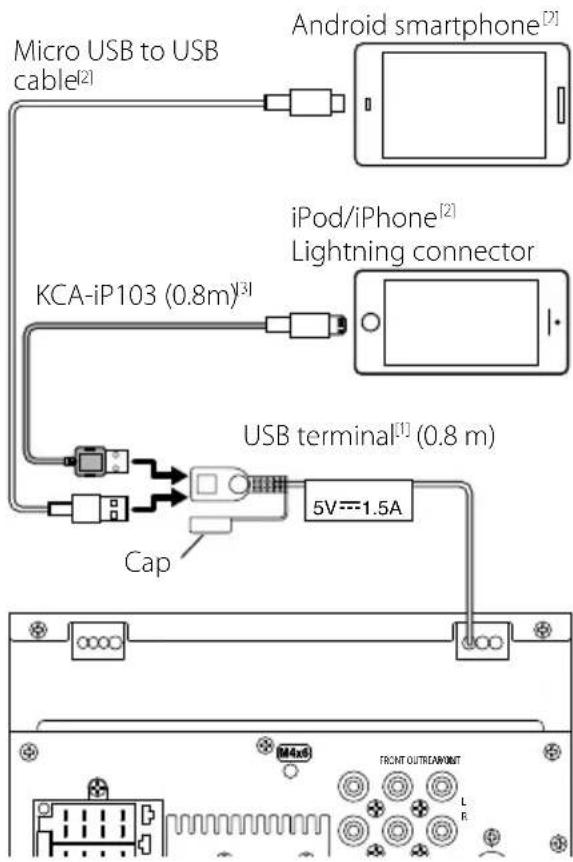
text_image
Micro USB to USB cable[2] Android smartphone[2] KCA-iP103 (0.8m)[3] iPod/iPhone[2] Lightning connector USB terminal[1] (0.8 m) Cap 5V---1.5A M4x8 FRONT OUTREAD/WONT L R[1] iPod/iPhone maximum power supply current: DC 5 V = 1.5 A
[2] Sold separately
[3] Optional accessory
Troubleshooting
Problems and Solutions
If any trouble occurs, first check the following table for possible problems.
NOTE
- Some functions of this unit may be disabled by some settings made on this unit.
- What might seem to be a malfunction in your unit may just be the result of slight misoperation or miswiring.

About settings
- Cannot set up the subwoofer.
- Cannot set up subwoofer phase.
- No output from the subwoofer.
- Cannot set up the low pass filter.
- Cannot set up the high pass filter.
Subwoofer is not set to on.
▶ Set the subwoofer to on. See Speaker/X'over setup (P.41).

About audio operations
Radio reception is poor.
The car antenna is not extended.
▶ Pull out the antenna all the way.
The antenna control wire is not connected.
Connect the wire correctly. See Connecting wires to terminals (P.50).
Cannot select a folder.
The random play function is enabled.
▶ Turn off the random function.
The sound skips when an audio file is being played.
The recording condition is bad.
Record the file again or use another USB memory.

Other
The Touch Sensor Tone doesn't sound.
The preout jack is being used.
The Touch Sensor Tone cannot be output from the preout jack.
Error Messages
When you fail to operate the unit correctly, the cause of the failure appears as the message on the screen.
No Device (USB device)
The USB device is selected as a source although no USB device is connected.
Change the source to any source other than USB/iPod. Connect a USB device, and change the source to USB again.
Disconnected (iPod, Bluetooth audio player)
The iPod/Bluetooth audio player is selected as a source although no iPod/Bluetooth audio player is connected.
Change the source to any source other than iPod/Bluetooth. Connect an iPod/Bluetooth audio player, and change the source to iPod/Bluetooth again.
No Media file
The connected USB device contains no playable audio file. Media was played that doesn't have data recorded that the unit can play.
➢ See Playable Media and Files (P.53) and try another USB device.
Appendix
playable Media and Files
You can play various kinds of media and files on this unit.

About files
The following audio and video files are supported.
■Playable Audio files
| Format Bit rate | Sampling frequency | Bit count | ||
| AAC-LC (.m4a) | MPEG2/4 AAC LC HE-AAC(V1,V2) | 8 – 320kbps, VBR 16 – 48 | kHz 16 bit | |
| MP3 (.mp3) | MPEG 1/2 Audio Layer 3 8 – 320kbps, VBR 16 – 48 kHz 16 bit | |||
| WMA (.wma) | Windows Media Audio Standard L3 profile (Version 7,8,9) | 8 – 320kbps | 16 – 48 kHz 16 bit | |
| Linear PCM (WAVE) (.wav) | RIFF waveform Audio Format | - | 16 – 192 kHz | 16/ 24 bit |
| FLAC (.flac) | flac | - | 16 – 192 kHz | 16/ 24 bit |
| Vorbis (.ogg) | vorbis | VBR | 16 – 48 kHz | 16 bit |
NOTE
• WMA and AAC of which is covered with DRM cannot be played.
- Although the audio files are complied with the standards listed above, the play may be impossible depending on the types or conditions of media or device.
■Acceptable Video files
| Profile | Max. Picture size | Max. bit rate | Audio format | |
| MPEG-1 (.mpg, .mpeg) | - | 352 × 240, 352 × 288 | 1.5 Mbps | MPEG Audio Layer 2 |
| MPEG-2 (.mpg, .mpeg) | MP@ML | 720 × 480, 720 × 576 | 8 Mbps | MPEG Audio Layer 2 |
| H.264/MPEG-4 AVC (.mp4, .m4v, .avi, .flv) | Baseline Profile, Main Profile | 1920 × 1080 (30 fps) | 8 Mbps | MP3, AAC |
| MPEG-4 (.mp4, .avi) | Advanced Simple Profile | 1920 × 1080 (30 fps) | 8 Mbps | MP3, AAC |
| WMV (.wmv) | Main Profile | 1920 × 1080 (30 fps) | 8 Mbps | WMA |
| MKV (.mkv) | Video Format follows H.264/MPEG-4 AVC, MPEG-4 MP3, AAC | |||
■Limitation of structure for the file and the folder
| USB device | |
| Maximum number of folder layers | 8 |
| Maximum number of files (per folder) | 999 |
| Maximum number of folders (per folder) | 9999 |
| Maximum number of folders (per device) | - |
NOTE
- You can enter a folder name and file name with 255 or fewer single-byte characters.
- Files in the folder whose folder name begins with a dot (.) cannot be played.
Specifications
■Monitor section
Picture Size
: 6.75 inches (diagonal) wide
: 151.8 mm (W) × 79.7 mm (H)
Display System
: TN LCD panel
Drive System
: TFT active matrix system
Number of Pixels
: 1,152,000 (800H x 480V x RGB)
Effective Pixels
:99.99%
Pixel Arrangement
: RGB striped arrangement
Back Lighting
: LED
■USB interface section
USB Standard
: USB 2.0 High Speed
File System
: FAT 16/32, NTFS
Maximum Power Supply Current
: DC 5 V = 1.5 A
D/A Converter
: 24 bit
Audio Decoder
: MP3/ WMA/ AAC/ WAV/ FLAC
Video Decoder
Total Harmonic Distortion
: 0.0001 % (1 kHz)
S/N Ratio (dB)
: 88 dB
Dynamic Range
:87 dB
Bluetooth section
Technology
: Bluetooth Ver.4.1
Frequency
: 2.402 - 2.480 GHz
Output Power
: +4dBm (MAX), 0dBm (AVE), Power Class2
Maximum Communication range
: Line of sight approx. 10m (32.8 ft)
Audio Codec
:SBC/ AAC
Profile (Multi Profile support)
• HFP (Hands Free Profile)
- SPP (Serial Port Profile)
• A2DP (Advanced Audio Distribution Profile)
• AVRCP (Audio/Video Remote Control Profile)
• PBAP (Phonebook Access Profile)
■DSP section
Graphics equalizer
Band: 13 Band
Frequency (BAND1 - 13)
: 62.5/100/160/250/400/630/1k/1.6k/2.5k/4k/
6.3k/10k/16kHz
Gain
:-9/-8/-7/-6/-5/-4/-3/-2/-1/0/1/2/3/4/5/6/7/8/9 dB
2Way X'Over
High pass filter
Frequency: Through, 30/40/50/60/70/80/90/
Slope: -6/-12/-18/-24 dB/Oct.
Low pass filter
Frequency: 30/40/50/60/70/80/90/100/120/
150/ 180/ 220/ 250 Hz, Through
Slope: -6/-12/-18/-24 dB/Oct.
Position
Front / Rear / Subwoofer Delay
: 0 - 6.1 m (0.01 m Step)
Gain
:-8 - 0 dB
Subwoofer level
:-40 - +6 dB
■DAB section (DMX7018DABS)
Frequency Range
BAND III: 174.928 - 239.200 (MHz)
Sensitivity
:-98 dBm
S/N Ratio (dB)
:82 dB
■Digital Antenna Connector section (DMX7018DABS)
Connector type
: SMB
Output Voltage (11 - 16V)
: 14.4 V
Maximum Current
:< 100 mA
■FM tuner section
Frequency Range (step)
: 87.5 MHz - 108.0 MHz (50 kHz)
Usable Sensitivity (S/N : 26 dB)
: 13.2 dBf (1.3 μV/75 Ω)
Quieting Sensitivity (S/N : 46 dB)
: 19.2 dBf (2.5 μV/75 Ω)
Frequency Response
: 30 Hz - 15 kHz
S/N Ratio (dB)
: 70 dB (MONO)
Selectivity ( ± 400 kHz)
: Over 80 dB
Stereo Separation
: 37 dB (1 kHz)
■AM tuner section
Frequency Range (step)
MW: 531 - 1611 kHz (9 kHz)
Usable Sensitivity
MW: 44.7μV
■Video section
Color System of External Video Input
: NTSC/PAL
External Video Input Level (RCA jack)
: 1 Vp-p/75 Ω
External Audio Max Input Level (RCA jack)
: 2 V/ 25 kΩ
Video Output Level (RCA jacks)
: 1 Vp-p/75 Ω
■Audio section
Maximum Power (Front & Rear)
:50 W×4
Typical Power Output (Front & Rear)
Full Bandwidth Power (at less than 1% THD)
:21 W×4
Output frequency band
: 20 - 20,000 Hz
Preout Level (V)
: 4 V/10 kΩ
Preout Impedance
:≤1.3 kΩ
Speaker Impedance
:4-8Ω
General
Operating Voltage
: 14.4 V (10.5 - 16 V allowable)
Maximum Current Consumption
:15 A
Installation Dimensions (W × H × D)
: 182 × 112 × 75 mm
Operational Temperature Range
:-10°C-+60°C
Weight
: 1.3 kg
NOTE
- Although the effective pixels for the liquid crystal panel is given as 99.99% or more, 0.01% of pixels may not light or may light incorrectly.
Specifications subject to change without notice.
About this Unit
■Copyrights
- The Bluetooth® word mark and logos are registered trademarks owned by Bluetooth SIG, Inc. and any use of such marks by JVC KENWOOD Corporation is under license. Other trademarks and trade names are those of their respective owners.
- The "AAC" logo is a trademark of Dolby Laboratories.
- Use of the Made for Apple badge means that an accessory has been designed to connect specifically to the Apple product(s) identified in the badge, and has been certified by the developer to meet Apple performance standards. Apple is not responsible for the operation of this device or its compliance with safety and regulatory standards. Please note that the use of this accessory with an Apple product may affect wireless performance.
- Apple, iPhone, iPod, iPod touch, and Lightning are trademarks of Apple Inc., registered in the U.S. and other countries.
- Apple, Siri, Apple CarPlay and Apple CarPlay logo are trademarks of Apple Inc., registered in the U.S. and other countries.
- Android, Android Auto, Google Play and other marks are trademarks of Google Inc.
- THIS PRODUCT IS LICENSED UNDER THE AVC PATENT PORTFOLIO LICENSE FOR THE PERSONAL USE OF A CONSUMER OR OTHER USES IN WHICH IT DOES NOT RECEIVE REMUNERATION TO (j)ENCODE VIDEO IN COMPLIANCE WITH THE AVC STANDARD ("AVC VIDEO") AND/OR (jj)DECODE AVC VIDEO THAT WAS ENCODED BY A CONSUMER ENGAGED IN A PERSONAL ACTIVITY AND/OR WAS OBTAINED FROM A VIDEO PROVIDER LICENSED TO PROVIDE AVC VIDEO. NO LICENSE IS GRANTED OR SHALL BE IMPLIED FOR ANY OTHER USE. ADDITIONAL INFORMATION MAY BE OBTAINED FROM MPEG LA, L.L.C. SEE HTTP://WWW.MPEGLA.COM
- THIS PRODUCT IS LICENSED UNDER THE MPEG-4 VISUAL PATENT PORTFOLIO LICENSE FOR THE PERSONAL AND NON-COMMERCIAL USE OF A CONSUMER FOR (j) ENCODING VIDEO IN COMPLIANCE WITH THE MPEG-4 VISUAL STANDARD ("MPEG-4 VIDEO") AND/OR (jj) DECODING MPEG-4 VIDEO THAT WAS ENCODED BY A CONSUMER ENGAGED IN A PERSONAL AND NON-COMMERCIAL ACTIVITY AND/OR WAS OBTAINED FROM A VIDEO PROVIDER LICENSED BY MPEG LA TO PROVIDE MPEG-4 VIDEO. NO LICENSE IS GRANTED OR SHALL BE IMPLIED FOR ANY OTHER USE. ADDITIONAL INFORMATION INCLUDING THAT RELATING TO PROMOTIONAL, INTERNAL AND COMMERCIAL USES AND LICENSING MAY BE OBTAINED FROM MPEG LA, LLC. SEE HTTP://WWW.MPEGLA.COM.
- THIS PRODUCT IS LICENSED UNDER THE VC-1 PATENT PORTFOLIO LICENSE FOR THE PERSONAL AND NON-COMMERCIAL USE OF A CONSUMER TO (i) ENCODE
VIDEO IN COMPLIANCE WITH THE VC-1 STANDARD ("VC-1 VIDEO") AND/OR (ii) DECODE VC-1 VIDEO THAT WAS ENCODED BY A CONSUMER ENGAGED IN A PERSONAL AND NON-COMMERCIAL ACTIVITY AND/OR WAS OBTAINED FROM A VIDEO PROVIDER LICENSED TO PROVIDE VC-1 VIDEO. NO LICENSE IS GRANTED OR SHALL BE IMPLIED FOR ANY OTHER USE. ADDITIONAL INFORMATION MAY BE OBTAINED FROM MPEG LA, L.L.C. SEE HTTP://WWW.MPEGLA.COM
- libFLAC
Copyright (C) 2000,2001,2002,2003,2004,2005,2006,2007,2008,2009 Josh Coalson Redistribution and use in source and binary forms, with or without modification, are permitted provided that the following conditions are met:
– Redistributions of source code must retain the above copyright notice, this list of conditions and the following disclaimer.
– Redistributions in binary form must reproduce the above copyright notice, this list of conditions and the following disclaimer in the documentation and/or other materials provided with the distribution.
- Neither the name of the Xiph.org Foundation nor the names of its contributors may be used to endorse or promote products derived from this software without specific prior written permission.
THIS SOFTWARE IS PROVIDED BY THE COPYRIGHT HOLDERS AND ONTRIBUTORS ``AS IS'' AND ANY EXPRESS OR IMPLIED WARRANTIES, INCLUDING, BUT NOT LIMITED TO, THE IMPLIED WARRANTIES OF MERCHANTABILITY AND FITNESS FOR A PARTICULAR PURPOSE ARE DISCLAIMED. IN NO EVENT SHALL THE FOUNDATION OR CONTRIBUTORS BE LIABLE FOR ANY DIRECT, INDIRECT, INCIDENTAL, SPECIAL, EXEMPLARY, OR CONSEQUENTIAL DAMAGES (INCLUDING, BUT NOT LIMITED TO, PROCUREMENT OF SUBSTITUTE GOODS OR SERVICES; LOSS OF USE, DATA, OR PROFITS; OR BUSINESS INTERRUPTION) HOWEVER CAUSED AND ON ANY THEORY OF LIABILITY, WHETHER IN CONTRACT, STRICT LIABILITY, OR TORT (INCLUDING NEGLIGENCE OR OTHERWISE) ARISING IN ANY WAY OUT OF THE USE OF THIS SOFTWARE, EVEN IF ADVISED OF THE POSSIBILITY OF SUCH DAMAGE.
- libvorbis
Copyright (c) 2002-2008 Xiph.org Foundation Redistribution and use in source and binary forms, with or without modification, are permitted provided that the following conditions are met:
– Redistributions of source code must retain the above copyright notice, this list of conditions and the following disclaimer.
– Redistributions in binary form must reproduce the above copyright notice, this list of conditions and the following disclaimer in the documentation and/or other materials provided with the distribution.
- Neither the name of the Xiph.org Foundation
nor the names of its contributors may be used to endorse or promote products derived from this software without specific prior written permission. THIS SOFTWARE IS PROVIDED BY THE COPYRIGHT HOLDERS AND CONTRIBUTORS ``AS IS'' AND ANY EXPRESS OR IMPLIED WARRANTIES, INCLUDING, BUT NOT LIMITED TO, THE IMPLIED WARRANTIES OF MERCHANTABILITY AND FITNESS FOR A PARTICULAR PURPOSE ARE DISCLAIMED. IN NO EVENT SHALL THE FOUNDATION OR CONTRIBUTORS BE LIABLE FOR ANY DIRECT, INDIRECT, INCIDENTAL, SPECIAL, EXEMPLARY, OR CONSEQUENTIAL DAMAGES (INCLUDING, BUT NOT LIMITED TO, PROCUREMENT OF SUBSTITUTE GOODS OR SERVICES; LOSS OF USE, DATA, OR PROFITS; OR BUSINESS INTERRUPTION) HOWEVER CAUSED AND ON ANY THEORY OF LIABILITY, WHETHER IN CONTRACT, STRICT LIABILITY, OR TORT (INCLUDING NEGLIGENCE OR OTHERWISE) ARISING IN ANY WAY OUT OF THE USE OF THIS SOFTWARE, EVEN IF ADVISED OF THE POSSIBILITY OF SUCH DAMAGE.
• libogg
Copyright (c) 2002, Xiph.org Foundation Redistribution and use in source and binary forms, with or without modification, are permitted provided that the following conditions are met:
- Redistributions of source code must retain the above copyright notice, this list of conditions and the following disclaimer.
- Redistributions in binary form must reproduce the above copyright notice, this list of conditions and the following disclaimer in the documentation and/or other materials provided with the distribution.
- Neither the name of the Xiph.org Foundation nor the names of its contributors may be used to endorse or promote products derived from this software without specific prior written permission.
THIS SOFTWARE IS PROVIDED BY THE COPYRIGHT HOLDERS AND CONTRIBUTORS ``AS IS'' AND ANY EXPRESS OR IMPLIED WARRANTIES, INCLUDING, BUT NOT LIMITED TO, THE IMPLIED WARRANTIES OF MERCHANTABILITY AND FITNESS FOR A PARTICULAR PURPOSE ARE DISCLAIMED. IN NO EVENT SHALL THE FOUNDATION OR CONTRIBUTORS BE LIABLE FOR ANY DIRECT, INDIRECT, INCIDENTAL, SPECIAL, EXEMPLARY, OR CONSEQUENTIAL DAMAGES (INCLUDING, BUT NOT LIMITED TO, PROCUREMENT OF SUBSTITUTE GOODS OR SERVICES; LOSS OF USE, DATA, OR PROFITS; OR BUSINESS INTERRUPTION) HOWEVER CAUSED AND ON ANY THEORY OF LIABILITY, WHETHER IN CONTRACT, STRICT LIABILITY, OR TORT (INCLUDING NEGLIGENCE OR OTHERWISE) ARISING IN ANY WAY OUT OF THE USE OF THIS SOFTWARE, EVEN IF ADVISED OF THE POSSIBILITY OF SUCH DAMAGE.
■Information on Disposal of Old Electrical and Electronic Equipment and Batteries (applicable for EU countries that have adopted separate waste collection systems)
Products and batteries with the symbol (crossed-out wheeled bin) cannot be disposed as household waste.
Old electrical and electronic equipment and batteries should be recycled at a facility capable of handling these items and their waste byproducts.
Contact your local authority for details in locating a recycle facility nearest to you.
Proper recycling and waste disposal will help conserve resources whilst preventing detrimental effects on our health and the environment.
Notice: The sign "Pb" below the symbol for batteries indicates that this battery contains lead.


■ וכלה
text_image
Low Off High Low KENWOODtext_image
Initial SETUP Language Clock Display Camera DEMO FinishLanguage
text_image
Initial SETUP Language Clock Display Camera DEMO Finish ONREMARQUE
text_image
Screen Adjustment Display OFF Camera SETUP Audio USBtext_image
SETUP AV Display User Interface Camera Special Bluetoothnatural_image
Simple line drawing of a rectangular object with four small symbols inside, no text or labels present.natural_image
Simple line drawing of a hand cursor clicking a button (no text or symbols)●Toucher longuement
text_image
Screen Adjustment Display OFF Camera SETUP Audio USB 1 DAB 2 Bluetooth 3text_image
Screen Adjustment Display OFF Camera SETUP Audio USBtext_image
Category List 1 2 6 Song Title1 Song Title2 Song Title3 Song Title4 Song Title5 Song Title6 Play Up Top 3 4 5
text_image
10:28 LTE Phone Music Maps Messages New Playing KENWOOD HOME Podcasts Audiobookstext_image
+ MNO + CBF + O2 + Loss KENWOODREMARQUE
text_image
iPod 1 Song Title1 Song Title2 Song Title3 Song Title4 6 0:01:23 4 < Music >1 [ ]
text_image
Category List Albumstext_image
Category List Link SearchREMARQUE
text_image
Category List Albums Artists Songs Genres Play Up Topnatural_image
Line drawing of a USB connector with an inserted port (no text or symbols)text_image
USB ASPECT - - - - - Music Song Title1 Song Title2 Song Title3 Song Title4 10:001 [ ]
text_image
Category List Song Title1text_image
Category List Link Search Folder ListREMARQUE
text_image
Category List Artists Albums Songs Genrestext_image
Category List Link Search Folder Listtext_image
FM AM PTY Album Na FM05 FM04 FM05text_image
FM 99.90MHz News Current Affairs Information Searchtext_image
Radio FM A Radio T1 SETUP AME PTY MDND LO.S AUTO1 99.90 PS RDS Radio Title/ - -text_image
Radio FM Radio T1 SETUP AME PTY MOND LO.S AUTO1 99.90 PS RDS Radio Title/ - - - AF TI LOS STtext_image
PTY Search PTY searching... News Current Affairs Information Sport Education Searchtext_image
Mobile phone status bar screenshot showing navigation icons and time controlstext_image
TI DAB Road Traffic flashConfiguration DAB
■[Announcement Select]
text_image
Announcement Select News flash OFF TRansport flash OFF Warning / Service OFF Area Weather flash OFF Event announcement OFFREMARQUE
text_image
Screen Adjustment Display OFF Camera SETUP Audio USBtext_image
SETUP AV Display User Interface Camera Special Bluetoothtext_image
Paired Device List Device Name1 Device Name2 Device Name3 Device Name4 Device Name5 Delete Delete Delete Delete Delete2 Touchez [Delete].
La lecture commence.
REMARQUE
text_image
Device name1 Please enter a phone number. 1 2 3 4 5 6 7 8 9 * 0/+ #text_image
Device name1 Please enter a phone number. 1 2 3 4 5 6 7 8 9 * 0/+ #3 Touchez

text_image
Phone book Detail Name Phone number1 Name Phone number2 Name Phone number3 Name Phone number4 Name Phone number5 NameREMARQUE
text_image
Incoming Call Sur Now Playing USB Radio DISCREMARQUE
text_image
Edit Preset Dial Edit preset number Add from phonebook Add number direct Delete Close■[Add number from phonebook]
text_image
Screen Adjustment Display Off Camera SETUP Audio USBtext_image
Rear Camera AV Out OFF 1text_image
Initializetext_image
A C D B Initialize2 Touchez [Screen Adjustment].
![KENWOOD DMX7018DABS - ■[Add number from phonebook] - 1](/content/2026/02/418450/images/aeb786b23f051ce312fcead3aa5e5d89100f3f02db571f0f9051b3c73ead7a55.jpg)
text_image
Screen Adjustment Display OFF Camera SETUP Audio USBtext_image
Screen Adjustment Initialize Contrast Brightness Colour Tint - 0 + - 0 + - 0 + - 0 +■Contrast / Brightness / Colour / Tint
text_image
Screen Adjustment Display OFF Camera SETUP Audio USB![KENWOOD DMX7018DABS - ■[Add number from phonebook] - 2](/content/2026/02/418450/images/9c2c2d3817fed164aa30157ed07949ab400f59fdb00ea88d24b7efdc83a03b6b.jpg)
![KENWOOD DMX7018DABS - ■[Add number from phonebook] - 3](/content/2026/02/418450/images/df923f2930bb5ea652fab30f385d5256212f0ade7cf9fe11fbcdb9643ebd0c7b.jpg)
text_image
SETUP AV Display User Interface Camera Special Bluetoothtext_image
Special Bluetoothtext_image
Background *1 No Image *2 No Image Background Colour User1 Select User2 Selecttext_image
User Background Select3 Touchez [Enter].
![KENWOOD DMX7018DABS - ■[Add number from phonebook] - 4](/content/2026/02/418450/images/09094c8af591adc0b95eaa352534cba3e73561cebb03ed82b2f17d68edd22ab9.jpg)
text_image
User Background Memory File Name Entertext_image
Screen Adjustment Display OFF Camera SETUP Audio USB Audio Speaker / X'over Equalizer Position/DTA Fader / Balance Volume Offset Sound Effecttext_image
Speaker / X'over Equalizer Position/DTA Fader / Balancetext_image
Speaker Select Car Type Compact Speaker 10 cmtext_image
Speaker Select ① ② Car Type Compact Speaker 10 cm Location Lower Door Area Tweeter Medium X'overSpeaker
text_image
Lower Door Area Tweeter Medium X'overtext_image
X'over Front Rear Subwoofer HPF FREQtext_image
X'over Front Rear Subwoofer HPF FREQ 100 Hz Slope -6 dB/Oct Gain 0 dB TW Gain -1 dBHPF FREQ
text_image
Speaker / X'over Equalizer Position/DTA Fader / Balancetext_image
Fader / Balance Center Balance Center Fader CenterFader / Balance
text_image
Speaker / X'over Equalizer Position/DTA Fader / Balancetext_image
Graphic Equalizer iPod ALL SRC Pops Easy Top40 Jazz Powerful Rock Flat iPod User1 User2 User3 User4REMARQUE
text_image
Graphic Equalizer USB ALL SRC Reset Storage User1 User2 User3 User4 Close Initialize Memory Off OFFDécalage du volume
text_image
Volume Offset USB Initialize Radio (FM) — 0 + Radio (AM) — 0 + AV-IN — 0 + DAB — 0 + USB — 0 + App/iPod — 0 +■Initialize
text_image
X'over Volume Offs Sound Effecttext_image
Sound Effect Bass Boost OFF 1 2 3 Loudness OFF Low HighBass Boost
"OFF", "Low" (Bas), "High" (Haut)
3 Touchez [Position/DTA].

text_image
Speaker / X'over Equalizer Position/DTA Reader / Balancetext_image
Position/DTA Front L Front R Front All All Adjusttext_image
Position/DTA Initialize Front L 0 cm 0 ms Rear L 0 cm 0 ms Subwoofer 0 feet 0 ms Front R 0 cm 0 ms Rear R 0 cm 0 ms Delay Leveltext_image
Position/DTA Tweeter L 0 dB Front L 0 dB Rear L 0 dB Subwoofer 0 dB Initialize Tweeter R 0 dB Front R 0 dB Rear R 0 dB Delay LevelREMARQUE
text_image
KENWOOD AUD DVD TV NAVnatural_image
Diagram showing a rectangular box being placed into a smaller rectangular frame, with an arrow indicating direction (no text or symbols present)Microphone
text_image
Diagram showing car interior components with numbered parts and directional arrows indicating movement or assembly.natural_image
Diagram of a cable being inserted into a clamp, showing mechanical components (no text or symbols)text_image
Technical diagram of a mechanical assembly with labeled components and an inset view showing a component.natural_image
Diagram of two rectangular panels with a central arrow, no text or symbols presentnatural_image
Technical line drawing of a mechanical component with a magnified inset showing a close-up detail (no text or symbols)natural_image
Technical line drawing of a mechanical component with two protruding parts (no text or symbols)natural_image
Line drawing of hands using a tool to cut or adjust a rectangular object (no text or symbols present)REMARQUE
natural_image
Line drawing of a hand inserting a component into a rectangular housing (no text or symbols)
MW:531-1611 kHz (9 kHz)
- The "AAC" logo is a trademark of Dolby Laboratories.
- Use of the Made for Apple badge means that an accessory has been designed to connect specifically to the Apple product(s) identified in the badge, and has been certified by the developer to meet Apple performance standards. Apple is not responsible for the operation of this device or its compliance with safety and regulatory standards. Please note that the use of this accessory with an Apple product may affect wireless performance.
• Apple, iPhone, iPod, iPod touch, and Lightning are trademarks of Apple Inc., registered in the U.S. and other countries.
• Apple, Siri, Apple CarPlay and Apple CarPlay logo are trademarks of Apple Inc., registered in the U.S. and other countries.
- Android, Android Auto, Google Play and other marks are trademarks of Google Inc.
- THIS PRODUCT IS LICENSED UNDER THE AVC PATENT PORTFOLIO LICENSE FOR THE PERSONAL USE OF A CONSUMER OR OTHER USES IN WHICH IT DOES NOT RECEIVE REMUNERATION TO (j)ENCODE VIDEO IN COMPLIANCE WITH THE AVC STANDARD ("AVC VIDEO") AND/OR (jj)DECODE AVC VIDEO THAT WAS ENCODED BY A CONSUMER ENGAGED IN A PERSONAL ACTIVITY AND/OR WAS OBTAINED FROM A VIDEO PROVIDER LICENSED TO PROVIDE AVC VIDEO. NO LICENSE IS GRANTED OR SHALL BE IMPLIED FOR ANY OTHER USE. ADDITIONAL INFORMATION MAY BE OBTAINED FROM MPEG LA, L.L.C. SEE HTTP://WWW.MPEGLA.COM
- THIS PRODUCT IS LICENSED UNDER THE MPEG-4 VISUAL PATENT PORTFOLIO LICENSE FOR THE PERSONAL AND NON-COMMERCIAL USE OF A CONSUMER FOR (j) ENCODING VIDEO IN COMPLIANCE WITH THE MPEG-4 VISUAL STANDARD ("MPEG-4 VIDEO") AND/OR (jj) DECODING MPEG-4 VIDEO THAT WAS ENCODED BY A CONSUMER ENGAGED IN A PERSONAL AND NON-COMMERCIAL ACTIVITY AND/OR WAS OBTAINED FROM A VIDEO PROVIDER LICENSED BY MPEG LA TO PROVIDE MPEG-4 VIDEO. NO LICENSE IS GRANTED OR SHALL BE IMPLIED FOR ANY OTHER USE. ADDITIONAL INFORMATION INCLUDING THAT RELATING TO PROMOTIONAL, INTERNAL AND COMMERCIAL USES AND LICENSING MAY BE OBTAINED FROM MPEG LA, LLC. SEE HTTP://WWW.MPEGLA.COM.
- THIS PRODUCT IS LICENSED UNDER THE VC-1 PATENT PORTFOLIO LICENSE FOR THE PERSONAL AND NON-
COMMERCIAL USE OF A CONSUMER TO (i) ENCODE VIDEO IN COMPLIANCE WITH THE VC-1 STANDARD ("VC-1 VIDEO") AND/OR (ii) DECODE VC-1 VIDEO THAT WAS ENCODED BY A CONSUMER ENGAGED IN A PERSONAL AND NON-COMMERCIAL ACTIVITY AND/OR WAS OBTAINED FROM A VIDEO PROVIDER LICENSED TO PROVIDE VC-1 VIDEO. NO LICENSE IS GRANTED OR SHALL BE IMPLIED FOR ANY OTHER USE. ADDITIONAL INFORMATION MAY BE OBTAINED FROM MPEG LA, L.L.C. SEE HTTP://WWW.MPEGLA.COM
- libFLAC
Copyright (C) 2000,2001,2002,2003,2004,2005,2006,2007,2008,2009 Josh Coalson Redistribution and use in source and binary forms, with or without modification, are permitted provided that the following conditions are met:
- Redistributions of source code must retain the above copyright notice, this list of conditions and the following disclaimer. - Redistributions in binary form must reproduce the above copyright notice, this list of conditions and the following disclaimer in the documentation and/or other materials provided with the distribution. - Neither the name of the Xiph.org Foundation nor the names of its contributors may be used to endorse or promote products derived from this software without specific prior written permission. HIS SOFTWARE IS PROVIDED BY THE COPYRIGHT OLDERS AND ONTRIBUTORS "AS IS" AND ANY EXPRESS OR IMPLIED WARRANTIES, INCLUDING, BUT NOT LIMITED TO, THE IMPLIED WARRANTIES OF MERCHANTABILITY AND FITNESS FOR A PARTICULAR PURPOSE ARE DISCLAIMED. IN NO EVENT SHALL THE FOUNDATION OR CONTRIBUTORS BE LIABLE FOR ANY DIRECT, INDIRECT, INCIDENTAL, SPECIAL, EXEMPLARY, OR CONSEQUENTIAL DAMAGES (INCLUDING, BUT NOT LIMITED TO, PROCUREMENT OF SUBSTITUTE GOODS OR SERVICES; LOSS OF USE, DATA, OR PROFITS; OR BUSINESS INTERRUPTION) HOWEVER AUSED AND ON ANY THEORY OF LIABILITY, WHETHER IN CONTRACT, STRICT LIABILITY, OR TORT INCLUDING NEGLIGENCE OR OTHERWISE) ARISING IN ANY WAY OUT OF THE USE OF THIS SOFTWARE, EVEN IF ADVISED OF THE POSSIBILITY OF SUCH DAMAGE.
- libvorbis
Copyright (c) 2002-2008 Xiph.org Foundation Redistribution and use in source and binary forms, with or without modification, are permitted provided that the following conditions are met:
- Redistributions of source code must retain the above copyright notice, this list of conditions and the following disclaimer. - Redistributions in binary form must reproduce the above copyright notice, this list of conditions and the following disclaimer in the documentation and/or other materials provided with the distribution.
- Neither the name of the Xiph.org Foundation nor the names of its contributors may be used to endorse or promote products derived from this software without specific prior written permission. THIS SOFTWARE IS PROVIDED BY THE COPYRIGHT HOLDERS AND CONTRIBUTORS ``AS IS'' AND ANY EXPRESS OR IMPLIED WARRANTIES, INCLUDING, BUT NOT LIMITED TO, THE IMPLIED WARRANTIES OF MERCHANTABILITY AND FITNESS FOR A PARTICULAR PURPOSE ARE DISCLAIMED. IN NO EVENT SHALL THE FOUNDATION OR CONTRIBUTORS BE LIABLE FOR ANY DIRECT, INDIRECT, INCIDENTAL, SPECIAL, EXEMPLARY, OR CONSEQUENTIAL DAMAGES (INCLUDING, BUT NOT LIMITED TO, PROCUREMENT OF SUBSTITUTE GOODS OR SERVICES; LOSS OF USE, DATA, OR PROFITS; OR BUSINESS INTERRUPTION) HOWEVER CAUSED AND ON ANY THEORY OF LIABILITY, WHETHER IN CONTRACT, STRICT LIABILITY, OR TORT (INCLUDING NEGLIGENCE OR OTHERWISE) ARISING IN ANY WAY OUT OF THE USE OF THIS SOFTWARE, EVEN IF ADVISED OF THE POSSIBILITY OF SUCH DAMAGE.
- libogg
Copyright (c) 2002, Xiph.org Foundation Redistribution and use in source and binary forms, with or without modification, are permitted provided that the following conditions are met:
– Redistributions of source code must retain the above copyright notice, this list of conditions and the following disclaimer.
– Redistributions in binary form must reproduce the above copyright notice, this list of conditions and the following disclaimer in the documentation and/or other materials provided with the distribution.
- Neither the name of the Xiph.org Foundation nor the names of its contributors may be used to endorse or promote products derived from this software without specific prior written permission.
THIS SOFTWARE IS PROVIDED BY THE COPYRIGHT HOLDERS AND CONTRIBUTORS ``AS IS'' AND ANY EXPRESS OR IMPLIED WARRANTIES, INCLUDING, BUT NOT LIMITED TO, THE IMPLIED WARRANTIES OF MERCHANTABILITY AND FITNESS FOR A PARTICULAR PURPOSE ARE DISCLAIMED. IN NO EVENT SHALL THE FOUNDATION OR CONTRIBUTORS BE LIABLE FOR ANY DIRECT, INDIRECT, INCIDENTAL, SPECIAL, EXEMPLARY, OR CONSEQUENTIAL DAMAGES (INCLUDING, BUT NOT LIMITED TO, PROCUREMENT OF SUBSTITUTE GOODS OR SERVICES; LOSS OF USE, DATA, OR PROFITS; OR BUSINESS INTERRUPTION) HOWEVER CAUSED AND ON ANY THEORY OF LIABILITY, WHETHER IN CONTRACT, STRICT LIABILITY, OR TORT (INCLUDING NEGLIGENCE OR OTHERWISE) ARISING IN ANY WAY OUT OF THE USE OF THIS SOFTWARE, EVEN IF ADVISED OF THE POSSIBILITY OF SUCH DAMAGE.
Declaration of Conformity with regard to the RE Directive 2014/53/EU
Declaration of Conformity with regard to the RoHS Directive 2011/65/EU
Manufacturer:
JVC KENWOOD Corporation
3-12, Moriyacho, Kanagawa-ku, Yokohama-shi, Kanagawa 221-0022, JAPAN
EU Representative:
JVCKENWOOD Europe B.V.
Amsterdamseweg 37, 1422 AC UITHOORN, The Netherlands
CE
Hereby, JVC KENWOOD declares that the radio equipment DMX7018DABS/DMX7018BTS is in compliance with Directive 2014/53/EU. The full text of the EU declaration of conformity is available at the following internet address: