LOOPTASTIC - Drone HAMA - Free user manual and instructions
Find the device manual for free LOOPTASTIC HAMA in PDF.
| Product type | Quadcopter drone |
| Brand | Hama |
| Model | LOOPTASTIC |
| Dimensions (L x W x H) | 215 x 215 x 75 mm |
| Width (diagonal, without propellers) | 260 mm |
| Weight | 70 g |
| Rotor diameter | 95 mm |
| Drone battery | Li-Po 380 mAh, replaceable |
| Remote control power supply | 4 LR6/AA batteries (not included) |
| Charging method | USB Type A connection (cable included) |
| Charging time | Approximately 1 hour |
| Flight time | 8 to 10 minutes |
| Maximum range | 100 m |
| Number of channels | 4 |
| Frequency band | 2.4 GHz (2.413 - 2.461 GHz) |
| Maximum RF power | 0.29 mW EIRP |
| Lighting | Multi-colored LEDs |
| Special functions | Looping, 360° rotation, headless mode, speed adjustment (H/L), trim adjustment |
| Usage | Indoor and outdoor (dry weather, calm to moderate wind) |
| Minimum age | 14 years (parental supervision) |
| Maintenance and cleaning | Slightly damp lint-free cloth, no aggressive detergent |
| Included spare parts | 4 spare rotor blades, 1 battery, 2 pylons, 1 landing pad |
| Repairability | Rotor blades and battery replaceable by user |
| Package contents | Drone, remote control, battery, USB cable, wrench, 4 spare blades, backing film with stickers, 4 LR6/AA batteries, 2 pylons, landing pad, instruction manual |
| Warranty | Warranty void if installation, assembly, or use not in accordance with instructions |
Frequently Asked Questions - LOOPTASTIC HAMA
User questions about LOOPTASTIC HAMA
0 question about this device. Answer the ones you know or ask your own.
Ask a new question about this device
Download the instructions for your Drone in PDF format for free! Find your manual LOOPTASTIC - HAMA and take your electronic device back in hand. On this page are published all the documents necessary for the use of your device. LOOPTASTIC by HAMA.
USER MANUAL LOOPTASTIC HAMA
Operating Instructions
Bedienungsanleitung
Mode d'emploi
Instrukcja obslugi
Manual de utiliser
GB
D
F
PL
RO


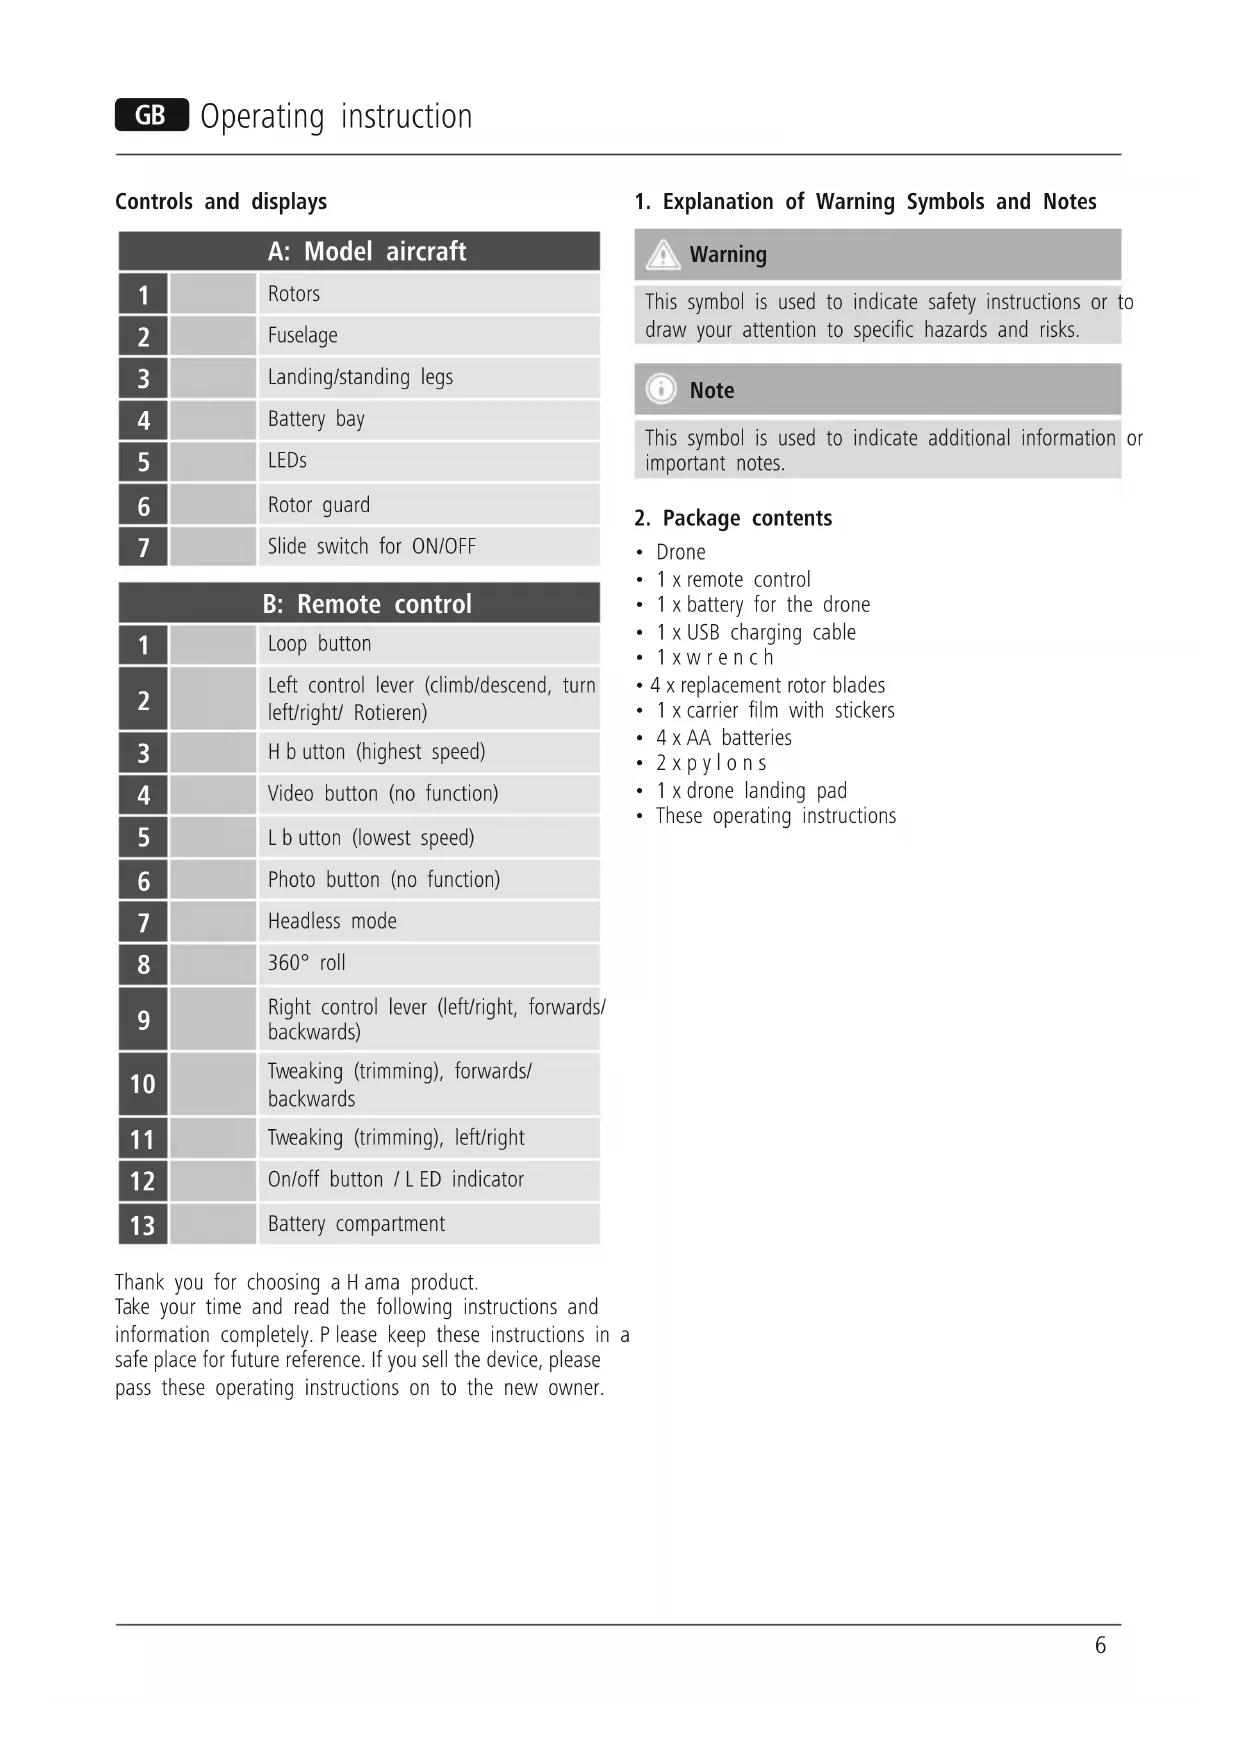
Controls and displays
| A: Model aircraft | |
| 1 | Rotors |
| 2 | Fuselage |
| 3 | Landing/standing legs |
| 4 | Battery bay |
| 5 | LEDs |
| 6 | Rotor guard |
| 7 | Slide switch for ON/OFF |
| B: Remote control | |
| 1 | Loop button |
| 2 | Left control lever (climb/descend, turn left/right/ Rotieren) |
| 3 | H b utton (highest speed) |
| 4 | Video button (no function) |
| 5 | L b utton (lowest speed) |
| 6 | Photo button (no function) |
| 7 | Headless mode |
| 8 | 360° roll |
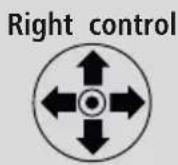
| 9 | Right control lever (left/right, forwards/backwards) |
| 10 | Tweaking (trimming), forwards/backwards |
| 11 | Tweaking (trimming), left/right |
| 12 | On/off button / L ED indicator |
| 13 | Battery compartment |
Thank you for choosing a H ama product.
Take your time and read the following instructions and information completely. Please keep these instructions in a safe place for future reference. If you sell the device, please pass these operating instructions on to the new owner.
1. Explanation of Warning Symbols and Notes

Warning
This symbol is used to indicate safety instructions or to draw your attention to specific hazards and risks.

Note
This symbol is used to indicate additional information or important notes.
2. Package contents
| • Drone |
| • 1 x remote control |
| • 1 x battery for the drone |
| • 1 x USB charging cable |
| • 1 x w r e n c h |
| • 4 x replacement rotor blades |
| • 1 x carrier film with stickers |
| • 4 x AA batteries |
| • 2 x p y l o n s |
| • 1 x drone landing pad |
| • These operating instructions |
3. Safety instructions
- The product is intended for private, non-commercial use only.
- Protect the product from dirt, moisture and overheating, and only use it in a dry environment.
- Do not drop the product and do not expose it to any major shocks.
- Do not operate the product outside the power limits given in the specifications.
- Make sure that you fly the drone in such a manner that you always have the product under control, and do not overestimate your capabilities.
- Keep hair, face, hands and loose clothing away from the product during operation. The rotors pose a risk of injury, as does the moving product in general.
- Keep the packaging material out of the reach of children due to the risk of suffocation..
- Do not modify the product in any way. Doing so voids the warranty.

Warning - Batteries
- Immediately remove and dispose of dead batteries from the product.
- Only use batteries (or rechargeable batteries) that match the specified type.
- Do not mix old and new batteries or batteries of a different type or make.
- When inserting batteries, note the correct polarity (+ and - m markings) and insert the batteries accordingly. Failure to do so could result in the batteries leaking or exploding.
- Do not overcharge batteries.
- Keep batteries out of the reach of children.
- Do not short circuit the batteries/rechargeable batteries and keep them away from uncoated metal objects.
4. Legal regulations/limitations when operating model aircraft

Note
- The information on legal regulations set out in these instructions covers only the German regulations and laws at the time of printing. Before using the product in other countries, find out about the applicable regulations!
-
Please note that in accordance with §1, para. 2, no. 9 of the German Air Traffic Act (Luftverkehrsgesetz or LuftVG), a model aircraft is considered to be aircraft, and in accordance with §43 LuftVG, liability insurance is needed. Find out from your insurance provider whether your personal liability insurance already covers the control of a model aircraft.
-
A licence may be required for commercial use. Contact your local authorities (for example, public order office) to clarify the legal issues.
- If you take photos or videos with this product, their use is considered commercial if they are published on the Internet, for example, and you allow any associated advertising!
5. Operating environment and proper use
- This product is intended for use only in sporting and leisure activities.
- This product is intended for use by children aged 14 or older under parental supervision.
- This product is intended for indoor use, but can also be used outdoors in calm and dry weather conditions (light to moderate wind).
- There is a general prohibition on climbing and operating model aircraft:
Over gatherings of people
Over accident sites and disaster areas
Over operation sites of state bodies (for example, police, authorities) and organisations with security responsibilities
Over penal institutions
Over industrial and energy generation plants (including solar parks)
Over military facilities and restricted areas
Over and near airfields/airports
Over and near hospitals
Over federal highways, federal waterways and railway facilities
Over conservation areas
Over stadiums
Over amusement parks
- Note that special, extended regulations and prohibitions on climbing model aircraft apply in large cities such as Berlin, Hamburg, Cologne, etc.
- Respect the personal and property rights of others! Do not use camera drones to capture images of other people without first asking for their permission.
- Do not fly over third-party property!
- Do not fly near people, waters, radio masts or power lines, and do not frighten animals with the product!
In areas where you are allowed to operate and climb a model aircraft, observe a maximum flying altitude of 100m - In areas where you are allowed to operate and climb a model aircraft, only fly within the range of vision.
In general, the following applies: Do not disturb your fellow human beings and your environment through actions that go against general decorum and/or that you yourself would consider to be a nuisance.
The pilot in command of the drone is, in principle, liable for all damages that may be caused during a flight. - Keep an eye on the battery of the drone. Land immediately if the battery loses power, so a s not to crash.
- Before flying, make sure the weather conditions are suitable.
- Always anticipate hazards when flying! Pay attention to both the drone and your environment.
- Do not use any technical devices to extend the range of vision.
- Unmanned aviation systems and model aircraft are obliged to give way to manned aircraft and manned balloons.
6. Getting started

Note
- Before getting started, familiarise yourself with the product and its operation, ideally under the guidance of a person who is experienced with similar products.
- The packaging can be used to store the product; it protects the product from dust and damage.
6.1 Remote control - inserting the batteries
- O pen the battery compartment (13) and insert four AA batteries, observing correct polarity. Then close the battery compartment cover.
6.2 Model aircraft - charging the battery

Note
- The battery, drone and charging adapter included in the delivery go together and should always be used in combination.
Fully charge the battery of the drone before using it for the first time.
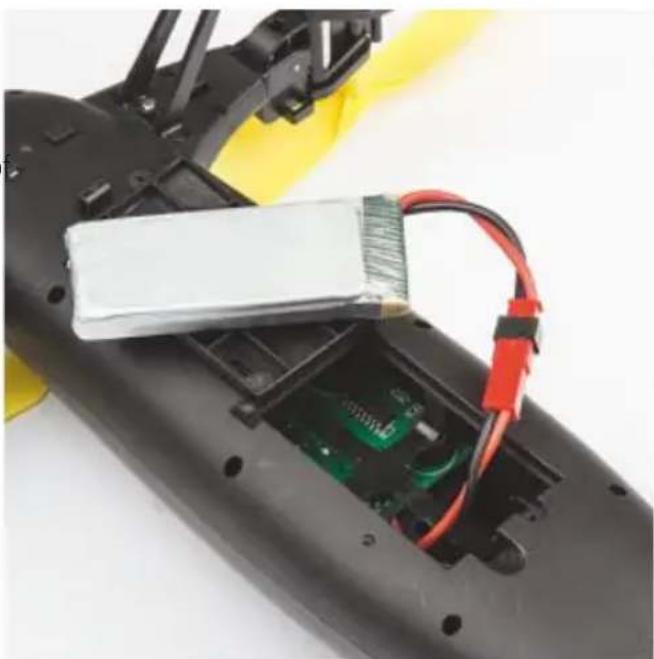
- Open the battery compartment cover of the battery bay (4) on the underside of the drone.
- Remove the battery of the drone.
- Connect the supplied USB charging cable to the battery.
- Connect the unused plug on the USB cable to an available USB port on your computer or another suitable USB charger. Please refer to the operating instructions for the USB charger used.
- The LED indicator of the USB charging plug is lit red during charging. When the battery is fully charged, the LED indicator goes out.
- Remove the connection cable from the battery bay (4) the drone.
- Connect the charged battery to the connection cable.
- Put the connected battery back into the battery bay (4) and then close the battery compartment cover.

Warning - rechargeable battery
- Only use suitable charging devices with USB connections for charging.
- As a rule, do not use charging devices or USB connections that are d effective and do not try to repair them yourself.
- Do not overcharge the product or allow the battery to completely discharge.
- Avoid storing, charging or using batteries in extreme temperatures.
- When stored over a long period of time, batteries should be charged regularly (at least every three months).
After every flight and before charging, allow the motors and the battery to completely cool!
Continually monitor charging! - Stop charging immediately if the battery becomes hot and/or deformed!
- Use a heat-resistant, fire-proof surface for charging!

Note - charging/battery capacity
- It takes approximately 1 hours to fully charge the battery.
- The battery comes partially charged. Initial charging may therefore take less time.
After a charging time of 60 minutes, the flying time is approximately 8-10 minutes. - The actual flying time varies according to use of the product, the settings and ambient conditions (for example, temperatures below 5^ and above 25^ reduce battery capacity).
7. Flight mode
7.1 Pairing the drone with the remote control
- Place the drone on a level surface.
- Move the slide switch (7) on the drone to the ON position. The LEDs (5) begin to flash.
- Press the on/off switch (12) to switch on the remote control.
- Move the left control lever (2) all the way up.
- Then move the left control lever (2) all the way down.
- Two signal tones are emitted to confirm the pairing. The drone's LED indicator (5) and that of the remote control (12) are now permanently lit.
7.2 Flight control

Note
- Control the drone only with minimal movements of the control levers so as to ensure smooth flight behaviour.
- Avoid jerky movements. The drone could get out of control.
- The direction specifications assume that the drone is in front of you and facing forward, or is in Actual Direction mode (see Section 7.4)
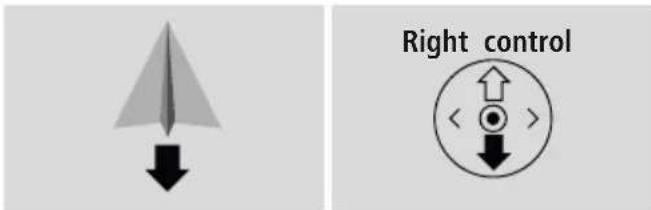
Taking off and climbing
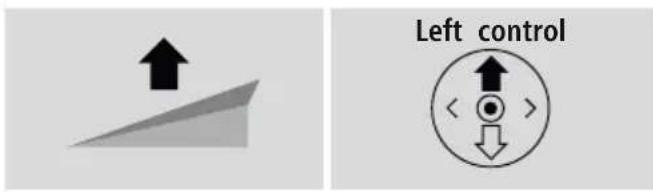
- To launch your drone or to gain altitude, move the left control lever (2) on the remote control upwards.
Landing and descending
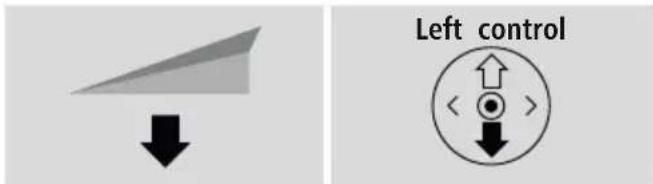
- To land the drone or to descend to a lower altitude, move the left control lever (2) on the remote control downwards.
Flying left and right

- To fly the drone left, move the right control lever (9) on the remote control to the left.
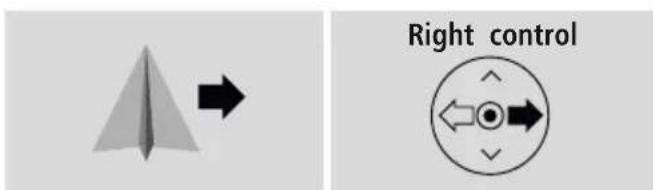
- To fly the drone right, move the right control lever (9) on the remote control to the right.
Flying forwards and backwards
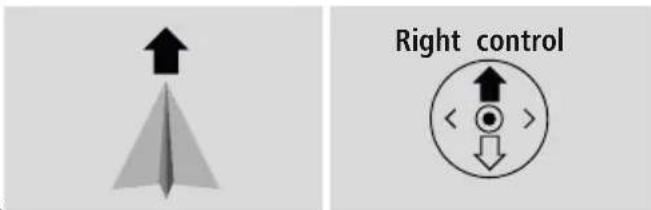
To fly the drone forwards, move the right control lever (9) on the remote control upwards.
- To fly the drone backwards, move the right control lever (9) on the remote control downwards.
Turning left or right
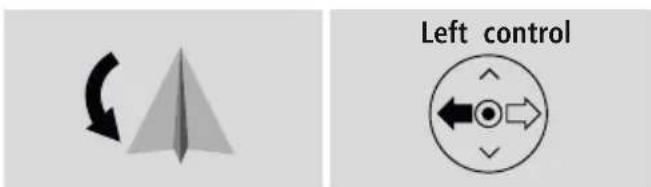
- To turn the drone left, move the left control lever (2) on the remote control to the left.
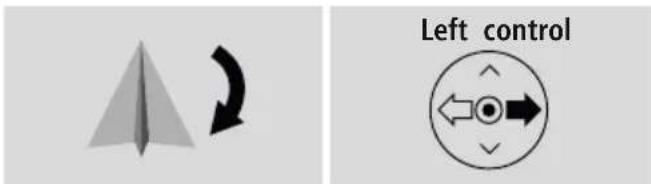
To turn the drone right, move the left control lever (2) on the remote control to the right.
Loops - only for experienced pilots!

Note - L oops and 360^ rolls
- The battery of the drone must be fully charged to be able to use the loop function.
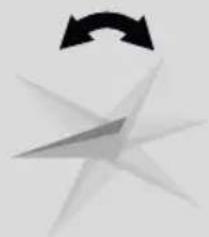
- Fly the drone at an altitude of approximately 3m .
- Press the Loop button 1 (1) to perform a loop.
- Press the Loop button 2 (8) and then move the right control lever (9) to the left or right to perform a 360^ roll sideways.
7.3 Tweaking the control (trimming)

Note -Trimming
- The drone should be smooth and stable in the air, and should fly only in the direction that is set using the control.
After a certain time, there may be slight directional tilts even though the control levers are in the resting/ neutral position.
These directional tilts can be eliminated by trimming the control.
Left/right
- If the drone continually tilts to the right during the flight, briefly push the Tweaking button (11) to the left. Repeat this step until the drone is aligned.
- If the drone continually tilts to the left during the flight, briefly push the Tweaking button (11) to the right. Repeat this step until the drone is aligned.
Forwards/backwards
- If the drone continually tilts forwards during the flight, briefly push the Tweaking button (10) downwards. Repeat this step until the drone is aligned.
- If the drone continually tilts backwards during the flight, briefly push the Tweaking button (10) upwards. Repeat this step until the drone is aligned.
7.4 Actual Direction mode

- If Actual Direction mode is activated, the control of the drone when sending commands is guided by the position of the pilot.
If you move the right control lever (9) upwards/ downwards, the drone flies away from you / towards you. - If you move the right control lever (9) to the left/right, the drone flies left/right.
-
The flight direction and position of the drone is irrelevant in this mode.
Make sure that you remain in the position that you take during calibration with the remote control. -
Position the drone directly in front of you so that its fuselage points away from you and in the desired flight direction.
- Hold the remote control such that it points to the rear part of the drone in a direct line.
- Launch the drone and fly it at a steady altitude.
- Press the Actual Direction mode button (7) during the flight to activate the Actual Direction mode.
- The Actual Direction mode is confirmed through two signal tones and fast flashing of the drone's LED indicator (5).
- If you press the Actual Direction mode button (7) again, the mode is deactivated. A signal tone will sound and the LED indicator (5) of the drone is now constantly lit.
7.5 Speed levels

Note
- When you switch on the product, the drone is in low speed mode.
-
Experienced pilots can increase the drone's speed by setting the top speed mode.
-
Press the [H] button (3) to increase the drone's speed to the highest speed.
- Two signal tones confirm the highest setting.
- Press the [L] button (5) to limit the drone's speed to the lowest speed.
- A signal tone confirms the lowest setting.
7.6 Changing the rotor blades
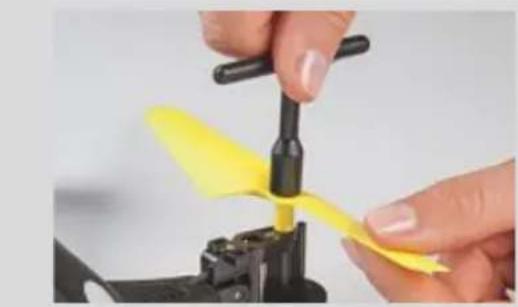
- Undo the screw of the rotor blade with the included screwdriver.
- Remove the existing rotor blade.
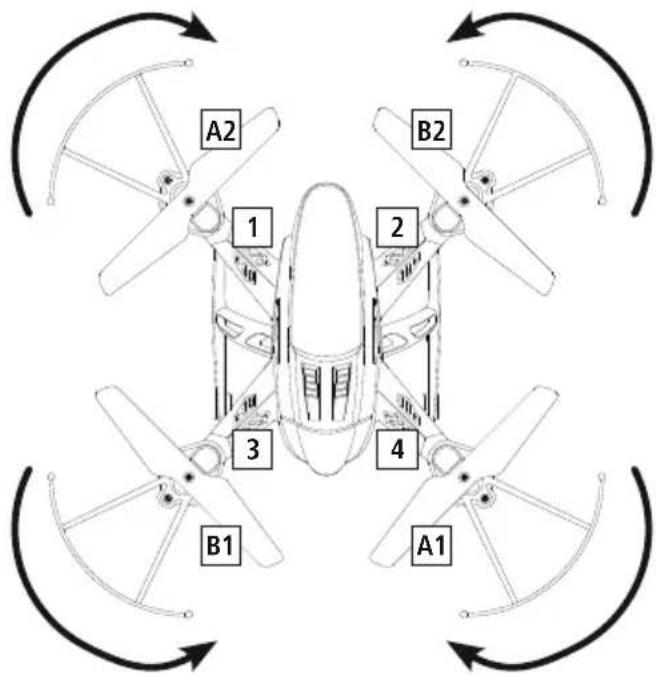
- Place the new rotor blade on the motor shaft. Make sure that the rotor blades are mounted as shown in the diagram, as otherwise the rotation direction will not be correct and no drive is generated.
- Secure the rotor blade using the included screwdriver.
7.7 Switching off the drone
- Land the drone.
- Move the slide switch (7) on the drone to the OFF position.
- Press the on/off switch (12) to switch off the remote control.
7.8 Troubleshooting
| Problem Possible | Cause Solution | |
| The drone stops for no apparent reason and/or does not launch. | The battery of the drone is weak or empty. | Fully charge the battery of the drone. |
| The batteries of the remote control are weak or empty. | Check the batteries of the remote control and replace them with new batteries if necessary. | |
| The rotors of the drone do not move | The drone's battery is not correctly connected to the drone. | Check the plug-in connection of the battery and the drone. |
| The battery of the drone is weak or empty. | Fully charge the battery of the drone. | |
| The batteries of the remote control are weak or empty. | Check the batteries of the remote control and replace them with new batteries if necessary. | |
| The drone rotates only around its vertical axis, overturns or does not launch. | The propellers of the drone are damaged or incorrectly arranged. | Check the propellers. Check the arrangement of the propellers and, if necessary, attach them as described in Section 7.6 Changing the rotor blades. |
| The drone pulls strongly in a particular direction. | The drone is not properly aligned. | Carry out tweaking as described in Section 7.3 Tweaking the control (trimming). |
| The drone won't perform loops. The battery charge is too low. | Fully charge the battery of the drone. | |
12. Care and Maintenance
- Only clean this product with a slightly damp, lint-free cloth and do not use aggressive cleaning agents.
- Make sure that water does not get into the product.
13. Warranty Disclaimer
Hama GmbH & Co KG assumes no liability and provides no warranty for damage resulting from improper installation/ mounting, improper use of the product or from failure to observe the operating instructions and/or safety notes.
14. Service and Support
Please contact Hama Product Consulting if you have any questions about this product.
Hotline: +49 9091 502-115 (German/English)
Further support information can be found here:
www.hama.com
15. Technical specifications
| Max. range: 100 m | |
| Number of channels 4 | |
| Lighting Multi-coloured LEDs | |
| Camera - | |
| With (diagonal, without propellers) | 260 mm |
| Width x depth x height | 215 x 215 x 75 mm |
| Weight 70 g | |
| Rotor diameter | 95 mm |
| Battery requirement for drone | 1 x Lithium polymer battery (replaceable), 380 mAh |
| Capacity 380 mAh | |
| Battery requirement for remote control | 4 x A A b a t t e r y |
| Type of charging USB-A | connection |
| Frequency range 2.4 GHz | |
16. Recycling Information
Note on environmental protection:
After the implementation of the European Directive 2012/19/EU and 2006/66/EU in the national legal system, the following applies: Electric and electronic devices as well as batteries must not be
disposed of with household waste. Consumers are obliged by law to return electrical and electronic devices as well as batteries at the end of their service lives to the public collecting points set up for this purpose or point of sale. Details to this are defined by the national law of the respective country. This symbol on the product, the instruction manual or the package indicates that a product is subject to these regulations. By recycling, reusing the materials or other forms of utilising old devices/batteries, you are making an important contribution to protecting our environment.
17. Declaration of Conformity
Hereby, Hama GmbH & Co KG declares that the radio equipment type [00126851] is in compliance with Directive 2014/53/EU. The full text of the EU declaration of conformity is available at the following internet address: www.hama.com->00126851->Downloads.
| Frequency band(s) | 2.413-2.461 GHz |
| Maximum radio-frequency power transmitted | 0.29 mW EIRP |
Avertizare - accumulator
6.2 Aeromodel - Incarcare accumulator

Indicatie
Avertizare - accumulator
86652 Monheim/Germany
www.hama.com