SGR 150 B1 - Electric grater SILVERCREST - Free user manual and instructions
Find the device manual for free SGR 150 B1 SILVERCREST in PDF.

| Product type | Electric grater |
| Brand / Model | SilverCrest SGR 150 B1 |
| Dimensions (W x H x D) | approx. 14 x 29 x 23 cm |
| Weight | approx. 1,390 g |
| Power supply | 220-240 V~, 50/60 Hz |
| Power consumption | 150 W |
| Max. operating time | 2 minutes |
| Protection class | II |
| Number of drums | 5 |
| Drum types | Fine slice (yellow), Coarse slice (orange), Fine grate (green), Coarse grate (blue), Scrape (red) |
| Main functions | Slice, grate, scrape vegetables, cheese, chocolate, etc. |
| Cleaning | Drums, feeder chute, pusher and storage compartment are dishwasher-safe; body cleaned with a damp cloth |
| Safety | On button must be held down; automatic stop when released; disconnect before changing drum |
| Storage | Integrated storage compartment for drums; power cable storage |
| Operating temperature | 5 °C to 35 °C |
| Operating humidity | 85% RH max |
| Storage conditions | -10 °C to +50 °C, 85% RH max |
| Warranty | 3 years (according to TARGA GmbH conditions) |
| Customer service | Phone and email by country (see manual) |
| Repairability | Contact approved technical service; do not open the housing |
Frequently Asked Questions - SGR 150 B1 SILVERCREST
User questions about SGR 150 B1 SILVERCREST
0 question about this device. Answer the ones you know or ask your own.
Ask a new question about this device
Download the instructions for your Electric grater in PDF format for free! Find your manual SGR 150 B1 - SILVERCREST and take your electronic device back in hand. On this page are published all the documents necessary for the use of your device. SGR 150 B1 by SILVERCREST.
USER MANUAL SGR 150 B1 SILVERCREST
natural_image
Illustration of a handwashing device with a glass bowl and coins, no visible text or symbols on the main subject.Electric Grater SGR 150 B1
TARGA GMBH
Социргов 45
59302 SCIST OFDMANN
GERMANY
Last Information Lipetia. Informationes central appraisal
Severe informationopdatering - Version des informations
Datum seureate versie - Stand de Informationen:
12/2013-Idem, No.: SOR 150 61 122013-1
CD
Electric Grater
Use manual and service information
休
Elektrisk grantspassrive
English....2
Svenska 19
Dansk....36
Français....53
Nederlands....70
Deutsch 87
Table of contents
Introduction.... 3
Intended use 3
Supplied items.... 4
Technical data 4
Short operating time....5
Safety instructions.... 5
Copyright 7
Description of the controls 8
Prior to use....8
First use....10
Cylinders....10
Operating steps....12
Cleaning 12
Storage 13
Troubleshooting 13
Environmental and disposal information.... 14
Conformity information.... 14
Recipe suggestions.... 15
Warranty and servicing advice 17
Introduction
Thank you for purchasing the SilverCrest SGR 150 B1 electric food grater, hereafter referred to as food grater (1). It is a modern, high-quality product that will facilitate your work in the kitchen and help you to instantly create tasty dishes and salads. Five easily interchangeable cylinders enable you to cut, grate or shred various vegetables and other suitable foods such as hard cheese or chocolate.
Intended use
This food grater (1) is a household device that is used for cutting, grating or shredding various types of vegetables and other suitable foods. The device should not be used outdoors or in tropical climates. Its use in a company or for commercial purposes is excluded. Use the food grater (1) only for private use in living areas as any other use is not as intended. This food grater (1) meets all relevant norms and standards in conjunction with CE conformity. In the event of any modification to the food grater (1) that was not approved by the manufacturer, compliance with these standards is no longer guaranteed. The manufacturer does not accept any liability for any resulting damage or faults in such cases. Only use accessories supplied by the manufacturer.
Please observe the regulations and laws in the country of use.
Supplied items
• SilverCrest food grater SGR 150 B1
- 5 cylinders
• These operating instructions
These operating instructions have a fold-out cover. The SilverCrest food grater SGR 150 B1 and all accessories and controls are illustrated with a numbering system on the inside of the cover. You can leave this cover page folded out while reading further sections of these operating instructions. Thus you always keep a reference to the relevant accessory/control in sight. The numbers indicate the following:
1 Electric food grater
2 Start button
3 Storage compartment cover
4 Rough cutting cylinder (orange marking)
5 Fine cutting cylinder (yellow marking)
6 Grating cylinder (red marking)
7 Rough shredding cylinder (blue marking)
8 Storage compartment
9 Motor shaft
10 Fine shredding cylinder (green marking)
11 Feed chute
12 Pusher
Technical data
| Designation SilverCrest SGR 150 B1 | |
| Power supply | 220-240V~, 50/60Hz |
| Power consumption 150W | |
| Short operating time 2 minutes | |
| Safety class |  |
| Dimensions (W x H x D) approx. 14 x 29 x 23cm | |
| Weight approx. 1,390g | |
| Operating temperature 5°C to 35°C | |
| Operating air humidity 85% rel. air humidity | |
| Permissible storage conditions -10°C to +50°C, max. 85% rel. air humidity | |
| Safety tested:TÜV SÜD |  |
The technical data and design may be changed without notification.
Short operating time
The short operating time indicates how long the electric food grater (1) can be operated without the motor overheating and becoming damaged. The short operating time for the electric food grater (1) is 2 minutes. After this time, the electric food grater (1) must remain switched off until the motor has cooled down.
Safety instructions
Before using the electric food grater (1) for the first time, always read the following instructions and pay attention to all warnings, even if you are familiar with handling electric devices. Store these operating instructions in a safe place for future reference. If you sell the food grater (1) or pass it on, always include these instructions.

WARNING! This symbol indicates important information for safe operation of the electric food grater (1) and the safety of the user.
This symbol indicates other important information on the topic.
WARNING! This symbol indicates possible health risks up to a risk of fatal injury and/or material damage due to an electrical shock.

Children and persons with disabilities
This device must not be used by children. The device and its power cable must be kept away from children. Devices can be used by persons with reduced physical, sensory or mental abilities or lack of experience or knowledge provided they are supervised or have been instructed on the safe use of the device and understand the resulting risks. Children must not play with the device. Small parts can be fatal if swallowed. Always keep plastic packaging out of reach also as it poses a suffocation risk.

Mains cable

Always handle the mains cable by the mains plug and do not pull on the cable itself. Never place furniture or other heavy objects on the mains cable and take care that the cable is not kinked, especially near the mains plug. Do not connect the mains cable over hot or sharp points and edges to prevent damage. Do not use adapter plugs or extension cables that do not comply with applicable safety standards, and do not make any alterations to the mains cable! If the mains cable
is damaged, it must be replaced by the manufacturer or its customer service representative or a similarly qualified person to prevent any safety hazards. Never tie a knot in the mains cable and do not tie cables together. Ensure that the mains cable is placed so that no one can trip over it and it does not cause an obstruction. There is a risk of injury.

Cleaning / maintenance

Servicing is necessary if the electric food grater (1) has been damaged or if liquids or objects have penetrated the housing, if it has been exposed to rain or moisture or if it does not work correctly or has been dropped. If smoke is produced, or there are any unusual sounds or odours, disconnect the mains cable of the electric food grater (1) from the socket immediately. In such cases, the electric food grater (1) should not be used until it has been inspected by authorised service personnel. Only have the device repaired by qualified personnel. Never open the housing of the electric food grater (1). Always remove the mains plug from the socket before cleaning the electric food grater (1). Never immerse the electric food grater (1) in water or hold it under running water when cleaning it.
Be careful when using and cleaning the cylinders (4, 5, 6, 7, 10). The blades are very sharp! There is a risk of injury.

Operation
- You must disconnect the electric food grater (1) from the mains power supply before assembling it.
- When operating the device, use the supplied accessories only, particularly the pusher (12) and cylinders (4, 5, 6, 7, 10). There is a risk of injury.
- Be careful when operating the device that no long hair, ties or wide clothes are near the rotating parts of the electric food grater (1) as they may get caught in them. There is a risk of injury.
- Never touch the rotating cylinders (4, 5, 6, 7, 10). There is a risk of injury.
- Remove the mains plug from the socket each time you want to change the cylinder. Always wait until the cylinder stops rotating. There is a risk of injury.
- Never use your bare hands to push food into the feed chute (11)! Always use the supplied pusher (12). There is a risk of injury.
- Never operate the electric food grater (1) without a cylinder (4, 5, 6, 7, 10). Never attempt to chop up fibrous foods such as meat or crush very hard foods such as ice cubes or nuts with shells. The electric food grater (1) could be damaged.
- Always remove the mains plug from the socket after using the electric food grater (1) or when it is unattended!
Operating environment
Always place the electric food grater (1) on a level, firm surface and do not place any objects on it. The electric food grater (1) is not designed for use in environments with a high temperature or humidity (e.g. bathrooms), and must be kept free from dust. Operating temperatures and operating air humidity: 5°C to 35°C, max. 85% rel. air humidity.

Ensure that:
- no direct heat sources (e.g. heating) can affect the electric food grater (1);
- no direct sunlight or bright artificial light reaches the electric food grater (1);
- contact with sprayed and dripping water and corrosive liquids is prevented and the device is never operated near water; in particular it should never be immersed. Never place any objects filled with liquids, for example, vases or drinks, on or near the electric food grater (1);
- no fire sources (e.g. burning candles) are placed on or near the electric food grater (1);
- no foreign objects penetrate the device;
- the electric food grater (1) is not subjected to any extreme temperature fluctuations, as this could result in condensation and electrical short circuits. If the device was subjected to extreme temperature fluctuations, however, wait (approx. 2 hours) until it has reached ambient temperature before use;
- the electric food grater (1) is never subjected to excessive shocks and vibrations.
Storage when not in use
If you will not be using the electric food grater (1) for a prolonged period, disconnect the device from the mains power supply. Ensure that the storage temperature remains between -10^ and +50^ . The humidity should not exceed 85% rel. air humidity.
Copyright
All information contained in these instructions is subject to copyright and is provided for information purposes only. It is only permitted to copy or duplicate data and information with the express and written consent of the author. This also includes commercial use of the content and data. The text and illustrations are based on the state of the art at the time of printing. Subject to change without notice.
Description of the controls
For safety reasons, the Start button (2) must be pressed and held to operate the electric food grater (1). As soon as you release the Start button (2), the electric food grater (1) switches itself off.
Prior to use
Remove the electric food grater SGR 150 B1 and all accessories from the packaging and check that all items have been included. Remove all protective foil. We recommend that you clean all accessories again prior to their initial use.
Inserting/removing cylinder
Select one of the 5 enclosed cylinders (4, 5, 6, 7, 10) as required and insert it into the feed chute (11). For the range of application of the individual cylinders (4, 5, 6, 7, 10), please refer to the diagram in the "Cylinders" section on page 10. Then attach the feed chute (11) with the inserted cylinder (4, 5, 6, 7, 10) to the motor shaft (9). To facilitate this attachment, an arrow (◀) is indicated at the back of the feed chute (11). On the housing of the food grater (1), an open lock 🔒 is indicated on the right next to the motor shaft (9) and a closed lock 🔒 is indicated above it. Proceed as follows:
- Attach the feed chute (11) with the inserted cylinder (4, 5, 6, 7, 10) to the motor shaft (9) so that the arrow (◀) on the feed chute (11) points towards the open lock 🔒 on the housing of the food grater (1).
- Then rotate the feed chute (11) anticlockwise until the arrow (◀) points to the closed lock 🔒 on the housing of the food grater (1).
Store the remaining cylinders (4, 5, 6, 7, 10) in the storage compartment (8) and close it with the storage compartment cover (3). Then attach the storage compartment (8) to the electric food grater (1).

To facilitate the closing of the storage compartment (8), an arrow (◀) is indicated on it and on the storage compartment cover (3). When closing the compartment, the arrows must lie more or less opposite each other (▶◀).

To facilitate the attachment of the storage compartment (8), an arrow (◀) is indicated on it and behind the Start button (2) on the electric food grater (1). When attaching the compartment, the arrows must lie more or less opposite each other (▶◀).
To remove the cylinder, first remove the feed chute (11) from the food grater (1).
- Then rotate the feed chute (11) clockwise until the arrow (◀) points to the open lock 🔒 on the housing of the food grater (1).
You can then remove the cylinder (4, 5, 6, 7, 10) from the feed chute (11).
Proceed as follows:
First, remove the pusher (12) from the feed chute (11). Then hold the feed chute (11) with one hand. Use your thumb and index finger of your other hand to grip the edge of the inserted cylinder and feed chute (11) and press them together as shown in the illustration. You can detach the cylinder easily in this manner and then remove it from the feed chute (11).
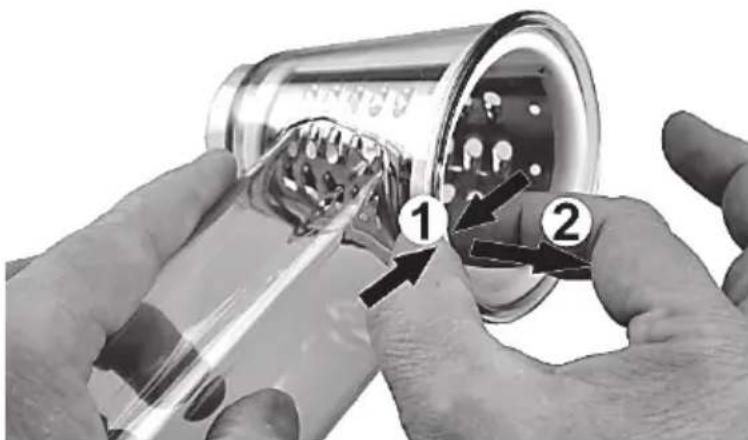

Be careful when removing the cylinders (4, 5, 6, 7, 10). The blades are very sharp! There is a risk of injury.
Please note that you cannot insert or remove the cylinder (4, 5, 6, 7, 10) while the feed chute (11) is attached to the food grater (1).
Mains cable/mains cable duct
Now, pull the integrated mains cable as required from the mains cable duct and insert the mains plug into a socket that is always easily accessible. You can store the mains cable again in the mains cable duct after use.

natural_image
Close-up of a mechanical component with a curved wire and two directional arrows indicating motion (no text or symbols)The electric food grater (1) is now ready to use.

Be careful when using and cleaning the cylinders (4, 5, 6, 7, 10). The blades are very sharp! There is a risk of injury.
First use
Cylinders
We supply 5 different cylinders (4, 5, 6, 7, 10). To aid visual differentiation, these 5 cylinders (4, 5, 6, 7, 10) are colour-coded.
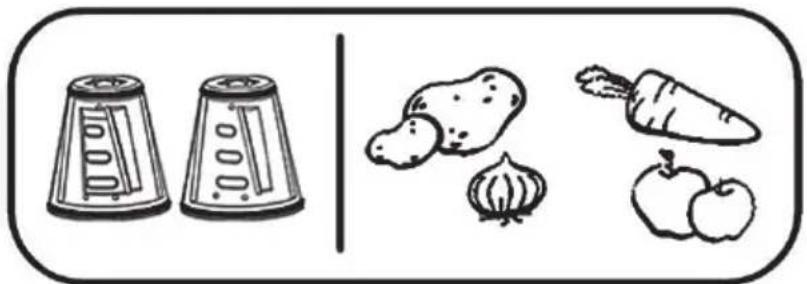
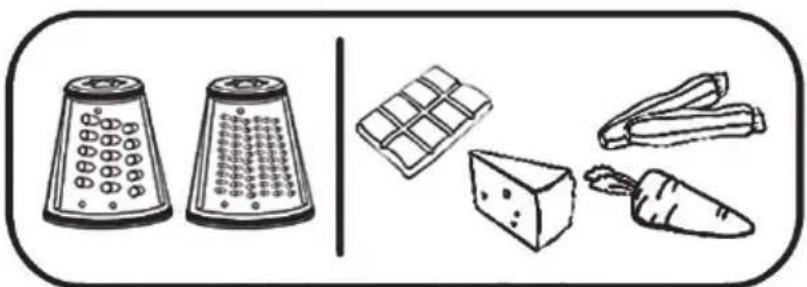
For the range of applications of the various cylinders, you can refer to the following diagram:

Fine cutting cylinder (yellow marking)

Rough cutting cylinder (orange marking)

Fine shredding cylinder (green marking)

Rough shredding cylinder (blue marking)

Grating cylinder (red marking)
natural_image
Illustration of two grater-like objects and four food items: cheese, carrot, and lettuce (no text or symbols)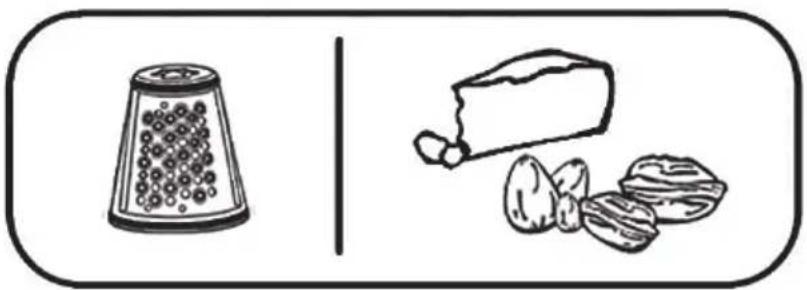
natural_image
Illustration of a cheese cone and bread slices (no text or symbols)The following table should assist you in selecting the appropriate cylinder for selected foods:
| Food | Fine cutting cylinder (yellow) 5 | Rough cutting cylinder (orange) 4 | Fine shredding cylinder (green) 10 | Rough shredding cylinder (blue) 7 | Grating cylinder (red) 6 |
| Apple | ■ ■ | ||||
| Cucumber | ■ ■ | ||||
| Hard cheese | ■ ■ ■ ■ | ||||
| Hazelnuts, almonds | ■ | ||||
| Potatoes | ■ ■ | ■ | |||
| Kohlrabi | ■ ■ | ■ | |||
| Coconut meat | ■ | ■ | |||
| Carrots | ■ ■ ■ ■ | ||||
| Pepper | ■ ■ | ■ | |||
| Parmesan | ■ | ||||
| Radishes | ■ ■ | ■ | |||
| Beetroot | ■ ■ | ||||
| Red or white cabbage | ■ ■ | ||||
| Chocolate | ■ ■ ■ | ||||
| Dry bread | ■ | ||||
| Courgette | ■ ■ ■ ■ | ||||
| Onions, shallots | ■ ■ |
Operating steps
• Prepare the food to be processed so that it can be inserted easily in the feed chute (11).
- Place a suitable bowl under the opening of the cylinder to collect the processed food.
- Now insert the prepared food in the feed chute (11).
- Press the Start button (2) and keep it pressed. The cylinder (4, 5, 6, 7 or 10) in use then rotates.

To prevent blocking of the cylinder in use, the pusher (12) should be pressed only when the Start button (2) is pressed and the cylinder rotates.
- The food in the feed chute can be inserted into the cylinder using the pusher (12). When the feed chute (11) is empty, you can insert more food if necessary.
The processed food falls forwards from the opening of the cylinder to the bowl placed previously under the device.
• After all prepared foods have been processed, release the Start button (2).

If you want to process larger quantities of food, always observe the short operating time of 2 minutes to avoid damaging the electric food grater (1).
- Remove the mains plug from the socket.
Cleaning
WARNING! Always remove the mains plug from the socket before cleaning. Never immerse the electric food grater (1) in water and never clean it under running water. There is a risk of an electric shock!

WARNING! Be careful when using and cleaning the cylinders. The blades are very sharp. There is a risk of injury!

Do not use any aggressive, abrasive or chemical cleaning agents. The surface of the electric food grater (1) and the accessories could be damaged irreparably.
- Remove the mains cable from the socket.
- Remove the 5 cylinders (4, 5, 6, 7, 10) from the storage compartment (8).
- Detach the storage compartment (8) from the electric food grater (1).
- Remove the pusher (12) from the feed chute (11).
-
Detach the feed chute (11) from the motor shaft (9).
-
Clean the electric food grater (1) with a damp cloth. You can apply a mild detergent to the cloth to remove stubborn dirt. Ensure that you remove all remaining detergent with a wet cloth.
- The 5 cylinders (4, 5, 6, 7, 10), the storage compartment (8), the storage compartment cover (3), the feed chute (11), and the pusher (12) are suitable for cleaning in a dishwasher. Alternatively, you can clean these parts with warm water and a mild detergent. After washing, rinse the parts with clear water. Make sure that all parts are completely dry the next time you use them.
- You can now reattach the cleaned parts to the electric food grater (1) and store cleaned cylinders (4, 5, 6, 7, 10) in the storage compartment (8).
Please note that some foods, for example, carrots or red cabbage, contain natural dyes. The plastic parts of the food grater (1) and the accessories may be discoloured by these dyes. These discolourations do not constitute defects.
Storage
If you will not be using the electric food grater (1) for a prolonged period, store it in a dry and clean location.
- Clean the electric food grater (1) and all accessories as described in the last section.
• Store the 5 cylinders (4, 5, 6, 7, 10) in the storage compartment (8). - Insert the mains cable so far into the mains cable duct that only the mains plug can be seen.
Troubleshooting
The electric food grater (1) is not working.
• The mains plug is not inserted in the socket. Insert the mains plug into a mains socket.
- The socket is defective. Try plugging the device into another socket which you know is definitely working.
• The electric food grater (1) is defective. Contact the Service Team.
One of the cylinders (4, 5, 6, 7, 10) cannot be detached.
- Always detach the entire feed chute (11) to insert or remove a cylinder (4, 5, 6, 7, 10). Also note the following image for this purpose on page 9.
Environmental and disposal information
natural_image
Symbol of a trash bin with crossed lines indicating no waste or discharge, and a solid black rectangle below (no text or labels)When this symbol appears on a product, this indicates that the product is subject to the European Directive 2012/19/EU. All electrical and electronic devices must be disposed of separately from household waste at designated disposal points. Disposal of old devices in this manner will prevent harm to the environment and human health hazards. For further information regarding disposal of old devices in accordance with the directive, contact your local government office or the retailer where you purchased the device.
Remember to protect the environment. Used batteries should not be disposed of in domestic waste. They must be taken to a collection point for old batteries. Please note that only discharged batteries may be deposited in collection bins for portable batteries. Care must be taken to ensure that batteries that are not fully discharged do not short circuit.
Dispose of the packaging in an environmentally compatible manner. Cardboard can be put out for municipal paper collections or brought to public collection points for recycling. Films and plastic used for packaging the device are collected by your local disposal services and disposed of in an environmentally compatible manner.
Conformity information

This appliance complies with the basic requirements and other applicable provisions of the Low Voltage Directive 2006/95/EC, EMC Directive 2004/108/EC, ErP Directive 2009/125/EC and RoHS Directive 2011/65/EU.
The complete EU Declaration of Conformity is available on request at:
TARGA GmbH
Product Compliance
Coesterweg 45
59494 SOEST
GERMANY
Recipe suggestions
White or red cabbage salad
◆ 1500g white or red cabbage
1 pepper
◆ 125g sugar
◆ 125ml oil
125ml vinegar
◆ 1 tablespoon salt
◆ 1 pinch pepper
Cut the cabbage with the rough cutting cylinder (4). Chop the pepper with the rough shredding cylinder (7). Mix the oil, vinegar, sugar, salt and pepper and heat this marinade slightly. Pour the lukewarm marinade over the cabbage and let it marinate for several hours. Mix the salad well and season it to your taste with salt and pepper. Enjoy your meal!
Wild garlic and almond pesto
◆ 60g almonds
◆ 60g parmesan
◆ 1 bunch wild garlic (approx. 100g)
◆ 120ml extra virgin olive oil
◆ Salt, pepper to taste
Grate almonds and parmesan with the grating cylinder (6). Mix the almonds, parmesan, olive oil, salt and pepper. Finally, remove the wild garlic from its stalks, chop it finely and stir it into the mixture, and again season to taste with salt and pepper. Enjoy your meal!
Courgette salad
◆ 3-4 small courgettes (approx. 800g)
◆ 1 cucumber
◆ 1 jar Miracle Whip (or yoghurt)
Tabasco to taste
◆ Pepper, salt, paprika
Garlic to taste
◆ 1 bunch chives
◆ 1 small tin sweet corn
Cut or shred the courgettes and cucumber with the rough cutting cylinder (4) or the rough shredding cylinder (7). Finely chop or cut the chives. Mix the courgettes, cucumber, sweet corn, chives and Miracle Whip. Season the salad with salt and pepper. Add a few splashes of Tabasco to give it more flavour. Add some more garlic if desired. Finally, decorate the salad by sprinkling paprika over it before serving. Enjoy your meal!
Potato fritters (4 portions)
◆ 10 large potatoes
◆ 4 large onions
◆ 2 tablespoons flour
◆ 4 large eggs
Salt and pepper
Apple compote
Oil for frying
Prepare the potatoes with the rough shredding cylinder (7) and the onions with the fine cutting cylinder (5). Stir the beaten eggs and flour into the mixture. Season with salt and pepper to taste. Heat the oil in a pan and pour dollops of mashed potato, roughly 10cm wide and not too thick, into the pan. Fry the potato fritters on both sides until golden brown. Serve the potato fritters with apple compote. Enjoy your meal!
Cherry and cream quark with grated chocolate (6 portions)
◆ 500g quark
◆ 2 cups cream (400ml)
◆ 2 bars chocolate, chilled (milk or dark chocolate)
◆ 1 jar morello cherries (pitted)
Sugar
Grate the chilled chocolate with the rough shredding cylinder (7). Whip the cream and add sugar to taste. Stir the quark and fold in the cream, grated chocolate and cherries. Enjoy your meal!
Warranty and servicing advice
Warranty of TARGA GmbH
Dear Customer,
This device is sold with three years warranty from the date of purchase. In the event of product defects, you have legal rights towards the seller. These statutory rights are not restricted by our warranty as described below.
Warranty conditions
The warranty period commences upon the date of purchase. Please keep the original receipt in a safe place as it is required as proof of purchase. If any material or manufacturing faults occur within three years of purchase of this product, we will repair or replace the product free of charge as we deem appropriate.
Warranty period and legal warranty rights
The warranty period is not extended in the event of a warranty claim. This also applies to replaced and repaired parts. Any damage or defects discovered upon purchase must be reported immediately when the product has been unpacked. Any repairs required after the warranty period will be subject to charge.
Scope of warranty
The device was carefully manufactured in compliance with stringent quality guidelines and subjected to thorough testing before it left the works. The warranty applies to material and manufacturing faults. This warranty does not cover product components which are subject to normal wear and which can therefore be regarded as wearing parts, or damage to fragile components such as switches, rechargeable batteries or components made of glass. This warranty is void if the product is damaged, incorrectly used or serviced. To ensure correct use of the product, always comply fully with all instructions contained in the user manual. The warnings and recommendations in the user manual regarding correct and incorrect use and handling of the product must always be observed and complied with. The product is solely designed for private use and is not suitable for commercial applications. The warranty is rendered void in the event of incorrect handling and misuse, if it is subjected to force, and also if any person other than our authorised service technicians interfere with the device. No new warranty period commences if the product is repaired or replaced.
Submitting warranty claims
To ensure speedy handling of your complaint, please note the following:
Before using your product for the first time, please read the enclosed documentation or online help carefully. Should any problems arise which cannot be solved in this way, please call our hotline.
- Always have your receipt, the product article number as well as the serial number (if available) to hand as proof of purchase.
- If it is not possible to solve the problem on the phone, our hotline support staff will initiate further servicing procedures depending on the fault.

Service

Phone: 0207-36 50 744
E-Mail: service.GB@targa-online.com

Phone: 01 - 242 15 83
E-Mail: service.IE@targa-online.com

Phone: 800 - 62 175
E-Mail: service.MT@targa-online.com

Phone: 800 - 92 496
E-Mail: service.CY@targa-online.com
IAN: 96257

Manufacturer
Please note that the following address is not a service address. First contact the service point stated above.
TARGA
GmbH
Coesterweg 45
59494 SOEST
GERMANY

natural_image
Close-up of a hand holding a flexible cable with two white arrows pointing to the cable (no text or symbols visible)natural_image
Symbol of a trash bin with crossed lines indicating no waste or discharge, and a solid black rectangle below (no text or labels)
natural_image
Close-up of a curved cable or wire with two white arrows pointing to a connector (no text or symbols visible)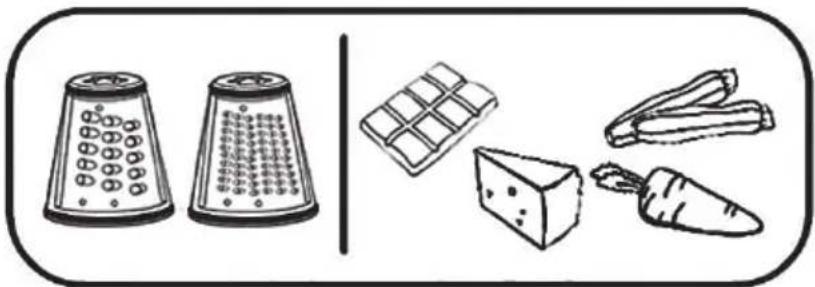
natural_image
Illustration of two grasses and four food items: cheese, potato, celery, and carrot (no text or symbols)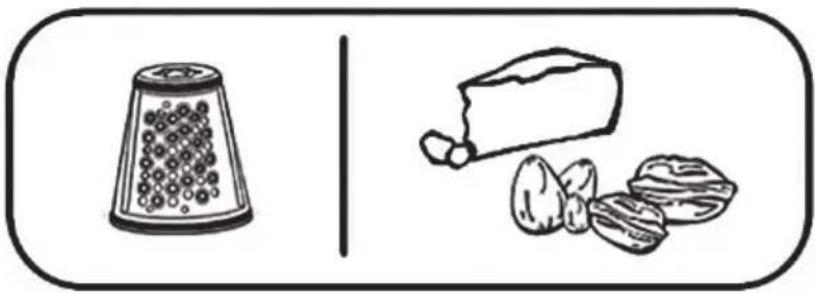
natural_image
Illustration of a griddle and bread roll with scattered nuts (no text or symbols)natural_image
Symbol of a trash bin with crossed lines indicating no waste or discharge, and a solid black rectangle below (no text or labels)
natural_image
Close-up of a mechanical component with a curved wire and two directional arrows indicating motion (no text or symbols)natural_image
Symbol of a trash bin with crossed lines indicating no waste or discharge, and a solid black rectangle below (no text or labels)Cher client, chère cliente,
Receptsuggesties.... 83
Service en garantie 85
Inleiding

natural_image
Close-up of a curved cable or wire being inserted into a cylindrical container (no text or symbols visible)natural_image
Illustration of kitchen utensils and vegetables (potato, onion, carrot, apple) with no text or symbols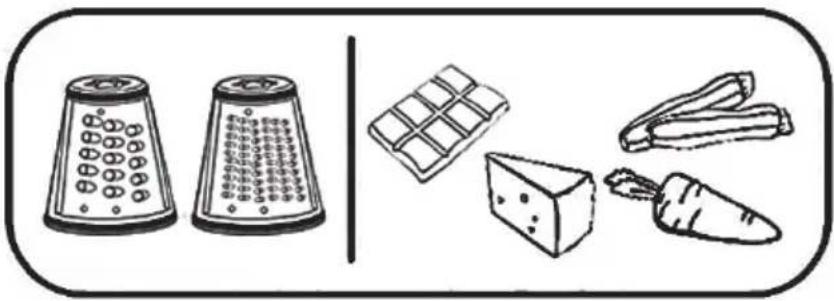
natural_image
Illustration of kitchen utensils including a grater, cheese, carrot, and a plate (no text or symbols)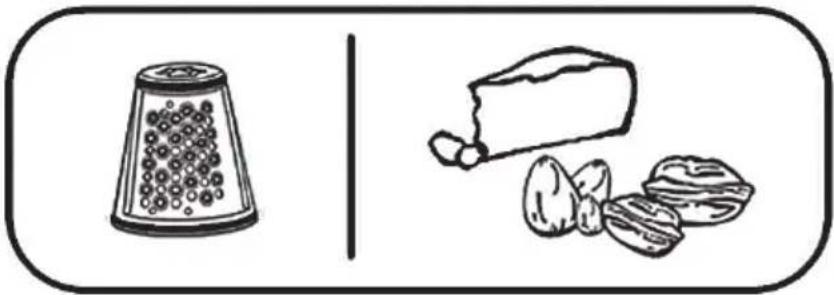
natural_image
Illustration of a grater and bread next to nuts, no text or symbols presentnatural_image
Symbol of a trash bin with crossed lines and a solid rectangle below (no text or labels)