
49S367BFS - Television TESLA - Free user manual and instructions
Find the device manual for free 49S367BFS TESLA in PDF.
| Product Type | LED Smart TV |
| Brand | Tesla |
| Model | 49S367BFS |
| Screen Diagonal | 124 cm (49 inches) |
| Screen Resolution | 1920 x 1080 pixels (Full HD) |
| TV Formats | PAL, SECAM, NTSC |
| TV Reception | DVB-T/T2/C/S/S2 |
| Connectivity | Built-in Wi-Fi, Ethernet (RJ45) |
| Video Inputs | 2x HDMI, 1x AV (Composite), 1x USB 2.0 |
| Audio Output | 1x S/PDIF optical, 1x 3.5 mm headphone jack |
| Audio Power | 2 x 6 W |
| Smart Features | Smart TV, YouTube access, Facebook, web browser, Miracast |
| USB Recording | Yes (PVR, Time Shift) |
| Electronic Program Guide | Yes (EPG) |
| Dimensions (with Stand) | Approximately 1103 x 700 x 240 mm (estimate) |
| Dimensions (without Stand) | Approximately 1103 x 650 x 90 mm (estimate) |
| Weight (with Stand) | Approximately 11 kg (estimate) |
| Power Supply | 100-240 V ~ 50/60 Hz |
| Power Consumption (max) | Approximately 90 W (estimate) |
| Standby Consumption | Less than 0.5 W |
| VESA Standard | 200 x 200 mm (estimate) |
| Maintenance and Cleaning | Unplug before cleaning; use a soft, dry cloth |
| Safety | Double insulation (Class II); do not expose to moisture |
Frequently Asked Questions - 49S367BFS TESLA
User questions about 49S367BFS TESLA
0 question about this device. Answer the ones you know or ask your own.
Ask a new question about this device
Download the instructions for your Television in PDF format for free! Find your manual 49S367BFS - TESLA and take your electronic device back in hand. On this page are published all the documents necessary for the use of your device. 49S367BFS by TESLA.
USER MANUAL 49S367BFS TESLA
Please read these instructions before operating your set and retain them for future reference.
AL
UDHEZIMPER
Ju lutemi lexonie kete udhezim para perdorimit te pajisje suaj dhe ruajeni per nevoja plotesuese eventuale.
BiH/CG
UPUTSTVO ZA UPOTREBU
Prije upotrebe uredaja procitati ova uputstva i zadrzati ih radi kasnijih referenci.
BG
HCHTPYKUN 3A EKCNIIOATAU
MOn, npOeTe Te3n HNCTpyKu, npEi Da n3non3BaTe yCtpoIcTBoTO n rn 3ana3e 3a 6bdeu cnpaBKn.
DE
BETRIEBSANLEITUNGEN
YIATCTBO 3A KOPNUCTHe
Be moIme npouHTajTe ro Oba ynatCTBO nped da ro HnctaIIpate n ynoTpe6yBaTe Baunotyped.
RO
INSTRUCTION DE UTILIZARE
WARNING AND PRECAUTIONS. 4
POSITIONING THE TV SET 7
PANEL BUTTONS 10
TERMINALS. 11
REMOTE CONTROL FUNCTIONS 12
PERSONALVIDEORECORDING(REC) 14
ELECTRONIC PROGRAMME GUIDE (EPG) 15
INITIAL SETUP & HOME FEATURES 16
MENUCONTROL 18
Menu Operation. 18
Picture 18
Sound 18
Installation 19
Setup 21
Time. 22
Advanced. 23
Network 23
USB CONTROL 23
USB Menu. 23
Reminder When Using the USB Player 23
Movie Menu. 24
Music Menu 25
Photo Menu 25
TROUBLESHOOTING. 26
SPECIFICATIONS. 28
Note
- The graphics in this manual are only for reference.
- Your TV's OSD may be slightly different with that shown in this manual.
- The information in this document is subject to change without notice. The manufacturer accepts no liability for damage resulting directly or indirectly from faults, incompleteness or discrepancies between the user manual and the product described.
- In dry environment due to static electricity, the product may be restart and return to the main OSD interface, USB player interface or the previous source mode, please continue to operate the TV as your will.
WARNING AND PRECAUTIONS
Note: Read all of the instructions before operating the set. Keep these instructions well for later use.
- Read these instructions -All the safety and operating instructions should be read before this product is operated.
- Keep these instructions - The safety and operating instructions should be retained for future reference.
- Heed all warnings - All warnings on the appliance and in the operating instructions should be adhered to.
- Follow all instructions- All operating and use instructions should be followed.
- Do not use this apparatus near water - The appliance should not be used near water or moisture - for example, in a wet basement or near a swimming pool, and the like.
- Clean only with dry cloth.
- Do not block any ventilation openings. Install in accordance with the manufacturer's instructions.
- Do not install near any heat sources such as radiators, heat registers, stoves, or other apparatus (Including amplifiers) that produce heat.
- Do not defeat the safety purpose of the polarized or grounding plug. A polarized plug has two blades with one wider than the other. A grounding plug has two blades and a third grounding prong. The wide blade or the third prong is provided for your safety. If the provided plug does not fit into your outlet, consult an electrician for replacement of the obsolete outlet.
- Protect the power cord from being walked on or pinched particularly at the plugs, convenience receptacles, and at the point where they exit from the apparatus.
- Only use attachments/accessories specified by the manufacturer.
- Use only with the cart, stand, tripod, bracket, or table specified by the manufacturer, or sold with the apparatus. When a cart or rack is used, use caution when moving the cart/apparatus combination to avoid injury from tip-over.
- Unplug the apparatus during lightning storms or when unused for long periods of time.
- Refer all servicing to qualified personnel. Servicing is required when the apparatus has been damaged in any way, such as power supply cord or plug is damaged, liquid has been spilled or objects have fallen into the apparatus, the apparatus has been exposed to rain or moisture, does not operate normally, or has been dropped.
- CAUTION: These servicing instructions are for use by qualified service personnel only. To reduce the risk of electric shock, do not perform any servicing other than that contained in the operating instructions unless you are qualified to do so.
- Do not install this equipment in a confined or building-in space such as a book case or similar unit, and remain a well ventilation conditions at open site. The ventilation should not be impeded by covering the ventilation openings with items such as newspaper, tablecloths, curtains etc.
- Caution - To prevent electric shock hazard, replace grille.
- Please refer the information on rear enclosure for electrical and safety information before installing or operating the apparatus.
- To reduce the risk of fire or electric shock, do not expose this apparatus to rain or moisture. The apparatus shall not be exposed to dripping or splashing and that no objects filled with liquids, such as vases, shall be placed on the apparatus.
- For the terminals marked with symbol of " " may be of sufficient magnitude to constitute a

risk of electric shock. The external wiring connected to the terminals requires Installation by an instructed person or the used of ready-made leads or cords.
- To prevent injury, this apparatus must be securely attached to the floor/wall in accordance with the installation instructions.
- Danger of explosion if battery is incorrectly replaced. Replace only with the same or equivalent type.
- The battery (battery or batteries or battery pack) shall not be exposed to excessive heat such as sunshine, fire or the like.
- Excessive sound pressure from earphones and headphones can cause hearing loss. Listening to music at high volume levels and for extended durations can damage one's hearing. In order to reduce the risk of damage to hearing, one should lower the volume to a safe, comfortable level, and reduce the amount of time listening at high levels.
- The mains plug/appliance coupler/direct plug-in adapter is used as disconnect device, the disconnect device shall remain readily operable.
- When not in use and during movement, please take care of the power cordset, e.g. tie up the power cordset with cable tie or something like that. It shall be free from sharp edges and the like that can cause abrasion of the power cordset. When put into use again, please make sure the power cord set being not damaged, If any damages found, please look for the service person to replace the power cord set specified by the manufacturer or have the same characteristics as the original one.
- Attention should be drawn to environmental aspects of battery disposal.
- No naked flame sources, such as lighted candles, should be placed on the apparatus. To prevent the spread of fire, keep candles or other open flames away from the apparatus at all times.
- If the apparatus don't have the symbol in its rating label and its power cord has three pins, it means protective earthing connection is needed. The apparatus should be connected to a mains socket outlet with a protective earthing connection.
- The following information are recommended to be included as far as applicable where applicable:
| ~ | Refers to alternating current (AC) |
| = = | Refers to direct current (DC) |
| □ | Refers to ClassII equipment |
| ○ | Refers to stand-by |
| I | Refers to power ON. |
| 4 | Refers to dangerous voltage |
- Warning for Apparatus containing COIN/BUTION CELL BATTERIES (Below instruction only used for the apparatus containing a user-replaceable coin/button cell battery)
WARNING
Do not ingest the battery, Chemical Bum Hazard (The remote control supplied with) This product contains a coin button cell battery. If the coin button cell battery is swallowed, it can cause severe Internal burns in just 2 hours and can lead to death. Keep new and used batteries away from children. If the battery compartment does not close securely, stop using the product and keep it away from children. If you think batteries might have been swallowed or placed inside any part of the body, seek immediate medical attention.
WEEE Directive

Correct Disposal of this product. This marking indicates that this product should not be disposed with other household wastes throughout the EU. To prevent possible harm to the environment or human health from uncontrolled waste disposal, recycle it responsibly promote the sustainable reuse of material resources. To return your used device, use the return and collection systems or contact the retailer where the product was purchased. They can take this product for environmental safe recycling.
CAUTION
RISK OF ELECTRIC SHOCK DO NOT OPEN

This lightning flash with arrowhead symbol within an equilateral triangle is intended to alert the user to the presence of non-insulated "dangerous voltage" within the product's enclosure that may be of sufficient magnitude to constitute a risk of electric shock. To reduce the risk of electric shock. Do not remove cover (or back). No user serviceable parts inside. Refer to qualified service personnel. The exclamation point within an equilateral triangle is intended to alert the user to the presence of important operating and maintenance instructions in the literature accompanying the appliance.
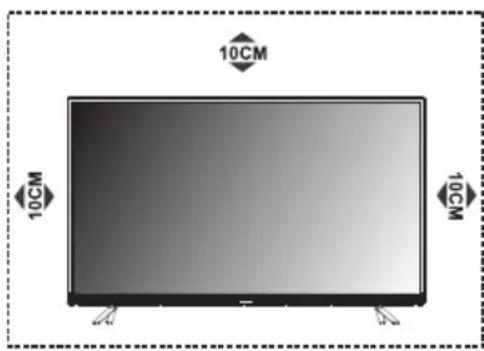
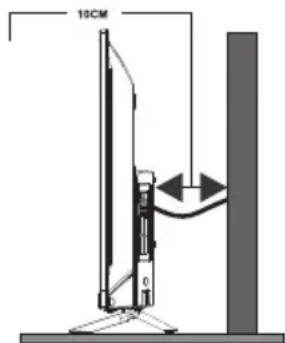
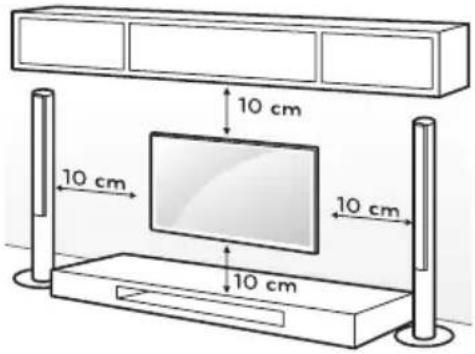
POSITIONING THE TV SET
- Install Display on solid horizontal surface such as a table or desk. For ventilation, leave a space of at least 10cm free all around the set. To prevent any fault and unsafe situations, please do not place any objects on top of the set. This apparatus can be used in tropical and/or moderate climates.
Fixing the rear of enclosure to wall. Below picture is different from actual item, thus it's only for reference. (only for some regions)
Never place a television set in an unstable location. A television set may fall, causing serious personal injury or death. Many injuries, particularly to children, can be avoided by taking simple precautions such as:
- Using cabinets or stands recommended by the manufacture of the television.
- Only using furniture that can safely support the television.
- Ensuring the television is not overhanging the edge of the supporting furniture.
- Not placing the television on tall furniture (for example, cupboards or bookcases) without anchoring both the furniture and the television set to a suitable support.
- Not placing the television set on cloth or other materials that may be located between the television set and supporting furniture.
- Educating children about the dangers of climbing on furniture to reach the television or its controls.
If your existing television set is being retained and relocated, the same considerations as above should be applied (Only for the TV with mass exceed 7kg ).
- An optional wall mount can be used with your television. Consult with your local dealer for a wall mount that supports the VESA standard used by your TV model.
Carefully attach the wall mount bracket at the rear of the TV. Install the wall mount bracket on a solid wall perpendicular to the floor. If you are attaching the TV to other building materials, please contact qualified personnel to install the wall mount.
Detailed instructions will be included with the wall mount. Please use a wall mount bracket where the device is adequately secured to the wall with enough space to allow connectivity to external devices.
CAUTION
- Disconnect the power before moving or installing the TV. Otherwise electric shock may occur.
- Remove the stand before installing the TV on a wall mount by performing the stand attachment in reverse.
- If you install the TV on a ceiling or slanted wall, it may fall and result in severe injury. Use an authorized wall mount and contact the local dealer or qualified personnel. Otherwise it is not covered by the warranty.
- Do not over tighten the screws as this may cause damage to the TV and void your warranty
- To prevent injury, this apparatus must be securely attached to the floor/wall in accordance with the installation instructions.
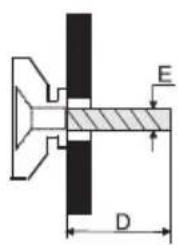
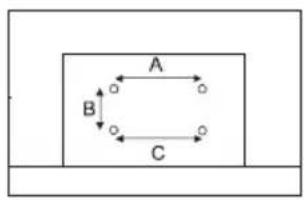
- Use the screws and wall mounts that meet the following specifications. Any damages or injuries by misuse or using an improper accessory are not covered by the warranty.
| Model Size: 32" Top Down | ||||
| Screw | Diameter (mm) "E" M4 | M4 | ||
| Depth (mm) "D" | Max 9 9 | |||
| Min 6 6 | ||||
| Quantity 2 2 | ||||
| VESA (AxBxC) 100x100x100 | ||||
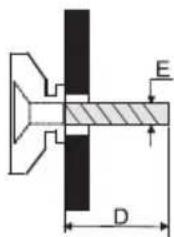
| Model Size: 40" Top Down | ||||
| Screw | Diameter (mm) "E" M6 | M6 | ||
| Depth (mm) "D" | Max 20 | 15 | ||
| Min 12 | 7 | |||
| Quantity 2 2 | ||||
| VESA (AxBxC) 200x100x200 | ||||
Note:
1) The pictures are for reference only.
2) For the TV sets with terminals towards the wall, in order to leave enough space to use the terminals, a rubber cushion is needed together with the screw to fix the wall mount. It is a small hollow pillar whose internal diameter is 8mm , external diameter is 18mm and height is 30mm .
Operating Environment
- Do not install this device in confined spaces such as bookcases or similar units.
- Do not use the set in damp and cold areas. Protect the set from overheating.
- Keep away from direct sunlight.
- Do not use the set in dusty areas.
- Do not place candles to accessible, open areas to avoid flammable foreign material from entering the TV.
Precautions for Using Remote Control
- Use the remote control by pointing it towards the remote sensor. The items between the remote control and the remote sensor will interfere with the normal operation.
- Do not expose the remote control to violent vibrations. Also, do not splash liquid on the remote control and do not place the remote control in high humidity areas.
- Do not expose the remote control to direct sunlight which can cause deformation of the unit due to heat.
- When the remote sensor is exposed to direct sunlight or strong light, the remote control will not work. If this is the case, please change the light direction or the position of the TV, or use the remote control closer to the remote sensor.
Precautions for Using Battery
Inadequate use of batteries may cause leakage. Therefore, please follow the steps below and use them with care.
- Please note the batteries polarity to avoid short circuit.
- If the battery voltage is insufficient, which affects the remote control range, you should replace used batteries with the new ones. Remove batteries from the remote control unit if you do not intend to use it for a long time.
- Do not use different types of batteries (for example, manganese and alkaline batteries) together.
- Do not put the batteries into fire. Do not charge or disassemble batteries.
- Please dispose of batteries in accordance with the relevant environmental protection regulations.
- WARNING: The batteries (battery pack or batteries installed) shall not be exposed to excessive heat such as sunshine, fire or the like.
Remote Control Battery Replacement
Place two AAA batteries in the remote control battery compartment, making sure that the polarity markings inside the compartment are matched.
PANEL BUTTONS
Note: The images are intended for reference only.
Bottom view

Rocker Button
Press middle button:
-
In standby mode, press it to turn on the TV;
-
Without OSD, press it to access source menu; press and hold for 5 seconds to turn the TV to standby;
-
With OSD, short press it to confirm a selection; long press it to return or exit a menu / submenu.
Push left: decrease volume or go to left.
Push right: increase volume or go to right.
Push forward: channel down or go to below.
Push backward: channel up or go to above.
TERMINALS
Note: The terminals may differ by model and regions, and please select the terminals basd on your purchased TV set.
LAN: Network part
AV IN (AUDIO L/R & VIDEO): Connect video and audio signal from signal source such as DVD.
HDMI1/2: Connect HDMI input signal from signal source such as DVD.
DIGITAL AUDIO:Use a SPFIF cable to output your TV audio signal to a compatible audio receiver.
EARPHONE: Audio output, speakers will be muted when earphone is plugged in.
USB 1/2: USB port.
AIR/CABLE/LNB: Connect a coaxial cable ro receive signal from the antenna, cable or satellite.
SERVICE: Debugging port only for professional technician.
CI: CI card port.
REMOTE CONTROL FUNCTIONS
Remote Control
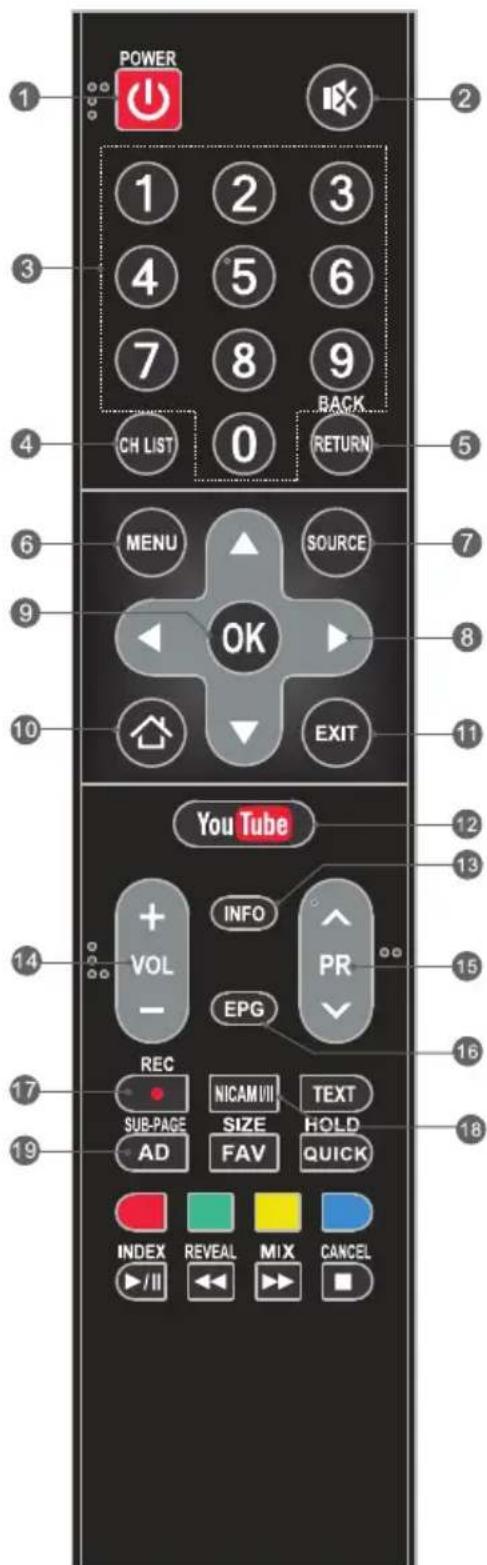
- POWER (O) Press to turn the TV on or to put it in standby.
- MUTE ( ) Press to mute or restore the volume.
- Numeric buttons Choose channel directly.
- CH LIST Press to enter the channel list.
- RETURN (BACK) Press to go back to a previously viewed channel.
- MENU Enter the menu options.
- SOURCE Select the input source mode.
- Up/Down/Left/Right (▲ /▼/▲ /▶) Navigate through the menu.
- OK Confirm the selection.
- HOME Press this button will access the home page, you can use the smart features and media player etc.
- EXIT Exit the current menu.
- YouTube Access the YouTube.
- INFO Display information about current source.
- Volume Up/Down (VOL+/VOL-) Adjust the volume level.
- Program Up/Down (PR+/PR-) Change programs up or down.
- EPG Press to display the current EPG information in DTV mode.
- Record (REC) Press to record the current programme (available in DTV mode only).
- NICAM Press to select desired sound output depending on the broadcasting channel.
- AD (Audio Description) Press to turn on audio description. Narrator will describe to blind or visually impaired viewers what is happening on the screen. Press again to turn this function off (available in DTV mode only).
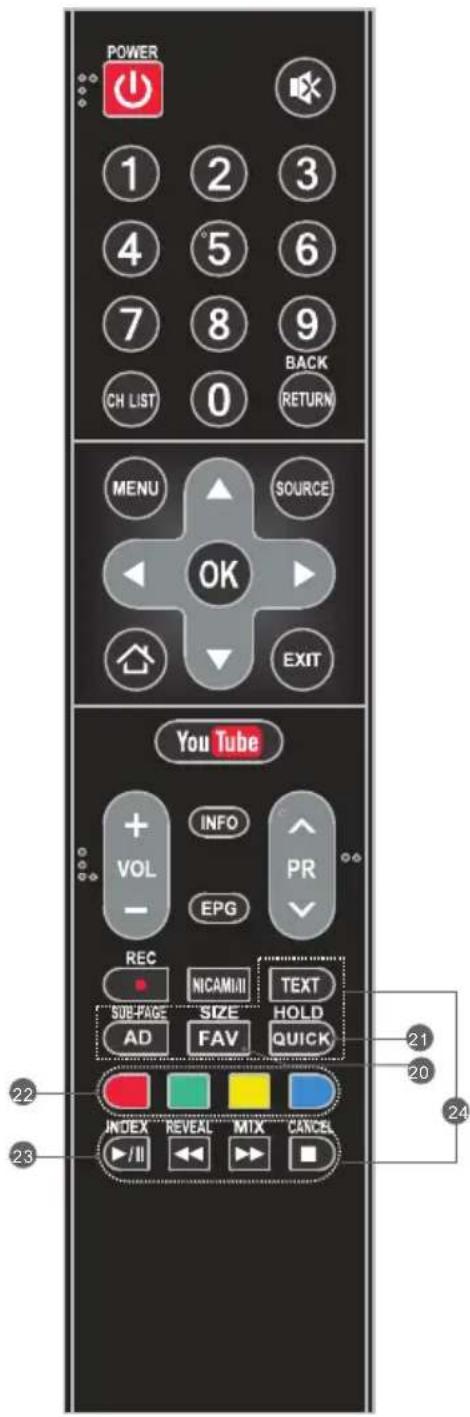
20. FAV. (Favorite Channel)
Press to view your assigned favourite channels. Press Up/Down buttons to move through your assigned favourite channels. Press OK to confirm.
-
QUICK Access the quick menu.
-
Color buttons Press to execute the fast-link function in TV or DTV mode.
23. USB Play Control Buttons Play & Pause (▶II)
Press to pause playback, then press again to continue playback.
Stop (
Press to stop playback.
Fast Backward Button (
Press to fast reverse.
Fast Forward (
Press to fast forward.
24. TELEXTB BUTTONS
TEXT Press to enter or exit the teletext menu.
SIZE Enlarge the teletext display: Press this button once to enlarge upper half of the screen. Press this button again to enlarge lower half of the screen. Press this button again to return to normal screen size.
HOLD
Press to hold the teletext page on screen without update and changes. Press again to release the hold state.
SUB-PAGE
Press this button to enter or exit subpage mode (if subpage is available). Press Red / Green button to select the desired subpage.
INDEX Press this button to display index page.
REVEAL
Press this button to display concealed information, such as solutions to riddles or puzzles. Press gain to remove the information from the display.
MIX
Press this button to superimpose the teletext over the TV programme. Press again to return to normal teletext
CANCEL
Press this button to temporarily return to TV programme while searching for a Teletext page. When the search is done, the page number will be displayed on the upper left of the screen. Press again to return to the Teletext page.
Note: Some buttons may be invalid for some models. When you press such buttons, they will not respond or there will be a display "Not available" on the screen.
PERSONALVIDEORECORDING(REC)
In DTV mode and with a USB device properly plugged in, you can record the channel you are watching and view at a later, more convenient time. Use it to record a program when your viewing is interrupted or delayed.
IMPORTANT NOTE:
- The REC function may not be available for some regions.
- Please insert an external high-speed storage devices into the appropriate USB port at the back of the TV, and make sure the device has enough free space.
- Before the recording, suggest to format your USB device to ensure the operating speed. In Option menu, select "REC File System" to format the USB device.
- During the recording, do not change channels or operate another function.
- If the signal is interrupted or removed, the recording will stop until the signal is established. This may cause you to lose program content.
- Please do not turn the TV OFF during recording. This will make the TV exit the REC and turn to standby.
- The file recorded can only be used in this TV, any copy communication is strictly prohibited.
- Use high-quality mobile device to record HD programs, otherwise the videos will be jammed during the playback.
- Back up all of the data in the USB storage device in case data was lost due to an unexpected accident. We do not assume any liability for the losses by misuse or malfunction. Data backup is consumer's responsibility.
- Only in DVB-T/T2 &DVB-C input source, record files can be played from REC_LIST.
Instant one-touch recording and playback
Press REC button to start the recording, at the same time below control bar will show at the bottom of the screen.

- Want to watch the recorded video while recording the program, press left direction button to select and press OK button, the recorded video will start playing.
Select or can fast backward or fast forward the playing.
- If want to stop and exit the recording, select O and press OK button.
Timeshift
Time-shift is the recording of television programs to a storage medium (such as your USB device) for viewing at a later, more convenient time. Use it to record a program when your viewing is interrupted or delayed. If you want to leave a while and watch the program without missing the contents, you can press button to stop the program, and press button again to start watching when you come back.
Note:
- Before time-shift, you'd better format the USB device to ensure the enough space for recording.
- You can also set the preset time of recording in EPG function (Refer to next page).
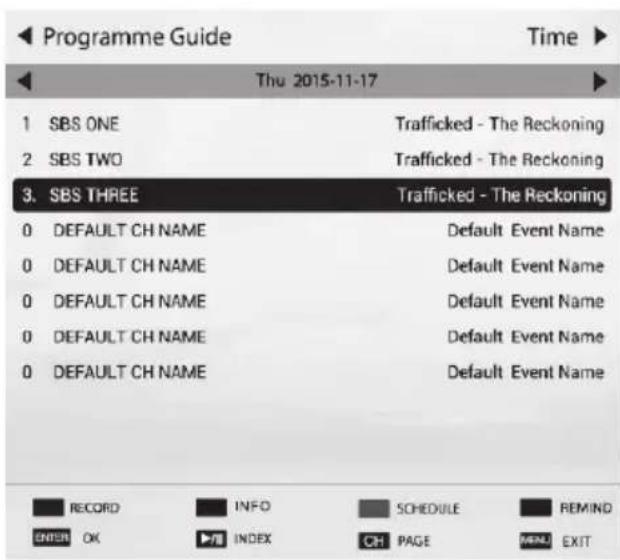
ELECTRONIC PROGRAMME GUIDE (EPG)
EPG stands for Digital Electronic Programme Guide. It is supplied by the programme providers and offers information about the programmes to be broadcast. You can access it in digital mode by pressing the EPG button on the remote control.
- Press the EPG button to enter the EPG interface. Current date and time will be displayed on the second bar from the top. On the list below, the channel you are currently watching will be highlighted.
- To check programmes to be broadcast in future, scroll up using the button to the date field. Use the button to select the date you want to check.
- Press the button to scroll up to the top bar in the display, then press the button to select "Time", you can check the program list of a channel of someday.
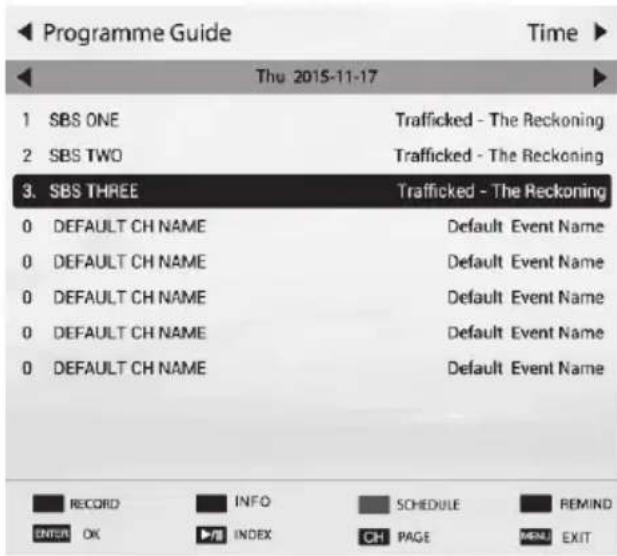
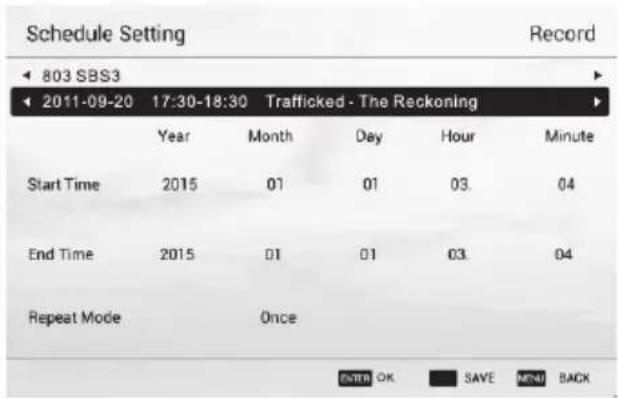
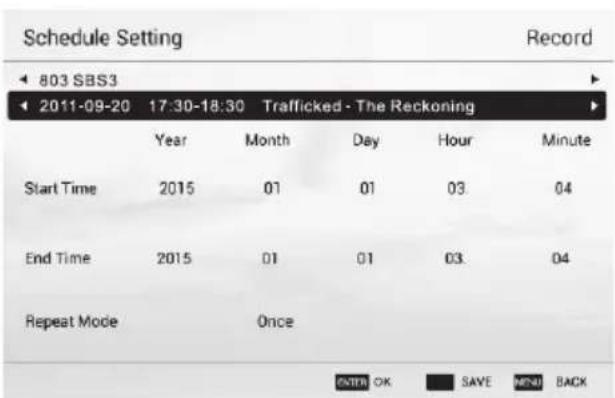
Schedule
Press the yellow button to display the recording schedule list. You can delete an appointment by press the red button.
Reminder
Press the blue button to display a reminder menu. You can set up the remind time and repeat mode.
Recorder
Press the RED button to display the schedule setting menu. By using navigation buttons, set the schedule time by highlight the number of year, month, day, hour or minute and press OK button, then use up and down buttons to adjust the number. Using same method to set up the repeat mode, and then select SAVE" button to save the setting.
Info
Press the GREEN button to show information about the selected program.
INITIAL SETUP & HOME FEATURES
Initial setup
The first time you power on the TV, there will show a setup wizard, press ENTER button to start and finish following steps:
Step 1 Select the OSD language as you need;
Step 2 Select the environment between "HOME" and "STORE";
Step 3 Select the country;
Step 4 Set up the TV clock (time setting), default is "Auto Sync";
Step 5 Read the legal statements;
Step 6 Set up the network configuration;
Step 7 Start auto tuning to search for programs, when finished, the programs will be stored into memories and the initial setup will be completed.
NOTE: Before power on the TV, you need to connect the TV signal cable to the tuner terminal well on the back of the TV.
Home
Press Home button to access the home page. Use navigation and OK buttons to select and access a shortcut.
Mirashare (May not be available on some models)
Without a data cable, open the Wi-Fi button on your mobile phone, then select "Mirashare" on the home screen after pressing HOME button, contents on your mobile phone will be shared to the TV, you can enjoy the big screen viewing experience.
STEPS:
- Open the miracast function of your mobile phone;
- Find the TV name on the mobile phone and select it, the TV will pop out a dialog, accept it to connect Mirashare function, the contents on your mobile phone will be played on the TV.
Note: For some models, after selecting the TV name, the mobile phone and the TV can connect automatically.
Source
Select input source.
Network Applications
Such social applications as YouTube are provided for you.
For example, select the Facebook icon on the home page, press OK can access.
TV Browser
Select the TV Browser icon on the home page and press OK to access the internet surfing.
Features include speed dial and bookmarks etc.
Note:
- The browser may not support some web pages or videos due to network failure, difference of regions or service interruption, which has nothing to do with the TV.
- If the current page is still not fully opened (progress bar is not completed), other page is selected directly, the previous page won't be saved in history.
Media Player
Connect a USB device to the TV and select the Media Player on the home page, you can play a video/music/photo file in your USB on the TV.
Opera TV
It is an on-line application store made for TV. Open it you can experience various types of apps, such as News & Weather, Nature & Travel, Kids, Lifestyle, Sports, Music, Live TV & Video, Games, Movies & TV etc.
Home Media (May not be available)
Sharing videos, music and pictures in your mobile phone or PC to the TV, you need to connect the TV and your device to the same network.
Note 1 Some of the applications on the home page may not be available on some models, and this manual doesn't include the operation instructions of all applications on the home screen.
Note 2 If service providers upgrade or modify their servers, applications such as YouTube and Facebook may not function on this Television.
Note 3 Your remote control may not be compatible well with some network applications or fail due to service interruption, that has nothing to do with this TV.
Note 4
Privacy Policy (may not be available): To protect your personal data and compliance with the legal provisions. You have the possibility to revoke at any time the acceptance of the privacy policy in the menu of your Tesla TV. If the cancellation is active, no connection is established to the Internet.
Note 5
Network application contents and services are controlled by network application providers by means of networks and transmission facilities, which are subject to alteration, suspension, removal, termination or interruption, or invalid access at any time without further notice in that the manufacturer is unable to control or to be informed of the aforesaid change. The manufacturer makes a further declaration that it disclaims any responsibility or liability arising from customer's failure to use the network application contents and services caused by, including but not limited to, failure of network connection or communication lines, technological updates, or the alteration, suspension, interruption, termination, disabling, or removal of any contents or services by the network application providers etc.
MENUCONTROL
For lasting update and upgrade, below descriptions of menu settings may not be in compliance with your TV, this is normal and the actual content on your TV shall govern.
Menu Operation
Press "MENU" key to enter the main menu.
Press the [] / [] key to select a menu.
Press the [ ] / [ ] key to select a menu.
Press "OK" key to enter the item.
Press "MENU" key to exit the item.
Note: The below menu options are under TV sources.
Picture
Picture Mode: Select the appropriate picture mode for different purposes.
Backlight: Adjust backlight parameter of the TV.
Color Temperature: Select the overall color tone of the picture.
Dynamic Noise Reduction: Choose between Off, Low, Middle and Strong.
MPEG Noise Reduction: Choose between Off, Low, Middle and Strong.
Aspect Ratio: Select the appropriate display mode for different purposes. Some options may not be available under some sources and video content.
Dynamic Contrast: Set to On or Off as desired.
Picture Sensor: This feature adjusts the screen brightness automatically when the brightness of the image changes. If the image is at night, the screen will turn darker automatically; if the image is at daytime, the screen will turn brighter automatically.
Film Mode: Set to On or Off as desired.
Picture Reset: Reset the picture settings to default values.
Sound
Sound Mode Setting: Choose between Standard, Music, Movie, Sport, User.
Balance: Control the sound balance between the right and left speaker.
Auto Volume: Choose between On and Off.
Surround Sound: Help to create rich and wider sound from stereo sound sources.
Analog Audio Output: This feature is used for selection of Headphone and Line Out.
Plug in a headphone to the headphone terminal of the TV, and you can listening through the headphone.
Digital Audio Output: This feature is used for selection of Auto and PCM. When connect a digital audio amplifier to the digital audio out terminal of the TV, select this feature from SOUND menu and then select the audio output mode.
Audio HDMI: Select the HDMI audio mode, options include: Auto, Digital and Analog.
Audio Description (May not be available): Turn on or turn off the Audio description. When turn on the audio description, a narrator will describe what is happening on the screen for blind or visually impaired viewers.
Sound Reset: Reset the sound settings to default values.
Installation
Program Edit
Edit the programs. You can press colored buttons on the remote control to skip programs, delete programs, and add programs to the favorite list by pressing FAV button.
5V Antenna Power
This option is only available in DVB-T/T2 source, select On to supply power for the TV's antenna; Select Off to turn off this function.
CI Information (Only available in DTV mode)
Enables the user to select from the CAM-provided menu. Select the CI menu based on the menu PC Card.
Signal Information
Showing the information of current DTV channel.
Auto Tuning
Select corresponding source from the source list before starting the auto tuning.
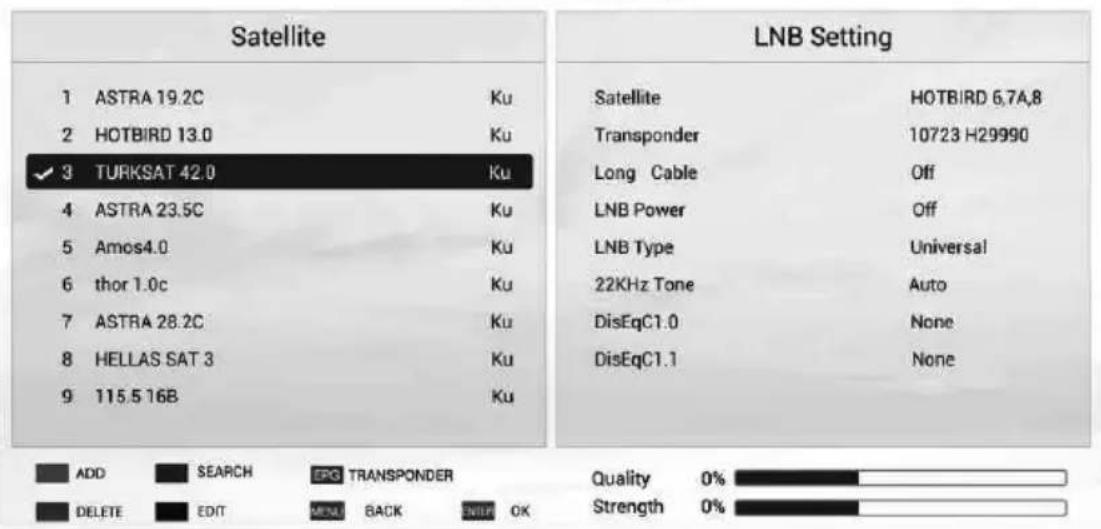
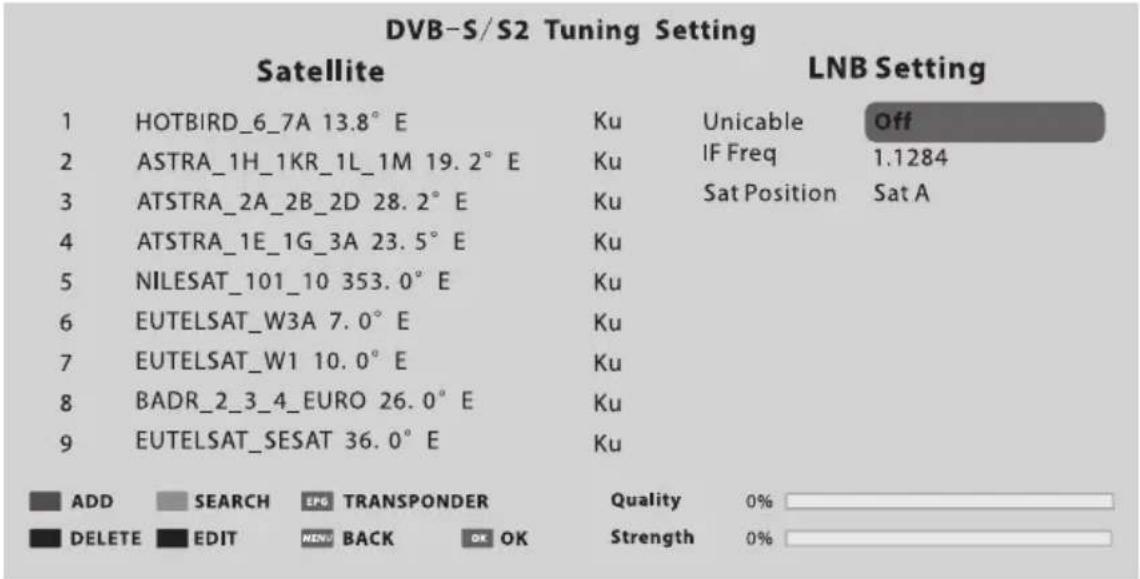
DVB-S/S2 Auto Tuning
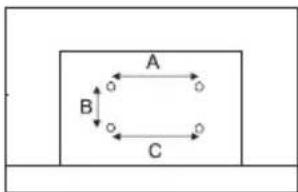
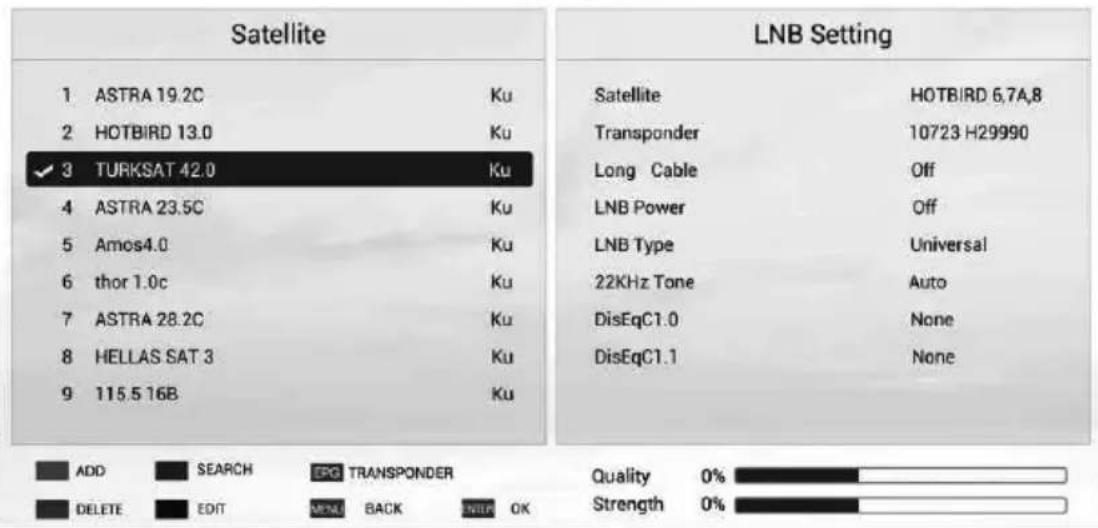
Satellite Dish Settings (Step 1-3, refer to Fig1 and Fig2)
A set of satellite dish settings must be configured for each wanted satellite before performing a channel scan.
Satellite - Select the satellite for this TV.
Long Cable - Increase LNB power.
LNB Type - Make sure the LNB type is corresponding to your dish.
LNB Power - Enable or disable the power supply for the LNB.
22KHz - Select the 22KHz to set 22K switch to ON/OFF. The auto mode is used to switch 22KHz on or off depending on the LNB type.
DiSEqC1.0/1.1 - Select the DiSEqC mode for the selected LNB.
Unicable/IF Freq/ Set Position - Setting the unicable parameter depend on your disk.
DVB-S Tuning Setting
Fig. 1

Fig. 2
Step 1 Press MENU button and select INSTALLATION menu. Select DVB-S/S2 auto tuning and press OK button, the screen will show as Fig1, and the default satellite will be highlighted.
Step 2 Press OK button to confirm the selected satellite.
Step 3 Press button to switch to LNB setting, press button to highlight LNB Type and press OK button to set up this parameter.
Step 4 Check if the 22KHz Tone, DiSEqC1.0/1.1 is corresponding to the selected satellite, if not, highlight and press OK button to set up the right parameter. (Refer to Fig 2) After the above steps are finished, press the blue button to search for channels.
DVB-T/T2 or DVB-C or ATV Auto Tuning
Select DVB-T/T2 (or DVB-C/ATV) Auto Tuning to search the programs automatically Before searching, you may need to select the country or set up the scan menu. If you want to stop the auto search, press MENU or EXIT button, a exiting dialog is popped out.
- Press to confirm exit.
- Press to continue searching.
DVB-T/T2 or DVB-C Manual Tuning
Search and store programs manually, first select the corresponding source before starting search.
- In Installation menu, select DVB-T/T2 (or DVB-C) manual tuning and press OK to access the searching interface, first select the country.
- Second press or to set up relevant parameters such as scan mode, scan scope etc., and then select Search and press or to start the search.
- The search stops when a program is found and this program will be stored in the current channel position. If you want to stop the search, press MENU button.
ATV Manual Tuning
In ATV mode, select ATV Manual Tuning and press OK button to access.
-
Use direction buttons to highlight and set up Storage To 1 (maybe other number), Color System, Sound System and Current Channel. Then select search and press or to start the search.
-
Press for the unit to search towards higher frequency;
-
Press for the unit to search towards lower frequency;
-
When a program is found, press the red button to stored it at the current channel position. If you want to stop the search, press MENU button.
- Fine-Tune
Use to make small adjustments to tuning of an individual channel. Fine-tune is not necessary under normal conditions. However, in area of inferior broadcast conditions where adjustments is necessary for a better picture and sound, use fine-tune.
- Select a channel that you want to fine tune.
- In Installation menu, select ATV Manual Tuning and press to highlight Fine-Tune.
- Press or to fine tune until the best possible picture and sound are obtained.
Setup
OSD Language: Select your desired OSD language.
Audio Language: Set the primary or secondary digital audio language corresponding
to the signal.
Subtitle Language: Select the subtitle language.
Hearing Impaired: This feature is helping hearing-impaired users to understand the programs by showing the relevant graphic information (similar to subtitle but not subtitle) on the screen. You need to turn on the switch before using this feature.
Teletext Language: Select the teletext language as your desire.
REC File System: If you want to use this function, you must receive a digital program and plug a USB disk.
Note:
Suggest to use a high speed mobile hard disk, or your TV may get stuck when using the REC and time shift function.
HDMI CEC: Link and control both the TV and its external devices by connecting the external device to the HDMI port of the TV.
HDMI CEC - Turn on or off HDMI CEC function.
Auto Standby - Turn the TV to standby automatically.
Device List - When HDMI CEC is on, you check the device list of connecting to the TV.
Location: Select the location mode of playing at home or at store, when select "Store", you can turn on the sticker demo.
Presentation: Turn on or turn off the sticker demo and USB demo.
USB demo:
- Required settings: Add "AutoDemo.txt" txt file at the root directory of a USB device, and then write the route of videos need to be played on the TV, each route needs a line break.
- When "USB Demo" is set up as "On", the TV will automatically play the videos in the "AutoDemo.txt", after played all videos, TV will go back to play the previous watching program. After five mintues, the TV will cycle playing wrote videos and program.
- The route should be wrote in English or numbers, otherwise the TV can't identify it.
Software Update:
- Software update (USB)
Firstly download and save the upgrading software into a USB device, secondly connect the USB device to a TV USB port, thirdly access "Setup" menu and select "Software update", then select "Software update (USB)" to start the upgrading process. When finished, the TV will restart automatically.
NOTE: Do not power off the TV during the software upgrading process, otherwise the TV may not work, and the customer should be responsible.
- Software Update (Network)
Connect the TV to the internet and you can upgrade the TV system or a network application on the TV.
NOTE: "Network Upgrade" may not be available for some regions.
- Software Update (OAD) (Only for some regions and only available in DVB-T mode)
Select it to update the TV system software over the air.
Advanced Option: Set up "Fast Boot" and "Wake on Network" function.
Blue Screen: When Blue Screen is set to On, the screen will turn blue and the sound will be muted when there is no signal received.
User Reset: Reset the menu settings to default values.
Legal Statements: Relevant legal statements.
Time
Clock: Set up the TV clock, time zone and summer time.
Clock mode - Options include Auto and Manual. When select "Auto", the TV clock will synchronize with the real time digital TV signal. When select "Manual", you need to manually set up the clock time, including setting up the number of year, month, date, hour and minute.
Time zone - Select the time zone according to your location.
Summer time (Daylight saving time)- You can turn on or turn off this function.
Off Timer: The feature allows you to set the TV to turn off automatically at a regular time.
On Timer: The feature allows you to set the TV to turn on automatically to a preset input or volume.
Sleep Timer: Set the automatic off time of the TV.
Automatic Power down: Set up the time to automatically turn off the TV on condition that there is no operation.
Continuous viewing timer: To prevent watching TV continuously for long periods of time, you can set a message to appear that suggests that the viewer takes a break. This is especially useful for preventing children from watching TV for long periods of time. From TIME menu select Continuous Viewing Timer and set the time. When the set time has passed, a message suggesting the viewer takes a break appears. Press OK or EXIT to clear the message.
Advanced
Lock System: Input the initial password (0000) to access this feature, select "on", the following feature such as "Set password", "Block channel", "Parental control" and "Panel lock" will be activated; select "off", the above mentioned three features will be inactivated. If you forget the password, try use the super password (8899) to access.
Set password: Reset the password of the lock system.
Block channel (Only in TV mode): Block the channels (programs) not suitable for your children.
Parental Control (Only in TV mode): Allows you to password restrict access to shows programs based on their parental rating.
Panel Lock: To disable the bottom keys on the TV. All buttons on the remote control can still be used.
Network
Wireless Connection
- Select "Wireless Connection" and press OK button, and then set "WLAN Switch" on;
- Wait a few seconds, the wi-Fi spots will be shown on the list, select and press OK button to open the interface of inputting password.
- Use navigation buttons to input the password, when finished, press the green button on the remote control to start the connection.
Wired Connection
- Connect the network cable to the LAN port at the back of the TV;
- Access main menu and select network sub-menu.
- Select "Wired Connection", and then select "Auto Input", wait a few seconds, the network configuration will be finished successfully.
Note: Before getting started, make sure that your router is working well.
USB CONTROL
USB Menu
You can view movie, music and photo files from your USB storage devices.
- Connect USB storage device to USB input terminal.
- Press Home button and select "Media Player".
MOVIE: Play movies from USB.
MUSIC: Play music from USB.
PHOTO: View photos from USB.
Reminder When Using the USB Player
- Some USB storage devices may not be compatible to operate smoothly with this TV.
-
Back up all of the data in the USB storage device in case data was lost due to an unexpected accident. We do not assume any liability for the losses by misuse or malfunction. Data backup is consumer's responsibility.
-
For large file sizes, the loading speed may be slightly longer.
- The recognition speed of a USB storage device may depend on each device.
- When connecting or disconnecting the USB storage device, ensure that the TV is not in USB mode otherwise the USB storage device or the files stored in it may be damaged.
- Please use only a USB storage device which is formatted in FAT16, FAT32, NTFS file system provided with the Windows operating system. In case of a storage device formatted as a different utility programme which is not supported by Windows, it may not be recognized.
- When using a USB Hard Disk Drive which requires electric power source, ensure its power does not exceed 500mA . If the power of the USB hard Disk exceeds 500mA , the TV system may be changed into standby mode, you should pull away the USB hand Disk and restart the TV system.
- An "Not support" message will be displayed if the file format is unsupported or corrupted
- FHD big picture needs longer time to process, which is not caused by the TV. Please be patient to wait.
- This TV may not support some multimedia files changed and upgraded as the change of encoding format or other technical advances.
Movie Menu
- Press / to select MOVIE. Press OK to enter.
- Press / or / to select the desired folder and Press OK to open the folder, press / to start playing.
- Press to stop movie playing and return to movie list.
- Press "EXIT" to the previous menu screens.
Movie Control Bar
- Press [ MENU ] to display Movie Control Bar while playing the movie.
- Press [] / [] to select the desired settings.
- Press [ MENU] to exit from Movie Control Bar.
Music Menu
- Press / to select MUSIC. Press OK to enter.
- Press / or / to select the desired folder and Press OK to open the folder, press / to start playing.
- Press to stop music playing and return to music list.
- Press "EXIT" to the previous menu screens.
Music Control Bar
- Press [ MENU ] to display Music Control Bar while playing the music.
- Press [] / [] to select the desired settings.
- Press [ MENU ] to exit from Music Control Bar.
Photo Menu
- Press / to select PHOTO. Press OK to enter.
- Press / or / to select the desired folder and Press OK to open the folder, press / to start playing.
- Press to stop photo playing and return to photo list.
- Press "EXIT" to the previous menu screens.
Photo Control Bar
- Press [ MENU ] to display Photo Control Bar during photo slide show.
- Press [▲] / [▶] to select the desired settings.
- Press [ MENU] to exit from Info bar.
TROUBLESHOOTING
Before calling a service technician, review following information for possible causes and solutions for the problem you are experiencing.
| Symptom Solution | |
| Remote control does not work. | 1. Check the remote sensor on the remote control. 2. Change the batteries. 3. Batteries are not installed correctly. 4. Main power is not connected. |
| Poor signal This is usually caused by interference from cell phones, walkie-talkie, automotive ignition system; neon, electric drill or other electronic equipment or radio interference sources. | |
| No picture, No sound 1. Check the signal source. 2. Plug another electrical device into the outlet to make sure it is working or turned on. 3. Power plug is bad contact with the outlet. 4. Check the signal. | |
| Abnormal picture 1. For no color or bad picture quality, you may: ·Adjust the color option in menu settings. ·Keep the TV at a sufficient distance from other electronic products. ·Try another channel, maybe exist broadcasting signal problem. 2. Bad TV signal (Display mosaic or snowflakes) ·Check the signal cable and adjust the antenna. ·Fine tune the channel. ·Try another channel. | |
| Normal picture, no sound 1. If no sound, unmute or increase the sound volume. 2. Open the sound menu and adjust "Balance". 3. Check if a headphone has been inserted in, if so, pull out the headphones. | |
| Audio is normal but video is abnormal. | 1. The media file maybe damaged, Check if the file can be played on the PC. 2. Check if video and audio codec is supported. |
| Video is normal but audio is abnormal. | 1. The media file maybe damaged, Check if the file can be played on the PC. 2. Check if video and audio codec is supported. |
| Network failure 1. Check if the router works well. 2. For models need ing USB dongle to connect to internet, check if the USB dongle is inserted well. 3. Make sure the TV has connected to the router successfully. | |
| Web page can not be displayed completely. | 1. Flash is not supported. 2. Supported formats: JPEG, PNG, GIF, BMP, WMV (ASF), WMA, MP3 and MP4. |
| Browser is forced to be shut down. | Web page include too many large pictures, thus lead to insufficient memory and close the browser. |
Note: If the problem persists after solutions, please contact your local support centre. What the troubleshooting list describe is only for reference, the actual problem may differ from it.
SPECIFICATIONS
Tesla TV 32S367BHS
| Screen size - diagonal 81cm | |
| Screen resolution 1366x768 | |
| Audio output power (L+R) 6W + 6W | |
| Working voltage 100-240V~ 50/60Hz | |
| Rated power consumption 60W | |
| Dimensions with stand (W x H x D mm) | 733.4x474x167.7 |
| Dimensions without stand (W x H x D mm) | 733.4x438.5x85.1 |
| Net weight with stand 4.0kg | |
| Net weight without stand 3.9kg | |
| Environment (only for Tropical climates zone): | Working temperature: 5°C~45°C Working humidity: 20%~80% Storage temperature: -15°C~50°C Storage humidity: 10%~90% |
| Environment (only for Moderate climates zone) | Working temperature: 5°C~35°C Working humidity: 20%~80% Storage temperature: -15°C~45°C Storage humidity: 10%~90% |
| System DTV: DVB-T/T2/C/S/S2 | TV: PAL-BG/DK/I, SECAM-BG/DK AV: PAL, SECAM, NTSC |
| Preset programmes ATV: 100; DTV: | 1000 |
| Status displaying method On screen | display |
| Function adjustment indicator Menu | display |
| Language of OSD Multiple options | |
| RF aerial input 75 ohm unbalanced | |
| AV video input | 75 ohm, 1.0Vp-p, RCA |
| AV audio input | 10k ohm, 0.5Vrms |
Tesla TV 40S367BFS
| Screen size - diagonal 101cm | |
| Screen resolution 1920x1080 | |
| Audio output power (L+R) 6W + 6W | |
| Working voltage 100-240V~ 50/60Hz | |
| Rated power consumption 74W | |
| Dimensions with stand (W x H x D mm) | 906.5x209.0 x574.5 |
| Dimensions without stand (W x H x D mm) | 906.5 x84.9 x525.9 |
| Net weight with stand 6.6kg | |
| Net weight without stand 6.4kg | |
| Environment (only for Tropical climates zone): | Working temperature: 5°C~45°C Working humidity: 20%~80% Storage temperature: -15°C~50°C Storage humidity: 10%~90% |
| Environment (only for Moderate climates zone) | Working temperature: 5°C~35°C Working humidity: 20%~80% Storage temperature: -15°C~45°C Storage humidity: 10%~90% |
| System DTV: DVB-T/T2/C/S/S2 | TV: PAL-BG/DK/I, SECAM-BG/DK AV: PAL, SECAM, NTSC |
| Preset programmes ATV: 100; DTV: | 1000 |
| Status displaying method On screen | display |
| Function adjustment indicator Menu | display |
| Language of OSD Multiple options | |
| RF aerial input 75 ohm unbalanced | |
| AV video input 75 ohm, 1.0Vp-p, RCA | |
| AV audio input | 10k ohm, 0.5Vrms |
LICENCES

The terms HDMI and HDMI High-Definition Multimedia Interface, and the HDMI logo are trademarks or registered trademarks of HDMI Licensing LLC in the United States and other countries.

Manufactured under license from Dolby Laboratories.
Dolby, Dolby Audio and the double-D symbol are DOLBY AUDIO trademarks of Dolby Laboratories.
Pörmbajtja
PARALAJMÈRIME DHE MASA PARAPRAKE. 32
POZICIONI I TV-SE. 35
BUTONATEPANELIT 38
TERMINALET 39
FUNSKIONET E TELEKOMANDES 40
REC(VIDEOINCIZIMEPERSONALE) 42
EPG (GUIDE ELEKTRONIKE E PROGRAMIT) 43
KONFIGURIME FILLESTARE & HOME KARAKTERISTIKA 44
MENUKONTROLLI 46
Menu Operimi. 46
Fotografia 46
Zeri 46
Instalimi 47
Konfigurime 49
Koha. 50
Avancuar. 51
Rrjeti. 51
USB KONTROLLI 51
USB Menu. 51
Keshillues i kendlshem gjatpe perdorimit te USB player 51
Movie Menu. 52
Menuja emuzikës. 53
Menuja e fotove 53
DIAGNOSTIKIMI 54
SPECFIKACIONE 56
Verejtje
- Grafikat ne kete manual janë vetem per reference.
- OSD e TV-se suajmund te jete pak me ndryshe me kete manual.
- Informacioni ne kete document eshte subjekt ndryshimi pa paralejmerim.
| Model Size: 32" Top Down | ||||
| Screw | Diameter (mm) "E" M4 | M4 | ||
| Depth (mm) "D" | Max 9 9 | |||
| Min 6 6 | ||||
| Quantity 2 2 | ||||
| VESA (AxBxC) 100x100x100 | ||||
| Model Size: 40" Top Down | ||||
| Screw | Diameter (mm) "E" M6 | M6 | ||
| Depth (mm) "D" | Max 20 | 15 | ||
| Min 12 | 7 | |||
| Quantity 2 2 | ||||
| VESA (AxBxC) 200x100x200 | ||||
Shenim:
SHENIM I RENDESISHEM:
EPG (GUIDE ELEKTRONIKE E PROGRAMIT)
EPGqendron per Gudie dixhitale elektronike te programit. Eshte e furnizuar nga ofruesite programeve dhe te ofron informacion ne lidhje me programet qe do te transmetohen.Mund te hyni ne menyre dixhitale duke shtypur buotnin EPG n telekomandee.
Home Media (May not be available)

DVB-S Tuning Setting
Sika 1
Sika 2
Korak 1 Pritisnuti taster MENI (MENU) i odabrati meni INSTALACIJA. Odabrati DVB-S/S2 automatsko podesavanje i pritisnuti taster OK, na satelitu ce se prikazati isto sto i na slici 1, a podrazumevani satelit biće istaknut.
Korak 2 Pritisnuti taster OK za potvrdivanje odabranog satelita.
Korak 3 Pritisnuti taster za prebacivanje na LNB podesavanja, pritisnuti taster za označavanje LNB tipa i pritisnuti taster OK za podesavanje parametara.
Korak 4 Provjeriti da li signal 22KHz, DiSEqC1.0/1.1 odgovara odabranom satelitu. Ukolko ne odgovara, oznaciti ga i pritisnuti taster OK za podesavanje pravih parametara. (Odnosi se na sliku 2)
Nakon obavljenih navedenih koraka, pritisnuti plavi taster zaTRAzenje kanala.
DVB-T/T2 ili DVB-C ili ATV Automatsko podesavanje
Odabrati DVB-T/T2 (ili DVB-C/ATV) Automatsko podesavanje da bi sePokrenulo automatsko pretraživanje programa. Možda ce biti neophodno da se podesi meni za pretragu ili izabere država prije pretrage. Ako se zelei zaustaviti automatiska pretraga pritisnuti MENI (MENU) ili taster IZLAZ (EXIT) i pojavice se prozor za dijalog o napusteju pretrage.
- Pritisnuti za potvrdivanje izlaska.
- Pritisnuti za nastavak pretraživanja.
DVB-T/T2 ili DVB-C Ručno podesavanje
3a da HamaIte pncA OT noXap nIIN TOKOB yIap, He n3laIaTe yCTpOcTBOTo Ha IbXd nIIN BnIra. AnapaTbT He Tp6Ba Da ce n3laRa Ha KaIKn nIIN npbckae He He Tp6Ba Da ce NoCTabRT PpeDMETN, NJIHN C TeUHOCTN, KATo Ba3N.
3a TepMNHaJIte, Oo3HaueHc CbC CmBOJ "MOKe Da ca CdoCTaTbUHa BeIuHHa, 3a da npedctabJIraBat pNCK OT TOKOB yIap . BbHshOto OkabeJIbaHe, CBp3aHO KbM KJIeMITE, N3NCKBa HCTaIIpaHe OT obyeH yIbJIHOMOSeH YOBek IIN IIN IIN IIN IIN Ka6eIi.
3a npeoTbpaTHe HapaHbAHn, To3n anapat Tp6Ba Da 6bJe 3npaBO 3akpenen KbM noJa / CTehata B CbotBETCTBne C INHCTpyKUnnte 3a MOHTax.
- OnachocT ot ekcnno3n npn HnpaBnHa noDmHa Ha 6aTepeyra. 3ameHete camo cbc sbu nnn EKBBaJIeHTe TIN.
- BaTepyra (6atepyra nn 6atepynte nn 6atepyra) He Tp86Ba da ce n3nara Ha npekomepeHa ToNnHa, KaTo Hapnpmep CbHueBO rpeene, ObH nn dpyn noo6Hn.
- Ппекомерно 3BykoBO HaJIraHe OTe CnyuHaJIKN I CyuHaJIKN MoKe Da IOBeJe Do 3aYb6a Ha clyxa. CnyuHaHeTo Ha My3nka npi BnCOKn HnBa Ha 3Byka N 3a No-ДьЛгп epINOd OT BpeMe MoKe Da yBpeDen clyxa Bn. 3a Да ce HamaJIIN pIcKbT OT yBpeKJaHe Ha clyxa, Tpr6Ba DA HamaJIIne CnJaTa Ha 3Byka Do 6e3ONaCHO n Ydo6Ho HnBO n Da HamaJIIne BpeMeTO 3a CnyuHaHe Ha BnCOKn HnBa.
CbeHnHTa 3a 3axpaHbau kabe / ype3a Cbbp3BaHe / dIpeKTeH aIantep 3a BkIIOuBaHe ce n3no13Ba KaTO yCTpOInCTBO 3a pa3eINHBAHe, yCTPOINCTBOTO 3a pa3eINHBAHe Tp6Ba Da e rOTOBo 3a pa6ota.
Korato Hee B ynoTpe6a n no BpeMe Ha dBnHexHne, MoJ, norgnkeTe ce 3a Ka6eJa 3a 3axpaHbaHe, Hnp. 3akayTe 3axpaHbAsnja Ka6eI C Ka6eJHa Bp3ka nn Heo npo6Ho. He Tpr6Ba Da nMa octpn p6oBe n noO6Hn, KOIO MOarTa da npuHNrT n3HocBaHe Ha 3axpaHbAsnja Ka6eI. PnIOBTOPO nyckaHe B eKcnloaataqna, MoJ, yBepeTe ce, ye KOMnKeTbT 3axpaHbAsnka6eI He eoBpeJeH. Ako OTkPte Te KaBnTo n da 6nIo NobpeNi, MoJ, NotbpcTe cepBn3, KOITo da CMeH N KomnLekTA 3axpaHbAsn Ka6eJI, OnpedeJeH OT npou3BOdnteJI, nn Da nMa cbuNte XapakTeepNCIK KaTO opunHaJHHn.
- Tp6Ba da ce 06bpe HBNMaHHe Ha eKoJoruHnTe acneKTn Ha n3XbPJIaHTo Ha 6aTeepnTe.
Ha anapata He Tp6Ba Da ce noctabT N3ToHnU Ha OTKpNT PnAmbK, KaTO 3aapanen CBeu. 3a da npedotBpaTne pa3npocTpaHeHneTo Ha NoXap, BnHarN cbxpaHraBte CBeu nn npytn OTKpNT PnAmbU O anapata.
Ako anapaTbT Hma CmboJa Ha HerOBnpeuTHr etnKeT n HerOBnT 3axpaHbaa Ka6eI mTa TpN uOHTa, TOBa O3HaUaBA, Ye e Heo6xOJMa 3aunTHa 3a3emBaa a Bpb3ka. AnapaTbT Tpr6Ba da 6bnde CbP3ah KbM eJeKtpnueckn KOHTaC 3aunTHO 3a3emBaHe.
CneBa da ce noocu nceHaTa INHOpMaun, IOKoKOTe npNIOXMO, KOraTo e npNIOXMO:
HaTnchTe Ha3aJ: KaHaJI Harope nII OtnIe He Harope.
TEPMINHAJIIN
3a6eIeKka: TepMNHaJIte MoKe Ja ce pa3JIuYBaT NO MOJeJa I peRHOHnTe N MoJra, n36peTe TepMNHaJIte, KOINTo Ce 6a3NpaT Ha 3aKynHeNrTeJeBn3Op.
LAN: MpeXkoBa yact
AV IN (AUDIO L / R &VIDEO): Cbpxte Bndeo n ayno cnHaJ OT n3TOHnK Ha cnHaJ, Hanpumep DVD.
HDMI1 / 2: Cbpbxte HDMI BxoJeH CNrHaJ OT n3ToHnK Ha cnHaJ, HanpImep DVD.
Lcnpob aynno: N3noJ3BaIe SPFIF ka6eI, 3a da n3BeJeTe aydno cnHaJa Ha TeNeBn3Opa Cn B CbBMecTUM ayDIO npneMHNK.
EARPHONE: Aynio n3xO, BncoKorOBopnteJIte 6bdaT 3aIyueHn, KOraTO cLywaJkata e BKIOUeHa.
USB 1/2: USB nopT.
Bb3dYX / KABEJI / LNB: CbbpXeTe KoakcnaJeH Ka6eJ 3a npneMaHe Ha cnHaJ OT aHTeHaTa, Ka6eJa nn cNtHnka.
CEPBN3: OTepaHЯBaHe Ha npOt caMo 3a npoΦecNoHaJIeN TexHnK.
Cl: NopT Cl KapTa.
ФУнкцип 3A ДИСТАЦИОНноуПравлЕне
Дистанционно упраь lienе

- POWER()HaTncHeTe,3a Da BKJIIOUHTe TeIeBn3Opa nn 3a peKIM Ha rOToBHOCT.
- MUTE (H) HatncheTe 3a 3arLywaBaHe Ha 3ByKa. IINI 3a Bb3CTaHOBraBe Ha 3ByKa.
- ByToHn C uHOpn DnpeKeTeH n36op Ha KaHaJI.
- CH LIST HatncheTe 3a DoctbI Do cnncbKa c KaHaJI.
- RETURN(BACK) Hata chete, 3a da ce Bbpe He Ha npednHn rJeDaH KaHaI.
- MENU O TBaprHe Ha onuHTe Ha MeHTo.
- SOURCE I36op Ha peKIM Ha n3TOUHnK Ha BXoI.
8.Harope/HaOny/HajBo/HaJcHo ( / / /) HabiracuB MeHOTO. - OK IToTbBpIeTe n36opa
- HOME CHaTnCKaHeTo Ha To3n 6yToH uce OTBOpn HauaHbTa CTpaHnua, MoKeTe Da n3NoJ3BaTe nHTeJIureHTHn φyHKuN N MyJTmEiNeH nIeIbp NT.H.
- EXIT V3JIe3aHe OT TEkyIooTo MeHIO.
- YouTubeДостынdoYouTubee.
- INFONoka3Ba INΦopMaζη 3a TeKуζη N3ToUHnK.
- Volume Up/Down (VOL+/VOL-) Peruapante cuna Ha 3Byka
- Program Up/Down (PR+/PR-) CmeHeTe nporpaMnte haRope nIi HaOJy
- EPG HaTncheTe, 3a Da nokaxe Tekyuata HOpMaun 3a EPG B pexm DTV.
- Record(REC)HaTnchete, 3a da 3aannweTe Tekyuata npoRpama (doCTbna caMo Bpexm DTV).
- NICAMHaTnChHeTe, 3a Da n36peTe JeKeJaanHna 3ByKOB CnHajB 3aBNCUMOCT OT KaHaja 3a N3JIbYBaHe.
- AD (Audio Description)
HaTnCHete, 3a Da BkIIOUHTe ayDnO OINCAHHeTO.
Pa3Ka3BaaybT ige ONnWe Ha 3pITeJIITE uNn
3pITeJIITE cyBpeDeHO 3peHne KaKBO Ce CInyBa Ha
ekpaHa. HaTnCHete OTHOB, 3a Da N3KIOUHTe Ta3n
fYHKuia (DocbHa cAmo B pexm DTV).

3a6eJexKa: HAKO 6yToH MoKe Da ca HeBaJIuIHN 3a HAKO MOJeI. Korato HaTnCHete TaKIBa 6yToH, Te HMa Da pearnpaTuN Ue ce NoRbU ekpaH "Not available"Ha ekpAna.
20.FAVHaTnCHTe,3a Da BnInTe BaunTe n36paHn IIO6mKahaln.HaTnCHete 6yToHnTe 3a Harope / HaOJy,3a Da npemHeTe npe3 n36paHnTe OT Bac IIO6mKahaln.HaTnCHete OK,3a Da notBbPnTe.
-
QUICKДocтbndo6b30To MeHIO
-
Color buttons HaTnchete, 3a da n3nbHnTe yHKuIra 3a 6bp3o CbP3BaHe BpeKIM TV nn DTV.
23. ByTOHn 3A YNPAXJIeHHe HA Bb3PON3BEXKDAHE IPE3 USB (II)
HaTnCHeTe 3a cnnpaHe Ha Bb3npOn3BexJaHeTo, CneI TOBa HaTnCHeTe OTHOB, 3a Da npOdbJxKInTe Bb3npOn3BeJaHeTo.
Stop()
HaTncheTe 3a cnipaHe Ha Bb3npOn3BexJaHe.
Bytoh 3a 6bp30 npebbptane Hanpei (
HaTnCHHeTe 3a Da npemHHeTe Ha3a.
Bytoh 3a 6bp3o npeBbPtaHe Ha3a(
HaTuscheTe 3a da npemHeTe Happei.
24. ByToHn 3A TEJETEKCT
TEXT Press to enter or exit the teletext menu.
SIZE YBeJIuHaBaHe Ha TeJIeTeKCTa: HATnCHETe TO3n 6yToH BeINbX, 3a Da yBeJIuHTe TOpHaTa NOLBnHa Ha ekpaHa. HATnCHETe OTHOB To3n 6yToH, 3a Da yBeJIuHTe DOJHaTa NOLBnHa Ha ekpaHa.
HaTnCHETeTo3n6yTOHOTHOBO,3aJaCeBbPHeTe KbM HopMaJIHHpa3MepeHaekpaHa
HOLD
HaTnchete,3a Da 3aDbpbnte CtpaHncaTa Ha TeJeTeKCTa Ha ekpaHa 6e3 Da aKtyaJIn3npate N da ce npomeHr. HATcHHeTe OTHOB03a Da OCBO6Odnte.
SUB-PAGE
HaTnCHTe To3n 6yToH 3a Da BJIe3eTe NJIu H3Je3eTe Or peKIM Ha NoCDtpaHnU (ako 23 noDCTpaHnua e haJInuHa).HaTnCHTe YepBeHHa 6yToH, 3a da n36peTe XeJHaHata CTPaHnua.
INDEX Press this button to display index page.
REVEAL
HaTncheteTo3n6yToH,3aDaBnInTe cKpnta HOpMaun, KaTo HaPnPmeppeSeHn3a 3arAdKn nnPi3eJIi. HaTnchete gain, 3a Da n3TpneTe HOpMaunTaOTDnCnIe.
MIX
HaTnCHHeTo3n6yToH,3a Da HacJIOXnTe TeJeTEKCTa No TeJIeBn3nOHnHaTApOprpMa. HatnCHete OTHOBo, 3a Da Ce BbPHeTe KbM HopMaJHnTeJeTEKCT
CANCEL
HaTnchTe To3n 6yToH, 3a Da Ce BbPHeTe BpemEHOB TeJeBn3NoHNa npOrpama, DOKaTO Tbpcnte TeJTeKCTHa CtpaHua. Korato npNKIOuH TbpceHTo, HomepbT Ha CtpaHuaTa Ue Ce NOKaKe B TropnI JAB bTbN Ha ekpaHa. HaTnchTe OTHOBo, 3a Da Ce BbPHeTe KbM CtpaHuaTa TeJTeKCT.
3AПИСВАЕ НА ЛИЧО ВИДEO (REC)
Bpekm DTV n c npabnHb BkIoueHO USB yctpoNCTBO moKeTe da 3aIncBaTe kaHaJa, KOITo
Tne I Tne IO-KbCHO, KOrato Bn e NO-yO6Ho. N3noJ3BaIte ro, 3a da 3aIINeTe nporpaMa,
Korato Tne DaHeTo e npkebChATO nn 3a6abeHo.
BAKHA 3ABEJIEXKA:
- Bb3MoXHo e ΦyHKzIyTa REC da He e docTbIHa 3a HЯКоI perNoHn.
- MoJra, noCTaBeTe BbHUnn yCtpoiCTBa 3a 6bP3O cBxaHene H NOxOJaUa USB nOpT ha rbp6a Ha TeJeBn3opa n Ce yBepete, ye yCtpoiCTBOTo hMa dOcTaTbUHO CBO6OJHo MRCTO.
- Ппедида наразавитЕ здпса, прениваме да ФорматураTE USB yctpoiCTBOTO, за да осигуриte ckорocTTa Ha paBoTa.В мeнюToОпци ИЗберетe "REC File System", за да ФорматураTE USB yctpoiCTBOTO.
- По Врeme на залиca He npomeha Te kaHaJIte u He pa6oTeTe cДpyra Функця.
- Ako cnHaBt 6bIe npekbchat nI npemaxHaT, 3aIncbT 1e cnpe, IOKaTO cnHaBt He 6bIe yCTHOBeH. ToBa moKe da IOBeJe Do 3aYbHa Na nporpaMHOTo cbIbpxaHne.
- MoJIa, He n3KJIIOuBaIte TeJeBUN3Opa IIO BpeMe Ha 3aIInc. ToBa Iue HApapa TeJeBUN3Opa Da I3Jne3e OT pexIM REC u da BJe3e B peXIM Ha roTOBHOCT.
- 3aɪncaɪnɪt φaɪŋ Mɔkjæ Da ceɪnɪŋɪsBa cʌmɒ Ha Tɔːn TeJIeBɪnɪʒop, BcɪkɑkBO Kɔnɪpɑh e cTporo 3a6paheHo.
8.ИЗПОЛЗВАЙТЕ ВИСОКОКAЧЕСТBEноМБИЛноуСТРОДTO 3a 3aПИС HA HDпрогамN,ВпOTиВЕнСлУЧАВИDEOKЛПОВЕТе сьБДаTЗаCEЧENNo BРЕмHa Bb3ПОИЗВЕЖДАнe. - HanpaBete pe3epBHO konne Ha BCnKn daHn B USB yctpoiCTBOTo 3a cbXpaHeHne B clya, ye daHHnTe ca 3ary6eHN nopaHn HeoayakBaHa aBapnA. Hne He Hocm OTROBOPHOCT 3a 3ary6bnte npaDn 3IoynOTpe6a nn Heu3npabHOCT. 3aunTata Ha daHHnte e OTROBOPHOCT Ha notpe6nteJr.
- Camo B DVB-T / T2 & DVB-C BXOJEN I3TOUHNK, 3aINcBaUNTe faiIOBe MoarTa Ce Bb3PON3BExJaT OT REC_LIST.
He3a6abHO 3aHNCBaHe N Bb3Pon3BExKaHaNe C eEDHO DOKOCBaHe
HaTnchete 6yToHa REC, 3a Da 3anOuHete 3aIncBaHeto, B CbUcTO BpeMe KOHTpoJHaTa JeHTa Ie ce nOABN B DOJHaTa YAcT Ha ekpaHa.

- Iockate da rIeIaTe 3aIncahOTo BnJeO, dOkato 3aIncBaTe nporpaMaTa, HATNCHeTe 6bVna 6yToH ha nocokata, 3a da n36peTe (play)HaTNCHeTe 6yToHa OK, 3aIncahOTO BnJeO uce 3anoyHe da ce Bb3npOn3BexJa. N36pauKn nn MoXeTe 6bp30 da npebbptate HaPpei nn Ha3aI.
Ako nckate da cnpete n da n3ne3eTe ot 3aInca, n36peTe O n haTnchete 6yToHa OK.
CmHa Ha BpeMeTo
CmHaTnHa BpeMeTo e 3aInc Ha TeJIeBUNOHn IpOrpaMn Ha HocHTe 3a CbXpaHHeHne (KaTO BaTeo USB yctpoiCTBO) 3a rIeJaHe NO-KbcHo, KOrato Bn e No-yDo6Ho . N3noJ3BaIte ro, 3a da 3aPiNeTe IpOrpMa, KOrato rIeJaHeTo e npeKbChato nn 3a6abEHO. Ako NcKeTa Da N3Je3HeTe N3BeCTHO BpeMe I da rIeAte IpOrpMaTa 6e3 Da n3rHy6nte CbIbPxahHeTo, MoXeTe Da HATNCHeTe 6yToHa △da cnpTe IpOrpMaTa, INOTHO HAITNCHeTe 6yToHa △da 3aNoUHeTe Da rIeJaTe, KOrato Ce BbPHeTe.
3a6eJekn:
- Ppei CmHaHata Ha BpeMeTo, no-do6pe fOpMaHpaIe USB yctpoNCTBOTo, 3a da ce yBepuTe, ye mma doCTaTbUHO MRCTO 3a 3aINC.
- MoxTe CbIO Taka Da 3aJaTe IpeBapntelHO 3aJaTeHO BpeMe 3a 3anC B EPG yHKnra (BnxTe cneBaata CTpaHnca).
EJEKTPOHHA HAPbUHA IPOΓPAMA (EPG)
EPG 03NaUaBa DnHtAInHO eJekTpoHH nporpaMHO pBkoBOcTBO. IpeIOCTaBceOTdoCTabuNTe Ha nporpaMn INpeDnara nHΦopMaunr 3a nporpaMnte, KOHTo 6bDat N3JIbUbaHn. MoKeTe Da NoIyUnTe DOctbn Do Hero B uΦpOB pexm, KaTO hATnCHete 6yToHa EPG Ha dNCTaHOnHHOTO ynpabJeHne.
- HatncheTe 6yToHa EPG, 3a Da Bne3e Te B EPG nHTeppeca. Tekuata data uac ue ce nokaxat Ha BtopaTa JeHrTa OTrope. B cnscbKa no-dOly, KaHaJIbT, KOITo rIeIaTe NOhactoIeM, ige 6bJe OTKpoeH.
- 3a da npOBepnte nporpamite, KOnto 6bTa n3lbvBaHn B 6bdee, npEBpTe Harope, KaTO n3noJ3BaTe 6yToHa KbM noJeTo 3a DaT. N3noJ3BaIte 6yToHa , 3a da n3bepete DaTata, KOrTo NCKate da npOBepnte.
- Hatnche 6ytoHa 3a da npeBbptnte do ropHata JeHTa Ha dncnJe, cnei Koeto HATNCHe 6ytoHa , 3a da n36epete "Time", MOKeTe da npOBepnte cnncbKa C nporpaMn Ha HraKoI KaHaI.
PaznicaHne
HaTnchTe XbJITn8 6yToH, 3a da ce nokaKe cnnckbT c rpaΦnk 3a 3annc. Moxete da n3tpneTe Cpeua, KaTO HaTnchTe YepBeHH 6yToH.
Hanomae
HaTnchHeTe CnHna 6yToH,3a da ce nOKaKe MeHIO 3a HAnOMHnHe. MoKte Da HAcTpOte BpeMeTo 3a HAnOMHnHe N pexkmbT Ha NobTopeHne.
3aHcBaIoo yCTpoIcTBo
HaTnCHTe YepBHeHna 6yToH, 3a Da ce nokaxe MeHIOTo 3a HactpoNka Ha rpaΦnka. C nomouTa Ha 6yTOHnTe 3a Habnraunr HactponTe yaca Ha IIaHnpaHe KaTo MapKnpaTe Homepa Ha rOINHaTa, Meceua, DeHry, Yacu NmMHyTaTa N HA TnCHTe 6yToHa OK, cIeT TOBa n3noJ3BaInTe 6yTOHnTe HaOpe n HADony 3a Da HAcTpOnTe Homepata. IV3noJ3BaInTe CbUma MeToD, 3a Da HAcTpOnTe pexnMa Ha NOBTOpeHne n CJIeT TOBa n36peTe "SAVE", 3a Da 3ana3nTe HAcTpOnKaTa.
HΦopMaζηa
HaTuscheTe 3eJIeHn8 6yToH, 3a Da BUnIte HΦOpMauŋra 3a N36paHaHaTa npOrpama.
Mirashare (MOKe Da He e HaJInce npn HЯKoN MocEnI)
Be3 Ka6eI 3a DaHHN OTBopeTe 6yToHa Wi-Fi Ha Mo6uHnHra Cn TeJefoH, CneI KoETo n36epete
"Mirashare" Ha haayalnna ekpaH, cIeI KaTo HATNCHeTe 6yToHa "HOME", cbIbpxaHneTo Ha MObnnna Bn TeJefoH Ie 6bIe CnoJeHcTeJeBn3Opa, IMoKeTe Da ce HaclaNITE Ha npexNBraHTo Ha rOJAM ekpaH.
CTbIKN:
- Otvbopete Miracast yHKzna Ha Mo6nHnra cn Telefoh;
- HamepeTe NMeTo Ha TeJeBn3Opa B MoBunHnra TeJefoH n To n36peTe, TeJeBn3Opa ue n3BeDe dnaIorOB npo3opeu, ue ro npneMe, 3a da ce Cbbpke yHKunra Ta Mirashare, cbdbpxaHneTo Ha MOBnHnRA BV TeJefoH ue Ce Bb3npOn3BeDe Ha TeJeBn3Opa.
3a6eJekka: PnHraKoMoei, CJIeI N3bpaHe Ha IMeTo Ha TeJeBn3Opa, MObIINrT TeJeOHO, IN TeJeBn3OpBT MoRaT Da Ce CBbp3BaT aBTOMaTHUHO.
M3TOUHnK
N36peTe N3TOUHnK Ha BXoI.
MpeKOBnpnIOXeHna
TaknBa cozaJIHn npIIOxEHH KAto YouTube ca npeIOCTaBeHN Ha Bac.
Hanpimep, n36epTe ukoHaTa Facebook ha hauaHaTa ctpaHnca n HaTncHe OK, 3a da noJynte doctbI.
TeJIeBn3mOHeH 6pay3bP
I36epete IkoHaTa TV Browser Ha hauaHaTa cTpaHnca n Hata NcHcTe OK 3a DocbTdo CbpHnpaHTo B INHTepHeT. FyHKunTe BKlOuBaT 6bp3o Ha6npaHe n OTMeTKn T.H.
3a6eJekka:
1.Бpay3bpbT MoKe Da He NODbPka HЯKoN ye6 CtpaHnIu NII BIndeOKlnIOBe NopaIi Heycnpex Ha MPeKaTa,pa3JIuHne B perNoHnte NII ppeKbcBaHe Ha ycLyraTa,KoETO HMa HNuO oBIo C TeJeBn3Opa.
2. Ako Tekyuata cTpaHnua BCE oSe He e HAnbJHo OTBopeHa (JeHTaTa 3a N3PbJHeHne He e 3aBbprHe), dIpeKTHo Ce n36npa dpyra cTpaHnua, npednHaTa cTpaHnua HMa Da 6bDe 3ana3eHa B INCTOPnra Ta n36paHn dIpeKTHO, npednHaTa cTpaHnua HMa Da 6bDe 3ana3eHa B INCTOPnra.
Media Player
CbpxkTe USB yctpoicTBO KbM TeIeBn3Opa n n36epeTe Media Player Ha hauaHaTa cTpaHua, MoxkeTe Da Bb3npoIN3BexKdaTe Bndeo fai/ My3nka / oTo aai BB Baunr USB Ha TeJeBn3Opa.
Opera TV
ToBa e OHlaH MaRa3nH 3a npJIoXeHna, HApBaEH 3a TeJIeBn3n. OTBOpTe ro, MoKeTe da
I3noJ3BaTe pa3InuHn TInOBe npJIoXeHna KaTo News & Weather, Nature & Travel, Kids, Lifestyle,
Sports, Music, Live TV & Video, Games, Movies & TV etc.
Haayano ha meunnte (MOKe da He e HaJIne)
3a cnOeJIyTe BnIeO, My3Nka n CHIMKn B MO6nHnC n TeIefoH nn KOMnIObP Ha TeJeBn3Opa, Tp6Ba Da CbpxKeTe TeJeBn3Opa N BaWeTo yCTpoiCTBO KbM cbUaTa MpeKa.
3a6eJekka 1
HЯко npиложеня Ha NaayalHaTa CTpaHua MoKe Ja He ca NaHaiuHn npi HЯКо moJeIи To3N HapbUnK He BKNIOUBy HA NcHTpykCunTe 3a pa6Ota Ha BCNUK npiNoJxehra Ha NaayalHna ekpaH.
3a6eJekka 2
Ako doctabuunte Ha ycnyu no 6noBrt nnn npomeHr CBOnte cbpBbpn, npioxehna kato YouTuben Facebook moke da He paobTn Ha ta3n TeleBn3n.
3a6eJekka 3
IInCTaHcUHOHTo ynpabHeHne MoKe Da He e do6pe CbBMeCTUMO C HAKON MpeXOBn PpNJIOXeHNy IIN Da Ce npOBaJIr TnpaI NpeKbCBAHe Ha ycLyraT, KOEt OHa HNuO oSuO C To3N TeLEBn3Op.
3a6eJexka4
ДeКларuaяза NOBepNTeJIHOCT (MOxE da He e HaJIuIe): 3a da 3aunITte JInHnTe cn daHHN IN cna3ITE 3aKoHObITE pa3nope6n. Imate Bb3MOXHOCT Da OTMeHnTE NO BCraKO Bpeme npneMaHeTO Na pOJIntUKaTa 3a NOBepNTeJIHOCCT B MeHIO To Ha TeJIeBu3Opa Tesla. Ako aHyJInpaHETo e AKTNBO, He ce yCTaHOBЯBa Bpb3ka C nHTepHET.
3a6eJexka5
CbDpKHaHHeTo u yCnyrnte Ha MPexKOBoTo npnIOJKeHne ce KOHTpOJIpaT OT DocTaBcNtHa
MpeXOBn npnIOJKeHnrype3 MpeXn nPpeBaTeHNmexAH3MN, NOJIeXaUHa nPOMHa,
CnIpaHe, PpeMaxBaHe, PpeKpaTBAHe nI IpeKbcBAHe nI IN HeBaINDeH DoCTbN IO BCaKO
BpeMe 6e3 DonblHNTeJHO yBeDMJIeHne, TB K aTO npON3BOJNTeJrT He e B CbCToHne Da
KOHTrPOJInpa nIi Da 6bJeTe nHOpMnpa 3a ropecnomeHaTata npomHa. POn3BOJNTeJrT npabN
DonblHNTeJHo DeKApuPaHe, Ye Ce OTKa3Ba OT OTROBOPHOCT nIIN 3aDbJIKeHn, BB3NHKAJIIn OT
HeCnocobocHTTa Ha KJIeHtA Da n3NoJ3Ba CbDpXaHHeTo u YcLyrnte Ha MPexKaT, npuHHeH NOT,
BKlIOChTEJHo, HO He CaMO, OT Ka3 OT MPexOBA Bpb3ka nIIN KOMyHnKaUONHH JINHH, TEXHOJOrnHn
AKTyAlN3aCn nIi nPOMHa, , PpeKbcBAHe, PpeKpaTBAHe, DeaKTNbUpaHe nIIN npemaxBaHe Ha
BCaKO CbDpKHaHne nIi yCnyrN O T DOCTaBcNtE Ha MPexOBn npnIOJKeHn r T.H.
KOHTPOJI HA MEHIOTO
3a NOCTOHHo aKtuaHn3npaHe n HaDCTPOuBaHe, OONCAHHTe NO-DOJy ONNCAHnHa HAcTPOIKNTe Ha MeHIO To MoKe Da He Ca B CbOTBeTCTBnE C BaUHr TeJeBn3Op, TOBa e HopMaJIHO n peaJIHOTo CbDbPxAHne Ha BaUHr TeJeBn3Op ige ce perynpa.
Pa6ota B MeHIOTo
HaTnCHeTe 6yToHa "MENu" 3a da BJe3eTe B rJaBHOTo MeHIO.
HaTnCHeTe 6yToHa [4] /[ ] 3a da n36epTe MeHIO.
HaTnCHeTe [A]/[▼] 3a da n36epTe MeHIO.
HaTnCHeTe "OK" 3a da BBeJeTe eIemEHTa.
HaTnCHeTe "MENU" 3a da n3Je3eTe OT eIemEHTa.
3a6eJekKa: OIuNTe Ha MeHIO T NO-DOJy Ca NOI TeJIeBn3IOHHN IN3TOHNU.
CHUMKa
PexmHa n3o6paKeHneTo: N36peTe noDxOaIypeKIM Ha KapTnHaTa 3a pa3JIuHn ceJI.
OHOBO oCBtJeHne: HactpoTe npaMeTbpa Ha fOHOBTO OCBtJeHne Ha TeJebn3Opa.
CBeTHa TempeAtya: N36peTe o6uIy cBeTeH ToH Ha KapTnHaTa.
HnHaMnUHO HaMaJIaBaHe Ha Wyma: N36epeTe MeKJy N3KJIIOyeHo, HNCKO, CpeIHO nCINHO.
MPEG haamajbahe Ha wyma: N36epete Mejdy n3KJIOyeHO, HnCKO, cpeHNO n CnJIHO.
Aspect Ratio: IV36epete noxodya npekm Ha noka3Bahe 3a pa3nHn ceJn. Bb3moXho e HAKON ONuN Da He ca HaNuHn prn HAKON I3TOUHnCn IN BnDEOCbDbpxaHne.
ДиhamMuEn KOHTpact: HacTpOte Ha BKn. Nn N3Kn. No KeJaHne.
Cen3Op 3a KapTnHa: Ta3n fynKzna ABTomatuHPO peryJnpa rpkocTTa Ha ekpaHa, KOrato rpkocTa Ha n3o6paXeHneTo ce npomeH. Ako n3o6paXeHneTo e npes HOuTa, ekpaHb T ue cTaHe no-TbMeH ABTomatuHo; aKO n3o6paXeHneTo e npes DeH, ekpaHb T ue cTaHe no-arpbk ABtomatuHo. Pekim Ha fnilma: HactpoTe Ha Bk. IIn N3Kn. Po xelaHne.
Bb3ctaHOBAhe Ha n3o6paXeHn: Bb3cTaHOBAaTe HacTPOKNTe Ha KapTuHaTa Ha CTOnHOCTnte No noJa36upaHe.
3ByK
HacTpoNka Ha 3Byka: N36epTe MeJy cTaHdApT, My3Nka, fIIM, Cnopt, nOtp6uTeI. BaIaHc: YnpabJIraBa 6aJaHca Ha 3Byka MeJx dy DecHna I JEBn BnCOKOrOBOpHTeI.
A B T O M A T N U E H 3B Y K: I36epeTe M e kdy B k n. I I N3k n.
CbpayHd 3B yK: POMOu 3a cb3daBaHe Ha 6oar u No-wnpOK 3B yK OT n3TOUHNuTe Ha Ctepeo 3ByK.
A H aIorob ayDn o n3xOo: Ta3n fynKzur ce n3noJ3Ba 3a n36op Ha cnywaJkn u n3XoJ 3a JInnra.
BKnIOUeTe CnywJAKn KbM TepmHaJa 3a CnywaJkn Ha TeJeBn3Opa i MoKeTe da CnywaTe
cnywaJKNTE.
LHPOB aynno n3xOa: Ta3n fynkuiy ce n3noJ3Ba 3a n36op Ha Auto n PCM. KoraTo cBbpxeTe Unfoayu ycnIbaTeK bM uNfpoBna ayDnO n3XoJ Ha TeJIeBn3opa, n36epeTe Ta3n fynKnra OT MeHIO SOUND (3BYKA) n cIeTobA n36peTe pexIma Ha ayDnO n3XoJ.
Aydno HDMI: N36peTe HDMl aydno pexm, KaTo onuHte BkIouBaT: Auto, Digital n Analog. Aydno onncahne (MOKe Da He e HaInue): BkIOUeTe nnn n3KIOUeTe onncAHneTo Ha 3Byka. Korato BKIOUHTe aydno onncAHneTo, pa3Ka3BaYbT uze onnWe KaKBO ce cnyBa Ha ekpaHa 3a 3pITeIN nn 3pITeIN cyBpeDeHo 3peHne.
Bb3cTaHOBaHe Ha 3ByKa: HyInpaIte HacTpoKnTe Ha 3ByKa Do CTOnHocTne No NpOpa36paHe.
HCTaJaCnA
PedaTupahe Ha nporpamata
Moxete da haTnchete uBeTHnte 6yToHn Ha nctaHcHHOHTO ynpabJeHne, 3a da npceckoHTe nporpaMn, da n3tpneTe nporpaMn n da doabnte nporpaMn KbM cnncbKa c JIObIMn, KaTo HATnCHete 6yToHa FAV.
5V aHTeHa
Ta3n onu e haunuHa cmo B DVB-T/T2 n3ToUHKn, n36epete On 3a 3axpaHbaHe Ha aHTeHaTa Ha TeJeBn3opa; N36epete N3KJIIOUeHo, 3a da N3KJIIOUHTe Ta3n yHKu.
HΦopMaζη 3a Cl (doctbna cmo BpexM DTV)
Aknbupa Ha noTpe6nteJra n36epe ot MeHIO, npedocTaBeHO ot CAM. N36epeTe MeHIO Cl ot MeHIO PC Card.
CnHaJIHa HhOpMaun
PokaBaHe Ha HOpMaunra Ta 3a TeKyuua KaHaJ Ha DTV.
AbTomaTuHa HaCTpoKa
I36epete CbOTBeTHNIG N3TOUHKN OT CNNCbKa C N3TOUHNU, npei Da 3aNouHHe Te aBtOMaTuHOTo HAcTPOIBaHe.
- ABTomatnua HaCTpoKa Ha DVB-S / S2
HacpoKn 3a caTeJIHTn aHTeHn (Ctbnka 1-3, BnXTe _nr1 n _nr2
Tp6Ba Da ce HacToH Na6Op OT HacToPouKn 3a caTeJIHTN YHHN 3a BCEKN N3dIupBaH caTeJIHT, npEi Da ce N3BbPn KaHaJIHO cKaHnpaHe.
Caten - N36epete caTeIuTa 3a TO3n TeJIeBn3Op.
BbIbIka6e-NyBeJIuHcTe CnHa LNB.
Tn LNB - YBepeTe ce, Ye Tnblt LNB cbotBcTCTBa Ha BaWata aHTeHa.
Power LNB-AkTbBpu NJIeakTbBpu 3axpaHbaHeTo Ha KOHBepTopa.
22KHz -Изберетe 22KHz, за да наст pontе певклioьатя 22К в поожене ON/OFF.
ABTomatuHnTpeXIMceN3NOJ3Ba 3a BKJIIOUbaHe NIN N3KJIIOUbaHe Ha 22KHz B 3aBNCMOCT OT BnDa Ha LNB.
DiSEqC1.0/1.1 -I36epetepekma DiSEqC 3a n36paHnLNB.
ФункцИUnicable/IFFreq/SetSet-3aDaaBaHToHa npaMaTebpa"eINH
ka6en(unicable)"3aBncn OT Ba7nA nCK.
DVB-S Tuning Setting
Fig. 1

Fig. 2
CTbNka 1 HATnCHete 6yToHa MENU n n36peTe MeHIO INSTALLATION. n36peTe DVB-S / S2
aBtOMaTHnHa NaCTPOkKa n HATnCHete 6yToHa OK, ekpaHbT ige ce nokaxe kato Fig1 n caTeJIHTbT
no noDpa36bnpaHe ige 6bIe MapKnpaH.
Ctbnka 2 HaTncHeTe 6yToHa OK, 3a da NotBbPdnte n36paHncaTeIIT.
Ctbnka 3 HATNCHETe 6yToHa, 3a Da npeBKnIOUHTe Ha HAcTPOKaTa Ha LNB, HATNCHETe 6yToHa, 3a Da MapKnPaTe TmLNB n HATNCHETe 6yToHa OK, 3a Da HAcTPOnte To3n npaMeTp.
Ctbnka 4 IpoBepTe daHn 22KHz Tone, DiSEqC1.0 / 1.1 OTRObApHa Ha n36paHncaTeJIHT, aKO He, MapKnpaIte n HATNCHeTe 6yToHa OK, 3a Da hAcTpOnte npabNJHnnapaMeTpB. (BxK fNr. 2) CJeI KaTO rOpHnTe CTbnKn pnpKNIOuAt, HATNCHeTe cHnHn 6yToH, 3a Da Tbpcnte KaHAn.
DVB-T/T2 nnn DVB-C nnn ATV aBtOMaTHHa hAcTpOJa
I36epete DVB-T/T2 (nD VDB-C/ATV) AToMaTHuHa HAcTPOJa, 3a Da TbpCtte ABToMaTHUHO nporpaMn Ipei Da n3BbPwnte TbpceHe, MoKe Ja Ce HaIoXn Da n36peTe cTpaHata Nn da HAcTpoTe MeHIOTo 3a CkaHnpaHe. Ako NcKaTe Da cNpTe aBTOMaTHUHO To TbpCeHe, HAtNCHeTe 6yToH MENU nn EXIT, n3ckaauu n3xOeH dnaIanoB npo3opeu.
- HatncheTe 3a da NOTBbPdnte n3xoJa.
- HatncheTe 3a da npodbIxne Ta Tbcnte.
DVB-T/T2 mnn DVB-C pbyHa hAcTpoiK
3A pBHyo TbpcHe n CbXpaHHe Hn npOrpaMn, NpBBO n36epeTe cBoTBETHnN 3TOUHk, npei Da 3aNoHTe TbpcHeTo.
- B MeHIO To HCTaJIupaHe n36peTe pbUHa hAcIpoiKa Ha DVB-T/T2 (nJn DVB-C) nHaTncHete OK 3a DoctbNo Do nHTepeEca 3a TbpceHe, nbpBO n36peTe cTpaHaTa.
- .Второ натуншete ил n3а ду Habст ponte CBOTBeTHnTe napametpn KaTO peKIM Ha ckaHupaHe, obxbat Ha ckaHupaHe n T.H., CneД Koeto n36epeTe TbpceHe n HaTuCHete 3a da 3anOuHete TbpcHeTo.
- TbpcheTo cnpa, Korato ce Hamep nporpaMa n Ta3n nporpaMa 6bde cbxpaHeBa B Tekyuata Na3nua Ha KaHaJa. Ako nckate da cnpeTe TbpcHeTo, hataChete 6yToHa MENU.
ATV Manual Tuning
BpekIMATVn36epeteATV Manual Tuning nHaTNCHeTe 6yToHa OK 3a doCTbI.
1.Изпольайтбутонiteз поочанe,3a Да МаркираTe И НастponTe StoragTe To 1 (Mоже SFIpyro YUCNTo),Color System,Sound System n Current Channel.CneTTOBa I36epeTe TbpceHe nHaTINCHeTe AIIn ▷,3aДа 3anOuHete TbpceHeto.
HaTnCHHe 3a Da Tbpcnte NO-BnCoka yeCTOta;
HaTnCHeTe 3a Ia npemHHeTe KbM nO-HnCKa YecToTa.
- Korato OTKpneTe nporpaMa, HATncHeTe ueBEnHa 6yToH, 3a Ja 3aNa3nTe B TeKyuToTo noloxHHe Ha KaHaJa. Ako NcKaTe Da cnpeTe TbpcHeTo, HATncHeTe 6yToHa MENU.
- Φина HabТpoИкa
I3noJ3BaIte MaJIKeTe HAcTpoKn 3a HAcTpoKnHa OTeJIeH KaHaJI. ΦHa HAcTpoKnHe e Heo6xoJMa Iprn HopMaJIHn ycIOBn. BbIpeKn TOBa, B paJOHa Ha HepaBHomepHnI3JIbUbaHn, KbJeTO ca Heo6xOJIMN KoPeKcHn 3a NO-IO6pa KapTHHa n 3ByK, I3NoJ3BaIteΦHa HAcTpoKnA.
1.Изберете KaHaJI, KoTo nCKaTe Да HabcTpoNTe Do6pe.
2. B MeHIOTo INHCTaJIpaHe I36epeTe ATV Manual Tuning n HATINCHeTe , 3a da MapKInpaTe Fine-Tune.
3. HATNCHeTe 1JINI 3a fHa HAcTpoiKa, IOKaTO NOLyUHTe Bb3MOxH0 HaN-IO6paTa KaPTuHa n 3ByK.
HacrtpoKn
E3NK Ha ekpaHHoTo MeHIO: N36peTe XeJaHnHa e3NK Ha ekpaHa.
E3NK Ha 3Byka: 3aanaTe cBOTBeTHnO OCHOBEH IIN BVToPnueH e3NK 3a UPOB 3ByK
KbM CnRHaJa.
E3NK Ha cy6tntpnte: 136epete e3nka Ha cy6tntpnte.
Otcna6BaHe Ha clyxa: Ta3n fynKcIy nomara Ha notpe6nteJIte cbc cnxyOBu yBpeKdaHn da pa3bepat nporpaMITE, KaTO noka3Ba HA ekpaHa cBOTBeTHaTgpaΦnHa INΦOpMaun (noo6Ha Ha cy6tntpn, Ho He n cy6tntpn). Ppei Da n3NoJ3BaTe Ta3n fynKcIy, Tp8Ba Da BkIoUHTe npebKJIIOUbaTeJI.
E3NK Ha TeIeTeKCTa: IV36epete JKeJahnHa e3NK Ha TeJIeTeKCTa.
REC File System: Ako nckate da n3no13BaTe Ta3n 0yHKu, Tp6Ba Da noJyUHTe uΦpoBa nporpaMa n da BkIouHte USB ndc.
3a6eJekka: IpeIIOKeTe Da n3NoJI3BaTe BUCOKOCKOpcTeH Mo6JIeH TBbPd NICK NJI TcJIeBn3OpBT Bu MOke Da oCTaHe He3a6eJIra3aH, KOraTo n3NoJI3BaTe yHKuJaTa REC n fYHKUJaTa 3a CMHa Ha BpeMeTo.
HDMI CEC: CBpbjxete n KOHTpOJInpaIte TeJeBUN3opa n HerOBnTe BbHsHn yCTpoiCTBa, KaTO CBpbjxete BbHsHOTo yCTpoiCTBO KbM HDMI nopTa Ha TeJeBUN3opa.
HDMI CEC - BkIIOUbaHe nJn n3KIOUbaHe Ha yHKzraTa HDMI CEC.
Auto Standby - Ппевьрhte Телевизopa B peЖIM Ha abTomaTHUHO.
CnncbK Ha yctpoiCTBaTa - KoraTo HDMI CEC e BKloueH, npOBepraBaTe cnncbKa c yctpoiCTBa 3a CBbp3BaHe KbM TeJeBu3opa.
MectonoJoxKeHne: N36epTe pexkMa Ha MeCToNIOJoxKeHneTO 3a Bb3POn3BExJaHe y Doma nIIN B Mara3nHa, KOrato N36epTe "Store", MoXeTe Da BKIOUHTe DeMOHCTpaunTa Ha CTnkepa.
PpeCTabHHe:BkIIOUeTe IIN N3KIOUeTe DeMOHcTpaCnraTa Ha CTNKePa N DeMOHcTpaCnraTa Ha USB.
USB demohcptaia:
- Heo6xoIIMn HacTpoKn: Do6aBeTe aJla txt "AutoDemo.txt" B OCHOBHata NipeKTopnHa USB yCTpoNCTBOTO n CLeI TOBa HAnIWeTe MapuPyTa Ha BInDeOKInNoBTe, KOInTO Tp86Ba Da 6bDat BB3POnU3BeDeHn Ha TeJIeBUN3OpA, BCEKn Mapwpyt Ce HyXdae OT IpeKcbBaHe Ha JINHn.
- Korato "USB Demo" e Habtpoeh katO"On", TeJeBn3OpbT abTomatNHO ue Bb3npOn3Bexda BnDeoklinOBeTe B "AutoDemo.txt", cIeK katO ca Bb3npOn3BeJI BCnUKN BnDeoklinOBe, TeJeBn3OpbT ue Ce BbPHe, 3a da Bb3npOn3BePeDnHaTa npOrpMa 3a rIeJaHe. CIeJ net MNHyTN, TeJeBn3OpbT ue nyska BnDeoklinOBe n npOrpAmn.
- Mapшутбт trябва да 6ьдe habиcaн Ha anrлійскn ilnyцфрn,В npotnbEN cIyay TeIeBu3opa He moKe da ro ndeHTnФицpa.
Akyan3aun Ha cofopepa:
- CoΦTyερHa aKτγaɪnɪn3aɪnɪy (USB)
Пьрв, ИЗТERЛЕТУ 3ЗАЗЕТСоФТуЕРа 3A CTУАЛИЗИРаНЕВ USB yCTpoIcTBO, HA BTOPO MЯСТО CBьркETe USB yCTpoIcTBOTO КБМ USB поТ Ha TEЛЕВИЗОпа, TpeTo ДOKОСHTe MEHOTO "Setup" И 3Бере "Software update", СLEД TOВА ИЗБере "Software update (USB)", 3a ДА CTapТираTe npOцeca на НадстpoиВаHe, Korato пprNKЛЮчITE, TEЛЕВИЗОрт Усе се рecтApTIPA abTOMaTиHo.
3a6eJekka: He n3KnIOuBaIte TeIeBn3Opa no BpeMe Ha npOceca Ha NaCTpOIBaHe Ha coTyepa, B npOTiBEH cIyaua TeIeBn3OpbT MOKe da He pa6oTu N KIneHTb T da 6bJe OTROBopeH.
- CoΦTyερHa aKτγaJIn3aζηa (Mpeixa)
Cbpxte TeIeBn30pa KbM INHTepHET NMOxTe Da bInpEiDHeTe TeIeBn3IOHHaTa CnCTema IIN MPexKOBTO npNIOXKeHne Ha TeIeBn30pa.
3a6eIeKka: "Network Upgrade" "bIprpeiBaHe Ha MpeKa" MoKe Da He e HaJIuCe 3a HraKoI perNoHn.
- CoΦTyepHa akTyaun3aun (OAD) (cAmo 3a HЯkon pernoHn IdoctbHnCa mo B pexm DVB-T) IV36epTe TOBa, 3aДа akTyaun3uPaTe TeJeBUNOHnCnCTeMeH coΦTyep n o eHnpa.
Pa3uHpeHa onzra: HacrpoIte "Fast Boot" u yHKzra "Wake on Network".
CnHnaekpan: Korato CnHnAe kpaH e hactpoeh Ha BKn., EkpaHbT ige cTaHe cnHb n 3ByKbT ige 6bJe 3aRnyuWeH, KORATO Hma noLyueH cnHaJ.
IopTe6nteKo HynpaHe:Bb3ctaHOBra HaCTpoIKte Ha MeHIOTo Do cTOnHOCTn no Iopda3bnpaHe.
PpaBn n3aBneHna: CbOTBeTHn npaBn n3aBleHna.
Bpeme
YacobnK: HactpoTe TeJIeBUNHOHHa YacOBnK, yacOBaTa 3OHa n JIaTHOTo YacOBO BpeMe.
Yacob pexkIM - OnuTe BkIIOUbAT ABtOMaTnUHO n PbuHc. Korato n36peTe "Auto", TeJeBn3NOHHNRT acOBHK ige ce cnHXPOHN3npa c ufoPBnA TReBn3NOHe CnHaJ B peaHObpeMe. Korato n36peTe "PbHoo", Tp8Ba pbuHO da HaCTponTe YacOBnKa, BkIIOUHTeJIHO da HaCTponTe RoINHaTa, Meceua, DaTaTa, yaca n MNHyTata.
Yacoba 30Ha - I36epeTe Yacobata 30Ha cnopeI MeToJIOXeHHeTO cn.
JrTHo BpeMe (JIrTHo yacobo BpeMe)-MoxTe Da BKIOUHTe NIN N3KIOUHTe Ta3n 0yHKuia.
Taimep 3a n3KIOUBaHe: Ta3n fuyHKuY Bn N03BOJyBa Da HAcTpOnTe TeJeBn3Opa Da ce N3KIOUBa ABOTOMaTHO B HopMaJIHO BpeMe.
Taimep 3a BkIOUbaHe: Ta3n fYHKcIy BN IO3BOJIyBa Da HAcTpOte TeJIeBUN3Opa Da ce BKIOUBA ABOTAMuHNO DO IpeDABpntEJHO 3aJaDeH BXoN NIN CINla Ha 3Byka.
Taimep 3a 3acnBaHe: 3aadTe BpeMeTo 3a aBtOMaTHUHO N3KJIIOUBAHe Ha TeJeBu3Opa.
A B T O M A T N U H O N3KJIIOUOVAHc: HAcTpoIe BpeMeTo 3a ABTOMaTNUHO N3KJIIOUOBAHe Ha TeJIeBn3Opa npu yCNoBVe, ye HЯMa oNepaun.
Henpekcbchat Taimep 3a rIeJaHe: 3a da npedotbpaTne HnpeKcbHaTo rIeJaHe Ha TeJIeBn3ra TnpoDbJxnteJHO BpeMe, MoKeTe Da 3aJadTe Cbo6uEHe, KoEt Da NOKaKe, Ye 3pNTeJr TnpaBn OouBka. ToBa e ocOBeHo nOJe3HO 3a npedotbpaTbaHe Ha rIeJaHeTo Ha TeJIeBn3ra OT Deca 3a Dblr nepnoi OT BpeMe. Ot MeHOTO TIME n36epTe Continuous Viewing Timer n 3aJaTe Yaca. Korato 3aJaDeHOTo BpeMe e n3TEKnO, ce NoRBA cbo6uEHe, KoEt noDcKa3Ba, ye 3pNTeJr npabn noUbKa. Hatnche TE K nn EXIT, 3a da n3uNCTne Cbo6uEHeNeTo.
NoBuee
CnCTema 3a 3akIouBaHe:BbBeTe Te npBPOHaJHnHaTa napoA (0000) 3a DoctbN do Ta3n yHKu, n36peTe "BKIOUeHO", ue ce aKTbInpuat CneHNte yHKcN KaTO "3aDaBaHe Ha napoA", "5LoKupaHe Ha kaHaJ", "PoNTeLckn KOHTpOJ" u"3akIooBaHe Ha naHeLa"; n36peTe "n3KIOUeHO", ropenocouHnte Tprn yHKcN Ue 6bDat DeaekTbInpaHn. Ako 3a6paBnte napoIata, onntaIte da n3noJI3BaTe cyep napoIata (8899) 3a DoctbN.
3aDabaHe Ha napoJa: Bb3cTaHOBraBe Ha napoJaTa Ha cInTeMaTa 3a 3aKJIIOBaHe.
MUSIC: Bb3npoun3BexKaHa Na My3nKa oT USB.
PHOTO:ПерледнаснмкоT USB.
- Hanomhne npn n3noJ3BaHe Ha USB nneBp HkON USB yctpoiCTBa 3a cbxpaHHeNe MoKe da He ca cbbMeCTUMN, 3a da pa6oT rJaKo C To3n TeJeBn3Op.
- HanpaBete pe3epBHO konne Ha BCnKn daHnn B USB yctpoiCTBOTo 3a cbxpaHeHne B cIyau, ye daHHnte ca 3aIy6bHn nopadn HeoayakBaHa aabpna. Hne He Hocim OTROBOPHOCT 3a 3aIy6nte npapn 3Iooyntpe6a nn HeN3npabHOCT. 3aunTata Ha daHHnte e OTROBOPHOCT Ha notpe6nteJia.
- 3a roJemn pa3mepn Ha aHIOBte cKOpocTtHa 3apeKdane MoKe da e MaIKo no-dbIra.
-
CkopocTtHa pa3n03HabaHe Ha USB yctpoiCTBO 3a cbxpaHHe MoKe Da 3aBncn OT BcKaOyCTPOICTBO.
-
Korato CBp3BaTe nnnn 13KIOUbaTe USB yctpoiCTBTO 3a cbxpaHeHne, yBepeTe ce, ye TeIeBu3OpbT He e B USB pexim, B npOTnBEH cnyaM MoKe da ce nobpeDn USB yctpoiCTBOTo 3a cbxpaHeHne nnn CbxpaHeHnte B Hero faiNoBe.
- MoJra, n3noJ3BaIte cAmo USB yctpoInCTBO 3a cbxpaHHe, KoTo e oFopMaTupaHO BbB FAT16, FAT32, NTFS qaiIOBa cnCTema, ch6dEHa C onepaunOHnTa cnCTema Windows. B cnUyauYe yctpoInCTBOTo 3a cbxpaHHe, e oFopMaTupaHO KaTo npYra nporpama 3a nomOuHN nporpamn, KOrTO He ce noDlbpxa ot Windows, moKe da He 6bJe pa3No3HaTa.
- Korato n3noJ3BaTe USB TBbpD nCK, KOIto n3nCKBa n3TOuHnK Ha eJeKTpoeHeprna, yBepTe ce, ye MoUHocTtMy He NaDbNuaBa 500 mA.AKO MoUHocTtHa USB TBbpDnA NCK HAdBnS 500mA, CNTemata Ha TeLEBn3Opa MoKe Da 6bDe npomeHea B pexm Ha rTOOBHOCT, Tp8Ba Da n3DbPnate USB ncka n da pectapTnpate TeLEBn3NoHHata CNTema.
- Ako faiIOBna fOpMaTe HeNoIbPxaH IJI NOBpeH, ige ce nokaxe cbo6eHne "He ce IOnIbPxa"
- TogJamata Kaptna Ha FHD ce Hxjdae ot no-dbIro BpeMe 3a o6pa6otka, Koeto He e npuHHeO OT TeJeBn3opa. MoJra, 6bDeTe TbpneJIINBn da noyaKeTe.
- To3n TeJIeBn3Op MoKe Ha He NoIbpyKa HЯKOn MyITmEiHn foAIOBe, IpOMeHn I bIprpeiBaHn KaTO npOMHa Ha oopMaT Ha KoIipaHe nn Dpyr TexHueckn HanpeBk.
MeHIO3aΦnJIMN
- Hatnchete ▲ nll▼ 3a da n36epete MOVIE. Hatnchete OK, 3a da Bne3eTe.
- HatncheTe / nnn ▲/▼ 3a da n36epeTe jekhaHaTa npanKa i HaTncHeTe OK, 3a da OTBOpnte nankata, HATNCHeTe 3a da 3aNoUHe Bb3npon3BexJaHete
- Hata 3a da cnpTe Bb3npoN3BexJaHeTo Ha qnIMn I da ce BbPHeTe KbM cnncbKa C nIMn
- HatncheTe EXIT" B nppeiunHnTe ekpaHn Ha MeHIOTo.
БлOK 3a KOHTpoJI Ha ΦиЛмTe
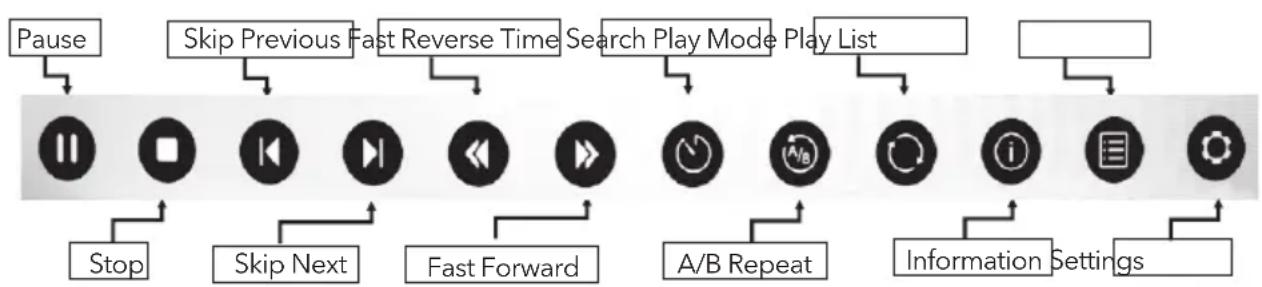
- HaTnchete [MENu] 3a da ce nokaxe JIeHTata 3a ynpabJIeHne Ha fNIMn, IOKaTO Bb3Pon3BexKdaTe fNIma.
-HaTncheTe [ ] / [ ] 3a da n36epete keJahHnte HaCTpOuKn.
-HaTnCHHe [MENu] 3a nIa nI3JIe3eTe OT IeHTaTa 3a ynpabLeHne Ha oJIMn.
MeHIO 3a My3nka
- HatncheTe 3a na n36peTe MUSIC. HatncheTe OK, 3a na Bne3eTe.
- HatncheTe / 3a da n36epete jekhaTa npanka n HatncheTe OK, 3a da OTBOPHTe nankata, HATNCHeTpe/1 pause 3a da 3anOue He Bb3npOn3BeJdaHeTo.
- HatncheTe , 3a Da cnpTe Bb3npou3BexJaHeTo Ha My3nka N da Ce BbpHeTe KbM CnucbKa C My3nka.
- Hatnchete "EXIT" B npdeuWNHTe ekpaHn Ha MeHIOTO.
BJOK3a KOHTPOI Ha My3NKaT
- Hatnche [ MENU ] 3a da se nokaxe Music Control Bar nokaTo Bb3npoun3BexkaTe My3nkata.
- HaTnCHeTe [▲] /[▶] 3a Да n3бepeTe ЛеЯнite HabtprokN.
- Hatnche [MENU] 3a da n3je3e te ot Music Control Bar.
MeHIO Ha CHIMKIN
- HatncheTe 3a da n36epete PHOTO. HatncheTe OK, 3a da Bne3eTe.
- HatncheTe / ▶ nnn ▲/▼ 3a da n36epete xeJeaHaTa npanKa n HATncheTe OK, 3a da OTBOPHTe nankaTa, HATNCHETe /I pause 3a 3anOuBaHe Ha Bb3npOn3BeXkaHe.
- HatncheTe 3a da cnpete Bb3npoN3BexKaHTo Ha CHIMKn I Da Ce BbpHeTe B CnncbKa CCHMKN.
- HatncheTe "EXIT" 3a npeHnHnTe ekpaHn Ha MeHIOTo.
BIOK3a KOHTPOHaΦOTOrpaΦNHTe
- HaTnchTe [MENU] 3a se nokaxe Photo Control Bar no Bpeme Ha cnaIduoyTo.
-HaTncheTe [4]/[B] 3a da n36peTe JeklaHnTe HaCTPOuKn. - HaTnchete [MENU] 3aДаИЗЛe3eTe OT ИнфОрмuaиоHHaТа ЛeHTa.
OTCTPAHЯBAHE HA ПЮБЛЕМИ
Ipei Da ce obaHte Ha cepBn3eH TexnK, pereJeaTe CneHaTa HOpMaun 3a Bb3MOxHnte npuHH n peSeHnHa npo6lema, KOHTO N3NTBaTe.
CmITOMn PeueHn
NCTAHUOHHOTO
ynpaBHeHne pa60Tn.
For lasting update and upgrade, below descriptions of menu settings may not be in compliance with your TV, this is normal and the actual content on your TV shall govern.
Menübedienung
DVB-S Tuning Setting
Abb.1

Fig. 2
Note: The below menu options are under TV sources.
Image
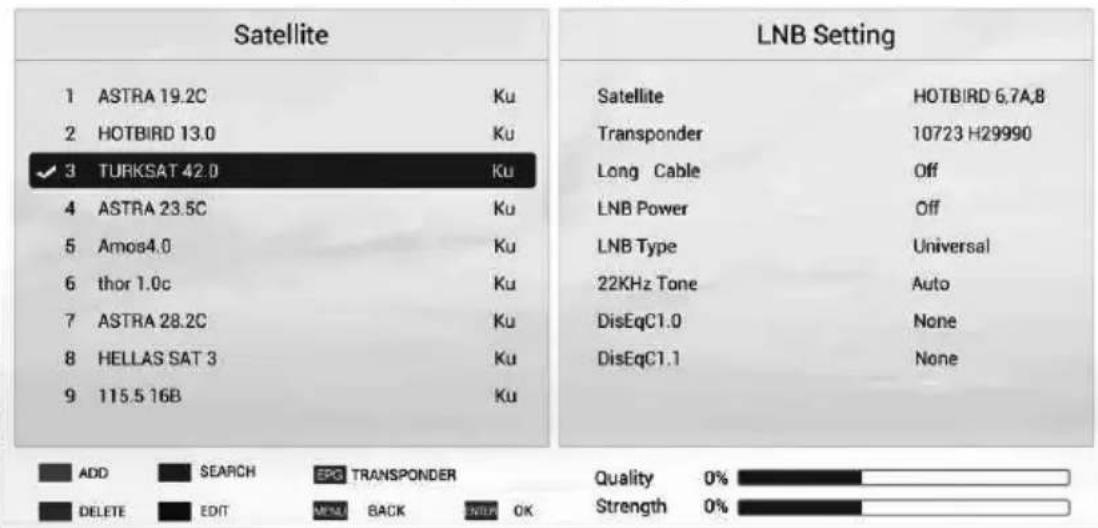
DVB-S Tuning Setting
1.abra

abra.2
Selection are input source
Privacy Policy (may not be available): To protect your personal data and compliance with the legal provisions. You have the possibility to revoke at any time the acceptance of the privacy poliyy in the menu of your Tesla TV. If the cancellation is active, no connection is established to the Internet.
Nota 5
For lasting update and upgrade, below descriptions of menu settings may not be in compliance with your TV, this is normal and the actual content on your TV shall govern.
Analog Audio Output: This feature is used for selection of Headphone and Line Out. Plug in a headphone to the headphone terminal of the TV, and you can listening through the headphone.
The terms HDMI and HDMI High-Definition Multimedia Interface, and the HDMI logo are trademarks or registered trademarks of HDMI Licensing LLC in the United States and other countries.

Manufactured under license from Dolby Laboratories.
Dolby, Dolby Audio and the double-D symbol are DOLBY AUDIO trademarks of Dolby Laboratories.
COДРЖИHA
COJPKINHA 255
IPEyIPEyBAHbA IN MEPKN HA IPetTnA3JIINBOCT 256
ПОЗИЦИОнРАБЕHA TEJIEBN3OPOT 259
KoIuHbA HA IaHEJOT. 262
TEPMINHAJI 263
ФУнКЦИНHAДALEЧИHCKNOT YNPABYBAU. 264
REC(CHIMAHBJIUYEHBNDEO3APNC) 266
EPG (EJEKTPOHCKN IPOIPTAMCKN BOIDNU) 267
INPBNUHOIOCTABYBAHBEI NOUETHN KAPAKTEPNCIKN 268
KOHTPOJHA HA MEHITO. 270
Pa6oTeHe co MeHnTo 270
Cnka 270
3ByK 270
HcTaJIpaHe. 271
NocTaByBaHbe 273
Bpeme. 274
HappeiNo 275
Mpexa 275
YCS-KOHTPOJIa. 275
YCb-MeHn 275
Mehn 3a 6HIMOBN. 276
IOTceTHNK Kora da ro kopncTe YCb-penpoyKtopoT. 276
Mehn 3a my3nka. 277
MeHn 3a oToIpaΦn .277
PELJIABAHbE IPOBJIEMN 278
CNEUΦNKAU. 280
Hanomeha
1.「pαφηчкnte npικa3n BO npripaunHkoB ce caMo 3a KOHcyltaun.
2.Ekpanckata cInka Ha TeIeBn3OpOT MoKe da 6nJe MaNky nopaznUHa oD Toa StTo e npKaxaHO BO npnpaHKnOT.
3.ИнфорmaциTe BO OOBJdoKymeHCT ce NOДLOXHN Ha npOMeH 6e3 ppeTXOHa HajaBa.Ipon3BOIDTeIOT He npiФaKa HnKaKBa OndroBOPHOCT 3a OHTyBaHa nopaN DInpeKTHi NIN INDInpeKTHi rpeuKN, HeueIoCHoCT NIN HeycorJIaceHoCT NOMErpy npipauHnKOT nONIIshAHNOt Ipon3BOI.
4. Bo cyba OKoJInHa n nopadn CtaTnKnot eJeKTpnuNTeT, npOn3BooDt MoKe da ce npecTapYBa n da ce BpaTu Ha rIaBHeNOT OSD-nHTepfjc, nHTepfjcot Ha YCb-penpoDyKTopoT nI npTeXoDHNOT n3BOpEn pexkM, npOdoJxete Da ro KopNCnTe TeJeBn3OpOT kaKO wTO cakate.
ПРЕДУПРЕДУBAнAИ МЕРКИ HA ПРETПАЗЛINBOCT
Hanomeha: IpouHTajTe rncnTe ynaTCTBa nped da pa6OTte co kOMnIeTOT. UybaJTe rnyaTCTBaTa 3a nooUHeKHa ynoTpe6a.
- Прочитajte Ги obne ynapctBa - Треба Да Ги прочитate спte ynapctBa 3a уnotpeba n 6e36eHocTпрд ду Кориспte npon3BODOT.
-Увajte Гуразова - уразова - уразова - уразова - уразова - уразова - уразова - уразова - уразова - уразова - уразова - уразова - уразова - уразова - уразова - уразова - уразова - уразова - уразова - уразова - уразова - UNHANCAJIA.
-
Bônde tcmetka 3a cnte npéynpeybaHa - Tpe6a da ce noHTyBaAT cnte npéynpeyBaHa 3a anapaTOT n Tne od ynatCTBOTo 3a ynotpe6a.
-
CnédeTe rncuTe ynaTCTBa - Tpe6a da ce nouyTuBaAT cnte ynaTCTBa 3a pa6oTeHe n ynoTpe6a.
He Kopnctete ro anapatot 6ncky do B0da - YpeoT He Tpe6a da ce KopncTy Do B0da nnBlaRa-Ha npimep BO BnaJxHa BN36a,do 6a3eH 3a nnBaHe n CnUHO.
- Ynctete cmo co cyBa kpn.
He 6IokpajTe rN OTBOpNTe 3a npoBeTpYBaHbe. HcTaInpajTe cnopeynaTCTBaTaHa npOn3BOIDTeJOT.
He nHcTaInpajTe BO 6JIIN3nHa Ha I3BOpn Ha TOJINHa, KaKo 1To ce paJiaTopn, TOnJIINckn pernctpn, neKn nn npyn CInuHn anapatn (BknyyBajkn 3acNlyBaun) 1To npOu3BeDyBaat ToJINHa.
He KOMnpomHTnpaJte ja 6e36eHocHaTa CEHa nOJapn3npaHnOT npKnyOK nIHa npNKnyOKOT 3a 3a3emjyBaHe. IOpJAPn3nPAHnOT npKnyOK nMa DBe JIeHTN OJ KOI eNoIpoka oD npYrata. PnKnyOKOT 3a 3a3emjyBaHe nMa DBe JIeHTN U TpeT KpaK 3a 3a3emjyBaHe. HInpOKaTA JeHTA nII KpaKOT 3a 3a3emjyBaHe e 3a Ba7a 6e36eHocT. DoCTABEHNOt npKnyOK He Ce BKNOnyBA BO OTBOPOT 3a N3Je3, KOHCytnpajTe ce co eJIeKtpuap 3a 3aMeHa Ha 3aCTapeHnOT OTBOP 3a N3Je3.
3aunntte TcpyjHnOt Ka6eJ 3a Ja He ce ra3n Bp3 Hero nIi Da ce notka BO npKnyoUnte Ha MeCTOTO KaJe N3JIeRyBa OJ anapaTOT.
- KopncTeTe cAmo npnlo3n/raJantepnja HabeeneH Od npOn3BODnteIOT.
KopncTe cAmo co KOLnUka, cTaTb, TpHNoD, dpxKa uIIM Maca HabeDeHN OJ npOn3BOAnTeJIoT uNc ce npOdaBa 3aeDHO co anapaToT. Kora ce Kopnstu KoIuKa uN peWetka, BHMAbajTe kora ja NOMeCTyBaTe KOINuKaTa uN Taa 3aeDHO co anapaToT 3a da ce n36erHaT nobpeDi N oD BPOT Ha rOpHnOT deJ.

- Ncknyute ro anapaTOT KORA rpmN nIe KORA He ce KopnCTn DoIro BpeMe.
CepBncpaHbTo Ha cHTe DeIOBn HeKa To BpUu KBAUNKkyBaH nepcoHaJ. CepBncpaHbTo e Notpe6Ho Kora e OwTeTeH anapaTOT Ha HeKakOB HauHH, KaO Ha npimep, OwTeTeH cTpyen KaBeI nII CTpyEN pNknyOK, TeuHOCT HABnerla BO anapaTOT nII HeKOJ npEdMeT naHaI Ha anapaTOT, 6JI I3IOXeH Ha DoJn IIN BlaRa, He paBoTN HopMaIHO nII NaHaI.
BHIMAHHE:OBnE yNaTCTBa 3a cepBncipahe BaxaT cAmo 3a KBaJIuΦNKyBaH cepBuceH nepcoHa.3a da ce hamaJI np3IKOT od CtpyeH yIap, He BpWeTe cepBncipaHe ITO He e HabeJeHO BO yNaTCTBOTO 3a yNoTppe6a,OCBeH aKO He cTE KBaJIuΦNKyBaHn 3a TaKba pa6Ota.
He nHCTaIInpajTe ja onpeMaBa BO CTecHet npocTo npn suJeH nJaKap, KaKO wTO ce noJIuCi 3a KHNr nn CnUHO MeTo, TyKy Tpe6a Da NmA Do6po npoBeTpYBaHe Ha OTBOpEHO MeTo. PpOBeTpyBaHeTo He cmee Da ce cnpeu Co NOKpNBaHe Ha BeHTNuAnCKnTe OTBOpN CO npEdMeTu, KaKO wTO ce BEcHk, pKeKnBKN, 3aBeCn U CnUHO
BHIMAHNE-3a da cnpeuHTe onachocT od ctpyeH yap, 3amehe ja peWetkata.
- Пожитajte Ги Инфорmaципerte Ha 3aДнот ДeЛ BO Врсka co Инфорmaци 3a eJeneКтпкаТи 6e36eHocTa прдда Ги Инсталпатe Ил дa pa6otnte co anapatOT.
3a da ro hamaJIte pnsIKOT od noXap nIIN CTpyeH yIap, He n3IOxgyBajTe ro anapaTOT Ha doXd IIN BnAra.AnapaTOT He Tpe6a Da ce n3IOxgyBa Ha MeCTO KaIe UTo IMa KaIeHe IIN npCKaHBe H Na Hero He Tpe6a Da ce OCTaBaAT PpeMETn NOHN CO BODa, KAKO UTO Ce Ha npIMep Ba3HN.
- TepMNHaJIte O3HaueHn co Cm6oJot " MoKe Ja HMaat DOBOLHa RoJeMnHa 3a Da npetCTaByBaat Pn3IK OD CTpyeH yIap. HAdBopeShHTe KIni NOBp3aHn Ha TepMNHaJIte Tpe6a
daIINHCTaJInpaObUyeHoJIuIeIJN DaCe ICKOpNCtAT NOIroTBeHN BOIOBn JIn Ka6JI.
- 3a da cnpeuHte noBpeHa, anapatot Mopa da 6nde npeuz3HO npKauen Ha nooT/suOTo Cnopey ynatCTBaTa 3a MOHTaxa.
- OnachocT od ekcnno3nja ako 6aTepnjata He ce Hamectn npabnlho. 3amehe te ja cmo co ncta nnc CO eKbBaJIeHTe TIN.
- Batepujata (batepuja, batepuin nn 6atepuickn komnleT) He tpe6a da ce n3noxyba HnpeKymepHa TOnnHa, KaKO uTO ce COHueBa CBETnHa, OraH nn CInuHO.
- Ппекумернот звун сптукок од, слшалкite можеда прдзвика Гбене на слухот. Слшаветор пемогу гласна музка полгпорно можеда ro owтeti слухот. Сцелда сималл ризковот од оштetyba-he на слухот, тpebaда се hamалл щачината на 3ыкот на 6e3б endo hydoбно НИВО ида сckpartn петюдт на слшаны многу гласна музка.
CtpyJHnOT npNKlyOe/Bp3NBnOteJeMeHT Ha ypeoT/InpeKTHnoT npKnyeH aanTeP ce KOpncTn KaKO ypeD 3a nCKLyUyBaHe co wTO ypeoT 3a nCKLyUyBaHe Ke Moxe JecHO da ce paKyBa.
3aHTnteH 3a3emjeH TepnHaI. AnapaT Tpe6a Da 6nJe NOBp3aH CO uTeKeP 3a cTpyja co 3aHTnTHa 3a3emjeHa Bpcka.
Kora He ce kopnctu anapatot nIi ce npemecTyBa, BHMabajte Ha ctpyhnte Ka6n, t.e. Bp3eTe rKabnte co BpBka 3a Ka6n nIi HeSto cInuHo. Tpe6a da Hema ocTpr pa6obu KOn moKe da npedin3Bnkaat ctpykeHe Ha KOMnletot ctpyjHn Ka6n. Kora Ke rN ynotpe6nte NobtopHo, yBepTe ce DeKa Ka6nTe He ce OwTeTeHn. Ako Ima HeKaBO OwTeYBaHe, nobapajte cepBucep 3a da rN 3aMeHn Ka6nTe HaBeDeHn OD npou3BoDInTeJOT nIi Da CTABN Ka6n co NCTN KapakTepcNTIKaKOpnHaHnHTe.
Tpe6a da ce o6phe BnmaHne Ha ekolowknte acNeKTn npn φpnaHeto Ha 6atepnjata. Ha anapaTOT He cMee Da nMa n3BOpn Ha oran, KaKO uTO ce 3aapanen CBekn. 3a da ce cnpeyn uHpebe oran, dpxTe rN CBeKnte nn Dpyrnte n3BOpn Ha oran Hactpana od OBOJ npOn3BOD ueNo BpeMe.
-Дokолу anapat hema cumboJ ha etnkeTata n Hej3HHOT Ka6eJ 3a HanojyBaHbe NMa TpN\PHa, Toa 3NaU n DeKa e NOTpe6Ho 3aWtntEHO 3aemjyBaHbe. Anapat Tpe6a da 6nide NOBp3aH co wTekep 3a CTpyja CO 3aWtNTHa 3aemjeHa Bpcka. - Ce npenopayba da ce Bklyuata n cIeHnBe INHOpMaun IOKOJy e MOxHO n KaJe WTo e MOxHO:
| ~ | Ce odncyba ha ha haizmeHHa ctpya (AC). |
| == | Ce odncyba ha eJHOnacOuHa ctpya (DC). |
| Ce odncyba ha onpema od KlaCa II. | |
| Ce odncyba ha noJrToBHeOCT. | |
| I | Ce odncyba ha BKJIyUeHA ctpya. |
| 4 | Ce odncyba ha onaceH haon. |
- Ппдуншуbahe 3a anapat wTo coPkn BATEPNH BO FOOPMA HA KOПЕ (ynaTcTaBATA NOДОЛВаЖКТ сAmO 3a anapat wTo coPkn batepna Jb FOOPMa Ha KONue wTO MoKe da ja ja 3amEHn KopncnKOT).
PNEyPENEYBAHbE
He roIrajTe r6baTePnInTe, noCTOn onaCHOCT od xemncka peakunja (rH mAb O daJeHHCKNOT ynpabvBa) Oboj npo3BOd coDPKn PLOCKATA 6atepna Bo oOpMa ha konue. Dokolky ce nporoJTA ploockata 6atepna BO oOpMa Ha KONue, MoKe Da npedn3BnKa TeWKn BHaTpeWn H3ropeHnCn 3a cAmO 2 caCa n da npuHn CMPT. UyBajTe rH NOBnE i KopncTeHnTE 6atepnn Hactpana OD deua. DOKOLKy nperepaDATA 3a 6atepnn He ce 3aTBopa 6e36eDnO, He KopncTeTe rnoBeke npo3BOodot n dpXeTe ro Hactpana OD deua. Ako MncnTe Deka 6atepjuata 6nila nporoJTAHa nn CTabeHa BO HeKOJ DeI OD TELOTo, BeDaHn NobapajTe MednCHsKa NOMOW.
Директува WEEE

IpaBnH0 oPpAbe Ha OBOJ npOn3BOD. OBaa 03HaKa O3NaUyBa DeKa OBOJ npOn3BOD He a da ce oPpTa 3aEiHO co DpyrOTo rYbpe Od IOMaKInHCTBOTO Hn3 ZeLa EY. 3a da cnpeHTe TyaJIHa 7TeTa Ha OKoJIInHATA nII Na HApUsyBaBe Ha YOBeKOBoT O3dpAbJe O HeKoHTpOJIpaHO pJaHe OTnA, peuNKInpajTe ro BHNMaTeHNO 3a Da npOMOBpate OndKJINBO NOBTO HO CTeBe Ha MaTePnJaHnTE pecypcn. 3a Da ro BpaTne KOpNCTeHOT ypeD, KopNCTeTg N aTHnTE i CObnpHnTE CnCTeMn II IN KOHTaKTnpajTe co LInCtA Od, npOdaXHOT MeCTO OD tTO CTe Ro KynPnIe npOn3BODOT. Tne MoKAT Da ce nOrpnKat 3a ekOLOuKO peuNKInpapHe.
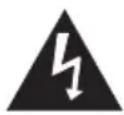
CAUTION
RISK OF ELECTRIC SHOCK DO NOT OPEN

Oba 3HaKue co MoJIb a BO paMHocTpaH TpnaROnHnK CnyxN da ro ONOMEHe KOpNCnKOT 3a npncycTBo Ha Heu30JnpaH ,OnaceH HAnOH" BO OKIOnOT Ha anapatOT KoJ MOKe Da Ima DOBOJHO cIIa 3a da npetCTaByBa OAnCHOCt OD CTpyeH ydap. 3a da ce HamaJI np3NKOT oD CTpyeH ydap. He otcpaHyBajTe ro Kanakot (IIN 3aDHNOT DeI). BHaTpe Hema DeIOBn 3a cepBncipaHe. ObpaTeTe ce kaj KBaJIInΦnkyBaH cepBnCeH nepcoHaJI. N3BnuHnKOT Bo paMHocTpaH TpnaROnHnK CnyxN da Ro ONOMEHe KOpNCnKOT 3a npncycTbo Ha BaXHi yNaTCTBa 3a pa6OteHe n OdpxKyBaHe BO npInloKeHaTa IInTePaTypa.
ПОЗИЦИОнIHРаБЕ HA TEJIEBN3OPOT
-Инсташилье ro ekpaHot haцретахорионлha nobpшина,кakoHa npimep Maca.3a npobetpybahe,octabete 6apem 10 cm cnoobden npocstop okoly TeleBn3opot.3a da cnpeuHTe He npoNCHn nIh Hebe36eHn cnTuayn,He CTabajTe HnKaKbI npedMeTn Bp3 TeleBn3opot.OBoj anapaT moKe da ce KopncTN BO TpONcN n/IIy yMepen KJIIMN.
-Пицьрстува hare Ha 3aДнnot DeI Ha Kyкштeto Ha sI.ДоЛнata сИнka ce pa3nkyBa Od BnCTHnCKNt npeMet n 3aToa e camo pepepeHTen npiKa3. (camo 3a Hekon perNoHn).
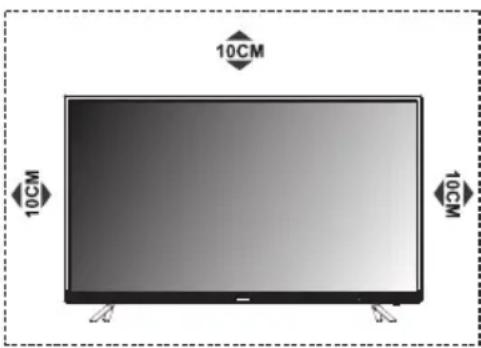

Hnkoraaw He cTaBajTe ro TeIeBn3OpOT Ha HeCTa6uHNO MeCTO. TeIeBn3OpOT MOMKe da naDne Hda npedn3Bnka cepno3Ha nobpeDa uIn cmpt. Moxe da ce cnpeyat MHOry noBpeNi, ocobeno kaj Deca, aKo Ce npe3MaT HeKoEJHOCTaBHmepKn Ha npETna3JIbBOCT, KaKO wTO ce:
KopncTeHe kyTm nn CtaTnBn npenopaahn Od npo3BOndTeIOT Ha TeJeBn3OpOT.
- Na ce kopnctn cmo Me6eHa koj moke 6e36eHNO da ce notnpa TeJebu30pO.
- IorpnjkeTe ce TeJIeBn3OpOT da He cToI oBeceH ha pa6oBInTe od nOtnpen Me6eJ.
He ctabajte ro TeleBn3OpOT Ha Bucok Me6eI (Ha npimep opMapn n noJin 3a KnHn) 6e3 da rna 3aCbpCTnte N Me6eJNot n TeleBn3OpOT Ha COoDbETHa NOTkpena.
He noctabaybajte ro teIeBn3OpOT Ha aIINuTa IIN npyrr MaTePnJaII NOMEr y Hero n NOTNOPHNO Me6en.
- Objachete ИМ на DeцаТа 3a onachocHTe od KauchyBaHbe Ha MebeIOT 3a Дa ГDocnHAT TeJIeBn3OpOT nII IN HeROBInTe KOHTpOJI.
Ako ro 3aIpxyBaTe n IomecTyBaTe noCToeKnot TeJeBn3Op, Tpe6a da ce 3eMaT npEiBnDropeHaBeDeHnTe npenopakn (cAmO 3a TeJeBn3Op notekok od 7 kg).
MK
3aEINOco TeIeBn3OpOT MoKe Da ce KopncTn 136bopen HsJeH dpXau. IpOBepTe kaj IokalHnot npOdaBaUdAInmAsnDeH dpXau KoJ ro 3aIOBOLyBa cTaHapDTo VESA koJto ro KopcTn Baunot moEn Ha TeIeBn3Op.BHMATEJIHO npKauTe ro SndHnot dpXau 3a MOHTnpaHe Ha 3aHaTAtpaHa od TeIeBn3OpT. NocTaBeTe ro sndHnot dpXau 3a MOHTnpaHe Ha CBpCT SnI HopMaJIHo Ha NoDT. Ako ro npKauYBaTe TeIeBn3OpOT Ha npyrr gpaedxHn MaTepnjAn, KOHCytnpajTe ce Co KBaJIINKByAHn LInca 3a IHCTaJaCuaJa Ha dpXauOT.
3aedno co dpkaot ke 6nadtpnloxehn deTalHn ynatCTBa. KopncTeTe snden dpxa 3a MOHTINpaphe co koj ypeoT ke 6nde cooDBETHO npucBpcteh Ha sNDOT n CO DOBOHNO pocstop 3a NOBp3yBaHe Ha npTu NaDBopeuHn ypeiN.
BHIMAHNE
Icknyte ja ctpyjata nped da ro npemectybate nHn Hnctanipate TeJeBn30pOT. Haky moke da doje do ctpyen yap.
- 13BaTeToCTaTbOT nped DaTo INHCTaJIpaTe TeJIeBn3OpOT Ha SIneH IpxaH co O6paTHa NOCTaNka OD pIpuKaHyBaHbETo Ha CTaTbOT.
Ako ro nHctaInpaTe TeJIeBucOpOT Ha TaBaH nn HabaJeH sN,MOKe da naHe n Da npedn3BnKa cepno3Ha NOBpeJa. KopncTeTe Odo6peH sUdEHN dpxaH KOHTaKtpajTe co JokalHnot npOdaBau nn Co KBaHnKuYBaHn Iua. NHaKy rapaHunjata HeMa da Baxn.
He npcterHybaje nI wpaOOBITE 3aToa Taka MoKe da Ce OwTeTn TeJeBn3OpOT n da ce noHnTu rapaHunjata.
- 3aДа спpeчnte NOBpeДа, anapatOT Mopa Да 6иde npeu3Hо npiKaueH Ha noIOT/sIOT cnopeD yNaTCTBaTа 3a MOHTaJa.
- YnOte6eIwpafoBn n SndHn dpXaun 7TO rN 3aIOBOJyBaAT cJeHNBe cneuKauNN. Cnte OHTeYBaHa n NobpeDn OD NorpeHNO KOpNCTeHe nN KOpNCTeHe HecOoDbETHa rAanTepnja He ce onfateHn od rapaHnzjata.
| Гolemina на м odeл: 32'' Tope | Долу | |||
| Завrtka | Диаметар (mm) "E" M4 | M4 | ||
| Диabочина (mm) "D" | Мakc 9 | 9 | ||
| Мин 6 | 6 | |||
| Колочина 2 2 | ||||
| VEDA (АхВхС) 100x100x100 | ||||
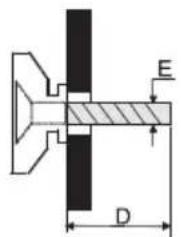

| Големина на м odeл: 40'' Ге | Дόль | |||
| Завrtka | Ди工作经验 (mm) "E" M6 | M6 | ||
| Ди工作经验 (mm) "M" | Мakc 20 | 15 | ||
| Мн 12 | 7 | |||
| Колимина 2 2 | ||||
| VEDA (АхВхС) 200x100x200 | ||||
Hanomeha:
1) CnKnte ce caMo 3a pepepeHua.
2) 3a TeIeBn3Opnte co TepMnHaJIu KOH SiADOT u CO ueJ Da ce OCTaBn IOBOJHO npocTOp 3a HNBHO KOpncTeHe, Tpe6a da CE KopNCtN rymeHa Oblora 3a da CE npuCpCTN sIHNOT dpXau. Ce pa60Tu 3a MaI wynlHB Hocay CO BHaTpeWeH dNjAmetap od 8 mm, NaDBopeWeH dNjAmetap od 18 mm n BucnHa oD 30 mm.
Pa6oTHa cpeuHa
He ro nHctaInpajTe OOBJ ypeD BO ORpaHnueHn IpocToPn KaKo ITO Ce NJIuCiN cJ.
He ro ynoTpe6yBaJTe ypeoT BO BlaXn I JaHn npocOpn. 3aHTuTeTo ro oD nperepejyBaHe.
- Yybajte ro HactpaHa oD coHueBa CBetlnHa.
He ro KopucTeTe ypeDoT BO npaunuBn oJbactn.
He cTabajte cBeKn Do npctanHn, OTBopeHn o6laCTn 3a da n36erHete pyrN, 3anaJIINBm MaTepJaN Da dOpnat Do TV ypeDTo.
MepknHa npetna3nBOcT 3a KopncTeHe Ha daJeunHckn ynpaByBaay
KopncTeTe ro daJeunHcknOT ynpaByBaTaka 7To Ke fo HacOHTe KOH ceH3OpOT 3a daJeunHcknU npaByBa. IpeMeNTe nomery daJeunHcknOT ynpaByBaN cEH3OpOT Ke cmTaat Ha HopMaHaTa pa6ota.
He ro n3noxybajTe daJeHHcknOT ynpaByBaH a cnHn Bn6paun. IcTo TaKa, He ro noleBajTe co TeuHOCT Hr Ro CTaBajTe Ha MHOry BJIaxHN MeCTa
He ro n3JIOxuyBajTe daJIeunHCKNOT ynpaByBaU Ha dIpeKTHa COHueBa CBeTInHa, Koja MoKe da npedn3Bnka deOpMaunja nopadn JxeHTnHaTa
Kora ceH3OpOT 3a daJeunHcN ynpaBvBa e n3NoXeH Ha dIpeKTHa cOnYeBa CBeTnHa nn jaKa CBETnHa, daJeunHcKnOT ynpaBvBa Hema da pa6Ot. Bo oBoj cnUayaj, Be moJIme cMeHeTe ro npaBeuot HA CBeTnHa nn no3njuata Ha TeJeun3OpOT nn KopNCTe Ro daJeunHckNt YnpaBvBa no6ncky do ceH3OpOT 3a daJeunHcKO npaBvBahe.
Mepkn Ha npetna3JnBocT 3a KopncTeHe 6aTepnja
HecooDbetHa ynoTpe6a Ha 6aTePN MoKe Da npEIN3BnKa nCTeKyBaHe. 3aToa, Be MOJIme CJeDeTe rN CJIeHNrte YekOpN KOpNCTeTe rN BHNMaTeJIHO.
1.06paTeBHHMaHHeHaNoJaPHToT Ha 6aTeepnte co zel da n36eHHeK paToK cnoj.
2. Ako haonohot ha 6atepujata e ocna6en, wTO Bnjae Ha domeHOT Ha daueyHCKNOT ynpaByBa, tpeba da rna 3ameHnte ynotpebeHnte 6atepn co HOB. OcTpaHeTe r6atepnte cenocho, aKO He nlaHpaTe da rN KOpNCITE NOJIORO BpeMe.
3.He Kopnctepe pa3nueHn BIOBn Ha 6aTeepn (Ha npimep, MaHraHckn aJkaJHn 6aTeepn) 3aeDHO.
4. He r n ctabajte 6aTeepnnte BO oran. He r n noJIhHeTe nn packlonnyBaTe 6aTepeHnte.
5. Φρλajte rι δατερηνιθe BO corgliachocTe co npοπικιte 3a 3aωntιTa Ha JxNBOTHaTa cpeɪnHa.
6. IPEyIpyBAHbE: BaTeepnte (nkyBaHe 6aTeepn nn HCTaIpaHn 6aTeepn) He Tpe6a da 6ndt n3IOxehn Ha n3BOpn Ha npekymepHa TOJIInHa, KaKO COHcE, NOXap N CINHO.
3aMeHa Ha 6aTeepHnTe Ha daJeuHcknOT ynpaByBaay
CTaBeTe DBe AAA 6aTePnN BO DeJNot 3a 6aTePnN Ha daleuHckNt ynpaByBaU, OcnIpyBajKn Ce deKa O3HaKInTe 3a NolapNTeTBO OndeJOT ce COBna'aaT.
KONHbA HAnHEJOT
HanomeHa: rpaΦnukTe pnpKa3n Ce cAmo 3a npetCTaByBaHe.
NorjeoDdoJHaTa cTpaHa
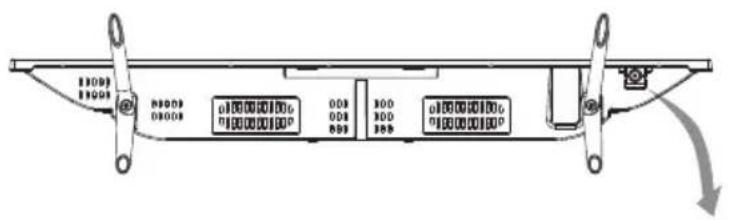
PpeKHyBaC o konHe
PnTnckaHe Ha CpeHTo KOnue:
1.Bo pexnHa noIroTbeHoc, npntncHeTe ro 3a Da Iro BknyuHte TeJeBn3OpoT;
2. Be3 ekpaHcKa cInka, npITncHeTe 3a da npIcTaIIte Do n3BOpHTo MeH; npITncHeTe I dpKTe 5 ceKHyn 3a da ro noCTaIIte TeJIeBN3OpOT BO pEKIM Ha NOdrotBeHOCT;
3. Co OSD, npntncheTe kpaTko 3a da ro notbprnte n36opot; npntncheTe doIro 3a da ce Bpatnte nn Da n3Je3eTe od MeHnTo/NoDMehnTo.
PnTnckaHeJeBO:ceHaMaJyBaIraChOCTaNJIceOAnHaJIeBO.
PnTnCKaBe DecHO: Ce 3rOJIeMyBa rJaChOCTa NJIe Ce ODi HaDecHO.
PntuCKaHe Hnpei: KaHaI noOJy IJIe Ce ONI noOJy.
PnTnCKaHae Ha3a: KaHaJI norope nIi ce OAn Harope.
TEPMINHAJI
HanomeHa: TepMHaJIte MoKe Ia ce pa3IkyBaAT cNopeJ moJeIOT n CnopeJ perHOHn, na 3aToa Be monme da rN 36epeTe TepMHaJIte cNopeJ TeLeBn3OpOT wTO CTe ro Kynnne.
LAN:Mpexa
AVIN (AUDIO L/R IVIDEO): Поврзete ro вideо и aydno сигнадOT co n3BOPOT ha cngnako DVD.
HDMI1/2:Поврзete ro HDMI Bile3HnOT cngan co n3BopOT ha cngan KaKO DVD.
DINNTAIEH AYNO: KopncTeTe SPFIF ka6eI 3a npOn3BOcTBO Ha aydnoT cInHaJ od BaHnOT TeJeBn3Op Ha KOMNaTb6uHnOt aydno npneMHNK.
CJyUJIKN: AynIO n3Ie3eH cnHaI, 3ByKOT Ha 3ByuHnIte Ke 6nIe HamaJIeH, Kora ce BKJyuHeN CJyUaIKNTE.
USB 1/2: USB npnknyok.
AIR/KABEN/LNB:IOBp3eTe ro KoakcnjajHnOT Ka6eJ 3a npneM Ha cnHaJIOn oJ aHTEH, Ka6nn nn caTeJIIT.
CEPBNCNPAHbE: PnKnyokOT 3a OTCTpaHyBaHe Ha JeΦeKtn Tpe6a Da ro N3BpHaT npoΦecNoHaJIHn TexHuaPn.
Cl: Kaptnuka 3a Cl npnKnyok.
ФУнкцииHAДАLEЧИHСКNotУПРABYВACH
Далецниступаввац.

- POWER (UKLJUCIVANJE/ISKLJUCIVANJE (
PnTncHeTe 3a Da rO BKnyuH TeJeBn3OpOT Nn da Bne3e BO peKIM Ha NOIroTBeHOCT.
2.ISKLJUCIVANJE ZVUKA()IpntucheTe 3a da ro NCKJIyUte IJIu Da rO BpaTnte 3ByKOT.
3. Numerick tasteri InpekTHo n36epeTe KaHaJI.
4. CH LIST Ппнше 3a Да ппсталпг На спсokOT co KaHaJI.
5.BPATNCEHA3AIIpntncheTe 3a da ce Bpatnte Ha npetXoNDHO rIeHaHnot KaHaJ.
6. MENU Ce OTbopaat onuHTe Od MeHInTo
7. SOURCE I36epeTe peKIm Ha BJIe3eH n3BOp.
8.Up/Down/Left/Right ( / / /)
Habiraguna Hn3 MeHnTo.
9.BopeI NotBpTeTo n36opOT.
- HOME (N3JE3) Co npntnckaHe Ha Oba KOJIe Ke npCTaNTe Ha NoHTHaTc TpaHua, MOKe Da KOpNCtTe NaMeTHn KaPAKTePnCTNKu IN pePnoDyKTOp Ha MeDnYmN nTH.
- EXIT(IZLAZ)ИЗлесе оД ТЕКOBHOTО Meн.
- YouTube ПпuctаитЕ на YouTube.
13.Инфорmaцпрпkaжувинфорmaци 3a TEKOBHNOT N3BOP. - Volume Up/Down (VOL+/VOL-) HamaJIeTe ja nIIN 3roJIeMeTe ja jaUnHaTa Ha 3ByKOT.
- Program Up/Down (PR+/PR-)
Менистусяngа рогампес наюу. - EPGПрипсichte 3a Да ce пикжатTekOBнITE nHфорmaциHa eJekТронcknot BoДИ (EPG) BO DTV-ржIM.
- REC(Record)Причнсные за ща чиматеTekOBнота поррама (pa6otn сamo bo DTV-peхиM).
- NICAM (I/II) Пушистецima да Гизберетecakанnot n3JIe3 Ha 3ByK BO 3aBnCHOCT OД kaHANOTo ce emTuBa.
- AD ПиTNCHeTe 3a Да BKnyHte ONHа aydno, a packakxyaHOT Ke onnIe WTo ce cnuyBa Ha ekpaHOT 3a CJIeN JInu IIN rJeDaUc co HapyuWeH BnI. ПиTNCHeTe NOBTOpH0 3a Da Ro NCKnyHTE (OoctanHo camo Bo DTV-peKmM).
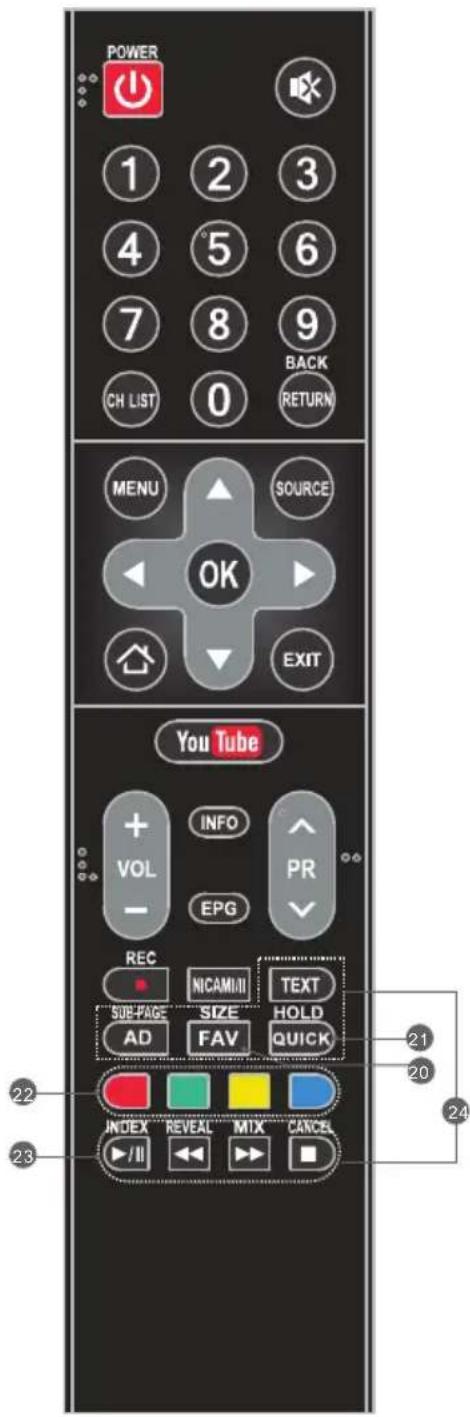
Hanomeha: Hekon Tactepn MoKe da 6nDaT HeBaXeKu 3a Hekon MoJeN. Kora Ke rnpntnche Te TakBnte Tactepn, Hema Da pearupaat nn Ha kpaot Ke ce nojabn Hatncot "Not available" (He e doctanho).
20.FAVpntncheTe 3a Da rN BnNTe O3HaueHnTe OMJIeHN KaHJI. PpNTncHeTe rN KOuHbTa Up/ Down (rope/IOly) 3a Da rN MeHyBaTe BaunTe OMJIeHN KaHJI n npTncHeTe OK (Bo peI) 3a da NOTBpIte.
21. QUICKПристандо 6рзо мени.
22. 06oEHn KOnHbA PpTncHeTe 3a da ja n3BpuNTe yHKnjuTa BO TV nI DTV-pekIM.
23. KOnTpOJHn KOnUHb a 3a penpoDyu npaHe nay3npaHe 3a YCb-penpoDyKunja (I)
PnTnCHTe 3a da ja naay3npate penpoDyKuJaTa, npTnCHTe NOBTOPOHO 3a da npOdoJXnTe CO pePOnDyKuJa.
Stop()
PnTncHeTe 3a da ja 3a npTe pe npOdyKunjata.
Konue 3a 6p3o HaHa3a(
PnTncHeTe 3a Ia BpaTnTe 6p3o Ha3aI.
Брзо HaHанрд(
PnTncHeTe 3a da oDnte 6p3o Happe.
- KONUHbA 3A TEJIETEKCT TEKCT
PnTncHeTe 3a Da Bne3eTe nn nIa n3Je3eTe OMeHTo 3a TeJETeKCT.
TOJEMHAA: 3roJemTe ro npka3OT Ha TeJeTeKCTOT: npITnCHTe ro OBA konue edHaW 3a da ja 3roJemnte rOpHaTaNIOBnHa od ekpaHot. PnITnCHTe ro OBA konue yuTe eHaW 3a da ja 3roJemnte DOJHaTaNIOBnHa od ekpaHot. PnITnCHTe ro OBA konue yuTe eHaW 3a da npOJnxITE CO HopMaJIHa ROJEMnHa Ha ekpaHot. HOLD: npITnCHTe 3a da ja 3aApXnTe cTpaHnCaTa 3a TeJeTeKCT Ha ekpaHot 6e3 axypupaHe i npomEn. PnITnCHTe NOBtOpHO 3a da ja oclo6oJnte Taa coctoJ6a.
SUB-PAGE (PODSTRANICA): npntnchete ro Oba KOnye 3a da Bne3eTe nIn n3Ne3eTe oJ pexmOT Ha notcTpaHua (ako e doctanHa notcTpaHua). PnTnCHete rKoNHBata uPBeHo / 3eJeHO 3a da n36epTe cakaHata notcTpaHua.
INDEX (INDEKS) Ппкжсстраиca Ha Инд ekc. REVEAL Ce npkaуbaaT ckpenHn HOpmaun KaKo WTo ce peweHna 3a rataHKn nN 3aRaTkn NOTCTpaHyBaHe Ha INOpMaunTe Od ekpaHot.
MIX (MIKS) Ппкжete Г TeJIeTeKCTOT NaI TeJIeBn3NcKaTa IpoRpaMa UIN BpaTe Ce BO HopMaJIeH peXIM Ha TeJIeTeKCT.
OTKAXN BpaTeCe TeIeBn3nckaTa npoPpMa
doNeKa npe6apyBaTe cTpaHua BO TeJeTekCT.
Kora Ke 3aBpuNTe co npe6apyBaHe, 6pojTo Ha
ctpaHnUaTa Ke ce npKaxe Ha rOpHnO TLeB aOrJ Od
ekpaHot. PnITncHEte NOBTOPO 3a Da Ce BpaTne Ha
CTpaHnUaTa OD TeJIeTEKCTOT.
REC (CHINMAHbE JInueH BnIeO3A\PNC)
Bo DTV-pexim n co npabunno npnknyeH YCb-ypeed moxe da ro chnmaTe kaHaJOT wTO ro rIepaTe n da ro n3rIepaTe noouna Kora Ke Bn Ondrobap. Ynotpe6eTe ja yHKunjata 3a da Chnmite nporpama Kora He MoxeTe da ja rIepaTe nn Kora douHN.
BAXHA HANOMEHA:
- REC ΦyHKπjata MoKeJa 6nnde HecooDBeTHa 3a HeKo peHNoHn.
- Ctabete haIbOpeuHm MemOpnsKypei co roJIema 6p3Ha BO COoDBeTHaTa YCb-nopTa Ha 3aHaTa CTpaHa oD TeJeBn3OpOT uYbePeTe ce DeKa ypeIoT Ma IOBOJHO cNo6OJeH npocToP.
- Ппд д понге ссимаьe, Ип Ви прлагаме ду ro Форматирау TE YCB-урет 3a д OBO3moхиTe cooDBetHa paobToHa 6p3nHa. Bo MeHITO OnuIN, n3bepeTe „REC File System" 3a ду ro Форматирау YCB-урет.
- 3a Bpeme Ha cHmMaHbETo, He MeHyBaJTe KaHaJI N He pa6oTe Co dpyrN fYHKUIN.
- Ako e cnHaJOT npeKHaT HmHema CnHaI, CHMaHBeTo Ke 3anpe DoKeKa He ce BocnoCTaBn CnHaI. Ha Toj NaHH MoKe Da ja N3ry6bTe CoDpKHaT Od, nporpaMata.
- He ICKJIYUyBAJTE ro TeIeBn3OpOT 3a BpeMe Ha ChIMaHbETo. Taka Ke n3Je3e oD REC uKe ce BpaTn BO pexHM Ha NODrTOBeHOCT.
- Chimaehata daToTeKa MoKe Da ce KopnCTn cMo Ha OBoj TeJIeBn3Op, a KOnIpaHbeto Ha KOMyHnKaunjaTa e Ctporu 3a6paHeto.
- KopnCTeTe BnCOKOBaJInteTeH Mo6IeH ype3a ChmMaHe nporpaMn CO BnCoka deHnNcJja (XД). Bo CnpOTIBHO BnDeO3aNNcITE Ke 3arIbAt npi penpoDyKuJaT.
- HanpaBete pe3epbHa konija od noaToUte Ha MemOpncknoT YCb-yepei Bo cnyaj da ce n3rybaT noaTOuTe npaHn HecpeKeH clyuj. Hne He npe3eMaMe HkaKBA oJROBOPHOCT 3a 3ary6n nopadn lowaYnoTpe6a nn deoekr. PpaBeHeTo pe3epbHa konija od noaToUte e oJROBOPHOCT Ha notpoWbauOT.
- Chmamhe Te daToTeK MoKe Da ce pe npDyuHpaT oD REC_LIST cMo BO BHe3eH n3Bop DVB-T/T2 &DVB-C.
HCTaHT cHMaHe n pePpOduyUpaHaBe
PnTnCHeTe ro konyeTo REC (ChmHaBe) 3a da 3anOHTe co ChmMaHbeto, a nCTOBpeMeHO noDolny Ke ce nojABn KOHTpOJHa JeHTa Ha dHOTo OD ekpaHOT.

Ako cakate da ro rleatae CHmehoto Bndeo dokeka CHMaTe nporpaMa, npHTNCheTe ro KonyeTo HaneBO 3a da n36epete n npTncheTe ro konyeTO OK (Bo pe), na ChmehOTO Bndeo ke noyHe da ce penpoDyuupa. N36npaHbete Moxe da ro npemotyBa penpoDyuupaHbeto 6p30 HaHaPpei nn 6p30 HaHa3aI.
Ako cakate da 3anpeTe n da n3Je3eTe oI cHImaHeTo, n36epTe O npTnCHte ro konyeTO OK (Bo pe).
Timeshift
Time-shift e noctanka 3a CHIMAbe TeleBn3nckn nporpaHn Ha ype3a cKnlaipnahe (kako uTo e YCB-Memopija) 3a da ce rkeja nOdoHa BO nonoroJHO Bpeme. Ynotpe6eTe ja fynKunjata 3a da CHIMnTe nporpama Kora He MoKeTe Da ja rIeDte NnKoRa DoUHN. Ako cakTe da 3amHeTe 3a KpaTko I da ja rIeDte nporpaMaTa 3a nponyuTnTe HeWTO od CoDPXnHaTa, MoKe Da ro npntchete KOHTe To 3a da ja 3anpeTe nporpaMaTa I da Ro npNTCHeTe KOHTe NOBtOpHo 3a da rIeDte Kora Ke ce BpATnte.
Hanomeha:
1.Ппд д понге co ChИMaHe Ha NaIbOpeWeH ypeД 3a cklaInpaHbe,poIobpo e da ro
ФорматираTe YCb-урет ot 3a Дбидete cnIpyHn Deka Има DoBOLHo npocToP 3a ChIMaHe.
2. IcTo Taka, MoKe Da ro To NoCTaBtE BpeMeTo Ha ChHMaHbe Bo fYHKunjata EPG (BnTe Ha CneHaTa CTpaHua).
EPG (EJIEKTPOHCKN IPOIPTAMCKN BOIDNU)
EPG 3hauN Dnrtanen eektpoHckn nporpaMckn BoOnu. Ce doctaByBa od daBaTeJIte Ha nporpaMaTaNHyDn HOpMaun 3a nporpaMnte wTo Ke ce emTuBaat. Moxe da npictanTe do Hero BO Dnrtanen pekIM co npitncKaHe ha konueTo EPG Ha daJeHHcknoT ynpaByauch.
- Пи捜сichte ro konчeto EPG 3a da npuctanite do nHTepcejcot 3a EPG. Ha Btopata lehta od rope ke ce npikkata TKOBHnTe daTm n Bpeme. Ha cncokot noDolny ke ce o3hau KaHaJOT ITO rIeNaTe MOMeHTaJIHo.
- 3a da npOBepnte nporpaMn To Ke ce emTuBaat Ha noounHexeH DaTym, Jn3rajTe co KOnHeTo △do nolto 3a daTym. PnTncheTe ro KonHeTo 3a da ro n36epete daTymOT To cakate da ro npOBepnte.
- ПпштснгTo кOnTuTo 3a Да ЛИЗгATEdo ro pOHaTЯ leHtA Ha ekpaHOT, a NotoA npITnCHTe ro KonTuTo 3a Дa ИЗбepeTe „Time" (BpeMe), Taka StTo moKe Дa ГлpoВeрпte CnICOKOT Ha npOrpamN Ha OndPeDeH KaHaI Ond PpeД OndpeDEHo BpeMe.
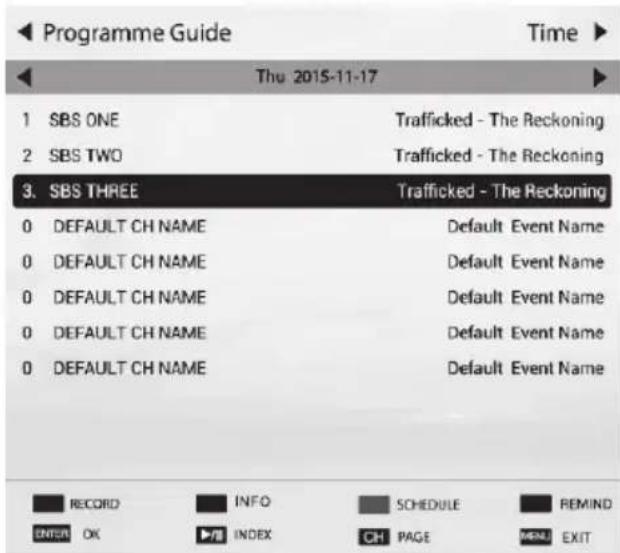
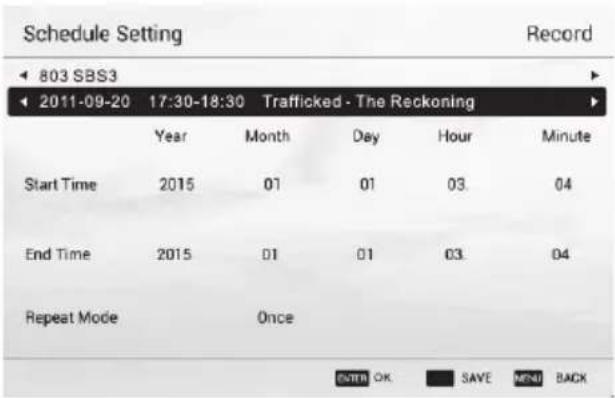
Pacnopei
PnTNCHeTo JxKoJITOTo KOnYe 3a Da ce
PnKaKe CnUCOKOT Ha pacNopeDoT 3a
ChIMaHe.MoKe Da n36pNiWeTe 3aKaKyBaHc co
PnTnCKaHe Ha UpBeHOTo KOnYe.
NotCetHnk
PnTnCHTe Ha CnHOTo KOnYe 3a Da ce npKakMeHrTO 3a NOTcETnIKOT. Cera MoKe Da roNoCTaBnTE BpeMeTo 3a NOTcETyBaHe N peXIMOT3a NOBtOpYBaHe
Chmay
PnTNCHe Ha LpBEHOTO konye 3a da ce npkaKe MeHTo 3a noCTaByBaBe Ha pacnopeIot. Co KopncTe He Ha KOnuHaTa 3a HABnraUja, noCTaBeTe ro pacnopeIot Ha BpeMeTO co O3NaUyBaHe Ha 6pOooBNTe 3a RoDInHa, Mceu, DeH, yac nIIu MNHyTa I npTNCHeTe RO KonYeTO ENTER (BheCu), a notoa CO KOnuHbTa rope n DOly 3a Da rO HameCTnte 6pojoT. Ynotpe6Te Ro NCTNtHaun 3a Da rO NOCTaBnTe peKIMOT 3a NOBTOpyBaHe, a NoToa n36epete „SAVE" (3auyBaj) 3a da rN 3auYBaTe NOCTaBKnTe.
HΦopMaun
PnTncHeTe ro 3EJIeHOTOKonue 3a da ce npkaKat INΦOpMaun 3a n36paHaTa nporpama.
ПВИЧNO ПОCTABYBAHBЕ И NOUYETHN KAPAKTEPNTIKN
PpBnHNo nocTaByBaHe
Ipbnot nat Kora Ke ro BKnyute Te neBun3OpOT Ke ce nojabn BOJIwe6HnK 3a NOCTaByBaHbe, npntucheTe ro konyeTo OK (Bo pei) 3a da 3anoohete n da rN 3aBpUnTe cneHNBe ueKO
YeKOp 1 N36epeTe ja3nK 3a OSD cnopei noTpe6nte;
YeKOp 2 N36epeTe ja OKoJInHaTa nomery,Home" n,Store";
Yekop 3 N36epete ja npkaBaTa;
YeKOp 4 NocTabeTe ro YacOBHnKOT Ha TeJeBn3OpOT (NocTabKn 3a BpeMeTo);
Yekop 5 Ppounjte ng npabHnTe n3jaBn;
YeKOp 6 NocTabeTe ja MpeXHaTa Bpcka;
YeKOp 7 3aNoUHeTe co aBtOMaTcKO npE6apyBaHbe 3a da 6apate nporpaMn, a Kora Ke 3aBpUnTe, nporpaMnte Ke ce 3aCyBaA T Bo MemopNJata n co Toa Ke 6Nde 3aBpSeHo npBnHOTo NoCTaByBaHe.
HANOMEHA: PpeI da rgo BKnyute TeJeBn3OpOT, Tpe6a da rgo NOBp3eTe Ka6eIOT 3a TeJeBn3nCKN CnHaHa TepMnHaNoT Od npneMHNKOT Ha 3aHaTa CTpaHa OJ TeJeBn3OpOT.
Home
PnTncHeTo KOuTeTo Home 3a da npuctannte Ha noyehata ctpaHua. Kopucte Tn KOnuHbata 3a Habirauju a n KonueTo OK 3a da n36epete u da npuctannte do IKoHa.
Mirashare (MOKe Da He e DoCTaHNo Ha HeKoN MoDeJI)
Бe3 ka6eI 3a noIaTOU, BkJyTe Ro Be3KuHnOT nHTepHeT Wi-Fi Ha MObUNHnOT TeJefoH, n36peTe „Mirashare" Ha noYeTHnOT ekpaH oTKaKo Ke ro npITncCHete KOnTuTo HOME (NoTeOK) I COJxHnITE OJ MOBUNHnOT TeJefoH Ke ce npIKaKByBaAT Ha TeJIeBn3OpOT mOKe da yXNBaTe BO rJaDaHbTe Ho rOJIema CInka.
YEKOPN:
1.OTbopete ja yHKunjata miracast Ha BaUHOT Mo6nJIeTJefoH;
2. HajindeTe ro Ha3nBOT Ha TeLeBn3OpOT ha Mo6nJIHnOT TeJefoH nI36epeTe ro, a noToa Ha TeLeBn3OpOT Ke ce ce nejABn dJaJor-pamKa. PnpaTeTe ro 3a da ja nobp3eTe yHKnjaTa Mirashare n coDpxnHaT oD BaNOn T eJefoH Ke ce pe npOduu npa Ha TeLeBn3OpOT.
Hanomeha: kaj Hekon Mojei, oTKaKO Ke ro n36peTe Ha3nBOT Ha TeJeBn3OpOT, Mo6NJHnOT TeJeOH, Mo6NJHnOT TeJeOH n TeJeBn3OpOT MOKe Ja ce NOBp3aT ABTomATCKN.
V3BOP
N36epeTeBne3eHn3BOp.
MpexHn anJnkaCm
3a BaC ce OBO3MOXeHn coUjAJIHn anJInKaUIN, kako 1To ce YouTube.
Ha npimep, n36epete ja nkohata 3a Facebook Ha noyehata ctpaHua n npntnche TE OK 3a da npictannte.
TB-npernybau
I36epeTe ja ukoHaTa 3a TB-nperLeNyBaU ha noeThaTc TpaHua n npntncHe TE OK 3a da pa3rJeDyBaTe Ha INTepHeT. KapakTepnCTNKte BknyuBaAT 6p3o 6npaHe, o6JIexyBaun, nTH.
Hanomeha:
- Moxho e npereybaot da He noepkyBa Hekon Be6-ctpaHnI nn BnEo3aHcN nopaI naHa Mpekata, pa3nka BO pernoHte IInn PpeKnH Ha ycLyraTa, Ho Toa Hema HnKaKBa Bpcka coTeJIeBn3OpOT.
- ДOKOLKY TEKOBHATA сика се ушte He e ue locho OTbopeha (JeHTaTa 3a Hanpeok He e 3aBpseHa), dinpeKTHO Ke ce n3bepe dpyra cTpaanuca, a npeTOxOHaTa cTpaHnua Ke ce 3auyBa BO nCTopnjata.
PepoaykTop Ha meynym
Iobp3eTe YCb-ypeiHa TeleBn3OpOT n 36epeTe Media Player (PepoDyKTop Ha Meynm) Ha NoeTHaTa cTpaHua n Ke MoxeTe da pePOnDyUcapaTe BnJeO/My3Nukn/ΦOTorpaΦcKn DaToTeKn OYCB Bo TelenBn3OpOT.
TeLeBn3Op co Opera
Toa e anlinaqnaHa nHTepHeT hnpabaHa 3a TeleBn3Op. OTBopeTe ja n mOKe da HajTe pa3uHN BIOBn anlinaqnn, KaKO uTO ce BcTn IN BpeMeHcKa npOrHO3a, npRoJa n NaTyBaHa, Deca, HauHH Ha XINBOT, CNOPT, My3Nka, TeLEBn3nja BO XINBO IN BInDeo, INrpn, fNIMOBn IN TELEBn3NCKn pOgpaMn, ITH.
Home Media (MOXe Da He 6nne IocTAnHo)
3a da cnoJeLyBaTe BnDeo3aHncn, My3nka n CnIKN OJ Mo6nHnOT TelefoH nn KOMnjyTePOr COKmNjyTePOr, Tpe6a Da rI NOBp3eTe TeneBn3OpOT N BaUnOT ypeI Ha IcTata MpeXa.
Hanomeha 1 Hekon od annilkaunTe Ha noeTHaTcTaHnca MoKe da He ce doctanHn kaj OndpeHn moJe, a BO OBOJ npupaHnK He ce onoateHn yNaTCTBa 3a KopncTeHe 3a Cnte annilkaun Ha noeTHnOT ekpaH.
Hanomeha 2 Ako Baunite daBaTeJn Ha ycnyr nHa dIgpaat Jn npomeHaT cBOte cepBepn, anikaunite oD tInot YouTube n Facebook moke da He cyHKuOnHpaat Ha OBJ TeJebu3Op.
Hanomeha 3 Baunot daJeunHcN ynpaByBauch moKeBn He e KompaTbnHe c HeKoMpeKn anikaun He paBOTn nopadn npeknHa ycnyrata, Koja wTO Hema HnKaKbA Bpcka co TeJebu3OpOT.
Hanomeha 4
ПОЛNTИКА 3a пиВаTHOCТ (MOжБи He eДocTанha): 3a 3aшТИТа Ha BaшИТe ЛчHи NOДATOци И 3a NOчNTуВа№ He Na lokaJIHnTe OndpeДб. ИмATE MOЖHOCT BO 6иLO KoJ MOMENT DA.To NOВLEЧЕТ прфakсьeto Ha NOЛNTИКATA 3a пиВаTHOCТ BO MeHITO Ha BaшИNot Tesla TeleEBu3Op. Ako e aKTNBHO OTkaxyBaHbeto, He ce BOCNoCTaByBa ВрСKa co INHTepHET.
Hanomeha 5
CopxHaTa ycnyrTe oMpeXHaTa anlkaunjra KOHTpolnpaat daBaTeIte Ha MpeXHaTa anlkaunjappeky objekTu 3a MpeXa n npenoc Ha noDaToU, KOn ce noJIOxHn Ha n3MeHn, DekeT, yKInHyBaHe, OTCTpaHyBaHe, ppeKn Hn, naK, HeBaKeuKn npctan BO Koe 6nlo Bpeme 6e3 npetXoHa HajaBa DeKa npO3BODntEton He e BO MOxHOCT Da KOHTpolnpa Hn Da 6nde INΦOpMnpaH 3a cnomeHaTata npomeHa. PpO3BODntEton NoHaTamy n3jabyBa DeKa ce OdpeKyBa Od cekkBa ODROBOPHOCT Nn ObPcKn To npO3JeYBaAT Ond HEmOXHOCTa Ha KopNCIKOT Da Tn KopNCTn CoDPxHnTe Nn ycLyrTe npuHNHeT O, Ho He e OrpaHnueHo Ha nad Ha MpeXHaTa Bpcka Nn KomyHKaunckNe JInHn, TexHOLOwKn aKypnPapaHa Nn 3aMeHa, OTKaXyBaHe, ppeKN, yKInHyBaBe Nn OTCTpaHyBaHe Ha KaKBa 6nlo COpXHa Nn YcLyrO nd CtpaHa daBaTeIOT Ha MpeXHaTa anlkaunjia nTH.
KOHTPOJIA HA MEHINTO
3a TpaJHO axKypnpaBe HnHaIgpaIb6a Dony HaBeJeHInTe OINcH Na NOpEcYBaHa Ha MeHnJaTa MoKe6n He Ce BO corLnacHocT co yNaTCTBOTO 3a BaNtOT TeLEBn3Op; Oba e BoO6NuHaeHo, a peAhnata CoDPxHHa Ha BaNtOT TeLEBn3Op e BO corLnacHocT co yNaTCTBOTO.
Pa6oTeHbe co MeHnTo
PnTnCHeTe Ha KOnyTeo MENU 3a Da BLe3eTe BO TJIaBHOTo MeHn.
PnTncHeTe ro konueTo [4] /[ ]3a da n36peTe meHn.
PnTncHeTe ro konyeTo [ ] / [ ]3a da n36peTe noMeHn.
PnTtncHeTe ro konuTeo OK 3a da BJIe3eTe BO CTaBka.
PnTncHeTe Ro KonueTo MENU 3a Ia n3Je3eTe Od CTaBkata.

HanomeHa: OIcHNTe OD IOLHOTo MeHN Ce BO N3BOpHTe Ha TeJIeBN3OpOT.
Cnka
PexmHa cIInKa: n36epete ro cooBETHnot pexm Ha cIInKa 3a pa3JIuHn IeJI.
3aHnHcKo CBETNo: HaroTeTo npaMeTapOT 3a 3aHHCKO OCBeTlyBaHe Ha TeJIeBn3OpOT.
TemnepaupaHa 6oja: n36peTe ro cEBkynHnot ToH Ha 6oJaTa 3a CInKaTa.
ДиhamMuHо hamaIyBaIbe IyM: n36epeTe mery Off (IcknyeHo), Low (Hncko), Middle (CpeiHo) N Strong (Cnilho).
HaMaIyBaHbe yM Ha MPEG: n36epTe Mery Off (NcknyeHo), Low (Hncko), Middle (CpeNo) n Strong (CunHo).
Iponopunja Ha rpaqnuk npka3: n3bepTe ro cooDbETHnot pekum Ha ndcnJIe 3a pa3nUHN ceJN. HeKoON ONUIM MOKe Da He 6uDaT DOCTaHn 3a OndpeDeHn n3BOPn N BnDoeOcOdpKHa.
Диhamчк Контс: посту base Na On (Влуно) Или Off (Иклуно), соред желба.
Cen3op 3a cInka: co OBaa KapaKTePnCTnKa aBTOMaTCK n Ce HArOdyBa OCBeTJIeHOCTa Ha ekpaHOT Kora Ke ce npomeHn OCBeTJIeHOCTa Ha cInkata. Ako cInkata e BO HOKHO BpeMe, ekpaHOT aBTOMaTCK Ke ce 3aTeMHn; aKO cInkata e BO DHeBHO BpeMe, ekpaHOT aBTOMaTCK Ke ce OCBETII.
PexmHa nIIM: noCTaBeTe Ha On (BknyeHo) nn Off (VcknyeHo), cnopeJxen6a.
ABTomatcka rlaacnoct: n36epeTe Mery On (BkJIyuHe) n Off (IckJIyuHe).
OnkpyKyaKn 3ByK: OBO3MOxYBa CO3JaBaHBe Ha no6oat n nouropok 3ByueH oncer od cTepeo H3BOPOT Ha 3ByK.
Ahaoreh aydnon3ne3: OBaa kapaKtepncTnka ce KopnCTn 3a n3bop Ha Cnyuajkn u N3Je3Ha JInHja. PpiKnyute cnyuajkn Ha TepMNHaIOT 3a Cnyuajkn BO TeJIeBn3OpOT mOKe da cnyuate npeky cnyuajknTe.
Дигтален aydnon3ne3: Oba Ka KapakTepnCTNa ce KopnCTn 3a n36op Ha ABTomatckn n PCM. Kora Ke noBp3eTe DiRtalaen 3acnnyBaay Ha 3Byk Ha TepmHaJ 3a DiRtalaen n3Ne3 3a 3Byk Ha TeJeBn3OpOT, n36epete ja Obaa fynKunja od MeHnTo SOUND (3Byk) n n36epete ro pexnMOT 3a aydnon3ne3.
Audio HDMI: n36epeTe ro pexHMOT 3a 3Byk npeky XDMN, a onuHte BknyCyBaAT: aBtOMaTCKn, dIgntaIeH n analoreH. Oncs co 3Byk (MOke da He 6nde doctanHo): Bknyte Ro IIN NcKnyte Ro ONCOT CO 3Byk. Kora Ke ro Bknyute ONCOT CO 3Byk, packaKyBaOH Te ONIwe ITO ce ClyCyBa Ha ekpaHot 3a cIePi Jnca iIi rIedauH co Hapuyen BnD.
NoBtOHO noCTaByBaHe Ha 3ByKoT: rI NoCTaByBa NOBtOpHo npaMeTpnte Ha cTaHapdHnTe
BpeHOCTN.
HnctaInpaHe
YpeDyBaHBe npOrpamM
YpeTe r npOrpAmte. Moxe da r npTnChTe oOeHnTe KOnuHa Ha daJeHHCKNt ynpaByBa 3a da npecKoHTe nporpaMn, n36pnwTe nporpaMn IdoaTe nporpaMn BO cncOKOT ha OMIneH co npTnckaHe ha konyeTo FAV (OmIneHn).
JaunHa ha aHTeHa o5V
Obaa onuja e doctanha camo 3a u3Bop DVB-T/T2, u36epete On (BknyeHo) da doheceTe HanojyBaHe 3a TeLeBn3nckata aHTeHa; U36epete Off (UcknyeHo) 3a da ja uCKnyuTe OBaa yHKunja.
HΦopmaun 3a CI (doctanho camo BO DTV-pekm)
My oBO3MOxJyBa Ha KOpIcHnKoT Da I36epe Od CAM-MeHnTo. I36epeTe ro Cl-MeHnTo 6a3npaHo Ha MeHnTO Od KOMnjyTepcka KapTuKa.
MaHyeIHo 6npaHb e Ha ATV
Bo ATV-pexim, n36epete ATV Manual Tuning (mahyeJno npncnocobyahe Ha ATV) n npntucheTe Ha konqueto OK (Bo peq) 3a da npnctanite.
- KOpncTeTe Tn KOnuHbTa 3a HacOka 3a Da O3HaunTe N da NoctaBnteStorage To 1 (MemopupaHe Ha 1) (Moxe6n npy6poj), Color System (CnCTem Ha 6oN), Sound System (CnCTem Ha 3Byu) n Current Channel (TekOBen KaHaI). IToOA n36peTe npe6apaj n npHTNCheTe 一 一 3a Da 3anOUnHeTe co nppe6apyaBe.
-Путисhev 3aда пpeбapyBa уретOT KOH NOBUCOKA;
-Припснichte 3a Да пpeбаруba уретOT кон понсяфразьида.
- Kora ke 6nne hajdeha nporpaMa, npTncheTe ro cpBeHTo konue 3a da ja 3auyBaTe Ha TeKOBHaTa n03uJa ha KaHaJot. Ako cakate da ro 3anpeTe npe6apyBaHeTo, npTncheTe ro KonyeTO MENU (MeH).
-ПпeциЗно 6ира№
Ce kopnctn 3a da ce HappaBAt MaJn HaOdyBaHa npi 6npaHbeto Ha INDIN dyAileh KaHaJI.
Ppeu3HOTo 6npaHe He e HeonxOndHo npi HopmaJHyCIOBn. Merytoa, Bo oblacta Ha
HHepnOpHn ycNoBn Ha emTyBaBe KaJe wTO ce Notpe6Hn HaOdyBaHa 3a noo6pn CInka n
3ByK, KopnCTePeu3HO 6npaHe.
1.ИЗберете канл StTo caKaTe Da ro Ги НаштимATEпрси3HO.
2. Bo MeHnTo Installation (Mnctanauja) n36epTe MaHyeIHO 6npaHe Ha ATV n npTnCHeTe 3a da O3NaHTe Fine-Tune (Ppeun3Ho 6npaHe).
3. Пптисе nii 3a пецизно бираье доideka He ce doбиJT hajdoobpTe moxн сліку n 3Byk.
NoctaByBaHbe
Ja3nk 3a OSD: n36epete ro caKaHHOT ja3nk 3a OSD.
Ja3NK Ha 3ByK: nocTaBeTe ro npImaPHeNOT IJI N CeKHyIaPHeNOT IINrITaJIeH ja3NK Ha 3ByK KOJ OndroBapa co Ha cnIHaiNoT.
Ja3NK Ha TnTn: n36epete ro ja3NKOT Ha TnTJIoT.
Liu ca co Hapuweh cnlyx: OBaa KapaKTePncTnKa NM NOMara Ha LiuaTa co HapyuweH cnlyx Da rna pa36epa Tporpamnte co npkaKxyBaHe Ha peJeBaHTn rpaΦnUKNnHΦopMaun (CInHo Ha TnI, Ho He e Toa) Ha ekpaHot. Tpeba Da ro BKnyte peknHybaOT nped da ja kOpnstte OBaa KapaKTePncTnKa.
Ja3NK Ha TeIeTeKCT: n36epete ja3NK Ha TeIeTeKCT cnopeJxJI6a.
IaToTeueH cncTeM 3a REC: Ako cakate da ja kOpunctte Obaa yHKunja, Mopa da npumnte IuRtAlHa nporpama n da npKnyute YCb-ypei.
Hanomeha: Hne Bn npednaame da Kopncntte Mo6nleH TBpD dNCK CO rOJema 6p3nHa, 3aHTo BO cnpOTNBHO TeJIeBn3OpOT MOKe Da 3aIabN KOra Tn Kopncntte fYHKcUNTe REC n ChImaHe 3a NOIOUHEKHO rIeJaHe.
HDMI CEC: Tn NOBp3yBa n Tn KOHTpoJnpa TeJeBn3OpOT N HeROBnTe HaNbOpeuHn ypeDu Co NOBp3yBaHe Na HaNBopeWeH ypeD Ha XDMN-nopTa oD TeJeBn3OpOT.
HDMI CEC - BknyBaHe nlln NcknyBaHe Ha fynKunjata HMI CEC.
Auto Standby (A B T O M A T C K A N O D R O T B E H O C T) - A B T O M A T C K I R B K J U Y B A T E J E B N 3 O P O T B O P E X I M H A N O D R O T B E H O C T.
Device List (Спсок на урети) - кORA e вклушина ФункцидаНДМИ СЕС, тpeба ду ro npоверпессokot на урети за поврзуваъе се телевизорот. Лokaшиja: ИЗберete реким на lokaшиja 3a penpoюцраье DOMA пли BO празавниca kORA ke ИЗберete „Store" (Празавниca) и ke може ду bo вклушистicker demo.
PpeTCTaByBaHbe: Bknyte ro nnn ncknyte ro sticker demo n YCb-demo.
MK
YCb-Демо:
- Nontpe6Hn nocTabKn: IodajTe ja TeKCTyaJHaTa daToTeKa „AutoDemo.txt" BO OCHOBHNOT IMEHNK Ha YCb-ypeoT, a noToa BHeCeTe ja naTeKaTa Ha BInDeo3aInciTe wTO Tpe6a da ce penpOdyuipaat Ha TeJeBn3OpT kaTe wTO cekoja liHHja ima CBOJa nay3a.
- Kora e noctabeno, YCb-Emo" ha, On" (Bknyeho), TeleBu3OpOT aTOMaTcN ke penpoDyu npa BnDeO3aHncn BO, AutoDemo.txt", a OKako Ke 3aBpHn pePOnDyKuJaTa Ha cHTe BnDeO3aHncn, TeleBu3OpOT Ke CE BpaTHa HneTXOJHO rIeDaHaTa nporpama. No Nt MInHyTu, TeleBu3OpOT Ke BpHn ZIKLyc Ha penpoDyKuJa Ha 3aIIShaHb BVdeA n nporpama.
- ΠaTeKaTa Tpe6a Da 6nIe HannuHa Ha aHrIiNcK ja3nK nIu co 6pojKn, 6nIeJkn BO cnpOTnBHO TeLeBn3OpO T HeMa Da Ja npEno3Hae.
Akynpahe coΦTBep:
- AxypupaHe Ha coΦTbepoT(YCb)
IrpBO npesemete ro n 3aaybajte ro cooTbepot 3a haadrgpa6ha YC5-ypei, nobp3eTe ro YC5-ypeot Ha YCb-nopTa oD teJeBn3OpOT, Bne3eTe BO MeHInTo „Setup" (IocTabyBaHe) u36epete „Software update" (AxynpaHe ha cooTbepot) u36epete „Software update (USB)" [AxyppaHe ha cooTbepot (YCb)] 3a da 3anOuHete co npouecot Ha haadrgpa6ba. Kora ke 3abPunTe, TeJeBn3OpOT abTomatckn Ke ce npectapTyBa.
HANOMEHA: He ncknybajte ro TeleBn3opot oD ctpya doKea Tpae HaIrpad6aTa Ha coTbepot, 6ndejkn BO cnpotNBHO TeleBn3opot Hema da pa6oTu Ke 6nide OndroBopeh NotpouBaoyt.
2. Axyupahe ha coΦTbepoT (mpexa)
Iobp3eTe ro TeLeBn3OpOT ha INTEpeHET moKe da ro HaAnrpaAnTe TeLeBn3NCKNOT CnCTEm nnMpeXHa anlkaunja Ha TeLeBn3OpOT.
HANOMEHA: "Network Upgrade" (Haɪrpaɪdə ha mpekata)ǒme ᵷa He 6nnde iocTAnHo 3a HeKoI pernoH.
3. AkyipapheTo Ha coTBepot (OAD) (cAmo 3a HeKOn peHOnn H cAmo BO peKm DVB-T). N36epeTe 3a da ro akyipapate CNTemcknot coTBeP ha TeJIeBn3OpOT 6e3xuHNo.
HanpeHa onuJa: NocTaBeTe rN fYHKunIte „Fast Boot" (Bp3o noIraHe) n „Wake on Network" (Aktubapaj mpeka).
Blue Screen (CnH ekpan): Kora e noctabeHo CnH ekpaH Ha BKnyeHo, ekpaHot Ke cTaHe CnH n rJaCoT Ke 6nnde 3anpen h ao Hema npneH ha cnHaJ.
User Reset (Kopncnucko noctabyahe): NOBTOPHO ce noCTaByBaat npaMeTpnte Ha MeHTo Ha CTaNapdHnTe BpeNHOCTN.
PpabHn n3jabn: peJIeBaHTn npaBn n3jabn.
Bpeme
Yacobnik: Nocabete ng Yacobnikot Ha TeJIeBn3OpOT, BpeMeHcKaTa 3OHa n IHeBHOTO CMeTaHb HApBpeMeTo.
Clock mode (PexmHa yacobnK) - onuTe BknyybaaT Auto (AbTomatckn) n Manual (PaHo). Kora ke n3bepete "Auto" (ABtomatckn), yacobnKOT Ha TeJeBn3OpOT Ke ce cHxpoHn3npa co peaHnOTo BpeMe oD dInrtaJHnO T B-cnHnA. Kora Ke n3bepete ,Manual" (PaHo), Tpe6a paHNo Da ro noCTaBnTe BpeMeTo Ha yacobnKOT, BknyybajKn I NOCTaBvBaHe Ha rOnHaTa, MeceLQT, DaTymOT, Yacot mMHytne.
Time zone (Bpemehcka 30ha)-n36epete ja BpeMHckata 30ha cnpoei Baawata MectonoJox6a.
Summer time (Дневно сMetaHe Na Врето)- може да ѳ вклунITE Или да ѳ ИсклунITE Obaa Функциja.
Off Timer (Tajmep 3a ncknyuBahe): OBaa KapaKTePnCTnKa BN OBO3MOyBa da rO nocTaBnTe TeJebn3OpOT da Ce nCKnyuBa aBTOMATCKn Ha BpeMeHcN INTEpBaJI.
On Timer (Tajmep 3a BknyBahe): OBaa KapaKTePncTnKa BN OBO3MOxyBa Da rO NOCTaBtTeJeBn3OpOT da Ce BkIyBa aBTOMaTcKn Ha IpeTXoJHO NOCTaBeH BJIe NII rJaCHoCT.
Sleep Timer (Tajmep 3a 3acnBaHe): TIOCTaByBa aBTOMaTCKN BpeMeTO 3a NCKJyBaHBe Ha TeJIeBn3OpOT.
Automatic Power down (ABTomatcko ncknybahe): rO nocTaByBa BpeMeTo 3a aBTOMaTCKO ncknybahe Ha TeIeBn3OpOT Kora He pa60Tu.
Continuous viewing timer (Tajmep 3a HnpeknHTo rIeAbe): 3a da cnpueHte HnpeknHTo rIeAbe TeIeBn3Ja dOJIr BpeMeHcN nepIO, Moxe Da nocTaBnTe da ce nojabyBa nopaka Koja npenopayBa rIeDaOT da hAnpaBn nay3a od rIeJaBeTo. Oba e oco6eNo KopncHO da ce cnpeuat DecaTa da rIeJaat TeIeBn3Ja dOJIr BpeMeHcN nepIO. Od MeHnTO TIME (BPEME) n36epete Continuous Viewing Timer
(Tajmep 3a Henpekenato rledahe) nocTabete ro BpemeTo. Kora nomnHaNoocTabeHOTo Bpeme,Ke ce nojabn nopaka koja npenopayba deka rledaot Tpe6a da hnpabn nay3a. Pnrtnche OK (Bo pei) iJIN EXIT (U3ne3) 3a da ce TprHe nopakata.
HappeiHo
CnCTem 3a 3aknyuBaHe: BHeceTe ja noeTHaTa lo3nHka (0000) 3a da npctanite do Obaa KaapakTepncTnKa, n36peTe "on" (BklyueHo) n Ke ce akTbupaat CneHnBe KapakTepnCTnK
"Set password'' (Пос tabи Лознka),''Block channel' (Блokрaj кан),''Parental control''
(PoInteLska KOHTpOa) n „Panel lock" (3aKnyuBaHbHe Ha naHEnOT); N3bepeTe „off" (NcKnyUeHO) n ropeHaBeJeHte KapakTePncTnK Ke ce deakTbBpaat. Ako cTe ja 3a6OpabJIe lo3nHKata, o6nIeTe ce co cyep lo3nHKata (8899) 3a da npunctanTE. IocTabeTe lo3nHKa: NOBtOpHo nocTabeTe ja lo3nHKata Ha cnCTemOT 3a 3aKnyuBaHbE.
Блokирай Канал (само ВToTeJIeBn3NcKn peKIM): ьлokираjetги каналte (прогрamite) loTo He ce cooDBeTHN 3a Deua.
PojnteJcKa KOHTpOJa (cMo BO TeJeBn3NcK npExm): Bn OBO3MOxyBa oRpaHnueH npNCtan co JIo3NHka Do npOrpaMn Bp3 OCHOBa Ha OueHaTa OD pOoiTeJIITE.
Panel Lock (3aKnyBaHe Ha naHelot): 3a Da Tn OHeBO3MOXHTe DOJIHNTE KOJNUHa Ha
TeIeBn3OpOT. CyeuTe MoKe Da ce KOpNCTaT Cnte KOnUHbHa Na daJeunHckNt ynpaByBaY.
Mpeka
Be3Kn4Ha Bpcka
- N36epete „Wireless Connection" (Бeзкуна Мрека) и пптснче тг кончето OK (Во рд), в пото поставе тг „WLAN Switch" (П配电инвача WLAN) на ВКлуше;
- Nooekajte HeKoJky cekyHn n Ha cnncokot ke ce npkaXat MeCTata co Wi-Fi, n36epete n npTncheTe Ha konyeTo OK 3a da ro OTbOpnte INHTepoejcoT 3a BHeCyBaHe lo3nHa.
- KopnCTeTe rKoNCHbata 3a Habnraunja 3a da ja BHece Te lo3nHKata, a Kora Ke 3aBpHnte, npTncHeTe ro 3eJeHOTo KOnue Ha daJIeunHcKnOT ynpaByBaay 3a da ja 3anOuHete NOBp3yBaHbeto.
KmueHaBpcka
- Поврзе Г мрекнnot кабел на потata 3a Лан на заднnot дл од телевиportoT;
- BlneTe BO rIaBHO MeHn n 36peTe mpeXHo IOpMeHn.
3.Изберete „Wired Connection"(БeЗкична Мржа),notoa Изберete „Auto Input" (Автоматски Влес),почекajte Неколky cekyни Мржнота конфигурациja ke bide успшно 3авшина.
Hanomeha:прдда заочhte, поверете дал pa6otи добpo пpenacovybaOT.
YCBS-KOHTPOJIa
YCb-MeHn
Moke da rneate fuiMckn, My3uukn foToRpaockn daToTeKn oMmOpuckn YCb-ypeu.
1.Поврзete YCb-ypeн на ВлесиOT TePmHaJ 3a YCb.
2.Притишистую кочето Home (Почеток) иизберete „Media Player" (Ренисту).
ΦNIM:penpoDyunpajTe ΦnMoBNoYCb.
MY3NKA:penpoodyuapajte My3nka oJ YCB.
ΦOTOPAΦH: rIeJaTe φotorpaΦn oD YCB.
NotceTnK Kora da ro kopncnte YCb-penpoDyKTopoT
- Hekon Memopncn YCb-ypeiMoKe Ja He ce KOMNaTn6uJIHn 3a paMHomepHo pa6oTeHe co OBOJ TeJeBn3Op.
- HanpaBeTe pe3epBHa konJa oJ noTaToUte Ha MemOpnckNoT YCB-ypeD Bo clyuaj da ce n3ry6aT noDaToUte npaDi HecpeKeH clyuaj. Hne He npe3eMaMe HkaKaBa oJROBOPHOCT 3a3aYbN npaDi lo7a ynoTpe6a nn deΦeKT. PpaBeHeTo pe3epBHa konJa oJ noTaToUte e OJROBOPHOCT Ha notpoSuByaOT.
- 3a roJIemn daToTeKn, 6p3n3HaTaN BcHTyBaHbMe MoKe da 6nnde MaNky no6aBHa.
4.БрзинагаHa npeNo3HabHe Ha MemOpncKnOT YCb-ypeД 3aBnCn OД ceKoJypeД noEInHeuHO. - Kora ro noBp3yBaTe nIu ncknyuBaTe MemOpncknot YCb-ypei, npOBepTe daJIu TeJeBn3OpOT He e BO YCb-pexIM, 3aUTo BO cnpoTHBHO MOke da ce oHTeY CB-ypeoT IIn DaTOTeKNTe 3aUyBaHn Ha Hero.
- Kopnctete cmo Memopncu YCb-ypei, uTo e ofoMaTnpaH BO daToTeHnTe CnCTeMn FAT16, FAT32, NTFS Bknyehn BO onepaTHBnOT CnCTem Windows. IOKoIky MemopncNt ypeI ce oOpMaTnpa co pyra ycJyKHa nporpama uTo He e noDipxHa oD Windows, ypeIoT MoKe Ja He 6nJe npeno3Haen.
- Kora kopnctte TBpD nck Ha YCb 6to 6apa n3BOP ha ekeTpnuHa eheprna, ybepeTe ce deka HanojyBaHbTo He hAmHyBa 500 mA. DoKoKy jaHnata Ha YCb-TBpNt Dnck HaamHe 500 mA, TeJeBn3NCKNOT CnCTe Ke npemHe BO pexmHa noIrotBeHocT, na Ke Mopa da ro n3BneTe YCbypeDot n da rnpctapTyBate TeJeBn3Opot.
- ДOKОЛКу датеунов сисем He e noДржан Ии e oштeteн, Ke ce nojabи nopakasta „Not support" (He e noДржано).
- 3a roIemata cIIka co ueIOcha Bucoka deHnHcunja (FHD) e nOte6Ho nOdoJro BpeMe 3a o6pa6oTKa, a Toa He e npEiN3BnKaHO OJ TeJeBn3OpOT. Be moJIme noeKajTe.
- Oboj TeIeBn3Op MoKe Ha He NpIpyBa HeKo npOMEHeu HaIrpAeHn MyJIITmEHyMCKn DaTOTekn nopAaN IpomeHaTa Ha opMaTOT 3a KoInpaHe e IIN dpYr TexHnckn HAnpeOK.
MeHn 3aΦnIMOBn
1.Пи捜сhte Ил n73а д a n36epeTe MOVIE (ФиIM).Пи捜сhte OK 3a д a notВрдnte.
2.ПиTNCHete / nii 3a ja ja n36epete cakHaTa nanka n npTNCHete OK 3a da ja otBOpHTe nankata, a noToa npTNCHete 3a da 3anoHete co penpoDyKuJa.
3.ПиТСНЕТа Дa Го ЗanpeTe peNpoДуцИраБeTo Ha ΦИлМOT И Дa ce ВpaTHTe Ha cnICOKOT coФиЛMOВи.
4.ПиТиСнeTe EXIT(ИЗлe3)зда се ВарптЕ на пpeTXODHITe ekpaHи OД MeHTo.
KoHTpOHaJeHTa3aΦnIM
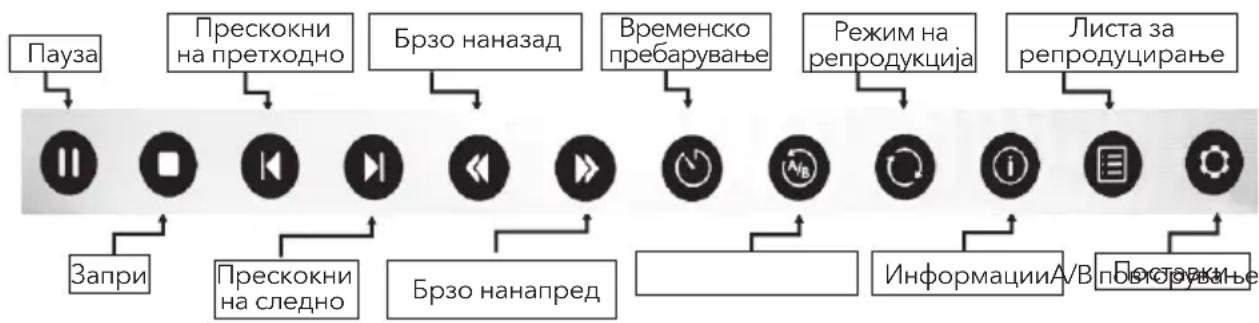
-Причсichte [MENU]3a Да се пикajes КОТролнота ЛeHTа 3a Филм Доideka ce peпpoуцрафилmot.
-ПиТиСHTeTe [ ]/[ ] 3a Да Ги ИЗБере ТсаКан�п NOCTaВкN.
-Пи捜сHeTe [MENu] 3a Да ИЗлe3eTe OД KOHTpoJHaTa Лenta 3a ФИЛМ.
MK
MeHn 3a My3nKa
1.ПИТСНСЕТe 一 ИЛ 3a ДА ИЗБЕРЕТe MUSIC(Myзика).ПИТСНСЕТe OK3aДА NOTВРДNTe.
2.ПиTиСнeTe / niiu / 3a da ja n36epeTe cakHaTa nanka n npTusCHeTe OK 3a da ja OTBOpHTe nankaTa, a NOToA npTusCHeTe 3a da 3anoyHeTe co penpoDyKunja.
3. PnTnCHeTe 3a da ro 3anpeTe pePpOduuPaHbeto Ha My3NKata n da ce BpaTnTe H CnUCOKOT CO MY3Nka.
4.ПиNTIChTe EXIT (ИЗлe3)за за се ВраTITE Ha претхODHITe ekpoHn OД MEHITO.
KoHTpOHa JeNTa 3a My3nKa
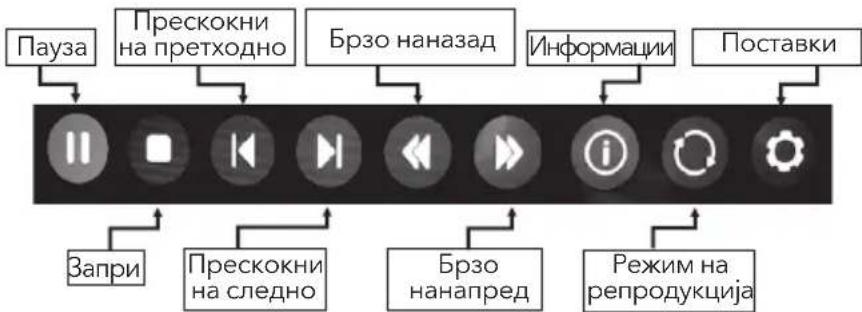
-Припсichte [MENU]за да ce пикawe Лentа 3a музka додака ce penpoуцupa музкata.
-ПиNTUCHETe [ ]/[ ] 3a Да Ги ИЗБере саКанITE NOCTABKN.
-ПпншеTe [MENu]за да И3Лe3eTe OД ККОHTрОнHaТа ЛeНТа 3a My3ИKa.
Mehn 3a φοτόραφή
- PnTnchTe A nIe 3a da n36epete PHOTO (FotorpaФи). PnTnchTe OK 3a da NOTBpDNTe.
2.ПиTиСнeTe / niiu / 3a ja naIz6epeTe cakHaTa nanka n npTusCHe OK 3a da ja OTBOpHTe nankaTa, a NOToA npTusCHe T 3a da 3anOuyHeTo co penpoDyKunja. - PnTnCHeTe 3a da ro 3anpeTe penpoDyucpaHbeto Ha oToIpaΦnnte n da ce BpaNTe HcNtco fOtorpaΦn.
4.ПиTиСHTe EXIT(ИЗлe3)за Дд СЕ ВВАТИЕ НА ПЕTXОДНITEЕКРАн OД MEHITO.
Kontrolna traka za fotografije
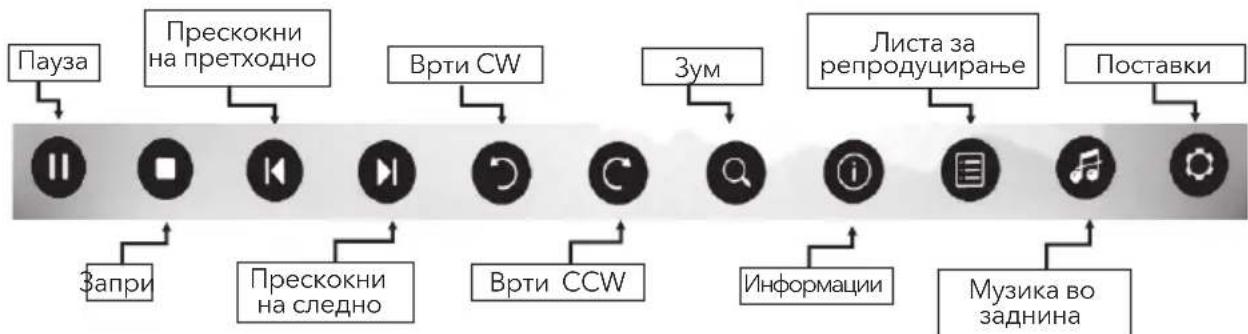
-ПуТиСHTe [MENu] 3a Да се пИКаже KOHTpoJHATA ЛЕТа 3a ФOTOrpaФи 3a Врeme Hа
пИКaЗТЯн СlaɪДОВи.
-Путисе [4]/[3a Да Ги ИЗберете саканITE NOCTABKN.
-ПуТиСHTeI [MENU]3a Да ИЗЛ e3eTe OД ИНФОМАТИВHAтЯЛЕНТ.
PEUABAHbE PPOBJEMN
Ipei Da NOBKate cepBncep, pa3rJeJaTe rN CJIeHNBe INHOpMaun 3a MoXn IpruHn I peWeHja 3a KOHKpeTHNO Tnp6Jem.
| ПюбLEMп Рецения и objachува Далочискnot уразавьач раобто | 1. Пюверete го сениот на далочискnot уразавьач. 2. Замене тг батериite. 3. Батериite не с постовени на сoudоветен начinn. 4. Уpejetон не постан на наноюва; Лож сигнал Ова обично ссычва поади превки подомылten Телегони, Воки-TOKи, состема за палоче авTomobши, вклuchуваные Нснда с Bretлеса, селковни, Душиалка по дугни селков рогонск. Hema слика, НEMA 3byk 1. Пюверete го сизворot на сизhalot. 2. Вкучete Н ekoj дуг сенихштейчени салвштейрот за дал пюверete далл paбOTиштейрOT и далу сюн. 3. Ложkontakt на сtrpvйнOT пirkлuchуок сштейрOT. 4. Пюверete го сизворot на сизhalot. Henopмална слика | 1. Аконима boja ivne e loш квашитETOT на сликata, обида: • Дуг посocobITE орциITE за boja BO постовkite od meнITO • ТелевизорOT ды福建省 на дoveлно pactодане od octahatITE селковпс • Ду пomerенье канALOT, можеби сpebobNTIа пюверето с EMITYba-he Na сизhalOT 2. Лож TB-cunhal (пухши ли сHER): • пюверete го кабелOT и пухсocobete ja anteнatable • Нamedetete Го канALOT спOMOИ на пухиЗнбирал; • пeoфрlete на Н ekoj дуг КанAL. |
| Hормална слиka, НEMA 3byk 1. | Аконима сизворOT пirkл/hcckn на сизворOT ivin Засилote Го сизKOT 2. OTboperete Го MeHITO 3a 3byk и наgoDEte Го „Balance"3. Пюверete ду He се вклuchenv сушалкite. Ако с, Исклuchуete Го сизалкite. | |
| Се поавь ворakata „Датenteкata e Иисправна" ил e 3bykOT Hopmален, a сликata не e. | 1. Можho e da e oштete на mediymckata дATOTEKA. Пюверete далу може ду се ретroduцura на komпун. 2. Пюверete далу се подраха на уdino n BVDeО кodeц. Hemodpraxno audino" ил сликata e Hopmалн, a 3bykOT He e. |
| ПюбLEMп Решениja и objacHyваьа | |
| Мрека на не павOTи 1. Пювере te дali paBOTи псанocувачOT2. Кaj модениte kaj кои тpe6a за се рпikлуни YCb-уpe徳 за се порзат на Иnteрнет, псане te дali e правлино рпikлунен YCb-уpe徳ot.3. Пюверete дali e телевизорот псанilloно поврasts co псанocувачOT | |
| Вe6-stpanucaTa He se пankжува цelosno. | 1. „Flash" He e подрахан.2. Пюдрахан Формати: JPEG, PNG, GIF, BMP, WMV (ASF), WMA, MP3и MP4. |
| ПергелдувачOT ce 3atbopaCAM. | Вe6-stpanucaTe coДрахи псанocувачи сlinkи и Нем doволно rolема MEMOPиja за рпikжуваъе, на псанувачOT ke ce 3atbopnCAM. |
Hanomeha:
- ako npo6nemot ce nojabya n nokpa j npimeheTne peuhenja, o6paTeCe BO lokaHnoT ceHTap 3a noDpka.
- Toa wTo e onnuaHO Bo dIeNoT co peWsaBaHBe npo6JIeMn e cAmO 3a yNaTyBaHbe, a KOHKpeTHNOT npo6JIeM MoKe da ce pa3NIkyBa oD Toa.
CNEUΦNKAUIN
Tesla TV 32S367BHS
| Големина на ekpanот - диагогално 81cm | |
| Рezолуцija на ekpanот: 1366x768 | |
| Московст на Илес за увк (Л+д): 6W + 6W | |
| РавOTEN наюн: 100-240V~ 50/60Hz | |
| Номинална посточьачka наеергija: | 60W |
| Димензий (Ш x В x Д) со статиВ: 733.4x474x167.7 | |
| Димензий (Ш x В x Д) бeз статиВ: 733.4x438.5x85.1 | |
| Нeto-TEXINHA co статиВ: 4.0kg | |
| Нeto-TEXINHAбeЗ статиВ: 3.9kg | |
| Околina(samо за зони со трорска кlimma): | РавOTHa Tempepatура: 5°C ~ 45°C РавOTHa влajхост: 20% ~ 80% Tempepatура за чуваBE: -15°C ~ 50°C Влajхост за чуваBE: 10% ~ 90% |
| Околina(samо за зони со умени Кlimma): | РавOTHa Tempepatура: 5°C ~ 35°C РавOTHa влajхost: 20% ~ 80% Tempepatура за чуваBE: -15°C ~ 45°C Влajхost за чуваBE: 10% ~ 90% |
| СисТЕM DTV: DVB-T/T2/C/S/S2 | TB: PAL-BG/DK/I, SECAM-BG/DK AV: PAL, SECAM, NTSC |
| ПретхODно постavenи prorpa'm: ATV: 100; DTV: 1000 | |
| Метод за п ri咔жуваBE статус Прикazа на ekpan | |
| наддикаторот за наgoodyваBE на функципte | Прикazа на мениTo |
| Jaizik на OSD Повеke onци за | |
| аNTehскь Влес RF | 75 ohm Nebalanncipan |
| AV видаеве3 | 75 ohm, 1.0Vp-p, RCA |
| AV aydnobve3 | 10k ohm, 0.5Vrms |
Tesla TV 40S367BFS
MK
| Големина на ekpanот - диагогално | 101cm |
| Рezолуцija на ekpanот: 1920x1080 | |
| Мос hoct на Излес 3а abyк (Л+д): 6W | 6W |
| РавOTEN haon: 100-240V~ 50/60Hz | |
| Номинална посточьачka на eнергija: | 74W |
| Димензи (Ш x В x Д) co Statов: 906.5 x 209.0 x 574.5 | |
| Димензи (Ш x В x Д) бeз Statов: 906.5 x 84.9 x 525.9 | |
| Нeto-TEXINa co Statов: 6.6 kg | |
| Нeto-TEXINa 6e3 Statов: 6.4 kg | |
| Околиna (само за зони со Тропска Клима): | РавOTHa Tempepatура: 5°C ~ 45°C РавOTHa влajхост: 20% ~ 80% Tempepatура за чува bene: -15°C ~ 50°C Влajхост за чува bene: 10% ~ 90% |
| Околиna (само за зони со умени Клима): | РавOTHa Tempepatура: 5°C ~ 35°C РавOTHa влajхost: 20% ~ 80% Tempepatура за чува bene: -15°C ~ 45°C Влajхost за чува bene: 10% ~ 90% |
| Систem DTV: DVB-T/T2/C/S/S2 | TB: PAL-BG/DK/I, SECAM-BG/DK AV: PAL, SECAM, NTSC |
| Претхон noocstавени prorpa'm: ATV: 100; DTV: 1000 | |
| Метod за п ri咔жва bene статус Пriпka3 на ekpan | |
| надидахогот за наючы bene на Функципte | Прикаиз на мени to |
| Jaizik на OSD Повеке onци 3a | |
| аNTehски в LEЗ RF | 75 ohm Neбалансиран |
| AV вideoble3 | 75 ohm, 1.0Vp-p, RCA |
| AV audiooble3 | 10k ohm, 0.5Vrms |
JIINCEHUN
HOMI
TepmHnTe HDMI n HDMl High-Definition Multimedia Interface, Kaoko n IoroTo HDMI ce TproBckn MapKn nn peRncTpnpaHn TproBckn MapKn Ha HDMI Licensing LLC Bo CAD n BO npyri 3emjn.

Ipn3BeJeHo nO liueHcN Dolby Laboratories. Dolby, Dolby Audio n cmmboJ duplo D ce 3aHTnTHn 3nau Dolby Laboratories.
Cuprins
AVERTISMENTE SIMASURI DE PRECAUTIE. 284
POZITIONAREA SETARII TV 287
BUTOANELE PANOULUI 290
TERMINALE. 291
FUNCTIILE TELECOMENZII 292
INREGISTRAREAVIDEO-URILE PERSONALE (REC) 294
GHIDUL PROGRAMULUI ELECTRONIC (EPG). 295
SETARI INITIALE I CHARACTERISTICI HOME 296
CONTROLUL MENIULUI. 298
- Want to watch the recorded video while recording the program, press left direction button to select and press OK button, the recorded video will start playing.
Select or can fast backward or fast forward the playing.
- If want to stop and exit the recording, select and press OK button.

DVB-S Tuning Setting
Sika 1

Sika 2

- UDHEZIMPER
- UPUTSTVO ZA UPOTREBU
- HCHTPYKUN 3A EKCNIIOATAU
- BETRIEBSANLEITUNGEN
- YIATCTBO 3A KOPNUCTHe
- INSTRUCTION DE UTILIZARE
- Note
- WARNING AND PRECAUTIONS
- WARNING
- WEEE Directive
- CAUTION
- RISK OF ELECTRIC SHOCK DO NOT OPEN
- POSITIONING THE TV SET
- Note:
- Operating Environment
- Precautions for Using Remote Control
- Precautions for Using Battery
- Remote Control Battery Replacement
- PANEL BUTTONS
- Bottom view
- TERMINALS
- REMOTE CONTROL FUNCTIONS
- Remote Control
- FAV. (Favorite Channel)
- USB Play Control Buttons Play & Pause (▶II)
- Stop (
- Fast Backward Button (
- Fast Forward (
- TELEXTB BUTTONS
- HOLD
- SUB-PAGE
- REVEAL
- MIX
- CANCEL
- PERSONALVIDEORECORDING(REC)
- IMPORTANT NOTE:
- Instant one-touch recording and playback
- Timeshift
- ELECTRONIC PROGRAMME GUIDE (EPG)
- Schedule
- Reminder
- Recorder
- Info
- INITIAL SETUP & HOME FEATURES
- Initial setup
- Home
- Mirashare (May not be available on some models)
- STEPS:
- Source
- Network Applications
- TV Browser
- Media Player
- Opera TV
- Home Media (May not be available)
- Note 4
- Note 5
- MENUCONTROL
- Menu Operation
- Picture
- Sound
- Installation
- Program Edit
- 5V Antenna Power
- CI Information (Only available in DTV mode)
- Signal Information
- Auto Tuning
- DVB-S/S2 Auto Tuning
- DVB-T/T2 or DVB-C or ATV Auto Tuning
- DVB-T/T2 or DVB-C Manual Tuning
- ATV Manual Tuning
- - Fine-Tune
- Setup
- USB demo:
- Software Update:
- Time
- Advanced
- Network
- Wireless Connection
- Wired Connection
- USB CONTROL
- USB Menu
- Reminder When Using the USB Player
- Movie Menu
- Movie Control Bar
- Music Menu
- Music Control Bar
- Photo Menu
- Photo Control Bar
- TROUBLESHOOTING
- SPECIFICATIONS
- LICENCES
- Pörmbajtja
- Verejtje
- Shenim:
- SHENIM I RENDESISHEM:
- EPG (GUIDE ELEKTRONIKE E PROGRAMIT)
- DVB-T/T2 ili DVB-C ili ATV Automatsko podesavanje
- DVB-T/T2 ili DVB-C Ručno podesavanje
- TEPMINHAJIIN
- ФУнкцип 3A ДИСТАЦИОНноуПравлЕне
- ByTOHn 3A YNPAXJIeHHe HA Bb3PON3BEXKDAHE IPE3 USB (II)
- ByToHn 3A TEJETEKCT
- 3AПИСВАЕ НА ЛИЧО ВИДEO (REC)
- BAKHA 3ABEJIEXKA:
- He3a6abHO 3aHNCBaHe N Bb3Pon3BExKaHaNe C eEDHO DOKOCBaHe
- CmHa Ha BpeMeTo
- 3a6eJekn:
- EJEKTPOHHA HAPbUHA IPOΓPAMA (EPG)
- PaznicaHne
- Hanomae
- 3aHcBaIoo yCTpoIcTBo
- HΦopMaζηa
- Mirashare (MOKe Da He e HaJInce npn HЯKoN MocEnI)
- M3TOUHnK
- MpeKOBnpnIOXeHna
- TeJIeBn3mOHeH 6pay3bP
- 3a6eJekka:
- Haayano ha meunnte (MOKe da He e HaJIne)
- 3a6eJekka 1
- 3a6eJekka 2
- 3a6eJekka 3
- 3a6eJexka4
- 3a6eJexka5
- KOHTPOJI HA MEHIOTO
- Pa6ota B MeHIOTo
- CHUMKa
- 3ByK
- HCTaJaCnA
- PedaTupahe Ha nporpamata
- 5V aHTeHa
- HΦopMaζη 3a Cl (doctbna cmo BpexM DTV)
- CnHaJIHa HhOpMaun
- AbTomaTuHa HaCTpoKa
- - ABTomatnua HaCTpoKa Ha DVB-S / S2
- DVB-T/T2 nnn DVB-C nnn ATV aBtOMaTHHa hAcTpOJa
- DVB-T/T2 mnn DVB-C pbyHa hAcTpoiK
- - Φина HabТpoИкa
- HacrtpoKn
- USB demohcptaia:
- Akyan3aun Ha cofopepa:
- Bpeme
- NoBuee
- MeHIO3aΦnJIMN
- БлOK 3a KOHTpoJI Ha ΦиЛмTe
- MeHIO 3a My3nka
- MeHIO Ha CHIMKIN
- OTCTPAHЯBAHE HA ПЮБЛЕМИ
- CmITOMn PeueHn
- Menübedienung
- Image
- Nota 5
- COДРЖИHA
- Hanomeha
- ПРЕДУПРЕДУBAнAИ МЕРКИ HA ПРETПАЗЛINBOCT
- PNEyPENEYBAHbE
- Директува WEEE
- ПОЗИЦИОнIHРаБЕ HA TEJIEBN3OPOT
- BHIMAHNE
- Hanomeha:
- Pa6oTHa cpeuHa
- MepknHa npetna3nBOcT 3a KopncTeHe Ha daJeunHckn ynpaByBaay
- Mepkn Ha npetna3JnBocT 3a KopncTeHe 6aTepnja
- 3aMeHa Ha 6aTeepHnTe Ha daJeuHcknOT ynpaByBaay
- KONHbA HAnHEJOT
- NorjeoDdoJHaTa cTpaHa
- PnTnckaHe Ha CpeHTo KOnue:
- TEPMINHAJI
- ФУнкцииHAДАLEЧИHСКNotУПРABYВACH
- REC (CHINMAHbE JInueH BnIeO3A\PNC)
- BAXHA HANOMEHA:
- HCTaHT cHMaHe n pePpOduyUpaHaBe
- EPG (EJIEKTPOHCKN IPOIPTAMCKN BOIDNU)
- Pacnopei
- NotCetHnk
- Chmay
- HΦopMaun
- ПВИЧNO ПОCTABYBAHBЕ И NOUYETHN KAPAKTEPNTIKN
- PpBnHNo nocTaByBaHe
- Mirashare (MOKe Da He e DoCTaHNo Ha HeKoN MoDeJI)
- YEKOPN:
- V3BOP
- MpexHn anJnkaCm
- TB-npernybau
- PepoaykTop Ha meynym
- TeLeBn3Op co Opera
- Home Media (MOXe Da He 6nne IocTAnHo)
- Hanomeha 4
- Hanomeha 5
- KOHTPOJIA HA MEHINTO
- Pa6oTeHbe co MeHnTo
- Cnka
- HnctaInpaHe
- YpeDyBaHBe npOrpamM
- JaunHa ha aHTeHa o5V
- HΦopmaun 3a CI (doctanho camo BO DTV-pekm)
- MaHyeIHo 6npaHb e Ha ATV
- -ПпeциЗно 6ира№
- NoctaByBaHbe
- YCb-Демо:
- Akynpahe coΦTBep:
- HappeiHo
- Mpeka
- Be3Kn4Ha Bpcka
- KmueHaBpcka
- YCBS-KOHTPOJIa
- YCb-MeHn
- NotceTnK Kora da ro kopncnte YCb-penpoDyKTopoT
- MeHn 3aΦnIMOBn
- KoHTpOHaJeHTa3aΦnIM
- MeHn 3a My3nKa
- KoHTpOHa JeNTa 3a My3nKa
- Mehn 3a φοτόραφή
- Kontrolna traka za fotografije
- PEUABAHbE PPOBJEMN
- CNEUΦNKAUIN
- Tesla TV 40S367BFS
- JIINCEHUN
- Cuprins
Brand : TESLA
Model : 49S367BFS
Category : Television