Space Station 49076700 - Telescope TASCO - Free user manual and instructions
Find the device manual for free Space Station 49076700 TASCO in PDF.

| Brand | Tasco |
| Model | Space Station 49076700 |
| Telescope type | Reflector (Newtonian) |
| Mirror diameter | 76 mm (3 inches) |
| Focal length | 800 mm |
| Magnification with H25mm eyepiece | 28x |
| Magnification with H10mm eyepiece | 70x |
| Magnification with SR4mm eyepiece | 175x |
| Barlow lens | 3x |
| Theoretical maximum magnification | 525x |
| Included accessories | H25mm, H10mm, SR4mm eyepieces, 3x Barlow lens, StarPointer finderscope, moon filter, moon map, tripod, equatorial mount, counterweight |
| StarPointer power supply | Battery (unspecified, likely button cell) |
| Mount | Equatorial with hour and declination axes |
| Polar alignment | Adjust polar axis according to latitude |
| Safety | Never observe the sun with or without filter – risk of permanent eye damage |
| Maintenance | Clean optics with a soft cloth, avoid touching optical surfaces, store telescope away from dust |
| Warranty | Limited lifetime warranty for first owner, electrical parts warranted 2 years |
| Repairability | Return to manufacturer for repair, $15 USD shipping fee |
Frequently Asked Questions - Space Station 49076700 TASCO
User questions about Space Station 49076700 TASCO
0 question about this device. Answer the ones you know or ask your own.
Ask a new question about this device
Download the instructions for your Telescope in PDF format for free! Find your manual Space Station 49076700 - TASCO and take your electronic device back in hand. On this page are published all the documents necessary for the use of your device. Space Station 49076700 by TASCO.
USER MANUAL Space Station 49076700 TASCO
natural_image
Black-and-white photo of a tilted astronomical telescope on a tripod, no visible text or symbolsModel # 49076700
OWNER'S MANUAL MANUEL DU PROPRIÉTAIRE MANUAL DEL USUARIO BENUTZERHANDBUCH MANUALE DELL'UTENTE MANUAL DO UTILIZADOR
Lit# 93-0474/06-07
natural_image
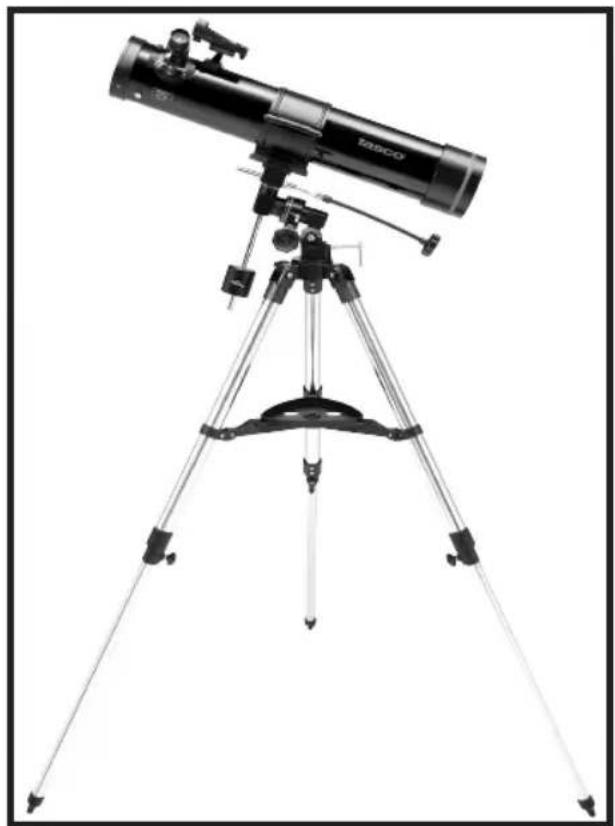
Black-and-white photo of a TESSO telescope on a tripod, no visible text or symbolsPARTS DIAGRAM

2
Model #: 49114900
PARTS DIAGRAM
Model #: 49076700
3
ASSEMBLY DIAGRAMS
natural_image
Close-up of a mechanical testing setup with a clamped component and central bore (no visible text or symbols)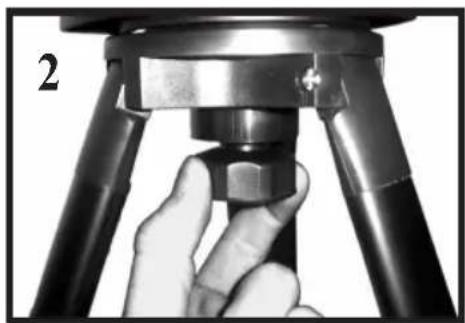
natural_image
Close-up of a hand adjusting a mechanical component on a tripod (no visible text or symbols)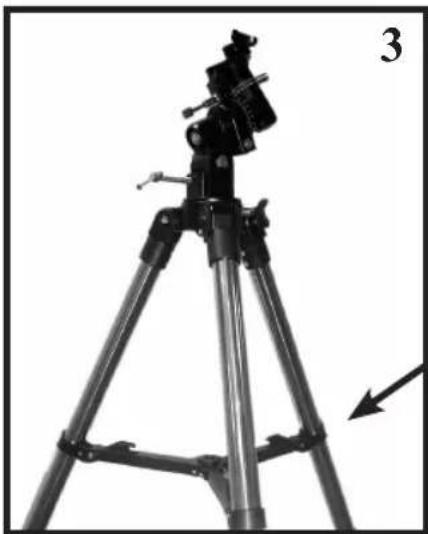
natural_image
Black-and-white photo of a tripod-mounted camera with a mounted sensor and an arrow pointing to the base (no text or symbols visible)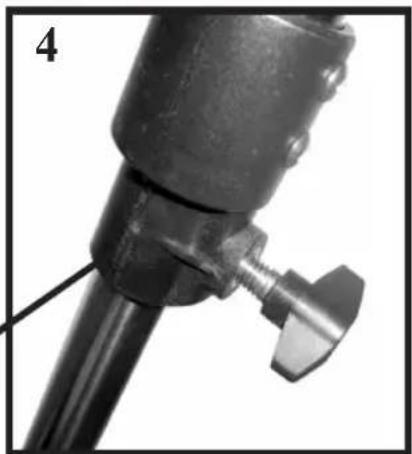
natural_image
Close-up of a mechanical component with a pointed tip and threaded shaft (no visible text or symbols)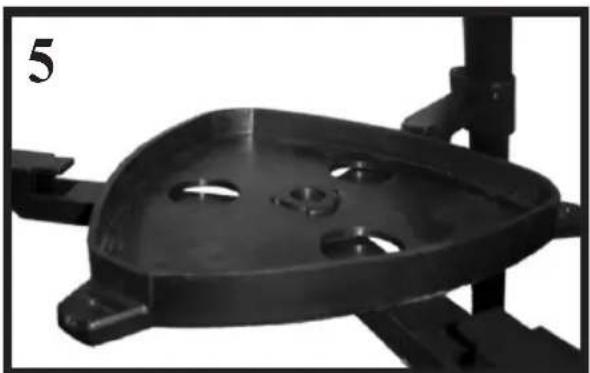
natural_image
Close-up of a black plastic mechanical component with mounting brackets and central holes (no text or symbols visible)
natural_image
Close-up of a hand holding a mechanical tool with a bracket, next to a cylindrical object (no visible text or symbols)4
ASSEMBLY DIAGRAMS
natural_image
Close-up of mechanical components including a cylindrical device and a clamp, with no visible text or symbols.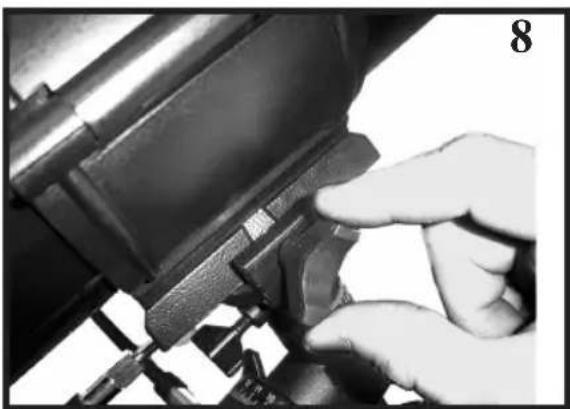
natural_image
Close-up of a hand adjusting a mechanical component with a tool (no visible text or symbols)
natural_image
Close-up of a mechanical measuring tool with a scale and adjustment knob, no visible text or symbols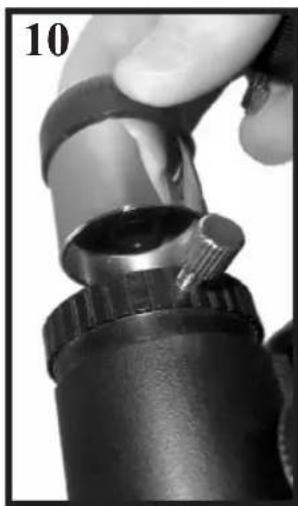
natural_image
Close-up of a hand holding a mechanical component, possibly a tool or device, with no visible text or symbols.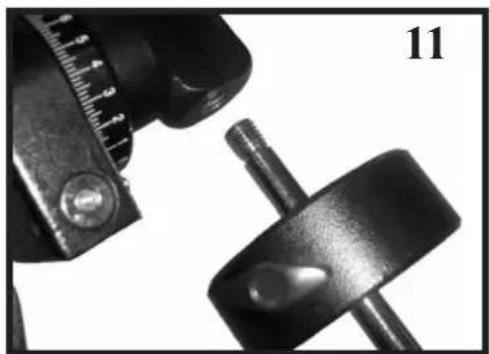
natural_image
Close-up of a mechanical clamp and a metallic tool with a ruler, no visible text or symbols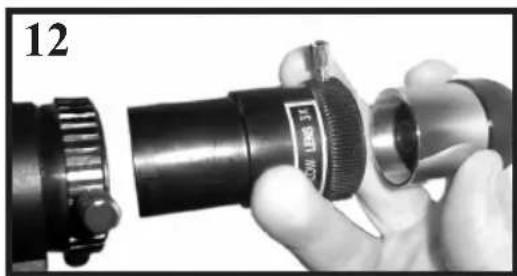
natural_image
Close-up of a hand holding a mechanical component with a dial indicator (no visible text or symbols)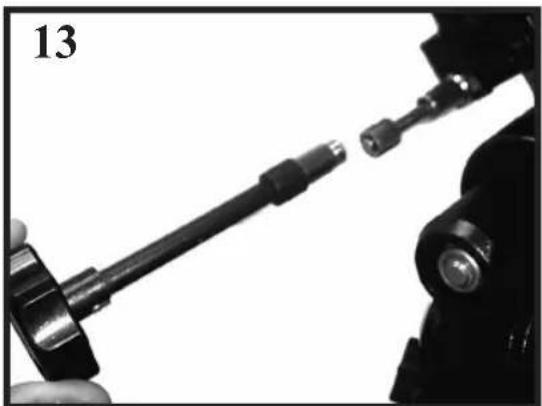
natural_image
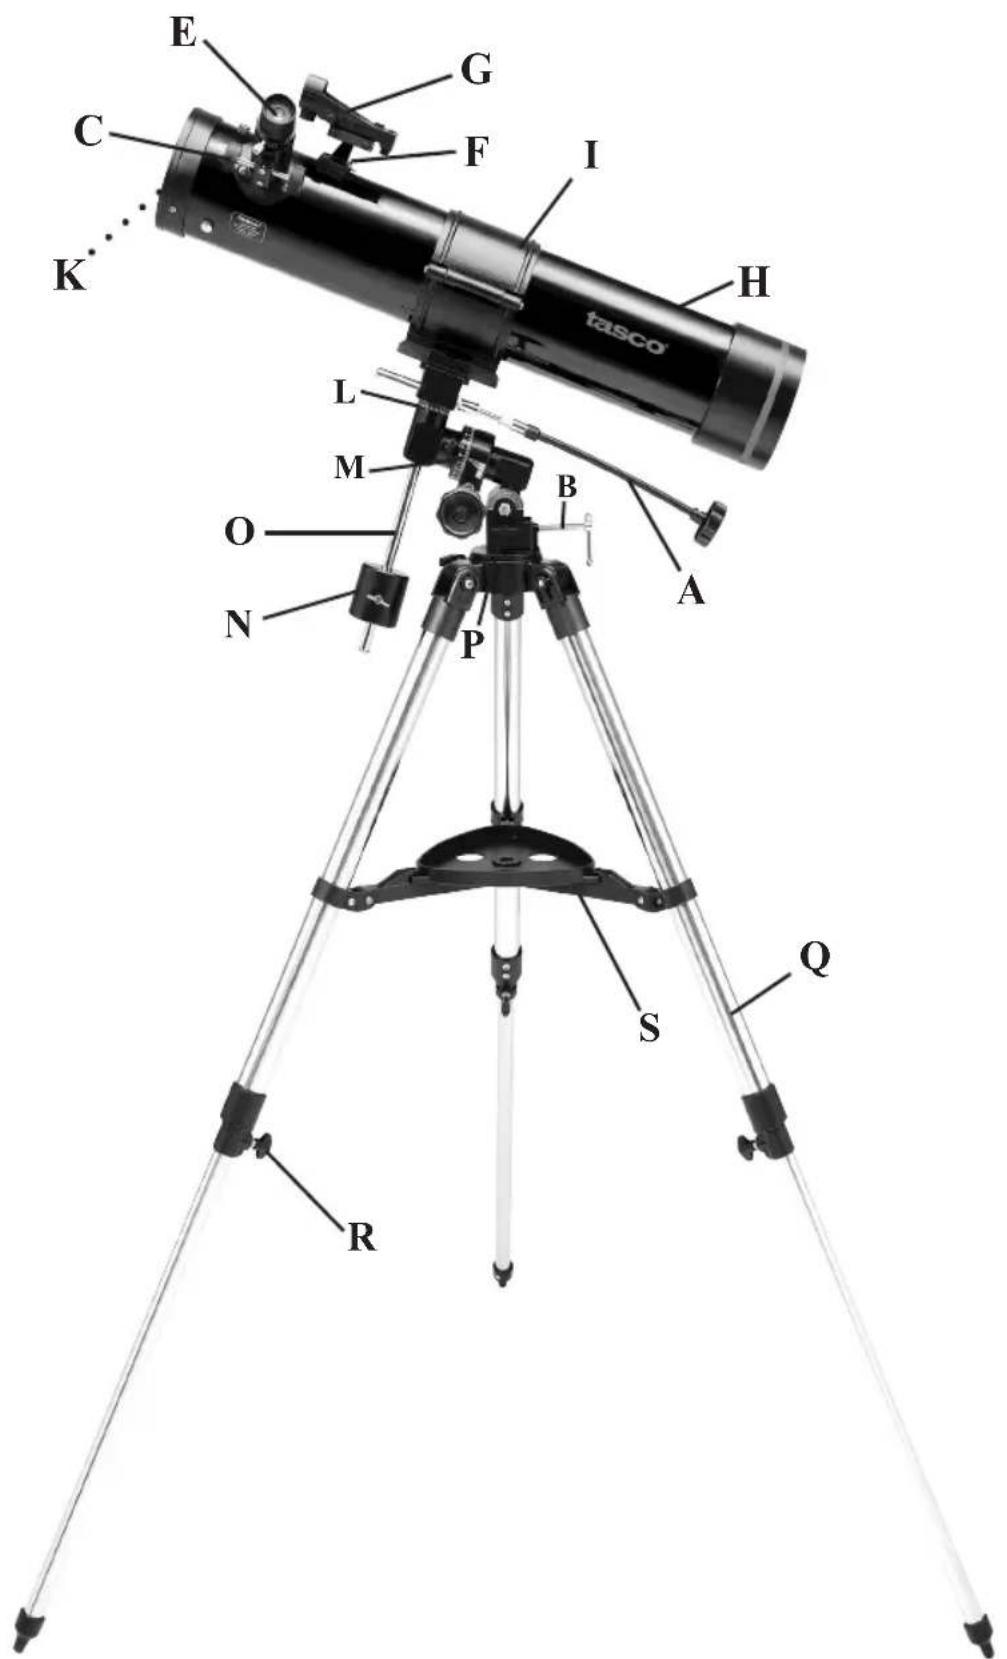
Close-up of a mechanical assembly showing a shaft being inserted into a connector (no text or symbols visible)PARTS GUIDE
| A. Flexible Control Cable | G Finderscope | M. Hour Axis Scale |
| B. Polar Axis Micro Adjustment Lever | H. Telescope Main Body | N. Counterweight |
| C. Focus Knob | I. Cradle | O. Counterweight Shaft |
| D. Focus Tube | J. Camera Set Screw | P. Polar Axis Locking Lever |
| E. Eyepiece | K. Dust Caps (remove before viewing) | Q. Tripod Leg |
| F. Finderscope Bracket | L. Declination Axis Scale | R. Tripod Leg Adjusting Screw / ClampS. Accessory Tray |
| A. Câble de contrôle flexible | G. Télescope chercheur | M. Echelle horaire |
| B. Levier pour le réglage précis de l'axe polaire | H. Corps principal du télescope | N. Contrepoids |
| I. Monture | O. Tige du contrepoids | |
| C. Bouton de focalisation | J. Vis de réglage caméra | P. Levier de verrouillage de l'xe polaire |
| D. Tube de focalisation | K. Coiffes de protection (à enlever avant l'observation) | Q. Pied du trépied |
| E. Oculaire | R. Vis de réglage pour le pied | |
| F. Support du télescope chercheur | L. Echelle de déclinaison de l'axe | S. Plateau pour accessoires |
| A. Cable de mando flexible | G. Telescópico Buscador | M. Escala Eje de la Hora |
| B. Manivela para el Ajuste del Eje | II. Cuerpo Principal del Telescópico | N. Contrapeso |
| Polar | Buscador | O. Arbol del Contrapeso |
| C. Botón de Enfoque | I. Armazón portador | P. Manivela para el Bloqueo del Eje Pola |
| D. Tubo de Enfoque | J. Tornillo de Ajuste para la Cámara | Q. Pata del Trípode |
| E. Mirilla | K. Protecciones contra el Polvo (quitar antes de mirar) | R. Tornillo de Ajuste de la Pata del Trípo |
| F. Abrazadera del Telescópico | S. Bandeja para los Accesorios | |
| Buscador | L. Escala Eje de Declinación | |
| A. Biegsames Steuerkabel | G. Sucher | M. Skala der Stundenachse |
| B. Polaraxe-Mikroeinstellhebel | H. Teleskopkörper | N. Gegengewicht |
| C. Fokussierknopf | I. Wiege | O. Schaff des Gegengewichts |
| D. Fokussiertubus | J. Camera-Stellschraube | P. Polarachsen-Sperrhebel |
| E. Okular | K. Staubkappen (vor dem Betrachten entfernen) | Q. Stativbein |
| F. Sucherklammer | L. Skala der Deklinationsachse | R. Stativbein-Einstellschraube |
| S. Zusatztablett | ||
| A. Cavo di controllo flessibile | G. Cercatore | M. Scala asse oraria |
| B. Leva di microregolazione asse polare | H. Corpo principale telescopio | N. Contrappeso |
| I. Culla | O. Asta contrappeso | |
| C. Manopola fuoco | J. Vite settaggio camera | P. Leva fermo asse polare |
| D. Tubo di messa a fuoco | K. Coperture antipolvere (toglierle prima di operare) | Q. Gamba treppiedi |
| E. Oculare | R. Vite regolazione gambe treppiedi | |
| F. Supporto cercatore | L. Scala asse declinazione | S. Scatola porta accessori |
| A. Cabo de comando flexível | G. Dispositivo Finderscope | M. Escala do eixo horário |
| B. Micro alavanca de ajuste do eixo polar | H. Corpo principal do telescópio | N. Contrapeso |
| I. Armação | O. Eixo do contrapeso | |
| C. Botão rotativo de focagem | J. Parafuso de fixação para máquina fotográfica | P. Alavanca de fixação do eixo polar |
| D. Tubo de focagem | Q. Perna do tripé | |
| E. Ocular | K. Tampas de proteção do pó (retire antes de efectuar observações) | R. Parafuso de ajuste das pernas do tripé |
| F. Suporte do dispositivo Finderscope | L. Escala do eixo de inclinação | S. Tabuleiro de acessórios |
English
TELESCOPE ASSEMBLY INSTRUCTIONS
-
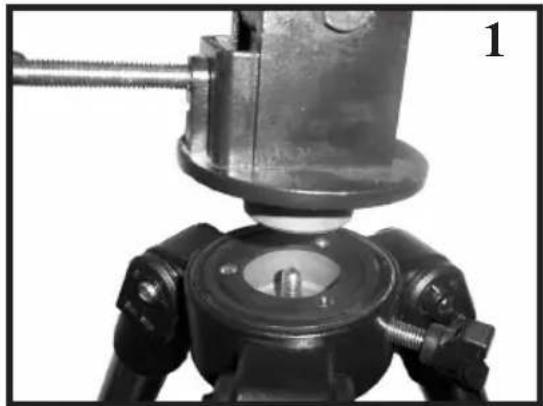
Remove the three tripod legs (U) from the box. To attach tripod legs to tripod head (N) align the holes of the tripod legs with those of the equatorial mount. Secure each leg by inserting a large (3") bolt with washer into the hole and secure with a wing nut and washer. Tighten bolts (Figs. 1 & 2).
-
Stand tripod and spread legs. Loosen the adjusting lock on each leg. Grab the equatorial mount and lift. Extend the tripod legs to the desired height (at equal lengths). In addition, tighten each leg's adjusting locks to hold them in position (Figs. 3 & 4).
-
Remove telescope main body (J), counterweight (R), counterweight rod (S), and the two flexible control cables (A) from the box. Carefully rest the telescope main body tube in the cradle (Fig. 7) Be sure the cradle is positioned at the center of the telescope main body tube for proper balancing. Tighten the cradle locking knobs (Fig. 8). Attach the control cables (Fig. 13) to the declination (P) and hour axis (Q) cable studs. Loosen counterweight clamping screw (Fig. 11). Slide weight into rod. Thread counterweight rod into the threaded hole located below the declination axis (Fig. 11).
-
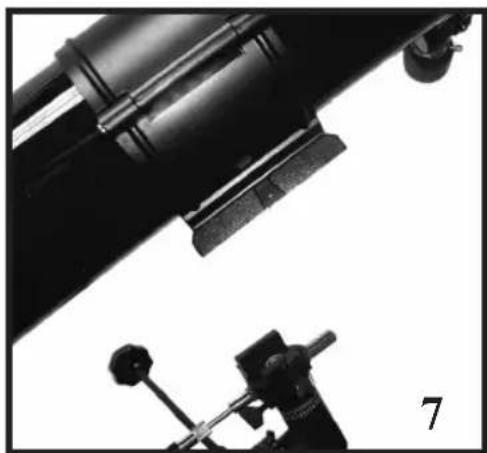
Remove the finderscope with finderscope bracket (H) attached from the box. Position the finderscope bracket on the telescope main body (Fig. 6).
-
Insert the eyepiece (Fig. 10) into the focus tube. Secure by tightening small retaining screw. When using the Barlow tube, Insert eyepiece into open end of Barlow and secure (Fig. 12).
The telescope is now fully assembled and ready for use.
CAUTION! Viewing the sun can cause permanent eye damage. Do not view the sun with this telescope or even with the naked eye.
BALANCING YOUR TELESCOPE
Precise controls were built into your equatorial mount to hold the telescope steady. When viewing at high magnifications, even a slight breeze vibrating the body can impair your ability to see detail. So to stack the cards on your side as much as possible against the limitations of nature, it is important to balance your telescope.
- Level tripod by adjusting legs.
- Loosen polar axis clamp and adjust polar axis to correspond to your observing latitude. If you do not know your latitude, consult a map or atlas. Retighten clamp screw.
BALANCING YOUR TELESCOPE
-
Loosen declination clamp screw and rotate telescope about the declination axis so that “90°” on the declination scale is aligned with the fixed pointer. Retighten clamp screw.
-
Loosen hour axis clamp, rotate scope until the counter weight rod is in a horizontal position. Do not tighten clamp screws.
-
If telescope is balanced, it will remain in place.
-
If telescope is out of balance, loosen counter weight thumb screw and slide weight along rod until telescope remains in place. Tighten weight and hour axis screws.
TO USE THE STARPOINTER
- The StarPointer is the quickest and easiest way to point your telescope exactly at a desired object in the sky. It's like having a laser pointer that you can shine directly into the night sky. The star pointer is a zero magnification pointing tool that uses a coated glass window to superimpose the image of a small red dot into the night sky. Like all finderscopes, the StarPointer must be properly aligned with the main telescope before it can be used.
- To turn on the StarPointer, rotate the variable brightness control clockwise until you hear a “click.” To increase the brightness level of the red dot, continue rotating the control knob about 180^ until it stops.
- Locate a bright star or planet and center it in a low power eyepiece in the main telescope. If the StarPointer is perfectly aligned, you will see the red LED dot overlap the alignment star. If the StarPointer is not aligned, take notice of where the red dot is relative to the bright star.
Without moving the main telescope, turn the StarPointer's azimuth and altitude alignment controls until the red dot is directly over the alignment star.
If the LED dot is brighter than the alignment star, it may make it difficult to see the star. Turn the variable brightness control counterclockwise, until the red dot is the same brightness as the alignment star. This will make it easier to get an accurate alignment. The StarPointer is now ready to be used. Remember to always turn the power off after you have found an object. This will extend the life of both the battery and the LED.
FINDING OBJECTS
-
Look through the StarPointer finderscope and pan the telescope until the object appears in the field of view. Once it's in the field, tighten the altitude and azimuth locks.
-
To center the object with the red dot in the StarPointer, use the fine adjustment ring on the altitude slow motion rod assembly.
FOCUSING
- Once you have found an object in the telescope, turn the focus knob until the image is sharp.
- To focus on an object that is nearer than your current target, turn the focus knob toward the eyepiece (i.e., so that the focus tube moves away from the front of the telescope). For more distant objects, turn the focus knob in the opposite direction.
- To achieve a truly sharp focus, never look through glass windows or across objects that produce heat waves, such as asphalt parking lots.
MAGNIFICATION
The magnification (or power) of a telescope varies depending upon the focal length of the eyepiece being used and the focal length of the telescope.
To calculate magnification, use the following formula, in which FL = focal length:
Magnification = FL (telescope) in mm
FL (cycpiece) in mm
SOLAR OBSERVATION
CAUTION! Viewing the sun can cause permanent eye damage. Do not view the sun with this product or even with the naked eye. Never leave a telescope unattended during the daytime; a child could look at the sun with it and suffer permanent damage to vision.
THE MOON FILTER
A moon filter has been included with your telescope for removing glare and increasing contrast when viewing the moon. To attach it to the telescope eyepiece, screw the filter onto the threaded end of the eyepiece.
CAUTION! The moon filter should only be used to view the moon. It is not intended for viewing the sun. Viewing the sun through this telescope (with or without the filter), or even with the naked eye, can cause permanent eye damage.
EYE LENS CHART & THEORETICAL POWER LIMITS
| Eyepiece / Model # 49114900Reflector | 49076700Reflector |
| H25mm Eye Lens Power 36x 28x | |
| H10mm Eye Lens Power 90x 70x | |
| SR4 Eye Lens Power 225x 175x |
NOTE: Magnification is calculated magnification. Low power is recommended for most viewing conditions.
TECHNICAL SPECIFICATIONS
| Spec / Model # 49114900 | Reflector | 49076700 Reflector |
| Mirror Diameter 114mm (4.5") 76mm (3.0") | ||
| Focal Length 900mm 800mm | ||
| Eyepiece-Low Power H25mm H25mm | ||
| Eyepiece-Medium Power H10mm H10mm | ||
| Eyepiece-High Power SR4mm SR4mm | ||
| Barlow Inc. Yes, 3x Yes, 3x | ||
| Maximum Magnification 675x 525x | ||
| Accessories Finderscope, | Moon Filter, Moon Map | Finderscope, Moon Filter, Moon Map |
NOTES
WARRANTY/REPAIR INFORMATION
Telescope lIFeTIMe lIMITeD WARRANTY
Your Tasco telescope is warranted to be free of defects in materials and workmanship for the lifetime of the original owner. The Lifetime Limited Warranty is an expression of our confidence in the materials and mechanical workmanship of our products and is your assurance of a lifetime of dependable service.
If your telescope contains electrical components, these components are warranted to be free of defects in materials and workmanship for two years after the date of purchase.
In the event of a defect under this warranty, we will, at our option, repair or replace the product, provided that you return the product postage prepaid. This warranty does not cover damages caused by misuse, improper handling, installation, or maintenance provided by someone other than a Tasco Authorized Service Department.
Any return made under this warranty must be accompanied by the items listed below:
1) A check/money order in the amount of \$15.00 to cover the cost of postage and handling
2) Name and address for product return
3) An explanation of the defect
4) Proof of Date Purchased
5) Product should be well packed in a sturdy outside shipping carton, to prevent damage in transit, with return postage prepaid to the address listed below:
IN U.S.A. Send To: IN CANADA Send To:
Bushnell Outdoor Products Bushnell Outdoor Products
Attn.: Repairs Attn.: Repairs
8500 Marshall Drive 25A East Pearce Street, Unit 1
Lenexa, Kansas 66214 Richmond Hill, Ontario L4B 2M9
For products purchased outside the United States or Canada please contact your local dealer for applicable warranty information. In Europe you may also contact Tasco at: BUSHNELL Outdoor Products GmbH
European Service Centre
MORSESTRASSE 4
D-50769 KÖLN
GERMANY
Tél: +49 (0) 221 709 939 3
Fax: +49 (0) 221 709 939 8
This warranty gives you specific legal rights.
You may have other rights which vary from country to country.
©2007 B.O.P
PARTS GUIDE
| A. Flexible Control Cable | G Finderscope | M. Hour Axis Scale |
| B. Polar Axis Micro Adjustment Lever | H. Telescope Main Body | N. Counterweight |
| C. Focus Knob | I. Cradle | O. Counterweight Shaft |
| D. Focus Tube | J. Camera Set Screw | P. Polar Axis Locking Lever |
| E. Eyepiece | K. Dust Caps (remove before viewing) | Q. Tripod Leg |
| F. Finderscope Bracket | L. Declination Axis Scale | R. Tripod Leg Adjusting Screw / ClampS. Accessory Tray |
| A. Câble de contrôle flexible | G. Télescope chercheur | M. Echelle horaire |
| B. Levier pour le réglage précis de l'axe polaire | II. Corps principal du télescope | N. Contrepoids |
| I. Monture | O. Tige du contrepoids | |
| C. Bouton de focalisation | J. Vis de réglage caméra | P. Levier de verrouillage de l'xe polaire |
| D. Tube de focalisation | K. Coiffes de protection (à enlever ayant l'observation) | Q. Pied du trépied |
| E. Oculaire | R. Vis de réglage pour le pied | |
| F. Support du télescope chercheur | L. Echelle de déclinaison de l'axe | S. Plateau pour accessoires |
| A. Cable de mando flexible | G. Telescópico Buscador | M. Escala Eje de la Hora |
| B. Manivela para el Ajuste del Eje Polar | H. Cuerpo Principal del Telescópico Buscador | N. Contrapeso |
| O. Arbol del Contrapeso | ||
| C. Botón de Enfoque | I. Armazón portador | P. Manivela para el Bloqueo del Eje Pola |
| D. Tubo de Enfoque | J. Tornillo de Ajuste para la Cámara | Q. Pata del Trípode |
| E. Mirilla | K. Protecciones contra el Polvo (quitar antes de mirar) | R. Tornillo de Ajuste de la Pata del TrípoS. Bandeja para los Accesorios |
| F. Abrazadera del Telescópico Buseador | L. Escala Eje de Declinación | |
| A. Biegsames Steuerkabel | G. Sucher | M. Skala der Stundenachse |
| B. Polaraxe-Mikroeinstellhebel | H. Teleskopkörper | N. Gegengewicht |
| C. Fokussierknopf | I. Wiege | O. Schaft des Gegengewichts |
| D. Fokussiertubus | J. Camera-Stellschraube | P. Polarachsen-Sperrhebel |
| E. Okular | K. Staubkappen (vor dem Betrachten entfernen) | Q. Stativbein |
| F. Sucherklammer | L. Skala der Deklinationsachse | R. Stativbein-EinstellschraubeS. Zusatztablett |
| A. Cavo di controllo flessibile | G. Cercatore | M. Scala asse oraria |
| B. Leva di microregolazione asse polare | H. Corpo principale telescopio | N. Contrappeso |
| I. Culla | O. Asta contrappeso | |
| C. Manopola fuoco | J. Vite settaggio camera | P. Leva fermo asse polare |
| D. Tubo di messa a fuoco | K. Coperture antípolvere (toglierle prima di operare) | Q. Gamba treppiedi |
| E. Oculare | R. Vite regolazione gambe treppiedi | |
| F. Supporto cercatore | L. Scala asse declinazione | S. Scatola porta accessori |
| A. Cabo de comando flexível | G. Dispositivo Finderscope | M. Escala do eixo horário |
| B. Micro alavanca de ajuste do eixo polar | H. Corpo principal do telescópio | N. Contrapeso |
| I. Armação | O. Eixo do contrapeso | |
| C. Botão rotativo de focagem | J. Parafuso de fixação para máquina fotográfica | P. Alavanca de fixação do cixo polar |
| D. Tubo de focagem | Q. Perna do tripé | |
| E. Ocular | K. Tampas de proteção do pó (retire antes de efectuar observações) | R. Parafuso de ajuste das pernas do tripéS. Tabuleiro de acessórios |
| F. Suporte do dispositivo Finderscope |
Français
INSTRUCTIONS POUR L'ASSEMBLAGE DU TÉLESCOPE.
8500 Marshall Drive 25A East Pearce Street, Unit 1
Lenexa, Kansas 66214 Richmond Hill, Ontario L4B 2M9
European Service Centre
MORSESTRASSE 4
D- 50769 Cologne
Allemagne
Tél: +49 (0) 221 709 939 3
Fax: +49 (0) 221 709 939 8
8500 Marshall Drive 25A East Pearce Street, Unit 1
Lenexa, Kansas 66214 Richmond Hill, Ontario L4B 2M9
European Service Centre
MORSESTRASSE 4
D- 50769 KÖLN
ALEMANIA
Tél: +49 (0) 221 709 939 3
Fax: +49 (0) 221 709 939 8
8500 Marshall Drive 25A East Pearce Street, Unit 1
Lenexa, Kansas 66214 Richmond Hill, Ontario L4B 2M9
European Service Centre
MORSESTRASSE 4
D- 50769 KÖLN
Deutschland
Tél: +49 (0) 221 709 939 3
Fax: +49 (0) 221 709 939 8
8500 Marshall Drive 25A East Pearce Street, Unit 1
Lenexa, Kansas 66214 Richmond Hill, Ontario L4B 2M9
European Service Centre
MORSESTRASSE 4
D- 50769 - Cologne
Germania
Tél: +49 (0) 221 709 939 3
Fax: +49 (0) 221 709 939 8
8500 Marshall Drive 25A East Pearce Street, Unit 1
Lenexa, Kansas 66214 Richmond Hill, Ontario L4B 2M9
European Service Centre
MORSESTRASSE 4
D- 50769 KÖLN
Alemanha
Tél: +49 (0) 221 709 939 3
Fax: +49 (0) 221 709 939 8