
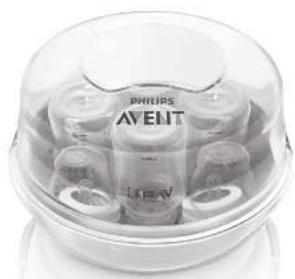
Avent SCF283 - Bottle sterilizer PHILIPS - Free user manual and instructions
Find the device manual for free Avent SCF283 PHILIPS in PDF.

| Brand | Philips |
| Model | Avent SCF283 |
| Product type | Microwave bottle sterilizer |
| Capacity | Up to 4 bottles, or 2 large bottles (330 ml), or 2 breast pumps + 2 bottles |
| Sterilization method | Microwave steam |
| Required water volume | Exactly 200 ml |
| Sterilization time | 2 min (1200-1850 W), 4 min (850-1100 W), 6 min (500-800 W) |
| Recommended cooling time | 2 minutes after cycle |
| Sterility duration in the appliance | Up to 24 hours with lid closed |
| Materials | BPA-free plastic (polypropylene) |
| Care | Dishwasher safe (components) or wash in warm soapy water |
| Safety | Do not use metal objects; do not open immediately after cycle; use only water without additives |
| Included accessories | Base, basket, lid with clips |
| Power supply | None (used in a microwave) |
| Warranty | International warranty (see enclosed leaflet) |
| Consumer service | www.philips.com |
Frequently Asked Questions - Avent SCF283 PHILIPS
User questions about Avent SCF283 PHILIPS
0 question about this device. Answer the ones you know or ask your own.
Ask a new question about this device
Download the instructions for your Bottle sterilizer in PDF format for free! Find your manual Avent SCF283 - PHILIPS and take your electronic device back in hand. On this page are published all the documents necessary for the use of your device. Avent SCF283 by PHILIPS.
USER MANUAL Avent SCF283 PHILIPS
Rogovay your product/brand export atwww.philips.com/welcome
SCF263,SCF282,SCF281


www.philips.com
1
一、重要事项
- 实验原理
PHILIPS

ENGLISH 6
DANSK 10
DEUTsCH 14
EAAHNIKA 19
ESPANOL 24
SUOMI 28
FRANÇAIS 32
ITALIANO 37
NEDERLANDS 42
NORSK 46
PORTUGUES 50
SVENSKA 54
TÜRKÇE 58
65
6 ENGLISH
Introduction
Congratulations on your purchase and welcome to Philips! To fully benefit from the support that Philips offers, register your product at www.philips.com/welcome.
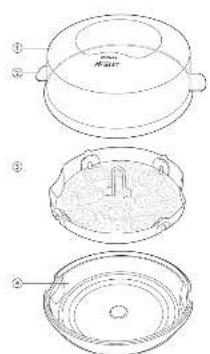
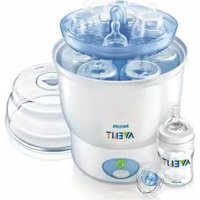
General description (Fig. 1)
1 Lid
2 Clips
3 Basket
4 Base
5 Bottle cavities
6 Teat cavities
7 Dome cap holders
8 Slots for large bottles
9 Slots for breast pumps
Important
Read this user manual carefully before you use the microwave steriliser and save it for future reference.
Warning
- Let the steriliser cool down before you remove it from the microwave. Be careful when you move or open the steriliser, because the water in it can still be hot.
- Do not remove the lid from the steriliser immediately after sterilising, as the steam that comes out is very hot. Let the steriliser cool down, as steam can cause burns.
- Only use water without any additives.
Always make sure that the base is filled with water when you use the steriliser in the microwave. - Do not put bleach or other chemicals in the steriliser.
- Do not place metal items in the steriliser, as this may cause damage to the microwave.
- Do not overload the steriliser, otherwise the items are not sterilised properly.
- Only sterilise baby bottles and other items that are suitable for sterilisers. Check the user manual of the items you want to sterilise, to make sure they are suitable for sterilisers.
- This steriliser is intended for household use only.
Caution
- Children should be supervised to ensure that they do not play with the steriliser.
- Always make sure the base is filled with 200ml water before you start sterilising.
- After each use, pour any remaining water out of the steriliser after the water has cooled down.
- Always let the steriliser cool down before you store it.
- Always wash your hands before you touch the sterilised items.
- Do not expose the steriliser to extreme heat or direct sunlight.
- Do not place the steriliser on a hot surface.
- If you use a combination oven (with grill function), make sure that the oven or grill is switched off and has cooled down before you put the steriliser in it.
Before first use
Before you use the steriliser for the first time, clean it thoroughly as described below.
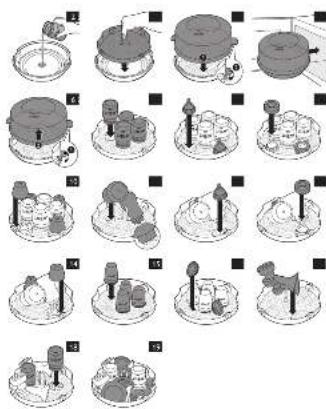
1 Remove the basket from the base.
2 Fill a baby bottle or a measuring cup with exactly 200ml tap water and pour this into the base (Fig. 2).
ENGLISH 7
The amount of water needs to be exactly 200ml . When the base contains too much water, the items will not be sterilised properly. When the base does not contain enough water, this can cause damage to the steriliser or microwave.
3 Place the basket in the base (Fig. 3).
Put the lid on the steriliser (1) and push down the clips to lock the lid into place (2). (Fig. 4)
5 Place the steriliser in the microwave. (Fig. 5)
Note: Make sure that the microwave is clean and dry before you start sterilising.
Note: If you have a combination oven, make sure that the oven or grill is switched off and has cooled down before you put the steriliser in it.
6 Select the appropriate microwave wattage and time (see the table in chapter 'Using the microwave steriliser') and let the microwave operate.
After the microwave has finished, open it and let the steriliser cool down before you remove it from the microwave.
8 Pull open the clips (1) and remove the lid (2) (Fig. 6).
9 Pour out the remaining water and rinse the base and basket thoroughly.
Preparing for use
Filling the basket
Before you put the items to be sterilised in the basket, clean them thoroughly in the dishwasher or clean them by hand with hot water and some washing-up liquid. Make sure you remove all milk residues.
Note: Make sure all items to be sterilised are completely disassembled and place them in the basket with their openings pointing downwards, to prevent them from filling with water.
Note: Do not stack the items too closely together. The steam has to be able to circulate around the items to ensure effective sterilisation.
There are several ways to fill the basket:
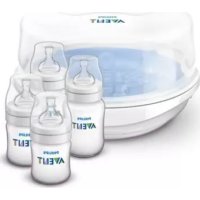
Four Philips AVENT feeding bottles
1 Place the bottles upside down in the bottle cavities. (Fig. 7)
2 Place the teats in the teat cavities (Fig. 8).
3 Place the screw rings loosely on top of the teats (Fig. 9).
Note: Larger screw rings only fit if placed in slanted position over the teats.
4 Place the dome caps in the dome cap holders (Fig. 10).
Two large Philips AVENT feeding bottles (330ml/11oz)
1 Insert the rim of the bottles into the slots for large bottles (Fig. 11).
2 Place the teats in the teat cavities (Fig. 12).
3 Place the screw rings loosely on top of the teats (Fig. 13).
Note: Larger screw rings only fit if placed in slanted position over the teats.
4 Place the dome caps in the dome cap holders (Fig. 14).
ENGLISH8
Four Philips AVENT storage cups and lids
1 Place the storage cups upside down in the basket (Fig. 15).
2 Place the lids vertically around the bottles. (Fig. 16)
Two Philips AVENT breast pumps and two Philips AVENT feeding bottles
Do not place the electrical parts in the steriliser.
1 Fully disassemble the breast pump.
2 Insert the rim of the pump body in the breast pump slots in the bottom of the basket (Fig. 17).
3 Place the bottles upside down in the bottle cavities (Fig. 18).
4 Place the remaining non-electrical parts of the breast pump in any unobstructed space in the basket (Fig. 19).
Note: Make sure steam can circulate around these parts.
Using the microwave steriliser
Only place items in the steriliser that are suitable for sterilising. Do not sterilise your bottle brush or items that are filled with liquid, e.g. teethers filled with cooling fluid.
Note: Before you sterilise bottles and other items, clean them first.
1 Remove the basket from the base.
2 Fill a baby bottle or measuring cup with exactly 200ml tap water and pour this into the base (Fig. 2).
The amount of water needs to be exactly 200ml . When the base contains too much water, the items will not be sterilised properly. When the base does not contain enough water, this can cause damage to the steriliser or microwave.
3 Place the basket in the base (Fig. 3).
4 Place the items to be sterilised in the basket (see chapter 'Preparing for use').
Put the lid on the steriliser (1) and push down the clips to lock the lid into place (2) (Fig. 4).
6 Place the steriliser in the microwave. (Fig. 5)
Note: Make sure that the microwave is clean and dry before you start sterilising.
7 Select the appropriate microwave wattage and time (see table below) and let the microwave operate.
Note: If you have a combination oven, make sure that the oven or grill is switched off and has cooled down before you put the steriliser in it.
Note: Do not exceed the sterilising time indicated in the table.
Microwave specifications
Wattage Sterilising time Cool-down time
1200W-1850W 2min. 2min.
850W-1100W 4min. 2min.
500W-800W 6min. 2min.
After the microwave has finished, open it and let the steriliser cool down before you remove it from the microwave.
Be careful, hot steam may come out of the microwave.
9 Remove the steriliser from the microwave.
Note: Make sure you keep the steriliser level to avoid leaking or spilling hot water.
Note: The sterilised items remain sterile for up to 24 hours in the microwave steriliser if you do not remove the lid.
10 Pull open the clips (1) and remove the lid (2) (Fig. 6).
11 Remove the bottles and other items from the basket. Use the tongs to remove the smaller items.
Be careful, hot steam may come out of the steriliser and the sterilised items may still be hot.
12 When you have removed the sterilised items, pour out the remaining water, rinse the base and basket thoroughly and wipe all parts dry.
Cleaning
Clean the lid, the basket and the base after every use, to prevent scale from building up.
Never use scouring pads, abrasive cleaning agents or aggressive liquids such as bleach, petrol or acetone to clean the steriliser.
Note: Let the steriliser cool down before you clean it.
1 Clean the steriliser parts in hot water with some washing-up liquid.
Note: You can also clean the steriliser parts in the dishwasher.
2 After cleaning, dry all parts properly.
Note: After cleaning, store the steriliser in a clean, dry place.
Guarantee and service
If you need service or information or if you have a problem, please visit the Philips website at www.philips.com or contact the Philips Consumer Care Centre in your country (you find its phone number in the worldwide guarantee leaflet). If there is no Consumer Care Centre in your country, go to your local Philips dealer.
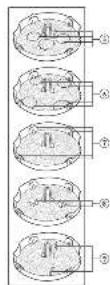
Introduktion
Philips AVENT w nni Philips AVENT w nn nwn
nun nn nnnnnnnnn
1
2
(17) non nnna
.18 3
(19) 4
n nn n nn nn nn nn nn nn nn nn nn nn nn nn nn nn nn nn nn nn nn nn nn nn nn nn nn nn nn nn nn nn nn nn nn nn nn nn nn nn nn nn nn nn nn nn nn nn nn nn nn nn nn nn nn nn nn nn nn nn nn nn nn nn nn nn nn nn nn nn nn nn nn nn nn nn nn nn nn nn nn nn nn nn nn nn nn nn nn nn
ywnn nn nnnn nn
1079 107107n n7 X Xn7 Xn7 nnnn nn nnnn nn nnnn
Jn 7nn nn nnnnnnnnnnnnnnnnnnnnnnnnnnnnnnnnnnnnnnnnnnnnnnnnnnnnnnnnnnnnnnnnnnnnnnnnnnnnnnnnnnnnnnnnnnnnnnn
nnn n 7, nn nn nn nn nn nn nn nn nn
0oannn nn nnn 1
200 2
(2)
n 200 nnnn
n 1007 nnnn nn nnnn nn nnnn nn
(3)
.("wnn"nn"n" n"n) ton nn nnnn nn nn 4
noon nn 7,non 1970 oosnn nx qint(1) nwn y noon nn 5
.4n(2)
(5)
7n nn nnn nn nnn nnn nnn nnn nnn nnn nnn nnn nnn
17777777
.2021 11nn nn nnnn nn nn nn
nyny64
n nnnn nnnn nn nnnn nnnn nnnn nnnn nnnn nnnn nnnn nnnn nnnn nnnn nnnn nnnn nnnn nnnn nnnn nnnn nnnn nnnn nnnn nnnn nnnn nnnn nnnn nnnn nnnn nnnn nnnn nnnn nnnn nnnn nnnn nnnn nnnn nnnn
(3)
noannn n 1,non 970 noenn nn qin (1) uon noon nn n (4nn).2
(5)
y77n7x77,nnnnn 197:nn
7n nn nnn nn nn nn nn nn nn nn nn nn nn nn nn nn nn nn nn nn nn nn nn nn nn nn nn nn nn nn nn nn nn nn nn nn nn nn nn nn nn nn nn nn nn nn nn nn nn nn nn nn nn nn nn nn nn nn nn nn nn nn nn nn nn nn nn nn nn nn nn nn nn nn nn nn nn nn nn nn nn nn nn nn nn nn nn nn nn nn nn nn nn nn nn nn nn nn nn nn nn nn nn
6
7
.(6) (2) noonnn nn onn (1) oonnn nn nnn nn 8
9
wnn nn
on
n nnnn nn nnnnnnnnnnnnnnnnnnnnnnnnnnnnnnnnnnnnnnnnnnnnnnnnnnnnnnnnnnnnnnnnnnnnnnnnnnnnnnnnnnnnnnnnnnnnnnnnnnnnnnnnnnn
n nn n nn nnnn nn nnnn nn nnnnnnnnnnnnnnnnnnnnnnnnnnnnnnnnnnnnnnnnnnnnnnnnnnnnnnnnnnnnnnnnnnnnnnnnnnnnnnnnnnnnnnnnnnnnnnnnnnnnnnnnnnnnnnnnnnnnnnnnnnnnn
T,07n 107n 7n n7n 7n 7n 7n 7n
:on nn nnnn
Philips AVENT
(7)
(8) ninn nn nnn nnn nnn 2
(9) ninnn nn, nnnnn nn nn nn 3
ninnynyinyiNINNNNIN
.(10)nnn nn nnnnnnnnnnnnnnnnnnnnnnnnnnnnnnnnnnnnnnnnnnnnnnnnnnnnnnnnnnnnnnnnnnnnnnnnnnnnnnnnnnnnnnnnnnnnnnnnnnnnnnnnnnn
(330) Philips AVENT w n nn
(11) 1
(12) nuiy nuiy nuiy nuiy nuiy nuiy 2
.13n nn nynnnn nn nn 3
ninn nn nnn nn nn nn nn nn nn nn nn nn nn nn nn nn nn nn nn nn nn nn nn nn nn nn nn nn nn nn nn nn nn nn nn nn nn nn nn nn nn nn nn nn nn nn nn nn nn nn nn nn nn nn nn nn nn nn nn nn nn nn nn nn nn nn nn nn nn nn nn nn nn nn nn nn nn nn nn
.(14)0nnn nn nnnnnnnnnnnnnnnnnnn 4
X12n
nannnn nn nnn nn nnn nnnnnnnnnnnnnnnnnnnnnnnnnnnnnnnnnnnnnnnnnnnnnnnnnnnnnnnnnnnnnnnnnnnnnnnnnnnnnnnnnnnnnnnnnnnnnnnnnnnnnnnnnnnnnnnnnnnnnnnnnnnnnnnnnnnnnnnnnnnnn
(1)
non 1
109n 2
703
0o1 4
D7D7D7N 5
nunnn 6
7
777777777 8
n nnwn nnn 9
#
117 111 111 111 111 111 111 111 111 111 111 1
#
.111 111 111 111 111 111 111 111
nynnnn
U.TINDAIND
.0007 77
.0007 0007
.0007 0007
.0007 0007
.0007 0007
.0007 0007
.1002 10nDnnn Dnny TIT7T,ONN nn nn nn nn nn
T
#
7n 200 w nnnn nn nnnnnnn
.10000000
n nn nnn yinn 1n nnn nnn nnn nnn nnn nnn nnn nnn nnn nnn nnn nnn nnn nnn nnn nnn nnn nnn nnn nnn nnn nnn nnn nnn nnn nnn nnn nnn nnn nnn nnn nnn nnn nnn nnn nnn nnn nnn nnn nnn nnn nnn nnn nnn nnn nnn nnn nnn nnn nnn nann nn nn nn nn nn nn nn nn nn nn nn nn nn nn nn nn nn nn nn nn nn nn nn nn nn nn nn nn nn nn nn nn nn nn nn nn nn nn nn nn nn nn nn nn nn nn nn nn nn nn nn nn nn nn nn nn nn nn nn nn nn nn nn nn nn nn nn nn nn nn nn nn nn nn nn nn nn nn nn nn nn
1
n nn nnnn nnnn nnnn nnnn nnnn nnnn nnnn nnnn nnnn nnnn nnnn nnnn nnnn nnnn nnnn nnnn nnnn nnnn nnnn nnnn nnnn nnnn nnnn nnnn nnnn nnnn nnnn nnnn nnnn nnnn nnnn nnnn nnnn nnnn
00nn nn nn n
1
n 200 n npnn nnn no nnpn (2)


- ENGLISH
- Introduction
- General description (Fig. 1)
- Important
- Warning
- Caution
- Before first use
- ENGLISH 7
- Preparing for use
- Filling the basket
- Four Philips AVENT feeding bottles
- Two large Philips AVENT feeding bottles (330ml/11oz)
- ENGLISH8
- Four Philips AVENT storage cups and lids
- Two Philips AVENT breast pumps and two Philips AVENT feeding bottles
- Using the microwave steriliser
- Microwave specifications
- Wattage Sterilising time Cool-down time
- Cleaning
- Guarantee and service
- Introduktion
- Philips AVENT w nni Philips AVENT w nn nwn
- ywnn nn nnnn nn
- nyny64
- wnn nn
- on
- Philips AVENT
- Philips AVENT w n nn
- X12n
- (1)
- #
- 1
Brand : PHILIPS
Model : Avent SCF283
Category : Bottle sterilizer