
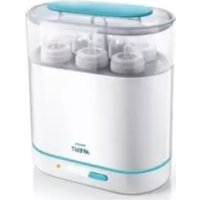
Avent SCF293 - Bottle sterilizer PHILIPS - Free user manual and instructions
Find the device manual for free Avent SCF293 PHILIPS in PDF.

| Brand | Philips |
| Model | Avent SCF293 |
| Product type | Electric steam bottle sterilizer |
| Sterilization type | Steam |
| Capacity | Up to 6 bottles of 330 ml |
| Power | 220-240 V, 50-60 Hz (mains voltage) |
| Sterilization cycle | Approximately 10 minutes (4 min heating + 6 min sterilization) |
| Automatic cycle (SCF293) | Approximately 40 minutes (sterilization + drying) |
| Drying cycle (SCF293) | Approximately 30 minutes |
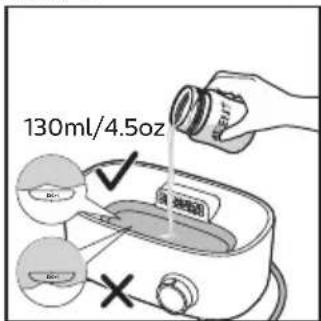
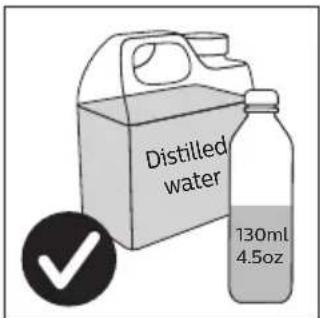
| Required water quantity | 130 ml distilled water |
| Operating modes | Sterilization, Automatic, Drying |
| Water level indicator | Yes, on the tank |
| Progress indicators | Yes (SCF293) |
| Automatic shut-off | Yes |
| Included accessories | Large basket, small basket, base, lid, tongs, cord storage |
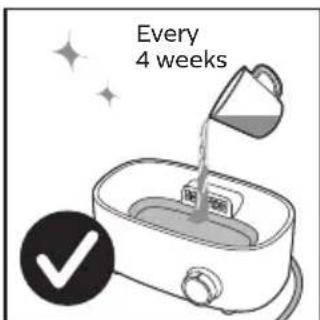
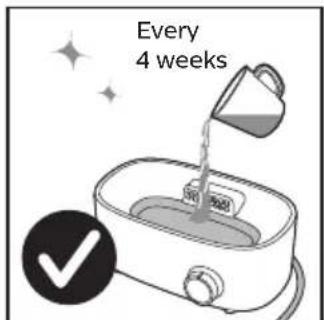
| Maintenance | Descaling every 4 weeks; filter cleaning every 4 weeks |
| Cleaning the baskets | In hot water and dish soap (not dishwasher safe) |
| Cleaning the base | With a damp cloth (do not immerse) |
| Safety | Automatic shut-off, hot steam, hot surfaces, do not immerse |
| Spare parts | Available at www.philips.com |
| Warranty | International warranty (see leaflet) |
Frequently Asked Questions - Avent SCF293 PHILIPS
User questions about Avent SCF293 PHILIPS
0 question about this device. Answer the ones you know or ask your own.
Ask a new question about this device
Download the instructions for your Bottle sterilizer in PDF format for free! Find your manual Avent SCF293 - PHILIPS and take your electronic device back in hand. On this page are published all the documents necessary for the use of your device. Avent SCF293 by PHILIPS.
USER MANUAL Avent SCF293 PHILIPS
Congratulations on your purchase and welcome to Philips! To fully benefit from the support that Philips offers, register your product at www.philips.com/welcome.
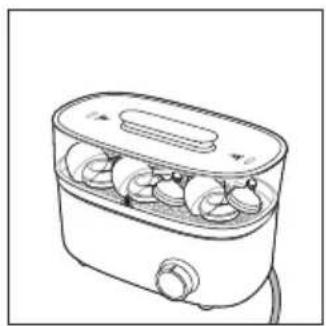
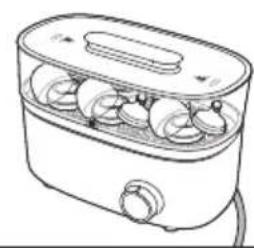
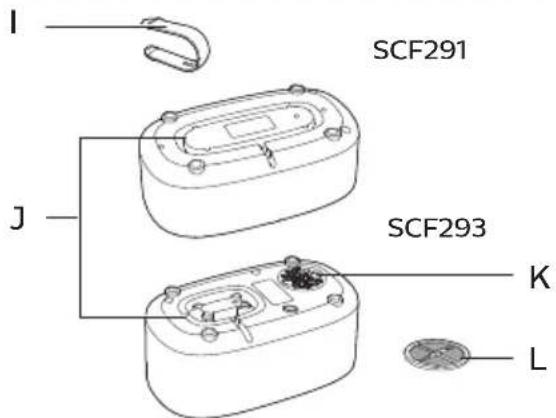
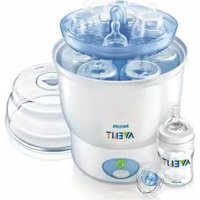
General description

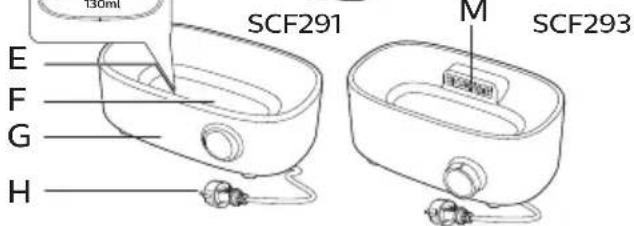
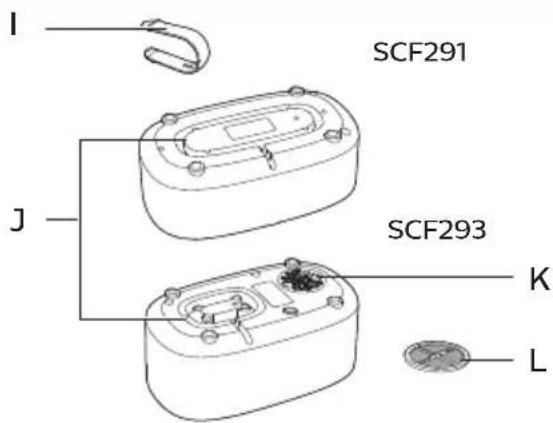
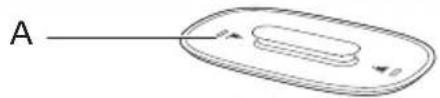
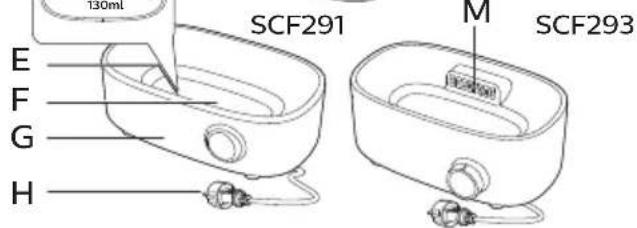
| A | Lid with grip | F | Heating element with water reservoir |
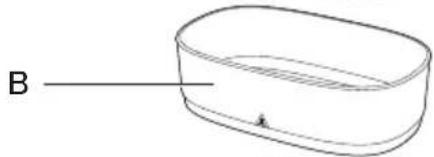
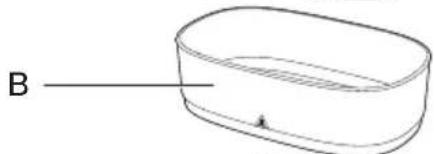
| B | Small basket | G | Base unit |
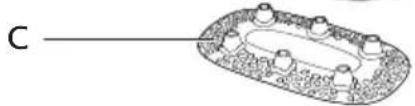
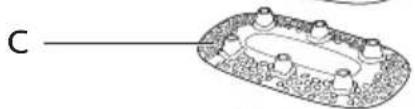
| C | Bottom plate for large basket | H | Power cord |
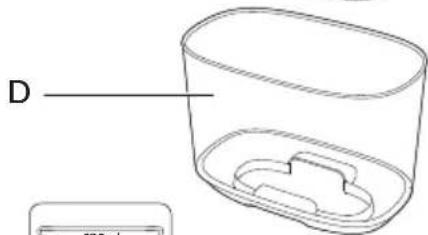
| D | Large basket with drip tray | I | Tongs |
| E | Maximum water level indicator | J | Cord storage |
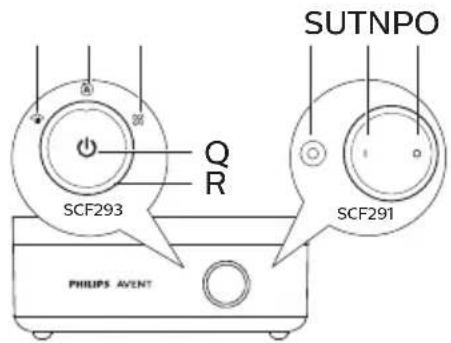
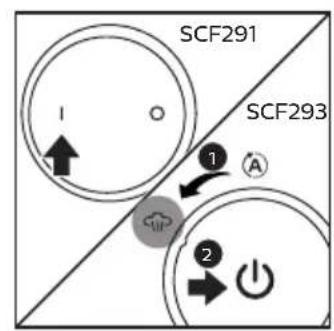
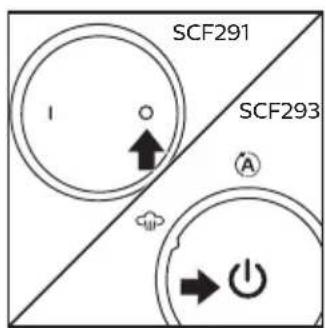
SCF293
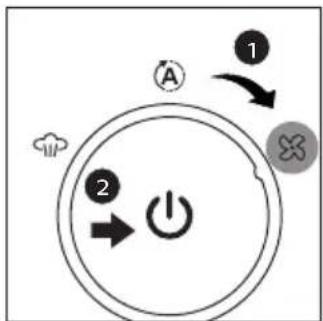
| K | Filter cover | O | Auto mode |
| L | Filter | P | Dry mode |
| M | Air outlet | Q | On/off button |
| N | Sterilize mode | R | Control knob with progress indicator lights |
SCF291
| S | On/off indicator light | U | Power off button |
| T | Power on button | ||
Note: You can find the type number of your sterilizer on the bottom of the appliance.
Important
Read this user manual carefully before you use the appliance and save it for future reference.
Danger
- Never immerse the base, the power cord or the mains plug in water or any other liquid.
- Failure to follow the descending instructions may cause irreparable damage.
- Never disassemble the base to avoid the risk of electric shock.
Warning
- This appliance can be used by persons with reduced physical, sensory or mental capabilities or lack of experience and knowledge if they have been given supervision or instruction concerning use of the appliance in a safe way and if they understand the hazards involved.
- This appliance shall not be used by children. Keep the appliance and its cord out of the reach of children.
- Children shall not play with the appliance.
- Check if the voltage indicated on the appliance corresponds to the local mains voltage before you connect the appliance.
- Do not use the appliance if the plug, the power cord or the appliance itself is damaged.
- If the power cord is damaged, it must be replaced by Philips, a service center authorized by Philips or similarly qualified persons in order to avoid a hazard.
- There are no serviceable parts inside the electric steam sterilizer. Do not attempt to open, service or repair the electric steam sterilizer yourself.
-
The appliance becomes extremely hot during operation and may cause burns if it is touched.
-
Beware of hot steam that comes out of the vent in the lid or when you remove the lid. Steam can cause burns.
- Do not touch the base, the baskets and the lid during or shortly after operation because they are very hot. Only lift the lid by its grip.
- Never move or open the appliance when it is in use or when the water in it is still hot.
- Never place items on top of the appliance when it is in use.
- Only use water without any additives.
- Do not put bleach or other chemicals in the appliance.
- Do not pour water over the indication on reservoir or 130ml / 4.5 oz water.
- Only sterilize baby bottles and other items that are suitable for sterilizers. Check the user manual of the items you want to sterilize, to make sure they are suitable for sterilizers.
- If you want to stop the operation, press power off button (for SCF291) or press the on/off button (for SCF293) to turn off the appliance.
- This appliance is intended for household use only.
- Do not misuse the sterilizer for other than its intended use to avoid potential injury.
Caution
- Never use any accessories or parts from other manufacturers or that Philips does not specifically recommend. If you use such accessories or parts, your guarantee becomes invalid.
- Do not expose the appliance to extreme heat or direct sunlight.
- Always let the appliance cool down before you move or store it.
- The accessible surfaces may become hot during use
- Do not sterilize very small items which can fall through the holes in the bottom of the basket.
English
- Never place items directly on the heating element when the appliance is switched on.
- Do not use the appliance if it has fallen or is damaged in any way. Take it to an authorized Philips service center for repair.
- Always place and use the appliance on a dry, stable, level and horizontal surface.
- Do not place the appliance on a hot surface.
- Do not let the power cord hang over the edge of the table or worktop on which the appliance stands.
- Always pour any remaining water out of the appliance after use and when the appliance has cooled down.
- Switch off the appliance and disconnect from supply before changing accessories or approaching parts that move in use.
- Environmental conditions, such as temperature and altitude, may affect the functioning of this appliance.
- Cleaning and user maintenance shall not be made by children.
- Always disconnect the device from supply if it's left unattended.
Electromagnetic fields (EMF)
This Philips appliance complies with all applicable standards and regulations regarding exposure to electromagnetic fields.
Getting to know the settings
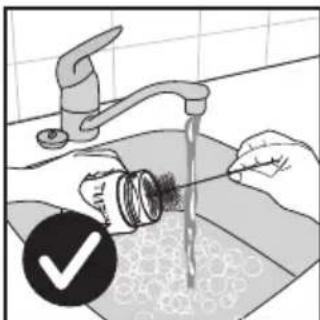
Note: Before you sterilize bottles and other items, clean them first.
Only place items in the sterilizer which are suitable for sterilizing. Do not sterilize items that are filled with liquid, e.g. a teether with cooling fluid.
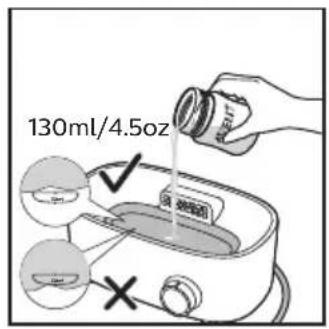
| Sterilize • Sterilize | mode is for sterilizing baby items. • A sterilizing cycle takes approximately 10 minutes. • Heating up takes approximately 4 minutes and sterilizing takes approximately 6 minutes. • Make sure to pour exactly 130 ml/4.5 oz distilled water directly into the water reservoir of the base. |
| Auto (SCF293 only) A | • Auto mode is for sterilizing and drying baby items in one go. • An auto cycle takes approximately 40 minutes. • When you use the “Auto” mode, the appliance starts sterilizing first and then drying will start automatically. The sterilizing cycle takes approximately 10 minutes, and the drying cycle takes approximately 30 minutes. • Make sure to pour exactly 130 ml/4.5 oz distilled water directly into the water reservoir of the base. |
| Dry (SCF293 only) B | • Dry mode is for drying baby items. • A drying cycle takes approximately 30 minutes. • When you dry baby items, do not add water to the water reservoir of the base. |
Things to Note
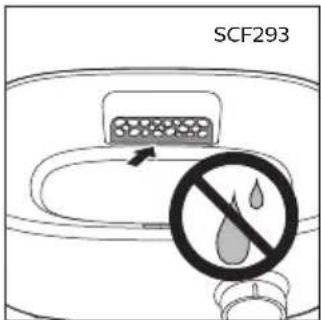
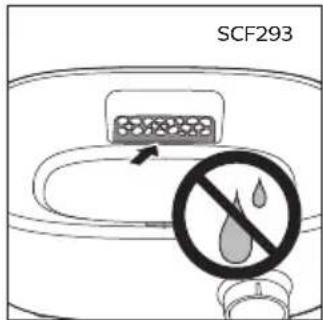
- Don't pour water into the air outlet.
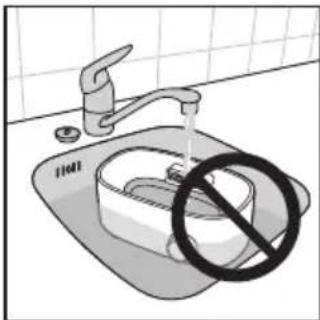
- Don't immerse the base unit in water.
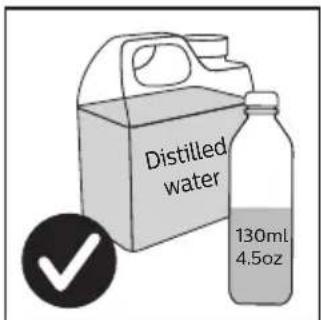
- Use 130ml/4.5 oz distilled water.
- Clean the items beforehand.
- Disassemble all parts completely and place them with openings pointing down.
- Pour out the remaining water from large basket after each use.

- Clean the filter every 4 weeks.
- Descale the sterilizer every 4 weeks.
Before first use
When you use the appliance for the first time, we advise you to let it complete one sterilization process with empty baskets.
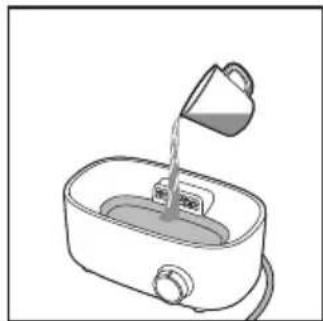
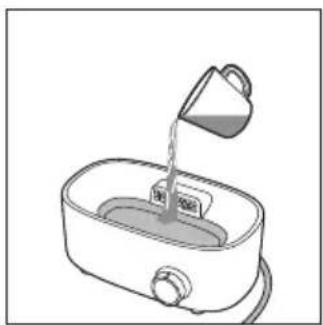
1 Use a clean baby bottle and pour exactly 130~ml / 4.5 oz distilled water directly into the water reservoir of the base.
Tip: Using distilled water can minimize the formation of limescale on heating element. For more information on limescale, see section "Dscaling".
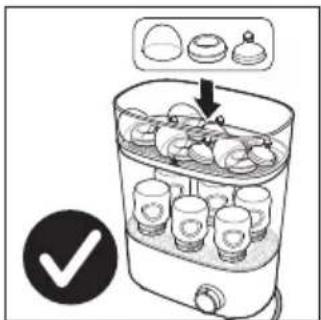
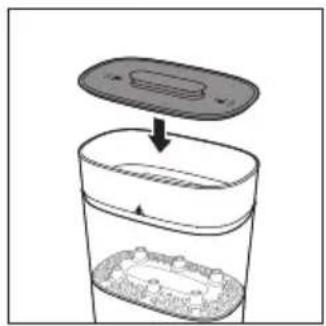
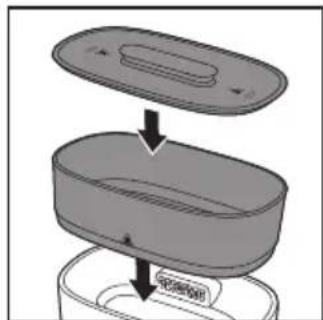
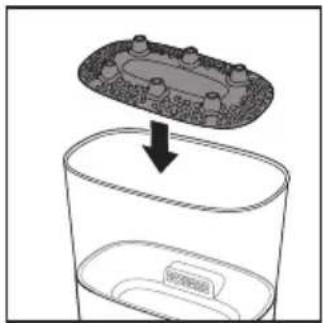
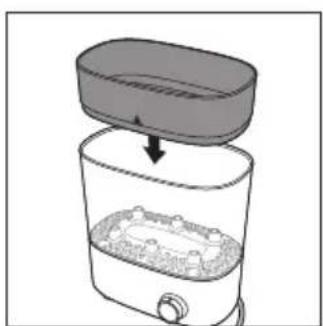
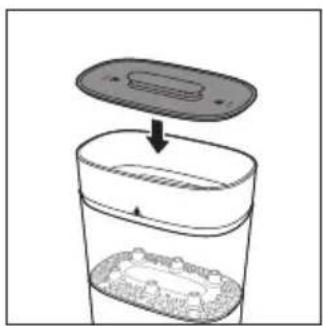
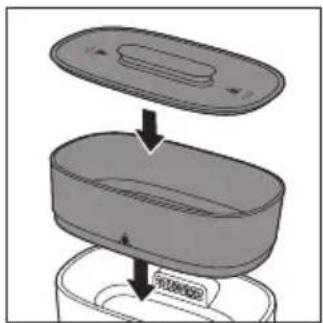
2 Place the large basket on the base.

3 Place the bottom plate in the large basket.
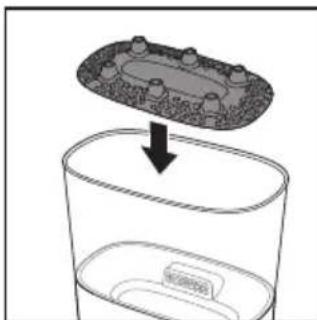
4 Place the small basket on the large basket.
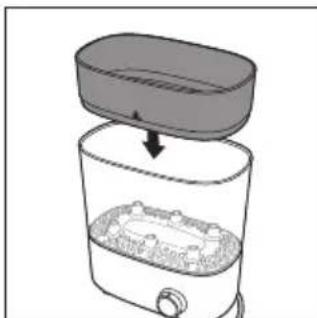
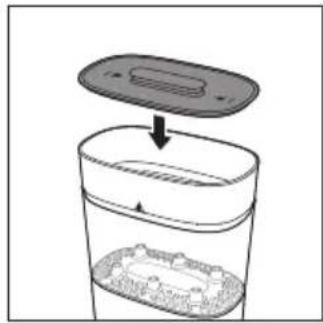
5 Place the lid on top of the small basket.
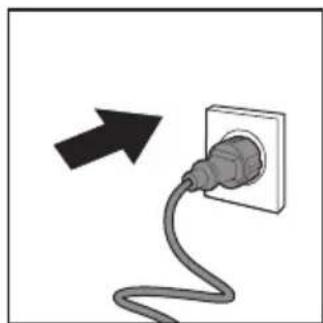
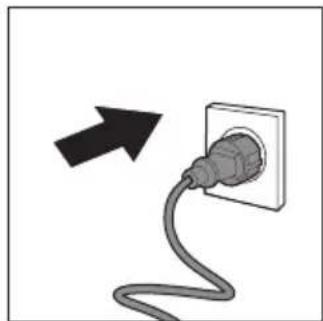
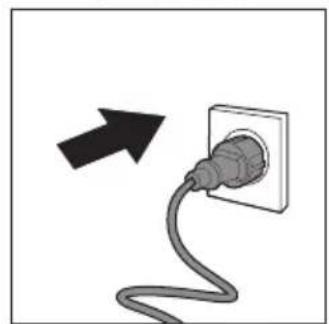
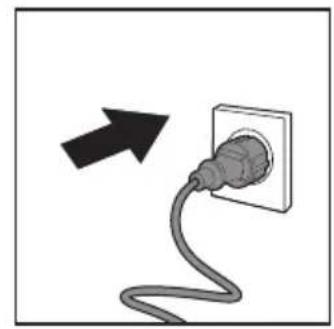
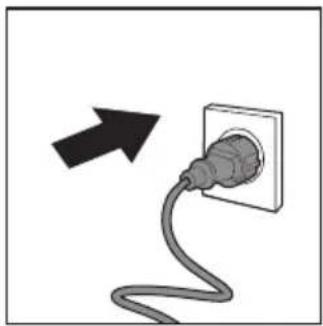
6 Put the plug in the wall socket.
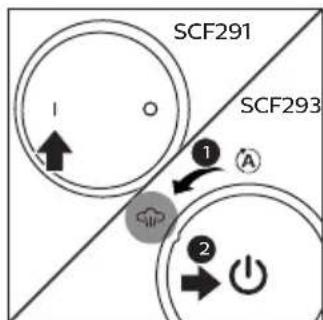
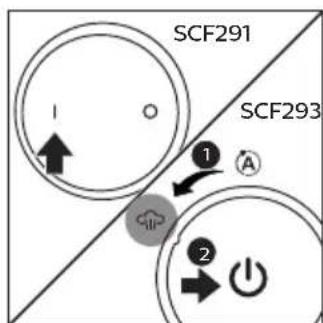
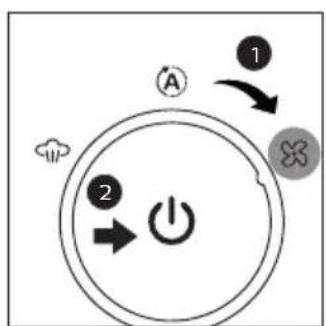
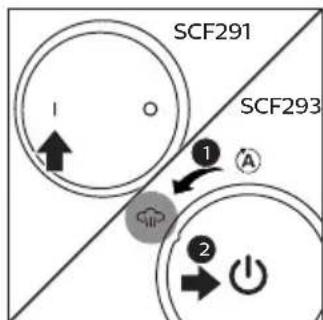
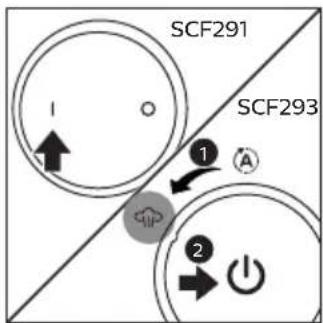
7 SCF291: Press the power on button to switch on the appliance.
SCF293: Turn the on/off button to "Sterilize" mode. Then press it to switch on the appliance.
Note: If you plug in the appliance after you have pressed the power on button, the sterilizer starts working immediately. You can switch it off by pressing power off button.
Caution: The base, the baskets and the lid become hot during or shortly after operation.
SCF291
- The on/off indicator light lights up to indicate that the appliance starts sterilizing.
- When the sterilization process is finished, the light goes off and the appliance switches off automatically.
SCF293
- The entire progress indicator lights flash to show the appliance is sterilizing.
- When the sterilization process is finished, the lights go off and the appliance switches off automatically.
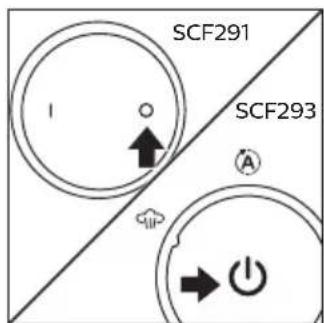
- You can turn the on/off button to "Dry" mode to dry the appliance. It takes approximately 30 minutes to complete the drying cycle.
8 After the appliance has cooled down completely, remove the lid, the small basket, the bottom plate, the large basket and wipe them dry.
Note: When you remove the large basket from the base, be aware of the remaining water on the base drip tray.
9 Let the appliance cool down completely for approximately 10 minutes before you use it again.
Note: The appliance does not work for 10 minutes after a sterilizing cycle. It needs to cool down first.
Preparing for use
Preparing for sterilizing
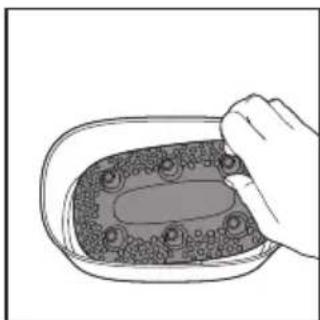
Before you put the items to be sterilized in the sterilizer, clean them thoroughly in the dishwasher or clean them by hand with hot water and some liquid dishwashing detergent.
Assembling the sterilizer
There are several ways to assemble the sterilizer.
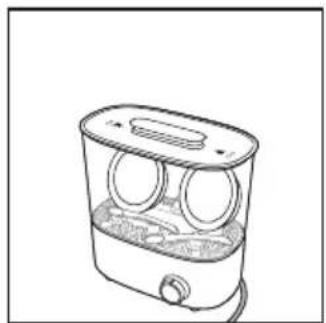
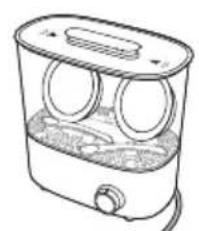
1 With only the small basket on the base to sterilize small items such as soothers.
2 With only the large basket on the base to sterilize medium-sized items such as breast pumps, toddler plates or toddler cutlery.
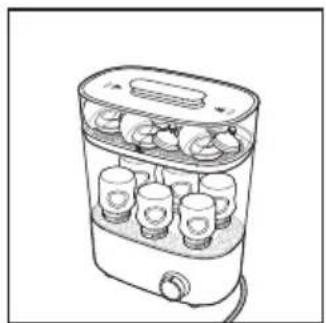
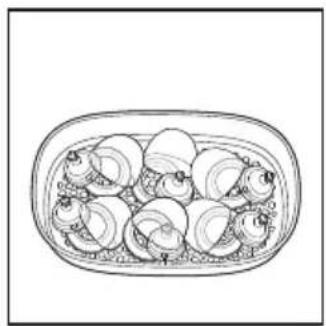
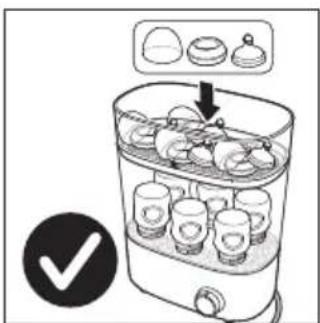
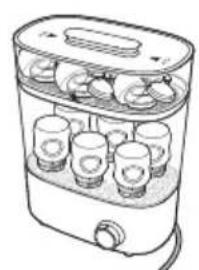
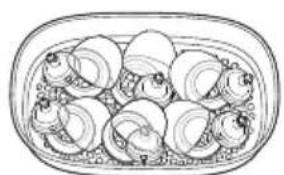
3 With the large basket and the small basket on the base to sterilize up to six 330~ml / 11 oz bottles. Place the bottles upside down in the large basket and place the bottle dome caps, screw rings and teats in the small basket.
Note: When you fill the small basket, put screw rings on the bottom, place the teats and the bottle caps loosely on top of the screw rings.
Note: Make sure all parts that need to be sterilized are completely disassembled and place them in the basket with their openings pointing down to prevent them from filling up with water.
Using the appliance
Sterilizing (SCF291 and SCF293)
1 Pour water directly into the water reservoir of the base (see section "Before first use").
2 Assemble the sterilizer (see section "Assembling the sterilizer") and place the items to be sterilized in it.
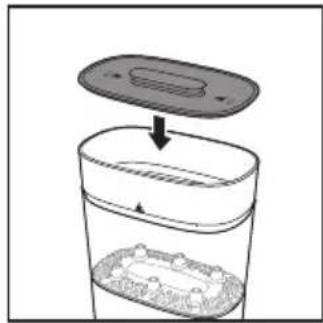
3 Place the lid on top of the small or large basket.
4 Put the plug in the wall socket.
5 SCF291: Press the power on button to switch on the appliance.
SCF293: Turn the on/off button to "Sterilize" mode. Then press it to switch on the appliance.
Caution: The base, the baskets and the lid become hot during or shortly after operation.
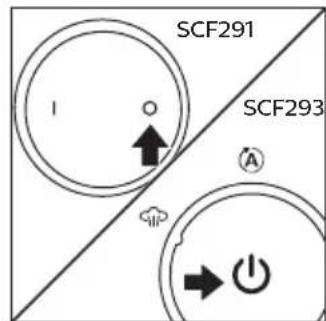
Note: You can switch the appliance off by pressing the power off button.
SCF291
- The on/off indicator light lights up to indicate that the appliance starts sterilizing.
- When the sterilization process is finished, the light goes off and the appliance switches off automatically.
SCF293
- The entire progress indicator lights flash to show the appliance is sterilizing.
- When the sterilization process is finished, the lights go off and the appliance switches off automatically.
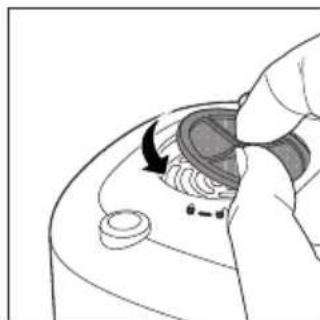
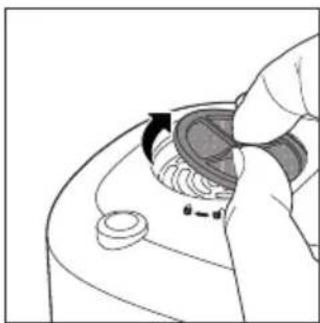
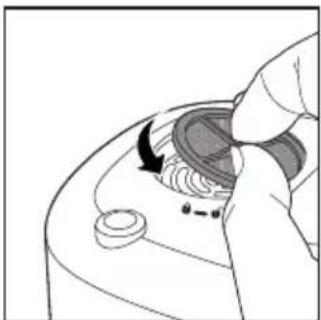
6 Remove the lid.
Wait until the appliance has cooled down before you remove the lid.
Be careful. Hot steam may come out of the sterilizer.
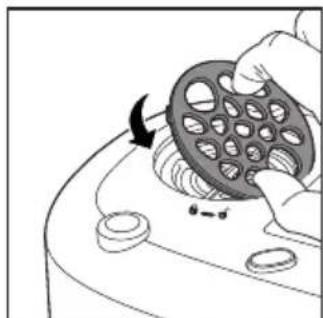
7 Remove the bottles and other items from the basket. Use the tongs to remove the smaller items.
Be careful. The sterilized items may still be hot.
Note: Make sure you wash your hands thoroughly before you touch the sterilized items.
8 Unplug the appliance and wait until the appliance has cooled down completely.
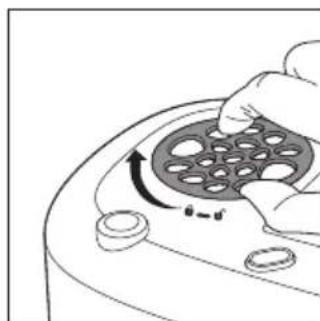
9 Remove the small basket and large basket.
Note: When you remove the large basket, be aware of the remaining water on the base drip tray.
Note: The drip tray is designed for catching milk or food residue from the items to avoid going into the water reservoir of the base. This is to optimize the sterilizing performance and make the heating element easy to clean.
10 Detach the bottom plate from the large basket. Pour out any remaining water from the large basket drip tray and clean it (see section "Cleaning").
11 Pour out any remaining water from the water reservoir and wipe it dry.
Note: The appliance does not work for 10 minutes after a sterilizing cycle. It needs to cool down first.
Auto - Sterilizing + Drying (SCF293)
1 Pour water directly into the water reservoir of the base (see section "Before first use").
2 Assemble the sterilizer (see section "Assembling the sterilizer") and place the items to be sterilized in it.
Note: Make sure all the items are completely disassembled and placed in the basket with their openings pointing down for effective drying.
Be careful. Hot steam will come out of the sterilizer when drying starts.
3 Place the lid on top of the small or large basket.

4 Put the plug in the wall socket.

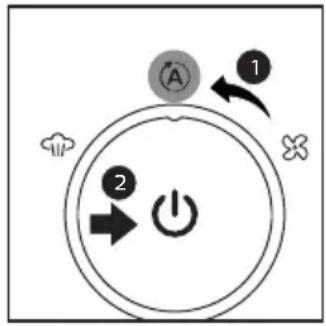
5 Turn the on/off button to "Auto" mode. Then press it to switch on the appliance.
- The appliance starts sterilizing first. The entire progress indicator lights flash to show the appliance is sterilizing.
- After that, drying will start automatically. The progress indicator lights flash and off gradually to show the appliance is drying.
- When the whole process is finished, the lights go off and the appliance switches off automatically.
Caution: The base, the baskets and the lid become hot during or shortly after operation.
6 Remove the lid.
7 Remove the bottles and other items from the basket. Use the tongs to remove the smaller items.
Be careful. The sterilized items may still be hot.
Note: Make sure you wash your hands thoroughly before you touch the sterilized items.
Note: The drying result may vary depends on the ambient temperature, ambient humidity and loading of sterilizer. You can run one more drying cycle if necessary.
8 Unplug the appliance and wait until the appliance has cooled down completely.
9 Remove the small basket and large basket.
Note: When you remove the large basket, be aware of the remaining water on the base drip tray.
10 Detach the bottom plate from the large basket. Pour out any remaining water from the large basket drip tray and clean it (see section "Cleaning").
Drying (SCF293)
1 Assemble the sterilizer (see section "Assembling the sterilizer") and place the items to be dried in it.
Note: Make sure all the items are completely disassembled and placed in the basket with their openings pointing down for effective drying.
Be careful. Hot steam will come out of the sterilizer when drying starts.
2 Place the lid on top of the small or large basket.
3 Put the plug in the wall socket.
4 Turn the on/off button to "Dry" mode. Then press it to switch on the appliance.
- Drying will start after about 30 seconds. The appliance warms up to produce warm air to dry items.
- The progress indicator lights flash and off gradually to show the appliance is drying.
- When the drying process is finished, the lights go off and the appliance switches off automatically.
Caution: The base, the baskets and the lid become hot during or shortly after operation.
5 Remove the lid.
6 Remove the bottles and other items from the basket. Use the tongs to remove the smaller items.
Be careful. The dried items may still be hot.
Note: Make sure you wash your hands thoroughly before you touch the dried items.
Note: The drying result may vary depends on the ambient temperature, ambient humidity and loading of sterilizer. You can run one more drying cycle if necessary.
7 Unplug the appliance and wait until the appliance has cooled down completely.
Cleaning
Do not use abrasive or aggressive cleaning agents (e.g. bleach) or a scouring pad to clean this appliance.
Never immerse the base and the power cord in water or any other liquid.
Note: The sterilizer is not dishwasher-proof. The baskets, the bottom plate and the lid can be cleaned with hot water and liquid dishwashing detergent.
1 Always unplug the appliance and let it cool down before you clean it.
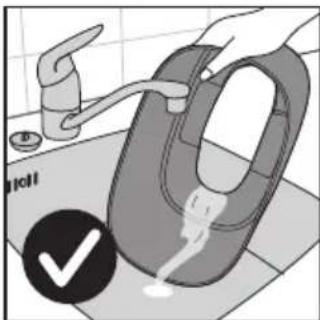
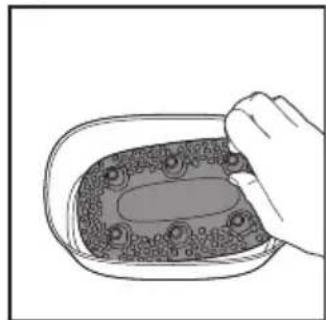
2 Clean the base with a moist cloth.
3 Detach the bottom plate from the large basket.
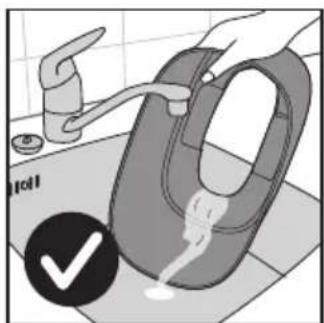
Pour out any remaining water from the large basket drip tray.
Note: Water accumulates on the large basket drip tray after each sterilizing cycle. Pour out the remaining water from the large basket after each use.
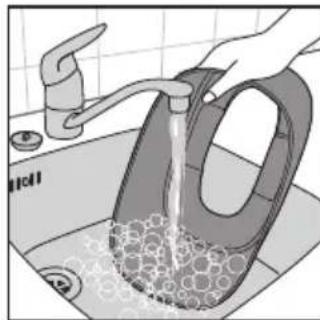
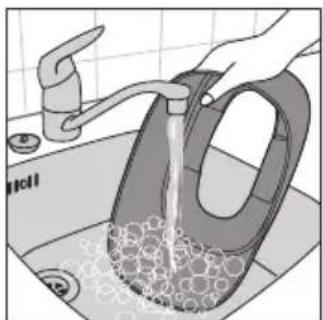
4 Clean the lid, the small basket, the bottom plate and the large basket in hot water with some liquid dishwashing detergent.
Note: After cleaning, store the sterilizer in a clean and dry place.
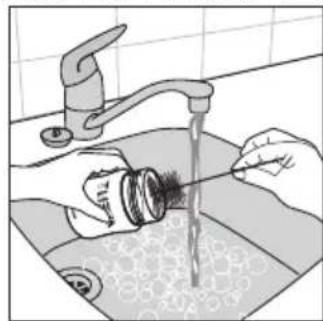
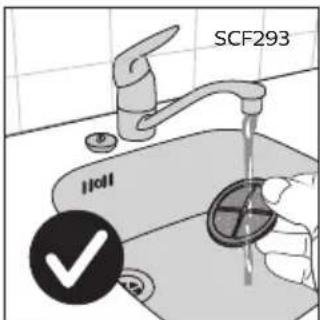
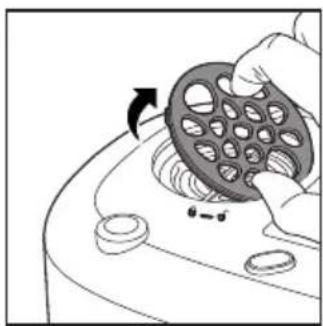
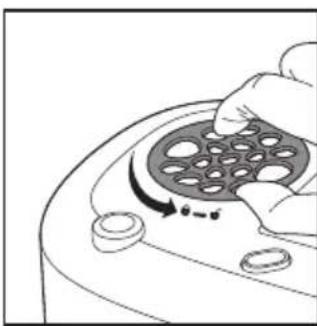
Cleaning the filter (SCF293)
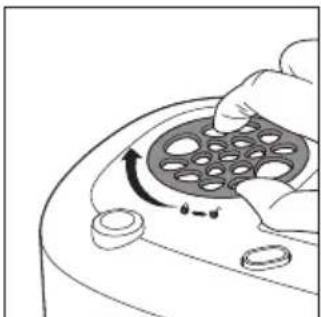
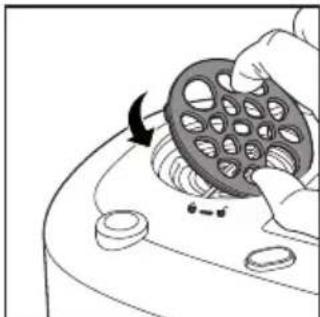
1 Detach the filter cover from the base.

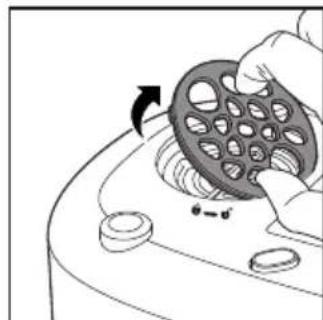
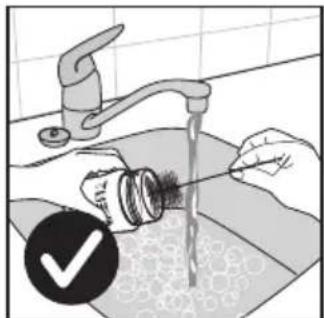
2 Take out the filter and clean it under tap water.
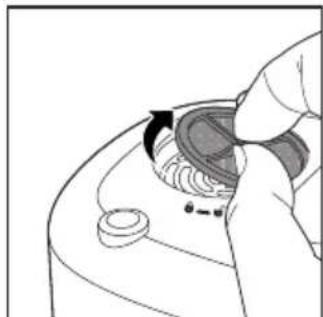

3 Let the filter air dry thoroughly. Put it back to the base and close the filter cover.
Note: Clean the filter at least every 4 weeks to ensure that it continues to filter effectively.
Descaling
The sterilization process is extremely important to ensure the most hygienic standards for your baby. Limescale deposits can slow down the sterilization cycle and even impair its effectiveness.
Limescale is the hard and chalky deposit. Depending on the water type in your area, limescale can have different appearances ranging from snow white looking powder to brownish stains. The harder the water, the faster scale builds up. It builds up in appliances as the residue of minerals naturally contained in water, which fail to evaporate when water is heated. Although it is not harmful as such, it is unsightly, hard to clean and can impair the operation of appliances or damage their components if allowed to build up.
Descale the sterilizer at least every 4 weeks to ensure it works efficiently.
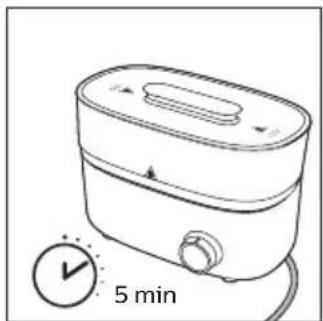
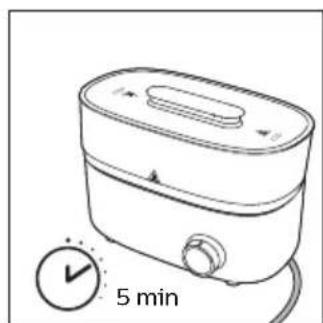
1 Pour 90~ml / 3 oz of white vinegar (5% acetic acid) and 30~ml / 1 oz of water into the water reservoir.
2 Place the small basket on the base. Place the lid on top of the small basket.
3 SCF291: Press the power on button to switch on the appliance.
SCF293: Turn the on/off button to "Sterilize" mode. Then press it to switch on the appliance.
Note: Place the small basket on the base to prevent hot liquid from splashing out.
4 Let the appliance operate for 5 minutes, and then switch it off. SCF291: Press the power off button to switch off the appliance. SCF293: Press the on/off button to switch off the appliance.
5 Empty the water reservoir and rinse it thoroughly. If you still see traces of scale, remove it by sponge. Rinse again and wipe the base with a damp cloth.
6 Rinse the small basket and lid as well to remove vinegar solution.
Note: You can also use citric acid based descalers.
Note: Do not use other types of descalers.
Ordering accessories
To buy accessories or spare parts, visit www.philips.com or go to your Philips dealer. You can also contact the Philips Consumer Care Centre in your country (see the worldwide guarantee leaflet for contact details).
Recycling
- Do not throw away the product with the normal household waste at the end of its life, but hand it in at an official collection point for recycling. By doing this, you help to preserve the environment.
- Follow your country's rules for the separate collection of electrical and electronic products. Correct disposal helps prevent negative consequences for the environment and human health.
Guarantee and support
If you need information or support, please visit www.philips.com/support or read the separate worldwide guarantee leaflet.
Note: This appliance needs to be descaled regularly for optimal performance. If you do not do this, the appliance may eventually stop working. In this case, repair is NOT covered by your warranty.
Troubleshooting
This chapter summarizes the most common problems you could encounter with the appliance. If you are unable to resolve the problem with the information below, contact the Consumer Care Center in your country.
| Problem Solution | |
| When should I descale my sterilizer? | When you use the sterilizer, you may notice that there are small spots ranging from snow white to brownish appearing on the heating plate. This is a sign that your sterilizer should be descaled. In any case, the sterilizer should be descaled at least every 4 weeks to ensure that it continues to work effectively. |
| Why is the sterilizing time so short? | You did not add enough water for sterilizing. Pour exactly 130 ml/4.5 oz water directly into the water reservoir of the base. |
| Why is there still much water remaining on heating plate after sterilizing? | The heating plate may be blocked by the limescale. The sterilizer should be descaled at least every 4 weeks. See section “Dscaling”. |
| Why is there a burning smell and burnt mark on the base? | You may not have poured out the remaining water from the large basket drip tray regularly. Water accumulates on the large basket drip tray after each sterilizing cycle. Pour out any remaining water from large basket after each use. 1 Detach the bottom plate from the large basket. Pour out any remaining water from the large basket drip tray. 2 Clean the bottom plate and the large basket in hot water with liquid dishwashing detergent. The items may be not cleaned thoroughly before sterilizing. Before you put the items to be sterilized in the sterilizer, clean them thoroughly in the dishwasher or by hand with hot water and liquid dishwashing detergent. |
| Why does the sterilizer stop working? | The heating plate may be blocked by the limescale. The sterilizer should be descaled at least every 4 weeks. See section “Dscaling”. |
| The items are still wet after drying. | The items may still be wet due to different reasons: · Ambient temperature or humidity · Loading of sterilizer · The items stack too closely together Make sure hot air is able to circulate around the items to ensure effective drying. You can run one more complete drying cycle if necessary. |
6 Retirez le couvercle.
jll jll lll jll jll jll jll jll jll jll
. 1
j 1
. pIuOoWvI ooi
jll laoe eag aayg yarall aegd jiaaie gagg jgdd
.
.4j0 j000 45j Jc g a1b1y uogjzjj 000 0e lgl jg j
(EMF) 1
aabolizogJgauu Jaaal aai biaI aablaI gao Philips jge
15
a.aaee 1s yjy jol jy g lal .jll aaii
a_1 = 90% = 12
a
.1
Ibblolj joo caij4.5/Jo 130 you
pIulzul US 0xSul alwJ zo aolol j
Jg JALIJI gai jL d yog .
L 4 Js aai jlaa no aai Sui ciu jll alljy
ai a ai 分母最小值为 k .
JgJy 0aU pJxWJy J
Jzj 1.
"


- 交差
3. 2 ≤ S1 all
4.δ
- _差 交 AD
- bilal
7.jgj1
jgllll 1s 1s 1s 1s 1s 1s 1s 1s 1s 1s 1s 1s 1s 1s 1s 1s 1s 1s 1s 1s 1s 1s 1s 1s 1s 1s 1s 1s 1s 1s 1s 1s 1s 1s
a a a a a a a a a a a a a a a a a a a a a a a a a a a a
paae j40 2a
a
1.
2g
aaiaaai 1011111111111111
311/J0336
jlll lalil gol "p"g 1 jlll lalil /lalil SCF293
aillgii de aas 8e yra gai aolll csl iacu wai buelll gailll gall
Jai 1j Jai jai jai jai jai jai jai jai jai
SCF291
a
slll jll jglall gagg ogall gabis qaeell dlos agil ic
SCF293
- · = PA · PB
- _b
.152
aegill jglj no jolw lwl wclayd. jdll g
21
7.
aioLo 1j y jg aoe o gll jy
- a < 1. ,d : x > 0
ailll jyjog 9.0Sllg
.0eall 3 oogb1 aaii 1 e aaiil oalj no gaii oynll alll j! i: abdo
joo 3 j0y111o delu. oolal oolal o1j 111111111111111111111111111111
aaii 151
10.("
11.
ygl 0j 45 j o. aqoll o95 elqil qg 10 od jolal y : abdo
(SCF293jIbU) + -
- ( c 一 一 ) ^ 一 ^
m = 311
- a : 12 10,1 : 8
ailll jy g 9. xSllg
.0eall 8oogob1 aaii iiaa oaiy 10a1 no gaii oyai alalil ai j ic: abxdo
10.("
(SCF293jI)
()
- d 与 s 与 s 重合
aaiia aaiia iaii jaii gai iaiis aaii gai aiil 1gai gai jaii gai iai
aagill aas uie pail jilg no lwl yel waiq joll ggi
-
_n 与 S 重合
-
= 0

4.jgulj
30 1
a
= 1, = 2,
aaii aaii aai iai
.
jai jai jie jie jie gge gge gge gge gge gge gge gge gge gge gge gge gge gge gge gge gge gge gge gge gge gge gge gge gge gge gge gge gge gge gge gge gge gge gge gge gge gge gge
yililil de oyaia o jgnojgl aolll csl iio Lw yai oelalgl alll gell
- a b c d e f g
6.001
aLw jj y dLaiae aaiy
aaii jill joljll uubuuiuuiuuiuuee oos
j 15 j 15 j 15 j 15 j 15 j 15 j 15 j 15 j 15 j 15 j 15 j 15 j 15 j 15 j 15 j 15 j 15 j 15 j 15 j 15 j 15 j 15 j 15 j 15 j 15 j 15
m = 311
7 · L S D
#
jaii iiaa aiaa aai g (jaiil Jaii Iaae) aagai abaiis algo y
. 15y15 y15u 15y15 u15u
aaii iiaai 1
450g jolll 2e aal [10]
1.
-
a.b.
-
_点 SJI aL
.0sUul aUuul aUul xbaull uauo yauaui bUol u
aJ 5 aJ 8 aJ 10 aJ 12 aJ 14 aJ 16 aJ 18 aJ 20 aJ 22 aJ 24 aJ 26 aJ 28 aJ 30 aJ 32 aJ 34 aJ 36 aJ 38 aJ 40 aJ 42 aJ 44 aJ 46 aJ 48 aJ 50 aJ 52 aJ 54 aJ 56 aJ 58 aJ 60 aJ 62 aJ 64 aJ 66 aJ 68 aJ 70 aJ 72 aJ 74 aJ 76 aJ 78 aJ 80 aJ 82 aJ 84 aJ 86 aJ 88 aJ 90 aJ 92 aJ 94 aJ 96 aJ
jaii jilw jolal g aiwl olly bll aullg alall sall g all l
(SCF293 jIbU)
- u_i

-
- ba + b = - dc + d
-
S OBC = S COD + S_ BOC
yJ 4 J5 jai b: a
A
a 100000000000000000000000000000000000000000000000
J 15 J 15 J 15 J 15 J 15 J 15 J 15 J 15 J 15 J 15 J 15 J 15 J 15 J 15 J 15 J 15 J 15 J 15 J 15 J 15 J 15 J 15 J 15 J 15 J 15 J 15
aalao jolal jdl d gwl4 Js aaijll jge no aaiuul l uauuill yog
1 2000019
. 1ol61 1j1j 3 ol61
.0eall jle oai all alll 2.
3.jglzllj
Jglal Jgat 1yge 10. "paaill" g o j! Jl aai / Jiaai / jz yj:SCF293 .aifll Jlgwll aiby gab dall de oxnall alw
3 4.
jglal jaiy jaiy jaiy jaiy jaiy jaiy jaiy:SCF293

j1i j0x 1j y 1s 13j. 4a a5b g oab j jz jz 5 oelall
a.b.aa
a 6. JJU
aai jaa aai aai ai aai alalal alal
aalssj 11 jll aljbjol gbl jg jelgl gdo
Ld1
Philips no. 00 all aou s jy Jauil g uu Philips Lg g y g www.philips.com 2juy jz jz jz jz jz jz jz
a a a a a a a a a a a a a a a a a a a a a a a a a a a a a
Philips
www.philips.com/welcome
05j 5j j0 0k i w dikg gla


| A. | |||
| B. | |||
| C. | |||
| I. | \( {}^{1} \) | D | |
| \( {}^{2} \) | J | \( {}^{3} \) | E |
SCF293
jU jJ JJ JJJ JJJ JJJ JJJ JJJ JJJ JJJ JJJ JJJ JJJ JJJ JJJ JJJ JJJ JJJ JJJ JJJ JJJ JJJ JJJ JJJ JJJ JJJ JJJ JJJ JJJ JJJ JJJ JJJ JJJ JJJ JJJ JJJ JJJ JJJ JJJ JJJ JJJ JJJ JJJ JJJ JJJ JJJ JJJ JJJ JJJ JJJ JJJ JJJ JJJ Jjj
L 1
1
d_总 = 12
4gjg00s gaeauo 1000000000000000000000000000000000000000000
. 5 5 5 5 5 5 5 5 5 5 5 5 5 5
ii 1
SCF291
103^ JS
.0g
SCF293
.
.3g
30 30 30 30 30 30 30 30 30 30 30 30 30 30 30 30 30 30 30
.
Ss 5 Ss 6035 216 by Ss3g g s4 ddo. Ss5 sss sss ss 5ol 5s sds
8
aeg aeg
9.8g S
gai jgl 10 4 gai 4 5
gicssjy jswoslo
y j 1 yj 1 yj 1 yj 1 yj 1 yj 1 yj 1 yj 1 yj 1 yj 1 yj
ouiis oigacuolkssd jg
i#dy 1s yu w jSos o u Sua Uwog. u
g j 1 20 g j 1 000 S 1 J Lw g 4 000
gjy jy 000000000000000000000000000000000000000000000000000000000
15 15312005 S 45 55 55
- wles
005 0
oolal oolss jgsololil 1 (sglolo) gla oolgla oolgla
Lg, g, g, g, g, g, g, g, g, g, g, g, g, g, g, g, g, g, g, g, g, g, g, g, g, g, g, g, g, g, g, g, g,
J 1 J 1 J 1 J 1 J 1 J 1 J 1 J 1 J 1 J 1 J 1 J 1 J 1 J 1 J 1 J 1 J 1 J 1 J 1 J 1 J 1 J 1 J 1 J 1 J 1 J 1 J 1 J 1 J 1 J 1 J 1 J 1 J 1 J 1 J
.0g 0g 0g
a 100000000000000000000000000000000000000000
4.
gogolololuslglgsfSCF291
0gogolc 100000000000000000000000000000000000000000000000000000000
5
.
6.3g 54
Sooaol Su jw wu y p j wgi go jnagao:
.(1sdsdojglaoafojfoofofofofofofofofofofofofofofofofofofofofofofofofofofofofofofofofofofofofofofofofofofofofofofofofofofofofofofofofofofofofofofofofofofofofofofofofofofo
#
paaai gao aoljy g sgtg jn jilg qab 1j5 jnl dyl jwli jg jzglg zgao gla y j oyos jt ooiyrae jly j
10505 805 805 805 b2000 4 2000 15
1 1 1 1 1 1 1 1 1 1 1 1 1 1 1 1 1 1 1 1 1 1 1 1 1 1 1
150s yg 1jw1 c0xw g C w j b000 (g)
ilu 9
Sd 1000000000000000000000000000000000000000000000000000000000000000000
g 10000000000000000000000000000000000000000000
#
J 10a2a1 b 1 a1 1 1 1 1 1 1 1 1 1 1 1 1 1 1 1 1 1 1 1 1 1 1 1 1 1 1
15.50
sIoggI J SsS sI aS dS uu Gao CwI JSS Ooos jOolaiwl pss
oliss jigicld olss ygdo ?p5 s5 p
1005i 1005i jgacwgl yj
a 4.5/130
olg5 1000
1015 gagaa okaa aia 4 y, aai oai sglauu sai ygws ly iy
jgaoo 05 gao 12y 1 300g 9 000
j 1 j 1 j 1 j 1 j 1 j 1 j 1 j 1 j 1 j 1 j 1 j 1 j 1 j 1 j 1 j 1 j 1 j 1 j 1 j 1 j 1 j 1 j 1 j 1 j 1 j 1 j 1 j 1 j 1 j 1 j 1 j 1 j 1 j 1 j
Cooie 100g Gw g 100g 0500000000000000000000000000
1 1
- 100g 1 g 100g
aol 100000000000000000000000000000000
y 1 y
1015 ggeo oks 4 y. uoy ouuogosg sot y wuyy
jolgl0uus jgacwolswol 5
uagbjojdo yduo 1000000000000000000000000000000000000000000
-1200 (slos y wgbj
.0115 gaaa olaa
a 1234567890
- 5g plai j g b ay jos S 15 5 5 5 5 5 5 5 5 5 5 5 5 5 5 5 5 5 5 5 5 5 5 5


- General description
- Important
- Danger
- Warning
- Caution
- English
- Electromagnetic fields (EMF)
- Getting to know the settings
- Note: Before you sterilize bottles and other items, clean them first.
- Things to Note
- Before first use
- SCF291
- SCF293
- Preparing for use
- Preparing for sterilizing
- Assembling the sterilizer
- Using the appliance
- Sterilizing (SCF291 and SCF293)
- Remove the lid.
- Auto - Sterilizing + Drying (SCF293)
- Drying (SCF293)
- Cleaning
- Cleaning the filter (SCF293)
- Descaling
- Ordering accessories
- Recycling
- Guarantee and support
- Troubleshooting
- 15
- JgJy 0aU pJxWJy J
- #
- A
- Ld1
- 05j 5j j0 0k i w dikg gla
- 0
- ilu 9
- 15.50
Brand : PHILIPS
Model : Avent SCF293
Category : Bottle sterilizer