
G14 - Walkie-talkie MIDLAND - Free user manual and instructions
Find the device manual for free G14 MIDLAND in PDF.

| Product type | PMR446 Two-way radio |
| Brand | Midland |
| Model | G14 |
| Frequency | 446.00625 - 446.09375 MHz |
| Number of channels | 16 |
| Transmit power | 500 mW (high) / 10 mW (low) |
| Power supply | Rechargeable Li-ion battery 7.4 V / 1200 mAh |
| Estimated battery life | 8 to 10 hours |
| Maximum range | Up to 12 km in open area |
| Dimensions (excluding antenna) | 100 x 58 x 33 mm |
| Weight (with battery) | 203 g |
| Display | LCD backlit, 3 colors to choose from |
| VOX functions | 3 adjustable sensitivity levels |
| SCAN | All channels and priority, TO/CO/SE modes |
| CTCSS/DCS codes | 50 CTCSS codes / 105 DCS codes |
| Voice scrambler | Built-in scrambler (ON/OFF) |
| Emergency alert | Activation by CALL + MON |
| Keyboard lock | Manual or automatic |
| Power saving | Automatic after 7 seconds without signal |
| Charging time | 4 to 5 hours |
| Included accessories | 1 two-way radio, 1 belt clip, 1 power adapter, 1 Li-ion battery, 1 charging cradle |
| Maintenance and cleaning | Keep dry, do not open, use a soft cloth |
| Safety | Do not transmit without antenna, respect voltage (6-8 V), avoid excessive heat |
Frequently Asked Questions - G14 MIDLAND
User questions about G14 MIDLAND
0 question about this device. Answer the ones you know or ask your own.
Ask a new question about this device
Download the instructions for your Walkie-talkie in PDF format for free! Find your manual G14 - MIDLAND and take your electronic device back in hand. On this page are published all the documents necessary for the use of your device. G14 by MIDLAND.
USER MANUAL G14 MIDLAND
TO - Time-operated scan
CO: Carrier-operated scan
Thanks for choosing Midland! 914 is a portable transceiver that is free use in almost all European countries. For further informations, we suggest you look at the "Restrictions on the use" chart.
Combining the latest technology in radio communication along with a sturdy mechanical frame, G14 is the ideal and effective solution for the professionals who need to stay in touch with colleagues (construction sites, buildings, hotels, trade fairs, shows) or with leisure users that just want to keep up with friends and family. Its robust frame, ease of use and simple design mean that it is ideal for use in any activity.
Thanks to Midland Programming software, specifically design for G14, it is possible to extend the flexibility and features of your radio:
- You can enable the channel scanning facility (either in normal and priority mode) and so, define one of the available channels as priority channel for the priority scanning mode.
- If necessary, you can make the use of the radio very basic and simple by disabling some of the default features.
Main characteristics
PMR446 Transceiver
Output power: 500mW
Channel spacing: 12.5KHz
Built-in VOX function (vocal-activated communication)
2 SCAN mode: all channels SCAN and PRIORITY CHANNEL SCAN
Scrambler
Backlit LCD display adjustable in 3 different colours.
50 CTCSS and 105 DCS Normal Inverter selectable codes
Time-out Timer function
Busy Lock Out function
Emergency alarm
Content
1 G14 transceiver
1 belt clip
1 wall adaptor
1 1200mAh Li-ion rechargeable battery pack
1 desktop charger
Coverage/range
The maximum range depends on terrain condition and is obtained during use in an open space. The only limitation to maximum possible range are environmental factors such as blockage caused by trees, buildings, or other obstructions. Inside a car or a metallic constructions, the range can be reduced. Normally the coverage in the city, with buildings or other obstructions is about 1 or 2Km . In open space but with obstructions like trees, leaves or houses the maximum possible range is about 4-6 Km. In open space, without obstructions and in sight, like for example in mountain, the coverage can be more than 12Km .
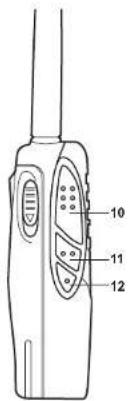
MAIN CONTROLS
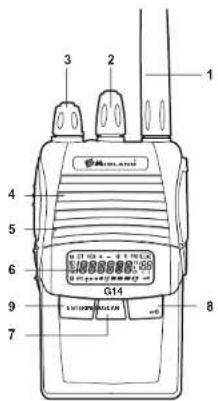

Antenna1
Encoder2. : rotate clockwise or counter-clockwise to choose among the several settings.
- Power/volume knob- turn clockwise to power on and increase the volume level. Turn counter-clockwise to
decrease the volume level and power off.
Speaker-G144. has a built-in speaker.
Built-in microphone 5. - Here is where sound is picked up by the microphone.
Display LCD6
MENU7:press this button to enter the radio menu
- SCAN/0: press this button to enable the SCAN function or to exit the current setting. Keep pressed this
button for about 5 seconds to activate th
-
ENTER: press this button to confirm the setting.
-
PTT: push this bullon in transmi, release it to receive
-
MONITOR: in reception mode, keep pressed this button to monitor the channel/frequency in use.
-
CALL: to send a call on the selected channel (received only by another G14):
CALL+MONITOR:press these two buttons to activate the Emergency function.
CALL+PTT:press these two buttons to activate the 1750 Hz sound note.
- EXTERNAL SPEAKER/MIC JACK- allows the connection with external devices such as headsets, micro
phones.
10
LCD display
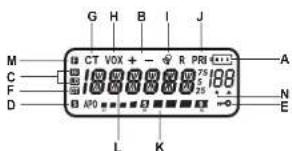
- indicates the battery level
- +/-: indicates the TX/RX "OFFSET" shift direction
- HI/LO: indicates the output power level (HI = high / LO = low)
- S: appears while the radio is scanning the channels
- keypad lock
- DT: DCS turned on
CT:CTGSS hurned on - VOX: VOX function ng
- ① appears when you send a CALL
- PRI: Priority Scan activated
- received signal strength and TX power
- 用票量表, frequency in use
13.45NUL functions -
- appears when the Scan finds a signal (open Squelch)
OPERATIONS
Power on/off and volume
Rotate the power/volume knob clockwise to turn the radio on and to increase the volume level. Rotate the control counter-clockwise to reduce the volume level and to turn the radio off.
During Power on, the LCD display will show all icons for 1 second and the LCD display will indicate the last channel/ frequency selected.
Transmission
To communicate, all radios in your group must be set to the same band (PMR) and to the same channel.
Hold down briefly the MON button to make sure that the frequency is not busy and then press the PTT button.
For a maximum clarity, hold the device at a distance of about 4 / 10cm
Release the PTT key to receive.
Only one user at a time can talk during radio communications. Therefore, it is important not to transmit when you are receiving a communication and use the transmission mode spanningly to allow other users to use the feature.
Transmission consumes a significant amount of energy and should therefore be used sparingly to prolong the battery life.
Alternatively, it is also possible to select a low transmission power.
If you are unable to contact a station that you have no problems in receiving, the station may be using CTCSS tones or DCS codes
Emergency Alarm
Keep pressed the CALL key for 1 second and press MON: the radio will switch to emergency alarm.
To disable this function, press the PTT button.
PRC - Priority Channel
It is possible to set a priority channel for the Priority SCAN.(see the following paragraph)
The priority channel is searched during the SCAN mode. You can choose the priority channel among 99 available channels. (If, for example you choose channel 9 as priority one, the Scan will be as following: 1929394959697....)
To choose the priority channel:
Press the 1. MENU button;
Rotate the 2. Encoder knob till 'PRC' is shown on the display.
Press 3. ENTER: Paste the 4. Encoder key
- Confirm your selection with ENTER and exit by pressing twice the SCAN button.
SCAN and PRI -Priority Scan
The SCAN function is very useful to monitor the channels before transmitting. When the radio is in receiving mode, the Scan function will stop, and will resume scanning 5 seconds after the
signal is no longer present . This function is useful to control which channels are free
All channels SCAN
Press the SCAN button; the radio will scan all channels from the channel in use. Whenever any signal is detected, the radio will suspend the Scan for 5 seconds; then continue to Scan unless you press PTT or ENTER.
PRI -Priority Scan
Press the MENU button. With the Encoder Knob, select 'PRI'. With the Priority Scan, the priority channel previously set is searched. Whenever any signal is detected, the radio will suspend the Scan for 5 seconds; then continue to Scan unless you press PTT or ENTER.
Scan mode settings
Press MENU and then rotate the Encoder knob. The display will visualize "SCANS". Press ENTER and then rotate the Encoder knob to choose the type of Scan (TO/CO/SE). Confirm your selection with ENTER and exit by pressing twice the SCAN button.
TO - Time-operated Scan
Whenever a signal is detected, the radio will suspend the scan for 5 seconds, and then will continue to scan even if the signal is still present.
CO: Carrier-operated Scan
Whenever a signal is detected, the radio will stop scanning. It will resume to scan once the signal will be no more present.
SE: Search Scan
The radio will stop scanning and exit the Scan mode once detected a signal.
VOX- Selecting the VOX sensitivity level
G14 enables hands free conversations through the VOX function: just speak in the direction of the microphone and the communication will be automatically activated.
The VOx sensitivity can be adjusted in 3 different levels. The VOx function is deactivated by default.
To activate it, follow the steps here below:
1. press the MENU button;
2. tum the Encoder knob until the display shows VOX
3. push the ENTER key:
4. turn again the Encoder knob and select the desired VOX level (1: high sensibility 2: medium sensibility 3: low sensibility);
Confirm your selection with ENTER and exit by pressing twice the SCAN button.
To disable the VOX function, follow the previous steps and choose "Off".
POW - Setting the transmission power
G14 has 2 selectable transmission power.
To select the desired power level.
1. press the MENU button;
2. tum the Encoder knob until 'POW' is displayed.
3. press the ENTER button
4 turn the Encoder knob and select the desired power level (there are 2 available power levels: 'H' = ~500mWERP and 'L' = ~10mWERP)
5. confirm the selection with ENTER. The display will show "HI" or "LO" depending on the power selected;
6. press twice the SCAN to exit.
If your radio has to operate within a short range, you can select the low power and therefore extend the battery life.
SQUELCH
With the Squelch function noises can be suppressed on the free channels.
To select the Squelch level
Press the MENU button;
Turn the Encoder knob until "SQL" is displayed;
Press the ENTER button.
Tum the Encoder knob and select the desired Squelch level (there's 9 available levels);
Confirm your selection with ENTER and exit by pressing twice the SCAN button.
Make sure you do not set an excessively high squeich level because in this case you may not be able to receive weaker signals. On the other hand an excessively low Squeich value could enable the Squeich even when no signals are present.
Squelch must always be adjusted when no signals are present.
SCRAMBLER
The scrambler is designed to protect communications.
This feature prevents parties from other networks from hearing and understanding voice communications.
To enable/disable the scrambler:
Press the 1. MENU button;
Turn the 2.Encoder knob until "SCRM" is displayed:
Push 3. ENTER to enter the fu
- Turn the Encoder knob to activate/deactivate the SCRAMBER: 'ON' (to activate it), or 'OFF' (to deactivate it);
5 Confirm your selection with ENTER and exit by pressing twice the SCAN button. The display will show "S" When the scramblr is enabled, it is not possible to clearly receive communications. Therefore, before enabling it, it is necessary to make sure that all the radios you wish to communicate with have enabled this feature, otherwise you will not be able to communicate with them. The scramblor of the transceiver does not fully guarantee the safety of communications.
LED-Backlight on/off
enable/disable the LCD backlight:
Press the 1. MENU button;
Turo the 2.Encoder knob until 'LED' is displayed:
Push 3. ENTER to enter the function:
- Turn the Encoder knob to activate/deactivate the Backlight. There are 3 available options: "ON", "OFF" and "AUTO".
- Confirm your selection with ENTER and exit by pressing twice the SCAN button.
LIGHT - Select the Backlight color
To select the Backlight color, follow these steps:
Press the 1. MENU button;
Turn the 2.Encoder knob until "LIGHT" is displayed:
Push 3. ENTER to enter the function:
Turn the 4.Encoder knob to choose between three different colors.
- Confirm your selection with ENTER and exit by pressing twice the SCAN button.
KEYPAD BEEP on/off
Every time a button is pressed, you will hear a Beep tone. The keypad beep tone is activated by default.
To disable the beeps, follow this procedure:
Press the 1. MENU button:
Turn the 2.Encoder knob until BEEP is displayed;
Push 3. ENTER to enter the fun
- Turn the Encoder knob to activate/deactivate the Beep tones: "ON" (to activate it), or "OFF" (to deactivate it);
- Confirm your selection with ENTER and exit by pressing twice the SCAN button.
CTCSS e DCS
The CTCSS tones can be added to the channels for creating new private channels. They are similar to access codes and enable the radio to communicate only with the users that are turned on the same channel and have set the same code. For each channel you can set up to 50 CTCSS tones and 105 DCS codes.
To select a CTCSS tone,
Press the 1. MENU button:
2. Turn the Editor knob fill: "C-CDC" (CTCSS both on TX and RX); "R-CDC" (only on RX) o "T-CDC" (only on TX) is visualized on the display.
Push 3. ENTER to enter the function;
12
To confirm, press the 5. ENTER button.
The setting of a GTCSS tone disables all DCS codes, because these functions cannot be used simultaneously.
If you want to use and select a DCS code, instead of a CTCSS tone, follow these steps:
Press the 1. MENU button;
- Turn the Encoder knob fill: "C-CDC" (CTCSS both on TX and RX); "R-CDC" (only on RX) or "T-CDC" (only on TX) is visualized on the display.
Push 3. ENTER to enter the function:
Press the 4. MENU button again:
Turn Iba 5.Encoder knob and select the desired DCS code. - Confirm the selection by pressing the ENTER button.
The setting of a DCS code disables all CTCSS tones, because these functions cannot be used simultaneously.
VOICE function
With this function, you activate a voice that informs you about any operation/selection you are doing.
To activate it, follow these steps:
Press the 1. MENU button;
Turn the 2.Encoder knob until VOICE" is displayed;
Push 3. ENTER to enter the function;
- Turn the Encoder knob to activate/deactivate the function: "ON" (to activate it), or "OFF" (to deactivate it);
- Confirm your selection with ENTER and exit by pressing twice the SCAN button.
TOT-TXtimeout timer function
G14 can be programmed with a transmission timer that temporarily blocks transmissions if the radio has been used
beyond the maximum time permitted
The radio is forced in reception mode if it continues transmitting after the preset timer threshold has been reached.
To restart the transmission, release the PTT key.
To enable this function:
1. Press the MENU button:
2. Turn the Encoder knob until "TOT" is displayed:
3. Push ENTER to color the function:
4. Turn the Encoder knob and set a timer from 30 to 270 seconds.
5. Confirm your selection with ENTER and exit by pressing twice the SCAN button.
Keypad Lock
It is possible to choose between two types of Lock Mode:
1. Press the MENU button;
2. Turn the Encoder knob until KEYBO is displayed;
3. Push ENTER to enter the fun
4. Turn the Encoder knob and choose between "MANUAL" or "AUTO."
- Confirm your selection with ENTER and exit by pressing twice the SCAN button.
As previously mentioned, there are two ways to lock the keypad:
MMANUALto lock the keypad, simply press and hold down the SCAN/ button for 3 seconds. will be di
splayed.
"AUTO": the keypad will be automatically lock after some seconds. To unlock the radio, keep pressed the SCAN/ button for 3 seconds.
Name
It is possible to choose and set a name to display instead of the channel number. It is possible to set the name only by the G14 programming software. Once set, by the radio is possible to enable or disable it choosing "on" or "off".
BATTERY RECHARGE
G14 is equipped for using a 7.4V LI-ion rechargeable battery pack which can be recharged connecting the socket of the AC/DC wall adaptor to a mains power socket and insert the jack of the wall adaptor into the desktop charger plug.
It takes 4-5 hours to fully recharge the radio.
For maximum battery life, we recommend charging the battery pack when the G14 is off and the low battery icon comes on.
Using a different battery charger other than the one specified can cause damage to your device or may even cause explosions and personal injuries.
BATTERY LEVEL INDICATOR
G14 has a BATTERY LEVEL METER that shows the battery power level.
The greater is the number of bars visible, the stronger will be the battery level. When the battery level is low, the Battery icon will flash in the display, indicating that your batteries should be recharged.
The battery power saving feature enables a reduction in consumption of up to 50% ; power saving comes on automatically when the transceiver does not receive any signal for more than 7 seconds.
MAINTENANCE
Your G14 was designed to fulfill any warranty obligations and to enjoy this product for many years.
Do not attempt to open the unit. Non-expert handling of the unit may damage it.
- When using regulated power supply, take notice of power voltage, that must be between 6V and 8V to avoid damages.
- High temperatures can shorten the life of electronic devices, and warp or melt certain plastics. Do not store the radio in dusty or dirty areas.
Keep the Radio dry. Rainwater or damp will corrode electronic circuits.
- If it appears that the Radio diffuses peculiar smell or smoke, please shut off its power immediately and take off the charger or battery from the Radio.
Do not transmit without antenna.
SPECIFICHE TECNICHE
| General | |
| Frequency range 446.00625-446.09375 MHz (PMR) | |
| Working temperature -20° +50° | |
| Operating voltage 7.4V | |
| Operate mode | Simplex |
| Dimensions | 100mm*58mm*33mm (Antenna excluded) |
| Weight | 203g (battery included) |
| Antenna impedance | 50Ω |
| Duty cycle | 5/5/90% |
| Transmitter | |
| Frequency stability | ±2.5PPM |
| Output power | ≤500mWERD |
| Max frequency deviation | ≤ 2,5KHz |
| Audio distortion | ≤ 3% |
| Adjacent channel power | < 60 dB |
| Spurious radiation | Within European legal terms |
| Occupied bandwidth | Within European legal terms |
| Receiver | |
| RF sensibility | ≤ 0.2UV@20 dB SINAD |
| Audio distortion | ≤ 3% |
| Audio response | 300Hz + 3KHz |
| Adjacent channel selectivity | Within European legal terms |
| Intermodulation rejection | Within European legal terms |
| Spurious response | Within European legal terms |
| Blocking | Within European legal terms |
PROBLEM SOLVING
| Problem Possible cause Solution | ||
| The radio doesn't switch on The battery | ery pack is discharged and/or has not been installed correctly. | Verify that the battery pack is charged and that it has been cor-rectly installed. |
| The radio switches off shortly after it has been switched on | Discharged battery pack. Recharge the battery pack. | |
| The battery pack does not recharge | The battery-charger has not been connected or installed correctly. | Inspect the connections of the battery-charger and the installation of the batteries. |
| The radio switches on but is unable to receive signals | The site of installation is too shielded. | Move to an another area. |
| The volume is too low Adjust the volume. | ||
| Incorrect CTCSS or DCS Check that the CTCSS lone or DCS code corresponds to the one set by the parties you are communicating with. | ||
| Noise is always present in reception mode | The monitoring function is enabled. Disable the monitoring function. | |
| It is not possible to communicate with other parties | An incorrect radio channel has been selected. | Select the same radio channel used by the parties you are communicating with. |
| The radio is installed in a shielded area or is too far from the party you are communicating with. | Move to another area. | |
| Incorrect CTCSS or DCS Check that the CTCSS lone or DCS code corresponds to the one set by the parties you are communicating with. | ||
| Reception is fragmented and/or disturbed | The signal is very weak. Try temporarily disabling the squelch by means of the Monitoring feature. | |
| The transmission distance is excessive and/or there are obstacles in the transmission path | Move closer to the party you are communicating with or to another area. | |
| Other parties are using the same channel | Check the traffic on the radio channel by means of the Monitoring feature and select another channel if required. | |
| The radio has been installed too close to equipment that causes interference (televisions, computers, etc.) | Increase the distance between the radio and this equipment. |
| Transmission is not always possible | The channel is used by an exces- sive number of parties or the transmission has been barred due to a busy channel. | Select another channel. Ask the ra- diao link provider to disable the block due to busy channel. |
| VOX causes the radio to accidentally enable transmission | The sensitivity and/or environmental noise is too high. | Reduce the VOX sensitivity. |
| The VOX feature requires speaking in a loud voice | The sensitivity is too low. If the environ- mental noise is not high, increase the sensitivity or use an optional microphone. | |
| The autonomy of the battery pack is limited | Commission time is too high. Try reducing the transmission time and/or using a low power. | |
| Logic related faults (unreadable displayed symbols, functions blocked, etc.) | Incorrect setting caused by a prob- lem with the power supply. | Recharge the battery pack |
G14
PMR446 Handfunkgerat
TOT-TX Time-out Timerfuction
Characteristics, Principales Transpons: PUF146
Fonction anti-bayard
To select the Backlight color, follow these steps:
Emissor receptor PMR446
Emissor receptor PMR446
Embaraihar (SCRAMBLER)*
TO - Time-operated apomega
OHTAE ovivvEe iEv oJg, aTOPOBIXKg EovbAaI n apouen y 5 DEUPOEAITIO, KAI OUVXIOE I IN APOUEN AOKa KAI vTo npau.
CO: Carrier-operated 2apwon
OToTe OvyeuBcIe Iva oJua, o ToymoBeknCgBa Oa TApamoei m ApoWOn. Oa ovuxeiTn apoWOn mAs to oJua maVa uOxuXe.
SE:Search∑apwon
O npocekntc Taatapnane npaonkai Bpye ano n aeoupyia Scan polic evtomei eva onp.
VOX-EmIoyn EimTeou euaioeioa VOX
To G14 emptpei nyn xpon hands free kara m keioupyia VOX: ama piinote oyn kareuBuvon rou
povou k n eikovvia Ea evpyotiroe autopato
H euaiaoia VOI mpti va pubate 3 diopotikia tio h H aouyia VOI anepepyonaiia an oynn
Tia va tv evpyoanjoe, aokouovnre ta napaxawip
- MIOE TO TAPKtpo MENU
- yupiote tov petya (Encoder) pexn oovn va eixe "Vox
- TIEOTTO TANKTOPO ENTER
- yupitr taiv toyayya (Encoder) kai emlele to emuunrto emtno VOX (1: uunnuaeogna 2:muip
- EmtbeBaeTne Tny emoyn oac me ENTER Kbi ByeFte mcvovracc doq opoc to kouptf SCAN
Tio va aievepyoienote in aeouyia VOX,akouothe ta npanavw Bnpa kai emtke "Off".
POW-PuBuioytacTnyIgyEeKIOUNTc
To G14 EK2 EMIIOYEC IYUOC EKTOUM
Tiovo emheEe rto emBpnuia immaa:
- MTNTATE TO KOUPTI MENU
- yupiatotov petaaywya (Encoder) np oovn va DEIPOW
- TIEOTE TO k o ENTER
- yipuia TnTov tayuyoe (Encoder) KuaeEte to eunupnnttme doxoc (ttapoxvou 2docto
- emiBaeiaWate Tny eMoiy oos cE ENTER.H obvOn 0a epuaovirr H' n LO avooy a myeivn lox
- mote duo qopctc SCAN ia va Byeire ano to peou.
Eo a otoBcTeKnOg cTepTe Ie AaouyPnoIoo oe oikp Otaotao, mTopeTe va emieEETe TynAohnyI ayu e amtaleauay Tnv EteaknTn Tn Dkpaek (Kun TmUptarpo.
SQUELCH
Me n laouyia Squelch o 0pouo npopoov va koraataoov oT a eObaepa Kavadia.
Tia va emuhéte re emineSquelch:
1. NIEOTe TO NIAKTOPO MENU
2. Nepiopippe rov petyea (Encoder) pxyva epaavnt i evdiq SQL
3. Natae to nAnkipo ENTER
- Ipiopipoyitov metoyuyia (Encoder) kai tlaiei to cthouyio 6eine Soqieh (imapxoyu 9 diofo
- EmeBaeBaiotnEv emoyn oC ENTER kai Byeine mowvraac dua qopec to koupi SCAN
BeBaBaeTeE n deevexi emuLcEva uvepeoia kuaHIO eimnoo sueeH yaritoeunr my pntmtnwn umopel va myn Ete in duovnmoja va laAbe aooBeVooepa aqurita.Airn 1y 6AAn,Evpeoia oohauo entne ooue suee H Oosu vyeewonwot to Sueaeh oukKan doy Aoeovvouo aqurita.
To Squeich npenei va puqicntoi oia anuia nuaia nuaia xavetai to anua.
SCRAMBLER
To scramber exi oxedicote ic kountoovia yia nyn npoataia nct eikovuaic.
Auto to xapaktnpiatiko atopetne iepn aawkTuov va akov kai va avaywupoiuv quwnikc ETIKaivwveic.
Tva vevpyoynoiae/anevpeyomnne to scramble.
- Dugts to PAnkTOO MENIL
- Nepotpue ToV metaywya (Encoder) uXpvia vapovntivvocnSCRM
- Pnntote to TAnktoe ENTER Vg Vg evyovtoepi n Aetoupyig.
- Tepetepetru ToT vetyeYy (Encoder) va va evpyooyiOte/ATEVEpyooyiOte to SCRAMBLER: ON"ON" (vayevyyolon). n' OFF"(va atyeyyolon).
Eeepieoie Tmmyooy Ooc ETER KAI pyite natoovc doo qopcs to kouin SCAN. H oboyn 0
Ovra atevyepoia To sanmber, pnte va atevpeoyoiai arat adooi suc TPOBtEkeis va atuapoe Eemovouk. Es k toou, trio vato tveyepoiaotae, elav atrapatnoTva beauwudte d oaoi ouaoutkeKes me touc otolouc emouelae va etikouvojtoe, den xouovtcepoiaei autn te leitouyia eodAeaV dev o tiopeae va etikouvojtoe meoJUc.
To scramble 1ou monodexn dev eyyuaia nnpwncnv aopaleia nns emoxovwias.
LED - on/off
Tia va evpyomoinaete/anevepyomoinoetoev pwnap0 nC LCD 8ovn
Aeroupyia TOT-TX timeout timer
To 014 uipoi Tpoepaiknte i Kpovosbiokim ktoTou tiokokopio poooovic Tc pabotocav a o Tpoekbckc exi xqnnnnoonnepe Tpoeptote a to To ettioe npoevoxho.
O OIOIeKTeK 13 TeTc e OAOAaON Jn ng ov ou KIOOTn n kIOOTn meo T oov npokoeBopueyo xpovo. Iio tEvakkiovN iS kIOOTN, aaleuEooPeOTo TmKIOKePTo.
Tva vayevpyooyate auty to kuyoyda: 1.Dueto ptyooo MENU
2. Nepippe Tov metayy (Encodor) pvi paavnti n evdigTOT
4. PNDTEWTEUYETAVVWvE (Encoder) KBI BEEYTOYXPODOKOTIN 30 EWC270 DEUEPOAETTA.
5. Emtpeakote nty maooc je ENTER kai byeite nattwac duo pape to koumi SCAN
-0-KaεiδωμaΠλκτρολoγiou
EvaBuvam n emuoy avuaoe or 0o tumous Kaeiayatoc (Lock Mode): 1. Prrn to rnrnre Menu
2. Nepippeipoeivovetaywya(Encodor) pexpv eapovniE iEvEIG KEYBO
3.1 HATNATE TO MANKTO ENTER YID VIA VEPYONBENI METUPOYA. 4. Proprroducts you use to use (Epcoder) key codes for your
5. Embetaiante my emoyn oac me ENTER kai Byeite maitvoc duo qopc to koupt SCAN.
Otnw avpepnke Tponyouevuc, Unpovouv duo pntoi va Kaedoe To TAnKtpoAyo:
"MANUAL": yia va kaiioueTo TAnKtpoAoyio, aTAd mTnOte Kki KpatnoTe TPOc ta KaTu To Koupti SCAN/
Y 3 DEUTEPOKETTCA
Time-out Timerfunction

- TO - Time-operated scan
- CO: Carrier-operated scan
- Main characteristics
- Content
- Coverage/range
- MAIN CONTROLS
- Antenna1
- LCD display
- OPERATIONS
- Power on/off and volume
- Transmission
- Emergency Alarm
- PRC - Priority Channel
- SCAN and PRI -Priority Scan
- All channels SCAN
- PRI -Priority Scan
- Scan mode settings
- SE: Search Scan
- VOX- Selecting the VOX sensitivity level
- POW - Setting the transmission power
- SQUELCH
- SCRAMBLER
- LED-Backlight on/off
- LIGHT - Select the Backlight color
- KEYPAD BEEP on/off
- CTCSS e DCS
- VOICE function
- TOT-TXtimeout timer function
- Keypad Lock
- Name
- BATTERY RECHARGE
- BATTERY LEVEL INDICATOR
- MAINTENANCE
- G14
- PMR446 Handfunkgerat
- TOT-TX Time-out Timerfuction
- Characteristics, Principales Transpons: PUF146
- Emissor receptor PMR446
- TO - Time-operated apomega
- CO: Carrier-operated 2apwon
- SE:Search∑apwon
- VOX-EmIoyn EimTeou euaioeioa VOX
- POW-PuBuioytacTnyIgyEeKIOUNTc
- To G14 EK2 EMIIOYEC IYUOC EKTOUM
- LED - on/off
- Aeroupyia TOT-TX timeout timer
- -0-KaεiδωμaΠλκτρολoγiou
Brand : MIDLAND
Model : G14
Category : Walkie-talkie