
G18 - Walkie-talkie MIDLAND - Free user manual and instructions
Find the device manual for free G18 MIDLAND in PDF.

| Product type | PMR446 transceiver |
| Brand | Midland |
| Model | G18 |
| Dimensions (without antenna) | 113 mm × 56 mm × 38 mm |
| Weight (with battery) | 240 g |
| Power supply | Rechargeable Li-ion battery 7.4 V / 1600 mAh |
| Output power | ≤ 500 mW ERP |
| Frequency bands | 446.00625 - 446.09375 MHz (PMR446) |
| Number of channels | 8 + 91 pre-programmed |
| Protection rating | IP67 (dust and water resistant up to 1 m for 30 min) |
| Battery life | About 4 hours charge – battery life varies with use |
| Operating temperature | -20 °C to +55 °C |
| Main functions | Scrambler, VOX (10 levels), Scan (TO/CO/SE), Adjustable squelch (10 levels), Roger Beep, Monitor, Emergency alarm, Key lock (manual/auto), Backlight (ON/OFF/Auto), Voice announcement, Power saving, TOT (anti-talking) |
| Included accessories | 1 transceiver, 1 belt clip, 1 desktop charger, 1 Li-ion battery, 1 wall adapter |
| Maintenance and cleaning | Do not open the device, use a 6-8 V power supply, avoid high temperatures, do not store in a dirty place, do not transmit without antenna |
| Safety | Use only the supplied charger, turn off immediately in case of smoke or abnormal odor |
| Spare parts and repairability | Parts not supplied – opening voids warranty, contact Midland after-sales service |
| General information | Optional programming software (PRG-G15) for advanced functions, CE certification, European standards |
Frequently Asked Questions - G18 MIDLAND
User questions about G18 MIDLAND
0 question about this device. Answer the ones you know or ask your own.
Ask a new question about this device
Download the instructions for your Walkie-talkie in PDF format for free! Find your manual G18 - MIDLAND and take your electronic device back in hand. On this page are published all the documents necessary for the use of your device. G18 by MIDLAND.
USER MANUAL G18 MIDLAND
TO - Time-operated scan
CO: Carrier-operated scan
Produced or imported by:
CTE INTERNATIONAL s.r.l.
Via. R.Sevardi 7 42124 Reggio Emilia Italy
Imported by:
ALAN-NEVADAUK
Unit 1 Fitzherbert Spur Farlington Portsmouth Hants.
P06 1TT - United Kingdom
www.nevada.co.uk
The use of this transceiver can be subject to national restrictions. Read the instructions carefully before installation and use. If the product contains batteries: do not throw the battery into fire. To disperse after use, throw into the appropriate containers.
Importado por:
ALAN COMMUNICATIONS, SA
What's in the box 28
Coverage/Range 29
Suggestions and warnings 30
Main controls and parts of the radio 31
LCD Display 31
Main controls and parts of the radio 32
Battery recharge 34
Operations 35
Power on/off and volume adjustment 35
Transmission and reception 35
Monitor 35
Roger Beep (end transmission tone) 36
Alarm function (Emergency) 36
MENU functions 37
Scan 37
PRI (Priority Scan) 37
VOX 37
POW - Setting the transmission power 38
Squelch 38
Scrambler 39
Led-Backlight 39
Keypad Beep on/off 40
Keypad lock (KEYBO) 40
Technical specifications 44
Troubleshooting 46
Thanks for choosing Midland! G18 is a portable transceiver that is free use in almost all European countries. For further information, we suggest you look at the "Restrictions on the use" chart.
Midland G18 is the new multi-tasks PMR446 transceiver.
Its robust frame and the IP67 certification ensure a total protection from dust and from the immersion in water up to 1mt depth for 30 minutes. G18 is the ideal solution for your free time but especially in extreme conditions that require a reliable device.
Programming software (optional)
Thanks to Midland Programming software PRG-G15, it is possible to increase the performance of your radio or to reduce its functionality by enabling or disabling some features (CTCSS, TOT, VOX, ROGER BEEP, SQUELCH, VOICE...)
For further information, please consult the Programming software manual.
Any attempt to change frequencies or output power of the radio invalidates the approval.
What's in the box
1 G18 transceiver
1 belt clip
1 wall adaptor
- 1 Li-ion da 1600mAh rechargeable battery pack
1 fast desktop charger
- Main features
- PMR446 transceiver
- IP67 certified: the housing protects the device from dust and from water infiltration up to a depth of 1 meter for 30 minutes
Output power: ≤ 500mW ERP - Channel spacing: 12.5KHz
- Scrambler
- Multifunction key
- Compander (programmable with PRG-G15)
FM Radio (programmable with PRG-G15) - Scan
Vocal announcement - Roger Beep
- Battery save
Monitor
Squelch
Coverage/Range
The maximum range depends on terrain condition and is obtained during use in an open space.
The only limitation to maximum possible range are environmental factors such as blockage caused by trees, buildings or other obstructions. Inside a car or a metallic construction, the range can be reduced. Normally the coverage in the city, with buildings or other obstructions is about 1 or 2Km . In open space but with obstructions like trees, leaves or houses the maximum possible range is about 4 - 6Km . In open space, without obstructions and in sight, like for example in mountain, the coverage can be more than 12Km .
Suggestions and warnings
Your G18 was designed to fulfill any warranty obligations and to enjoy this product for many years.
As for all the electronic devices, we recommend you to follow these suggestions:
- Do not attempt to open the unit. Non-expert handling of the unit may damage it and annul the warranty.
- When using regulated power supply, take note of the power voltage, that must be between 6V and 8V to avoid damages.
- High temperatures can shorten the life of electronic devices, and warp or melt certain plastics. Do not store the radio in dirty areas.
- If it appears that the Radio diffuses peculiar smell or smoke, please shut off its power immediately and take off the charger or battery from the radio.
- Do not transmit without antenna.
Main controls and parts of the radio
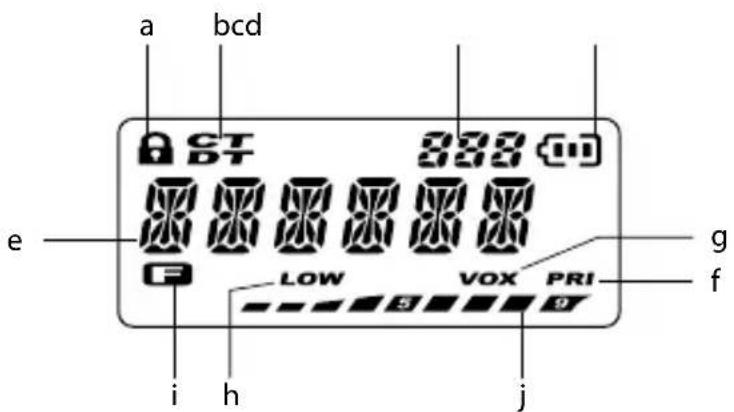
LCD Display
a.Keypad lock
b. Selected CTCSS tone or DCS code
c. Number of the menu/channel indicator
d. Battery status indicator
e. Channel in use
f. Priority scan mode
g. VOX function activated
h. Low power indicator
i. Function key activated
j. Indicator of rx and tx signal strength
Main controls and parts of the radio
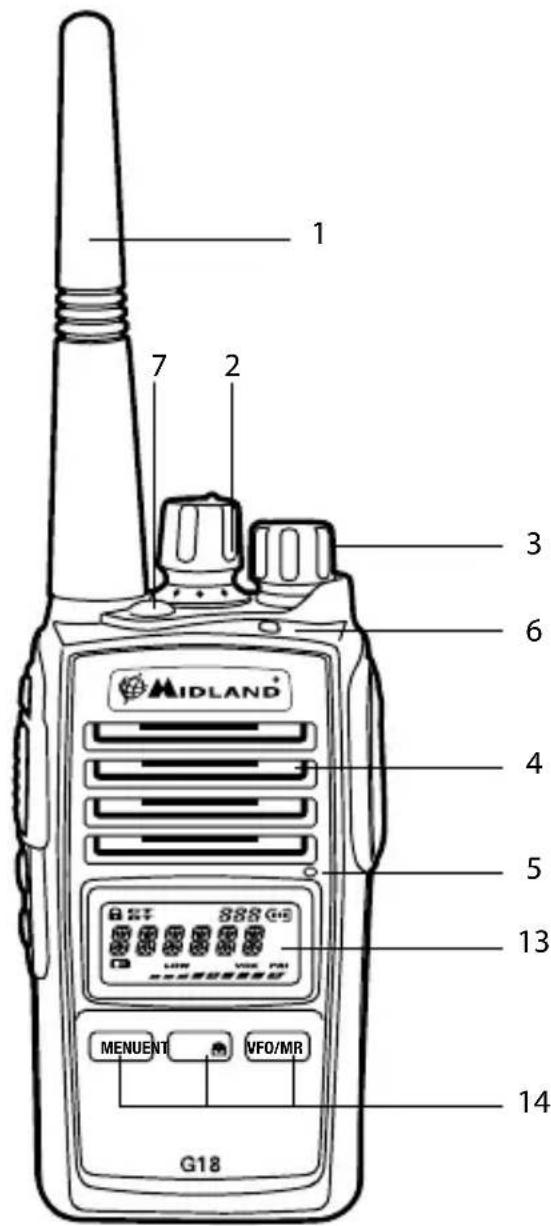
- Antenna
- Encoder: rotate clockwise or counter-clockwise to select the different settings.
- Power/volume knob: turn clockwise to power on and increase the volume level. Turn counter-clockwise to decrease the volume level and power off.
- Speaker
- Built-in microphone
- Led indicator: RED: TX; GREEN: RX.
- Emergency button (it can be activated through the programming software)
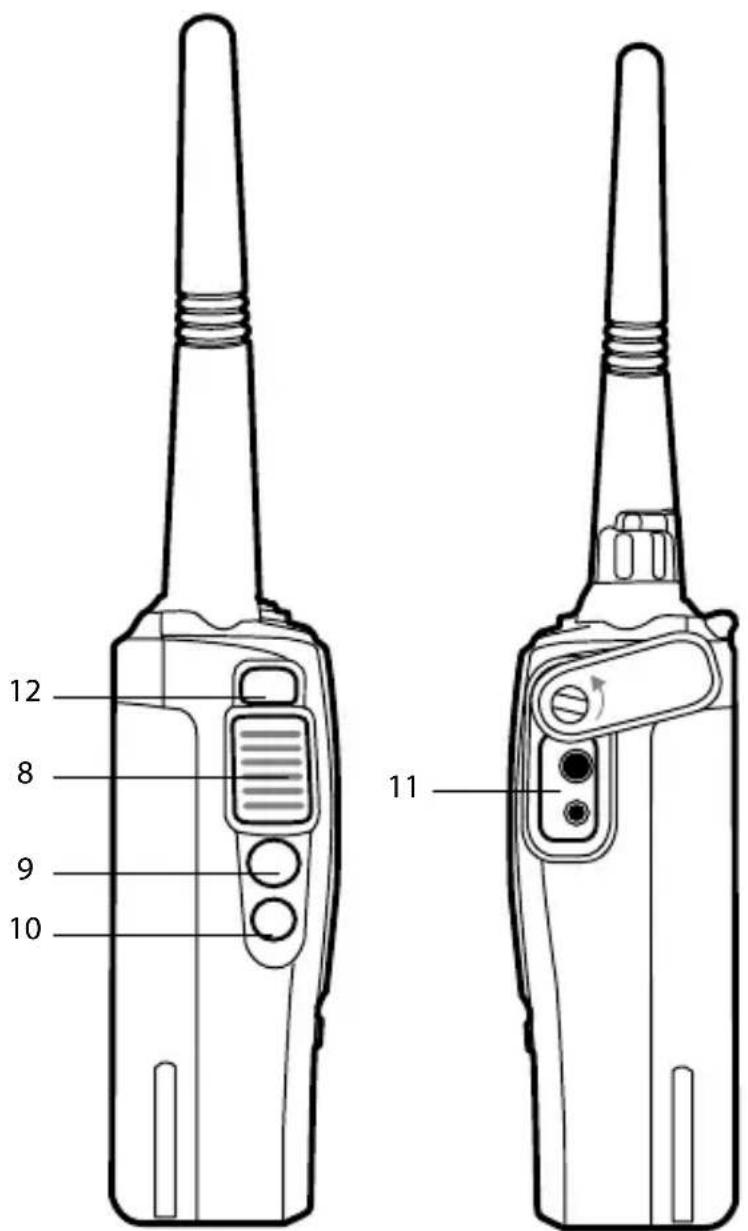
- PTT: push this button to transmit, release it to receive.
- Function key 1: Short pressure: Monitor function activation (PF3).
- Function key 2: Long pressure: SCAN function activation (PF4).
- External Speaker/Mic Jack (Motorola type): allows the connection with external devices such as headsets, microphones.
- Multi-function key 'FUN': it allows to activate secondary functions.
- LCD Display
- Multi-function keys MENU-ENT-VFO/MR
Battery recharge
G18 is equipped for using a 7,4V Li-ion rechargeable battery pack, which can be recharged by connecting the socket of the AC/DC wall adaptor to a mains power socket and inserting the jack of the wall adaptor into the desktop charger plug.
It takes 4 hours to fully recharge the radio.
The led of the desktop charger indicates the status of the recharge:
Red = charging,
Green = full charge
For maximum battery life, we recommend you to charge the battery pack when the G18 is off and the battery pack is fully discharged.
! Using a different battery charger other than the one specified can cause damage to your device or may even cause explosions and personal injuries.
The Battery power saving feature enables a reduction in consumption of up to 50% and saves the battery life. If it has been set, it automatically activates when the transceiver does not receive any signal for more than 5 seconds. Power saving can be disabled only through the Programming software.
Operations
Power on/off and volume adjustment
Rotate the PWR/VOL clockwise to turn the radio on.
Rotate the control clockwise /counter-clockwise to adjust the volume level as you prefer.
To turn the radio off, rotate the control counter-clockwise till hearing a mechanical "click".
Transmission and reception
To communicate, all radios in your group must be set to the same channel.
Briefly press the Function key 1 to enable the Monitor feature in order to make sure that the frequency is not busy, then press the PTT button.
For a maximum clarity, hold the device at a distance of about 4 / 10cm
Release the PTT key to receive.
Only one user at a time can talk during radio communications. Therefore, it is important not to transmit when you are receiving a communication and use the transmission mode sparingly to allow other users to talk.
Transmission consumes a significant amount of energy and should therefore be used sparingly to prolong the battery life.
If you are unable to contact a station that you have no problems in receiving, the station may be using CTCSS tones or DCS codes.
Monitor
The Monitor feature is for excluding (opening) the Squelch, in order to listen to signals that are too weak to keep the Squelch permanently opened.
Press briefly the Function key 1 to enable such function.
Roger Beep (end transmission tone)
When the PTT button is released, the radio will beep to confirm to other users that you've finished your transmission and that they can start talking.
Roger Beep is disabled by default and can be activated through the programming software.
Alarm function (Emergency)
By pressing the Emergency button, the radio will switch to Alarm Emergency mode.
G18 will switch to transmission for 30 seconds by generating a sound alarm, then for further 30 seconds will remain in tx to allow the user to communicate his status.
At the end, the radio will switch to reception.
If needed, the Emergency call can be repeated.
MENU functions
Here below is a list of the default functions that you will find in the menu of this radio.
First of all, you have to push the MENU button to enter and find the desired function.
Scan
This function is enabled by pushing the Function key 2 for 3 seconds; you will see the channels scanning on the display of the radio.
Whenever any signal is detected, the scanning will stop on a busy channel and, if no operation is done, will start after 5 seconds.
If you press the PTT, the radio will transmit on the latest busy channel; after about 5 seconds that you released the PTT, the scanning will be active.
PRI (Priority Scan)
When you activate this function, the radio will alternately scan the standard channels and the priority one. The priority channel can be selected only with the programming software. The default priority channel is CH1.
VOX
The VOX feature enables hands free conversations without using PTT: just speak in the direction of the microphone and the communication will be automatically activated.
The VOX sensitivity can be adjusted in 10 different levels (0,1,2,3...9) through the Menu or programming software:
OFF means that the VOX is turned off, level 1 is set by default and has the lowest VOX sensitivity, 9 is the highest one.
To activate the VOX levels, follow these steps:
-
Press the MENU button;
-
Turn the Encoder knob until the display shows "VOX";
-
Press the ENT key;
-
Turn again the Encoder knob and select the desired VOX level: 1= low sensitivity; 9= highest sensitivity.
- Confirm your selection with the ENT key.
POW - Setting the transmission power
G18 has 2 power levels.
To select the desired level:
- Press the MENU button;
- Rotate the Encoder knob till the display shows "POW";
- Press ENT;
- Rotate the encoder knob and select the desired power level;
- Press ENT to confirm. If you selected the low power, the display will show "LOW"
By default, both low and high power are set at 500mW.
Squelch
The Squelch function suppresses noises on free channels and allows to receive even weak signals.
G18 has 10 (0-9) different Squelch levels that can be set by programming software or Menu:
0 means that the Squelch is turned off; from level 1 to level 9 you will have different levels of noise reduction. The higher is the level, the louder will be the Squelch.
By default, the Squelch level is set on level 5.
To select the Squelch level:
- Press the MENU button;
- Turn the Encoder knob until "SQL" is displayed;
- Press the ENT button;
- Turn the Encoder knob and select the desired Squelch level (the levels available are 10);
- Confirm your selection with ENT.
Make sure you do not set an excessively high squelch level because in this case you may not be able to receive weaker signals. On the other hand an excessively low Squelch value could enable the Squelch even
when no signals are present.
Squelch must always be adjusted when no signals are present.
Scrambler
The scrambler is designed to protect communications.
This feature prevents parties from other networks from hearing and understanding voice communications.
To enable/disable the scrambler:
- Press the MENU button;
- Turn the Encoder knob until "SCRM" is displayed;
- Push ENT to enter the function;
- Turn the Encoder knob to activate/deactivate the SCRAMBLER: "ON" (to activate it), or "OFF" (to deactivate it);
- Confirm your selection with ENT.
When the scrambler is enabled, it is not possible to clearly receive communications. Therefore, before enabling it, it is necessary to make sure that all the radios you wish to communicate with have enabled this feature, otherwise you won't be able to talk with them.
The scrambler of the transceiver does not fully guarantee the safety of communications.
Led-Backlight
To enable/disable the LCD backlight:
- Press the MENU button;
- Turn the Encoder knob until "LED" is displayed;
- Push ENT to enter the function;
- Turn the Encoder knob to activate/deactivate the Backlight.
There are 3 available options: "ON", "OFF" and "AUTO".
AUTO: the display backlight activates when you press any key and lasts a few seconds.
OFF: back light off.
ON: backlight always on. Attention: in this mode the power save is off, therefore the battery consumption will increase.
- Confirm your selection with ENT.
Keypad Beep on/off
Every time a button is pressed, you will hear a Beep tone. The keypad beep tone is activated by default.
To disable the beeps, follow this procedure:
- Press the MENU button;
- Turn the Encoder knob until "BEEP" is displayed;
- Push ENT to enter the function;
- Turn the Encoder knob to activate/deactivate the Beep tones: "ON" (to activate it), or "OFF" (to deactivate it);
- Confirm your selection with ENT.
Keypad lock (KEYBO)
It is possible to choose between two types of Lock Mode:
- Press the MENU button;
- Turn the Encoder knob until "KEYBO" is displayed;
- Push ENT to enter the function;
- Turn the Encoder knob and choose between "MANUAL" or "AUTO".
- Confirm your selection with ENT.
As previously mentioned, there are two ways to lock the keypad:
"MANUAL": to lock the keypad, simply press FUN and ENT keys for 3 seconds. B will be displayed.
"AUTO": the keypad will be automatically locked after 20 seconds. To unlock the radio, press FUN and ENT keys.
G18 can be programmed with a transmission timer that temporarily blocks transmissions if the radio has been used beyond the maximum time permitted.
The radio is forced in reception mode if it continues transmitting after the preset timer threshold has been reached.
To restart the transmission, release the PTT key.
To enable this function:
-
Press the MENU button;
-
Turn the Encoder knob until "TOT" is displayed;
- Push ENT to enter the function;
- Turn the Encoder knob and set a timer from 30 to 270 seconds.
- Confirm your selection with ENT.
SCAN mode settings
Press MENU and then rotate the Encoder knob. The display will show "SCANS".
Press ENTER and then rotate the Encoder knob to choose the type of Scan (TO/CO/SE).
Confirm your selection with ENT.
TO - Time-operated Scan
Whenever a signal is detected, the radio will suspend the scan for 5 seconds, and then will continue to scan even if the signal is still present.
CO: Carrier-operated Scan
Whenever a signal is detected, the radio will stop scanning. It will resume to scan once the signal will disappear.
SE: Search Scan
The radio will stop scanning and exit the Scan mode once detected a signal.
VOICE function
With this function, you activate a voice that informs you about any operation/selection you are doing.
To activate it, follow these steps:
- Press the MENU button;
- Turn the Encoder knob until "VOICE" is displayed;
- Push ENT to enter the function;
- Turn the Encoder knob to activate/deactivate the function: "ON" (to activate it), or "OFF" (to deactivate it);
- Confirm your selection with ENT.
C-CDC / R-CDC / T-CDC
The CTCSS tones can be added to the channels for creating new private channels. They are similar to access codes and enable the radio to communicate only with the users that are tuned on the same channel and have set the same code. For each channel you can set up to 50 CTCSS tones and 105 DCS codes.
To select a CTCSS tone:
- Press the MENU button;
- Turn the Encoder knob till "C-CDC"(in TX and RX); "R-CDC"(only in RX) or "T-CDC" (only in TX) appears on the display;
- Push ENT to enter the function;
- Turn the Encoder knob and select the desired CTCSS tone
- To confirm, press the ENT button.
The setting of a CTCSS tone disables all DCS codes, because these functions cannot be used simultaneously.
If you want to use and select a DCS code, instead of a CTCSS tone, follow these steps:
- Press the MENU button;
- Turn the Encoder knob till: "C-CDC"(in TX and RX); "R-CDC"(only in RX) or "T-CDC" (only in TX) appears on the display;
- Push ENT to enter the function;
- Press the Function key 1;
- Turn the Encoder knob and select the desired DCS code;
- Confirm the selection by pressing the ENT button.
The setting of a DCS code disables all CTCSS tones, because these functions cannot be used simultaneously.
Name - Nome
It is possible to choose and set a name that will appear on the display instead of the channel number.
Technical specifications
| General |
| Frequency range 446.00625- 446.09375 MHz (PMR446) |
| Channels 8 +91 pre-set |
| Working temperature -20°+55° |
| Operating voltage 7.4V |
| Operative Mode Simplex |
| Dimensions 113mm×56mm×38mm (Antenna excluded) |
| Weight 240g (Battery included) |
| Impedance Antenna 50Ω |
| Duty cycle 5/5/90% |
| Transmitter | |
| Frequency stability ±2.5PPM | |
| Output power ≤500mW ERP | |
| Max frequency deviation ≤2,5KHz | |
| Audio distortion ≤3% | |
| Adjacent channel power < 60 dB | |
| Spurious radiation | Within European legal terms |
| Occupied bandwidth | Within European legal terms |
| Receiver | |
| RF sensitivity | <0.2UV@20 dB SINAD |
| Audio distortion | ≤3% |
| Audio response | 300Hz ÷ 3KHz |
| Adjacent channel selectivity Within European legal terms |
| Intermodulation rejection Within European legal terms |
| Spurious emissions Within European legal terms |
| Blocking Within European legal terms |
Hereby, CTE International declares that G18 is in compliance with the essential requirements and other relevant provisions of Directive 1999/5/ EC.
WARNING: Direct plug-in ac/dc power supply must be used for disconnecting the transceiver from the mains; the desktop charger must be positioned close to the unit and easily accessible.
Troubleshooting
| Problem Possible Cause Solution | ||
| The radio doesn’t switch on | The battery pack is discharged and/or has not been installed correctly. | Verify that the battery pack is charged and that it has been correctly installed. |
| The radio switches off shortly after it has been switched on | Discharged battery pack. | Recharge the battery pack. |
| The battery pack does not recharge | The battery-charger has not been connected or installed correctly. | Inspect the connections of the battery-charger and the installation of the batteries. |
| The radio switches on but is unable to receive signals | The site of installation is too shielded. | Move to an another area. |
| The volume is too low | Adjust the volume level. | |
| Incorrect CTCSS or DCS | Check that the CTCSS tone or DCS code corresponds to the one set by the parties you are communicating with. | |
| It is not possible to communicate with other parties | An incorrect radio channel has been selected. | Select the same radio channel used by the parties you are communicating with. |
| The radio is installed in a shielded area or is too far from the party you are communicating with | Move to another area. | |
| Incorrect CTCSS or DCS | Check that the CTCSS tone or DCS code corresponds to the one set by the parties you are communicating with. | |
| The signal is very weak. | Try temporarily to disable the Squelch by means of the Monitor feature. | |
| Reception is fragmented and/or disturbed | The transmission distance is excessive and/or there are obstacles in the transmission path | Move closer to the party you are communicating with or to another area. |
| Other parties are using the same channel | Check the traffic on the radio channel by means of the Monitor feature and select another channel if required. | |
| The radio has been installed too close to equipment that causes interference (televi-sions, computers, etc.) | Increase the distance between the radio and this equipment. | |
| The autonomy of the battery pack is limited | Transmission time is too long. | Try to reduce the transmission time and/or use a low power. |
Produced or imported by:
CTE INTERNATIONAL s.r.l.
Via. R.Sevardi 7 42124 Reggio Emilia Italy
Imported by:
ALAN-NEVADAUK
Unit 1 Fitzherbert Spur Farlington Portsmouth Hants.
P06 1TT - United Kingdom
www.nevada.co.uk
The use of this transceiver can be subject to national restrictions. Read the instructions carefully before installation and use. If the product contains batteries: do not throw the battery into fire. To disperse after use, throw into the appropriate containers.
Importado por:
ALAN COMMUNICATIONS, SA
TO: Time-Operated Scan
Produced or imported by:
CTE INTERNATIONAL s.r.l.
Via. R.Sevardi 7 42124 Reggio Emilia Italy
Imported by:
ALAN-NEVADAUK
Unit 1 Fitzherbert Spur Farlington Portsmouth Hants.
P06 1TT - United Kingdom
www.nevada.co.uk
The use of this transceiver can be subject to national restrictions. Read the instructions carefully before installation and use. If the product contains batteries: do not throw the battery into fire. To disperse after use, throw into the appropriate containers.
Importado por:
ALAN COMMUNICATIONS, SA
Produced or imported by:
CTE INTERNATIONAL s.r.l.
Via. R.Sevardi 7 42124 Mancasale Reggio Emilia Italy
Imported by:
ALAN-NEVADAUK
Unit 1 Fitzherbert Spur Farlington Portsmouth Hants.
P06 1TT - United Kingdom
www.nevada.co.uk
The use of this transceiver can be subject to national restrictions. Read the instructions carefully before installation and use. If the product contains batteries: do not throw the battery into fire. To disperse after use, throw into the appropriate containers.
Importado por:
ALAN COMMUNICATIONS, SA
De scrambler activeren/deactiveren:
"On" (activen) of "Off" (deactiven);
Produced or imported by:
CTE INTERNATIONAL s.r.l.
Via. R.Sevardi 7 42124 Reggio Emilia Italy
Imported by:
ALAN-NEVADAUK
Unit 1 Fitzherbert Spur Farlington Portsmouth Hants.
P06 1TT - United Kingdom
www.nevada.co.uk
The use of this transceiver can be subject to national restrictions. Read the instructions carefully before installation and use. If the product contains batteries: do not throw the battery into fire. To disperse after use, throw into the appropriate containers.
Importado por:
ALAN COMMUNICATIONS, SA
| No Frequency No Frequency No Frequency | ||
| 1 446.00625 | 34 446.03125 | 67 446.05625 |
| 2 446.01875 | 35 446.05625 | 68 446.08125 |
| 3 446.03125 | 36 446.08125 | 69 446.01875 |
| 4 446.04375 | 37 446.01875 | 70 446.04375 |
| 5 446.05625 | 38 446.04375 | 71 446.06875 |
| 6 446.06875 | 39 446.06875 | 72 446.09375 |
| 7 446.08125 | 40 446.09375 | 73 446.00625 |
| 8 446.09375 | 41 446.00625 | 74 446.03125 |
| 9 446.00625 | 42 446.03125 | 75 446.05625 |
| 10 446.01875 | 43 446.05625 | 76 446.08125 |
| 11 446.03125 | 44 446.08125 | 77 446.01875 |
| 12 446.04375 | 45 446.01875 | 78 446.04375 |
| 13 446.05625 | 46 446.04375 | 79 446.06875 |
| 14 446.06875 | 47 446.06875 | 80 446.09375 |
| 15 446.08125 | 48 446.09375 | 81 446.00625 |
| 16 446.09375 | 49 446.00625 | 82 446.03125 |
| 17 446.00625 | 50 446.03125 | 83 446.05625 |
| 18 446.03125 | 51 446.05625 | 84 446.08125 |
| 19 446.05625 | 52 446.08125 | 85 446.01875 |
| 20 446.08125 | 53 446.01875 | 86 446.04375 |
| 21 446.01875 | 54 446.04375 | 87 446.06875 |
| 22 446.04375 | 55 446.06875 | 88 446.09375 |
| 23 446.06875 | 56 446.09375 | 89 446.00625 |
| 24 446.09375 | 57 446.00625 | 90 446.03125 |
| 25 446.00625 | 58 446.03125 | 91 446.05625 |
| 26 446.03125 | 59 446.05625 | 92 446.08125 |
| 27 446.05625 | 60 446.08125 | 93 446.01875 |
| 28 446.08125 | 61 446.01875 | 94 446.04375 |
| 29 446.01875 | 62 446.04375 | 95 446.06875 |
| 30 446.04375 | 63 446.06875 | 96 446.09375 |
| 31 446.06875 | 64 446.09375 | 97 446.00625 |
| 32 446.09375 | 65 446.00625 | 98 446.03125 |
| 33 446.00625 | 66 446.03125 | 99 446.05625 |
CTCSS TONE TABLE: 50 tones
| No FREQ.(HZ) No FREQ.(HZ) No FREQ.(HZ) |
| 01 67.0 18 118.8 35 183.5 |
| 02 69.3 19 123.0 36 186.2 |
| 03 71.9 20 127.3 37 189.9 |
| 04 74.4 21 131.8 38 192.8 |
| 05 77.0 22 136.5 39 196.6 |
| 06 79.7 23 141.3 40 199.5 |
| 07 82.5 24 146.2 41 203.5 |
| 08 85.4 25 151.4 42 206.5 |
| 09 88.5 26 156.7 43 210.7 |
| 10 91.5 27 159.8 44 218.1 |
| 11 94.8 28 162.2 45 225.7 |
| 12 97.4 29 165.5 46 229.1 |
| 13 100.0 30 167.9 47 233.6 |
| 14 103.5 31 171.3 48 241.8 |
| 15 107.2 32 173.8 49 250.3 |
| 16 110.9 33 177.3 50 254.1 |
| 17 114.8 34 179.9 |
| 18 114,8 36 183,5 |
DCS (Digital Code) TONE TABLE: 105 codes
| No Dcs Code No Dcs Code No Dcs Code No Dcs Code | |||||||
| 01 | 023 | 31 | 165 | 61 | 356 | 91 | 627 |
| 02 | 025 | 32 | 172 | 62 | 364 | 92 | 631 |
| 03 | 026 | 33 | 174 | 63 | 365 | 93 | 632 |
| 04 | 031 | 34 | 205 | 64 | 371 | 94 | 645 |
| 05 | 032 | 35 | 212 | 65 | 411 | 95 | 654 |
| 06 | 036 | 36 | 223 | 66 | 412 | 96 | 662 |
| 07 | 043 | 37 | 225 | 67 | 413 | 97 | 664 |
| 08 | 047 | 38 | 226 | 68 | 423 | 98 | 703 |
| 09 | 051 | 39 | 243 | 69 | 431 | 99 | 712 |
| 10 | 053 | 40 | 244 | 70 | 432 | 100 | 723 |
| 11 | 054 | 41 | 245 | 71 | 445 | 101 | 731 |
| 12 | 065 | 42 | 246 | 72 | 446 | 102 | 732 |
| 13 | 071 | 43 | 251 | 73 | 452 | 103 | 734 |
| 14 | 072 | 44 | 252 | 74 | 454 | 104 | 743 |
| 15 | 073 | 45 | 255 | 75 | 455 | 105 | 754 |
| 16 | 074 | 46 | 261 | 76 | 462 | ||
| 17 | 114 | 47 | 263 | 77 | 464 | ||
| 18 | 115 | 48 | 265 | 78 | 465 | ||
| 19 | 116 | 49 | 266 | 79 | 466 | ||
| 20 | 122 | 50 | 271 | 80 | 503 | ||
| 21 | 125 | 51 | 274 | 81 | 506 | ||
| 22 | 131 | 52 | 306 | 82 | 516 | ||
| 23 | 132 | 53 | 311 | 83 | 523 | ||
| 24 | 134 | 54 | 315 | 84 | 526 | ||
| 25 | 143 | 55 | 325 | 85 | 532 | ||
| 26 | 145 | 56 | 331 | 86 | 546 | ||
| 27 | 152 | 57 | 332 | 87 | 565 | ||
| 28 | 155 | 58 | 343 | 88 | 606 | ||
| 29 | 156 | 59 | 346 | 89 | 612 | ||
| 30 | 162 | 60 | 351 | 90 | 624 | ||
Produced or imported by:
CTE INTERNATIONAL s.r.l.
Via. R.Sevardi 7 42124 Reggio Emilia Italy
Imported by:
ALAN-NEVADAUK
Unit 1 Fitzherbert Spur Farlington Portsmouth Hants.
P06 1TT - United Kingdom
www.nevada.co.uk
The use of this transceiver can be subject to national restrictions. Read the instructions carefully before installation and use. If the product contains batteries: do not throw the battery into fire. To disperse after use, throw into the appropriate containers.
Importado por:
ALAN COMMUNICATIONS, SA

- TO - Time-operated scan
- CO: Carrier-operated scan
- Main controls and parts of the radio 31
- Battery recharge 34
- Operations 35
- MENU functions 37
- Midland G18 is the new multi-tasks PMR446 transceiver.
- Programming software (optional)
- What's in the box
- - Main features
- Coverage/Range
- Suggestions and warnings
- Main controls and parts of the radio
- LCD Display
- Battery recharge
- Operations
- Power on/off and volume adjustment
- Transmission and reception
- Monitor
- Roger Beep (end transmission tone)
- Alarm function (Emergency)
- MENU functions
- Scan
- PRI (Priority Scan)
- VOX
- POW - Setting the transmission power
- Squelch
- Scrambler
- Led-Backlight
- Keypad Beep on/off
- Keypad lock (KEYBO)
- SCAN mode settings
- SE: Search Scan
- VOICE function
- C-CDC / R-CDC / T-CDC
- Name - Nome
- Technical specifications
- Troubleshooting
- TO: Time-Operated Scan
- CTCSS TONE TABLE: 50 tones
Brand : MIDLAND
Model : G18
Category : Walkie-talkie