
SMA 30 - Manicure and pedicure set SANITAS - Free user manual and instructions
Find the device manual for free SMA 30 SANITAS in PDF.
| Product type | Manicure and pedicure set |
| Brand | Sanitas |
| Model | SMA 30 |
| Power supply | Mains adapter 230 V AC / 50 Hz, output 2.4 V DC / 800 mA |
| Battery life | Approximately 30 minutes on battery |
| Charging time | First charge 15 hours, then approximately 7 hours |
| Speeds | 9,000 and 14,000 rpm ± 12% |
| Rotation | Right and left |
| Included attachments | 8 attachments (A to H): sapphire discs, grinders, felt cone, cuticle attachment, etc. |
| Use | Hand and foot care, personal use |
| Safety | Automatic shut-off after 30 minutes, do not use in water, check temperature |
| Maintenance | Clean with a slightly damp cloth, attachments with alcohol if necessary |
| Repairability | Repairs only by authorized after-sales service |
| Hygiene | Strictly personal use |
| Warranty | Information not provided |
Frequently Asked Questions - SMA 30 SANITAS
User questions about SMA 30 SANITAS
0 question about this device. Answer the ones you know or ask your own.
Ask a new question about this device
Download the instructions for your Manicure and pedicure set in PDF format for free! Find your manual SMA 30 - SANITAS and take your electronic device back in hand. On this page are published all the documents necessary for the use of your device. SMA 30 by SANITAS.
USER MANUAL SMA 30 SANITAS
GB Operating Instructions
Manicure/Pedicure set
F Mode d'emploi
Ensemble manicure/pedicure
E Modo de empleo
natural_image
White laboratory brush tool with a dial and handle, no visible text or symbols on the device itself.DEUTSCH
natural_image
Close-up of a metallic tool with a rounded body and a shaft, isolated on white background (no text or symbols)A - Saphirkegel
natural_image
White cylindrical object with a metallic shaft, resembling a stylized button or sensor (no text or symbols visible)B - Filzkegel
natural_image
Close-up of a metallic mechanical component with textured surface and cylindrical shaft (no visible text or symbols)C – Saphirscheibe, fein
natural_image
Close-up of a metallic tool tip with textured surface and shaft (no text or symbols visible)natural_image
Metal mechanical component with a pointed tip and threaded end (no text or symbols visible)E - Zylinderfräser
natural_image
Close-up of a metallic tool tip with tapered end (no text or symbols visible)F - Flammenfräser
natural_image
Metal tool or probe with a pointed tip and spherical end (no text or symbols visible)Please read these instructions for use carefully and keep them for later use, be sure to make them accessible to other users and observe the information they contain.
1. Important notes
Read through these instructions for use carefully before first use. Keep them to hand for later use and ensure that they are accessible to other users.
IMPORTANT:
When in use, there may be an intense heat build-up on the skin or nail.
- Check results regularly during treatment. This is particularly advisable in the case of diabetics, as they are less sensitive to pain and are liable to become injured more easily. Attachments A, B. C and D that are provided are basically suitable for diabetics as they are only used for treatment of areas rather than specific points. Attachments E, F and G are, however, less suitable for diabetics. Always use with extreme care. If in doubt, ask your doctor.
- This instrument must be used only for the purpose for which it has been developed, and in the manner described in the instructions for use. Any improper use can be dangerous.
- In case of prolonged intensive use (e.g. milling of dead skin from your feet) the device might get very hot. In order to prevent skin burns in these situations, there should be longer breaks between each application. For your own safety, constantly monitor heat build up in the device. This particularly applies to people who are insensitive to heat.
- The device is only for private use and is not intended for medical or commercial purposes.
- For reasons of hygiene, the device should only be used on one person.
- The manager is not responsible for damage or injury caused by improper or incorrect use.
- Ensure before use that there is no visible damage to the instrument and accessories. In the event of doubt, do not use them and contact your dealer or the customer service address stated.
- Keep children away from the packaging materials. Risk of suffocation.
- The appliance must be checked frequently for signs of wear or damage. If such signs are present, or if the appliance has been used improperly, it must be taken to either the manufacturer or the dealer before further use.
- Switch off the instrument immediately in the event of defects or malfunctions.
- Repairs may be carried out only by the customer service or authorized dealers.
- On no account try to repair the instrument yourself!
- Use the instrument only with the accessories provided.
- Never operate the appliance without supervision, particularly when children are in the vicinity.
- Children, helpless or disabled persons must use the appliance only under the supervision of adults or must be made familiar with the appliance beforehand.
- Do not use on small animals/animals.
- Prevent all contact with water (except when cleaning with a slightly moistened cloth!). Water must never enter the inside of the appliance. Never immerse the appliance in water. On no account use the appliance in the bath, in a shower, in a swimming pool or over a water-filled wash basin. In the unlikely event that water gets into the case, disconnect the appliance immediately from the mains and contact your specialist electrical supplier or customer service.
- Keep the instrument away from sources of heat.
- Do not use the instrument under blankets, pillows etc.
- The instrument must not be operated continuously for longer than 30 minutes. After this time, wait an interval of at least 15 minutes to prevent the motor from overheating.
- Ensure your hands are dry before handling either the instrument or the plug-in power unit.
- Do not pull on the power cord or instrument to unplug the plug-in power unit from the socket outlet.
- The plug-in power unit must be operated only from a power supply as specified on it.
- The appliance should only be operated with the power unit provided.
- After use, before cleaning and changing any accessory parts, the power unit should always be disconnected.
- The appliance should be disposed of according to Regulation 2002/96/EC-WEEE (Waste Electrical and Electronic Equipment). In the event of any queries, please contact your local authority responsible for waste disposal.
2. Preparation
2.1 Battery operation
Before using the appliance for the first time, charge the battery for at least 15 hours. To do this, connect the power unit to the mains supply. After charging for the first time, charge time is approximately 7 hours. Turn off the appliance when charging.
Connect the mains adapter cable to the jack on the appliance and plug the adapter into the wall outlet. The LED indicator shows that the appliance is charging.
After every charge, you can use the appliance for 30 minutes.
Please note that you can best preserve the life of the rechargeable battery by avoiding interruption to the charging cycle prematurely, and continuing to operate the appliance until the battery is discharged.
Ensure that the mains adapter is unplugged from the mains power supply at the end of the charging time.
2.2 Mains operation
If the battery is empty, the appliance can also be run using the plug-in power supply. To do this, let the appliance charge with the power unit for approx. 5 minutes; it will then be fully operational again. The appliance should only be operated with the voltage indicated on the power unit.
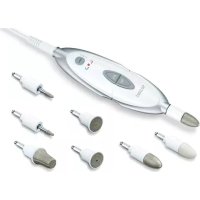
2.3 What you should know about the appliance
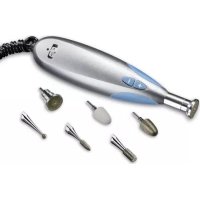
This manicure and pedicure appliance is equipped with top-quality attachments. It has a cuticle pusher and 7 attachments with a long-life sapphire coating or polishing felt.
Together with the 2-level speed control and clockwise/anticlockwise operation, this ensures a professional pedicure and manicure that would otherwise only be possible at a podiatrist.
3. Application
3.1 General
- This instrument is intended only for the treatment of hands (manicure) and feet (pedicure).
- Select an attachment and push it onto the instrument spindle using a slight pressure. To remove: pull the attachment and instrument apart in the axial direction (straight).
- To turn the appliance on, move the rotary switch to the left (anticlockwise operation) or right (clockwise operation).
In each case, you can select from two speeds (I and II).
- All file and cutting attachments are coated with a sapphire grain. This guarantees extremely long life and almost guarantees freedom from wear.
- Do not exert heavy pressure and always guide the attachments carefully over the surface to be treated.
- Move the instrument under light pressure in circular movements slowly over the parts to be treated.
- Note that the cutting attachments will have a reduced effect if the skin is softened or moist. For this reason, do not carry out any pretreatment in a bath.
- Do not remove all the callus skin in order to retain the natural protection of the skin.
- Always ensure that the spindle can rotate freely. It must never be permanently jammed, otherwise the instrument will become too hot and suffer damage.
- After every use, apply moisturizing cream to the parts treated.

Important:
Check the results during treatment. This is particularly important for diabetics, since their hands and feet are less sensitive.
3.2 Attachments
As these are attachments for use by professionals, we would ask you to handle them with care as they can cause injury when used incorrectly. Particular caution is advised at higher speeds.
The following attachments are provided with your appliance:
natural_image
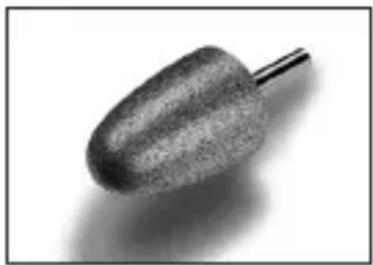
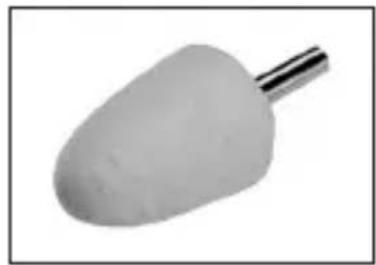
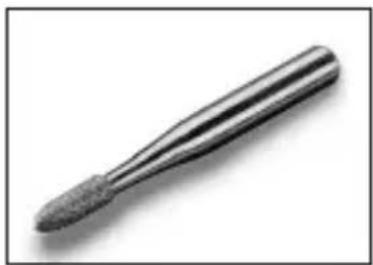
Close-up of a textured, oval-shaped object with a metallic rod extending from its tip (no text or symbols visible)A – Sapphire cone
Removal of dry skin or calluses from the soles of the feet and from the heels and for manicuring the nails.
natural_image
White cylindrical object with a metallic rod, resembling a stylized tooth or stick (no text or symbols visible)B - Felt cone
Smoothing and polishing the edge of the nail after filing as well as for cleaning the nail surface. Always polish in circular movements and do not allow the felt cone to rest in one place, otherwise friction could cause heat to develop.
natural_image
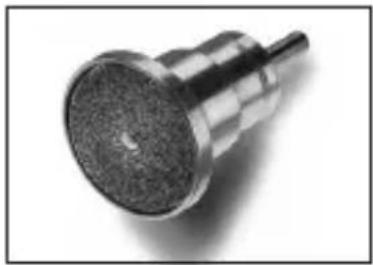
Close-up of a metallic mechanical component with textured surface and cylindrical body (no visible text or symbols)C – Sapphire disk, fine
Filing and treatment of the nails, fine grained sapphire disk. The specific aspect of this sapphire disk is that only the inner disk rotates, while the outer support is stationary. This enables precise filing of the nails without the risk of burning the skin with the fast rotating disk.
natural_image
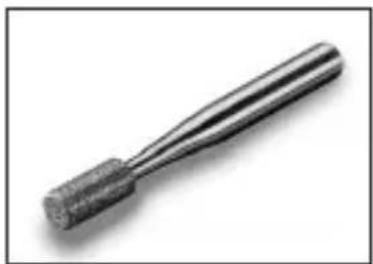
Close-up of a textured, metallic object with a cylindrical shaft (no visible text or symbols)D – Sapphire callus rasp
For rapid removal of stubborn calluses and hard skin on the soles of feet and heels This attachment can be used on large areas.
natural_image
Metal tool with threaded end and tapered tip, isolated on white background (no text or symbols)E – Cylindrical milling cutter
Grinding of lignified foot nail surfaces as well as smoothing of these. For this purpose, apply the milling cutter horizontally to the nail surface and remove the unwanted layer of nail using slow circular movements.
natural_image
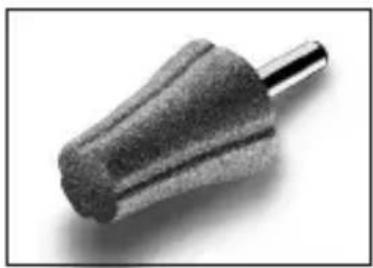
Close-up of a metallic tool tip with textured surface (no text or symbols visible)F - Flame milling cutter
For removing ingrowing nails. Carefully guide the flame cutter up to the part to be treated and remove parts of the nail as necessary.
natural_image
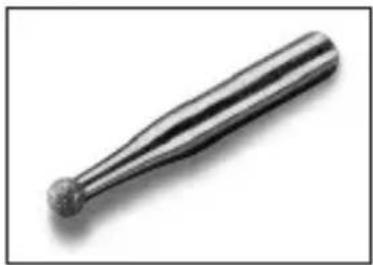
Metal tool with a pointed tip and rounded end, isolated on white background (no text or symbols)G – Sapphire milling cutter, round
This accessory attachment is for the careful removal of corns. When using this attachment, please remember when removing the layer of skin from the corn that you will quickly penetrate deeper into the skin and this could injure the periosteum.
H - cuticle pusher
Soften the cuticle with water or cuticle oil. Now you can push back or remove the cuticle. Depending on the sensitivity and stubbornness of the skin, you can either use the soft, rounded side or the harder pointed side.
When filing, always work from the outside of the nail towards the tip!
Always check results regularly during treatment. As soon as the application becomes unpleasant, stop the treatment.
4. Cleaning/care
Before cleaning the power unit, always unplug it from the socket outlet!
- Clean the instrument with a slightly moistened cloth. You can also moisten the cloth with mild soap suds to remove more stubborn dirt.
- If necessary, for reasons of hygiene, the attachments can be cleaned with a cloth or brush moistened with alcohol. Dry them carefully afterwards.
- Do not drop the instrument.
- Make sure that no water enters the instrument. But if this should happen, do not use the instrument again until it is completely dry.
- Do not use chemical detergent or scouring agents for cleaning.
- Never immerse the instrument or plug-in power unit in water or other liquids.
5. Technical data
Power unit voltage Input: 230 V AC / 50 Hz / 5,8 W
Output: 2,4 V DC / 800 mA / 1,9 W
Speed: 9.000/14.000 U/min ±12%
FRANÇAIS
natural_image
Close-up of a textured, oval-shaped object with a metallic rod extending from its tip (no text or symbols visible)A - Cône saphir
natural_image
Close-up of a white plastic object with a metallic shaft, resembling a stylized lamp or button (no text or symbols visible)B - Cône feutre
natural_image
Close-up of a metallic mechanical component with textured surface and cylindrical body (no visible text or symbols)natural_image
Close-up of a textured, cylindrical object with a metallic shaft (no visible text or symbols)D – Ponceuse de la corne en saphir
natural_image
Metal mechanical component with threaded end and tapered shaft (no text or symbols visible)E – Fraiseuse cylindrique
natural_image
Close-up of a metallic tool tip with tapered end (no text or symbols visible)natural_image
Metallic cylindrical object with a pointed tip and rounded end, isolated on white background (no text or symbols)G – Fraiseuse saphir ronde
natural_image
Close-up of a textured, oval-shaped object with a thin rod, possibly a knob or knob (no text or symbols visible)A - Cono de zafiro
natural_image
Close-up of a white, oval-shaped object with a metallic rod extending from its tip (no text or symbols visible)B - Cono de fieltro
natural_image
Close-up of a metallic mechanical component with textured surface and cylindrical body (no visible text or symbols)natural_image
Close-up of a textured, conical object with a metallic shaft (no visible text or symbols)natural_image
Metal tool with threaded end and tapered tip, isolated on white background (no text or symbols)natural_image
Close-up of a metallic tool tip with a textured tip and pointed tip (no text or symbols visible)natural_image
Metallic cylindrical object with a pointed tip and rounded end, isolated on white background (no text or symbols)G - Fresa de zafiro redonda
natural_image
Close-up of a metallic tool with a rounded tip and handle (no text or symbols visible)natural_image
Close-up of a dental implant with a metallic shaft and rounded body (no text or symbols visible)В – Войлочный конус
natural_image
Close-up of a metallic mechanical component with a circular top and protruding shaft (no visible text or symbols)natural_image
Close-up of a metallic tool tip with textured surface (no text or symbols visible)natural_image
Metal mechanical component with a pointed tip and threaded end (no text or symbols visible)natural_image
Close-up of a metallic tool tip with textured surface (no text or symbols visible)natural_image
Metal tool with a pointed tip and rounded end, isolated on white background (no text or symbols)

- DEUTSCH
- A - Saphirkegel
- B - Filzkegel
- C – Saphirscheibe, fein
- E - Zylinderfräser
- F - Flammenfräser
- Important notes
- IMPORTANT:
- Preparation
- Battery operation
- Mains operation
- What you should know about the appliance
- Application
- General
- Attachments
- A – Sapphire cone
- B - Felt cone
- C – Sapphire disk, fine
- D – Sapphire callus rasp
- E – Cylindrical milling cutter
- F - Flame milling cutter
- G – Sapphire milling cutter, round
- H - cuticle pusher
- When filing, always work from the outside of the nail towards the tip!
- Cleaning/care
- Technical data
- FRANÇAIS
- A - Cône saphir
- B - Cône feutre
- D – Ponceuse de la corne en saphir
- E – Fraiseuse cylindrique
- G – Fraiseuse saphir ronde
- A - Cono de zafiro
- B - Cono de fieltro
- G - Fresa de zafiro redonda
- В – Войлочный конус
Brand : SANITAS
Model : SMA 30
Category : Manicure and pedicure set