XT 1000 ES - Hand dryer Starmix - Free user manual and instructions
Find the device manual for free XT 1000 ES Starmix in PDF.
| Product type | Hand dryer |
| Brand | Starmix |
| Model | XT 1000 ES |
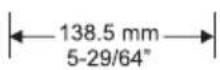
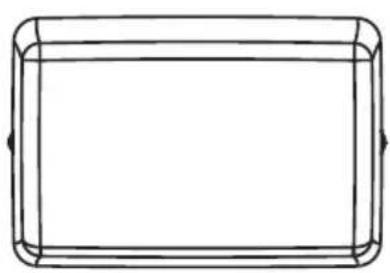
| Dimensions (W x D x H) | 250 x 138 x 180 mm |
| Weight | 3.8 kg |
| Supply voltage | 220-240 V~ |
| Frequency | 50/60 Hz |
| Rated power | 900 W |
| Max power | 1000 W |
| Motor power | max. 500 W |
| Heating power | max. 500 W |
| Air volume | 28 l/s |
| Air outlet speed | 90 m/s |
| Drying time | approx. 15 seconds |
| Protection rating | IPX1 |
| Start-up | Automatic via infrared sensor |
| Safety | Do not use in explosive atmosphere; repair by qualified personnel only; use original parts |
| Maintenance | Clean the air intake grilles with a vacuum cleaner or brush; wipe the housing with a dry or damp cloth |
| Housing material | Impact-resistant plastic |
Frequently Asked Questions - XT 1000 ES Starmix
User questions about XT 1000 ES Starmix
0 question about this device. Answer the ones you know or ask your own.
Ask a new question about this device
Download the instructions for your Hand dryer in PDF format for free! Find your manual XT 1000 ES - Starmix and take your electronic device back in hand. On this page are published all the documents necessary for the use of your device. XT 1000 ES by Starmix.
USER MANUAL XT 1000 ES Starmix
Mounting Instructions and
Directions for Use

GB Original operatin instructions in German 10
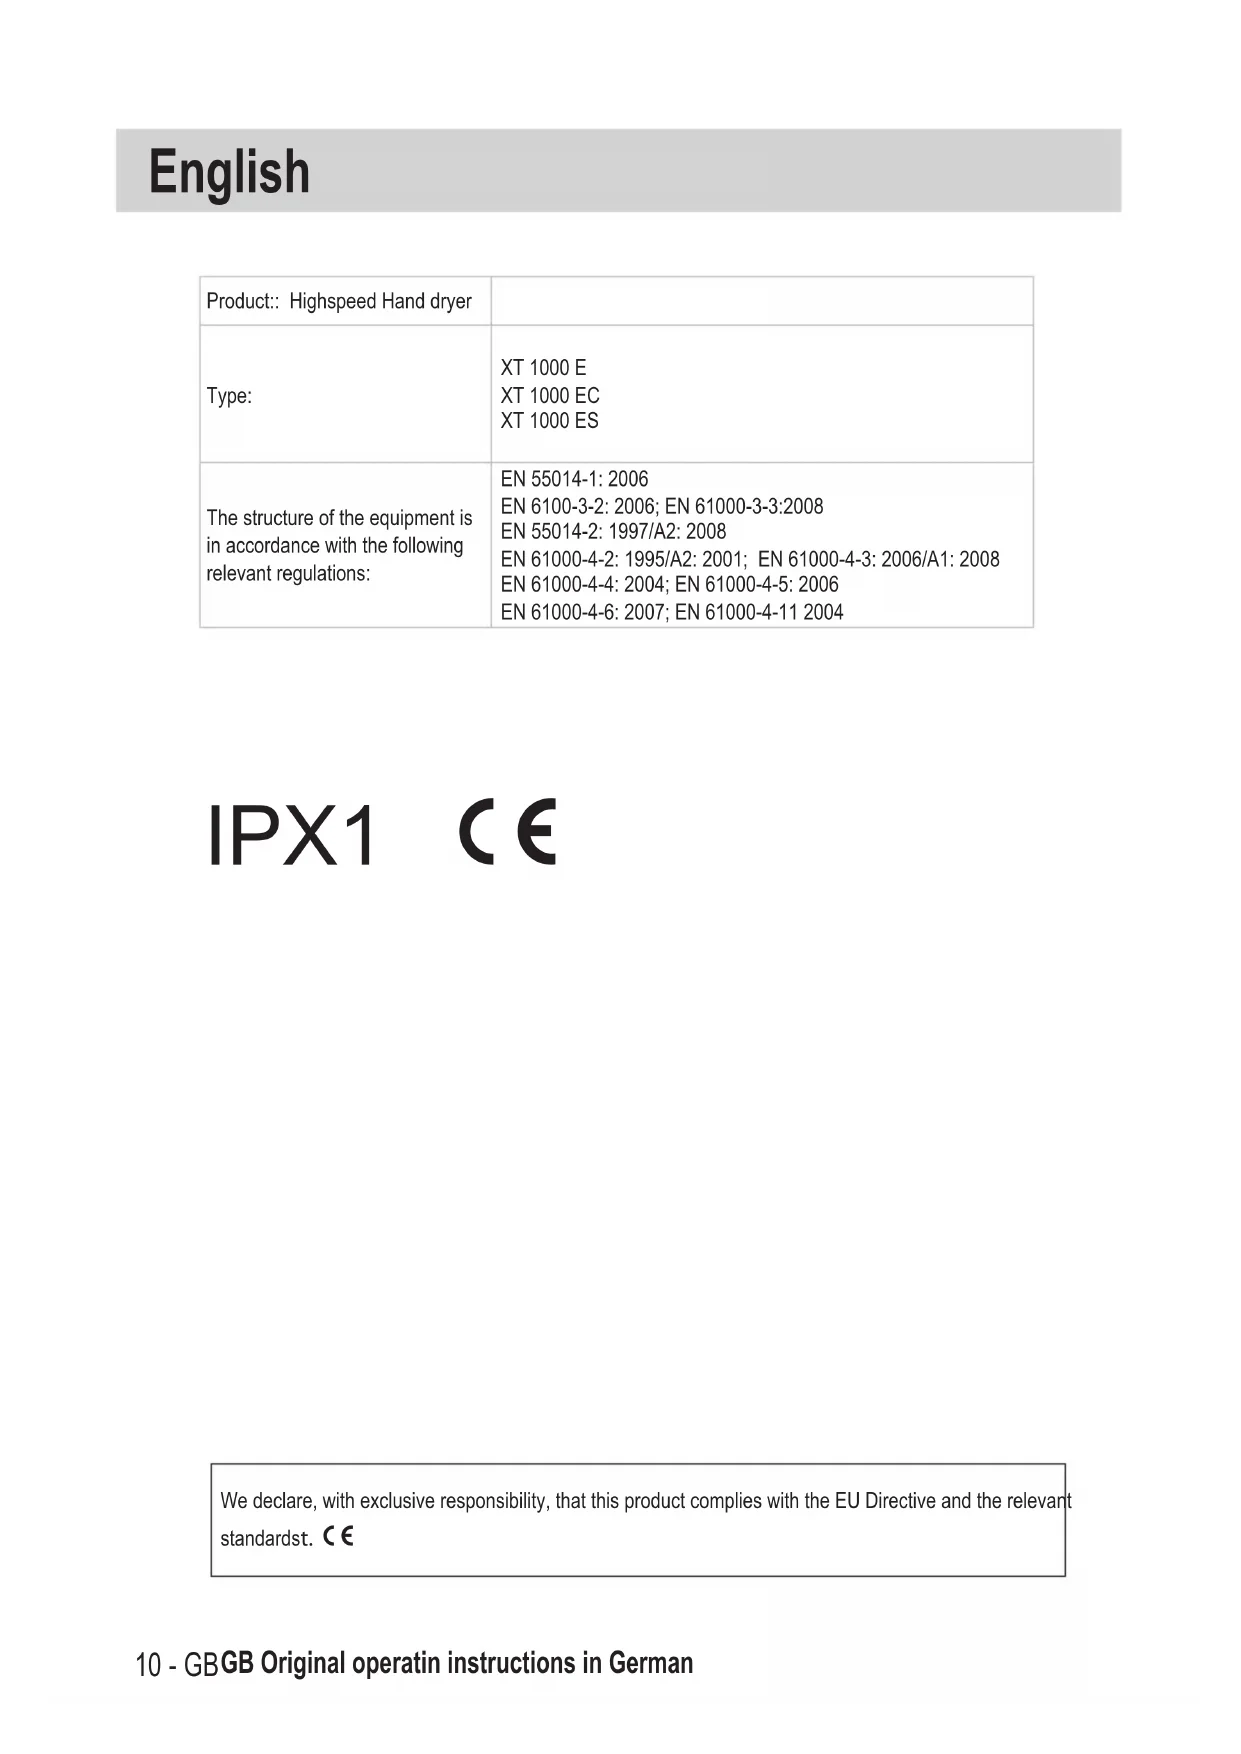
| Product:: Highspeed Hand dryer | |
| Type: | XT 1000 E XT 1000 EC XT 1000 ES |
| The structure of the equipment is in accordance with the following relevant regulations: | EN 55014-1: 2006 EN 6100-3-2: 2006; EN 61000-3-3:2008 EN 55014-2: 1997/A2: 2008 EN 61000-4-2: 1995/A2: 2001; EN 61000-4-3: 2006/A1: 2008 EN 61000-4-4: 2004; EN 61000-4-5: 2006 EN 61000-4-6: 2007; EN 61000-4-11 2004 |
IPX1 CE
We declare, with exclusive responsibility, that this product complies with the EU Directive and the relevant standardst. C E
Read the operating manual carefully before starting to use the hand dryer. It provides important instructions for the operation, safety, care and maintenance. Keep the operating manual in a safe place and, in case you sell the unit, hand it on to the next owner.
The manufacturer reserves the right to carry out modifications to the design and equipment.
Any other work not covered by this operating manual must not be carried out.
1 Before use
We have compiled these operating instructions so that you become familiar with your new appliance quickly and comprehensively.
- Please read these instructions carefully before using this appliance. It provides you with important information on its safety, operation, maintenance and disposal.
- Familiarise yourself with your new appliance and its various functions following the sequence of the instructions.
- Follow all notes and explanations referring to the correct operation and handling. This will ensure the continuous availability and a long life for your appliance.
- The safety notes, in particular, must be followed. They help you to prevent accidents and to protect your appliance from damage.
- Please keep these instructions for future reference.
This appliance complies with the current state of technology and the applicable safety regulations for electrical appliances.
The manufacturer will not accept any liability for damage caused by improper use or incorrect operation.
2 Safety advice
- Danger of suffocation
- Keep packaging material such as plastic bags away from children.
- In case of any leakage of foam or liquid, immediately switch off the dryer
-
Do not start the dryer device including its accessories if:
-
the dryer device shows detectable damage (fissures/cracks);
- the power connection line is defective or shows fissuring or ageing; or
-
any invisible defect is suspected (after a fall).
-
Do not operate the dryer device where there is danger of explosions.
- Keep away the dryer device from inflammable gases and substances.
- In case of any inappropriate usage, improper operation or repair, the producer shall be exempt from liability.
- Do not use any damaged extension lines.
- If the connector line of the dryer device has been damaged, it must be replaced with a special connector line which is available from the producer or their service.
- Before connecting the appliance check that the voltage stated on the name plate corresponds with your mains voltage. The name plate is located on the underside of the enclosure.
- Persons (including children) who are, due to their physical, sensory or intellectual abilities or lack of experience or knowledge, unable to safely use the vacuum device should not use it without supervision or instruction by a responsible person.
- Particular caution is advised with children, elderly or infirm persons.
- Do not use any steam jets or high-pressure dryer for cleaning.
- Acids, acetone and solvents may corrode parts of the dryer device.
- Have repairs been made only by experts, e. g. the producer's service. Use original spare parts only.
- Improperly repaired devices pose a hazard for the user
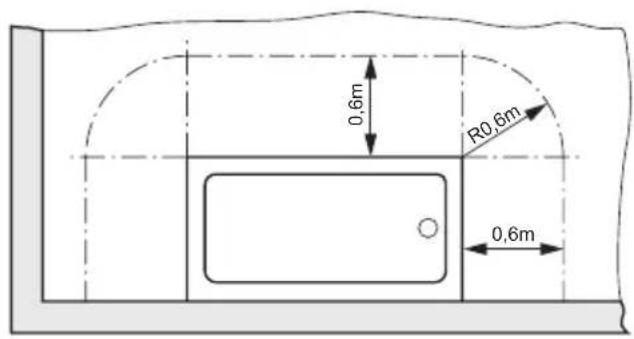
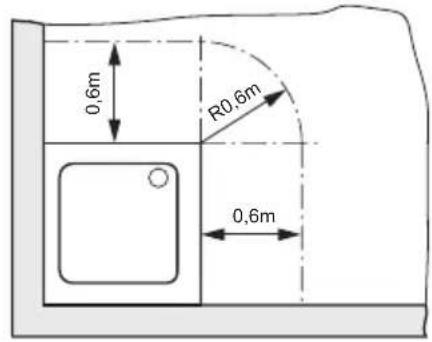
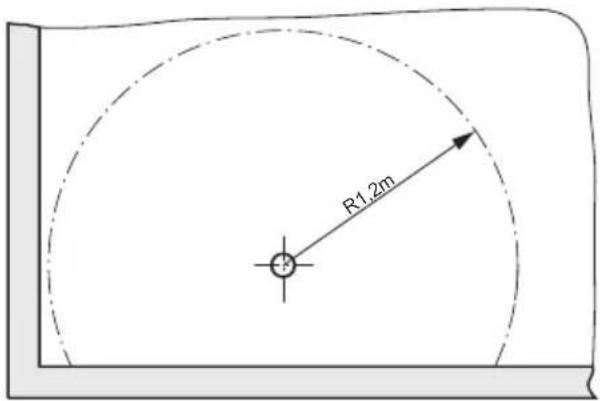
3 Minimum distances
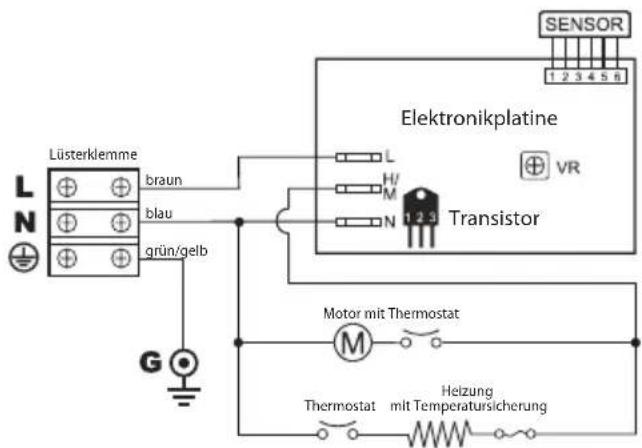
4 Wiring diagrams
5 Technical Data
| XT 1000 E XT 1000 EC XT 1000 ES | ||||
| Voltage U 220-240 V~ 220-240 V~ 220-240 V~ | ||||
| Frequency Hertz 50/60 Hz 50/60 Hz 50/60 Hz | ||||
| Rated power Watt 900 900 900 | ||||
| Max. power | Watt | 1000 | 1000 | 1000 |
| Motor output: | Watt | max. 500 | max. 500 | max. 500 |
| Heating output: | Watt | max. 500 | max. 500 | max. 500 |
| Air flow: | l/sec. | 28 | 28 | 28 |
| Speed of air flow: | m/sec | 90 | 90 | 90 |
| Hand drying time: | sec. | ca. 15 | ca. 15 | ca. 15 |
| Weight | kg | 3,8 | 3,8 | 3,8 |
| Dimensions: (W x D x H) | mm | 250 x 138 x 180 | 250 x 138 x 180 | 250 x 138 x 180 |

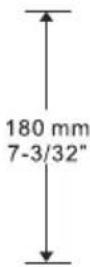
6 Installation instructions
- The installation must be carried out by qualified personnel to ensure that the appliance is connected in accordance with safety regulations. In rooms with showers and bath tubs the appliance must be installed with the minimum distances laid down in the VDE regulations (0.6 mtrs (24 inches) from the edge of the shower and/or bath and 1.2 mtrs (48 inches) from a shower head).
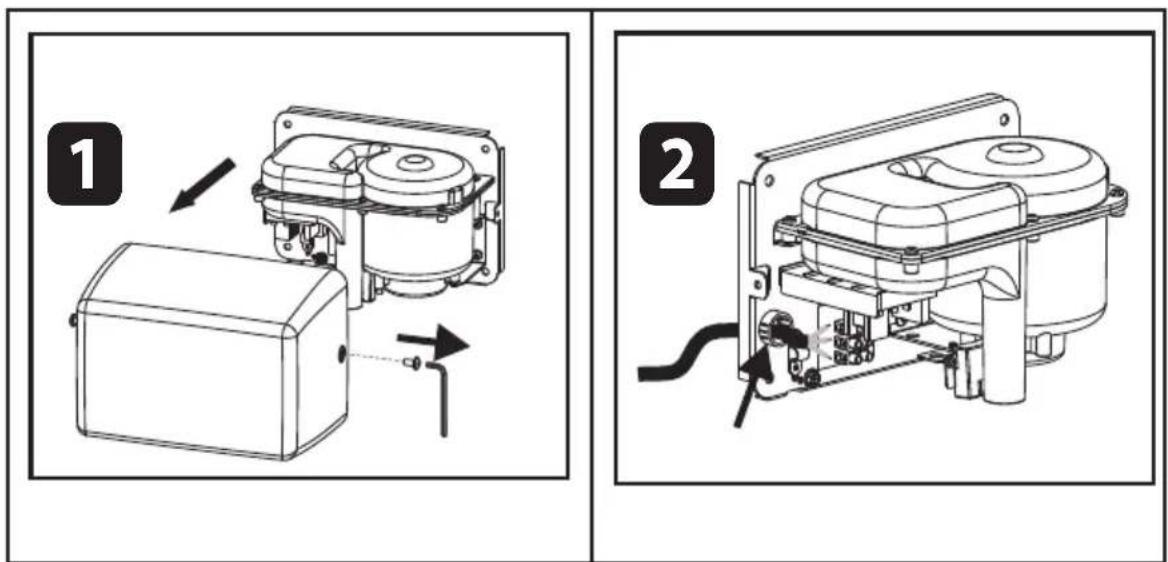
- Carrying out any work or cleaning the appliance, make sure that it is isolated from the power supply! !
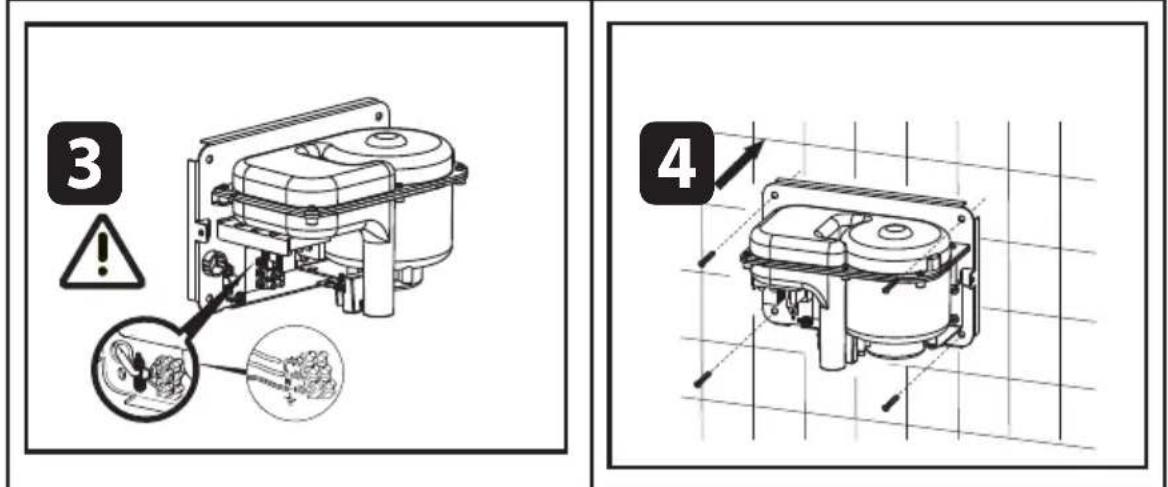

Fix the installation pattern on the wall at the height recommended in the table shown below on the left.
- Mark the centre of the four fixing holes to be drilled with a sharp-pointed instrument, then drill the holes using an 8 mm drill bit.
- Remove the lid from the appliance; to do this, unscrew completely both the anti-theft screws on the mounting plate. Use the special hexagon spanner supplied to do this.
- Next, fix the mounting plate to the wall, using the wall plugs and screws supplied.
- Connect the appliance to the power supply, taking care to observe the information in the chapter entitled "Safety instructions". THIS MAY ONLY BE CARRIED OUT BY A QUALIFIED ELECTRICIAN
- Place the cover on the appliance again, and fix it with the two anti-theft screws. Tighten the screws by hand.
7 Cleaning and servicing
Clean the air inlet openings to remove sticking fluff and dust as required with a narrow vacuum cleaner fitting. Remove any dirt which is still stuck in the air inlet with a stiff brush. The surface of the housing may be wiped over with a damp or a dry cloth. Abrasive cleaners must not be used.
8 Note
Old equipment contains valuable materials which are designed for re-processing. The vacuum cleaners must not be thrown away in the normal household waste, but should be disposed of at a suitable proper collection system, e. g. via your communal disposal location.
| Produit: Highspeed Séchoir à mains | |
| Type: | XT 1000 E XT 1000 EC XT 1000 ES |
| La construction des apparèils est conforme aux stipulations déterminantes suivantes: | EN 55014-1: 2006 EN 6100-3-2: 2006; EN 61000-3-3:2008 EN 55014-2: 1997/A2: 2008 EN 61000-4-2: 1995/A2: 2001; EN 61000-4-3: 2006/A1: 2008 EN 61000-4-4: 2004; EN 61000-4-5: 2006 EN 61000-4-6: 2007; EN 61000-4-11 2004 |
IPX1 CE