
Photo Agent - Digital photo frame INTENSO - Free user manual and instructions
Find the device manual for free Photo Agent INTENSO in PDF.
| Product Type | Digital Photo Frame |
| Brand | Intenso |
| Model | Photo Agent |
| Screen Size | 7 inches TFT LCD |
| Display Format | 16:10 |
| Screen Resolution | 432 x 234 pixels |
| Supported Photo Formats | JPEG (max 8000 x 8000 pixels) |
| Compatible Memory Cards | SD, SDHC, MMC, Memory Stick |
| USB Port | USB Host 2.0 (USB flash drives) |
| Power Supply | Power adapter 5V 1A (100-240V AC) |
| Dimensions | 219 x 151.6 x 29 mm |
| Weight | 381 g |
| Main Functions | Slideshow, clock, calendar, alarm, photo viewing without PC |
| Control | Back buttons and infrared remote control |
| Transition Effects | Random or continuous, adjustable duration |
| Operating Temperature | 0°C to +45°C (humidity <80%) |
| Storage Temperature | -20°C to +60°C (humidity <95%) |
| Supplied Accessories | Remote control (CR2025 battery included), stand, power adapter, multilingual manual |
| Maintenance | Clean with a soft cloth, no chemicals |
| Safety Instructions | Do not expose to water, do not open the casing, avoid heat sources |
Frequently Asked Questions - Photo Agent INTENSO
User questions about Photo Agent INTENSO
0 question about this device. Answer the ones you know or ask your own.
Ask a new question about this device
Download the instructions for your Digital photo frame in PDF format for free! Find your manual Photo Agent - INTENSO and take your electronic device back in hand. On this page are published all the documents necessary for the use of your device. Photo Agent by INTENSO.
USER MANUAL Photo Agent INTENSO
Intenso 7" PHOTOAGENT
Bedienungsanleitung
Intenso 7" PHOTOAGENT
Inhaltsverzeichnis
ALLGEMEINE PRODUKTMERKMALE
Operating Instructions
Intenso 7" PHOTOAGENT
Table of Contents
INTRODUCTION 1
GENERAL PRODUCT CHARACTERISTICS 2
OVERVIEW 3
REMOTE CONTROL 4
INSERTING BATTERIES INTO REMOTE CONTROL 5
FASTENING THE FRAME BASE 5
FIRST STEPS. 6
USING MEMORY CARDS 7
MAIN MENU 8
VIEWING PHOTOS 9
Playing a slideshow. 9
Photo preview menu 10
Viewing and individual photo 11
Changing the view 12
Using the OSD Menu 13
Displaying time and date. 15
SET-UP MENU 16
Setting options 17
Setting the time and date 19
Activating automatic on/off 20
FAQs. 21
PRODUCT SPECIFICATIONS 24
SERVICE AND MAINTENANCE 25
INTRODUCTION
Thank you for buying the Intenso's DIGITAL PHOTO FRAME (DF).
Before using this device please carefully read these operating instructions and observe all safety notes. Please store these instructions at a safe place to have an answer at hand whenever you have questions. These instructions have been compiled with great care to enable you to safely use all functions of the DF.
The DF allows you watching digital photos directly from your camera's memory card. You can watch your photos in a slide show mode provided by the photo frame. The DF is compatible with the following card formats: SD™ (Secure Digital), SDHCTM (Secure Digital High Capacity), MMC™ (Multimedia Card), MS™ (Memory Stick) and USB flash drive.
We are not liable for any damages or loss of data in the case of malfunction, maloperation or if you repair the device yourself. Please do not disassemble the device into individual parts and do not try to repair it yourself; in such a case guarantee will expire. Software, hardware and the operating instructions can be all subject to change. We will not inform you hereof and reserve all rights in this matter.
GENERAL PRODUCT CHARACTERISTICS
- Decorative appearance, excellent quality
- Shows pictures (JPEG) without requiring a computer
Automatic slide show with various transition effects and individual display duration
Calendar function - Timer function
- Compatible with SD / MMC and MS cards
- USB slot to connect USB flash drives
2-way control: 7 buttons on the digital photo frame, infrared remote control
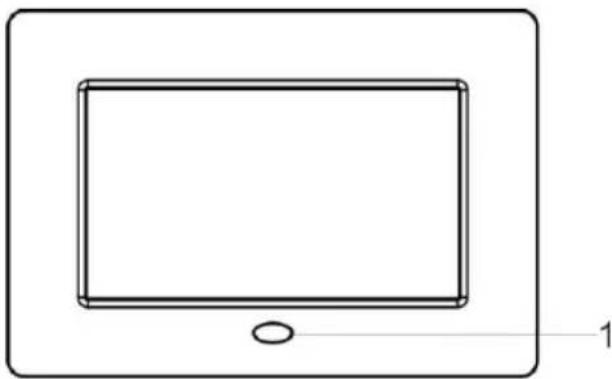
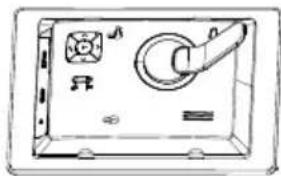
OVERVIEW
Front view
Side and rear view
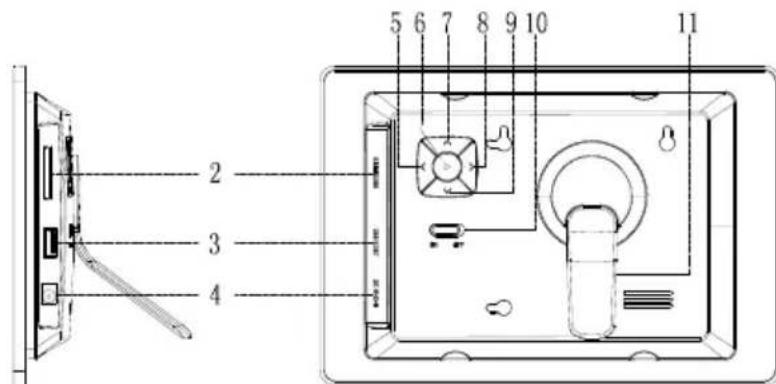
- Infrared sensor
- SD/MMC/MS card slot
- USB host slot
- DC 5V 1A input
- [<] left button. Press and hold this button for 4 seconds to view photos.
-
Play/Enter [▶] button.
-
Up/Back [▲] button. Press and hold this button for 3 seconds to open the main menu.
- Right [>] button. Press and hold this button for 3 seconds to open the "Settings" menu.
-
Down/Forward [▼] button. Press and hold this button for 3 seconds to open the OSD menu.
-
Power on/off
- Stand
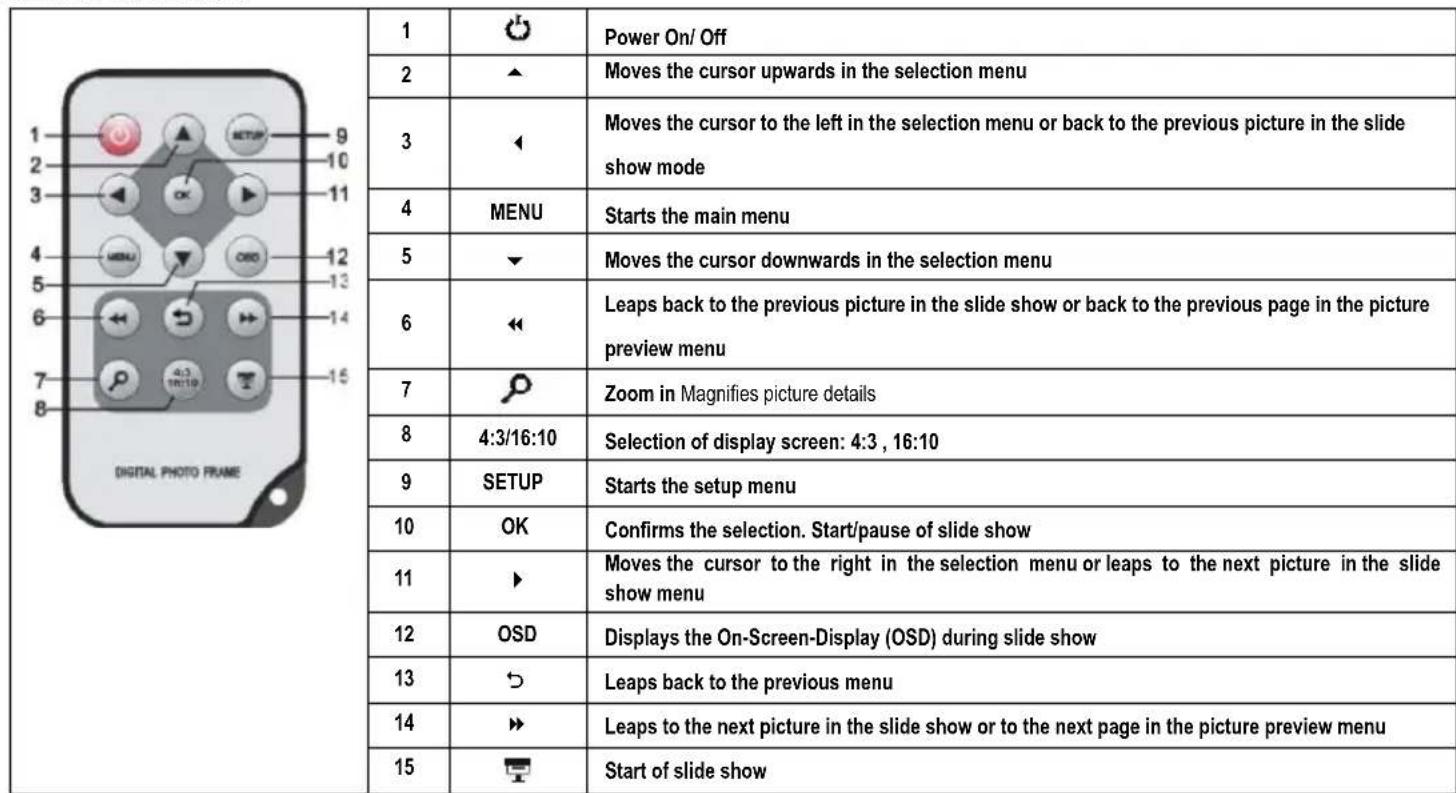
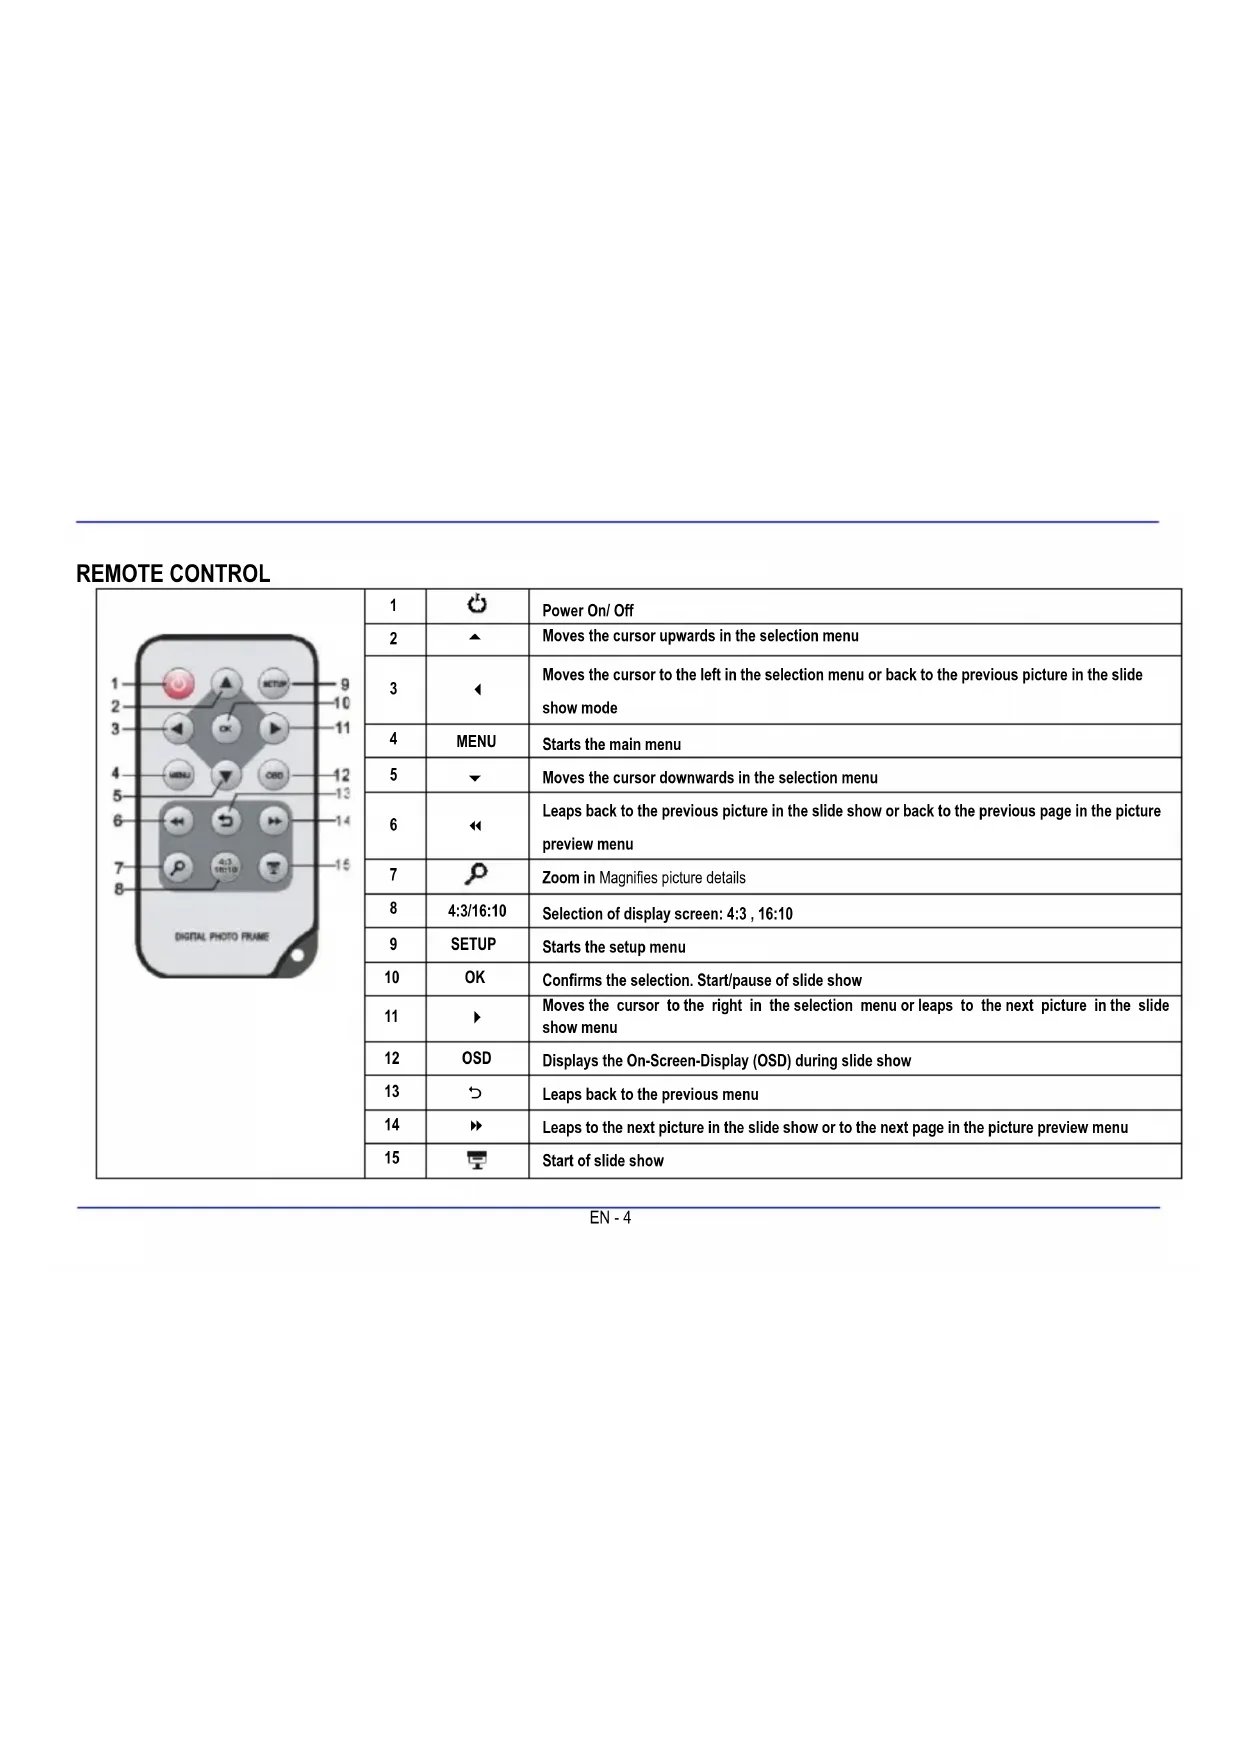
REMOTE CONTROL
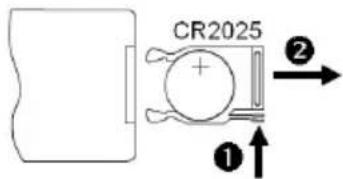
INSERTING BATTERIES INTO REMOTE CONTROL
- Turn your remote control upside down with the buttons facing down.
There is a spring on the left side of the battery compartment. Hold it to the right and simultaneously pull out the battery compartment. - Insert a CR2025 Lithium battery to the battery compartment with the Plus symbol facing upwards.
- Reinsert the battery compartment into the housing of the remote control.
Please note: Please dispose batteries according to legal regulations.
FASTENING THE FRAME BASE
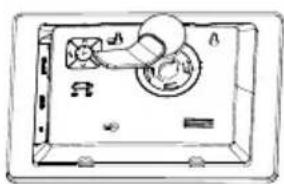
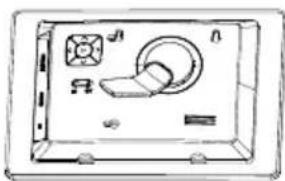
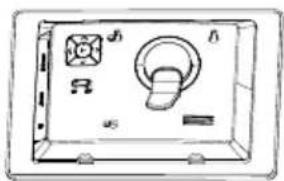
- Turn the frame base in anticlockwise direction to select the so-called scenery or portrait position.
FIRST STEPS
- Connect the frame base to the DIGITAL PHOTO FRAME (DF).
Connect the mains adapter provided with the DF. Plug the other end of the provided mains adapter into the power outlet.
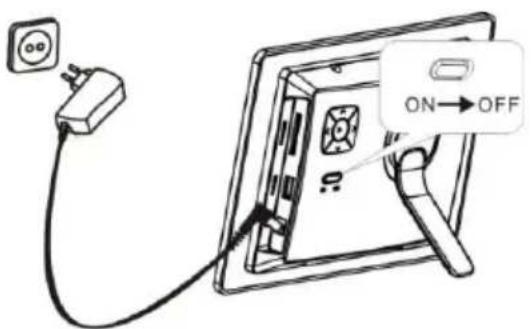
- Move the slider of the DF into "ON" position.
- Using the device for the first time please select the Language in the appearing window by use of the keys on the rear side or the remote control. Confirm your selection with the [▶] button on the rear side or the OK -button on the remote control.
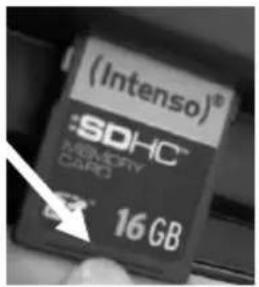
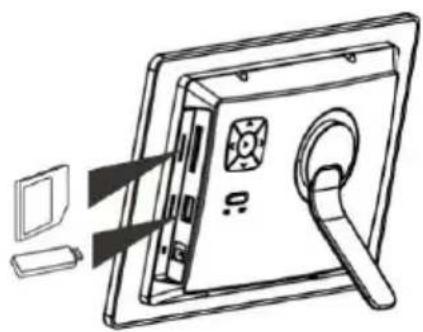
USING MEMORY CARDS
Insert SD / MMC / MS cards into the 3-in-1 card slot with the contacts facing the display.
USB storage mediums can be connected with the DIGITAL PHOTO FRAME by inserting these mediums into the USB port (USB host).
Please note:
- Please do not insert memory cards by use of force.
The 3-in-1 card reader can only read one card at a time. Thus, please connect only one SD / MMC or MS card with the photo frame at a time.
To disconnect inserted cards from the DIGITAL PHOTO FRAME remove them carefully from the card slot. (Please note: SD and MMC cards have a small notch in cross direction. By use of your finger nail you can remove the card from the slot).
MAIN MENU
The main menu will automatically open when the device is turned on.
Note: If a memory device is connected to the DF, a slide show will automatically start when the device is turned on. If several memory devices are connected to the DF, it will always read the photos on the USB stick first after the device is turned on.
You can select the memory device(s) connected to the device, or open time, calendar or settings menu from the main menu..
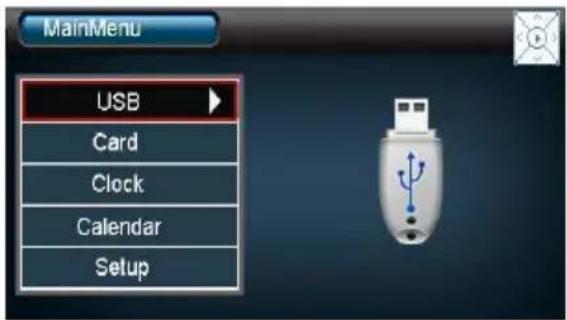
| USB | Displayed when a USB stick is connected to the device. |
| Card | Displayed when a memory card is connected to the device. |
| Clock | Open the clock. |
| Calendar | Open the calendar. |
| Set-up | Open the settings menu. |
Press and hold the [A] button on the back of the DF for app. 3 seconds, or press the Menu button on the remote control and use [A] and [V] buttons on the back of the DF or the A, V buttons on the remote control to open the selected memory device, time, calendar or set-up menu.
Note: A 'button indicator' on the upper right of the screen shows you which button you are pressing.
VIEWING PHOTOS
Playing a slideshow
You can use the [ ] button on the remote control to start the slide show from any menu. The slideshow will start with the first photo. To pause the slideshow to view an individual photo, press the [ ] button on the DF or the OK button on the remote control. Press the [ ] button on the DF or the OK button on the remote control again to continue with the slideshow.
- Press the [▶] button on the remote control or press and hold the [▶] button on the DF to leave the slideshow and open the photo preview menu.
- To leave the slideshow, press the Menu button on the remote control or press and hold the [A] button on the DF for 3 seconds. This will take you back to the main menu.
Note: If a SD/MMC/MS card and a USB device are connected to the DF at the same time, the slideshow will only display photos from one device. The slideshow will not automatically switch to the next device.
Photo preview menu
The photos on the selected device are displayed as thumbnails in the photo preview menu. Up to 15 thumbnails can be displayed at a single time.
- Select a memory device from the main menu (USB, SD/MMC/MS) and press the [▶] button on the DF or the OK button on the remote control.
- Use the [],[],[] , and [] buttons on the DF or the , , , and buttons on the remote control to navigate between thumbnails. Use the or button on the remote control to go directly to the next preview page.
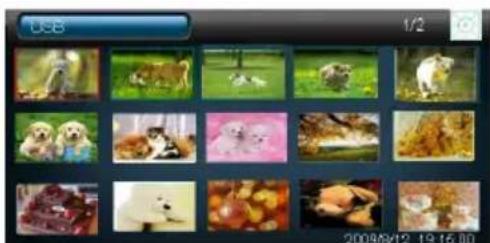
Note: You can also leave the slideshow and open the photo preview menu by pressing the [D] button on the remote control or by pressing and holding the [▶] button on the DF.
Viewing and individual photo
You can select an individual photo to be displayed.
- Select a photo from the photo preview menu and press the [▶] button on the DF or the OK button on the remote control. The photo will then be displayed in full view and the II symbol will appear in the upper right corner of the screen.
Use the [ ] / [ ] buttons on the DF or the / buttons on the remote control to view the previous/next photo..
- To enlarge a photo, press the button on the remote control repeatedly. After the photo has been enlarged, you can use the [ ], [ ], [], and [] buttons on the DF or the , , , and buttons on the remote control to change the focus point.
- Press the [▶]-button on the DF or the OK button on the remote control to start the slideshow with the selected photo.
- To return to the photo preview menu, press and hold the [▶] button on the DF or the [▷] button on the remote control.
Changing the view
You can change the viewing mode while viewing an individual photo or watching a slideshow by pressing the [4:3/16:10] button on the remote control.
- 4:3: When this option is selected, a photo that is saved in 4:3 will be displayed in its original format with a black border on the left and right side.
16:10: When this option is selected, a photo that is saved in 4:3 will be stretched and displayed on the entire screen.
Note: A photo that is saved in 16:10 can only be displayed in 16:10.
The function described above is not active with photos with a resolution less than 432x234.
Using the OSD Menu
You can perform the following actions from the OSD menu.
- Press the [OSD] button on the remote control or press and hold the [] button on the DF for 3 seconds.
The slideshow will stop and the OSD menu will open.

Note: If you do not make a selection within the amount of time given, the OSD menu disappear. Press the OK button on the remote control or the [▶] button on the DF to continue with the slideshow. You can select the amount of time you wish to have to make a selection under settings.
-
Press the [ ] , [> ] buttons on the DF or the , buttons on the remote control to navigate between the different options.
-
To pause or continue to slideshow, select the symbol and press the [▶] button on the DF or the OK button on the remote control.
- To enlarge a photo, select symbol and press the [▶] button on the DF or the OK button on the remote control repeatedly. After a photo has been enlarged, you can use the [<], [>, [▲], [▼] buttons on the DF or the ▲, ▼, △, ▶ buttons on the remote control to change the focus point.
- To rotate a photo 90 degrees, select the symbol and press the [▶] button on the DF or the OK button on the remote control.
- You can return to the photo preview menu by selecting the symbol and pressing the [ ] button on the DF or the OK button on the remote control.
Displaying time and date

Time mode
In this mode, the current time, date, day and a smaller version of the slideshow of the available photos is displayed.
- Select Clock from the main menu.
- Press the [O] button on the remote control or press and hold [A] button the DF for 3 seconds to return to the main menu.
Note: The date and time can only be changed under the settings menu.
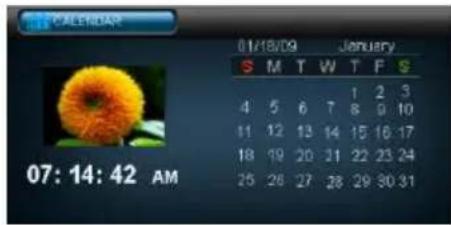
Calendar mode
In this mode the current time, a calendar overview for the month and a smaller version of the slideshow of the available photos is displayed. Select Calendar from the main menu.
- Use the [ ],[ ] buttons on the DF or the , buttons on the remote control to change the month. You change the year using the [ ],[ ] buttons on the DF or the , buttons on the remote control.
Note: The date and time can only be changed under the settings menu.
SET-UP MENU
You can create individual settings for the DF.
- Select Settings from the main menu and confirm your selection with the [▶] button on the DF or with the OK button on the remote control. You can also open this menu directly by pressing the [SET-UP] button on the remote control.
- To open an individual settings menu, press the [] , [] buttons on the DF or , buttons on the remote control and confirm your selection.
- You can now make the desired changes under the respective set-up menu. Make a selection and confirm the change.
- To leave the menu, press the [ ] button on the remote control or press and hold the [ ] button on the DF for 3 seconds.
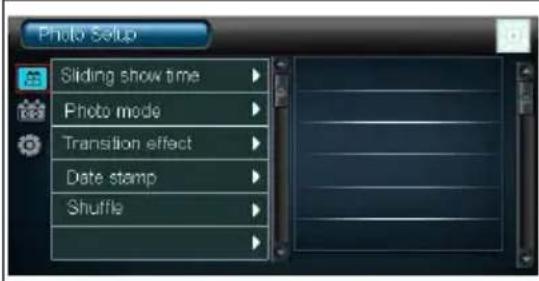
Setting options
| Setting options | Description | |
| Photo settings | Display time | Select the amount of time to display each picture during the slideshow. You can choose from: 3 sec, 5 sec., 15 sec., 1 min, 15 min |
| Photo mode | Choose between full view and standard view. | |
| Transition mode | Choose between random and continual transition. | |
| Photo information | Display the date of origin in full view mode and during the slideshow. | |
| Random | Random display on/off. | |
| Clock/Calendar Set-up | Photo | Display a smaller version of the slideshow while in clock or calendar mode. |
| Time settings | Set the current time. | |
| Time mode | Choose between 12 and 24 hour time. | |
| Date | Set the current date | |
| Date mode | Select the display mode for the date. | |
| General Set-up | Language | Choose the language. |
| Brightness | Adjust the brightness. | |
| Contrast | Adjust the contrast. | |
| Saturation | Adjust the color saturation. | |
| Auto Run | Select the starting mode for when the device is turned on (photo, main menu, clock, calendar). | |
| On | Activate automatic start. Off / Once / Daily | |
| Off | Activate automatic shut off. Off / Once / Daily | |
| Warn time | Select the amount warn time for a selection to be made (in the OSD menu, for example). | |
| Original settings | Restore the original settings. |
Setting the time and date
Set the time on the Intenso DF as follows:
- Select Clock/Calendar set-up from the settings menu.
- Press the [], [] buttons on the DF or the , buttons on the remote control to select the time settings and confirm your selection.
- Press the [], [] buttons on the DF or the , buttons on the remote control to scroll between the previous/next element (hour minute). Press the [], [] buttons on the DF or the , buttons on the remote control to enter the desired values.
- To confirm your input, press the [ ] button on the back of the DF or the OK button on the remote control.
Set the date on the Intenso DF as follows:
- Select Clock/Calendar set-up from the settings menu.
- Press the [], [] buttons on the DF or the , buttons on the remote control to select the date and confirm your selection.
- Press the [], [] buttons on the DF or the , buttons on the remote control to scroll between the previous/next element (year month). Press the [], [] buttons on the DF or the , buttons on the remote control to enter the desired values.
- To confirm your input, press the [ ] button on the back of the DF or the OK button on the remote control.
Activating automatic on/off
You can set your Intenso DF to automatically turn on/off at a desired time.
Note: You must set the clock to the correct time before this function can be used.
- Select General Set-up from the settings menu.
- Press the [], [] buttons on the DF or the , buttons on the remote control to select the On or Off in the menu and confirm your selection.
-
Press the [], [] buttons on the DF or the , buttons on the remote control to scroll between the previous/next element (hour, minute). um das nächste oder vorherige Element auszuwahlen (Stunde, Minute). Press the [], [] buttons on the DF or the , buttons on the remote control to enter the desired settings and set-up the timeplan.
-
Off: Deactivate automatic on/off.
Once: The DF will automatically turn on and/or off one time at the set time.
Daily: The DF will automatically turn on and/or off at the set time each day. -
To confirm your input, press the [▶] button on the back of the DF or the OK button on the remote control.
FAQs
Why is the actual capacity of a memory card less than specified on the packaging?
The storage capacity of a flash storage medium is specified according to capacity specifications for hard drives and is subject to the SI regulations (International System of Units). This system does not use the binary system, which converts 1024 MB into one GB. The SI standard uses the powers of 1000, where 1000 Megabyte make 1 Gigabyte. Due to this different way of calculation, capacity specification might be different.
Why does the DF not display some pictures of my memory card?
Some not so widespread storage mediums are not compatible with the DF. Please use a compatible card. Please bear in mind that this photo frame can only play photos with the file format "JPEG".
A memory card is inserted but the DF cannot read this card. What can I do?
At first please check if this card is actually compatible with Intenso's DIGITAL PHOTOFRAME.
Then, please check if the card is properly inserted into the card slot. Please bear in mind that only the file format "JPEG" is supported.
Please note: Some digital cameras do not save pictures by use of the standard format JPEG. In such a case please refer to the operating manual of your camera.
Why are some pictures loaded faster than others?
Pictures with a high resolution need longer times to be displayed. To increase the loading speed please use pictures with a lower resolution.
Please note: The photo frame supports a resolution of up to 8000*8000 pixels.
Why does the software not start although power supply is ensured and the power switch is in "On" position?
This might be a system error. Please reset the software by cutting off power supply for a few seconds.
Why is the main menu not displayed?
Please check if the DF is properly connected to the power outlet and the power switch is in "On" position.
Can I rotate pictures on the display?
Yes, please use the OSD menu.
Please note: With a new start the rotated picture will be displayed in normal mode again.
Can I adjust the colours of pictures?
No. All colours are set when the picture is being taken. However, you can adjust the brightness and the contrast of the display. However, you can adjust the brightness and the contrast of the display.
What is the ideal resolution to display pictures on the DF?
The ideal resolution for this DF is 432^*234 pixels.
Why do the functions: Automatic power-on / off not work although I have enabled them?
Please make sure your time settings are correct. If the set time is in the past, the function will be enabled on the next calendar day for the first time.
Please do not move the slider on the rear side of the DF into POWER OFF position. Only change the status of the DF into stand by.
PRODUCT SPECIFICATIONS
| Display | Analog TFT LCD Display size: 7 inch (168 mm visible screen size) Display modus: 16:10 Resolution: 432*234 pixels |
| Mains adapter | Input: 100~240V AC, 50/60Hz Output: 5V 1A DC |
| USB port | USB Host 2.0 Device Supports USB storage mediums |
| Memory cards supported | SD™ (Secure Digital Card), MMC™ (MultiMedia Card), MS™ (Memory Stick) |
| Picture size supported | JPEG, max. resolution:8000*8000 pixels |
| Storage temperature | -20°C ~ +60°C with humidity <95% |
| Operating temperature | -10°C ~ +45°C with humidity <80% |
| Dimensions | 219 x 151.6 x 29 mm |
| Weight | 381 gr |
| Accessory | Remote control (incl. battery), foot, mains adapter, multi-lingual operating instruction |
SERVICE AND MAINTENANCE
Service
- To avoid risks of electric shocks please do not remove screws or the housing.
Do not use the device in the vicinity of water. Do not expose the device to rain or moisture. Do not place any objects in the vicinity of the device that store water or any other liquids.
Do not install this picture frame in the vicinity of heating systems, ovens or other heat emitting devices.
Do not open the housing. Do not try to repair the device yourself. Leave any repairs to specialised personnel only. - Avoid using your device on sandy places.
- Please do properly connect the plug of the mains adaptor to the existing opening of the DF. Thus, you can avoid electro-static charge.
- Plug in all connections correctly and safely.
- Please do not touch the display. Do not expose the display to direct sunlight.
- The picture frame only plays compatible file formats.
Pictures might be protected by copyright law of third parties. Playing such pictures without licences might represent an infringement of such copyright laws. - Please do not touch the DF with metallic object during operation.
Please avoid operation on pillows, sofas or any other heat emitting home appliances since the device might overheat in such cases.
Please do not remove memory cards while the device is reading. Otherwise this might result in abnormal system ends or loss of data. - Please do not switch off the device with the slide show running.
- Please do not directly wrap the device after longer operating hours. Please make sure the device has cooled down properly. Otherwise the device might overheat.
- To guarantee better service this operating instruction is subject to alterations.
Device Maintenance
THE DEVICE MUST BE SWITCHED OFF.
NEVER SPRAY OR APPLY LIQUID SUBSTANCES DIRECTLY ONTO THE DISPLAY OR THE HOUSING.
Cleaning the display / housing / frame
Clean the housing, frame and LCD display carefully with a soft cloth which is free of lint and chemicals. Only use cleaning a gents which are suitable for cleaning LCD displays.
Disposal of WEEE (Waste Electrical and Electronic Equipment)

Devices marked with the WEEE logo are subject to the European Community Directive 2002/96/EC.
Waste Electrical and Electronic Equipment must be separated from household rubbish and disposed at sites that collect WEEE.
By orderly disposing WEEE you will avoid damage caused to the environment.
Istruzioni d'uso
Intenso 7" PHOTOAGENT
Summario
QUESTIONS FREQUEMENT POSEES 21
CHARACTERISTIQUES DU PRODUIT 24
SOIN ET ENTRETIEN 25
INTRODUCTION
QUESTIONS FREQUEMENT POSEES
CHARACTERISTIQUES DU PRODUIT
Las imagenes del soporte de memoria seleccionado se presentaran en miniatura. SeSEOSEOSEOSEOSEOSEOSEOSEOSEOSEOSEOSEOSEOSEOSEOSEOSEOSEOSEOSEOSEOSEOSEOSEOSEOSEOSEOSEOSEOSEOSEOSEOSEOSEOSEOSEOSEOSEOSEOSEOSEOSEOSEOSEOSEOSEOSEOSEOSEOSEOSEOSEOSEOSEOSEOSEOSEOSEOSEOSEOSEOSEOSEOSEOSEOSEOSEOSEOSEOSEOSEOSEOSEOSEOSEOSEOSEOSEOSEOSEOSEOSEOSEOSEOSEOSEOSEOSEOSEOSEOSEOSEOSEOSEOSEOSEOSEOSEOSEOSEO SEOEEOSE
CUIDADO E MANUTENCAO 25
CUIDADO 25
Configure as hours da MFD Intenso:
- Bubepa a mao hno hno nht hno HACTPOH M noTaepe TaBau bop kono ( 一 ) ha LPhn hnokn OK na dyctahonohn Oynpaanem. B pnoe moho nonactb npnnm nyam, kdoh Hony (SETUP) ha dactaunonoh om ypananehm.
2 406wOtKpTaOaHO MaHO HAcTe KHeMaTe HaKHeM [A] [V] HA LΦHMM HA NHTAM ▲ HA DaCTaHJHOHcYrpaTbHMM nOeTae Baa Su6o.
1 Bubepre a HnHn HnTpoek ty HnTpoiky, KtOpye Hn6xdo mno kmo. Bubepre Hn6xdo mne aetnnn Hn oqteeppe Taau auop.
4 1n 10000 HmHnHnHnHnHnHnHnHnHnHnHnHnHnHnHnHnHnHnHnHnHnHnHnHnHnHnHnHnHnHnHnHnHnHnHnHnHnHnHnHnHnHnHnHnHnHnHnHnHnHnH
Boxwoommoctnmaactpoison
Noe 3rno npoepe, npaaa Hn aactaaeha kpaarHed. He 3abwaiTe, YO noepmaetor tonho fopmat
6paTe 8HHHHe HnOTope uepoBae Kaepu coxpaHOT foTporpaHMe a ctaHapthom fOpMaTe JPEG.BaHOM Cnyae npoepebe.4TO HnHcHae a Hmctpynnn noBaaatner Kaepu.
Hoyemy HeKOTOpbIe fOToRpaPn rpy3rTa 6bICTpe dpyrux?
Дя photorpaфи CBbICOKO pa3dJIbHoi CNOC6HOCTbIO Heo6XODMO 60JIbIe BpemeH, NOKa OHN CMOTy 6bITb BBIEDeHbI Ha 3KpaH.Дя noBbIeHnA CKOpocTn npocMToPa nCnoJIb3yIte photorpaФnC bOJee Hn3Ko pa3dJIbHoi CNOC6HOCTbIO.
3aemeuHue:ΦomopamKa noddepxuaem pa3deneHyto cnocobnmb 8000*8000 nuKcenei.
Noemy He 3anyckaetc nporpamma, Korda 3neKtponntaHne nodaetc n perynTOp haoDHTc B no3nun "On"? Bo3mOxHo, Bo3Nkla cncTeMna own6ka. 3anyctnte nporpammy no HOBMy, npepBaB Ha neckoIbKO cekyHd 3neKtponntaHne.
Noemy Ha dncnnee He noBraetc rnaBHOe MeHIO?
PpOBepbTe, npaBnIbHo IIN pOKnIyHeHa LcK pOzEKe HaxoDITcI IN BkNIOuATEJIb B No3nIIN "On".
Moxho nperynnpoBaTb zBeta foTOrpaan?
He. Bce cBeToBbIe HAcTpoKn IpoBoaTcR BO BpeM ChrTa CHmKOB. Ho B npIbope MoXHO peryInpoBaT bApKocTb N KOHTpact dncnne.
Kakon pa3deneBHO cnoc6hoctbIO doJXHbI 6naadTb foTOrpaHn, YTObI n3OpaXeHne Ha dinCnnee 6blno ONTMaJIbHbIM?
Jyua pa3eIbna cnoochoctb 40 432*234 nKceJe.
Почему He pa6oTaIOT Функци: АВТOMATЧЕСКOE BKNIOчЕнe / АВТOMATЧЕСКOE BbIKIOчЕнe, HECMOTр Ha To, YTO OHn aKTHBИрОВаНы?
Y6eHntecb, YTO HAcTpoKa BpeMeHN npaBnIbHa. EcNl BpeMa HAcTpoKIN OTHocNTcR K npoJLOmy, daHna FyHKuRA B nepBbIe aKTNBnpyeTcra ToJIbKO Ha cNeDyUOsiK KanEHDapHbI deHb.
He cTabbTe BbIKJIouaTeIb Ha o6paTHoH CTOpOHe LΦ B nO3nUPO POWER OFF. NocTabbTe LΦ TOnIbKO B pexKIM OxNJaHnA.
OINCAHNEIPOIDKTA