IAN 277588 - Watch AURIOL - Free user manual and instructions
Find the device manual for free IAN 277588 AURIOL in PDF.
Download the instructions for your Watch in PDF format for free! Find your manual IAN 277588 - AURIOL and take your electronic device back in hand. On this page are published all the documents necessary for the use of your device. IAN 277588 by AURIOL.
USER MANUAL IAN 277588 AURIOL
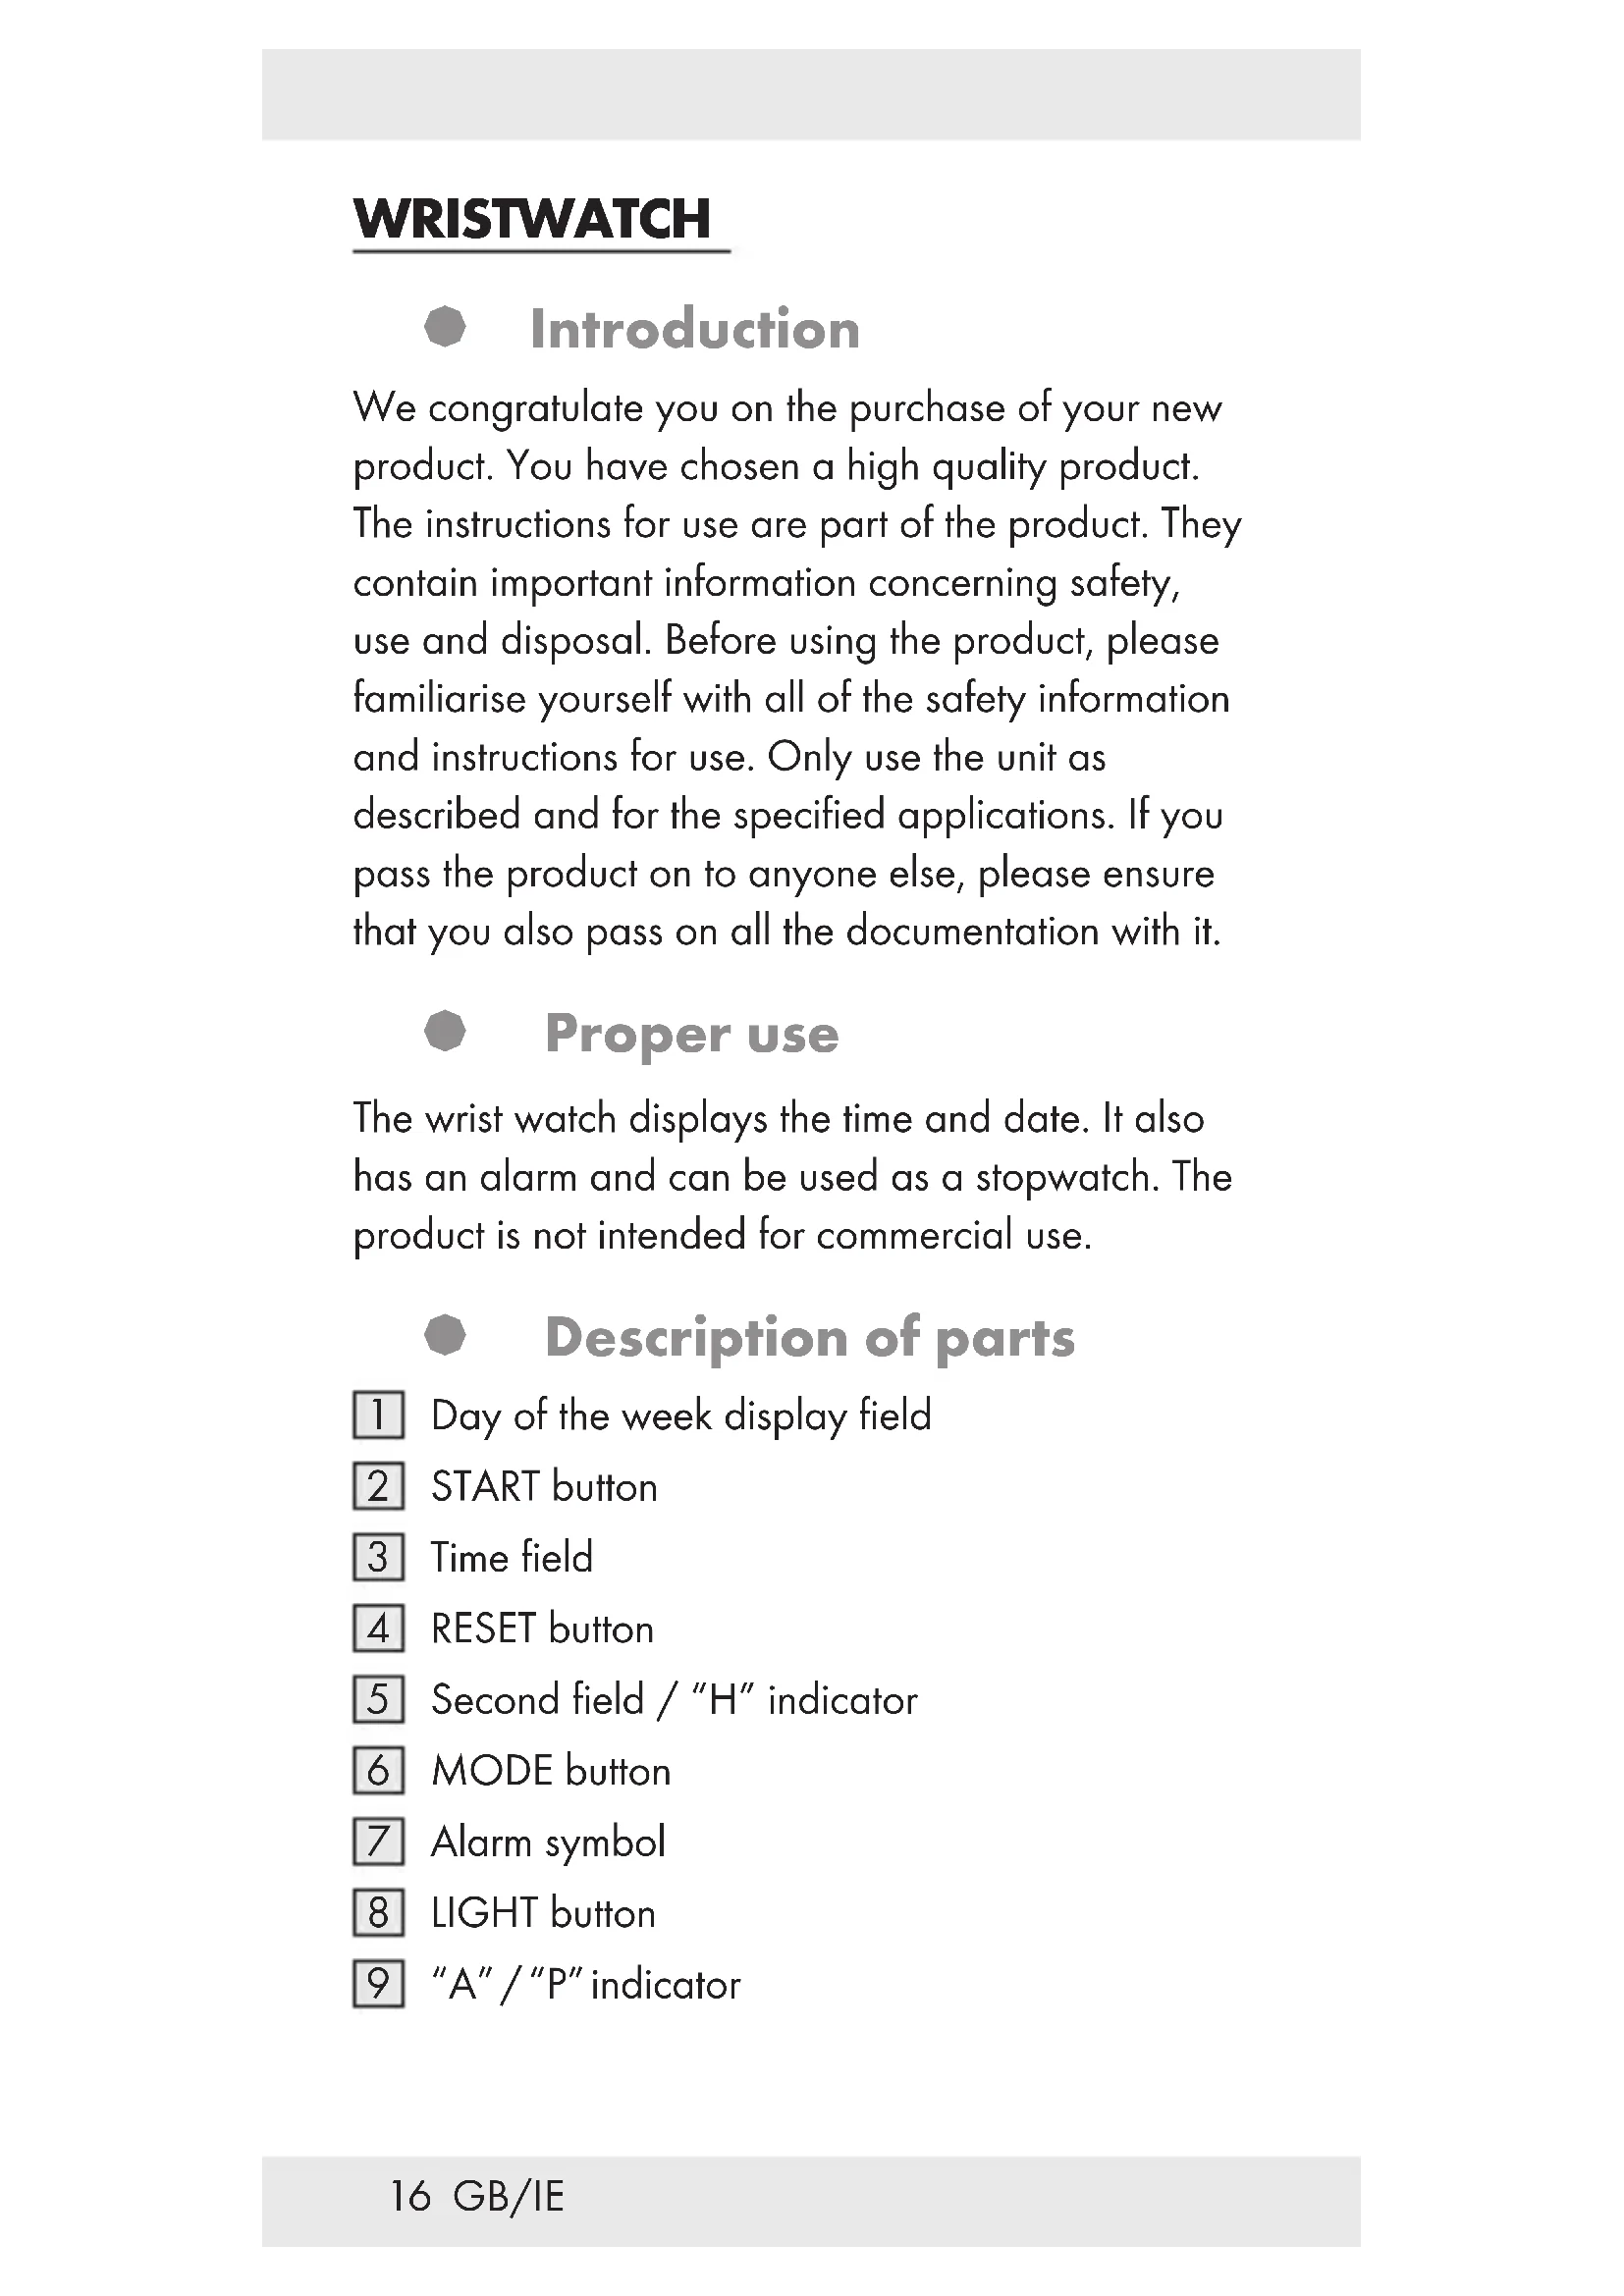
Day of the week display field
“A” / “P” indicator17 GB/IE General Safety Instructions
KEEP ALL THE SAFETY ADVICE AND
AND CHILDREN! Never leave children unattended with the packaging material. Packaging material can cause suffocation. WARNING! DANGER TO LIFE! Batteries can be swallowed, which can prove fatal. Consult a doctor immediately if anyone swallows a battery. Never take the product apart on any account. Improper repairs could cause considerable danger for the user. Only let qualified people carry out any repairs. Battery Safety Instructions
EXPLOSION! Never recharge the batteries.18 GB/IE Have a spent battery removed from the instrument immediately. There is an increased risk of leakage. Batteries must not be disposed of in household waste. Consumers are under a legal obligation to dispose of batteries in the proper way. Keep the battery out of the reach of children, do not dispose of the battery in fire, do not short-circuit it, and do not take it apart. Failure to observe these instructions may result in the battery discharging beyond its end voltage, which poses a risk of leakage. If the battery in your instrument has leaked, have it removed immediately to prevent damage to the instrument. Avoid contact with skin, eyes and mucous membrane. In the event of contact with battery acid, rinse the affected area with plenty of water and /or consult a doctor. § Water resistance This watch is water-resistant up to 3 bar in accordance with DIN 8310. Do not press any buttons if the watch comes into contact with water. 3 bar water resistant19 GB/IE § Replacing the battery Note: Have batteries changed in a specialist shop. Have any repairs or battery replacements carried out by a suitably experienced specialist in order to avoid damaging the insides of the watch. Dispose of used batteries in an environmentally compatible manner. Do not dispose of the watch with the household rubbish. § Operation Press the MODE button
to set the desired mode: Time mode > Stop watch > Alarm > Setting the time > Time mode. § Setting the time and date
three times. The second field
and the day of the week field
flash in the display.
to set the second field
to confirm your setting. The minute field flashes in the display.
to set the desired minute value.
to confirm your setting. The hour field flashes in the display.
to set the desired hour value.20 GB/IE Note: Pay attention to the symbols A, P
in the display when setting the hour value. A and P (A = a.m. / P = p.m.) are used for the 12-hour time format. H is used for the 24-hour format. Press the START button
to set the desired value and format. Press the RESET button
to confirm your setting.
to confirm your setting. The date field flashes in the display.
to set the desired date value.
to confirm your setting. The month field flashes in the display.
11. Repeat steps 8 and 9 to set the day of the week
field. The names of the days of the week are shortened as follows: MO = Monday TU = Tuesday WE = Wednesday TH = Thursday FR = Friday SA = Saturday SU = Sunday
to enter the default display.21 GB/IE § Lighting the display Press and keep pressed the LIGHT button
switch on the light. Release the LIGHT button
and the light will switch off after approx. 3 seconds. § Displaying the date Press the START button
while the watch is in time mode. The date appears on the display. Release the START button
to return to time mode. § Setting the alarm Press the MODE button
twice to enter the alarm mode. The hour field of the alarm time flashes in the display. Press the START button
to set the desired hour value. Press the RESET button
to confirm your setting. The minute field flashes in the display. Press the START button
to set the desired minute value. Press the RESET button
to confirm your setting. Press the MODE button
to enter the time mode.22 GB/IE § Switching the alarm on / off Switch the alarm on by pressing and keeping pressed the START button
and the RESET button
while in time mode. If the alarm is switched on, the alarm symbol
appears in the display. When the alarm sounds, you can activate the Snooze function by pressing the START button
. The alarm sounds again after 4 to 5 minutes. The alarm will keep on sounding as many times as you press the START button
to stop the alarm. The alarm will keep on sounding for approx. 1 minute if you don’t press any button. Press the RESET button
when the watch is in time mode to display the alarm time. If the watch is in time mode, press and keep pressed the RESET button
to switch off the alarm. The alarm symbol
disappears. § Activating / deactivating the acoustic signal Note: An acoustic signal will sound every hour on the hour. Press the MODE button
repeatedly until the time field
appears in the display. Press and keep pressed the RESET button
and while doing this, press the MODE button
. All the day of the week fields
appear. The audible signal function is activated.23 GB/IE Press and keep pressed the RESET button
and while doing this, press the MODE button
. All the day of the week fields
disappear. The audible signal function is deactivated. § Using the stopwatch Press the MODE button
repeatedly until the time field
appears in the display. Press the MODE button
once to enter the stopwatch mode. Press the START button
to start the stopwatch. Press the START button
again to stop the stopwatch. Press the RESET button
to set the stopwatch to 0. Measuring an intermediate time: Press the MODE button
repeatedly until the time field
appears in the display. Press the MODE button
once to enter the stopwatch mode. Press the START button
to start the stopwatch. Press the RESET button
to display the intermediate time. The stopwatch continues to run in the background. Press the RESET button
to return to the stopwatch time.24 GB/IE Press the START button
to stop the stopwatch. Press the RESET button
to set the stopwatch to 0. § Cleaning and care Clean the product with a dry, fluff-free cloth. A spectacles cloth is ideal. § Disposal The packaging is made entirely of recyclable materials, which you may dispose of at local recycling facilities. Contact your local refuse disposal authority for more details of how to dispose of your worn-out product. To help protect the environment, please dispose of the product properly when it has reached the end of its useful life and not in the household waste. Information on collection points and their opening hours can be obtained from your local authority. Faulty or used batteries must be recycled in accordance with Directive 2006 / 66 / EC and its amendments. Return the battery and / or the device through the appropriate collection facilities. Environmental damage through incorrect disposal of the batteries!25 GB/IE Batteries may not be disposed of with the usual domestic waste. They may contain toxic heavy metals and are subject to hazardous waste treatment rules and regulations. The chemical symbols for heavy metals are as follows: Cd = cadmium, Hg= mercury, Pb = lead. That is why you should dispose of used batteries at a local collection point. § Warranty The device has been manufactured to strict quality guidelines and meticulously examined before delivery. In the event of product defects you have legal rights against the retailer of this product. Your legal rights are not limited in any way by our warranty detailed below. The warranty for this device is 3 years from the date of purchase. Should this device show any fault in materials or manufacture within 3 years from the date of purchase, we will repair or replace it – at our choice – free of charge to you. The warranty period begins on the date of purchase. Please keep the original sales receipt in a safe location. This document is required as your proof of purchase. This warranty becomes void if the device has been damaged or improperly used or maintained.26 GB/IE The warranty applies to faults in material or manufacture. This warranty does not cover product parts subject to normal wear, thus possibly considered consumables (e.g. batteries) or for damage to fragile parts, e.g. switches, rechargeable batteries or glass parts. The warranty further excludes a reduction in water tightness. The state of water tightness is not a permanent property and should therefore be regularly maintained. Please note, opening and repairs performed by unauthorized individuals will void any warranty.27 FR/BE MONTRE Introduction Nous vous félicitons pour l’achat de votre nouveau produit. Vous avez opté pour un produit de grande qualité. Le mode d‘emploi fait partie intégrante de ce produit. Il contient des indications importantes pour la sécurité, l’utilisation et la mise au rebut. Veuillez lire consciencieusement toutes les indications d‘utilisation et de sécurité du produit. Ce produit doit uniquement être utilisé conformément aux instructions et dans les domaines d‘application spécifiés. Lors d‘une cession à tiers, veuillez également remettre tous les documents. Utilisation conforme La montre affiche l’heure et la date et dispose d’une fonction d’alarme et de chronomètre. Le produit n‘est pas destiné à l‘utilisation professionnelle. Descriptif des pièces