
REV 800 - Doorbells Plieger - Free user manual and instructions
Find the device manual for free REV 800 Plieger in PDF.
Frequently Asked Questions - REV 800 Plieger
User questions about REV 800 Plieger
0 question about this device. Answer the ones you know or ask your own.
Ask a new question about this device
Download the instructions for your Doorbells in PDF format for free! Find your manual REV 800 - Plieger and take your electronic device back in hand. On this page are published all the documents necessary for the use of your device. REV 800 by Plieger.
USER MANUAL REV 800 Plieger
natural_image
Abstract geometric pattern with intertwined curved lines and a small circular symbol at the top (no text or symbols)D GB F CZ DK E FIN H HR PL S SK SLO N LV NL P IS I TR RUS
MONTAGEANLEITUNG FUNK-GONG + WETTERSTATION INSTALLATION INSTUCTION RADIO CHIME + WHATHER STATION NOTICE D'UTILISATION CARILLON SANS FIL + STATION MÉTÉO NÁVOD K OBSLUZE BEZDR. GONGU + METEOROLOGICKÉ STANICE BRUGSANVISNING RADIOSTYRET GONGONG + VEJRSTATION INSTR. DE USO PARA GONG INALÁMBRICO + ESTACIÓN METEOROLÓGICA KÄYTTÖOHJEET: RADIOAALLOILLA TOIMIVA SOITTOKELLO + SÄÄASEMA RÁDIÓS GONG + METEOROLÓGIAI ÁLLOMÁS KEZELÉSI ÚTMUTATÁSA UPUTE ZA UPORABU BEŽIČNOG GONGA + VREMENSKA STANICA INSTRUKCJA OBSŁUGI STACJA POGODOWA + GONG BEZPRZEWODOWY BRUKSANVISNING TILL TRÅDLÖS DÖRRKLOCKA + VÄDERSTATION NÁVOD NA OBSLUHU BEZDR. GONGU + POVETERNOSTNEJ STANICE NAVODILA ZA UPORABO BREZZIČNEGA ZVONCA + VREMENSKE POSTAJE BRUKSANVISNING TRÅDL∅S RINGEKLOKKE + VÆRSTASJON RADIOGONGA UN LAIKA STACIJAS LIETOŠANAS INSTRUKCIJA BEDIENINGSHANDLEIDING RADIOGONG + WEERSTATION INSTR. DE OPERAÇÃO GONGO DE TRANS. DE RÁDIO + TRANS. DE TEMPO NOTKUNARLEIDBEININGAR PRÁDLAUS-GONG + VEĐURSTÖD ISTRUZIONI D'USO DEL GONG RADIO + STAZIONE METEREOLOGICA TELSIZ GONG + METEOROLOJI ISTASYONU KULLANÍM TALIMATÍ РУКОВОДСТВО ПО ЭКСПЛУАТАЦИИ РАДИОЗВОНКА + МЕТЕОСТАНЦИИ.
text_image
22:28 29:00 DEW IN 0.5 PICKIT DRY 20% SLOCK AL ARM CHANNEL MEMORY PRESSURE HEAT INDEX ZONE SEARCH DEW POINT
natural_image
Black electric guitar charger with attached cable and power plug (no visible text or symbols)
natural_image
White plastic water dispenser device with control panel and handle (no visible text or symbols)
text_image
RF WIRELESS 29.4% 20% REMOTE SENSORInhaltsverzeichnis
D MONTAGEANLEITUNG FUNK-GONG + WETTERSTATION 2 - 8
GB INSTALLATION INSTUCTION RADIO CHIME + WHATHER STATION 9 - 15
F NOTICE D'UTILISATION CARILLON SANS FIL + STATION MÉTÉO 16 - 22
CZ NÁVOD K OBSLUZE BEZDR. GONGU + METEOROLOGICKÉ STANICE 23 - 25
DK BRUGSANVISNING RADIOSTYRET GONGONG + VEJRSTATION 26 - 28
E INSTR. DE USO PARA GONG INALÁMBRICO + ESTACIÓN METEOROLÓGICA 29 - 31
FIN KÄYTTÖOHJEET: RADIOAALLOILLA TOIMIVA SOITTOKELLO + SÄÄASEMA 32-34
H RÁDIÓS GONG + METEOROLÓGIAI ÁLLOMÁS KEZELÉSI ÚTMUTATÁSA 35 - 37
HR UPUTE ZA UPORABU BEŽIČNOG GONGA + VREMENSKA STANICA 38 - 40
PL INSTRUKCJA OBSŁUGI STACJA POGODOWA + GONG BEZPRZEWODOWY 4 1 - 4 3
s BRUKSANVISNING TILL TRÅDLÖS DÖRRKLOCKA + VÄDERSTATION 4 4 - 4 6
SK NÁVOD NA OBSLUHU BEZDR. GONGU + POVETERNOSTNEJ STANICE 47 - 49
SLO NAVODILA ZA UPORABO BREZŽIČNEGA ZVONCA + VREMENSKE POSTAJE 50 - 52
N BRUKSANVISNING TRÅDL∅S RINGEKLOKKE + VÆRSTASJON 53-55
LV RADIOGONGA UN LAIKA STACIJAS LIETOŠANAS INSTRUKCIJA 56-58
NL BEDIENINGSHANDLEIDING RADIOGONG + WEERSTATION 59-61
P INSTR. DE OPERAÇÃO GONGO DE TRANS. DE RÁDIO + TRANS. DE TEMPO 62 - 64
IS NOTKUNARLEIDBEININGAR PRÁDLAUS-GONG + VEDURSTÖD 65 - 67
ISTRUZIONI D'USO DEL GONG RADIO + STAZIONE METEREOLOGICA 68 - 70
TR TELSIZ GONG + METEOROLOJI ISTASYONU KULLANIM TALIMATI 71-73
RUS РУКОВОДСТВО ПО ЭКСПЛУАТАЦИИ РАДИОЗВОНКА + МЕТЕОСТАНЦИИ. 74 - 76
Allgemein
text_image
Vollmond Neumondnatural_image
Simple black-and-white icon set showing a sun and clouds (no text or symbols)TEILWEISE BEWÖLKT

natural_image
Abstract black ink cloud shapes on white background (no text or symbols)BEWÖLKT

natural_image
Silhouette of a factory with smoke and bar chart elements (no text or symbols)REGNERISCH

natural_image
Two black silhouette icons depicting lightning, wind, and rain symbols (no text or labels)STÜRMISCH
Melodienauswahl
text_image
Diagram showing a device with labeled ports and a magnified view of a vertical panel with two numbered indicators.Positionen:

- We assume no liability for losses through incorrect application or non-observance of the safety instructions.
- The device must not be modified or rebuilt, otherwise not only the approval (CE), but also the guarantee expire.
- The manufacturer or supplier does not assume responsibility for incorrect indications or any effects or troubles caused by an incorrect indication.
- The device sensitively responds to electrostatic discharge. If there are any malfunctions, please reset the device.
- The device is no toy and should be kept away from children!
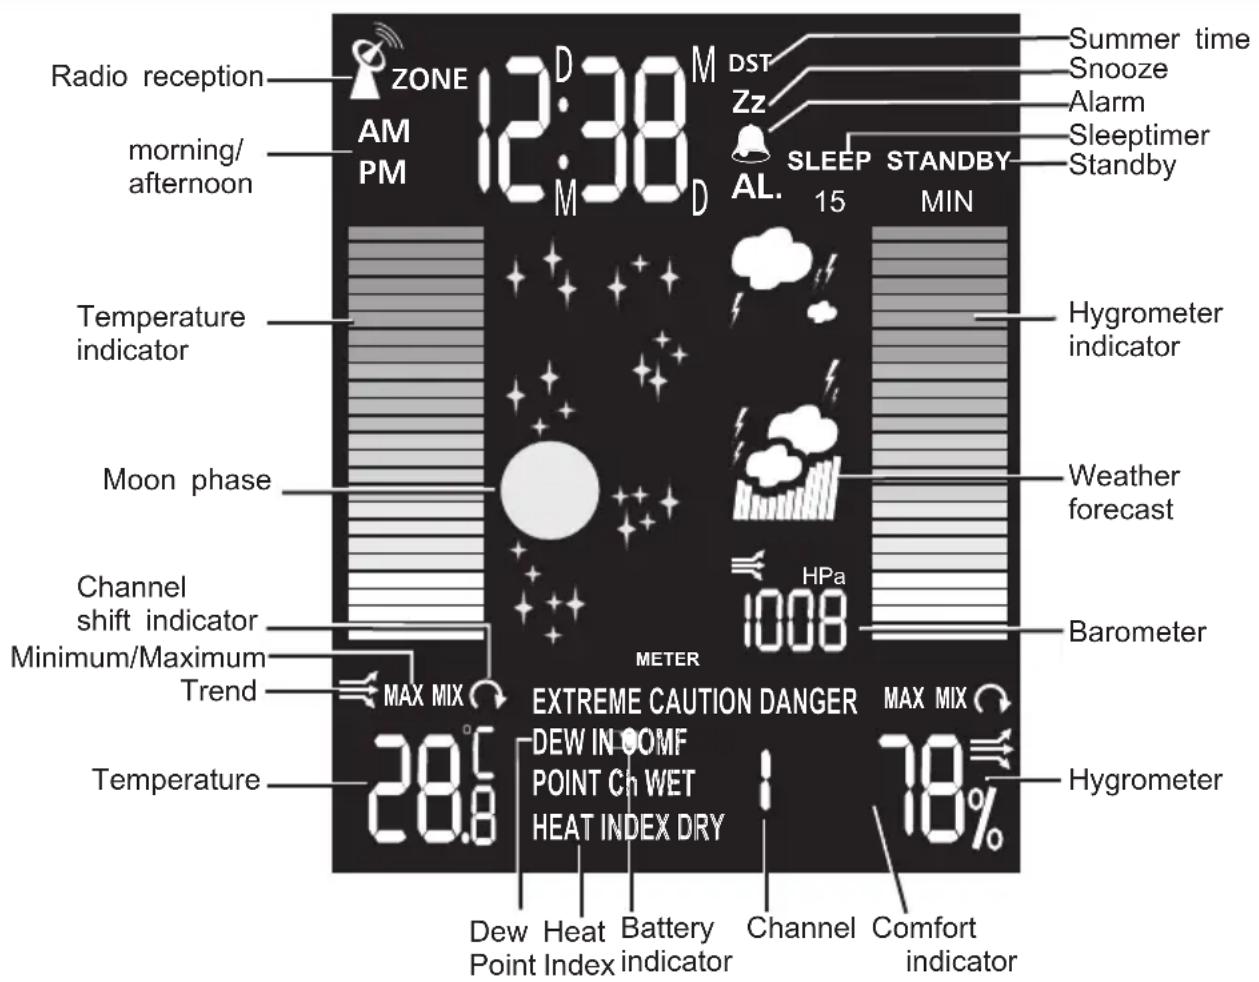
Explanation of display
text_image
Radio reception ZONE 12:38 M DST Zz AL. SLEEP STANDBY 15 MIN Summer time Snooze Alarm Sleeptimer Standby morning/ afternoon Temperature indicator Moon phase Channel shift indicator Minimum/Maximum Trend MAX MIX 28.6 METER EXTREME CAUTION DANGER MAX MIX DEW IN OOMF POINT CH WET HEAT INDEX DRY 78% Channel Comfort indicator Dew Heat Battery Channel Point Index indicatorInstallation
Home receiver unit:
Mains operation: Plug in the mains adapter (21) into the adapter socket at the backside (20) for basic operation and continuous backlight. Additionally insert 3 pieces of AA batteries to assure current supply during a power failure.
Battery operation: If a continuous backlight is not necessary you only have to insert 3 pieces of AA batteries. The backlight can be activated for about 15 seconds by pushing the button "Snooze/Light/Sound" (10).
Press the bell push button (15). On the receiver, the signal tone sounds. Select the loudness by using the volume control (17).
After the installation of the device the unit of the pressure is flashing. Select between the press units mb (millibar), inHg (inches of mercury) and hPA (hektopascal) with buttons 3 and 4 and choose with button "Pressure" (7). Now the spot height is flashing, which can be selected in the same manner. The more exact the spot height of the location, the more exact is also the weat forecast.
Remote sensor for thermo-hygrometer
- Loosen the screws on the battery door with a small screwdriver
- Insert 2 pieces of AAA batteries according to the indicated polarity
- Channel 1 is preselected. If more than one sensor is used you have to select channel 2 and for the 2nd and 3rd sensor.
- To connect to the main station press and hold the "CHANNEL/SEARCH"-button (5) on main until you hear a beep sound.
- Press the "TX"-button (B) for the registration of the outdoor sensor on the main station, so that the measured values will be shown on the main station after a successful transmission.
- Select degree unit Celsius (C) or Fahrenheit (F) by pushing the "C/F"-button (A).
- Close the battery compartment.
Automatic adjustment of time and date
Pushing the button 🎨” results in a synchronisation with the radio clock in Mainflingen (Germany In this process the antenna symbol flashes until a successful transmission and afterwards it is shown permanently. If a transmission is not possible, the process must be repeated on another place.
Note: The weather station should be synchronised apart from electrical devices, because they have a negative influence on the synchronisation.
If a synchronisation is also not possible after several attempts, the time and date can also be adjusted manually as described in the following. During the next synchronisation the manual adjusted values will be overwritten.
Manual adjustment of time and date
By pushing the "Clock"-button (1) for 3 seconds the display "24H" starts flashing. Now the desired settings can be selected with buttons 3 and 4 and confirmed by pushing "Clock" (1) again. The different settings are all adjusted in the same manner and have the following sequence:
24H/12H (format) hour minute year date (format) month day.
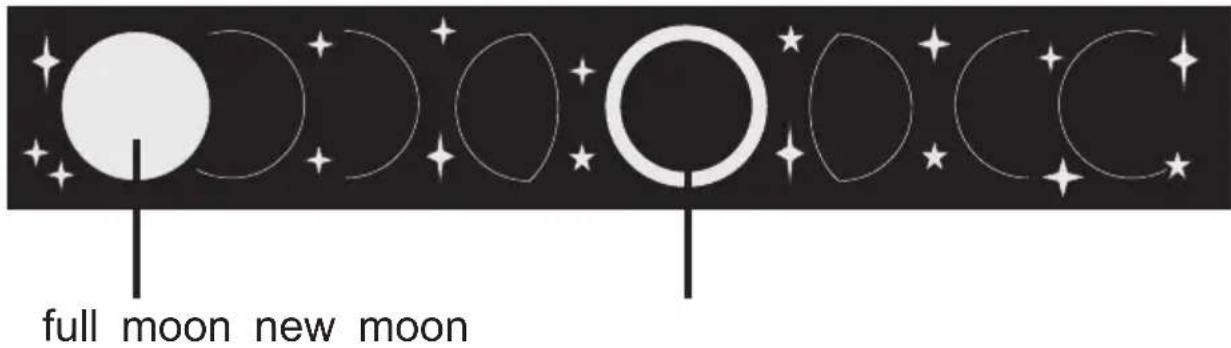
The weekday and moon phase indicator will be added automatically according to the entered date
Display for the phase of the moon
text_image
full moon new moonAdjustment of Alarm:
By pushing the button “Alarm” (2) for 3 seconds the hours of the time display “0:00” starts flash and the bell symbol 🔒 ” and “AL” appear on the display. Now the desired settings can be selected with buttons 3 and 4 and confirmed by pushing “Alarm” (2) again. The minutes can be selected the same manner. By confirming the setting for the minutes the normal mode (display of time) shown again.
Read and activate/deactivate the alarm
Read: Press button "Alarm" (2) in normal mode 1x
Activate: Press button "Alarm" (2) in normal mode 2x
Deactivate: Press button "Alarm" (2) in normal mode 3x
Back to normal mode Press button "Clock" (1) 1x
Alarm signal:
As alarm you can hear a beep sound every second for one minute and then a continuous tone one minute. If the button “Snooze/Light” (8) is pushed during that time the symbol “Zz” appears the display and the alarm signal is repeated after 10 minutes. Otherwise it is inactive until the day.
Adjustment of time zone:
To show the time of another place on the world (e.g. on holidays) the time zone can be adjust the following way:
- By pushing the button "Zone" (9) for 3 seconds, the display shows "Zone 0".
- Select desired time zone from +12 to -12 with buttons 3 and 4.
- Return to normal mode by pushing button "Zone" (9).
Note:
Push "Zone"-button (9) to switch from normal mode to time zone-display. It is shown on the display by the note "Zone" next to the time.
Display of minimum and maximum temperature and humidity
Maximum: Press button "MEMORY" (6) in normal mode 1x
Minimum: Press button "MEMORY" (6) in normal mode 2x
Back to normal mode: Press button "MEMORY" (6) in normal mode 3x
Delete: Press button "MEMORY" (6) for 3 seconds
Display for comfort zone
The comfort zone results from the temperature and the humidity and reflects the room climate.
| Display | Temperature range | Humidity range | Note for |
| COMF | 20°C til 25°C(60°F til 77°F) | 40% til 70% | Ideal ratio of temperature and humidity |
| WET | -5°C til +50°C(23°F til 122°F) | over 70% | Humidity too high |
| DRY | -5°C til +50°C(23°F bis 122°F) | under 40% | Environment too dry |
| No display | Less than 20°C(68°F) or more than 25°C (77°F) | 40% til 70% | Not applicable |
Display for temperature, humidity and trend
Shortly after the installation of the device the indoor temperature and humidity are shown as digital and bar display respectively. These values can be shown for each channel and for the location of the device by pushing the button “Channel/Search” (5). It is also possible to adjust a rotating display (change every 10 seconds) between the channels and the main station, which is indicated by the symbol “”.
The trend display shows a constant process at the beginning (horizontal arrow) and varies during a temperature change of more than 1^ C (and 2^ F respectively) per hour to a rising or falling air.
| Display |  |  |  |
| Temperature trend | rising | constant | falling |
| Humidity trend | rising | constant | falling |
Adjustment of temperature display (°C or °F)
Push button “C/F” (13) to toggle between the temperature display in °C and °F.
Snooze/Light/Sound
Alarm repetition: Push button „Snooze/Light“ (10) during an alarm.
Backlight: Push button „Snooze/Light“ (10) in normal mode, if the device is used with an adapter
Heat Index with indicator
The heat index is the actual windchill factor of the human body and results of the current air temperature and humidity. By pushing the buttons “Channel/Search” (5) and „Heat Index/Dew Point“ (8) it can be shown for each channel and for the location of the device. In the normal n also the following indicators are displayed:
CAUTION - Exercise more fatiguing than usual
EXTREME CAUTION - Heat cramps, exhaustion possible
DANGER - Heat exhaustion likely
EXTREME DANGER - Heat stroke imminent
Dew Point
The dew point is the saturation point of the air, or the temperature to which the air has to be cooled in order to get condensation. By pushing the buttons “Channel/Search” (5) and „Heat Index/Dew Point“ (8) twice, it can be shown for each channel and for the location of the device
Low battery indication
If the symbol 📄 "appears on the display of the main station or the outdoor sensor the batteries are low and must be changed.
Barometric pressure
These values can be adjusted with buttons 3 and 4 and the "Pressure"-button (7) as described under „Installation“.
During operation the unit of the pressure can be selected between mb, inHG and hPa by press the "Pressure"-button (7) for 3 seconds until the display "Meter" appears on the display and the spot height flashes. It can be changed with buttons 3 and 4 and confirmed with the "Pressure"-button (7).
Weather forecast
The unit predicts the weather condition of the next 12 24 hours based on the change of atmospheric pressure in the last 6 hours with an accuracy of about 70-75%. The coverage area around 30 km. The weather forecast center uses the following 5 symbols to display the weather condition of the coming 12-24 hours:

SUNNY

natural_image
Simple black-and-white icon set showing a sun and clouds (no text or symbols)PARTLY CLOUDY

CLOUDY

natural_image
Silhouette of industrial smokestacks emitting smoke (no text or symbols)RAINY

natural_image
Two black silhouette icons depicting lightning, wind, and rain symbols (no text or labels)STORMY
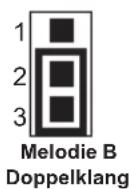
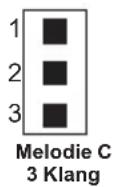
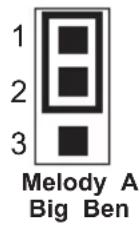
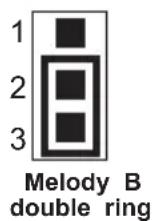
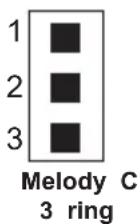
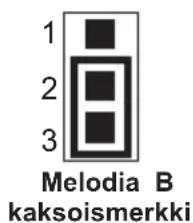
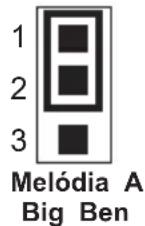
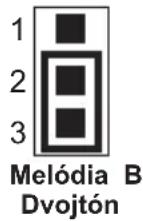
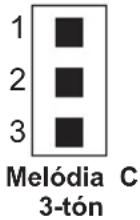
Choice of melodies
Turn the slide switch of the device to "HI/LOW", after the insertion of the batteries.
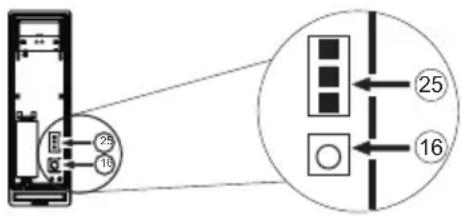
- Open the transmitter on the backside. Over the jumper (25) you can choose the desired melody. Totally there are three different melodies available.
- To adjust the different melodies, you have to put the jumper (25) in the three different positi Position 1-2 (Big Ben), Pos. 2-3 (two-tone) or don't plug in the jumper (three-tone).
text_image
25 16 25 16Positions:
Change of code in the case of interferences:
If there are interferences with other radio-units or the chime is disturbed by other devices, the transmitter-code must be changed:
A: Adjust a new sender-code on the sender:
- Push the button (16) until the LED lights.
- Push the button (16) once again within 5 seconds. The LED blinks.
- Now a new code is created.
B: Inherit a new code on the receiver
- Carry out sequence A.
- Push button (23) on the receiver, to start the learning process.
- Push the push-button (15) on the transmitter within 7 seconds. The LED (24) on the transmitter lights during the hitting.
Note
The weather forecast works not correct within the first 12-24 hours after installation, because the data for interpretation is not available yet.
Reset
Push „Reset“-button (14) with an acuate object to delete all values.
Technical data
Main station:
Temperature range: 0°C to +50°C (+32°F til +122°F)
Temperature resolution: 0,1°C (or 0,2°F)
Temperature tolerance: 0°C to 40°C: +/- 1°C
40^ to 50^ : +/- 1,5^
Metering range of air humidity: 20 % to 90 %
Hygrometer tolerance (at 25°C): 40 % to 80 %: +/- 5 %
30% to 40%: + / - 8%
80% to 90% : + / - 8%
20 % to 90 % and > 90 %: no accurate measurements
Resolution of air humidity: 1 %
Measuring cycle: 30 sec.
Energy demand: 6V adaptor and 3 x 1,5V AA LR6 alkaline batteries if applicable
Time: DCF 77, Crystal operation during malfunction of radio signal
Outdoor sensor:
Temperature range: -20°C to +60°C
Temperature tolerance: -20^ to 0^ : +/- 1,5^
50^ C to 60^ C: +/- 2^ C
Metering range of air humidity: 20 % 90 %
Energy demand: 2 x 1,5V AAA LR03 alkaline batteries
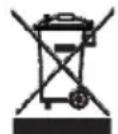
WEEE-reference of disposal
In accordance with European defaults used electrical and electronics devices may no more be given to the unsorted waste. The symbol of the waste bin on wheels refers to the necessity of separate collection.
Please help with environmental protection and see to it that this device is given
to the for this purpose designated systems of waste sorting if you do not use it any longer.
GUIDELINE 2002/96/EG of the EUROPEAN PARLIAMENT AND the COUNCIL of January 27th
2003 about electrical and electronics old devices.
DE 72368453
Declaration of Conformity
REV Ritter GmbH hereby declares that the 800 model is in accordance with the underlying requirements and other relevant provisions of Directive 1999/EC. For the complete CE Declaration of Conformity please refer to www.rev.biz under the article in question.
This product is a Radio Gong and should only be used as this.

434 MHz
Warranty
During manufacturing this REV product is passed through several quality testing stations which are set up with newest technology. Should nevertheless a defect arise, REV offers a warranty to the following extent:
- The duration of the warranty is 24 months after the date of purchase.
- The unit is either repaired or replaced by REV free of charge or if it can be shown that it has become unusable during the warranty period due to a manufacturing or material Defect.
- The liability does not cover transport damages or damaged incurred through defective installation.
- If REV repudiates the warranty claim and no objection is made within 6 months, the right to repair becomes time-barred.
- In a warranty case the unit must be sent to the dealer or REV together with the sales slip and a short description of the defect.
- If there is no proof for a warranty liability being in place, any repair carried out will be Invoiced.

Allgemein
text_image
Diagram showing a device with labeled ports and an inset diagram illustrating internal components with numbered annotations.
text_image
Diagram showing a device with labeled ports and an inset diagram illustrating a layout or connection between two numbered compartments.text_image
Diagram showing a device with labeled ports and an inset diagram illustrating a layout or connection between two numbered boxes.Polohy:
Zmena kódu pri poruchách:
text_image
Diagram showing a device with labeled pins and an inset diagram illustrating a layout or connection between two boxes.Display area comfort
text_image
Diagram showing a device with numbered components and an inset view of a control panel with labeled arrows.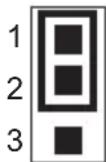
Melodi A
Big Ben