
Cafe Roma Plus (329 - Coffee machine ARIETE - Free user manual and instructions
Find the device manual for free Cafe Roma Plus (329 ARIETE in PDF.
| Product type | Espresso and cappuccino coffee machine |
| Brand | Ariete |
| Model | Cafe Roma Plus (329) |
| Power supply | 220-240 V ~ 50/60 Hz |
| Power consumption | 1100 W (estimated according to CE standards) |
| Water tank capacity | 1.5 L (Max level) |
| Bean container capacity | 230 g max |
| Preparation system | Thermocream® (constant crema), Maxi Cappuccino, self-priming |
| Functions | Coffee (ground or beans), cappuccino, hot milk, tea and infusions (hot water) |
| Grind type | Integrated coffee grinder with grind adjustment (12-14 positions) |
| Dispensing devices | Continuous flow (instant grinding) and Dispenser/Doser |
| Portafilter | Professional portafilter with Thermocream® filter, silicone perforated disc and Thermocream® disc |
| Safety | Child protection (>8 years), overheat shutdown, portafilter lock, burn warnings |
| Maintenance and cleaning | Regular cleaning of filters, portafilter, Maxi Cappuccino; descaling with NOCAL (citric acid) every 3 months |
| Included accessories | Portafilter, Thermocream® filters (U, V, W), doser, tamper, water drip tray, cup rack |
| Repairability | Spare parts available from Ariete authorized service centers |
| General information | Manufacturer's warranty, complies with directives 2006/95/EC and 2004/108/EC |
Frequently Asked Questions - Cafe Roma Plus (329 ARIETE
User questions about Cafe Roma Plus (329 ARIETE
0 question about this device. Answer the ones you know or ask your own.
Ask a new question about this device
Download the instructions for your Coffee machine in PDF format for free! Find your manual Cafe Roma Plus (329 - ARIETE and take your electronic device back in hand. On this page are published all the documents necessary for the use of your device. Cafe Roma Plus (329 by ARIETE.
USER MANUAL Cafe Roma Plus (329 ARIETE
WITH REGARD TO THIS MANUAL
Even if the appliances are made in conformity with the European regulatory specifications in force and therefore all potentially hazardous parts are protected. Carefully read these warnings and use the appliance only for the use it is designed for in order to prevent accidents and damage. Keep this manual close by for future consultation. If you should decide to give this appliance to other people, remember to also include these instructions.
The information provided in this manual is marked with the following symbols indicating:

Danger for children

Danger due to electricity

Danger of damage originating from other causes

Warning of burns

Warning - material damage
INTENDED USE
You may use your Café Roma Deluxe to prepare coffee and cappuccino, and thanks to the possibility of dispensing hot water, you can also prepare tea and tisanes.
This appliance must not be used for commercial or industrial purposes.
This appliance is designed solely for household and similar uses such as:
- in cooking areas used by personnel of shops, offices and other professional environments;
on farms; - guests of hotels, motels and other residential environments;
- bed and breakfast type of environments
No other use of the machine is contemplated by the manufacturer, which is exempt from any liability for all types of damages caused by improper use of the machine. Improper use also results in any form of warranty being forfeited.
RESIDUAL RISKS
The construction characteristics of the appliance this publication refers to do not allow the user to be protected from a direct jet of steam or hot water.

Warning!
Danger of burns - When dispensing hot water and steam, do not direct the jets towards others or yourself. Hold only the plastic part of the tube.

Use only containers made of material "for foods".
IMPORTANT SAFEGUARDS
READ THE INSTRUCTIONS CAREFULLY BEFORE USE.
- This appliance is designed only for private use, and is therefore to be considered unsuitable for commercial or industrial purposes.
- We decline any responsibility resulting from misuse or any use other than those covered in this booklet.
We suggest you keep the original box, as our free-of-charge service does not cover transportation damage due to inadequate packaging of the product when sent to an Authorised Service Centre. - This product complies with the 2006/95/EC Directive and EMC Directive 2004/108/EC.
- The maximum operating noise level for this appliance is 86 dB(A).

Danger for children
- This appliance can be used by children aged from 8 years and above and persons with reduced physical, sensory or mental capabilities or lack of experience and knowledge if they have been given supervision or instruction concerning use of the appliance in a safe way and understand the hazards involved.
Children shall not play with the appliance.
- Cleaning and user maintenance shall not be made by children without supervision.
- Do not leave the packing components near children because they are potentially dangerous.
- In the event that this appliance is to be disposed of, it is recommended that the power chord be cut. It is also recommended that all potentially dangerous components are rendered harmless to prevent children from hurting themselves when playing with the apparatus.
Danger due to electricity
-
Do not leave the power cord within the reach of children under the age of 8 years.
-
Before connecting the appliance to the power supply, make sure that the voltage indicated on the plate on the bottom of the machine corresponds to the local mains voltage.
- The use of extension leads, which have not been authorised by the appliance manufacturer, may cause damage and accidents.
- Before filling the tank with water, remember to always disconnect the appliance at the socket.
- If the electric cable is damaged it must be replaced by the manufacturer or its Technical Assistance Service, or in any case by a person with similar qualifications.
- Never let the live parts come into contact with water: this may cause a short circuit!
- Unplug before any cleaning or maintenance operations.
-
Do not immerse the appliance in water or other liquids.
-
The plug must be removed from the socket-outlet before the boiler is filled with water.
Danger of damage originating from other causes
- Do not lift the appliance from the water tank; instead use the cavities found at the base of the machine.
- Choose a sufficiently well lit and clean environment, with an easily accessible electric socket.
- Avoid putting excessive quantities of water into the tank.
- Never leave the appliance unattended when it is connected to the power supply.
- When placing the iron on its stand, ensure that the surface on which the stand is placed is stable.
- The appliance is not to be used if it has been dropped, if there are visible sign of damage or if it is leaking. Do not use the appliance if the power cord or the plug are damaged, or if the appliance is faulty. To prevent any accident, all repairs, including the replacement of the power cord, must be carried out by an Authorised Service Centre or, in any case, by qualified personnel.
- Do not use the appliance if the power cord appears to be damaged, with parts showing burns, etc...; an authorised Ariete service centre must repair and replace the power cable, under penalty of the warranty being forfeited.

Warning of burns
- Never direct the steam or hot water jet towards parts of the body; handle the steam/hot water spout with care: risk of scalding!
- The appliance's external metallic parts and the filter holder must not be touched when the machine is functioning as it could cause burns.
- If water does not come out of the filter holder, it may be because the Thermocream® filter is clogged. Stop the brewing and wait ten seconds. Remove and disconnect the filter holder because any remaining pressure could cause splashes or squirts. Then clean as explained in the relevant paragraph.

Warning - material damage
- Place the machine on a stable surface where it cannot be knocked over.
- Never use the machine without water because the pump will burn out.
- Never fill the water tank with hot or boiling water.
- Do not place the machine on very hot surfaces or near open flames in order to prevent damage to the body.
- The cable must not touch any hot parts of the machine.
- Do not use sparkling water (with added carbon dioxide).
- Never put substances other than ground coffee into the filter holder. They could cause serious damage to the appliance.
- Do not leave the machine at a room temperature below 0^ because the water remaining in the boiler could freeze and cause damage.
- Never use the appliance outdoors.
- Do not expose the appliance to atmospheric agents (rain, sun...).
- Before cleaning the appliance always unplug it and allow it cool down. Clean only with a non-abrasive cloth that has been slightly dampened with water, adding a few drops of mild, non-aggressive detergent (never use solvents that damage plastic).
- Do not adjust the coffee grinder when it is functioning. Never introduce ground coffee in the coffee grinder, only coffee beans must be used.
KEEP THESE INSTRUCTIONS IN A SAFE PLACE
ARIETE coffee makers are for those who know how to enjoy the pleasures of life, beginning with a good cup of coffee. The innovative Thermocream® device gives you hot and rich coffee shop espresso, right at home. In fact, Thermocream® is designed with a filter that ensures coffee brewing at constant pressure. In this manner it is possible to enjoy very creamy coffee with an intense aroma and full-bodied flavour, without the necessity of pressing energetically, and by using whatever type of blend as long as it is not too fine. Ariete coffee makers also satisfy cappuccino lovers as they have a Maxi Cappuccino attachment that allows you to obtain, in a few seconds, a rich and dense froth in less than ten seconds. Furthermore, the coffee is ready instantly with Ariete makers as they have an auto-priming system which allows a cup of coffee to be made immediately, even if the maker has not been used for a long time or after filling the water tank.
Enjoy your coffee with Café Roma Ariete!
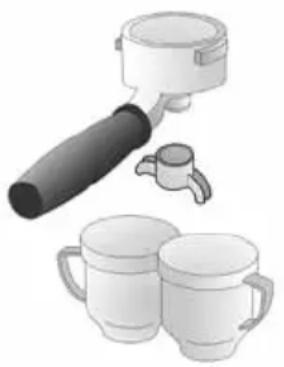
DESCRIPTION OF COMPONENTS
A - Machine body
B - Lock button of the coffee grinding regulator
C - Tank cover
D - Coffee beans tank, grinding regulator
E - Dispenser cover
F - Water/steam lever
G - Accessories box
H - Water tank (capacity 1,5 lt MAX level)
I - Tank filler flap
L - Control panel
M - Continuous flow device of ground coffee
N - Dispenser with ground coffee measure
O - Maxi Cappuccino attachment and stylus for water and steam supply
P - Press
Q - Water collection tray
R - Water collection tray
S - Cup grille
T - Professional filter holder
U-Thermocream® Filter
V - Perforated silicone disc
W - Thermocream® Disc
Control description
1 On/off light
2 Coffee temperature light
3 Steam temperature light
4 Dispenser filler light
5 On/Off button
6 Coffee brewing button
7 Steam button
8 Dispenser filler device button
Identification data
The following machine identification data are shown on the plate found underneath the machine's standing base:
- manufacturer and CE mark
- model (Mod.)
- serial number (SN)
- electrical supply voltage (V) and frequency (Hz)
- absorbed electric power (W)
- assistance toll-free number
Always give the model and serial number to the Authorised Service Centres when requesting assistance.
PRELIMINARY PHASES FOR USE
Starting the appliance
Check that the voltage of the domestic network is the same as that indicated on the technical information plate of the appliance. Place the appliance on a flat surface.
Remove the water tank (H) from the opening on the machine (Fig. 3), fill with fresh natural water up to the Max mark (1.5 lt), and refit it into its housing onto the body. In order to guarantee the correct operation of the appliance, push the tank down as far as it will go. The tank may also be filled from the top, by pouring water through the opening and after lifting the filler cap (I), Fig. 4. Plug the appliance into the mains.
Starting the first time
Press the main switch (5) Fig. 2; the power light (1) will light up and light (2) will start blinking until the operating temperature has been reached. Put a cup underneath the Maxi Cappuccino device and lower the water/steam lever (Fig. 5 - F), and, at the same time, press the coffee brewing button (6) thus bleeding any air or water out of the circuit. Fill up at least a cupful of water. Lift the water/steam lever (F) back up and stop the brewing cycle by pressing the coffee button (6).
It is recommended that this operation be carried out every time the machine is started after a few days it has not been used.
For the daily refilling of the water tank, lift the filler flap (l) and pour in fresh natural water through the opening (Fig. 4). Introduce the coffee into the coffee beans tank (D) Max 230 gr (Fig. 7).
Coffee may be ground coarse or fine, as per your personal preferences. To change the grinding level, press the stop button (B) and turn the coffee grinder clock or anticlockwise, following the graded scale, Fig. 8.
This operation must only be performed with the grinder off.
Boiler heating and the dispensing function are cut out while the coffee grinder is operating
Choice of the ground coffee supply device
The appliance is provided with two interchangeable devices:
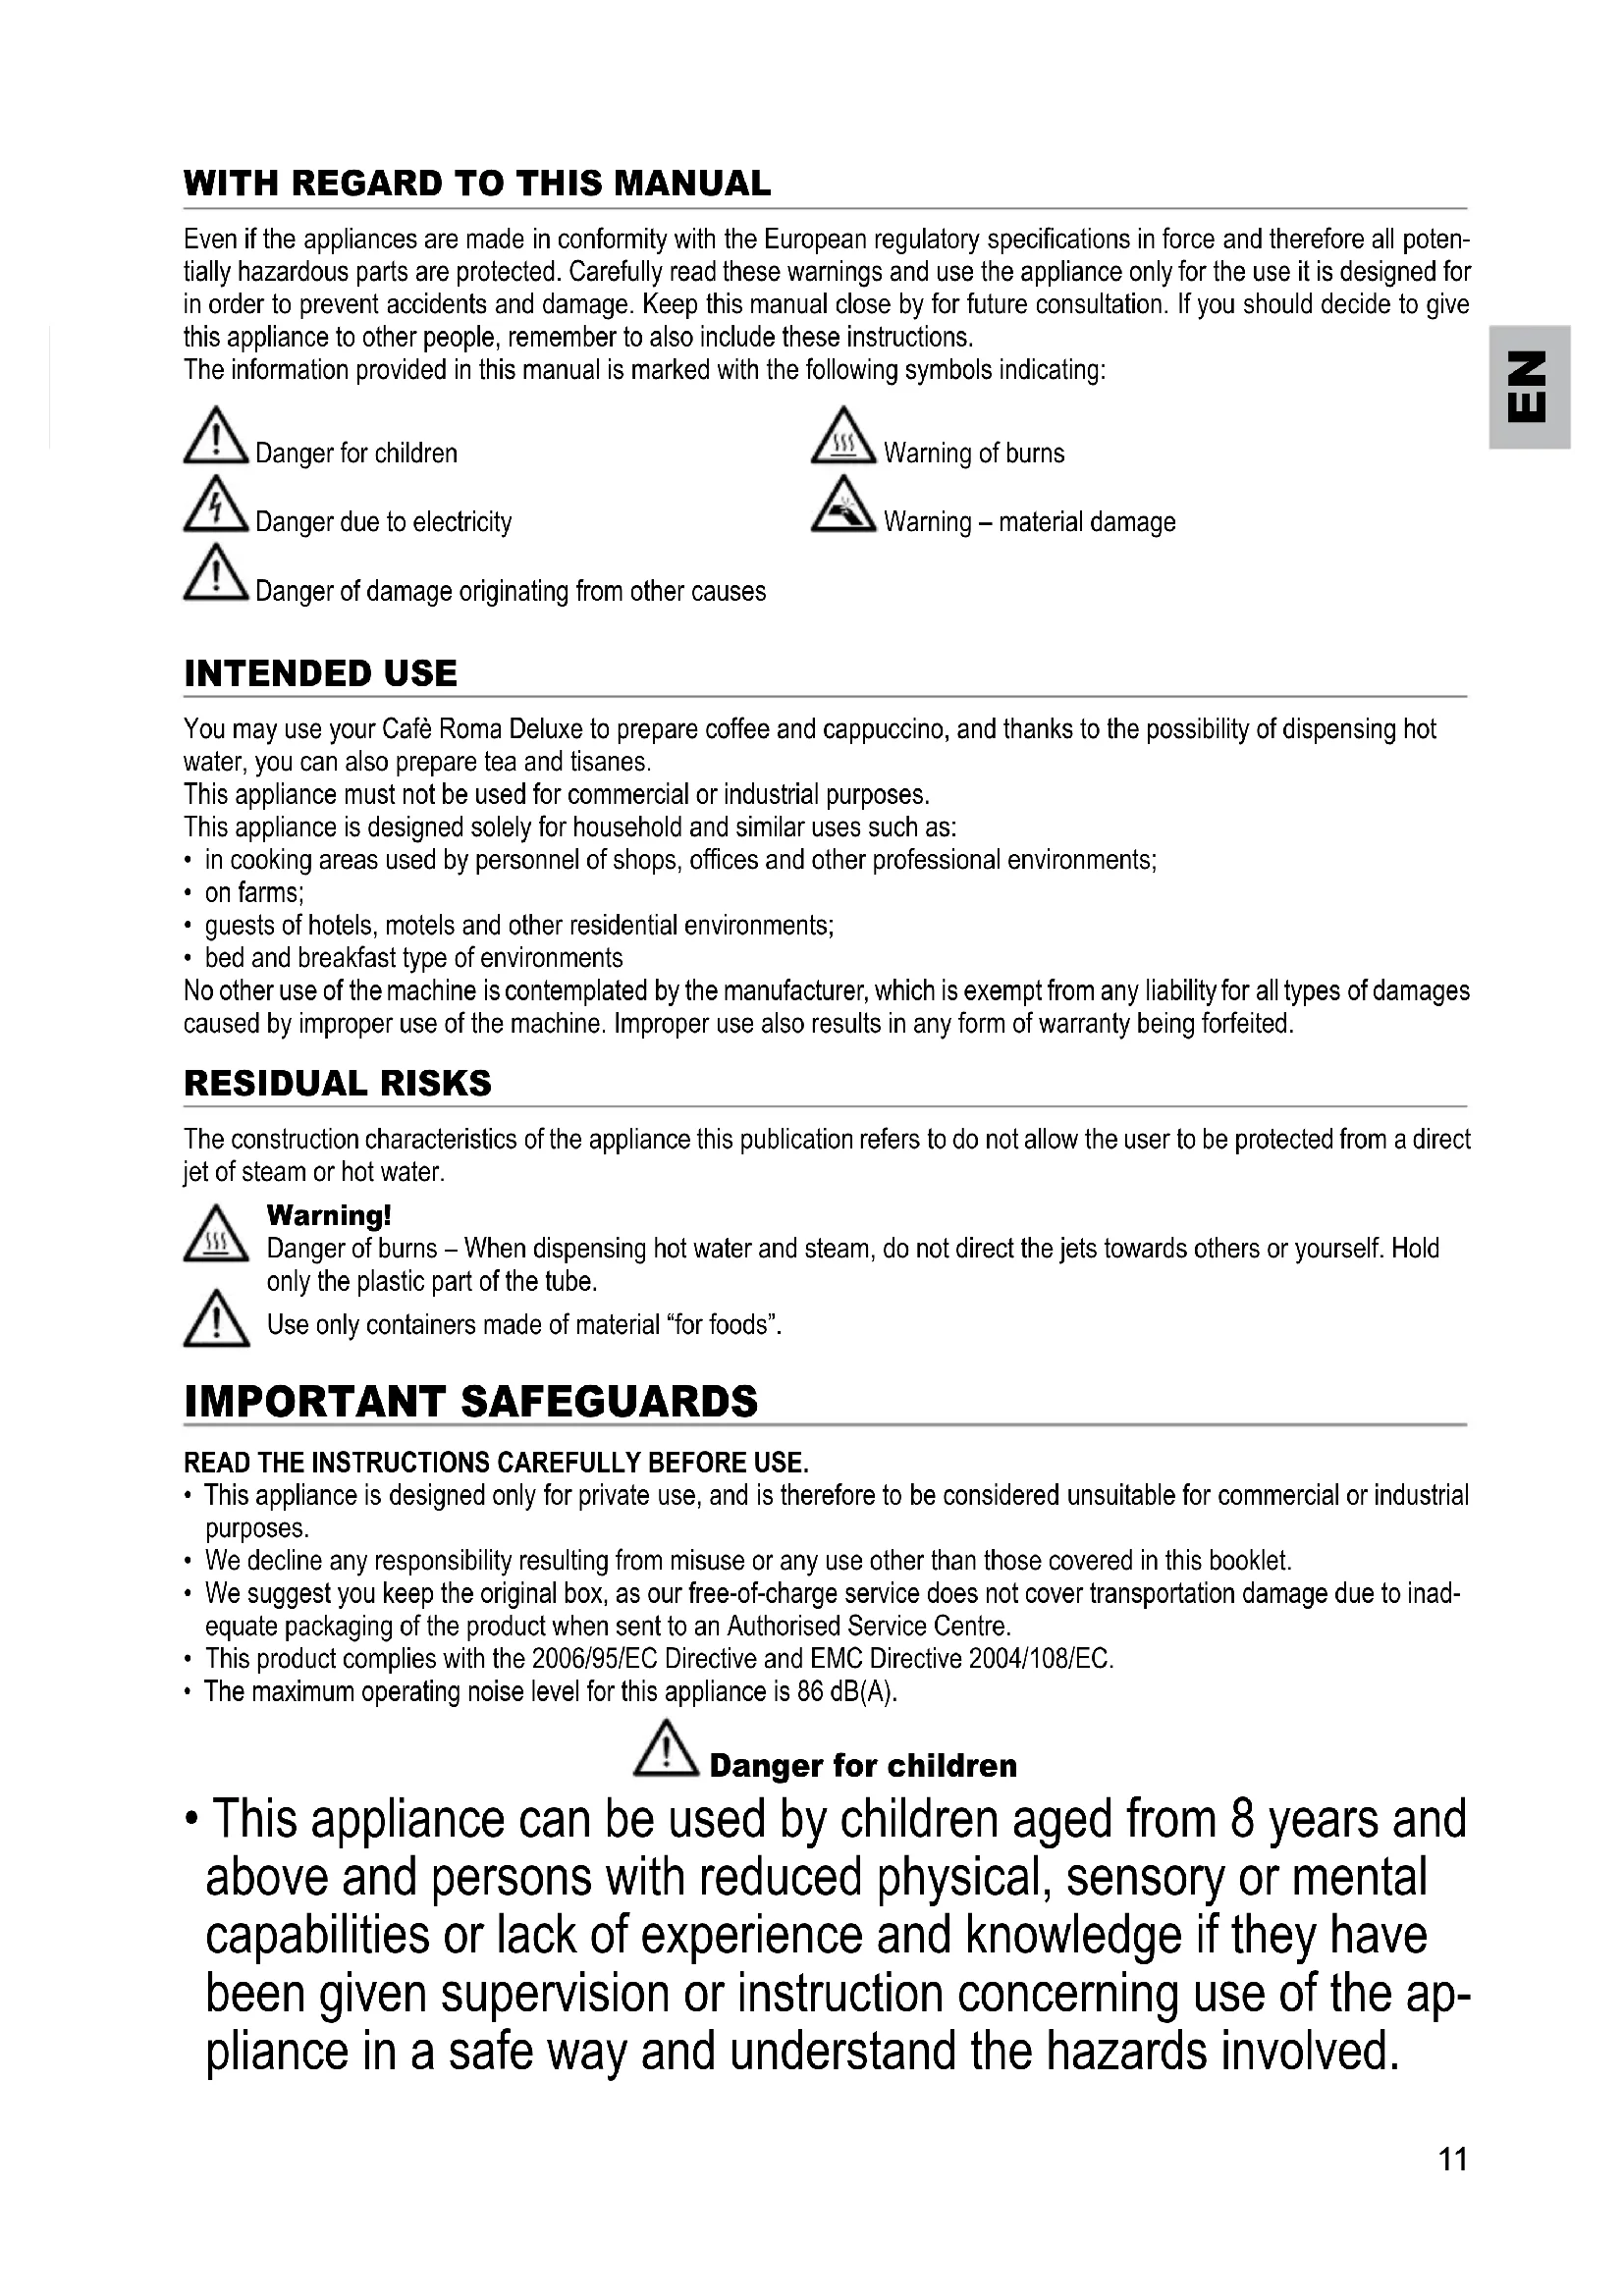
1) "Continuous flow" device (M) Fig. 1 for the coffee instantaneous grinding. Put the filter holder into the specially provided fork so as to press the button (M/a) located underneath the ground coffee opening, Fig. 9.
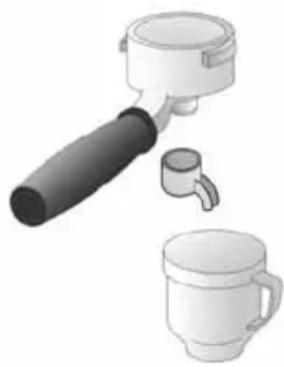
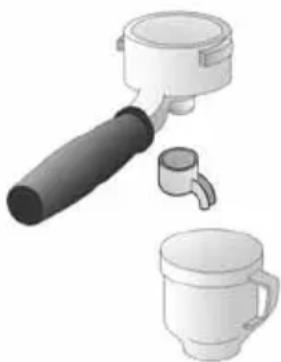
2) "Dispenser/Measuring Device" (N) Fig. 10. Keep the switch (8) Fig. 2 pressed until the ground coffee Dispenser is full: operate the Measuring Device lever once or twice, according to how many cups of coffee you wish to prepare, and keep the filter ring inserted into the fork. To release, pull the devices (M) or (N) in your direction.
If the coffee grinder jams, the dispenser filling indicator lamp (4) starts to blink. The reason might be that there are impurities mixed with the coffee beans.
To unblock the coffee grinder, press the dispenser filling button (8) so that the blinking indicator lamp turns off. Press the
button (8) again to restart the coffee grinder. If it does not restart and is still jammed with the indicator lamp (4) blinking, press the button (8) to turn off the coffee grinder. Press the release button (B) and repeatedly turn the coffee grinder right and left. Try to restart the coffee grinder again.
To make unblocking easier, position the coffee grinder on the coarsest grinding (positions 12-14). If the operation is not successful after several attempts, contact the closest Authorised Service Centre.
HOW TO MAKE COFFEE
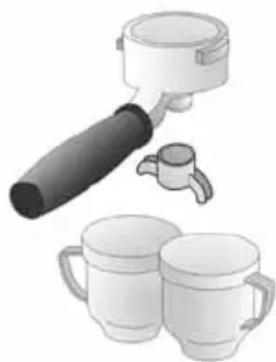
Check the water level in the tank (H). Make sure that the water tank is correctly placed into its position. Put the Thermocream® Disc (W), the perforated silicone disc (V) and the Thermocream® Filter (U) into the filter holder in the order indicated (Fig. 11).
Measure the coffee in the filter ring (Fig. 9) with the supply device that you have chosen and slightly press it (Fig. 12). Insert the filter holder into its seat

Warning!
Tighten the filter holder firmly by ensuring it is securely fitted against the flange (Fig. 13).
If too much ground coffee is put inside the filter, turning the filter holder may prove difficult and/or you may get leaks from the filter holder when the coffee is being dispensed.
Check that the steam function button has not been unintentionally pressed.
It is advisable to let the filter holder heat up a few minutes in its seat before making a cup of coffee so that the first cup is piping hot, too. This will not be necessary for the cups of coffee that follow
The appliance will be ready for use, as soon as light (2) Fig. 2 stops blinking and stays lit.
Then press the switch for the outflow of the coffee (6). Press it again (6) to stop the coffee outflow. The maximum dose for one coffee is 50ml .

Warning!
As with professional coffee machines, do not remove the filter ring when the supply switch (6) is turned on: danger of burns!

Warning!
Wait about ten seconds after the coffee has been dispensed before removing the filter holder. To remove it, turn it slowly from right to left so as to prevent splashes or spurts of water or coffee.
When the machine is in stand-by, the lamp (2) will turn on and off periodically. This shows that the boiler thermostat is tripping, which serves to keep the water temperature optimum.
If small puffs of steam come out of the filter holder coupling seat, this phenomenon is to be considered absolutely normal.
The ARIETE Thermocream® system was specially designed to best meet all of the consumer's needs, and is made up of two components: the Thermocream® filter (U), and the Thermocream® disc (W) with the perforated silicone disc (V). Cleaning the three components often, will help guaranteeing its preservation in time.
HOW TO MAKE A CAPPUCCINO
Before using Maxi Cappuccino, make sure you detached the filter holder from its housing.
To brew a cappuccino, or a hot chocolate, or to simply heat up any drink, press the steam button (7), Fig. 2. Light (2) will go off and light (3), on the steam button, will start blinking; as soon as light (3) stops blinking and stays lit, the appliance is ready to produce steam.
When warming up, your appliance may release small puffs of steam from the filter holder; this is perfectly normal.
Lower the water/steam lever (F), Fig.5, after placing a glass underneath the Maxi Cappuccino stylus (O), Fig. 15. A small amount of water from the nozzle will be immediately followed by strong jet of steam. Stop the steam delivery by lifting the lever (F) back up, position a jug containing whipping milk underneath the stylus, reopen the steam flux by slowly lowering the lever and immerse the stylus deep into the milk: in a few seconds you will notice a thick, creamy foam rising up the jug, Fig. 16.
Once the operation is completed, deactivate the steam function by pressing the steam button a second time (7). The steam light (3) will go off.
Dispense the steam for a few seconds after every use in order to free the hole of any milk residue.
REUTILIZATION FOR COFFEE
Press button (7) to exclude the steam function. To switch from steam to coffee, you must let the boiler cool down: press the coffee brewing button (6) and make water come out of the filter holder coupling seat until the indicator light (2) turns off. Wait until the light turns back on before making coffee.
HOW TO MAKE TEA OR TISANES
After performing the operations described in the "Preliminary steps for use" chapter, place a cup underneath the Maxi Cappuccino tube (O); lower the water/steam lever (F) and press the coffee (6) and steam (7) buttons at the same time. Water will start flowing out of the Maxi Cappuccino tube (O). To stop the flow, press the coffee button (6). Lift the steam lever.
USEFUL TIPS FOR OBTAINING A GOOD ITALIAN ESPRESSO
The ground coffee in the filter holder has to be pressed lightly. Whether the coffee is stronger or weaker depends on the degree the coffee is ground, the quantity put into the filter holder and the pressing. Just a few seconds are needed for the coffee to flow down into the cups. If the dispensing time is longer, this means that the coffee is ground too fine or that the coffee put into the filter holder has been pressed too much.
CLEANING THE APPLIANCE

Warning!
All cleaning operations described below must be performed with the machine off and with the electric plug disconnected from the socket-outlet.

Warning!
Regular maintenance and cleaning preserve and keep the machine efficient for a longer amount of time. Never wash machine components in the dishwasher. Do not use direct jets of water.

Warning!
All operations must be performed when the machine is cold.
Cleaning the filter containing the grounds.
Check that the holes are not clogged and if so, clean them with a small brush (Fig. 17). Dispense boiling water from the filter holder with the filter inside, without coffee grounds, in order to dissolve or remove any coffee residue or impurities.

Warning!
Slowly remove and disconnect the filter holder because any remaining pressure could cause splashes or squirts.
It is advisable to thoroughly clean the filter (U) about every 3 months using Ariete COFFEE CLEAN detergent tabs, which can be found at retail stores and the Authorised Service Centres, following the instructions inside the package. As an alternative, you can use a simple dishwasher detergent tab (without added rinse aid or other chemical additives) as follows:
- Put a dishwasher detergent tab into the filter (without coffee) when the machine is hot (after heating for at least five minutes).
- Couple the filter holder to the machine and put a container underneath the filter holder.
- Press the coffee button to start dispensing water, and dispense the water for 15-20 seconds.
- Stop the water supply and let the tab act for at least 15 minutes while keeping the filter holder coupled on the machine.
- Repeat the water dispensing operation by operating the pump for about 15-20 seconds, and then letting it rest for another 15-20 seconds, until two tanks of water are used up.
- Remove the filter holder from the machine, remove the filter and rinse it well under running tap water.
- Turn off the machine, disconnect the power cable from the socket-outlet and clean the coupling seat of the filter holder with a sponge in order to remove any detergent residue from the shower disc.
- Turn the machine back on, couple the filter holder once again and dispense at least 2 cups of water again to complete the rinsing.
If the coffee machine is used daily, it is advisable to carry out the cleaning operation at least every three months.
Cleaning the silicone disc
Wash the silicone disc (V) under running water, bending it slightly on the sides in order to free the centre hole of any residue of coffee grounds that could clog it (Fig. 18).
Cleaning the filter holder seat
With time, coffee residue may accumulate on the filter holder seat. It can be removed with a toothpick, a sponge (Fig. 19), or by letting water run through without fitting the filter holder (Fig. 6).
Cleaning the Maxi Cappuccino device

Warning!
Perform this operation when the chrome-plated pipe is cold so as to prevent burns.
Unscrew the device (O) from the small pipe and wash it with running water. The small pipe can be cleaned with a non-abrasive cloth. Screw the cappuccino maker back on as far as it will go. If necessary, clean the small steam outlet hole again with a pin. After use, always let the steam nozzle run for a few seconds so to free the outlet from any possible residue.
Cleaning the grill and water recovery drawers
Remember to empty the water recovery drawers (Q) and (R) from time to time.
Remove the two drawers from the machine, empty them and wash them under running water. Also wash the cup grill (S).
Cleaning the machine body

Warning!
Clean the fixed parts of the machine using only a damp, non-abrasive cloth so as to not damage the body.
Cleaning the tank
Periodically clean the inside of the tank with a sponge or damp cloth.
DECALCIFICATION
Good maintenance and regular cleaning preserve and keep the machine efficient for a longer amount of time, considerably limiting the risks of lime deposits forming inside the appliance. However, should your coffee machine fail to work properly as a result of the frequent use of hard, high calcium content water, you may perform a decalcification procedure to restore its operational efficiency. For this purpose you must use only Ariete's, citric acid-based decalcifying products (NOCAL). This product is easily found at the Ariete technical service centres. Ariete does not assume any responsibility whatsoever for damage to components inside the coffee machine caused by the use of non-compliant products containing chemical additives. Should you need to decalcify your appliance, please follow the instructions which come with the decalcifying product.
PUTTING OUT OF SERVICE
If you want to put the machine out of service, you must disconnect it electrically, empty the water tank and drip tray and clean it (see the paragraph on "Cleaning the appliance").
In the case of scrapping, you must separate the various materials used in making the machine and dispose of them based on their composition and on the legal provisions in force in the country of use.
TROUBLESHOOTING

Warning!
If there are problems with operation, immediately turn off the machine and unplug it from the socket-outlet.
| PROBLEM CAUSE | SOLUTIONS | |
| The coffee maker does not supply boiling water for tisanes. | Air has probably entered the circuit and deactivated the pump. | Make sure the tank is properly inserted and that the water is not below the minimum level. Repeat the operations described in the “Preliminary phases for use” paragraph. |
| The steam exit hole on the dispenser wand is clogged. | Unclog any deposits that may have formed in the hole of the dispenser wand with a pin. | |
| The coffee maker does not supply steam. | There is little water and the pump does not suck it up. | Check that the water level in the tank is correct. If necessary, fill it with cool tap water. |
| The steam exit hole on the dispenser wand is clogged. | Unclog any deposits that may have formed in the hole of the dispenser wand with a pin. | |
| Steam overflow-ing from the edges of the filter ring. | You are trying to dispense the coffee with the steam function on. Check that the steam function button has not been unintentionally pressed. | Stop dispensing the coffee. Press button (7) to turn off the steam function. Wait for the indicator lamp (2) to change from blinking to steady before preparing new coffee. |
| PROBLEM CAUSE SOLUTIONS | ||
| Coffee overflow-ing from the edges of the filter ring. | Probably an excess amount of ground coffee has been placed in the filter ring preventing the filter ring from being correctly tightened into its housing. | Slowly remove and disconnect the filter holder because any remaining pressure could cause splashes or squirts. Clean the coupling seat with a sponge (Fig. 19). Repeat the operation placing the correct quantity of coffee in the filter. |
| Residues of ground coffee have remained on the gasket of the filter holder coupling seat. | Clean the seal with a toothpick or a sponge (Fig. 19). | |
| The hole of the silicone disc (V) is clogged. | Wash the silicone disc (V) under running water, bending it slightly on the sides in order to free the centre hole of any residue of coffee that could clog it (Fig. 18). | |
| The exit holes of the filter containing coffee grounds are clogged. | Slowly remove and disconnect the filter holder because any remaining pressure could cause splashes or squirts. Clean the clogged filter hole with a pin. Clean the filter using Ariete COFFEE CLEAN tabs, following the instructions provided in the package. | |
| The coffee is not supplied or flows too slowly. | The holes of the perforated disc in the filter holder coupling seat are clogged. | Turn on the machine without the filter holder, making the water run. If the water still does not come out from all the holes evenly, carry out the descaling cleaning operation using the Ariete NOCAL product found at Ariete service centres, following the instructions provided in the package. |
| The exit holes of the filter containing coffee grounds are clogged. | Slowly remove and disconnect the filter holder because any remaining pressure could cause splashes or squirts. Clean the clogged filter hole with a pin. Clean the filter using Ariete COFFEE CLEAN tabs, following the instructions provided in the package. | |
| The coffee blend is ground too fine. | Try using coarser coffee blends. | |
| The coffee blend is pressed down too much. | Tamper coffee inside the filter using less pressure. | |
| The tanks is not inserted well. Fit | the tank securely by pushing it as far as it will go. | |
| The hole of the silicone disc (V) is clogged. | Wash the silicone disc (V) under running water, bending it slightly on the sides in order to free the centre hole of any residue of coffee that could clog it (Fig. 18). | |
| There is little water and the pump does not suck it up. | Check that the water level in the tank is correct. If necessary, fill it with cool tap water. | |
| The coffee is too watery and cold. | The blend has been ground too coarsely. | A more finely ground blend must be used to obtain a more concentrated and hotter coffee. Anyhow, this problem is easily solved thanks to the Thermocream® System, which always guarantees hot coffee accompanied by a reach cream, even with coarsely ground beans. |
| Coffee grinder jammed. | Impurities are probably mixed with the coffee beans. | Press button (8) to stop grinding. Press coffee grinder release button (B) and repeatedly turn the container from left to right, then try again. If the problem persists, try to set coarser grinding (positions 12-14). |
A PROPOS DU MANUEL
HOE MAAK JE CAPPUCCINO
BCErda XPAHnTb DAHHyIO IHCTpyKunio
KoepnHbMaunHb «ARIETE» npedctabJIOCTco60 nideaHbB bapnaHT dIaTex, KTO yMeet HacnaJaTbCn INoJIyAtb ydoBoJIbCTBHe OT JIN3HN, HauHna C xopoWero KoPe. BnarOapra 3ckcyn3NBHO CnCTeMe Thermocream® dIa Doma Bcerda MoNHO npiroTOBb rOpAHy n rCyToH KoPe, KaB bape. TakIM o6pa3OM, MoXHO hAcnaJDAbCkpeMo3HbIM KoPeM C rYCTbIM apOMATOM IN CNlbHbIM IN NOIHbIM BKycOM, 6e3 HeobxOdMOCtCNbHOr O pceccoBaHnI c npImeHeHem IIOBOrTO TnPa NOMOnA He OueHb MeIKoRo. KoepnHbMaunHb «Ariete» yDobNeTbOPaT TaKke IIObTeJe KannyUHO, TAK KaK,
6laorapy yctpoctBy Maxi Cappucino Bbl cmoxete noyuHTb 3a HeckonbKO cekyHr cyTu H hacbiueHHy neHy. Kpome Toro, 6bictpo npirotoBHeHne KoPe nocpeCTBOM npibopob «Ariete» DoctnraeTc8 6laorapy Tomy, tTO nocleHne obopydoBaHb ciTeMo ABToHNuHnnpoBAHnur, YTO No3BOJAEt 6bictPO npiroTOBHT KoPe TaKke Pn DOnrM NCIOB3OBAHn npibopa Hnn noce 3anONHeHn pe3epByapa BoOn. Bkychoro KoPe BCem BMecte c «Café Roma Plus Ariete»!
ONICAHNE IPNBOPA
A-KopnycMaunHbI.
B-Khonka yctahOBKN peyunipobAHnI NOMa KoFe
C-KpbuIkaemKocTn,coedepeKauee KoPe.
D - EmkocTB, coepkaaag KoFe B 3eephax, cpeynpobKoI NOMOla
E-3akpbitne Dispenser
F -PykoTka Boda/napa
G-YyIbIeHneIpnomeuHn npHaJdxKHeTei
H -БakДЯ BOДы (eMkoCTbIO JI.1,5 ypoBeHb MAX)
I - KpbIeueKa dIy 3aIOnJIHeHn8 6aka
L-PaHeJIb cKOMaHdAmI
M - UcTpoNCTBO DnI NOdau NOTOKa MoNtOrO KoΦe
N - Ппспocблени Dispenser cdo3aTopom monotoro Kofoe
O -Писncoc6нe М maxi Cappuccino n epurinyuoyu cn ctepxeHb Boda/nap
P - CdaBnBaTeIb Pressino
Q-员甲用c6opacTeKaHnBOdbI
R-员甲用c6opacTeKaHnBObl
S-PeWtKaIyCTaHOBKuAweK
T-ФильтpoidepkateNB
U - Φινήθρ Thermocream®
V - CnIMKHOBOE CNTO
W -ДиСТermocream®
Onncahne komaHd
1 CBeTOBOI INDnKaTOp BKnHoueHnIa
2 CBeTOBoi INHnIkaTOp TempePaTypbI Kofoe
3 CBeToBOI INHnKaTOp TeMnepaTpybI npa
4 CBeToBOHnDnKaTOp HanoJIHeHnDispenser
5 KhoNka BkJIoueHnIa
6 BknHouaTeIb IoDaun KoPe
7 BknouateIb npa
8 Khonka hanoheHna yctpoiCTba Dispenser
IeHTnKauHbIe daHHbIe
Ha Ta6nue C HOMHaJIbHbIM DaHHbIM, HaxoJaIeIcN yCTaHOBOHOr OCHOB MaUNHbI, npNBedeHbI cJeDyUOJIe. nDeHTnKauIOHbIe daHHbIe:
C03daTeJIb n 6o3HaueHnE C
- MoŋeJIb (Mod.)
- n° MaTpnu4b1 (SN)
3JIeKtpnueckoe HanpJKeHneB nHTaHn (V) uactota (Hz)
- NORILOUaMaJ 3JIeKTpuecka MoUHocTb (W)
- 3eJHeHbI TeJefoHHbI HOMep o6cnyKbAHnI
Pn3aipoeB ABTOpH3OBaHHbIe CepBnCHbIe LcHTpbI yka3bBaTb MoJeI b H OHomeP MaTpuiI.
IODTOTOBNTeHbIE ΦA3bl IEPED NcPONb3OBAHNEM
PpOaTobKa K npMHeHHIO
Y6eHNTecb, YTO HApJxHe NOMaUHe CTeN COOTBeTCTByET HApJxKeHIO, YKa3aHHOMy Ha UNTke C HOMHaJIbHbIMn TEXHNueckmM daHHbIMn np6opa. 3aTeM pa3MeCTnte np6op Ha poBHyIO NOBepXHOCTb.
BbHb6aK JnBa (H) n3 BcTAbKn B MaunHe (Pnc. 3), HanoHnItb ero HatypaIbHO CBexeB BOOdo ypoBna Max. (IIT.1,5) n BcTaBnTb Ha cBoe MeTo B Kycyc MaunHbI. IJra oBeCneueHn XopoWero FyHKUHOHPOBaHnMaunHbI BcTaBt b xopoio do KOuca 6ak. BaK MoKeT HanoHnTbCn I npYrIm Oba3om, HauBaB Aody uepe3 CneuaJIbHOe yrny6JeHne noCne otKpbItn KpbIeueKn (I) Pnc. 4. BcTaBnTb WTeNceB b 3NeKtpnueckyo po3eTKy.
NepBoe BKJIIOueHne
HaxaTb Ha o6uBn BkIIOUaTeB (5) Pnc. 2; BkIIIOHTbcra NOCToHHO CBETOBn INHINKATop (1) nCBETOBn INHINKATop (2) NaHHeT MInrTaB Do DOCTXKeHn HEO6xOIMo TMnepaTypbI, NocJe Yero OCTaHETbc BkIIOueHHbIM. IOpCTaBnTB yAUKy IOn yctpoiCtBO Maxi Cappuccino onyctntb pykoTky BOa/nap (Pnc. 5 - F), npn 3Tom OndHOBPemHo Haxmam Ha BkIOUaTeB IOnaH N KOFe (6), BblNcTNTb BO3MOHbN bOpa3OBaBUncR B03dyx NIN BOy B cIPKyJIaun. HanONHITb XOTs b6by OAnHy aawKy 3ToB BoDn. POnHraTb pykoTky BOa/nap (F) nPpeKpATntb NODaCy KoFe, Haxmam Ha KONky (6).
PekomeHdyetbcra npOBoNTb daHHyIO onepaunIO kaxdbpa3 npn BKNoyeHN MaunHbI Nocne HeckOJIbKnx DHei He npimehen.
Pocne 0bHoro HanoHHeHn6aKa, noHrTb KpbIeUky (I) nHaJIITb CBExKyHO HAtypaIbHyO BDOy B CneuaIbHoe yIy6JeHne (Pnc.4). HacbnaiNb KoFe B3ephaxB EMKoCTb (D) Max 230 rp. (Pnc.7).
Kofo MeKet 6bItb nepemEneHO 60nee Hn MeHee MeNko, B 3aBcHMOCTn OT Heo6xOIMoC TepeH. Ira n3MeHn CTepeHn n3MeJIbueHn HaKaTb Ha KhoNkY yctaHOBKn (B) n BpaTaB KofoMOnKy BnpaBO Nn BJIeBO B COOTBeTCTBn C uΦpOBoI shKanoi (Pnc.8).
3Ta onepaun DOnkHa npoBOnTbc TaIbKo npn BblKnHouHNO KoFemOJIke.
Bo Bpemra6oToI KofoemOnKn 0a3a HarpBa KOTla N fynKcNn Ipaay OTKHueHbI.
Bb6op Bnda yctpoiCTBa dny noaun MoIOToro Kope.
Maunha OchaueHa DByMBA3aHmHO 3aMeHReMbIMyCTpOncTBamn:
1) yctpoCTBO «NoctoHHoro NotoKa» (M), Pnc. 1 no3BoJraT HmEt b NoctoHHbIM MHOBeHHbIM NOMI. BCTaBtB φnIb- TPOdePkaTeNb B CneuaJIbHyIO BnIKy, TAKIM o6pa3OM, YTO 6bl HaxaTB Ha KhoNkY (M/a), pacnoIooKeHHyo IOD BbIXOdom MOIOTOKO KoPe (Pnc. 9).
2) yctpoiCTBO "Dispenser /do3atop" (N) Pnc.10. Inra hanoHHeHna Dispenser moTbIM KOeM haxaTb Ha nepeKIOUaTeIb (8) Pnc. 2 n HanoHNHTb eO do KOHca, BBeCTn B DeICTBne nepeKIOUaTeIb DO3aTOpA OINH INn Dba pa3a B 3aBNCMOCTn OT KONIIueCTBa Heo6xoJIMbIX Yaaek KOeF, pni 3tOM fHbTPOePjAteIb DOJXeH 6bTb BCTabJIeH B BuIKy. IInrTOrO, YTO6bl erO bHyTb, BbITAHyTb IO HaprabJIeHIO K Bam yctpoiCTBa (M) n (N).
B cnyuae 6IIOKINOBKN KoΦeMOJKN HaUNHaET MIRaTB INHINKATop (4) 3anOJIHeHnRA Do3aTopa. PpUHHoM MoKeT cTaTb HAIyne npIMecE B KOΦeHbIX 606ax.
Дя pa36LOKINOBAHЯ KOΦeMOJN HAXMITE KHOJKY (8) 3aONHeHry yCTpoiCTBa Do3aTopa TaKIM o6pa3OM, YTO6bI OT-KIQUHTb rOpaIyI INDIAKATOp. BHOb HaxMITE Ha KHOJky (8), YTO6bI CHOBa 3aNyCTnB KoΦeMOJKy. EcIn OHa He 3anyCKaETcB bTOpHuO IocTaETC 3a6LOKINOBAHHO C rOpaIyIM INDIAKATOpM (4), HAXMITE Ha KHOJky (8) dIy OTKIIIOUeHry KOΦeMOJN. HaxMITE Ha KHOJky pa3 NOBepHnTe KOΦeMOJKy BnpaBO n BnEBO. ChOBa yDOCTOBEPbTEcB, YTO Bbl 3aYCTnIJ NKOΦeMOJKy.
Ia 6nne Hn pa3bokpoBaHna yctahOBte KofoemOnky Ha cambl rpy6bmyomol (no3n12-14).Ecn nocne HeckoBknx nonbIK ONepaunr He ydaNacb, opaTntecb B 6nKanM ABTOIN3OBAHHb IeHTp NOMU.
ПРИГOTOBЛЕНЕ KOФЕ
PpOBepuBt ypoBHe B0Dbl B6ake (H).Y6eIITbcra, YTO 6ak npabunbHO BCTaBneH Ha CBOE MeTO.
BCTaBte B fNtbpOepKxatel Ncck Thermocream® (W), cTo n3 cnNkoHa (V) n FInbTp Thermocream® (U) Byka3aHHOIocJeIOBaTeNbHocTn (Pnc. 11). OTmepntb Kope dIy fNtbpOepKxatel Pnc.9 npn IIMOOnu ycTpoiCtBa IOnaUn, Bbl-6paHoro Bamn, n CTeRk aPiDaBHTe rO HauBaNTeMe (Pnc. 12). BCTaBntb fNtbpOepKxatel Ha cBOe MeCTo.

BHHMaHHe!
ПлnotHo BCTaBnTb ФиньТpoDEpKαTeЛь,уБexДЯсьВФпанцeВOMКрплелн (Pnc.13).
Pn CBepxMepHom HanoJIHeHHH 0uBtropeKataJMy MoNtBIM KoPe, eO 6ydt CNOXHO npIKpenTb DO KOHcA B CBOE MeCTo N/INI Pn ATOM B TeueHHN NOaH N KoPe MOrT O6hApKntBCr NOTePN I3 FIOBtropeKataJy.
PpOBepntb, He haxaTa IIN cIyuaHNo KOnka nOauN napa.
Pekomeyetbcra octabntb fnlbtpodepkaTeIb Ha CBOeM MecTe Ha HeCKoJIbKO MNHyT nepei npiroTOBHeHem KoPe, TaKIM O6pa3OM, YTO 6bl OH 6bl TROPaHm. 3To He Hado 6ydt npOeIbIBaT dI pyroTOBHeHn CneDyUoEro KoPe
Maunha roTOBa K npmehenIO, KOrda CBetOBOn IHnKaTOp (2) Pnc. 2 nepeCTaHET MInatb n octaHeTBcBkIoueHHbIM. HaxaTb Ha BkIouaTeJIb NOaU KoPe (6). IINr IpeKpaueHn IODaH NaxaTb Ha nepeKlOuataJIb (6). MaKcImaJIbHaJdo3a IINr OndHO KoPe 50 mI.

BHHMaHHe!
Kak n B npoepccnoHaJIbHbIX MaunHax, He y6npaTb pInbTpOpepKaTeIb npu yCTaHOBJIeHHOM nepeKIOUcATEIe (6) B no3nui Noaui.

BHHMaHHe!
IOnOxKaTb OKoNo DeCraTn CeKHyN Nepei TEM Ka ChaTb PtopePkaTeB NO
OKOHaHn NODaH N KOe; IIN TORO, YTObI CHrTB FInIbTPOdePKeTaTeN, MeDJIeHHo NOBepHyT b er O cnpaba HaleBO, BO n36exKaHne 6pb130B BOnblnn KoPe.
Korda Maunha yctaHOBnHa B standby, cBeTOBoi HndkaTOp (2) 6ydt nepeoUneckn BKIOuATbcra N BbIKIOUaTbcra, yKa3bBaI cyHKcIOHnpOBAHne TepMOCTaT KoTla dIЯ NOd-DepKKN ONTImaJIbHoI TempepaTpybl BObl.
Filtrelik böglanti noktasinda ufas buhar cikis seslerinin olusmasi durumu, tamamen normal calisma sartlarinin mevcudiyetini belirtir.
CnCTema Thermocream® Mapkn ARIETE npedha3naeHa dIra HauNyUeO yIOBnetBOpeHn 3aInpocOB nOTpe6nteHn COCToNT u3 DByX 3JIeMeHTOB: pINbTpTa Thermocream® (U) C cnNkoHObIM CITOM (V), KOtOpbIE CNOCO6CTByHT o6pa3OBAHnIO neHbI, IN DnCKThermocream® (W).
IOBTOPHOE IcnoJb3OBAHNE IJI PnIroTOBJIeHnKoΦE
HaxaTb KhoNky (7) dny otKIOUeHnA cyHKuIN npapa. Iy nepexoA ot noaun npapa K npiroTOBHeHIO KoOfe Heo6xOIMO OXIOIITb KOtJ: HaxaTb Ha nepeKIOUaTeJIb noaun KoOe (6) N BbInCyTb BOy u3 MeCTa npIKpeHnA qINbTpOepJxATEJIa Do Tex nop, NOKA CBETOBn INDnKaTOP (2) He BBKIOUHTbcra. IIOOJaTa b NOKA CBETOBn INDnKaTOP BKIOHTbcra BHOBb nepeI npIROBHeHnEM KoOe.
KAK DEJIATb YAIMHACTOJKN
Iocne npoBeHnna onepaun, onncanHbIX B pa3deJe «IoproToBnteHbIe fa3bl nepeid nCnoNtB3OBaHMeM», noDCTaBtB uakky noi ctepkeHb Maxi Cappuccino (O); onyctntb pykoTky Boa/nap (F) n HaxaTb odHOBpeMeHHo Ha nepeKIOuAteTI (6) noaun KoFe n npa (7).
HauHET BbIXoINtB BOa n3 cTepxHra Maxi Cappuccino (O). Inna npekpaueHn noaun HaxaH Na BkIouaTeN b Kope (6). POnHrT pyKoRrky napa.
OuNCTka rHe3da DepeKaTeJIaФиЛbTpOB
B npocce npmeHn Moryt obpa3oBaTc 3aTbepeBwne KoepHbIe OcaKn B MeCTe npncOeHHeHn FnIbTpodePkata, KOTOpbIe ydaJIyIObC npn NOMOUs 3y6OuNcTOK (Pnc. 19), rynK nnn npn BkIouehn BbIXoDa BoIb 6e3 BcTaB- neHHoro fnhTpOepXaTeTg (Pnc. 6).

BHHMaHHe!
HeMbITbΦnIbTpOepeKaTeJIbNocydomoEChNoMaJInHe
Ounstka npnbopa Maxi Cappuccino

BHHMaHHe!
AnHHyO OepaunHO Heo6xoJnMo OcyueeCTBJIaTb npOxnaJeHHo XpOMIpOBaHHo Tpy6e, BO n36ekHane OKOrOB.
OTBeHTne yCTpoCTBO (O) OT Tpy6bl, n npomoe ero Tekyue BDOJ. DaHHyIO Tpy6b MOxHO uNCTNb npn NOMOAn abpa3NBHO MaTePnAna. ChOba 3anycTne KopeBapKy, BnIOb Do OKOHuaHn npo6era. Pn Heo6xoDmocTN, Bbl MoKeTe npOn3BecTI NOBTOPHyO ONUCTKy npn NOMOuI WtntTa OTBepCTNa napa. NocJe KaXDo rnpimeHeHn BbInyCTNb nap Ha HEckONbKO CeKYd dnn OCBO6OXDeHn OTBepCTNa OT BO3MOXbIX OTINOKeHn.
OuHSeHne peWetKN n JaunukOB c6opa BOJbl
POMHHTb O nepeoundueckom ocB60kdeHNn IaunKOB c6opa Bobl (Q) n (R).
BbTaunTb Dba Raunka n3 MaunHbI, OCBO6OuNTb N BbIMbITb NOI TeKyuI NOIo. IpnomblpeWetky dIy noCTabKn aWeek (S).
OuNCTka Kopnyca MaunHbI

BHHMaHne!
YnCTb pKcnpoBaHbI yactn MaunHbI npn NOMOu BnaXHO He a6pO3NBHO r6Kn, YTO6bI He NOBpeDntb Kopnyc.
OuHcTka pe3epByapa
PekomeHdyeTc npnoDnueckn npou3BODITb OuncTKy BHyTpEHHeYacTu pe3epByapa npn nOMOu ng6Kn IIN BnaXHOI MaTePN.
DEKALbIuΦNtPOBAHNE
XopoOee Texo6cnyKbAHne n peryIepnHa oOncKa coxpaHIO n 3cffeKTHBNO NOdepKbAHO t MaunHy Ha nnTeNbHbI nepnoB BpeMeHN, BO MHOrOM yCTpaHra pNCKn fOpMnpOBaHn I3BeCTKOBbIX OTLOKeHN B aannapate. Upe3 onpeJeHHbI npomexkyTOK BpeMeHN pa6ota aannapata MoKet 6bITb HApUWeHa n0 npuHHe YacTO r npimeHn E KcKIO uCINBO 3BeCTKOBo BObl, dnyUCPAHn NLOXORO fynKUHnPOBaHn BO3MOXHO npOBeHne DeKaJIbUcNfKaUu. JIra 3ToJ ueJI npimeHn ToBko PpOdyKT DeKaJIbUcNfUncPOBaHn ApNeTe Ha OCHOBE JIMMOHHO KNCOTBI NOCAL. 3ToT npOyKT MOxHO NaTN B cHTpax TexHueCKOrO obcLyKbAHn ApNeTe. Ariete He 6ePte HA c6Ba HNKaKo OTBETCTBeHHocTn 3a BO3MOXHO IOBpeXDeHne BHyTpEHHNX KOMNoHEtOB pN6opa, Bb13BaHHoe npimeHHeMeM BeSeCTB C pNcCyTCTBmE B Hnx XmMnuecknX do6abok. B cNyae Heo6xoDmOCn TpoBeHn DeKaJIbUcNfUncPOBaHn, O3NaKOMNTbcr C yka3aHnRMn B HHCTpyKcN Camoro DeKaJIbUcNfKnAtopa.
HEBO3MOXKHOE IPNIMEHEHNE
B cnyuae noIOMKn, Heo6xOdmo OTOCoeHNHTb OT 3neKtpnueCTBa MaunHy, onyctouinTB BOJHOH 6aN KannHeKaONnteJIbHy BoHHouky uOCHNTb (CMOTpeTb naparpa 喜 «Ouictka annapata»).
B cnyuae Bb6poca deTanei, Heo6xOIMMO npOBcTn pa3deneHne pa3NHybIX nCnONb3yeMbIX npn npOn3BOIDCTBe MaunHbI MaTePnaIOB Ha oCHOBaHN IN CoCTaba N DeiCTByUeero 3aKoHa B Ctpahe npImeHeHn.
PYKOBODCTBO NO YCTPAHEHIO HEKOTOPbIX PPOBJEM

BHHMaHHe!
B cnyuae HnnpaBeIbHoro yHKUHOHPOBaHnra, BbIKIOHTb cpa3y MaUNHy N BbITaUNTb UTeNCEJIb n3 3neKtpuecko pO3eTKn
.0j 1i j 0o o j 00 00 00 00 00 00 00 00
aoloj-
Lai jie jin Jg 12
ailll oio joo aab1 yolo gdy aSb1 Jozy
.
auiuuii iin no gns uunn no bnn y
aS1jooJol1sjoUgJusJusuOoLpa
()
Jg j 1
a 156 b 156
.
glbl algl gldiS1b1 Joxu y
...la g g w w w j b) a gall Jolg u jzj q jy y
a aaaaa aabw ybaa jagl lgl baae bpa aal 1j gnnn n nn n n n n n n n n n n n n n n n n
a 150
.(
.8g 1000000000000000000000000000000000000000000
Ldol
"p 1234567890123456789012345678901234567890123456789012345678901234567890123456789012345678901234567890123456789
Jnag jI Jk aal llaa aal n nn nnnnnae gaaagaaa aan no nae gaaagaaa aen
gss s 1s j. aag g agg rge gagagagagagagagagagagagagagagagagagagagagagagagagagagagagagagagagagagagagagagagagagagagagagagagagagagagagagagagagagagagagagagagagagagagagag
-
-
-
-
-
-
-
-
-
-
- 1.
-
-
-
-
-
-
-
-
-
Café Roma Plus Ariete! go sSgaa! gao
L 1
- S B = A
gall jobpao aogjj -B
0g 1c
0g 120000000000000000000000000000000
Egbl oJluw-E
1Jx/1cUda
G
(a)15j1,54z)UbJjH
JzjaiyI
Soll 1gJ aogJ - L
aagabbl oggell yaaab1 01 -M
diogabbl ogeall aegy uuaui pllbi ggo - N
J11/1111 10g "gssgSgSla"ol -O
上之0101 - P
Uol oJzwioguiio -Q
U610524000000000000000000000000000000000000000000000
JUULI 1
julalol -T
Thermocream -U
jgksll j0 gaa 00- V
Thermocream -W
Ugolgo golp
1
aagai 2rj aqrj oJw! 2
jll 0j 3
gbl dai oJli 4
J5
8aJ 6
7 64
8
a#logso
:aii iaii ioglslde auiu oia jawol ogbl ologsl agg
CE aolgl gaiall
( )
(SN) aGooob
()0g()aLg)aLg)aLg
(bg) aabbl aby 50
ailllll 1
aLgJgJgJgJgJgJgJgJgJgJgJgJgJgJgJgJgJgJgJgJgJgJgJgJgJgJgJgJgJgJgJgJgJgJgJgJgJgJgJgJgJgJgJgJgJgJgJgJgJgJg
JlssyI lal
a.slbj
.5gssbgsjglalaglglgglgglgglgglgglgglgglg
jbjjul
1,5)gaiy dai yjgl jybl 3 Jkai yao laaui (H) uui jz
aaii i j 150. aiiil aie g jg jjll bdo jg jsi bia jia oia jao
1 4 1 (I) 1 1 1 1 1 1 1 1 1 1 1 1 1 1
yoJgY aSb1 J
J 15 J 15 J 15 J 15 J 15 J 15 J 15 J 15 J 15 J 15 J 15 J 15 J 15 J 15 J 15 J 15 J 15 J 15 J 15 J 15 J 15 J 15 J 15 J 15 J 15 J 15
L 1 (2)
g jyj yj yj yj yj yj yj yj yj yj yj yj yj yj yj yj yj yj yj yj yj yj yj yj yj yj yj yj yj yj yj yj yj yj yj yj yj yj yj yj yj yj yj yj yj yj yj yj yj yj yj
(jF)Jll/ellal aefj.ellil jno joln joln JdIe Iol .gglgl gglggl 6
(6)jjI JxJxJxJxJxJxJxJxJx
Joo 100
yJd (D) 10g.4 J (4 J) 100
.7 15
aagabbl jabll aegd cnuu dusg psei Jsu blo legi oogall jab j
g j 10j 8gall aab (B) ggljjde bcl (ogall ags gss) jablldo
.8J5JI 3 JIO SO loT g
Joo 1
.8gall gj g j 10000000000000000000000000000000000000000000
aogab1 oggal gjgolg j
JSLU W 1
1
2J (8) 11j.10 J. (N)"
jololgo gao lsslgl aagbblgall jolig ducuog. jorog ojo goblae;JolS Jaua
Jol (N) g (M) oJy U. quU. Joo joo
lo gdsg j 1 5 4 (4) 8gbl aai ola l 120
.888
05y (8)jjde yjoo jn bokol. gog jui jil oJyI labi 8)jj de bokol.oagai diaho
Loo 15000000000000000000000000000000000000000000000000000000000
.
a 1
g:JkJyIaIJIgJzIJI JIJIARIET EJJoo aabipj
Jg 100000000000000000000000000000000000000000000
.(W)
a 150 Jxu Lgabjj Jxj no caggl gao aaii ci jdo axo jde bdoal po
guiu gui 1 1 1 1
0o jn no n no jnl Jol o slj y cai jn no qao “gssgJ gsl Jos
(7)
JyL 2 Jx
.(3)g
a 1
.15 Jkll 1000000000000000000000000000000000000000000000000000
alb1 ossxw ydsio g u
.(R)g(Q) 1g jn nn nnnn nn nnnnnnnnnnnnnnnnnnnnnnnnnnnnnnnnnnnnnnnnnnnnnnnnnnnnnnnnnnnnnnnnnnnnnnnnnnnnnnnnnnnnnnnnnnnnnnnnnnnnnnnnn
.(S)
aui5u1
!
a 1
jz
aB aBg jzaiw! aaa uuul uoog yd k b jz d
J
LgAaBaa aaii jn no n 1s y Bn b 1yBn no n Cg g Bb Aisu Ie BlaI
Ss u no no s y w s y Bn y Bn y Bn no no no no no no no no no no no no no no no no no no no no no no no no no no no no no no no no no no no no no no no no no no no no no no no no no no no no no no no no no no no no no no no no no no no no no no no no no no no no no no no
NOCAL gnnnns nnssnnns nnssnnns nnssnnns nnssnnns nnssnnns nnssnnns nnssnnns nnssnnns nnssnnns nnssnnns nnssnnns nnssnnns nnssnnns nnssnnns nnssnnns nnssnnns nnssnnns nnssnnns nnssnnns nnssnnns nnssnnns nnssnnns nnssnnns nnssnnns nnssnnns nnssennns nnssnnns nnssnnns nnssnnns nnssnnns nnssnnns nnssnnns nnssnnns nnssnnns nnssnnns nnssnnns nnssnnns nnssnnns nnssnnns nnssnnns nnssnnns nnssnnns nnssnnns nnssnnns nnssnnns nnssnnns nnssnnns nnssnnns nnssnnns nnssnnns nnss
Joo 1e aie 1
1 1 1 1 1 1 1 1 1 1 1 1 1 1 1 1 1 1 1 1 1 1 1 1 1 1 1 1 1 1 1 1 1 1 1
JSLshj
!
1 1

| العربية | ||
| بُمَنَهُّةِ الحَلُّرْ وَالَزَتَنَهُّةِ الحَلُّرْ وَالَزَتَنَهُّةِ الحَلُّرْ وَالَزَتَنَهُّةِ الحَلُّرْ وَالَزَتَنَهُّةِ الحَلُّرْ وَالَزَتَنَهُّةِ الحَلْدَالْحَسَنَهُّةِ الحَلْدَالْحَسَنَهُّةِ الحَلْدَالْحَسَنَهُّةِ الحَلْدَالْحَسَنَهُّةِ الحَلْدَالْحَسَنَهُّةِ الحَلْدَالْحَسَنَهِّةِ الحَلْدَالْحَسَنَهِّةِ الحَلْدَالْحَسَنَهِّةِ الحَلْدَالْحَسَنَهِّةِ الحَلْدَالْحَسَنَهِّةِ الحَلْدَالْحَسَنَهِّةِ الح—"العربية"“;}。“العربية” | العربية"العربية"العربية"العربية"العربية"العربية"العربية"العربية"العربية"العربية"العربية"العربية"العربية" | |
| . . . . . . . . . . . . . . . . . . . . . . . . . . . . . . . . . . . . . . . . . . . . . . . . . . . . . . . . . . . . . . . . . . . . . . . . . . . . . . . . . . . . . . . . . . . . . . . . . . . . . . . . . . . . . . . . . . . . . . . . . . . . . . . . . . . . . . . . . . . . . . . . . . . . . . . . . . . . . . . . . . . . . . . . . . . . . . . . . . . . . . . . . . . . . . . . . . . . . . . . . . - . . . . . . . . . . . . . . . . . . . . . . . . . . . . . . . . . . . . . . . . . . . . . . . . . . . . . . . . . . . . . . . . . . . . . . . . . . . . . . . . . . . . . . . . . . . . . . . . . . . ? . . . . . . . . . . . . . . . . . . . . . . . . . . . . . . . . . . . . . . . . . . . . . . . . . . . . . . . . . . . . . . . . . . . . . . . . . . . . . . . . . . . . . . . . . . . . . . . . . . . ; . . . . . . . . . . . . . . . . . . . . . . . . . . . . . . . . . . . . . . . . . . . . . . . . . . . . . . . . . . . . . . . . . . . . . . . . . . . . . . . . . . . . . . . . . . . . . . . . . . . \. . . . . . . . . . . . . . . . . . . . . . . . . . . . . . . . . . . . . . . . . . . . . . . . . . . . . . . . . . . . . . . . . . . . . . . . . . . . . . . . . . . . . . . . . . . . . . . . . . . 、 . . . . . . . . . . . . . . . . . . . . . . . . . . . . . . . . . . . . . . . . . . . . . . . . . . . . . . . . . . . . . . . . . . . . . . . . . . . . . . . . . . . . . . . . . . . . . . . . . . . - 1 - 2 - 3 - 4 - 5 - 6 - 7 - 8 - 9 - 10 - 11 - 12 - 13 - 14 - 15 - 16 - 17 - 18 - 19 - 20 - 21 - 22 - 23 - 24 - 25 - 26 - 27 - 28 - 29 - 30 - 31 - 32 - 33 - 34 - 35 - 36 - 37 - 38 - 39 - 40 - 41 - 42 - 43 - 44 - 45 - 46 - 47 - 48 - 49 - 50 - 51 - 52 - 53 - 54 - 55 - 56 - 57 - 58 - 59 - 60 - 61 - 62 - 63 - 64 - 65 - 66 - 67 - 68 - 69 - 70 - 71 - 72 - 73 - 74 - 75 - 76 - 77 - 78 - 79 - 80 - 81 - 82 - 83 - 84 - 85 - 86 - 87 - 88 - 89 - 90 - 91 - 92 - 93 - 94 - 95 - 96 - 97 - 98 - 99 - 100 - 101 - 102 - 103 - 104 - 105 - 106 - 107 - 108 - 109 - 110 - 111 - 112 - 113 - 114 - 115 - 116 - 117 - 118 - 119 - 120 - 121 - 122 - 123 - 124 - 125 - 126 - 127 - 128 - 129 - 130 - 131 - 132 - 133 - 134 - 135 - 136 - 137 - 138 - 139 - 140 - 141 - 142 - 143 - 144 - 145 - 146 - 147 - 148 - 149 - 150 - 151 - 152 - 153 - 154 - 155 - 156 - 157 - 158 - 159 - 160 - 161 - 162 - 163 - 164 - 165 - 166 - 167 - 168 - 169 - 170 - 171 - 172 - 173 - 174 - 175 - 176 - 177 - 178 - 179 - 180 - 181 - 182 - 183 - 184 - 185 - 186 - 187 - 188 - 189 - 190 - 191 - 192 - 193 - 194 - 195 - 196 - 197 - 198 - 199 - 200 - 201 - 202 - 203 - 204 - 205 - 206 - 207 - 208 - 209 - 210 - 211 - 212 - 213 - 214 - 215 - 216 - 217 - 218 - 219 - 220 - 221 - 222 - 223 - 224 - 225 - 226 - 227 - 228 - 229 - 230 - 231 - 232 - 233 - 234 - 235 - 236 - 237 - 238 - 239 - 240 - 241 - 242 - 243 - 244 - 245 - 246 - 247 - 248 - 249 - 250 - 251 - 252 - 253 - 254 - 255 - 256 - 257 - 258 - 259 - 260 - 261 - 262 - 263 - 264 - 265 - 266 - 267 - 268 - 269 - 270 - 271 - 272 - 273 - 274 - 275 - 276 - 277 - 278 - 279 - 280 - 281 - 282 - 283 - 284 - 285 - 286 - 287 - 288 - 289 - 290 - 291 - 292 - 293 - 294 - 295 - 296 - 297 - 298 - 299 - 300 - 301 - 302 - 303 - 304 - 305 - 306 - 307 - 308 - 309 - 310 - 311 - 312 - 313 - 314 - 315 - 316 - 317 - 318 - 319 - 320 - 321 - 322 - 323 - 324 - 325 - 326 - 327 - 328 - 329 - 330 - 331 - 332 - 333 - 334 - 335 - 336 - 337 - 338 - 339 - 340 - 341 - 342 - 343 - 344 - 345 - 346 - 347 - 348 - 349 - 350 - 351 - 352 - 353 - 354 - 355 - 356 - 357 - 358 - 359 - 360 - 361 - 362 - 363 - 364 - 365 - 366 - 367 - 368 - 369 - 370 - 371 - 372 - 373 - 374 - 375 - 376 - 377 - 378 - 379 - 380 - 381 - 382 - 383 - 384 - 385 - 386 - 387 - 388 - 389 - 390 - 391 - 392 - 393 - 394 - 395 - 396 - 397 - 398 - 399 - 400 - 401 - 402 - 403 - 404 - 405 - 406 - 407 - 408 - 409 - 410 - 411 - 412 - 413 - 414 - 415 - 416 - 417 - 418 - 419 - 420 - 421 - 422 - 423 - 424 - 425 - 426 - 427 - 428 - 429 - 430 - 431 - 432 - 433 - 434 - 435 - 436 - 437 - 438 - 439 - 440 - 441 - 442 - 443 - 444 - 445 - 446 - 447 - 448 - 449 - 450 - 451 - 452 - 453 - 454 - 455 - 456 - 457 - 458 - 459 - 460 - 461 - 462 - 463 - 464 - 465 - 466 - 467 - 468 - 469 - 470 - 471 - 472 - 473 - 474 - 475 - 476 - 477 - 478 - 479 - 480 - 481 - 482 - 483 - 484 - 485 - 486 - 487 - 488 - 489 - 490 - 491 - 492 - 493 - 494 - 495 - 496 - 497 - 498 - 499 - 500 - 501 - 502 - 503 - 504 - 505 - 506 - 507 - 508 - 509 - 510 - 511 - 512 - 513 - 514 - 515 - 516 - 517 - 518 - 519 - 520 - 521 - 522 - 523 - 524 - 525 - 526 - 527 - 528 - 529 - 530 - 531 - 532 - 533 - 534 - 535 - 536 - 537 - 538 - 539 - 540 - 541 - 542 - 543 - 544 - 545 - 546 - 547 - 548 - 549 - 550 - 551 - 552 - 553 - 554 - 555 - 556 - 557 - 558 - 559 - 560 - 561 - 562 - 563 - 564 - 565 - 566 - 567 - 568 - 569 - 570 - 571 - 572 - 573 - 574 - 575 - 576 - 577 - 578 - 579 - 580 - 581 - 582 - 583 - 584 - 585 - 586 - 587 - 588 - 589 - 590 - 591 - 592 - 593 - 594 - 595 - 596 - 597 - 598 - 599 - 600 - 601 - 602 - 603 - 604 - 605 - 606 - 607 - 608 - 609 - 610 - 611 - 612 - 613 - 614 - 615 - 616 - 617 - 618 - 619 - 620 - 621 - 622 - 623 - 624 - 625 - 626 - 627 - 628 - 629 - 630 - 631 - 632 - 633 - 634 - 635 - 636 - 637 - 638 - 639 - 640 - 641 - 642 - 643 - 644 - 645 - 646 - 647 - 648 - 649 - 650 - 651 - 652 - 653 - 654 - 655 - 656 - 657 - 658 - 659 - 660 - 661 - 662 - 663 - 664 - 665 - 666 - 667 - 668 - 669 - 670 - 671 - 672 - 673 - 674 - 675 - 676 - 677 - 678 - 679 - 680 - 681 - 682 - 683 - 684 - 685 - 686 - 687 - 688 - 689 - 690 - 691 - 692 - 693 - 694 - 695 - 696 - 697 - 698 - 699 - 699 - 699 - 699 - 699 - 699 - 699 - 699 - 699 - 699 - 699 - 699 - 699 - 699 - 699 - 699 - 699 - 700 - 701 - 702 - 703 - 704 - 705 - 706 - 707 - 708 - 709 - 710 - 711 - 712 - 713 - 714 - 715 - 716 - 717 - 718 - 719 - 720 - 721 - 722 - 723 - 724 - 725 - 726 - 727 - 728 - 729 - 730 - 731 - 732 - 733 - 734 - 735 - 736 - 737 - 738 - 739 - 740 - 741 - 742 - 743 - 744 - 745 - 746 - 747 - 748 - 749 - 750 - 751 - 752 - 753 - 754 - 755 - 756 - 757 - 758 - 759 - 760 - 761 - 762 - 763 - 764 - 765 - 766 - 767 - 768 - 769 - 770 - 771 - 772 - 773 - 774 - 775 - 776 - 777 - 778 - 779 - 780 - 781 - 782 - 783 - 784 - 785 - 786 - 787 - 788 - 789 - 790 - 791 - 792 - 793 - 794 - 795 - 796 - 797 - 798 - 799 - 800 - 801 - 802 - 803 - 804 - 805 - 806 - 807 - 808 - 809 - 810 - 811 - 812 - 813 - 814 - 815 - 816 - 817 - 818 - 819 - 820 - 821 - 822 - 823 - 824 - 825 - 826 - 827 - 828 - 829 - 830 - 831 - 832 - 833 - 834 - 835 - 836 - 837 - 838 - 839 - 840 - 841 - 842 - 843 - 844 - 845 - 846 - 847 - 848 - 849 - 850 - 851 - 852 - 853 - 854 - 855 - 856 - 857 - 858 - 859 - 860 - 861 - 862 - 863 - 864 - 865 - 866 - 867 - 868 - 869 - 870 - 871 - 872 - 873 - 874 - 875 - 876 - 877 - 878 - 879 - 880 - 881 - 882 - 883 - 884 - 885 - 886 - 887 - 888 - 889 - 890 - 891 - 892 - 893 - 894 - 895 - 896 - 897 - 898 - 899 - 899 - 899 - 899 - 899 - 899 - 899 - 899 - 899 - 899 - 899 - 899 - 899 - 899 - 899 - 899 - 899 - 900 - 901 - 902 - 903 - 904 - 905 - 906 - 907 - 908 - 909 - 910 - 911 - 912 - 913 - 914 - 915 - 916 - 917 - 918 - 919 - 920 - 921 - 922 - 923 - 924 - 925 - 926 - 927 - 928 - 929 - 930 - 931 - 932 - 933 - 934 - 935 - 936 - 937 - 938 - 939 - 940 - 941 - 942 - 943 - 944 - 945 - 946 - 947 - 948 - 949 - 950 - 951 - 952 - 953 - 954 - 955 - 956 - 957 - 958 - 959 - 960 - 961 - 962 - 963 - 964 - 965 - 966 - 967 - 968 - 969 - 970 - 971 - 972 - 973 - 974 - 975 - 976 - 977 - 978 - 979 - 980 - 981 - 982 - 983 - 984 - 985 - 986 - 987 - 988 - 989 - 990 |
| الإستعمال | ||
| .الإستعمال الحرفية (7) (8) (9) (10) (11) (12) (13) (14) (15) (16) (17) (18) (19) (20) (21) (22) (23) (24) (25) (26) (27) (28) (29) (30) (31) (32) (33) (34) (35) (36) (37) (38) (39) (40) (41) (42) (43) (44) (45) (46) (47) (48) (49) (50) (51) (52) (53) (54) (55) (56) (57) (58) (59) (60) (61) (62) (63) (64) (65) (66) (67) (68) (69) (70) (71) (72) (73) (74) (75) (76) (77) (78) (79) (80) (81) (82) (83) (84) (85) (86) (87) (88) (89) (90) (91) (92) (93) (94) (95) (96) (97) (98) (99) (100) | .الإستعمال | |
| .الإستعمال الحرفية (10) (11) (12) (13) (14) (15) (16) (17) (18) (19) (20) (21) (22) (23) (24) (25) (26) (27) (28) (29) (30) (31) (32) (33) (34)(35)(36)(37)(38)(39)(40)(41)(42)(43)(44)(45)(46)(47)(48)(49)(50)(51)(52)(53)(54)(55)(56)(57)(58)(59)(60)(61)(62)(63)(64)(65)(66)(67)(68)(69)(70)(71)(72)(73)(74)(75)(76)(77)(78)(79)(80)(81)(82)(83)(84)(85)(86)(87)(88)(89)(90)(91)(92)(93)(94)(95)(96)(97)(98)(99)(100)(101)(102)(103)(104)(105)(106)(107)(108)(109)(110)(111)(112)(113)(114)(115)(116)(117)(118)(119)(120)(121)(122)(123)(124)(125)(126)(127)(128)(129)(130)(131)(132)(133)(134)(135)(136)(137)(138)(139)(140)(141)(142)(143)(144)(145)(146)(147)(148)(149)(150)(151)(152)(153)(154)(155)(156)(157)(158)(159)(200)(201)(202)(203)(204)(205)(206)(207)(208)(209)(210)(211)(212)(213)(214)(215)(216)(217)(218)(219)(220)(221)(222)(223)(224)(225)(226)(227)(228)(229)(230)(231)(232)(233)(234)(235)(236)(237)(238)(239)(240)(241)(242)(243)(244)(245)(246)(247)(248)(249)(250)(251)(252)(253)(254)(255)(256)(257)(258)(259)(260)(261)(262)(263)(264)(265)(266)(267)(268)(269)(270)(271)(272)(273)(274)(275)(276)(277)(278)(279)(280)(281)(282)(283)(284)(285)(286)(287)(288)(289)(290)(291)(292)(293)(294)(295)(296)(297)(298)(299)(300)(301)(302)(303)(304)(305)(306)(307)(308)(309)(310)(311)(312)(313)(314)(315)(316)(317)(318)(319)(320)(321)(322)(323)(324)(325)(326)(327)(328)(329)(330)(331)(332)(333)(334)(335)(336)(337)(338)(339)(340)(341)(342)(343)(344)(345)(346)(347)(348)(349)(350)(351)(352)(353)(354)(355)(356)(357)(358)(359)(360)(361)(362)(363)(364)(365)(366)(367)(368)(369)(370)(371)(372)(373)(374)(375)(376)(377)(378)(379)(380)(381)(382)(383)(384)(385)(386)(387)(388)(389)(390)(391)(392)(393)(394)(395)(396)(397)(398)(399)(400)(401)(402)(403)(404)(405)(406)(407)(408)(409)(410)(411)(412)(413)(414)(415)(416)(417)(418)(419)(420)(421)(422)(423)(424)(425)(426)(427)(428)(429)(430)(431)(432)(433)(434)(435)(436)(437)(438)(439)(440)(441)(442)(443)(444)(445)(446)(447)(448)(449)(450)(451)(452)(453)(454)(455)(456)(457)(458)(459)(460)(461)(462)(463)(464)(465)(466)(467)(468)(469)(470)(471)(472)(473)(474)(475)(476)(477)(478)(479)(480)(481)(482)(483)(484)(485)(486)(487)(488)(489)(490)(491)(492)(493)(494)(495)(496)(497)(498)(499)(500)(501)(502)(503)(504)(505)(506)(507)(508)(509)(510)(511)(512)(513)(514)(515)(516)(517)(518)(519)(520)(521)(522)(523)(524)(525)(526)(527)(528)(529)(530)(531)(532)(533)(534)(535)(536)(537)(538)(539)(540)(541)(542)(543)(544)(545)(546)(547)(548)(549)(550)(551)(552)(553)(554)(555)(556)(557)(558)(559)(560)(561)(562)(563)(564)(565)(566)(567)(568)(569)(570)(571)(572)(573)(574)(575)(576)(577)(578)(579)(580)(581)(582)(583)(584)(585)(586)(587)(588)(589)(590)(591)(592)(593)(594)(595)(596)(597)(598)(599)(600)(601)(602)(603)(604)(605)(606)(607)(608)(609)(610)(611)(612)(613)(614)(615)(616)(617)(618)(619)(620)(621)(622)(623)(624)(625)(626)(627)(628)(629)(630)(631)(632)(633)(634)(635)(636)(637)(638)(639)(640)(641)(642)(643)(644)(645)(646)(647)(648)(649)(650)(651)(652)(653)(654)(655)(656)(657)(658)(659)(660)(661)(662)(663)(664)(665)(666)(667)(668)(669)(670)(671)(672)(673)(674)(675)(676)(677)(678)(679)(680)(681)(682)(683)(684)(685)(686)(687)(688)(689)(690)(691)(692)(693)(694)(695)(696)(697)(698)(699)(700)(701)(702)(703)(704)(705)(706)(707)(708)(709) |
| الإستعمال | ||
| . محيى بعبيعة بعبيعة بعبيعة بعبيعة بعبيعة بعبيعة بعبيعة بعبيعة بعبيعة بعبيعة بعبيعة بعبيعة بعبيعة بعبيعة بعبيعة بعبيعة بعبيعة بعبيعة بعبيعة بعبيعة بعبيعة بعبيعة بعبيعة بعبيعة بعبيعة بعبيgua بعبيgua بعبيgua بعبيgua بعبيgua بعبيgua بعبيgua بعبيgua بعبيgua بعبيgua بعبيgua بعبيgua بعبيgua بعبيgua بعبيgua بعبيgua بعبيgua بعبيgua بعبيgua بعبيgua بعبيgua بعبيgua بعبيgua بعبيgua بعبيgua بعبيigua بعزرخ وعاءة الحرفية الحرفية الحرفية الحرفية الحرفية الحرفية الحرفية الحرفية الحرفية الحرفية الحرفية الحرفية الحرفية الحرفية الحرفية الحرفية الحرفية الحرفية الحرفية الحرفية الحرفية الحرفية الحرفية الحرفية الحرفية الحرفية الحرفية الحرفية الحرفية الحرفية الحرفية الحرفية الحرفية الحرفية EXO. ( X ) جزyllه عبزد . محيى بعبيعة بعبيعة بعبيعة بعبيعة بعبيعة بعبيعة بعبيgua بعبيgua بعبيgua بعبيgua بعبيgua بعبيgua بعبيgua بعبيgua بعبيgua بعبيgua بعبيgua بعبيgua بعبيgua بعبيgua بعبيgua بعبيgua بعبيgua بعبيgua بعبيgaeل نج晗 بعزرخ وعاءة الحرفية الحرفية الحرفية الحرفية الحرفية EXO. ( Y ) جزyllه عبزد . محيى بعبيعة بعبيعة بعبيعة بعبيgua بعبيgua بعبيgua بعبيgua بعبيgua بعبيgua بعبيgua بعبيgua bعبيgua bعبيgua bعبيgua bعبيgua bعبيgua bعبيgua bعبيgua bعبيgua bعبيgua bعبيgua bعبيgua bعبيgua bعبيgua bعبيgua bعبيgua bعبيgua bعبيgua bعبيgua bعبيgua bعبيgua bعبيgua bعبيgua bعبيgua bعبيgua bعبيgua بعبيgua bعبيgua bعبيgua bعبيgua bعبيgua bعبيgua bعبيgua bعبيgua bعبيgua bعبيgua bعبيgua bعبيgua bعبيgua bعبيgua bعبيgua bعبيgua bعبيgua bعبيgua bعبيgua bعبيgua bعبيgua bعبيgua bعبيgua bعبيgua بعبيgua بعبيgua bعبيgua bعبيgua bعبيgua bعبيgua bعبيgua bعبيgua bعبيgua bعبيgua bعبيgua bعبيgua bعبيgua bعبيgua bعبيgua bعبيgua bعبيgua bعبيgua bعبيgua bعبيgua bعبيgua bعبيgua bعبيgua bعبيgua بعبيgua bعبيgua بعبيgua bعبيgua bعبيgua bعبيgua bعبيgua bعبيgua bعبيgua bعبيgua bعبيgua bعبيgua bعبيgua bعبيgua bعبيgua bعبيgua bعبيgua bعبيgua bعبيgua bعبيgua bعبيgua bعبيgua bعبيgua bعبيgua bعبيgua بعبيgua بعبيgua بعبيgua bعبيgua bعبيgua bعبيgua bعبيgua bعبيgua bعبيgua bعبيgua bعبيgua bعبيgua bعبيgua bعبيgua bعبيgua bعبيgua bعبيgua bعبيgua bعبيgua bعبيgua bعبيgua bعبيgua bعبيgua bعبيgua بعبيgua bعبيgua bعبيgua بعبيgua bعبيgua bعبيgua bعبيgua bعبيgua bعبيgua bعبيgua bعبيgua bعبيgua bعبيgua bعبيgua bعبيgua bعبيgua bعبيgua bعبيgua bعبيgua bعبيgua bعبيgua bعبيgua bعبيgua bعبيgua bعبيgua بعبيgua bعبيgua بعبيgua بعبيgua bعبيgua bعبيgua bعبيgua bعبيgua bعبيgua bعبيgua bعبيgua bعبيgua bعبيgua bعبيgua bعبيgua bعبيgua bعبيgua bعبيgua bعبيgua bعبيgua bعبيgua bعبيgua bعبيgua bعبيgua bعبيgua بعبيgua بعبيgua bعبيgua بعبيgua bعبيgua bعبيgua bعبيgua bعبيgua bعبيgua bعبيgua bعبيgua bعبيgua bعبيgua bعبيgua bعبيgua bعبيgua bعبيgua bعبيgua bعبيgua bعبيgua bعبيgua bعبيgua bعبيgua bعبيgua bعبيgua بعبيgua بعبيgua بعبيgua بعبيgua bعبيgua bعبيgua bعبيgua bعبيgua bعبيgua bعبيgua bعبيgua bعبيgua bعبيgua bعبيgua bعبيgua bعبيgua bعبيgua bعبيgua bعبيgua bعبيgua bعبيgua bعبيgua bعبيgua bعبيgua بعبيgua bعبيgua bعبيgua bعبيgua بعبيgua bعبيgua bعبيgua bعبيgua bعبيgua bعبيgua bعبيgua bعبيgua bعبيgua bعبيgua bعبيgua bعبيgua bعبيgua bعبيgua bعبيgua bعبيgua bعبيgua bعبيgua bعبيgua bعبيgua bعبيgua بعبيgua bعبيgua bعبيgua بعبيgua بعبيgua bعبيgua bعبيgua bعبيgua bعبيgua bعبيgua bعبيgua bعبيgua bعبيgua bعبيgua bعبيgua bعبيgua bعبيgua bعبيgua bعبيgua bعبيgua bعبيgua bعبيgua bعبيgua bعبيgua bعبيgua baikal. ( Z ) جزyllه عبزد . محيى بعبيعة بعبيعة بعبيعة بعبيعة بعبي周四 ( X ) جزyllه عبزد . محيى بعبيiegel. ( Y ) جزyllه عبزد . محيى بعبيiegel. ( Z ) جزyllه عبزد . محيى بعبيiegel. ( Y ) جزyllه عبزد . محيى بعبيiegel. ( Z ) جزyllه عبزد . محيى بعبيiegel. ( Y ) جزyllه عبزد . محيى بعبيiegel. ( Z ) جزyllه عبزد . محيى بعبيiegel. ( V ) جزyllه عبزد . محيى بعبيiegel. ( W ) جزyllه عبزد . محيى bga. ( X ) جزyllه عبزد . محيى bga. ( Y ) جزyllه عبزد . محيى bga. ( Z ) جزyllه عبزد . محيى bga. ( W ) جزyllه عبزد . محيى bga. ( X ) جزyllه عبزد . محيى bga. ( Y ) جزyllه عبزد . محيى bga. ( Z ) جزyllه عبزد . محيى bga. ( W ) جزyllه عبزد . محيى bga. ( X ) جزyllه ع metab . ( Y ) جزyllه ع metab . ( Z ) جزyllه ع metab . ( W ) جزyllه ع metab . ( X ) جزyllه ع metab . ( Y ) جزyllه ع metab . ( Z ) جزyllه ع metab . ( W ) جزyllه ع metab . ( X ) جزyllه ع metab . ( Y ) جزyllه ع metab . ( Z ) جزyllه ع metab . ( W ) جزyllه ع metab . ( X ) جزyllه ع metab . ( Y ) جزyllه ع metab. ( Z ) جزyllه ع metab. ( W ) جزyllه ع metab. ( X ) جزyllه ع metab . ( Y ) جزyllه ع metab . ( Z ) جزyllه ع metab . ( W ) جزyllه ع metab . ( X ) جزyllه ع metab . ( Y ) جزyllه ع metab . ( Z ) جزyllه ع metab . ( W ) جزyllه ع metab . ( X ) جزyllه ع metab . ( Y ) جزyllه عmet . ( Z ) جزyllه ع metab . ( W ) جزyllه ع metab . ( X ) جزyllه ع metab . ( Y ) جزyllه ع metab . ( Z ) جزyllه ع metab . ( W ) جزyllه ع metab . ( X ) جزyllه ع metab . ( Y ) جزyllه ع metab . ( Z ) جزyllه ع metab . ( W ) جزyllه عmet . ( X ) جزyllه ع metab . ( Y ) جزyllه ع metab . ( Z ) جزyllه ع metab . ( W ) جزyllه ع metab . ( X ) جزyllه ع metab . ( Y ) جزyllه ع metab . ( Z ) جزyllه ع metab . ( W ) جزyllه ع metab . ( X ) جزyllه ع metab . ( Y ) جزyllه عmet. ( Z ) جزyllه ع metab . ( W ) جزyllه ع metab . ( X ) جزyllه ع metab . ( Y ) جزyllه ع metab . ( Z ) جزyllه ع metab . ( W ) جزyllه ع metab . ( X ) جزyllه ع metab . ( Y ) جزyllه ع metab . ( Z ) جزyllه ع metab . ( W ) جزyllه ع metab. ( X ) جزyllه ع metab . ( Y ) جزyllه ع metab . ( Z ) جزyllه ع metab . ( W ) جزyllه ع metab . ( X ) جزyllه ع metab . ( Y ) جزyllه ع metab . ( Z ) جزyllه ع metab . ( W ) جزyllه ع metab . ( X ) جزyllه ع metab. ( Y ) جزyllه ع metab . ( Z ) جزyllه ع metab . ( W ) جزyllه ع metab . ( X ) جزyllه ع metab . ( Y ) جزyllه ع metab . ( Z ) جزyllه ع metab . ( W ) جزyllه ع metab . ( X ) جزyllه ع metab . ( Y ) جزyllه ع metab . ( Z ) جزyllه ع metab. ( W ) جزyllه ع metab . ( X ) جزyllه ع metab . ( Y ) جزyllه ع metab . ( Z ) جزyllه ع metab . ( W ) جزyllه ع metab . ( X ) جزyllه ع metab . ( Y ) جزyllه ع metab . ( Z ) جزyllه ع metab . ( W ) جزyllه ع metab . ( X ) جزyllه ع metab. ( Y ) جزyllه ع metab. ( Z ) جزyllه ع metab . ( W ) جزyllه ع metab . ( X ) جزyllه ع metab . ( Y ) جزyllه ع metab . ( Z ) جزyllه ع metab . ( W ) جزyllه ع metab . ( X ) جزyllه ع metab . ( Y ) جزyllه ع metab . ( Z ) جزyllه ع metab . ( W ) جزyllه عmet. ( X ) جزyllه ع metab . ( Y ) جزyllه ع metab . ( Z ) جزyllه ع metab . ( W ) جزyllه ع metab . ( X ) جزyllه ع metab . ( Y ) جزyllه ع metab . ( Z ) جزyllه ع metab . ( W ) جزyllه ع metab . ( X ) جزyllه ع metab . ( Y ) جزyllه عtab . ( Z ) جزyllه ع metab . ( W ) جزyllه ع metab . ( X ) جزyllه ع metab . ( Y ) جزyllه ع metab . ( Z ) جزyllه ع metab . ( W ) جزyllه ع metab . ( X ) جزyllه ع metab . ( Y ) جزyllه ع metab . ( Z ) جزyllه ع metab . ( W ) جزyllه عtab . ( X ) جزyllه ع metab . ( Y ) جزyllه ع metab . ( Z ) جزyllه ع metab . ( W ) جزyllه ع metab . ( X ) جزyllه ع metab . ( Y ) جزyllه ع metab . ( Z ) جزyllه ع metab . ( W ) جزyllه ع metab . ( X ) جزyllه ع metab . ( Y ) جزyllه عtab. ( Z ) جزyllه ع metab . ( W ) جزyllه ع metab . ( X ) جزyllه ع metab . ( Y ) جزyllه ع metab . ( Z ) جزyllه ع metab . ( W ) جزyllه ع metab . ( X ) جزyllه ع metab . ( Y ) جزyllه ع metab . ( Z ) جزyllه ع metab . ( W ) جزyllه عtab. ( X ) جزyllه ع metab . ( Y ) جزyllه ع metab . ( Z ) جزyllه ع metab . ( W ) جزyllه ع metab . ( X ) جزyllه ع metab . ( Y ) جزyllه ع metab . ( Z ) جزyllه ع metab . ( W ) جزyllه ع metab . ( X ) جزyllه ع metab . ( Y ) جزyllه ع tab. ( Z ) جزyllه ع metab . ( W ) جزyllه ع metab . ( X ) جزyllه ع metab . ( Y ) جزyllه ع metab . ( Z ) جزyllه ع metab . ( W ) جزyllه ع metab . ( X ) جزyllه ع metab . ( Y ) جزyllه ع metab . ( Z ) جزyllه ع metab . ( W ) جزyllه ع tab. ( X ) جزyllه ع metab . ( Y ) جزyllه ع metab . ( Z ) جزyllه ع metab . ( W ) جزyllه ع metab . ( X ) جزyllه ع metab . ( Y ) جزyllه ع metab . ( Z ) جزyllه ع metab . ( W ) جزyllه ع metab . ( X ) جزyllه ع metab . ( Y ) جزyllه ع TAB. ( Z ) جزyllه ع metab . ( W ) جزyllه ع metab . ( X ) جزyllه ع metab . ( Y ) جزyllه ع metab . ( Z ) جزyllه ع metab . ( W ) جزyllه ع metab . ( X ) جزyllه ع metab . ( Y ) جزyllه ع metab . ( Z ) جزyllه ع metab . ( W ) جزyllه ع TAB. ( X ) جزyllه ع metab . ( Y ) جزyllه ع metab . ( Z ) جزyllه ع metab . ( W ) جزyllه ع metab . ( X ) جزyllه ع metab . ( Y ) جزyllه ع metab . ( Z ) جزyllه ع metab . ( W ) جزyllه ع metab . ( X ) جزyllه ع metab . ( Y ) جزyllه عTab. ( Z ) جزyllه ع metab . ( W ) جزyllه ع metab . ( X ) جزyllه ع metab . ( Y ) جزyllه ع metab . ( Z ) جزyllه ع metab . ( W ) جزyllه ع metab . ( X ) جزyllه ع metab . ( Y ) جزyllه ع metab . ( Z ) جزyllه ع metab . ( W ) جزyllه ع-tab. ( X ) جزyllه ع metab . ( Y ) جزyllه ع metab . ( Z ) جزyllه ع metab . ( W ) جزyllه ع metab . ( X ) جزyllه ع metab . ( Y ) جزyllه ع metab . ( Z ) جزyllه ع metab . ( W ) جزyllه ع metab . ( X ) جزyllه ع metab . ( Y ) جزyllه ع Tab. ( Z ) جزyllه ع metab . ( W ) جزyllه ع metab . ( X ) جزyllه ع metab . ( Y ) جزyllه ع metab . ( Z ) جزyllه ع metab . ( W ) جزyllه ع metab . ( X ) جزyllه ع metab . ( Y ) جزyllه ع metab . ( Z ) جزyllه ع metab . ( W ) جزyllه عTab. ( X ) جزyllه ع metab . ( Y ) جزyllه ع metab . ( Z ) جزyllه ع metab . ( W ) جزyllه ع metab . ( X ) جزyllه ع metab . ( Y ) جزyllه ع metab . ( Z ) جزyllه ع metab . ( W ) جزyllه ع metab . ( X ) جزyllه ع metab . ( Y ) جزyllه عstab. ( Z ) جزyllه ع metab . ( W ) جزyllه ع metab . ( X ) جزyllه ع metab . ( Y ) جزyllه ع metab . ( Z ) جزyllه ع metab . ( W ) جزyllه ع metab . ( X ) جزyllه ع metab . ( Y ) جزyllه ع metab . ( Z ) جزyllه ع metab . ( W ) جزyllه عstab. ( X ) جزyllه ع metab . ( Y ) جزyllه ع metab . ( Z ) جزyllه ع metab . ( W ) جزyllه ع metab . ( X ) جزyllه ع metab . ( Y ) جزyllه ع metab . ( Z ) جزyllه ع metab . ( W ) جزyllه ع metab . ( X ) جزyllه ع metab . ( Y ) جزyllه ع stabbing. ( Z ) جزyllه ع metab . ( W ) جزyllه ع metab . ( X ) جزyllه ع metab . ( Y ) جزyllه ع metab . ( Z ) جزyllه ع metab . ( W ) جزyllه ع metab . ( X ) جزyllه ع metab . ( Y ) جزyllه ع metab . ( Z ) جزyllه ع metab . ( W ) جزyllه ع stabbing. ( X ) جزyllه ع metab . ( Y ) جزyllه ع metab . ( Z ) جزyllه ع metab . ( W ) جزyllه ع metab . ( X ) جزyllه ع metab . ( Y ) جزyllه ع metab . ( Z ) جزyllه ع metab . ( W ) جزyllه ع metab . ( X ) جزyllه ع metab . ( Y ) جزyllه ع stab. ( Z ) جزyllه ع metab . ( W ) جزyllه ع metab . ( X ) جزyllه ع metab . ( Y ) جزyllه ع metab . ( Z ) جزyllه ع metab . ( W ) جزyllه ع metab . ( X ) جزyllه ع metab . ( Y ) جزyllه ع metab . ( Z ) جزyllه ع metab . ( W ) جزyllه ع stab. ( X ) جزyllه ع metab . ( Y ) جزyllه ع metab . ( Z ) جزyllه ع metab . ( W ) جزyllه ع metab . ( X ) جزyllه ع metab . ( Y ) جزyllه ع metab . ( Z ) جزyllه ع metab . ( W ) جزyllه ع metab . ( X ) جزyllه ع metab . ( Y ) جزyllه ع stabbed. ( Z ) جزyllه ع metab . ( W ) جزyllه ع metab . ( X ) جزyllه ع metab . ( Y ) جزyllه ع stabbing. ( Z ) جزyllه ع metab . ( W ) جزyllه ع metab . ( X ) جزyllه ع metab . ( Y ) جزyllه ع stabbing. ( Z ) جزyllه ع metab . ( W ) جزyllه ع metab . ( X ) جزyllه ع metab . ( Y ) جزyllه ع stabbing. ( Z ) جزyllه ع metab . ( W ) جزyllه عstab. ( X ) جزyllه ع metab . ( Y ) جزyllه ع stabbing. ( Z ) جزyllه ع metab . ( W ) جزyllه ع metab . ( X ) جزyllه ع metab . ( Y ) جزyllه ع stabbing. ( Z ) جزyllه ع metab . ( W ) جزyllه ع metab . ( X ) جزyllه ع metab . ( Y ) جزyllه ع stabbing . ( Z ) جزyllه ع metab . ( W ) جزyllه ع metab . ( X ) جزyllه ع metab . ( Y ) جزyllه ع stabbing. ( Z ) جزyllه ع metab . ( W ) جزyllه ع metab . ( X ) جزyllه ع metab . ( Y ) جزyllه ع stabbing. ( Z ) جزyllه ع metab . ( W ) جزyllه ع metab. ( X ) جزyllه ع metab . ( Y ) جزyllه ع stabbing. ( Z ) جزyllه ع metab . ( W ) جزyllه ع metab . ( X ) جزyllه ع metab . ( Y ) جزyllه ع stabbing. ( Z ) جزyllه ع metab . ( W ) جزyllه ع metab . ( X ) جزyllه ع metab . ( Y ) جزyllه عstab. ( Z ) جزyllه ع metab . ( W ) جزyllه ع metab . ( X ) جزyllه ع metab . ( Y ) جزyllه ع stabbing. ( Z ) جزyllه ع metab . ( W ) جزyllه ع metab . ( X ) جزyllه ع metab . ( Y ) جزyllه ع stabbing. ( Z ) جزyllه ع metab . ( W ) جزyllه عtab. ( X ) جزyllه ع metab . ( Y ) جزyllه ع stabbing. ( Z ) جزyllه ع metab . ( W ) جزyllه ع metab . ( X ) جزyllه ع metab . ( Y ) جزyllه ع stabbing. ( Z ) جزyllه ع metab . ( W ) جزyllه ع metab . ( X ) جزyllه ع metab . ( Y ) جزyllه ع stab. ( Z ) جزyllه ع metab . ( W ) جزyllه ع metab . ( X ) جزyllه ع metab . ( Y ) جزyllه ع stabbing. ( Z ) جزyllه ع metab . ( W ) جزyllه ع metab . ( X ) جزyllه ع metab . ( Y ) جزyllه ع stabbing. ( Z ) جزyllه ع metab . ( W ) جزyllه ع stabbing. ( X ) جزyllه ع metab . ( Y ) جزyllه ع stabbing. ( Z ) جزyllه ع metab . ( W ) جزyllه ع metab . ( X ) جزyllه ع metab . ( Y ) جزyllه ع stabbing. ( Z ) جزyllه ع metab . ( W ) جزyllه ع metab . ( X ) جزyllه ع metab . ( Y ) جزyllه ع stabbed. ( Z ) جزyllه ع metab . ( W ) جزyllه ع metab . ( X ) جزyllه ع metab . ( Y ) جزyllه ع stabbing. ( Z ) جزyllه ع metab . ( W ) جزyllه ع metab. ( X ) جزyllه ع metab . ( Y ) جزyllه ع stabbing. ( Z ) جزyllه ع metab . ( W ) جزyllه عstab. ( X ) جزyllه ع metab . ( Y ) جزyllه ع stabbing. ( Z ) جزyllه ع metab . ( W ) جزyllه ع metab . ( X ) جزyllه ع metab . ( Y ) جزyllه ع stabbing . ( Z ) جزyllه ع metab . ( W ) جزyllه ع metab . ( X ) جزyllه ع metab . ( Y ) جزyllه ع stabbing . ( Z ) جزyllه ع metab . ( W ) جزyllه ع metab . ( X ) جزyllه ع metab . ( Y ) جزyllه ع stabbing. ( Z ) جزyllه ع metab . ( W ) جزyllه ع metab. ( X ) جزyllه ع metab . ( Y ) جزyllه ع stabbing. ( Z ) جزyllه ع metab . ( W ) جزyllه ع metab. ( X ) جزyllه ع metab . ( Y ) جزyllه ع stabbing. ( Z ) جزyllه ع metab . ( W ) جزyllه ع metab . ( X ) جزyllه ع metab . ( Y ) جزyllه ع stabbing . ( Z ) جزyllه ع metab . ( W ) جزyllه ع metab . ( X ) جزyllه ع metab . ( Y ) جزyllه عstab. ( Z ) جزyllه ع metab . ( W ) جزyllه ع metab . ( X ) جزyllه ع metab . ( Y ) جزyllه ع stabbing. ( Z ) جزyllه ع metab . ( W ) جزyllه ع metab. ( X ) جزyllه ع metab . ( Y ) جزyllه ع stabbing. ( Z ) جزyllه ع metab . ( W ) جزyllه عtab. ( X ) جزyllه ع metab . ( Y ) جزyllه ع stabbing. ( Z ) جزyllه ع metab . ( W ) جزyllه عtab. ( X ) جزyllه ع metab . ( Y ) جزyllه ع stabbing. ( Z ) جزyllه ع metab . ( W ) جزyllه عtab. ( X ) جزyll. ( Y ) جزyll. ( Z ) جزyll. ( W ) جزyll. ( X ) جزyll. ( Y ) جزyll. ( Z ) جزyll. ( W ) جزyll. ( X ) جزyll. ( Y ) جزyll. ( Z ) جزyll. ( W ) جزyll. ( X ) جزyll. ( Y ) جزyll. ( Z ) جزyll. ( W ) جزyll. ( X ) جزyll. ( Y ) جزyll. ( Z )。 ( W ) جزyll. ( X ) جزyll. ( Y ) جزyll. ( Z ) ( W ) جزyll. ( X ) جزyll. ( Y ) جزyll. ( Z ) ( W ) جزyll. ( X ) جزyll. ( Y ) جزyll. ( Z ) ( W ) جزyll. ( X ) جزyll. ( Y ) جزyll. ( Z ) ( W ) جزyll. ( X ) جزyll. ( Y ) جزyll. ( Z ) ( W ) jizyll. ( X ) jizyll. ( Y ) jizyll. ( Z ) ( W ) jizyll. ( X ) jizyll. ( Y ) jizyll. ( Z ) ( W ) jizyll. ( X ) jizyll. ( Y ) jizyll. ( Z ) ( W ) jizyll. ( X ) jizyll. ( Y ) jizyll. ( Z ) ( W ) jizyll. ( X ) jizyll. ( Y ) jizyll. (Z) jizyll. ( X ) jizyll. ( Y ) jizyll. ( Z ) ( W ) jizyll. ( X ) jizyll. ( Y ) jizyll. ( Z ) ( W ) jizyll. ( X ) jizyll. ( Y ) jizyll. ( Z ) ( W ) jizyll. ( X ) jizyll. ( Y ) jizyll. ( Z ) ( W ) jizyll ( X ) jizyll. ( Y ) jizyll. ( Z ) ( W ) jizyll ( X ) jizyll. ( Y ) jizyll ( Z ) ( W ) jizyll ( X ) jizyll ( Y ) jizyll ( Z ) ( W ) jizyll ( X ) jizyll ( Y ) jizyll ( Z ) ( W ) jizyll ( X ) jizyll ( Y ) jizyll ( Z ) ( W ) jizyll ( X ) jizyll ( Y ) jizyll ( Z ) ( W ) jizyll ( X ) jizyll ( Y )jizyll ( Z ) ( W ) jizyll ( X ) jizyll ( Y ) jizyll ( Z ) ( W ) jizyll ( X ) jizyll ( Y ) jizyll ( Z ) ( W ) jizyll ( X ) jizyll ( Y ) jizyll ( Z ) ( W ) jizyll ( X ) jizyll ( Y ) jizyll ( Z ) ( W ) jizyll ( X ) jizyll ( Y ) jizyll ( Z ) ( W ) jizyll ( X ) jizyll ( Y ) jizyll ( Z ) ( W ) jizyll ( X ) jizyll ( Y ) jizyll ( Z ) ( W ) jizyll ( X ) jizyll ( Y ) jizyll ( Z ) (W) jizyll ( X ) jizyll ( Y ) jizyll ( Z ) ( W ) jizyll ( X ) jizyll ( Y ) jizyll ( Z ) ( W ) jizyll ( X ) jizyll ( Y ) jizyll ( Z ) ( W ) jizyll ( X ) jizyll ( Y ) jizyll ( Z ) ( W ) jizyll |


- WITH REGARD TO THIS MANUAL
- INTENDED USE
- RESIDUAL RISKS
- Warning!
- IMPORTANT SAFEGUARDS
- READ THE INSTRUCTIONS CAREFULLY BEFORE USE.
- Danger for children
- Danger due to electricity
- Danger of damage originating from other causes
- Warning of burns
- Warning - material damage
- - Place the machine on a stable surface where it cannot be knocked over.
- KEEP THESE INSTRUCTIONS IN A SAFE PLACE
- DESCRIPTION OF COMPONENTS
- Control description
- Identification data
- PRELIMINARY PHASES FOR USE
- Starting the appliance
- Starting the first time
- Choice of the ground coffee supply device
- HOW TO MAKE COFFEE
- Check that the steam function button has not been unintentionally pressed.
- HOW TO MAKE A CAPPUCCINO
- REUTILIZATION FOR COFFEE
- HOW TO MAKE TEA OR TISANES
- USEFUL TIPS FOR OBTAINING A GOOD ITALIAN ESPRESSO
- CLEANING THE APPLIANCE
- Cleaning the filter containing the grounds.
- Cleaning the silicone disc
- Cleaning the filter holder seat
- Cleaning the Maxi Cappuccino device
- Cleaning the grill and water recovery drawers
- Cleaning the machine body
- Cleaning the tank
- DECALCIFICATION
- PUTTING OUT OF SERVICE
- TROUBLESHOOTING
- A PROPOS DU MANUEL
- HOE MAAK JE CAPPUCCINO
- BCErda XPAHnTb DAHHyIO IHCTpyKunio
- ONICAHNE IPNBOPA
- Onncahne komaHd
- IeHTnKauHbIe daHHbIe
- IODTOTOBNTeHbIE ΦA3bl IEPED NcPONb3OBAHNEM
- PpOaTobKa K npMHeHHIO
- NepBoe BKJIIOueHne
- Bb6op Bnda yctpoiCTBa dny noaun MoIOToro Kope.
- ПРИГOTOBЛЕНЕ KOФЕ
- BHHMaHHe!
- PpOBepntb, He haxaTa IIN cIyuaHNo KOnka nOauN napa.
- IOBTOPHOE IcnoJb3OBAHNE IJI PnIroTOBJIeHnKoΦE
- KAK DEJIATb YAIMHACTOJKN
- OuNCTka rHe3da DepeKaTeJIaФиЛbTpOB
- Ounstka npnbopa Maxi Cappuccino
- OuHSeHne peWetKN n JaunukOB c6opa BOJbl
- OuNCTka Kopnyca MaunHbI
- BHHMaHne!
- OuHcTka pe3epByapa
- DEKALbIuΦNtPOBAHNE
- HEBO3MOXKHOE IPNIMEHEHNE
- PYKOBODCTBO NO YCTPAHEHIO HEKOTOPbIX PPOBJEM
- aoloj-
- Lai jie jin Jg 12
- Ldol
- L 1
- Ugolgo golp
- a#logso
- JlssyI lal
- a.slbj
- yoJgY aSb1 J
- guiu gui 1 1 1 1
Brand : ARIETE
Model : Cafe Roma Plus (329
Category : Coffee machine