
K 940 AFC - Earphones AKG - Free user manual and instructions
Find the device manual for free K 940 AFC AKG in PDF.
| Product Type | Semi-open wireless dynamic headphone |
| Brand | AKG |
| Model | K 940 AFC |
| Category | Headphone |
| Transmission technology | UHF, LPD band 864 MHz |
| Selectable carrier frequencies | 863.5 MHz, 864.0 MHz, 864.5 MHz |
| Maximum range (free field) | Approx. 100 m |
| Headphone power supply | 3 V DC (2 NiMH rechargeable batteries 1.2 V, 600 mAh, AAA size) |
| Battery life (with included batteries) | Approx. 20 hours |
| Transmitter power supply | 9 V DC, 500 mA via included power adapter |
| Frequency response | 20 Hz - 22,000 Hz |
| Max. sound pressure level | 103 dB SPL |
| Distortion | < 1% |
| Headphone weight | Approx. 320 g |
| Transmitter weight (T 940 AFC) | Approx. 315 g |
| Main features | Autotuning (automatic frequency adjustment), volume adjustment, charging of rechargeable batteries on the transmitter or via external charger |
| Maintenance and cleaning | Clean with a soft, dry cloth. Do not use alcohol, gasoline or thinner. |
| Safety | Use only the supplied power adapter. Do not open the housing. Do not expose to heat, moisture or rain. |
| Spare parts and repairability | Replaceable rechargeable batteries (AAA), removable ear pad. Optional external charger available. Repair by qualified technician only. |
Frequently Asked Questions - K 940 AFC AKG
User questions about K 940 AFC AKG
0 question about this device. Answer the ones you know or ask your own.
Ask a new question about this device
Download the instructions for your Earphones in PDF format for free! Find your manual K 940 AFC - AKG and take your electronic device back in hand. On this page are published all the documents necessary for the use of your device. K 940 AFC by AKG.
USER MANUAL K 940 AFC AKG
Thank you for purchasing an AKG product.
The K 920 AFC / K 940 AFC wireless headphone system is based on advanced UHF transmission technology.
In order to make optimum use of the benefits of your K 920 AFC / K 940 AFC, please take a few minutes to read the instructions below carefully before operating the equipment.
Please keep the manual for future reference.
2 Description
The K 920 AFC / K 940 AFC headphone system
- uses state-of-the-art UHF radio transmission technology;
- features an "Aulotuning" function that automatically tunes the headphones to the transmitter frequency for optimum reception;
connects to any audio, video, TV set, PC, or notebook computer with a headphones, line, or recording output; - provides perfect sound reproduction, full mobility, and signal transmission through walls and ceilings over a distance of up to 330 feet (100 m) under ideal transmission conditions (free field).
To share your listening enjoyment with other persons, you can operate your transmitter with several headphones simultaneously.
K 920 AFC / K 940 AFC headphones are available separately.
3 Precautions
- Operate the headphones with two AAA size 1.2 V rechargeable (supplied) or 1.5 V dry batteries only.
- Never try to charge dry batteries using the transmitter's charging feature.
- Before charging the headphones batteries, always make sure that the batteries in the headphones are rechargeable types.
- Dispos of spent dry or rechargeable batteries conforming to local waste disposal rules. Never throw batteries into fire.
- Operate the transmitter with the supplied 9 VDC, 500 mA AC adapter only. Check that the AC voltage stated on the AC adapter is the same as that available in your country. Using the transmitter with a different AC adapter voids the warranty.
- Always switch the headphones OFF after use.
- Never try to open the headphone or transmitter case. Refer servicing to qualified service personnel only.
- Never place the equipment near heat sources such as radiators or electric heaters or expose it to direct sunlight, excessive dust, humidity, rain, temperatures below freezing, or impacts.
- Never use alcohol, petroleum-based cleaners, or paint thiners to clean the headphones or transmitter.
- If you do not use your headphones system for an extended period of time (e.g., when traveling), disconnect the AC adapter from the AC outlet.
- Also refer to section 7 Important Notes.
4 Unpacking and Optional Accessories 4.1 Unpacking
Your headphones system package contains the following components:

K 920 AFC, or K 940 headphones
T 920 AFC, or T 940 AFC transmitter
Connecting cable with stereo mini jack plug and L/R RCA plugs for connecting the transmitter to your audio source
AC adapter for powering the transmitter (9 V DC, 500 mA)
Two 1.2 V AAA size recharge-able batteries: NiMh, 600 mAh (K 940 AFC) or NiCd, 300 mAh (K 920 AFC) for powering the headphones (inside the headphones) If anything is missing, contact your AKG dealer immediately.
4.2 Optional Accessories
External charger (6 V DC, 100 mA) for supplied or optional headphones (refer to fig. 12).
| Version Order Number | |
| EU standard (except UK) 6000 H 1002 | |
| UK standard 6000 H 1003 | |
| US standard 6000 H 1004 | |

| Headphones | Order Number |
| K 920 AFC | 6000 X 1081 |
| K 940 AFC | 6000 X 1082 |
5 Controls
5.1 Headphones (Fig. 1)
- POWER switch: switches power to the headphones On and OFF.
- Status LED: illuminates green to indicate power to the headphones is ON, and red to indicates the batteries inside the headphones are being charged.
3a Charging contacts
3b Charging jack for optional external charger
4. Battery compartment (beneath the detachable ear pad)
5. AUTOTUNING switch: activates the automatic tuning function
6. VOLUME control
5.2 Transmitter (Fig. 2)
- AUDIO IN L/R, audio input sockets
- DC 9 V: DC input jack for AC adapter
- FREQ: frequency selector
- Charging contacts
- POWER ON/CHARGE: tri-color LED indicating charging and operating modes
6 Operating Notes
6.1 Connecting the Transmitter to AC Power
- Connect the cable on the supplied AC adapter to the DC 9 V jack [8] on the transmitter rear panel as shown in fig. 3.
- Check that the AC voltage stated on the AC adapter is the same as that available in your country. If it is, connect the AC adapter to a convenient AC outlet (see fig. 4). The transmitter will automatically be ready to operate.
Note that the transmitter will switch on as soon as it detects an audio signal at the AUDIO IN jacks or the jack.
6.2 Connecting the Transmitter to Your Audio Source
You may connect the transmitter to a headphones output (mini jack or 1/4'' jack), LINE, or REC outputs.
6.2.1 Connecting to a Headphones Output
- Before connecting the transmitter to your audio source, switch the audio source OFF.
- Referring to fig. 5, plug the red RCA connector (right channel) on the supplied connecting cable into the red AUDIO IN R socket [7] and the white RCA connector (left channel) into the white AUDIO IN L socket [7] on the transmitter rear panel.
- Connect the stereo mini jack plug on the connecting cable to the headphones output of your audio source (fig. 6/7).
- If the headphones output on your equipment is a 1/4'' jack, plug the supplied mini jack to 1/4'' adapter jack onto the connecting cable. Connect the adapter jack to the headphones output.
6.2.2 Connecting to a LINE or REC Output
- Before connecting the transmitter to your audio source, switch the audio source OFF.
- Referring to fig. 6/7, plug the red RCA connector (right channel) on the supplied connecting cable into the red LINE OUT R or REC OUT R socket and the white RCA connector (left channel) into the white LINE OUT L or REC OUT L socket on your audio source.
- Connect the stereo mini jack plug on the connecting cable to the jack (7) on the transmitter rear panel (see fig. 8).
6.3 Charging the Batteries in the Headphones
In order to ensure the longest possible service life for the rechargeable batteries, we deliver them uncharged, inside the headphones. Therefore, you will need to charge the supplied batteries before first operating your headphones system. Before charging, pull the protective foil away from the earphone in a straight movement.
WARNING: If you operate the headphones on dry batteries (see section 6.4), never try to charge the batteries using the transmitter's charging feature. This would cause serious damage to your headphone system. Dispense of spent
batteries conforming to local waste disposal rules.
- Referring to fig. 12, place the headphones on the transmitter such that the charging contacts [3] on the bottom of the left-hand earphone will rest on the charging contacts (10) on the transmitter.
The POWER ON/CHARGE LED (11) on the transmitter will light red to indicate that the batteries in the headphones are being charged. If signal is present at the transmitter audio input, the POWER ON/CHARGE-LED (11) will light orange. If the POWER ON/CHARGE LED (11) fails to illuminate, rotate the headphones to the point that the charging contacts (3) will rest on the charging contacts (10) on the transmitter. The batteries will be fully charged after approximately 7 hours. [The POWER ON/CHARGE LED (11) will continue lighting red.] You may leave the headphones on the transmitter for as long as you like without risking overcharge the batteries.
Important: In order to maintain full battery capacity for as long as possible, discharge the batteries completely about once a month:
Switch the headphones on and leave them outside the transmitter until the status LED (2) extinguishes.
Recharge the batteries as described above.
6.3.1 Optional External Charger
Alternatively, you use can the optional external charger to charge the batteries as shown in fig. 12. The batteries will be fully charged within approximately 7 hours.
- Plug the charger cable into the charging jack (3b) on the headphones.
- Plug the charger into a convenient power outlet. The status LED (2) on the headphones will illuminate red to indicate that the batteries are being charged.
Note: You can use the K 920 AFC headphones even while charging batteries.
6.4 Replacing Batteries
The capacity of any rechargeable battery will decrease over time. If you feel that you need to recharge the supplied batteries more often than would be convenient, you may consider replacing the batteries with new AAA size 1.2 V rechargeable or 1.5 V alkaline dry batteries.
- Remove the ear pad from the left-hand earphone as shown in fig. 9.
- Remove the old batteries.
- Referring to fig. 10, insert the new batteries into the battery compartment (4). Make sure to align the batteries with the polarity marks inside the battery compartment.
- Replace the ear pad on the earphone and rotate the ear pad CW to the point that the ear pad will click into place.
6.5 Setting Up the System
- Remove the headphones from the transmitter.
- Switch ON the audio source to which the transmitter is connected. If audio signal is present at the transmitter input, the POWER ON/CHARGE LED (11) on the transmitter will light green.
Note: If no signal arrives at the transmitter input for approx. 3 minutes, the transmitter will automatically switch off and the POWER ON/CHARGE LED (11) will extinguish.
- Set the FREQ selector (9) on the transmitter to its center position.
- Use the POWER switch (1) to switch the headphones on, so that the status LED (2) will illuminate green. Press the AUTOTUNING switch (5) on the headphones.
The Autotuning function will automatically tune the reception frequency to the carrier frequency set on the transmitter. After a few seconds, you should hear the signal in the headphones clearly and free of interference.
If your first try fails, set the FREQ selector (9) on the transmitter to a different position and press AUTOTUNING (5) again.
FREQ (9) lets you select one of three different carrier frequencies.
- Set the VOLUME control (6) on the headphones to the desired volume level.
Note: If the transmitter signal is disturbed, e.g., by reflections (multipath reception) or shadow effects, the headphones will automatically mute. This function eliminates interference related noise.
6.6 POWER ON/CHARGE LED Status
If LED is... Transmitter...
| ...lighting green: ...is connected to AC power and audio source and receives signal. Headphones are not on the transmitter, charging function is off. |
| ...lighting orange: ...is connected to AC and audio source and receives signal. Headphones are on the transmitter, charging function is on. |
| ...lighting red: ...has detected no signal for several minutes, headphones are on the transmitter, charging function is on. |
| ...dark: ...has detected no signal for several minutes, headphones are not on the transmitter, charging function is off, OR ...is not connected to AC power. |
7 Important Notes
- Operating switches on or connecting the transmitter to your audio source may cause clicks which at high volume settings may affect your hearing. Therefore, be sure to set the VOLUME control on the headphones to minimum before switching between different sources (tuner, turntable, CD player, etc.) or connecting the transmitter.
- Listening over headphones at high volume levels, particularly over extended periods of time, may damage your hearing.
- Your K 920 AFC / K 940 AFC is a radio frequency device that conforms to the strict European standards. For physical reasons that have nothing to do with the quality of the product, extremely strong interference sources may affect reception. In order to maintain interference-free listening pleasure, do not operate your K 920 AFC / K 940 AFC in the close vicinity of radio equipment, cellular telephones, or directly above TV or computer monitor picture tubes (see fig. 11). The supplied connecting cable is long enough to allow the transmitter to be placed at a safe distance from interference sources. Interference caused by other users of the 864 MHz LPD band are beyond AKG's control.
8 Specifications
System Performance
Modulation: FM
Carrier frequency band: 864 MHz (LPD band)
Selectable carrier frequencies: FREQ 1: 863.5 MHz
FREQ 2:864.0 MHz
FREQ 3:864.5 MHz
T 920 AFC / T 940 AFC Transmitter
Power supply: 9 VDC, 500 mA
Radiation angle: approx. 360^
Max. radiated power: 10 mW ERP (Equivalent Radiated Power)
Max. range (free field*): approx. 330 ft. [100 m]
Weight (T 920 AFC): approx. 9.7 oz. (275 g)
[T 940 AFC]: approx. 11.1 oz. (315 g)
K 920 AFC Headphones
Distortion: <1%
Type: semi-open dynamic headphones
Weight: approx. 6.3 oz. (180 g)
K 920 AFC Headphones
Power supply: 3 VDC (2 x 1.2 V, 300 mAh AAA)
size NiCd rechargeable batteries supplied)
Battery life: approx. 10 hours
(NiCd rechargeable batteries)
Frequency range: 20 Hz to 22,000 Hz
Max.SPL: ~103 dB SPL
K 940 AFC Headphones
Power supply: 3 VDC (2 x 1.2 V, 600 mAh AAA)
size NiMh rechargeable batteries supplied)
Battery life: approx. 20 hours
(NiMh rechargeable batteries)
Frequency range: 18 Hz to 24,000 Hz
Max.SPL: ~107 dB SPL
Distortion: <1%
Type: semi-open dynamic headphones
Weight: approx. 11.3 oz. (320 g)
- under ideal transmission conditions
9 Troubleshooting
| Symptom | Possible Cause | Remedy |
| No sound. | 1. AC adapter is not connected to transmitter and/or AC outlet.2. Transmitter is not connected to audio source.3. Connected audio source is switched off.4. Volume control on audio source is at zero.5. Batteries are low.6. Headphones are switched off.7. VOLUME control on headphones is at zero. | 1. Connect AC adapter to transmitter and/or AC outlet.2. Connect transmitter to audio source.3. Switch audio source on to feed signal to transmitter input.4. Set audio source volume to desired level.5. Charge batteries.6. Switch headphones on.7. Set VOLUME control to desired level. |
| POWER ON/CHARGE LED does not light. | 1. Transmitter is not connected to AC power.2. Batteries are not correctly aligned with polarity marks.3. Headphones are incorrectly positioned on transmitter. | 1. Connect transmitter to AC power.2. Check orientation of batteries in battery compartment.3. Place headphones on transmitter correctly. |
| Mono sound on headphones. | 1. Connected audio source operates in mono mode.2. Transmitter is not correctly connected to audio source. | 1. Switch audio source to stereo mode.2. Check cable connection between transmitter and audio source. |
| Loud noise. | 1. Transmitter and receiving frequencies are not identical.2. Audio level at transmitter input is too low.3. Input signal is noisy.4. Batteries are dead.5. Transmitter position. | 1. Press AUTOTUNING switch on headphones or use FREQ selector to select different carrier frequency and press AUTOTUNING on headphones.2. Increase audio source volume.3. Check audio source.4. Charge batteries.5. Relocate transmitter (refer to fig. 11). |
| Distorted sound. | 1. Audio level at transmitter input is too high.2. Transmitter and headphones carrier frequencies do not match.3. Batteries are dead. | 1. Decrease audio source volume.2. Use FREQ selector on transmitter to select different carrier frequency and press AUTOTUNING switch on headphones.3. Charge batteries. |
1 Introduction
Certificate of conformity for K 920 AFC & K 940 AFC
AKG Acoustics GmbH herewith declares that the K 920 AFC / K 940 AFC (Receiver + Transmitter) is in compliance with the essential requirements and other relevant provisions 1999B/RCive
To order a free copy of the Declaration of Conformity, visit http://www.akg.com or contact sales@akg.com.
Par la presente AKG Acoustics GmbH declare que l'apparil K 920 AFC / K 940 AFC (Receiver + Transmitter) est conforme aux exigences essentielles et aux autres dispositions pertinentes dd998/5/6Erective
- Theorem 2. The existence of () -algebras having the following properties: () is a regular subring of , and () is a regular subring of ^* .
1.2.1.1. The non-trivial 3d system (x,y) and its associated Schur homology groups are the same as in [10].
shows that the two-dimensional homotopy groups are free over a finite dimensional vector field.
1.2.3.1.1.1.1.1.1.1.1.1.1.1.1.1.1.1.1.1.1.1.1.1.1.1.1.1.1.1.1.1.1.1.1.1.1.1.1.1.1.1.1.1.1.1.1.1.1.1.1.1.1.
1
- 10.2.2023 10:46 PM (UTC)
L
w. Uem gongrode goe Brehk, der zu 20
T
protein, metal, or membrane. Polymerase chain reaction (PCR) is a widely used technique in biology. Methods
K920AEC/1940AECerhaben.5uacchshn al Zubehl
3 Sicherheitswirss
1.Dernberer,Stefos Kopfchiorin,rat 3:56
2.L.Y. Keshmiri (supervisor under 3:48),3:1
Sarre de Gabe AAA. 1.Vaurette 2. plaine, skr.
Sorokin, mirrher der Ledererlachung abdald 1. Verwasserne Stuhr nach laudern Inferenzen
dom sich effiziente Satzerke (Abkona in
In the context of this literature, we thank Dr. John P. Kohn for his help in the methodology version corrections. NID: No 5
1.
Phalangkrai (1985) 20, 41. (M.Sq.367 m.a.)
[1] Uthunlakorn, vongpakul, 40, 41. (M.Sq.367 m.a.)
n
2018年1月1日
. . . . . . . . . . . . . . . . . . . . . . . . . . . . . . . . . . . . . . . . . . . . . . . . . . . . . . . . . . . . . .
e
Kleppner Vorder Uphaus 4, 10003 Bielefeld
C. P 原子的核外电子团是 H2 S ,而 H2 S 是 CH 的单质
Pnepipn nnnnne nnne nee
4.3 Stocky Eutectics
毛
1
C


4
5 Sedimenta
5.1 Kapitalflow (Rg
1
1
1.1.1.2.1.1
中
中
(一)本次股东大会的召集人:公司董事会
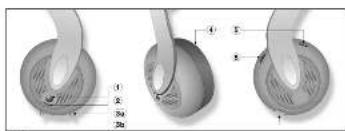
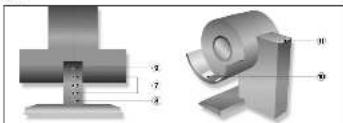
图1

图2
图3

图6.3
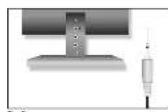
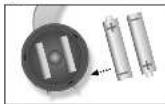
图6
图16
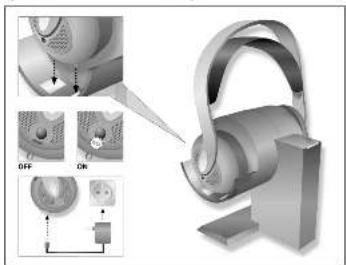
图12

- Description
- Precautions
- Unpacking and Optional Accessories 4.1 Unpacking
- Optional Accessories
- Controls
- Headphones (Fig. 1)
- Transmitter (Fig. 2)
- Operating Notes
- Connecting the Transmitter to AC Power
- Connecting the Transmitter to Your Audio Source
- Connecting to a Headphones Output
- Connecting to a LINE or REC Output
- Charging the Batteries in the Headphones
- batteries conforming to local waste disposal rules.
- Important: In order to maintain full battery capacity for as long as possible, discharge the batteries completely about once a month:
- Optional External Charger
- Replacing Batteries
- Setting Up the System
- POWER ON/CHARGE LED Status
- If LED is... Transmitter...
- Important Notes
- Specifications
- System Performance
- T 920 AFC / T 940 AFC Transmitter
- K 920 AFC Headphones
- K 940 AFC Headphones
- Troubleshooting
- Introduction
- Certificate of conformity for K 920 AFC & K 940 AFC
Brand : AKG
Model : K 940 AFC
Category : Earphones