
40 Neon - Smartphone ARCHOS - Free user manual and instructions
Find the device manual for free 40 Neon ARCHOS in PDF.
| Product type | Smartphone |
| Brand | ARCHOS |
| Model | 40 Neon |
| Operating system | Android |
| Screen size | 4 inches |
| Screen resolution | 480 x 800 pixels |
| Connectivity | WiFi 802.11 b/g/n, Bluetooth 4.0, 3G/4G (depending on version) |
| Charging port | Micro-USB |
| Battery | Lithium-ion 1400 mAh (removable) |
| Internal memory | 4 GB (expandable by microSD up to 32 GB) |
| RAM | 1 GB |
| Rear camera | 5 megapixels |
| Front camera | 0.3 megapixels |
| Processor | Quad-core 1.2 GHz |
| Sensors | Accelerometer, proximity sensor |
| Main functions | GPS, Android Device Manager, app management, wallpapers, widgets |
| Maintenance and cleaning | Clean with a soft, dry cloth. Do not use abrasive products. |
| Security | Screen lock by PIN, pattern, or password |
| Repairability | Removable battery, screen and back cover replaceable by a professional |
| General information | Manual available for download at notice-facile.com |
Frequently Asked Questions - 40 Neon ARCHOS
User questions about 40 Neon ARCHOS
0 question about this device. Answer the ones you know or ask your own.
Ask a new question about this device
Download the instructions for your Smartphone in PDF format for free! Find your manual 40 Neon - ARCHOS and take your electronic device back in hand. On this page are published all the documents necessary for the use of your device. 40 Neon by ARCHOS.
USER MANUAL 40 Neon ARCHOS
Congratulations for the purchase of an ARCHOS device! This quick start guide helps you to start using your device properly. If you have more questions concerning the use of your device, visit us at:

twitter.com/archos

www.facebook.com/archos
Blog
https://blog.archos.com/

http://faq.archos.com/

www.archos.com, click Support > After-sales support

www.archos.com, click Support > Downloads > Declaration of conformity
As we are often updating and improving our products, your device's software may have a slightly different appearance or modified functionality than presented in this quick start guide.

Unboxing
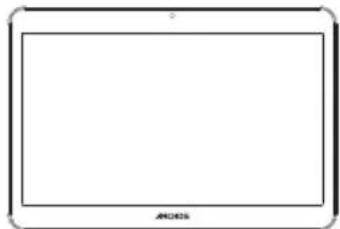
ARCHOS 101f Neon
Quick start guide
Warranty, legal and safety notice

Charger adapter
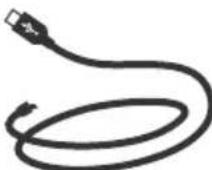
Charging cable
Your device is running Android operating system. Updates could be offered to improve the device's performance. To check if any update is available, go to: Settings > About tablet > Check for update.
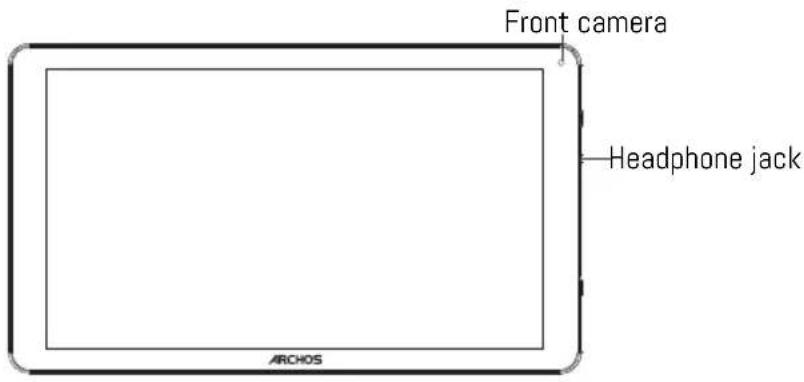
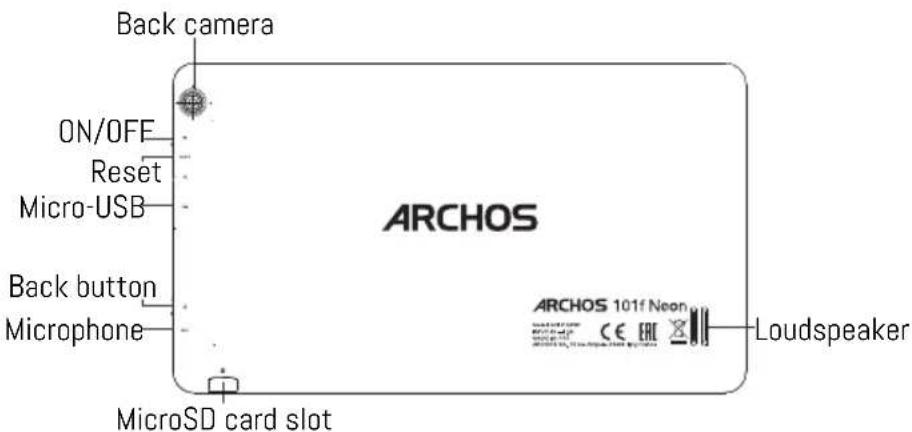
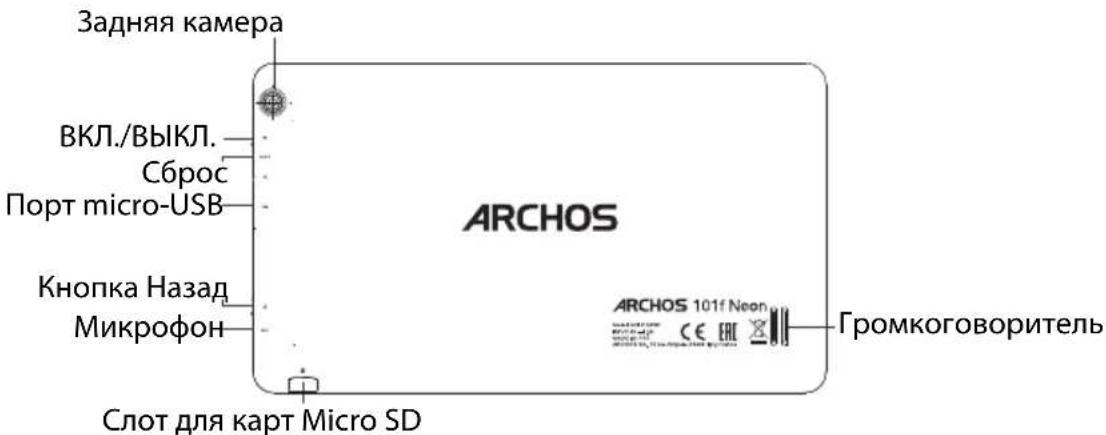
Describing your device


Starting up
Charging your battery completely
Plug the charging cable in the Micro-USB port and the adapter in a power outlet. Leave the device until the battery is fully charged.
Turning ON
- Press and hold the ON/OFF button to turn on the device.
- Follow the instructions to set up your device: language, WiFi, copy your data, enter your name, set up email, protect your phone, notifications to be shown, Google services, third party apps.
NOTE: You can skip some steps and define them later from the Settings app.
Moving a home screen item: Touch and hold your finger onto it until the positioning gridlines appear, then slide it to the desired location, and release your finger.
Removing a home screen item: Touch and hold it, slide your finger towards the top of the screen and drop it over the Remove icon.
Uninstalling an item: From the All apps screens, touch and hold it, slide your finger towards the top of the screen and drop it over Uninstall bin.
Creating application folders: Drop one app icon over another on a home screen and the two icons will be combined.
Changing your wallpaper: Hold your finger on a home screen at an empty location, then choose from the list: Wallpaper.
Hints & tips
Widgets: Hold your finger on a home screen at an empty location, then choose from the list: Widgets.
Securing your device: Define a lock screen to protect your privacy. Select the Settings app, then Security. Choose a screen lock.
Android device manager: When your device is lost, you can use the android device manager page (https:// www.google.com/android/devicemanager) to erase all your contents, to lock the device, to locate the device or to make it ring.
Scheduled power on&off: Schedule power on & off to set when the device turns off and turn on. For example, you can set it for sleep time.

Troubleshooting
-If your device is frozen:
Press the ON/OFF button for 10 seconds or use the reset button.
-If your device doesn't turn on:
-
Charge your device.
-
Press the ON/OFF button for 10 seconds.
-If your device functioning is too slow:
Close all apps which are not currently used.
-If your WiFi reception is too low:
Make sure you are not far from the WiFi hotspot.
Reset and redefine your connection parameters.
Contact your WiFi connection provider.
-If your device has dysfunctions:
Reinitialize your device. Go to Settings > Backup & reset > Factory data reset. If you can't have access to the settings for any reason, consult our FAQs about the reinitialization process.
For more answers about your technical difficulties, do not hesitate to visit: faq.archos.com
EN
6
Contactez-nous

www.archos.com, click Support > After-sales support

www.archos.com, cliquez Support > Telechargesments > Déclaration de conformité
TapaHTn n HNCTpyKcnn no 6e3oNaCHOCTn

AanTepeaepnHoro yctpoicTba
Ka6enb 3apraHoro yctpoiCTBa
JaHoe yctpoiCTBO pa6oTaET noJ npabHeHem onepaunOHHO cnCTeMbI Android 8.1. MoryT npedaratbcn OboBHeHn, no3BOJauOuHne ynyuHTb kcnnyaTaUOnHHbE xapaKTepeNtKNy cTPOiCTBa. IpnobepKn HAnuHn o6HOBHeHn BblonHnTe nepexo; Settings > About tablet > Check for update (HaCtpoNk > O PnlaHseTe > PpOBepNTb HAnuHne o6HOBHeHn).
Oncanhe yctpoiCTBa

ΦpoHTaJIbHaJaKaMepa
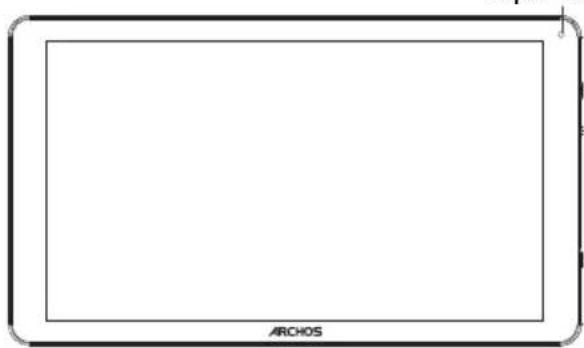
THe3doIJIa NOdkIOUOeHnHauyuHnKOB
RU

Hauano pa60TbI
Полна заряда AkKулгетopa
BCTaBbTe Ka6eJb 3apAnHoro yctpoiCTBa B nopT micro-USB, noCne yero BcTaBbTe aanTepe 3apAnHoro yctpoiCTBa B po3eKy cetn 3JeKtpoNtAHn.
Dokntecb nonHou 3apAkn aKKymyIaTopa.
BknIoueHne
- HaxmTe u ydepXnBaIte KhoNky BKJI./BblKJI., yTO6bl BkJIOuHTb yCTPOINCTBO.
- Cnéduynte uHCTpykCnM dIy BbINoHHeHn HaCTpoiKu yCTpoiCTBa: Bbl6op a3bika, napametpoB Wi-Fi, konnpobAHn DaHHbIX, BBOda IMeHN, HAcTPOiKN 3JeKTPoHHO NOUtBi, 3aunTbTeNefoHa, Bbl6opa OTO6paXaembix yBeOMLeHn, cnyx6 Google n npInoxeHn CTOPOHHX npOn3BODnteNe.
ПРИМЕЧАНЕ: HeKOTOpbIe onepaun MOxHNo npOnyCTnTb I NaCTpOuNTb N03dHee B npNIOJKeHIn Settings (HaCToPouKn).
IepemeueHne 3JeMeHTa Ha rnaBHOM 3KpaHe: KocHTecb 3JeMeHTa naIbUeM u ydepKuBaIte erO, NOKa He NOBRTcA LIHN CetTKI PO3NIOHnPOBaHnA, 3aTeM npeTAHTE erO B HxHoe MeCTo I OTnyCTnte NaIeu.
YdaHHe 3aTe 3aTe HepaHa nOtnyctnte Ha 3HaKOM Remove (yaHne).
Дeнсталлсьл eemeHTa:Ha эКpaHc All Apps (Bce npiloxkeHn) KocHTecb əLemnta nalbucm ydepxnbaiTe erO, 3aTeM nepetAHte erO B bepxHIO qactb əKpaHa N OTnyCTNTe Had KOp3Hoi Uninstall (Дeнсталлсь).
Co3daHne npINOxKeHH: Ha rnaBHOM 3KpaHe nepeTAHTE OINH 3HaOK npINOxKeHHa DpyroH n OTnCyTNe; DBa 3Tnx 3HaUka 6ydyT o6bEduHeBb B ODHo nnKe.
I3MeHeHne OHOBOrO pncyHa: yJeepKbAite NaIeuc Ha rJIaBHOM 3KpaHe B NcyCTOM MeCTe, 3aTeM
CObEtbl NO nCnOJb3OBaHnIO

BbIepeHTe n3 cncsKa:Wallpaper (OHOOBiPnCyHOK).
BnJxKTebl: yndePknBaIte naneu Ha rnaBHOM 3kpaHe B nyCTOM MecTe, 3aTeM BbIbepnte n3 cnNcKa: Widgets (BnJxKTebl).
3aunTa yctpoiCTBa: aKTNbpyuIte 6nOKnpOBky 3kpaHa dJa 3aunTbI KOHneHcnaJIbHocTn. 3anyCTnTe npInOxKeHne Settings (HacTpoiKn), 3aTeM Bbl6epnte Security (BezonaChocTb).
Bb6epnte 6JIOKnpOBky kpaHa.
YdaJIeHHOe ynpaBHeHne Android: ecn BaWe yCTpoiCTBO yTepaHO, Bbl MoKeTe BOcNoIb3ObaTbcr CTpaHnueydaJIeHHoro ynpaBHeHnra Android (https://www.google.com/android/ devicemanager), tTO6bI cTepeTb C Hero BCE coOpexHMoe, 3a6JIOKIpOBaTb yCTpoiCTBO, HauTN erO MEcToIOnIOJoxHne nII N 3aCTaBHTb yCTpoiCTBO 3BOHNTb.
BkIIOueHne I BbIKIOueHne I O paCnscAnHIO: 3aaiTe paCnscHne BKIOUeHna I BbIKIOUeHna, UTO6bl yCTPOIcTB BO BbIKIOUaOcB IN BKIOUaOcB H a3HaueHHe Bpem. HanpImep, MoXHO 3aIIaHnPoBaTb BbIKIOUeHne YCTPOIcTBa Ha BpeM cHa.

Ponck nyctpaHene HeNCnpaBHOCTeI
-Ecnn yctpoiCTBO 3aBnCNo:
Haxmnte KhoNky BKJ./BblKJI. Ha 10 cekyI NII IN cnoIb3yIte KhoNky c6poca.
-Ecnn yctpoicBO He BkIouaetca:
1.3aprntyeyctpoiCTBO.
- Haxmnte KhoNky BKJ./BbIKJ. Ha 10 ckyHd.
-Ecnn yctpoiCTBO pa6oTaet cniuKOM MeJeHHO:
3aKpoTe npuIoxeHn, KOTOpbIe He NCIOJIb3yIOTcB DaHHbIMOMeHT.
-Ecnn KaueCTBO CBa3n Wi-Fi cinnKom Hn3Koe:
Y6eIntecb, yTO Bbl He haxoIntecb cIIuKOM daJeKO OT ToUKn DoCTyna Wi-Fi.
C6pocbTe n 3aJaTe 3aHOBO npaMeTpbl NODKJIoueHn.
CbXnTeEc b npoBaIepom noKIOueHn Wi-Fi.
-Ecnn yctpoonCTBO yHKnOHNpyeT HenpaBnIbHo:
BbIOnHnTe NOBToPHyU INHnuaJIa3aunIO yCTpoiCTBa. IpeuIInTe B Settings > Backup & reset > Factory data reset (HacTpoiKn > C6poc N BOCCTaHOBneHne > C6poc K 3aBOJcKmM HAcTpoiKaM).
Ecn no KaKIM-Ni6o npuHnAm DoCTyna K NaCTPOkam HeT, CM. ONncHne IpOcecca NOBTOPOHn HnCuaN3aun B pa3dene Yacto 3aDaBaEmbIX BOpOCOB N OTBeTOB.
3aKpniTe Bci DoaTkn, rKi BN Ha daHn MOMeHT He BnKOpNCTOByeTe.
-Як soo nepeenaаданх uepe3WiFi duke nobibha:
IpekeohaiTeca, 0B 3naOHTecb He dyke daNEKO BiD TouKn doCTyny Fi.
3knHbTe Ta npeBn3HaUte npaMeTpni 3'EnHaHH.
3B'jxitbc3 noctaunbHnKOM nocnyr WiFi 3'eHaHH.
-Якwo npicptiMaeЯkcbdncfychkuii:
BiΦopMaTyIe npIcTpi. IpeenDiB B po3dIn HanaWtYBaHn > Pe3epBHe KoniOBAHH i CkndaHH > CkndaHH HaalaWtYBaHb. RaKIO Bn He MoKeTe OTPMaTn DOCTyn Do HanaWtYBaHb 3a 6ydb-jaKoi npuHH, 3BepHiTbcrdo FAQ y po3dIn CkndaHH HaalaWtYBaHb.
IIO5 OTPIMATN BIIbIE BIDIOBIDEI CTOCOBHO TEXHUYNX IINTAHb BIDBIIAITE FAQ. ARCHOS.COM

National restrictions
This device is intended for home and office use in all EU countries (and other countries following the EU directive 2014/53/
EU) without any limitation except for the countries mentioned below:
Country Restriction ReasonRemark
Bulgaria None General authorization required for outdoor use and public service
France Outdoor use limited to 10
mW e.i.r.p. within the band
2454-2483.5 MHz
Military Radiolocation use. Refarming of the 2.4 GHz band has been ongoing
in recent years to allow current relaxed regulation. Full implementation
planned 2012
Italy None If used outside of own premises, general authorization is required.
Luxembourg None General authorization required for network and service supply (not for
spectrum)
Norway Implemented This subsection does not apply for the geographical aera within a radius of
20 km from the centre of Ny-Alesund
Russian None Only for indoor applications
Federation
Note: Frequency 2454-2483.5MHZ are restricted to indoor use in France.
Archos company (Contact address : ARCHOS SA 12 Rue Ampère 91430 Igny France) declares that this tablet ARCHOS 101f
Neon is in compliance with the essential requirements and other relevant provisions of Directive 2014/53/EU:
https://www.archos.com/products/conformity.html
https://www.archos.com/products/conformity.html

| WLAN | ||
| Standard | Frequency | Max EIRP (dBm) |
| 802.11b/g | 2412 ~ 2472 MHz | 12.12 |
| 802.11n – HT20 | 2412 ~ 2472 MHz | 10.38 |
| 802.11n – HT40 | 2422 ~ 2462 MHz | 9.33 |
| Bluetooth | ||
| Bluetooth Version | Frequency Range | Max EIRP (dBm) |
| BDR | 2402 ~ 2480 MHz | 6.27 |
| BLE | 2402 ~ 2480 MHz | 6.31 |