
Fornarina 2 73978 - Bread maker TERMOZETA - Free user manual and instructions
Find the device manual for free Fornarina 2 73978 TERMOZETA in PDF.

| Product type | Bread machine |
| Brand | Termozeta |
| Model | Fornarina 2 73978 |
| Power supply | 230 V ~ 50 Hz |
| Number of programs | 12 programs |
| Bread capacities | 750 g or 900 g (depending on program) |
| Browning levels | 3 levels: light, medium, dark |
| Timer function | Yes, up to 13 hours in advance |
| Special programs | Dough, jam, cake, sandwich, bake only |
| Bowl and kneader | Removable bowl (6) and kneader (2) with non-stick coating |
| Included accessories | Measuring cup (7), measuring spoons (8), hook for removing kneader (10) |
| Control window | Yes, on the lid (4) |
| Keep warm | Yes, approximately 1 hour after baking |
| Cleaning | Bowl and kneader by hand with non-abrasive sponge; do not put in dishwasher; body cleaned with damp cloth |
| Materials | Plastic (body), steel (bowl?), non-stick (bowl and kneader) |
| Spare parts available | Bowl, kneader, measuring cup, measuring spoons, hook |
| Repairability | Authorized Termozeta service center for repairs; original spare parts |
| Safety | Do not immerse; hot surface; do not use barefoot; unplug before cleaning |
| Warranty | Void if installation not compliant |
| General information | Household use only; keep out of reach of children |
Frequently Asked Questions - Fornarina 2 73978 TERMOZETA
User questions about Fornarina 2 73978 TERMOZETA
0 question about this device. Answer the ones you know or ask your own.
Ask a new question about this device
Download the instructions for your Bread maker in PDF format for free! Find your manual Fornarina 2 73978 - TERMOZETA and take your electronic device back in hand. On this page are published all the documents necessary for the use of your device. Fornarina 2 73978 by TERMOZETA.
USER MANUAL Fornarina 2 73978 TERMOZETA
7.Graduated cup
8.Measuring spoons
9. Electrical cable with plug
10. Hook to extract the kneading blade
E
DESCRIPTION
The present manual is the integral part of the appliance and must be carefully read before using it as it gives important indications with regard to safety of installation, use and maintenance. Keep it with care.
- After taking off the packaging make sure that the appliance is intact. In case of doubt do not use it and contact an assistance centre authorised by TERMOZETA.
- Don't leave pieces of packaging (plastic bags, polystyrene foam, nails etc.) within reach of children or persons with reduced mental capacities since these are potential sources of danger.
- The electrical safety of this appliance is ensured only when it is correctly connected to an effective earthing system in compliance with the existing electrical safety standards. TERMOZETA shall not be held responsible for any damages caused by the lack of an earthing system.
- Before connecting the plug to the socket check that the working voltage of the appliance corresponds to the one in your house. If in doubt, contact professionally qualified staff.
- Use of adaptors, multiple sockets and extension leads is not advisable. In case of necessity use exclusively approved devices in conformity with the current safety regulations while making sure that they are compatible with the appliance power. If in doubt, contact professionally qualified staff.
- Any installation which doesn't comply with what is specified can endanger your safety and the warranty expires.
- The appliance was exclusively designed for domestic use to cook food.
-
For safety reasons pay attention and:
-
do not use the appliance when you are barefoot or having wet hands or feet
- do not use the appliance outside the domestic environment
- do not leave the appliance exposed to atmospheric agents (sun, rain...)
- the appliance is not intended to be used by persons with reduced physical or mental capacities or without experience, unless there is
someone controlling them or unless they have the use instructions - never pull the feeding cable or the appliance itself to disconnect the plug from the socket
- never immerse the appliance in water or other liquids.
- The feeding cable of the appliance should never be replaced by the user himself. In case of necessity contact an assistance centre authorised by TERMOZETA or professionally qualified staff.
- In case of problem or malfunctioning of the appliance, turn it off and do not tamper with it. For any repairs contact an assistance centre authorised by TERMOZETA and ask for the use of original spare parts.
- At the end of the life-cycle of the appliance, put it out of service by cutting the feeding cable after disconnecting the plug from the socket. For the disposal of the appliance follow the regulations which are valid in your place of residence.
- Termozeta cannot be considered responsible for any damage to persons, animals or things caused by the incorrect installation or as a result of an illegitimate, mistaken or unreasonable use.
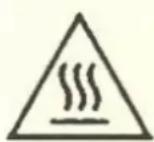
WARNING! HOT SURFACE
The appliance can reach high temperature during its operation. Avoid touching it with bare hands.
INSTRUCTIONS FOR USE
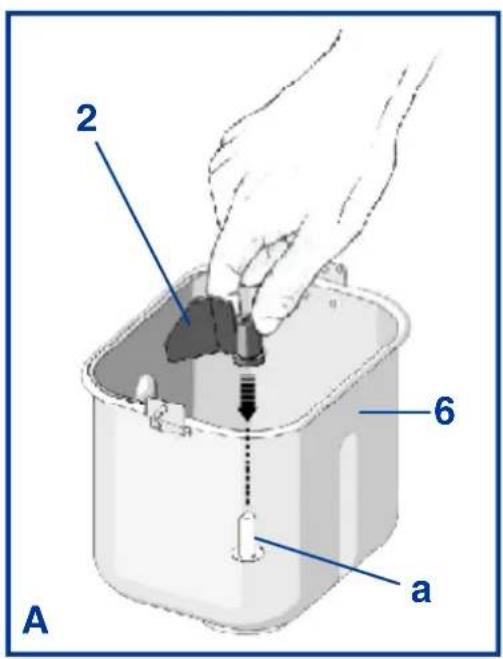
INSERTING/REMOVAL OF BASKET (6) AND BLADE (2)
ASSEMBLY
Open the lid (3) and insert the basket (6) into the baking chamber inside the appliance.
Tum the basket in a clockwise direction until it locks into place: do not use the handle to turn the basket.
Place the kneading blade (2) into the centre of the basket by inserting it onto the shaft (a) (see picture A).
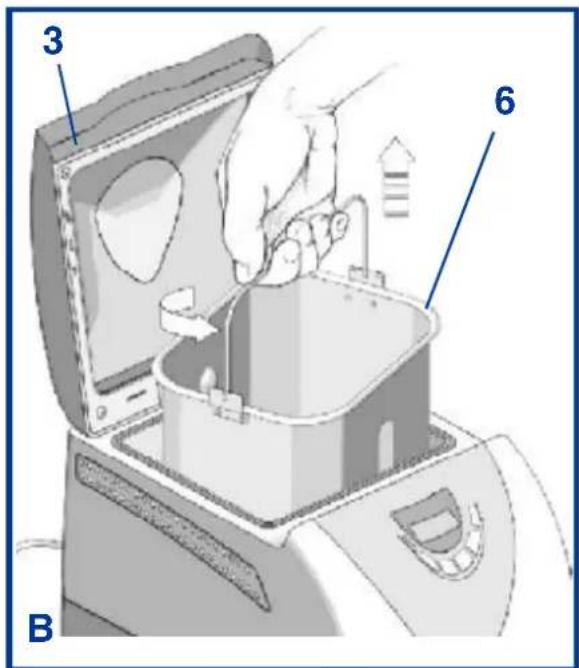
DISASSEMBLY
Open the lid (3).
Lift the kneading blade (2) and remove it. Turn the basket (6) in a counterclockwise direction and lift it by using the handle (see picture B).
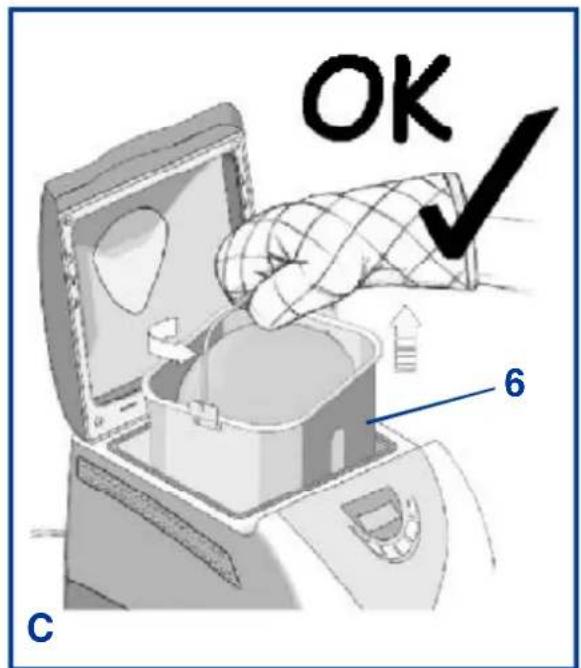

ATTENTION
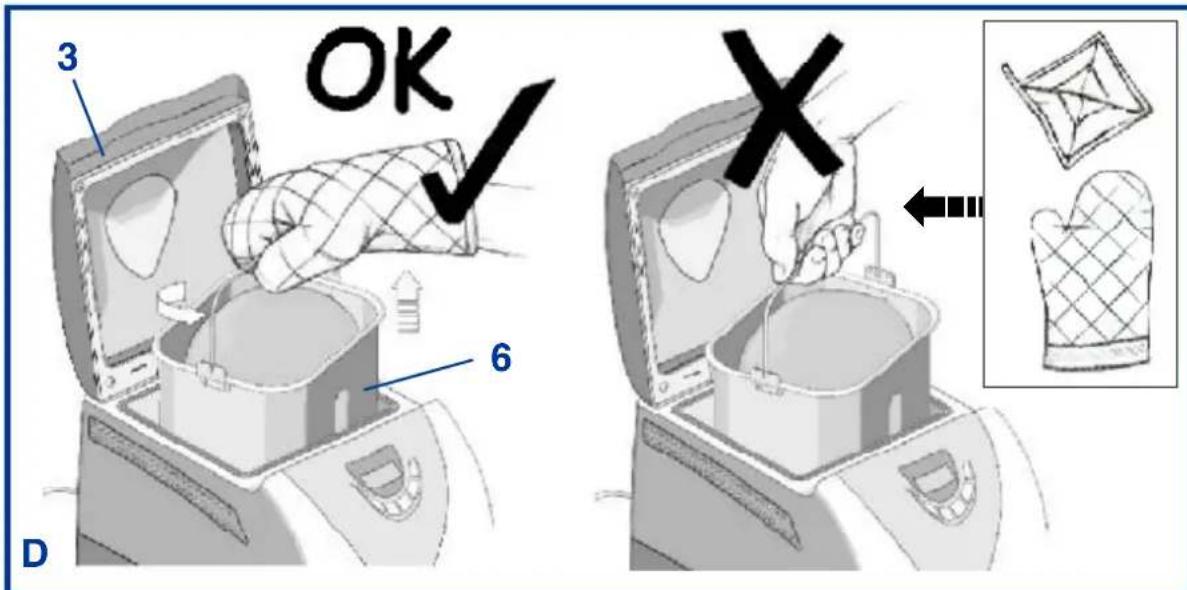
Use oven mitts or pot holders when the appliance is hot, since the basket (6) and the kneading blade (2) can become very hot (see picture C).
Always make sure the plug is disconnected from the power outlet before inserting/removing the kneading blade (2) and the basket (6).
CONTROL PANEL
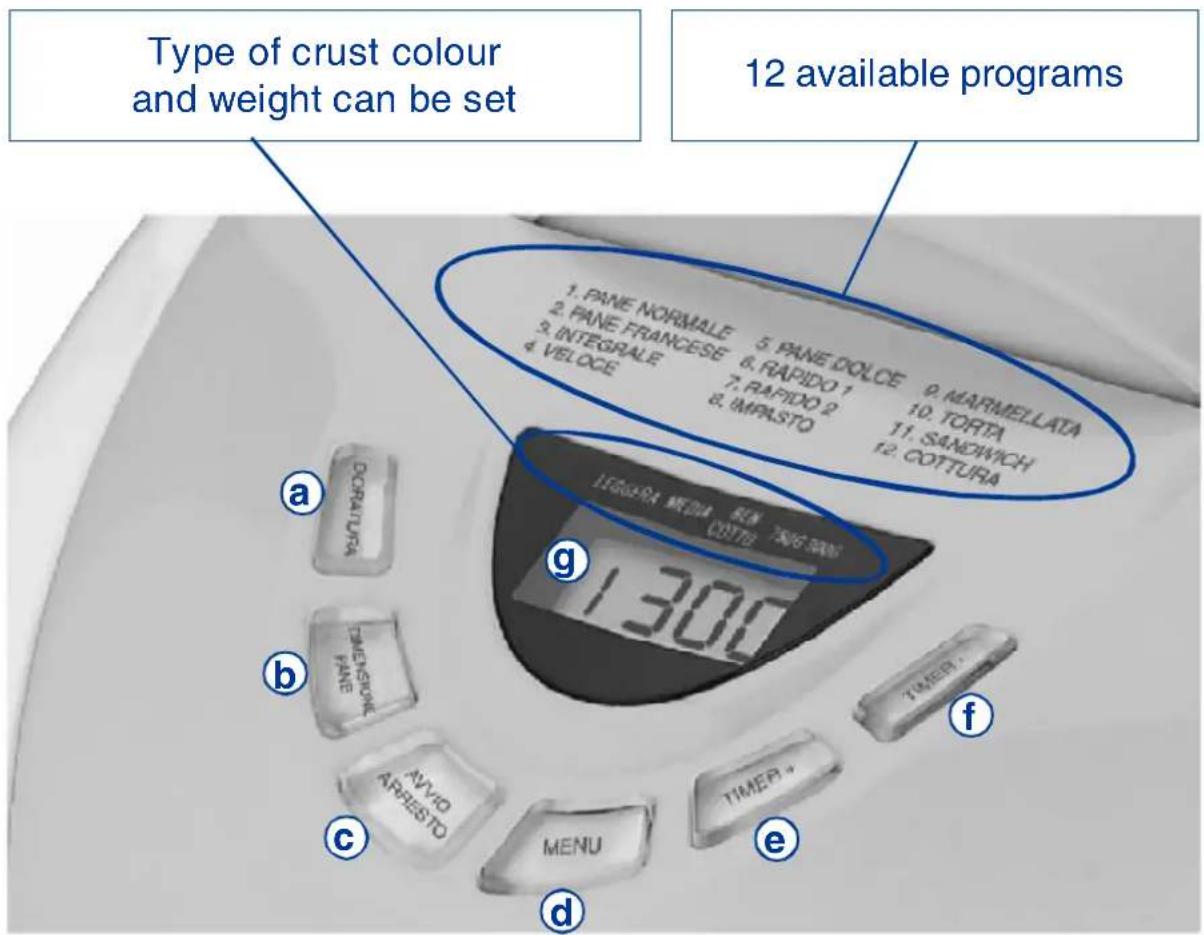
The information on the functions set are shown on the display (g): program number selected, program time, type of crust colour and bread size.
The control panel is equipped with six keys with the following functions:
CRUST COLOUR key (a):
three crust colours for the bread can be selected: light, medium or dark. A triangle appears on the display positioning itself in correspondence of the selected crust colour.
This function cannot be used in the following programs: DOUGH, JAM, CAKE, SANDWICH, BAKE.
BREAD SIZE key (b):
the bread size is selected with this key by choosing between 750g or 900 g.
A triangle appears on the display positioning itself in correspondence of the pre-selected quantity.
This function cannot be used in the following programs: QUICK, RAPID 1, RAPID 2, DOUGH, JAM, CAKE, BAKE.
START/STOP key (c):
START: keep the START/STOP key (c) pressed for one second to start the program.
STOP: keep the START/STOP key (c) pressed for some seconds to stop a program in operation. A beep will confirm that the program has been interrupted.
MENU key (d):
allows to select the desired program (see table A), choosing from the twelve available programs. The twelve programs are shown on the control panel. The program number selected is shown on the display.
TIMER + (e) and TIMER - (f) keys:
these keys set the timer for starting and automatically turning off the appliance (refer to the paragraph on "Timer function").
This function cannot be used in the following programs: RAPID 1 and RAPID 2.
PROGRAMS THAT CAN BE SELECTED WITH THE MENU KEY
The baking machine Fornarina 2 is provided with 12 programs whose main features are described below:
Table A
| PROGRAM No | TYPE OF BREAD - FUNCTION | DURATION and WEIGHT | CRUST COLOUR |
| 1 Pane normale | Normal bread: kneading, rising and baking | for 900 g: 3 hours for 750 g: 2 hours 53' | can be set |
| 2 Pane francesse | French bread: kneading, extended rising and baking | for 900 g: 3 hours 50' for 750 g: 3 hours 40' | can be set |
| 3 Pane integrale | Wholemeal bread: kneading, rising and baking | for 900 g: 3 hours 40' for 750 g: 3 hours 32' | can be set |
| 4 Velocce | Quick: kneading, rising and baking of the bread with baking powder | 1 hour 40' weight preset and cannot be changed (see recipe) | can be set |
| 5 Dolce | Sweet: kneading, rising and baking of sweet bread | per 900 g: 2 hours 55' per 750 g: 2 hours 50' | can be set |
| 6 Rapido 1 | Rapid 1: kneading, rising and rapid baking of about 750g of bread | 58' weight preset and cannot be changed (see recipe) | can be set |
| 7 Rapido 2 | Rapid 2: kneading, rising and rapid baking of about 900g of bread | 58' weight preset and cannot be changed | can be set |
| 8 Impasto | Dough: kneading and rising without baking | 1 hour 30' weight preset and cannot be changed (see recipe) | preset and cannot be changed |
| 9 Marmellata | Jam: kneading and cooking of jam | 1 hour 20' weight preset and cannot be changed (see recipe) | preset and cannot be changed |
| 10 Torta | Cake: kneading, rising and baking of cake with baking powder | 1 hour 50' weight preset and cannot be changed (see recipe) | preset and cannot be changed |
| 11 Sandwich | Sandwich: kneading, rising and baking of sandwich bread | for 900 g: 3 hours for 750 g: 2 hours 55' | preset and cannot be changed |
| 12 Cottura | only baking | 1 hour weight preset and cannot be changed (see recipe) | preset and cannot be changed |
All programs can be replaced with the Quick, Rapid 1 and Rapid 2 program: in this case the brewer's yeast must be replaced with baking powder and the liquid ingredients must be warmed up.
NOTE: the program times are fixed and cannot be changed.
TIMER FUNCTION
This function allows you to set the time if you want to have freshly baked bread at a certain time, taking into consideration the preset times for each program as indicated in table A.
The maximum time that can be set is 13 hours.
Set the crust colour (key a), bread size (key b) and program (key d) to display the duration of the actual program.
Press the TIMER + key (e) to set the time delay or when you want the selected program to end (current time + execution time).
Each time the TIMER + key (e) or the TIMER - key (f) is pressed the selected program time increases or decreases by 10 minutes, accompanied by a beep.
Keep the key pressed to advance the time continuously, no beep is emitted.
EXAMPLE
It is 8 pm and you want the bread ready for 7 am the following morning, that is 11 hours after the current time. Press the TIMER + key (e) until 11 hours appear on the display. Then press the START/STOP key (c).
The timer has been set.
ATTENTION
The required time is not calculated automatically, but it must be set by the user on the display.
The display is not a clock, but only indicates the hours and minutes concerning the program times or the timer function set.
To remove the timer function, keep the START/STOP key (c) pressed for some seconds until a beep confirms that the function has been disabled.
NOTE
When setting the timer function, do not use ingredients that easily deteriorate like milk, eggs, fruit or vegetable purees.
HOW THE BAKING MACHINE WORKS
The program is made up of 3 phases with a changeable length according to the recipe and the bread size chosen.
- Kneading: phase of mixture of the ingredients.
- Rising: one or several rising cycles with very short kneading intervals.
- Baking: final phase of the cycle, when the baking takes place.
CHOICE OF THE INGREDIENTS
The ingredients to be used are the ones generally used in doughs with yeast: flour, water, yeast, milk, sugar, salt, eggs, etc.
Flour. It must be a bread making flour, that is a medium-strong flour, which is simply obtained with a mixture of T45 or T55 flour (00 or 0). It is also possible to use flours of cereals which are different from soft wheat.
Yeast. Both fresh and dehydrated brewer's yeast can be used. It is important to observe the quantities indicated in the recipes because an excess or a lack of yeast may cause negative results.
Water. This ingredient is almost always present and can be substituted or combined with milk and/or eggs.
To establish the water quantity, a rule of traditional bread making methods can be used: the water quantity must be equal to the 60% with respect to the flour. Example: if the recipe requires 500g of flour, the water must be 300g . For lower rates, a too hard dough does not allow the bread to rise enough. If there is too much water, the rising can be excessive because of a too soft dough, with a subsequent reduction of the swelling during the baking phase.
Sugars. Also salty recipes generally require a small quantity of sugars, such as sugar, honey or malt. These ingredients help in making the rising more active and in the crust colour.
Fats. All the recipes generally require small quantities of oil or butter which give softness to the finished product.
IMPORTANT NOTE
The ingredients must be poured into the basket (6) observing the order suggested in the recipes. However, the liquids must generally be positioned on the bottom, then the flour must be scattered in order to cover them. The salt and the sugar must be poured in different areas on the flour.
Make a small well in the centre of the flour (without reaching the liquids below) where the yeast must be put. If fresh yeast is used, crumble it with your hands.
Especially if the timer function has been set, it is important to avoid the direct contact between the yeast and the salt, because the salt tends to inactivate the yeast (especially the fresh one), and between the yeast and the liquids because the fermentation would begin before the program starting and probably the yeast would not have the required strength during the rising.
USING THE APPLIANCE FOR THE FIRST TIME
- Wash all the parts that come into contact with food: blade (2), basket (6), graduated cup (7) and measuring spoons (8) according to the instructions in the cleaning section.
- Replace the basket (6) and the blade (2) in the appliance.
- Grease these parts with oil and allow the appliance to operate for around ten minutes loadless: select program No. 12 – BAKING via the MENU key (for further information refer to the section “Putting into operation”).
- On completion, wash the parts oiled beforehand.
- During these operations make sure all the other parts of the appliance are dry.

ATTENTION: never run the appliance when it is empty for a period which is longer than the indicated one.
- Place the appliance on a stable and heat resistant surface, away from heat sources and inflammable materials.
-
Completely unwind the feeding cable and do not let it hang from the resting surface of the appliance.
-
Place the ingredients in the basket (6), close the lid (3) and insert the plug into the power outlet. A beep will be emitted and the initial screen "1 3:00" will appear on the display (g). The two dots ":" between "hour" and "minutes" are lit up to indicate that the appliance is ready to be put into operation. "1 - Pane Normale", medium crust colour and 900g quantity will be automatically displayed.
- Select the type of program by pressing the MENU key (d): a beep will be emitted each time the key is pressed, the program will change and the corresponding number will be displayed on the screen (Table A).
- At this point, select the crust colour preferred and the bread size using the crust colour (a) and size (b) keys respectively. The methods selected will be displayed on the display with two small triangles.
- If desired, the timer can be set according to the methods described in the section "Timer Function".
- Press the START/STOP key (c) to start the program. The program set starts immediately, accompanied by a beep. The “:” on the display will start to flash and the display will signal the countdown (decreasing as the program proceeds).
- To interrupt a program while it is in operation, press the START/STOP key (c) for two-three seconds until a long beep confirms the interruption. The initial screen "1 3:00" will once again appear on the display.
- At the end of the kneading, rising and baking cycle, the appliance emits a series of 10 beeps.
- At the end of the program, the appliance keeps the bread warm for roughly an hour and turns off automatically. If you do not require this function, press the START/STOP key (c) after the program has ended. A prolonged beep will confirm the removal of this function. Then disconnect the plug from the power outlet.
NOTE WELL: If the appliance is started with an incorrect setting, press the START/STOP key to stop the program. Enter the correct setting and restart.
During the baking phase, steam may be generated; therefore it could come out of the air holes of the lid.

WARNING
- The inside of the appliance becomes very hot during baking: use oven mitts to prevent burns.
- During baking, do not open the lid (3) of the appliance and check the program through the viewing window (4).
- Do not obstruct the air holes positioned on the sides and on the lid of the appliance.
- Leave sufficient space around the appliance to allow for heat dispersion.
- Never set or insert the appliance in a cabinet or wall unit.
- Be careful and do not touch moving parts.
- Do not leave the appliance connected to mains power when not in use.
AFTERUSE
- Open the lid (3) and remove the basket (6). Use oven mitts or pot holders to prevent burns since the inside parts become very hot during baking.
- Remove the basket (6) by turning it in a counter clockwise direction and lift it by means of the handle.
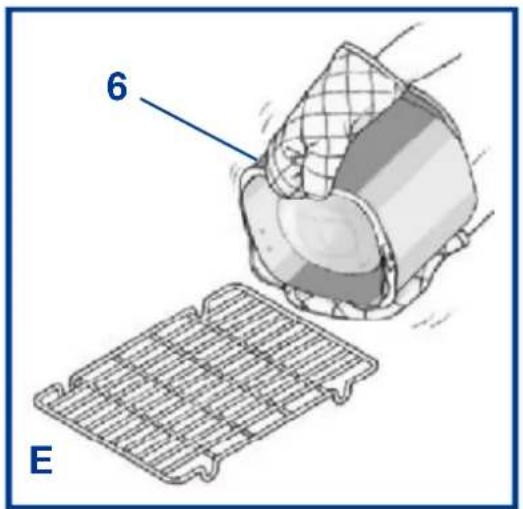
- Turn the basket upside down and shake it lightly to let the bread fall out (see picture E).
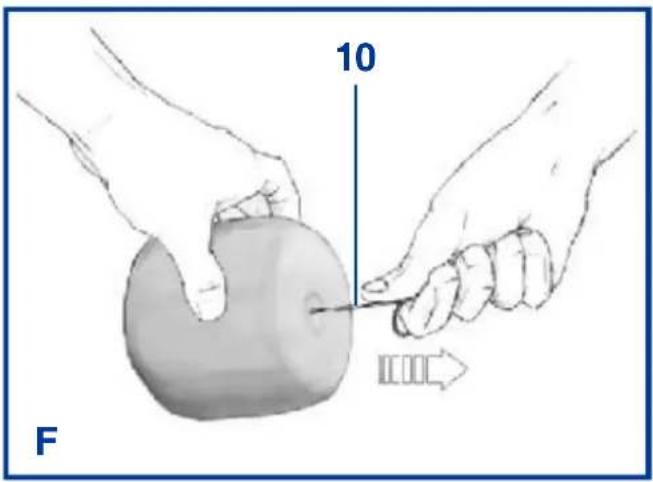
- The kneading blade (2) always remains inside the finished product. Remove it from the bread by using the proper hook (10) (see picture F).
IMPORTANT
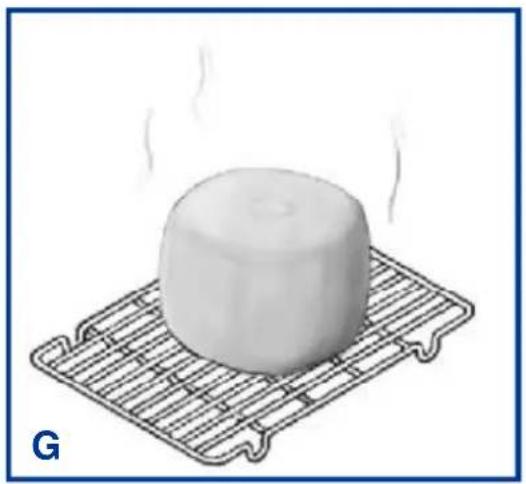
Do not let the bread cool inside the appliance.
Once the bread has been extracted from the basket (6), let it rest on a grate for about one hour (see picture G).
SUGGESTIONS ON PREPARED THE BREAD
- To achieve a good result, especially with a recipe which has never been experienced before, it is necessary to check if the dough consistency is correct.
After about 10 minutes from the beginning of the working, observe the dough appearance through the viewing window (4): its surface must be quite homogeneous and it must move around the basket without crumbling nor remaining attached to the walls.
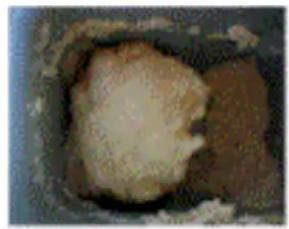
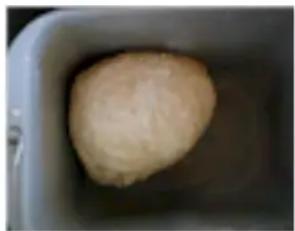
In order to get a more precise idea about it, observe the three pictures below. The first one shows a too hard dough, the second one a too soft dough and the third one, on the contrary, a dough with the correct consistency.
1

2
3
The consistency can be adjusted by adding some water or flour, one spoon at a time, and waiting for some minutes until it is blended into the dough and before adding something more, if needed.
- All the ingredients, including the liquids, must be at room temperature.
- Two rising phases are available for the NORMAL, FRENCH, WHOLEMEAL, SWEET and SANDWICH programs. At the beginning of the second rising cycle, the appliance emits a series of beeps. Fruit, nuts or special ingredients must be added during the second rising phase.
- The appliance can work optimally at different room temperatures, but the temperature difference between a cold environment and a hot one can influence the size and quality of the bread because of the rising. It is recommended to use the appliance in a tempered environment.
- Never open the appliance lid during the rising and baking phases: the sudden change of temperature may cause the dough to lose its swelling.
- Given the many factors that contribute to make bread (type of yeast, room temperature, air humidity, etc.) any 'bad' results are not attributable to the malfunctioning of the appliance but to these factors.
Carry out various tests to acquire suitable experience.
- During the initial kneading, the dry ingredients may accumulate in an angle of the container and may not amalgamate well. If this occurs, help the machine with the kneading to prevent flour lumps from forming using a plastic/wooden spatula so as not to scratch the non-stick surface.
Be careful and do not touch the moving parts.
BAKING WITH THE QUICK PROGRAM (nr. 4)
Use baking powder when baking bread using the quick program.
Place the liquid ingredients on the bottom of the basket and the solid ingredients on top.
BAKING WITH THE RAPID PROGRAM (nr. 6 and 7)
Use hot water at a temperature of 48 - 50^ for these programs and always use baking powder.
DOUGH (nr. 8)
Different types of bread doughs to be kneated and baked in the oven can be prepared.
In the dough program, the times are the same for 750g and 900g sizes, therefore the weight cannot be selected.
JAM (nr. 9)
Follow these instructions to make jam.
Wash the fresh fruit; peel the apples, pears, peaches and other type of fruit with peel.
Always use the doses recommended in the recipes otherwise the jam may boil too much or too little.
Weigh the fruit and cut it into small pieces (1 cm max).
Add the sugar and the gelatine/isinglass (in the proportion of 2:1).
Mix the fruit with the sugar and start the program.
On completion, pour the jam into hot containers.
SPECIAL SIGNALS ON THE DISPLAY
When "H:HH" appears on the display (g) after the appliance has been turned on, the temperature inside the machine is still too high for a new preparation.
Turn the appliance off, open the lid (3) and let it cool.
When "E:EE" appears on the display after the appliance has been turned on, the temperature sensor is damaged and must be replaced.
Contact an assistance centre authorised by Termozeta.
CLEANING AND MAINTENANCE
Before carrying out any cleaning operation, always disconnect the plug from the power outlet and wait for the appliance to cool.
Clean the basket (6) and the kneading blade (2) with a normal non-abrasive sponge and dishwashing liquid, do not scratch the non-stick surface. Once finished, dry all the parts thoroughly. Do not place the basket and the kneading blade into the dishwasher.
Clean the outside and inside of the appliance body with a slightly damp sponge.
Do not use chemical substances or abrasives.
Do not immerse the body of the appliance in water or other liquids. Keep the appliance in a dry place.
PRESCRIPIONS DE SECURITE
Touche MARCHE /ARRÉT (c):
In accordance with European Directives 2002/95/CE, 2002/96/CE and 2003/108/CE on the restriction of the use of dangerous substances in electric and electronic equipment as well as their waste disposal.
- The barred symbol of the rubbish bin shown on the equipment indicates that, at the end of its useful life, the product must be collected separately from other waste.
- Therefore, any products that have reached the end of their useful life must be given to waste disposal centres specialising in separate collection of waste electrical and electronic equipment, or given back to the retailer at the time of purchasing new similar equipment, on a one for one basis.
- The adequate separate collection for the subsequent start-up of the equipment sent to be recycled, treated and disposal of in an environmentally compatible way contributes to preventing possible negative effects on the environment and health and optimises the recycling and reuse of components making up the apparatus.
- Abusive disposal of the product by the user involves application of the administrative sanctions according to the laws in force.
