
Fornarina 2 IN 1 76002 - Bread maker TERMOZETA - Free user manual and instructions
Find the device manual for free Fornarina 2 IN 1 76002 TERMOZETA in PDF.


| Product Type | Bread maker |
| Brand | Termozeta |
| Model | Fornarina 2 IN 1 76002 |
| Functions | Bread baking, dough making, jam, cake |
| Number of Programs | 12 automatic programs |
| Capacity | Up to 1.5 lb (750 g) loaf |
| Crust Control | 3 settings: light, medium, dark |
| Timer | Up to 13 hours delay |
| Keep Warm | Automatic keep warm for 1 hour |
| Power | 650 W |
| Voltage | 220-240 V ~ 50/60 Hz |
| Dimensions (W x D x H) | 30 x 25 x 35 cm |
| Weight | Approximately 5.5 kg |
| Material | Stainless steel housing, non-stick baking pan |
| Display | LCD with backlight |
| Control Type | Touch button panel |
| Viewing Window | Large transparent window with interior light |
| Safety Features | Auto shut-off, overheat protection, non-slip feet |
| Cleaning and Maintenance | Wipe exterior with damp cloth; wash pan and kneading paddle in warm soapy water |
| Spare Parts Availability | Replacement pans and paddles available from Termozeta customer service |
| Warranty | 2-year warranty |
| Included Accessories | Measuring cup, measuring spoon, kneading paddle, user manual |
Frequently Asked Questions - Fornarina 2 IN 1 76002 TERMOZETA
User questions about Fornarina 2 IN 1 76002 TERMOZETA
0 question about this device. Answer the ones you know or ask your own.
Ask a new question about this device
Download the instructions for your Bread maker in PDF format for free! Find your manual Fornarina 2 IN 1 76002 - TERMOZETA and take your electronic device back in hand. On this page are published all the documents necessary for the use of your device. Fornarina 2 IN 1 76002 by TERMOZETA.
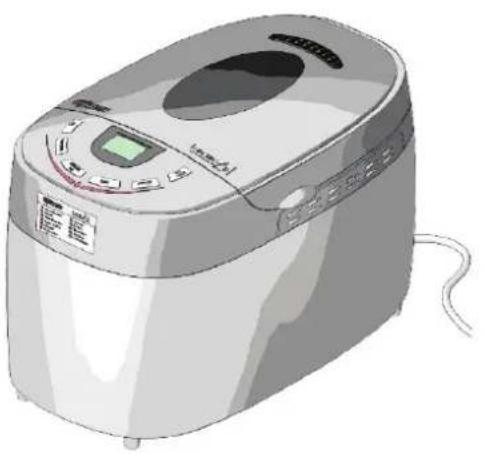
USER MANUAL Fornarina 2 IN 1 76002 TERMOZETA
natural_image
Illustration of a standard 19-inch bread maker with control panel and digital display (no text or symbols on the device itself)Fornarina2in1
natural_image
Illustration of a rice cooker with digital display and control panel (no text or symbols)DATI TECNICI
TECHNICAL DATA
DATOS TÉCNICOS
FORNARINA 2 IN 1
Type 411002
230 V\~ 50 Hz 800 Watt
Maximum quantity of flour /
Maximum quantity of raising agent /
DESCRIZIONE
-
Graduated cup
-
Measuring spoons
-
Metal hook to extract the blade
GB
DESCRIPCIÓN
- Panel de control
Botones:
a. Menú
bTemperatura
c. Tamaño pan
dTiempo
e.Proceso
natural_image
Illustration of hands operating a rice cooker with open lid (no text or symbols)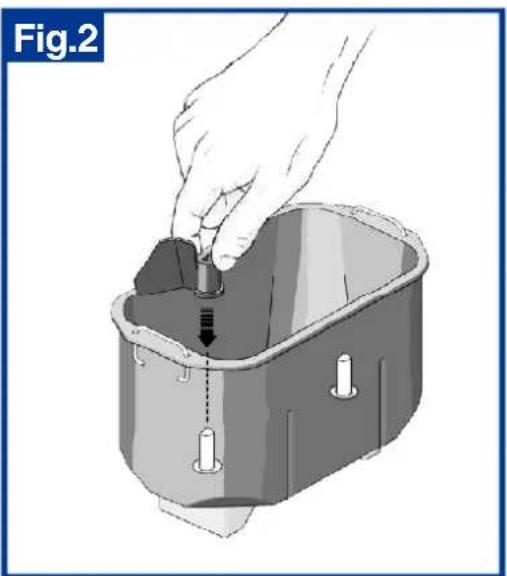
natural_image
Illustration of a hand placing a small object into a container with a downward arrow indicating motion (no text or symbols)natural_image
Illustration of a hand pressing down on a rice cooker with a black checkmark indicating the process (no text or symbols)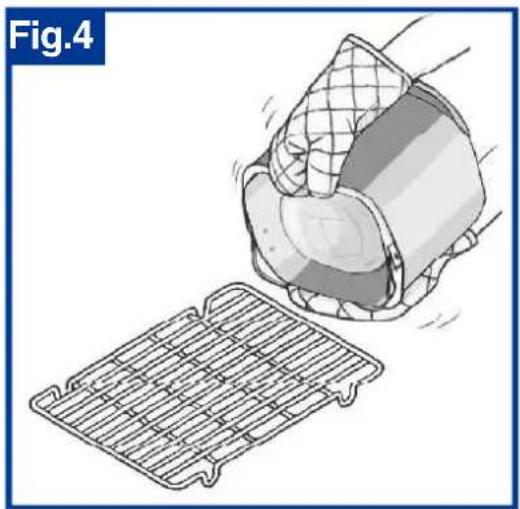
natural_image
Illustration of a mesh netting device with a mesh cover and mesh casing, labeled Fig.4 (no text or symbols on the diagram itself)natural_image
Illustration of a steaming dessert on a cooling rack (no text or symbols)natural_image
Close-up of a textured, irregularly shaped object with a dark brown base and light beige interior (no visible text or symbols)
natural_image
Close-up of a textured, irregularly shaped object with dark background (no visible text or symbols)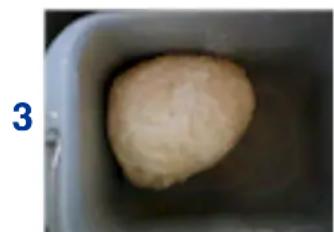
natural_image
Close-up of a dough ball inside a metal container (no text or symbols visible)The present manual is the integral part of the appliance and must be carefully read before using it as it gives important indications with regard to safety of installation, use and maintenance. Keep it with care.
- After taking off the packaging make sure that the appliance is intact. In case of doubt do not use it and contact an assistance centre authorised by TERMOZETA.
- Do not leave pieces of packaging (plastic bags, polystyrene foam, nails etc.) within reach of children or persons with reduced mental capacities since these are potential sources of danger.
- The electrical safety of this appliance is ensured only when it is correctly connected to an effective earthing system in compliance with the existing electrical safety standards. Termozeta shall not be held responsible for any damages caused by the lack of an earthing system.
- Before connecting the plug to the socket check that the working voltage of the appliance corresponds to the one in your house. If in doubt, contact professionally qualified staff.
- Use of adaptors, multiple sockets and extension leads is not advisable. In case of necessity use exclusively approved devices in conformity with the current safety regulations while making sure that they are compatible with the appliance power. If in doubt, contact professionally qualified staff.
- Any installation which does not comply with what is specified can endanger your safety and the warranty expires.
- The appliance was exclusively designed for domestic use to cook food.
- For safety reasons pay attention and:
- do not use the appliance when you are barefoot or having wet hands or feet
- do not use the appliance outside the domestic environment
- do not leave the appliance exposed to atmospheric agents (sun, rain, etc...)
- the appliance is not intended to be used by children or persons with reduced physical or mental capacities or without experience, unless
there is someone controlling them or unless they have the use instructions
- never pull the feeding cable or the appliance itself to disconnect the plug from the socket
- never immerse the appliance in water or other liquids.
- The feeding cable of the appliance should never be replaced by the user himself. In case of necessity contact an assistance centre authorised by TERMOZETA or professionally qualified staff.
- In case of problem and/or malfunctioning of the appliance, turn it off and do not tamper with it. For any repairs contact an assistance centre authorised by TERMOZETA and ask for the use of original spare parts.
- At the end of the life-cycle of the appliance, put it out of service by cutting the feeding cable after disconnecting the plug from the socket. For the disposal of the appliance follow the regulations which are valid in your place of residence.
- Termozeta cannot be considered responsible for any damage to persons, animals or things caused by the incorrect installation or as a result of an illegitimate, mistaken or unreasonable use.

WARNING! HOT SURFACE
The appliance can reach high temperature during its operation. Avoid touching it with bare hands. It is advisable to use kitchen gloves to avoid the risk of burning.

WARNING! Some vapour could be produced during the baking use. Therefore, some vapour can come out through the vent of the lid.
- Do not obstruct the air outlet holes located on the appliance sides and lid.
- Leave enough space around the sides and the upper part of the appliance to allow the heat dissipation.
- The appliance must not be embedded or inserted into a piece of furniture.
- Be careful not to touch moving parts.
- Do not leave the appliance connected to the power system when unused.
INSTRUCTIONS FOR USE
USING THE APPLIANCE FOR THE FIRST TIME
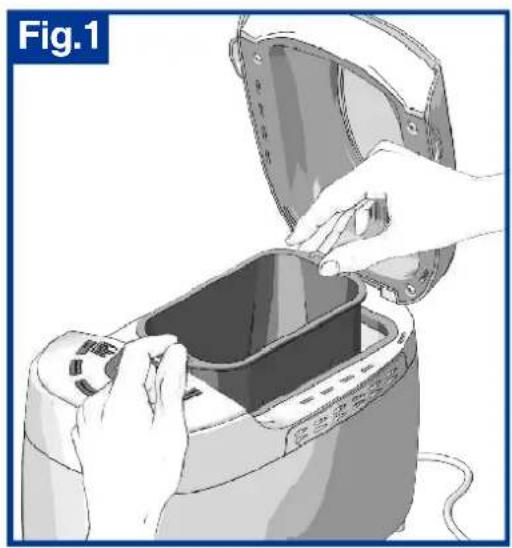
- Insert one of the two baskets into the appliance and press until the
basket is in the right position (see fig.1).
- Put the two kneading blades of the basket that is being used on the shafts on the basket bottom (see fig.2).
- Close the lid.
- Put the plug into the wall socket. A short beep will be heard and the backlight of the display will switch on for about 30 seconds. The display will show Program 1, time 3:20 and temperature 180^ . The two points (:) between the hours and the minutes do not blink to show that the appliance is not working.
- Press the MENU button repeatedly till the display shows program 8 (BAKE mode).
- Press the START/STOP button and let the appliance bake for about 10 minutes. The two points (:) in the time display will blink to show that the appliance is running. The time display will count down.
• After about 10 minutes, press the START/STOP button for more than
natural_image
Illustration of hands placing a component into a square oven using an electric stove (no text or symbols visible)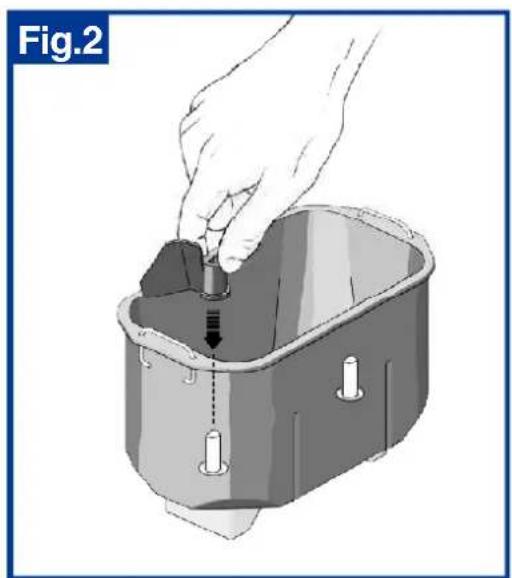
natural_image
Illustration of a hand placing a small component into a container with a dashed arrow indicating direction (no text or symbols)two seconds to stop the program. A beep will be heard as a sign that the program is stopped. Let the appliance cool down.
- Pull the basket out of the appliance.
- Clean the basket and the kneading blades and dry them thoroughly.
See "Cleaning and maintenance".
- Repeat this procedure with the second basket.

WARNING
The appliance may emit a little smoke and a characteristic smoke when you turn it on for the first time. Make sure the appliance has sufficient ventilation.
STARTING
- Put the appliance on a flat, stable surface where it cannot fall.
- Choose the basket that you want to use with the corresponding kneading blades.
- Place the two kneading blades on the shafts on the bottom of the basket of your choice.
Before baking, it is recommendable to grease the basket shafts with butter or oil. This facilitates the removal of the bread from the kneading blade.
ADDING INGREDIENTS
- Weigh the required ingredients for the recipe.
Never fill the appliance with more than the maximum quantity (a total of a maximum of 1130 g (2.5 lb.) for the single basket to 450 g (1 lb.) for each half of the double basket); otherwise the dough will spill over the basket.
- Add the ingredients one by one to the basket. Begin by pouring water or liquid into the basket. Then add the flour and, depending on the recipe, add sugar, salt, butter and yeast.
Put the yeast or baking powder in a hollow in the flour and each of the other ingredients in one corner of the basket (this is particularly important when using the timer).
- Place the basket in the appliance and press it firmly down till it clicks in position.
- Close the lid.
Make sure there is sufficient free space around the appliance. This will ensure that the vapour is distributed well and items close to the appliance will not become damp.
Do not use sharp implements such as metal spatulas, knives and forks. This may damage the non-stick surface of the baskets.
SETTING THE PROGRAM
- Put the plug into the wall socket. A short beep will be heard and the backlight of the display will switch for about 30 seconds.
The display (g) will show Program 1, time 3:20 and temperature 180^ C . The two points (:) in the time indication do not blink to show that the program is not running. - Select the required program by pressing the MENU button (a) repeatedly till the required program number is displayed. See “Menu selection”.
- Select the required baking temperature by pressing the TEMPERATURE button (b) repeatedly till the required temperature is displayed. See “Temperature selection”.
- Specify the size of the load by pressing the BREAD SIZE button (c) repeatedly till the display places the arrow below the required bread size (1130 g/2.5LB, 900 g/2.0LB; DOUBLE). See “Bread size selection”.
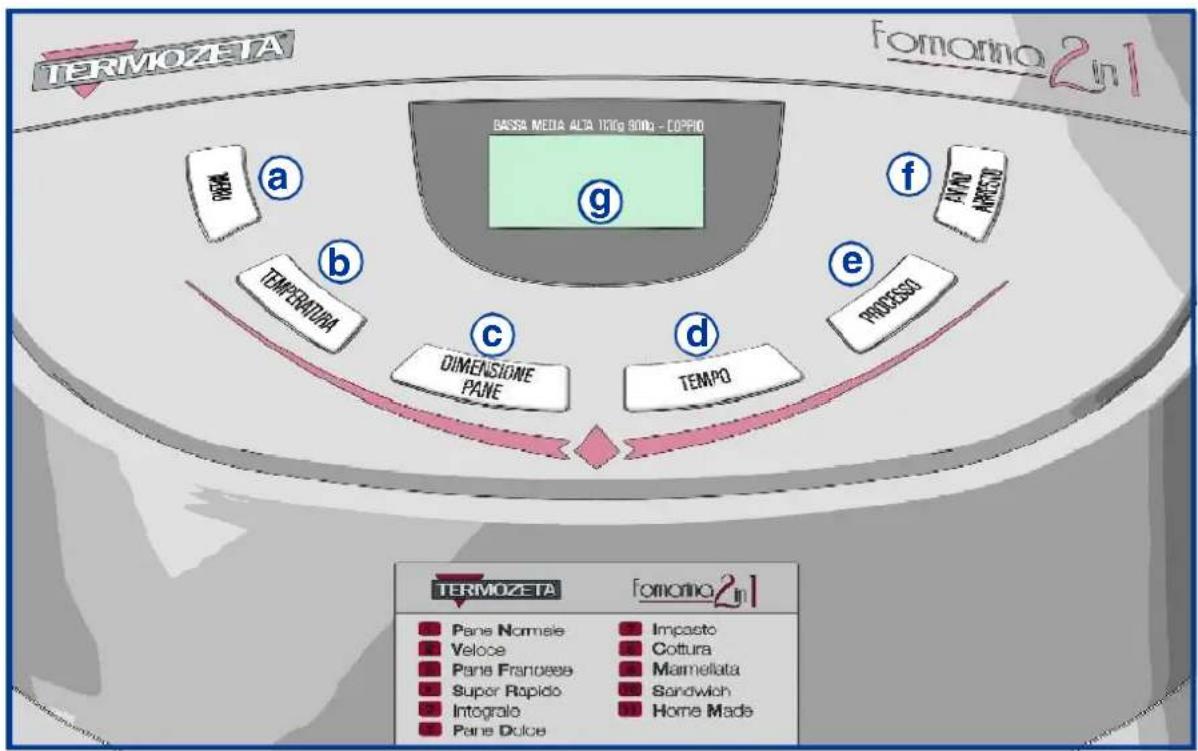
You can delay the time at which you wish to have the bread ready by using the TIME BUTTON (d). See 'Timer function'.
BAKING
- Press the START/STOP button (f). A short beep will be heard and the two points (:) in the time display will start blinking to show that the selected program is running.
- Apart from START/STOP button (f), all other buttons are inactive from now on to avoid unwanted program changes by accidentally pressing a button.
- The program can be stopped by pressing the START/STOP button (f) for more than two seconds.
A short beep will be heard and the two points (:) in the time display will stop blinking to show that the program has stopped.
• Always use the appliance with the lid closed.
- The appliance will automatically switch off in the event of a power failure whilst it is in use. The appliance will automatically switch on again if the power is restored within 5 to 15 minutes. The appliance will then complete the program. If the power interruption exceeds 15 minutes, the program cannot be kept. If in this case the dough has not yet entered the rising phase, you can press the START/STOP button (f) to restart the program from the beginning. Otherwise, discard the ingredients and start over again.
WARNING
Use oven gloves if you need to touch the appliance during or after use. The appliance and the basket will become hot.
- The appliance will work fine in a wide temperature range, but there may be a difference in bread size baking in a very warm room or in a very cold room. We suggest that the appliance is used at temperatures between 15 and 35^ .
- You can keep track of the program cycle by looking through the 2 windows in the lid.
- During the programs BASIC, QUICK, FRENCH, SUPER RAPID, WHOLE WHEAT, SWEET and SANDWICH beeps will be heard. These beeps alert you to add extra ingredients. Open the lid and add the
required ingredients and close the lid again. See "Other ingredients".
END
- When the program is finished, beeps will be heard to alert you to the program end.
- The appliance will keep the bread warm for one hour once it is baked. This prevents condensation on the crust.
If you want to stop this warming process, press the START/STOP button for more than 2 seconds. You will hear a beep to indicate the end of the program.
natural_image
Illustration of a hand placing food into a microwave oven with a checkmark indicating processing (no text or symbols)WARNING
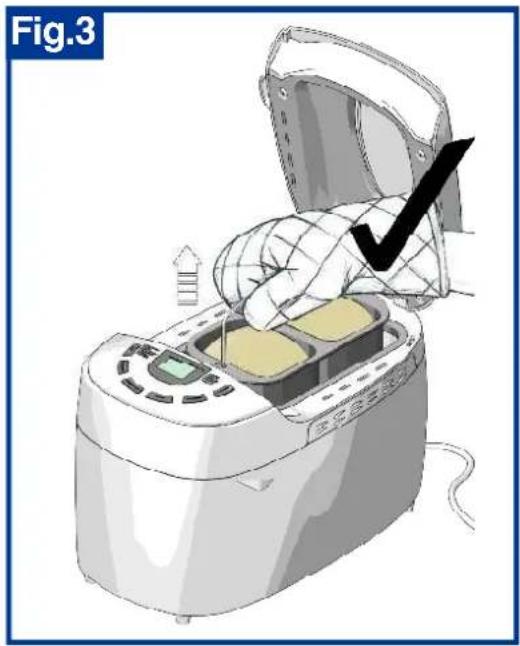
The appliance and the basket are very hot. Use oven gloves to open the lid and remove the basket out of the appliance (fig.3).
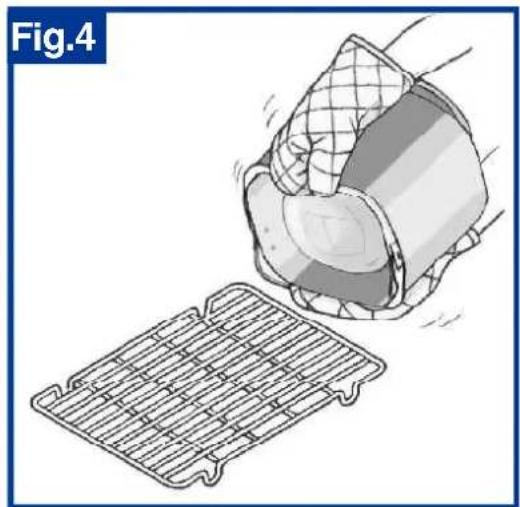
- Remove the bread from the basket by turning it upside down and tapping it gently (fig.4). If so required, you can use a wooden or plastic spatula to remove the bread; take care however not to damage the non-stick surface.
natural_image
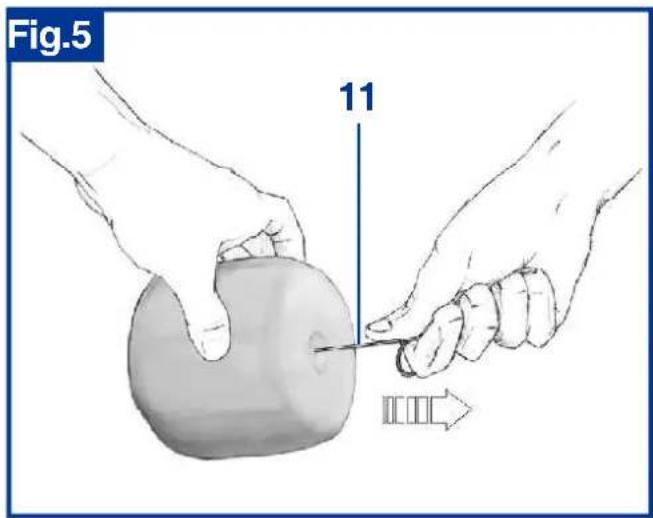
Illustration of a hand placing a mesh net into a grid-patterned plastic container (no text or symbols)- The kneading blades may remain in the bread. Use the metal hook (11) to remove them from the bread (fig.5). Take care when removing them; they are hot.
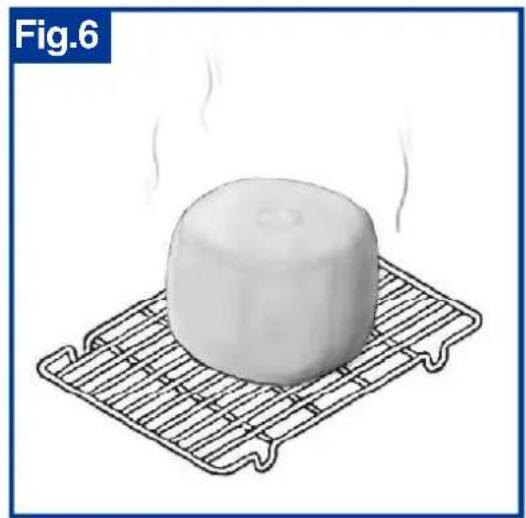
- Allow the bread to cool down before cutting it (fig.6).
natural_image
Illustration of a steaming dessert on a cooling rack (no text or symbols)- Allow the appliance to cool down sufficiently before using it.
- When you have finished using the appliance remove the plug from the wall socket and allow the appliance to cool down sufficiently before you clean and store it. See “Cleaning and maintenance”.
MENU SELECTION
The appliance has 11 programs that can be selected through the MENU button. The main features of the programs with their duration are indicated below:
1. BASIC 3:20
This is the most used program for kneading, rising and baking normal bread.
2. QUICK 1:58
This program is used to prepare the bread in less time than the BASIC program.
Bread baked with this program is usually smaller with a dense texture.
3. FRENCH 3:40
This program is used to prepare the typical French bread, with a crispy crust and a light texture. The rising time with this program is longer.
4. SUPER RAPID 1:59
This is a very short program to knead, rise and bake bread. The result will be a rough bread.
5. WHOLE WHEAT 3:30
This program is used to prepare whole wheat bread. As to the program used for white bread, the rising and baking phases in this program are longer since the dough contains a high quantity of whole wheat and it tends to rise less than the white flour.
6. SWEET 3:10
Program to knead sweet recipes.
7. DOUGH 1:50
This program is used to knead and rise dough without baking it. The dough can be used for making bread rolls, pizza, flat bread...
8. BAKE 1:00
This program only bakes bread without kneading and rising. This program can also be used to increase the baking time after using another standard bake program.
9. JAM 1:20
This program is used for preparing jams and marmalades.
10. SANDWICH 3:00
This program can be used for preparing a type of bread containing special ingredients (yoghurt, milk). The result is a bread with a soft crumb and a thin and soft crust.
11. HOME MADE
This program can be adapted by the user. All the program phases can be customized: kneading, rising, baking and keeping warm to make a personalized recipe.
See 'HOME MADE Program'.
When the Quick or Super Rapid program is used, it is better to replace the brewer's yeast with the baking powder and to warm up the liquid ingredients.
NOTE: The program duration is fixed and so it cannot be modified.
HOME MADE Program
In the HOME MADE program you have the possibility to adjust the timing of the different program elements to your particular wishes. In this way you can create completely personalized recipes.
The time ranges are as follows:
| Program element | Time |
| KNEAD1 | 3-14 min. |
| RISE1 | 20-60 min. |
| KNEAD2 | 8-24 min. |
| RISE2 | 1-60 min. |
| RISE3 | 20-120 min. |
| BAKE | 0-80 min. |
| WARM | 0-120 min. |
- Put the plug into the wall socket. A short beep will be heard and the backlight of the display will switch on for about 30 seconds.
The display will show Program 1, time 3:20 and temperature 180^ C . The two points (:) in the time indication do not blink to show that the program is not running.
- Press the MENU button (a) repeatedly till program number 11 (HOME MADE) is displayed.
- Press the PROCESS button (e) on the control panel.
On the display you can see that KNEAD1 starts blinking and the display shows the time setting for this KNEAD1 element of the program. Change the setting by pressing the TIME button (d) repeatedly. Each time you press the TIME button (d), the time setting will increase by one minute. If you keep the TIME button (d) pressed, the time setting will increase faster. When the time setting has reached the maximum setting, press the TIME button (d) again to go to the minimum time setting again. Adjust the time setting to the required setting.
- Press the PROCESS button (e) to go to the setting of the next program phase (RISE1). Change the time setting in the same way as described above.
-
Press the PROCESS button (e) each time to adjust time settings for the remaining program elements: KNEAD2, RISE2, RISE3, BAKE; in addition to the time it is also possible to select the baking temperature by pressing the TEMPERATURE button repeatedly till the desired temperature and WARM are displayed.
-
After adjusting the program settings, press the START/STOP button to store the program.
- You can delay the time at which you have the bread ready by using the TIME button. See “Timer function”.
- Press the START/STOP button again to restart the program.
- For further baking, see “Baking” and “End”.
TEMPERATURE SELECTION
The baking temperature is indicated on the display in ^ C and also with an arrow indicating the type of temperature: lower, medium or high.
| No. Program | LOW | MEDIUM | HIGH |
| 1. BASIC | 160°C | 180°C 200°C | |
| 2. QUICK | 165°C | 175°C | 185°C |
| 3. FRENCH | 160°C 180°C 200°C | ||
| 4. SUPER RAPID | 180°C 190°C 200°C | ||
| 5. WHOLE WHEAT | 160°C 180°C 200°C | ||
| 6. SWEET | 160°C 180°C 200°C | ||
| 7. DOUGH | n.a. | n.a. | n.a. |
| 8. BAKE | 160°C | 180°C | 200°C |
| 9. JAM | n.a. n.a. n.a. | ||
| 10. SANDWICH | 160°C 180°C 200°C | ||
| 11. HOME MADE | Progr. | Progr. | Progr. |
Press the TEMPERATURE button to move through the LOWER, MEDIUM and HIGH settings.
This function allows defining perfectly the bread crust browning.
Select the crust browning level:
- Soft
- Normal
- Crisp
The baking times are normally set on the browning level Normal.
BREAD SIZE SELECTION
Only for the programs BASIC, FRENCH, SUPERRAPID, WHOLE WHEAT, SWEET and SANDWICH. Press the BREAD SIZE button size to move through the quantity settings indicated aside.
The setting 2.5 LB and 2 LB are
| Setting | Quantity |
| 2.5 lb. | 1130 g. |
| 2.0 lb. | 900 g. |
| DOUBLE | 2x450 g. |
normally used for the single basket while the DOUBLE setting is normally used for the double basket.
TIMER
The timer enables you to specify when the appliance must complete the selected program. It is available with the following programs: BASIC, FRENCH, WHOLE WHEAT, SWEET, BAKING, SANDWICH and HOME MADE.
The maximum time that can be set is 13 hours.
- Add the ingredients one by one to the basket. Begin by pouring water or liquid into the basket. Then add the flour and, depending on the recipe, add sugar, salt, butter and yeast or baking powder.
NOTE: Put the yeast or baking powder in a hollow in the flour and each of the other ingredients in a corner of the basket. The yeast must not come into contact with liquids, salt or butter, since this would immediately stop the fermentation process.
- Select the required program, temperature and quantity settings.
EXAMPLE: it is 10.00 PM and you wish the freshly-baked bread to be ready at 7:30. In this case, the time difference is 9 hours and 30 minutes. Use the TIME button to set the timer of about 9:30. Each time you press the TIME button the time will increase by 10 minutes. - Press the START/STOP button to start the timer. The two points (:) in the time display will start blinking to show that the clock is running. The timer will start the program and ensures that your bread will be ready at the adjusted time.
NOTE: If the timer function is set, we recommend not to use easily perishable ingredients such as milk, eggs, fruit or vegetable purées.
TURNING OFF AND STORING THE APPLIANCE
- Remove the plug from the plug socket.
- Allow the appliance to cool down.
- Clean the appliance and all accessories (see “Cleaning and maintenance”).
- Store the appliance in a dry, frost-free location.
INGREDIENT SELECTION
It is possible not only to bake bread according to one of the recipes indicated, but also to try new recipes using different ingredients. To do this, it is useful to have much information on the different ingredients to prepare bread.
FLOUR
The main ingredient of bread is flour. There are many different kinds of flour and mixes of flour. The type of flour used makes a big difference for bread. For example, since wheat flour contains much gluten, it rises better than the heavier flour. Therefore, less yeast is needed. Gluten is a protein compound which is found in cereals, such as wheat, oats, rye and barley. As the bread rises, gluten creates a network that keeps in the carbon dioxide bubbles and this makes the bread rise.
'Patent flour' or household flour
Most of the white flour is called ‘patent flour’ or household flour. It has almost no fibres or seeds, but it contains much gluten. This flour is usually used to bind soups and sauces, but also to bake (white) bread.
Wheat flour and wheatmeal
Wheat flour is white wheatmeal. Wheatmeal is a little greyer and it contains a small quantity of fibres and seeds. Wheat flour and wheatmeal also contain much gluten.
Whole wheat flour
Whole wheat flour is obtained from whole untreated grains of wheat. It conains all the wheat fibres and seeds. Whole wheat contains much gluten as wheat flour, but it is heavier because of fibres and seeds. As
a result, the bread will be more compact if it made using only whole wheat.
Therefore, some bakers add wheat flour.
Besides these types of flour there are many other types of flour: oatmeal, wheat meal, maize mill and rye flour.
Flour mixes
Most types of flour can be mixed. The combination of buckwheat flour/oatmeal/wheat flour is a good example. It is also possible to mix barley meal and wheat flour. Various mixes can also be bought in shops, such as cornmeal, six-grain meal, nine-grain meal or ten-grain meal. These mixes sometimes contain flour and/or bread improvers.
All-in-one mixes
It is also possible to buy mixes containing all the ingredients, except water. These mixes are easy and quick to use.
YEAST
Yeast is necessary to make the bread rise. It is possible to buy fresh yeast (blocks) or dry yeast (granules). The fresh yeast taste is slightly stronger than the dry yeast taste. There are several brands of dry yeast and the effect they have varies somehow. The yeast that suits you the best is a question of personal preference. Roughly about half the weight of dry yeast (also called instant yeast) is necessary compared to fresh yeast. The yeast effect can be affected if it comes into contact with salt or fats. Salt dries out yeast and the fats hold the yeast cells, so that the dough does not rise any more. Therefore, it is important to ensure that the yeast, salt and butter are not placed too close to each other inside the breadmaker.
SALT
Salt adds to the taste of bread, but it is also important for the crust and for rising (although salt can also stop the bread rising if it comes into contact with yeast). Salt strengthens the gluten formation which shapes bread.
Salt also ensures that the bread does not rise out of the basket and then sinks before it is well-backed. It is possible to bake low-sodium or salt-free bread, but the ingredients must be varied.
LIQUIDS
The most common liquid used to bake bread is water. To knead bread you can also use milk (soya milk), yoghurt, etc. Of course the choice of the liquid to use for kneading depends on the personal taste.
The use of liquids other than water influences the bread rising and structure as well.
The whole milk keeps the bread fresh longer thanks to the fats it contains, while the sugar it contains (lactose) increases the rising power.
A good variant of fresh milk is powdered milk. Start with a small quantity (1 spoon) and check the kneading result. Of course powdered milk cannot replace the liquid: some water must be added, too.
SUGAR
Sugar only makes a small contribution to the rising process and it helps to create the crust.
Instead of sugar it is possible to use honey, treacle or syrup.
Do not use coarse-grained sugar (hard sugar) or vanilla sugar in the breadmaker. This could damage the anti-stick surface.
Sugar cannot be replaced with artificial sweeteners during baking. These substances are generally denatured by heat.
FATS
Fats are bread improvers. It is not necessary to use it but if you do bread is better. Fats make the dough softer and ensure that it can rise more easily. They also contain the gluten that keeps in the carbon dioxide. This makes bread softer and fresher for a long time.
Different types of fats can be used. Oil (sunflower oil or olive oil), butter and margarine ensure an excellent result.
Oil makes the crust softer. Margarine makes the crust crispier and improves the rising process. When herb bread is baked, using a seasoned oil such as walnut oil, garlic oil or basil oil could add taste.
NOTE: When the ingredients are inserted into the basket they must be at room temperature. Never use a too hot liquid since it can have a negative effect on the yeast.
OTHER INGREDIENTS
Other ingredients can be used to the dough according to one's own taste. For example herb, fruit or garlic bread can be a savoury alternative.
Other ingredients can only be added after the beep. If the ingredients are added too early, they will be ground by the kneading blade.
As many ingredients as you want can be added, but remember that what you add can affect the rising process and the final result.
For example, if you add some cheese, fewer fats must be used since cheese already contain fats. The same goes for tomatoes, vegetables and the other ingredients that contain much water. It is advisable to add ingredients containing as little water as possible. Therefore, add dried or peeled tomatoes or tomatoes in oil instead of fresh tomatoes.
It is possible to add ingredients with a weight equal to 50-100 % of the flour weight, but remember that the heavier the bread, the more difficult the rising. Therefore, to obtain a heavier bread, use more yeast.
CURRANTS
Currants can be added in two ways:
Very rapid: wash, soak and add to the dough.
Better way: wash, soak for about fifteen minutes in tepid water, let them drip in a pasta strainer and let them stand (if necessary covered) at room temperature for a whole night.
With the rapid way, the currants remove some other liquid from the dough, making it drier. Of course, there are no problems if the bread is eaten in the same day.
In any case, dry the currants before adding them to the dough. If the dough is little stiff, the currants as well as other heavy ingredients may settle on the bottom. In this case it can be useful to flour the currants before adding them to the dough.
Some ingredients can be added with the flour (without waiting for the beep).
Generally speaking it is better to add the seeds and all the “hard” ingredients after the beep, as well as the ingredients that smash easily during the kneading, such as olives and currants. On the contrary,
cheese, grated apples, bran and other additional ingredients, that must mingle perfectly in the dough, can be inserted into the baskey with the flour.
BRAN
Bran is generally added to obtain a stiffer bread full of fibres, but whole wheat flour already contains much bran. Therefore, with this type of flour it is not necessary to add bran since it could have a negative effect absorbing much water and drying too much the bread. On the contrary, bran can be added without problems to blended flour, made up of several cereals.
EGGS
If you add an egg-yolk, bread becomes softer. Do not add more than two egg-yolks every 500 grams of flour. Too many yolks make the dough too soft. The yolks can be poured into the basket with the flour. Since the yolks contain some liquid, use less water.
You will find below a non-exhaustive list of the ingredients that can be added to the dough: sunflower seeds, linseeds, sesamum seeds, poppy seeds, pumpkin seeds, cornflakes, nuts, figs, dates, bran, corn, all types of grated cheese, cube ham, aniseeds, caraway, cloves and other spices and fresh or dry herbs, grated carrots, olives, tomatoes, garlic, ground onions, fried onions, chive, basil, pesto, pine nuts, currants (soak as described before), tropical dried fruit (soak as the currants), vanilla sugar, muesli, lemon juice, pieces of orange peel, (grated) apple, cinnamon, ginger, chilli purée, maize grains, all types of fruit and vegetables, etc.
GARNISH
Different types of garnishing can be used to garnish bread:
Egg icing: whip an egg with a spoon of water and apply to the risen dough before baking. Do not apply a too thick layer of egg, otherwise the crust risks burning.
Butter icing / milk icing: sprinkle with melted butter/milk/liquid cream on the bread just taken out of the oven. The crust will be softer and brighter.
Cheese icing: grate some cheese (emmenthal, cheese similar to Parmesan cheese..) and apply to the dough before baking.
Pumpkin seeds, poppy seeds, caraway, sesame: after applying the icing spread these seeds on the bread surface.
MIXTURES AND JAMS
Using program 7 (DOUGH) it is possible to prepare doughs that can be kneaded later and baked.
Using program 9 (JAM), you can obtain tasty jams.
In this case, follow the instructions below:
- Wash the fresh fruit
- Peel apples, pears, peaches and other types of fruit with peel.
- Use always the quantities recommended in the recipes otherwise the jam risks boiling too little or too much.
- Weigh the fruit and cut it into small pieces (1 cm max).
- Add sugar and jelly/isinglass in the proportion of 2 to 1.
- Mix the fruit with the sugar and start the program.
- At the end pour the jam into hot containers.
SUGGESTIONS ON PREPARING THE BREAD
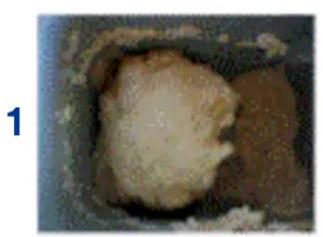
To achieve a good result, especially with a recipe which has never been experienced before, it is necessary to check if the dough consistency is correct. After about 10 minutes from the beginning of the working, observe the dough appearance through the viewing window (6): its surface must be quite homogeneous and it must move around the basket without crumbling nor remaining attached to the walls. In order to get a more precise idea about it, observe the three pictures below. The first one shows a too hard dough, the second one a too soft dough and the third one, on the contrary, a dough with the correct consistency.
natural_image
Close-up of a textured, irregularly shaped object inside a dark container (no visible text or symbols)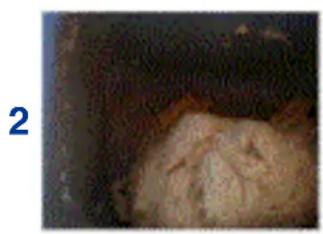
natural_image
Close-up of a textured, brownish surface with dark background (no visible text or symbols)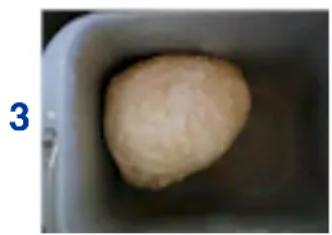
natural_image
Close-up of a dough ball inside a container, no text or symbols visibleThe consistency can be adjusted by adding some water or flour, one spoon at a time, and waiting for some minutes until it is blended into the dough and before adding something more, if needed.
Given the many factors that contribute to make bread (type of yeast, room temperature, air humidity, etc.) any ‘bad’ results are not attributable to the malfunctioning of the appliance but to these factors.
Carry out various tests to acquire suitable experience.
Let the bread cool down on a grill
After baking, let the bread cool down on a grill. The heat can then escape from all sides. Cut the bread when it is cold. Homemade bread can be cut better when it is cold.
Storing bread
Once the homemade bread is cold, it is advisable to wrap it in a tea-towel. This keeps the crust fresh and crisp. Some special paper bags are also available. The bread becomes soft it is kept in a plastic bag or in the refrigerator.
Freezing bread
Homemade bread can be frozen when it is cold. Freeze it in daily portions.
Defrost the bread at room temperature since the microwave oven dries it out too quickly.
Although the bread can be frozen, it always has a negative effect on its quality.
Darker bread
A spoon of cocoa powder can be added to the flour to give bread a darker colour, without changing its flavour.
Crispier crust
To obtain a crispier crust leave the bread in the breadmaker from ten to fifteen minutes during the keep-warm phase.
If the bread rises out of the basket
The rising process can be followed from the viewing window. Avoid opening the lid during the rising process since the bread could sink. However, should the bread rise out of the basket during rising, by sticking against the viewing window (even during baking), lift the lid for a while. The dough will then sink slightly.
Small, compact bread
Too much liquid produces small and flat bread. The dough does not rise properly since it is too wet. The yeast could be too old.
Too dry bread
If an insufficient quantity of liquid is added, bread will be too dry. Add a little more water or milk. On the contrary, if bread is ok after baking, but it dries out quickly, add more oil or butter.
Sunken bread
If the bread rises well but it sinks during baking, try to use the QUICK program. As a rule longer programs increase the chance of the bread to sink.
SPECIAL SIGNALS ON THE DISPLAY
When “H:HH” appears on the display (g) after the appliance has been turned on, the temperature inside the machine is still too high for a new preparation.
Turn the appliance off, open the lid (4) and let it cool.
When “E:EE” appears on the display after the appliance has been turned on, the temperature sensor is damaged and must be replaced.
Contact an assistance centre authorised by Termozeta.
CLEANING AND MAINTENANCE

WARNING
Before carrying out any cleaning operation, always disconnect the plug from the power outlet and wait for the appliance to cool.
Clean the basket (2) or (3) and the kneading blades (8) with a normal non-abrasive sponge and dishwashing liquid, do not scratch the non-stick surface. Once finished, dry all the parts thoroughly. Do not place the basket and the kneading blades into the dishwasher.
Clean the outside and inside of the appliance body with a slightly damp sponge.
Do not use chemical or abrasive substances.
Do not immerse the body of the appliance in water or other liquids. Keep the appliance in a dry place.
RECIPES
Consider the following measurement units:
$$ \mathrm{Cup} = 2 5 0 \mathrm{ml} $$
$$ \mathrm{Tbsp} = \text { tablespoon } = 1 5 \mathrm{ml} $$
$$ T s p = \text { teaspoon } = 5 m l. $$
| WHITE BREAD - Program: BASIC | |||
| QUANTITYINGREDIENTS | 1130g | 900g 450g | |
| Water | 400ml | 330ml | 160ml |
| Margarine or butter | 2+1/2tbsp | 2tbsp | 1tbsp |
| Salt | 2tsp | 1+1/2tsp | 1tsp |
| Flour | 4+2/3cups | 4cups | 2cups |
| Sugar | 2+1/2tbsp | 2tbsp | 1tbsp |
| Powdered milk | 2+1/2tbsp | 2tbsp | 1tbsp |
| Baking powder | 1+3/4tsp | 1+1/2tsp | 1tsp |
| SWEET BREAD - Program: SWEET | |||
| QUANTITYINGREDIENTS | 1130g | 900g 450g | |
| Water + 1 egg | 410ml | 330ml | 160ml |
| Margarine or butter | 4tbsp | 3tbsp | 2tbsp |
| Salt | 1+3/4tsp | 1tsp | 1/2tsp |
| Flour | 4+2/3cups | 4cups | 2cups |
| Sugar | 5tbsp | 4tbsp | 3tbsp |
| Baking powder | 1+3/4tsp | 1+1/2tsp | 1tsp |
| Powdered milk | 2+1/2tbsp | 2tbsp | 1tbsp |
SANDWICH - Program: SANDWICH
| QUANTITYINGREDIENTS | 1130g | 900g 450g | |
| Water | 400ml | 330ml | 160ml |
| Margarine or butter | 3tbsp | 2tbsp | 1tbsp |
| Salt | 2tsp | 1+1/2tsp | 1tsp |
| Powdered milk | 3tbsp | 2tbsp | 1tbsp |
| Sugar | 2+1/2tbsp | 2tbsp | 1tbsp |
| Flour | 4+2/3cups | 4cups | 2cups |
| Baking powder | 1tsp | 1tsp | 1tsp |
FRENCH BREAD - Program: FRENCH
| QUANTITYINGREDIENTS | 1130g | 900g 450g | |
| Water | 400ml | 330ml | 160ml |
| Salt | 1+1/2tsp | 1tsp | 1tsp |
| Sugar | 2tbsp | 1+1/2tbsp | 1tbsp |
| Flour | 4+2/3cups | 4cups | 2cups |
| Margarine or butter | 3tbsp | 2tbsp | 1tbsp |
| Baking powder | 1+3/4tsp | 1+1/2tsp | 1tsp |
WHOLE WHEAT BREAD - Program: WHOLE WHEAT
| QUANTITYINGREDIENTS | 1130g | 900g 450g | |
| Water | 380ml | 330ml 160ml | |
| Margarine or butter | 4tbsp | 3tbsp | 2tbsp |
| Salt | 2+1/2tsp | 2tsp 1tsp | |
| Whole wheat | 3+1/3cups | 2+1/2cups | 1cup |
| Flour | 1+1/3cups | 1+1/2cups | 1cup |
| Sugar | 3tbsp | 2tbsp | 1tbsp |
| Powdered milk | 4tbsp | 3tbsp | 2tbsp |
| Baking powder | 2tsp | 1+1/2tsp | 1+1/2tsp |
| QUICK BREAD - Program: QUICK | |||
| INGREDIENTS | QUANTITY | 1130g | 900g 450g |
| Water (48°C) | 460ml | / | |
| Margarine or butter | 4tbsp | / | |
| Salt | 1+1/2tsp / / | ||
| Flour 5cups | / | ||
| Sugar | 5tbsp | / | |
| Baking power | 1+1/2tsp | / | |
| SUPER RAPID BROWN - Program: SUPER RAPID | ||||
| INGREDIENTS | QUANTITY | 1130g | 900g 450g | |
| Water (48°C) | 450ml | 350ml 150ml | ||
| Eggs | 1 | 1 | 1 | |
| Margarine or butter | 3tbsp | 2tbsp | 1tbsp | |
| Salt | 1+1/2tsp | 1tsp | 1tsp | |
| Sugar | 4tbsp | 3tbsp | 2tbsp | |
| Flour | 4+2/3cups | 4cups 2cups | ||
| Baking powder | 3+1/2tsp | 3tsp | 2tsp | |
| Powdered milk | 3tbsp | 2tbsp | 1tbsp | |
| SESAME BREAD - Program: SESAME | |||
| INGREDIENTS | QUANTITY | 1130g | 900g 450g |
| Water | 400ml / 160ml | ||
| Margarine or butter | 5tbsp | / | |
| Powdered milk | 5tbsp | / | |
| Sesamum seed | 4tbsp | / | |
| Flour | 4+2/3cups | / 2cups | |
| Sugar | 4tbsp | / | |
| Salt | 1+1/2tsp | / 3/4tsp | |
| Baking powder | 1+1/2tsp | / 1tsp | |
COFFEE BREAD- Program: BASIC
| QUANTITY INGREDIENTS | 1130g | 450g |
| Water | 380ml | 130ml |
| Eggs | 1 | 1 |
| Margarine or butter | 3tbsp | 1tbsp |
| Powdered milk | 2tbsp | 1tbsp |
| Instant coffee | 4 bags 2 bags | |
| Honey | 2tbsp | 1tbsp |
| Flour | 4+1/3cups | 2cups |
| Sugar | 1/3cup 1/5cup | |
| Salt | 1+1/3tsp | 1tsp |
| Baking powder | 1+1/4tsp | 1tsp |
CURRANT BREAD - Program: BASIC
| QUANTITY INGREDIENTS | 1130g | 450g |
| Water | 360ml | 130ml |
| Eggs | 1 | 1 |
| Margarine or butter | 4tbsp | 2tbsp |
| Powdered milk | 1/2cup 1/4cup | |
| Currants | 1/2cup 1/4cup | |
| Honey | 2tbsp | 1tbsp |
| Flour | 4cups 2cups | |
| Sugar | 1/3cup | 3tbsp |
| Salt | 1+1/2tsp | 3/4tsp |
| Baking power | 1+1/2tsp | 1tsp |
BANANA BREAD-Program: SWEET
| QUANTITY INGREDIENTS | 1130g | 450g |
| Water | 380ml | 140ml |
| Eggs | 1 | 1 |
| Margarine or butter | 4tbsp | 2tbsp |
| Powdered milk | 1/2cup 1/4cup | |
| Banana | 1cup 1/2cup | |
| Honey | 2tbsp | 1tbsp |
| Flour | 4+1/2cups | 2cups |
| Sugar | 1/2cup 1/5cup | |
| Salt | 1+1/2tsp | 3/4tsp |
| Baking powder | 1+1/4tsp | 3/4tsp |
NUT BREAD - Program: BASIC
| QUANTITY INGREDIENTS | 1130g | 450g |
| Water | 370ml | 130ml |
| Eggs | 1 | 1 |
| Margarine or butter | 5tbsp | 2tbsp |
| Powdered milk | 5tbsp | 2tbsp |
| Honey | 2tbsp | 1tbsp |
| Nuts | 3/4cup | 1/5cup |
| Flour | 4+1/2cups | 2cups |
| Sugar | 4tbsp | 2tbsp |
| Salt | 1+1/2tsp | 3/4tsp |
| Baking powder | 1+1/2tsp | 1tsp |
Note: cut the banana into pieces and add it after all the other ingredients.
Note: grind the nuts and add them to the second dough.
| COCONUT BREAD- Program: SWEET | ||
| QUANTITY INGREDIENTS | 1130g | 450g |
| Water | 380ml | 140ml |
| Eggs | 1 | 1 |
| Margarine or butter | 4tbsp | 2tbsp |
| Powdered milk | 1/2cup 1/4cup | |
| Honey | 2tbsp | 1tbsp |
| Coconut | 1/2cup 1/4cup | |
| Flour | 4 1/3cups | 2cups |
| Sugar | 1/2cup | 1/4 cup |
| Salt | 1+1/2tsp | 1tsp |
| Baking powder | 1+1/2tsp | 1+1/2tsp |
Note: add half coconut after the second dough and add the rest at the end of the dough.
| DOUGH- Program: DOUGH | ||
| QUANTITY INGREDIENTS | 1130g | 450g |
| Water | 400ml | 160ml |
| Margarine or butter | 3tbsp | 1tbsp |
| Salt | 1+1/4tsp | 3/4tsp |
| Flour | 4+2/3cups | 2cups |
| Sugar | 2+1/2tbsp | 1tbsp |
| Baking powder | 2tsp 1tsp | |
| JAM - Program: JAM | ||
| QUANTITY INGREDIENTS | 1130g | 450g |
| Ground strawberries | 4cups | 1+1/2cups |
| Sugar | 10tbsp | 5tbsp |
| Lemon juice | 6tsp 3tsp | |
The double basket
It can be used in 3 ways:
1) Make bread with any program using only a part of the double basket.
2) Make the same type of bread with any program on both parts of the double basket.
3) Make two different types of bread at the same time according to the programs contained in the table below:
| MENU | TYPE OF BREAD | |
| 1 | Basic | White bread and sweet bread |
| 2 | Sweet | White bread and sweet bread |
| 3 | Basic | White bread and French bread |
| 4 | French | White bread and French bread |
| 5 | Whole wheat | Whole wheat bread and French bread |
| 6 | French | Whole wheat bread and French bread |
| 7 | Sandwich | Sandwich and sweet bread |
| 8 | Sweet | Sandwich and sweet bread |
| 9 | Basic | White bread and Sandwich |
| 10 | Sandwich | White bread and Sandwich |
natural_image
Illustration of hands operating a cooking appliance into a rectangular oven (no text or symbols visible)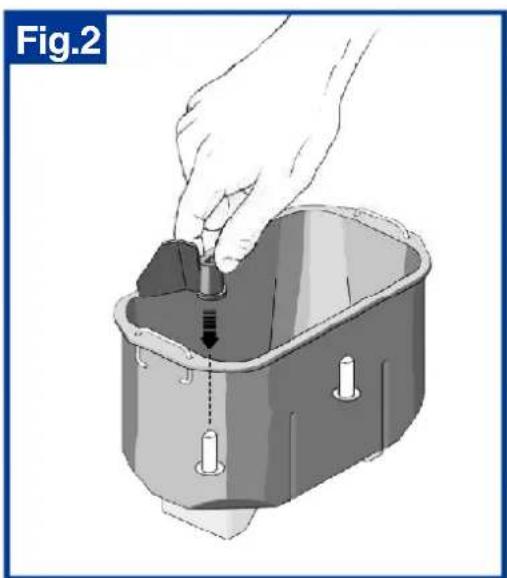
natural_image
Illustration of a hand placing a small object into a container with a dashed arrow indicating direction (no text or symbols)natural_image
Illustration of a hand pressing down on a rice cooker with a black checkmark indicating the process (no text or symbols)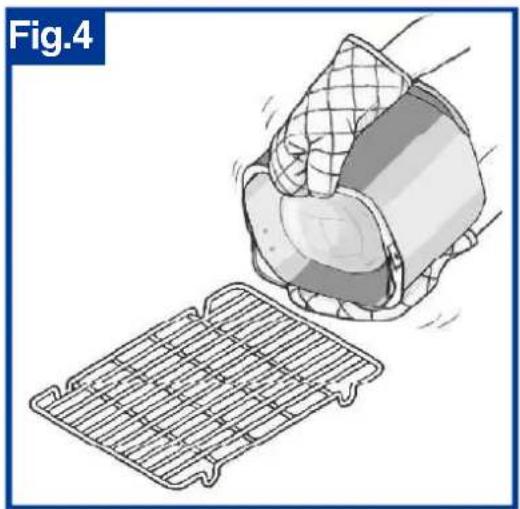
natural_image
Illustration of a hand cleaning a mesh material with a magnified inset showing the meshing (no text or symbols)natural_image
Illustration of a steaming cylindrical dessert on a cooling rack (no text or symbols)SEE ET A DE G B H N G R E D I E A T L SEE ET A DE G B H N G R E D I E A T L SEE ET A DE G B H N G R E D I E A T L
natural_image
Close-up of a textured, circular object with a beigeish interior, possibly a food item or substance (no visible text or symbols)
natural_image
Close-up of a textured, irregularly shaped object with dark background (no visible text or symbols)
natural_image
Close-up of a dough ball inside a container, no text or symbols visibleTbsp (tablespoon) = cuchara grande = cuchara de mesa = 15ml
Tsp (teaspoon) = cucharilla = cucharilla de café = 5ml.
| PAN BLANCO - Programa: PAN NORMAL | |||
| CANTIDAD INGREDIENTES | 1130g | 900g 450g | |
| Agua | 400ml | 330ml | 160ml |
| Margarina o mantequilla | 2+1/2tbsp | 2tbsp | 1tbsp |
| Sal | 2tsp | 1+1/2tsp | 1tsp |
| Harina | 4+2/3cups | 4cups | 2cups |
| Azúcar | 2+1/2tbsp | 2tbsp | 1tbsp |
| Leche en polvo | 2+1/2tbsp | 2tbsp | 1tbsp |
| Polvo de hornear | 1+3/4tsp | 1+1/2tsp | 1tsp |
| PAN DULCE - Programa: PAN DULCE | |||
| CANTIDAD INGREDIENTES | 1130g | 900g 450g | |
| Agua + 1 huevo | 410ml | 330ml | 160ml |
| Margarina o mantequilla | 4tbsp | 3tbsp | 2tbsp |
| Sal | 1+3/4tsp | 1tsp | 1/2tsp |
| Harina | 4+2/3cups | 4cups | 2cups |
| Azúcar | 5tbsp | 4tbsp | 3tbsp |
| Polvo de hornear | 1+3/4tsp | 1+1/2tsp | 1tsp |
| Leche en polvo | 2+1/2tbsp | 2tbsp | 1tbsp |
| SANDWICH - Programa: SANDWICH | |||
| CANTIDAD INGREDIENTES | 1130g | 900g 450g | |
| Agua | 400ml | 330ml | 160ml |
| Margarina o mantequilla | 3tbsp | 2tbsp | 1tbsp |
| Sal | 2tsp | 1+1/2tsp | 1tsp |
| Leche en polvo | 3tbsp | 2tbsp | 1tbsp |
| Azúcar | 2+1/2tbsp | 2tbsp | 1tbsp |
| Harina | 4+2/3cups | 4cups | 2cups |
| Polvo de hornear | 1tsp | 1tsp | 1tsp |
| PAN FRANCÉS - Programa: PAN FRANCÉS | |||
| CANTIDAD INGREDIENTES | 1130g | 900g 450g | |
| Agua | 400ml | 330ml | 160ml |
| Sal | 1+1/2tsp | 1tsp | 1tsp |
| Azúcar | 2tbsp | 1+1/2tbsp | 1tbsp |
| Harina | 4+2/3cups | 4cups | 2cups |
| Margarina o mantequilla | 3tbsp | 2tbsp | 1tbsp |
| Polvo de hornear | 1+3/4tsp | 1+1/2tsp | 1tsp |
| PAN INTEGRAL - Programa: INTEGRAL | |||
| CANTIDADINGREDIENTES | 1130g | 900g 450g | |
| Agua | 380ml | 330ml 160ml | |
| Margarina o mantequilla | 4tbsp | 3tbsp | 2tbsp |
| Sal | 2+1/2tsp | 2tsp 1tsp | |
| Harina integral | 3+1/3cups | 2+1/2cups | 1cup |
| Harina | 1+1/3cups | 1+1/2cups | 1cup |
| Azúcar | 3tbsp | 2tbsp | 1tbsp |
| Leche en polvo | 4tbsp | 3tbsp | 2tbsp |
| Polvo de hornear | 2tsp | 1+1/2tsp | 1+1/2tsp |
| PAN RÁPIDO - Programa: PAN RÁPIDO | |||
| INGREDIENTES CANTIDAD | 1130g | 900g 450g | |
| Agua (48°C) | 460ml | / | / |
| Margarina o mantequilla | 4tbsp | / | / |
| Sal | 1+1/2tsp / / | ||
| Harina | 5cups | / | / |
| Azúcar | 5tbsp | / | / |
| Polvo de hornear | 1+1/2tsp | / | / |
| PAN SUPER RÁPIDO - Programa: SUPER RÁPIDO | ||||
| INGREDIENTES | CANTIDAD | 1130g | 900g 450g | |
| Agua (48°C) | 450ml | 350ml 150ml | ||
| Huevos | 1 | 1 | 1 | |
| Margarina o mantequilla | 3tbsp | 2tbsp | 1tbsp | |
| Sal 1+1/2tsp | 1tsp | 1tsp | ||
| Azúcar | 4tbsp | 3tbsp | 2tbsp | |
| Harina | 4+2/3cups | 4cups 2cups | ||
| Polvo de hornear | 3+1/2tsp | 3tsp | 2tsp | |
| Leche en polvo | 3tbsp | 2tbsp | 1tbsp | |
| PAN DE SÉSAMO - Programa: PAN NORMAL | |||
| INGREDIENTES | CANTIDAD | 1130g | 900g 450g |
| Agua | 400ml / 160ml | ||
| Margarina o mantequilla | 5tbsp | / | |
| Leche en polvo | 5tbsp | / | |
| Semillas de sésamo | 4tbsp | / | |
| Harina | 4+2/3cups | / 2cups | |
| Azúcar | 4tbsp | / | |
| Sal | 1+1/2tsp | / 3/4tsp | |
| Polvo de hornear | 1+1/2tsp | / | |
| PAN DE CAFÉ - Programa: PAN NORMAL | ||
| CANTIDAD INGREDIENTES | 1130g 450g | |
| Agua | 380ml | 130ml |
| Huevos | 1 | 1 |
| Margarina o mantequilla | 3tbsp | 1tbsp |
| Leche en polvo | 2tbsp | 1tbsp |
| Café soluble | 4 sobres | 2 sobres |
| Miel | 2tbsp | 1tbsp |
| Harina | 4+1/3cups | 2cups |
| Azúcar | 1/3cup 1/5cup | |
| Sal | 1+1/3tsp | 1tsp |
| Polvo de hornear | 1+1/4tsp | 1tsp |
| PAN DE PASAS-Programa: PAN NORMAL | ||
| CANTIDAD INGREDIENTES | 1130g 450g | |
| Agua | 360ml | 130ml |
| Huevos | 1 | 1 |
| Margarina o mantequilla | 4tbsp | 2tbsp |
| Leche en polvo | 1/2cup 1/4cup | |
| Pasas | 1/2cup 1/4cup | |
| Miel | 2tbsp | 1tbsp |
| Harina | 4cups 2cups | |
| Azúcar | 1/3cup 3tbsp | |
| Sal | 1+1/2tsp | 3/4tsp |
| Polvo de hornear | 1+1/2tsp | 1tsp |
| PAN DE PLÁTANO - Programa: PAN DULCE | ||
| CANTIDAD INGREDIENTES | 1130g 450g | |
| Agua | 380ml | 140ml |
| Huevos | 1 | 1 |
| Margarina o mantequilla | 4tbsp | 2tbsp |
| Leche en polvo | 1/2cup 1/4cup | |
| Plátano | 1cup 1/2cup | |
| Miel | 2tbsp | 1tbsp |
| Harina | 4+1/2cups | 2cups |
| Azúcar | 1/2cup 1/5cup | |
| Sal | 1+1/2tsp | 3/4tsp |
| Polvo de hornear | 1+1/4tsp | 3/4tsp |
| PAN DE NUECES - Programa: PAN NORMAL | ||
| CANTIDAD INGREDIENTES | 1130g 450g | |
| Agua | 370ml | 130ml |
| Huevos | 1 | 1 |
| Margarina o mantequilla | 5tbsp | 2tbsp |
| Leche en polvo | 5tbsp | 2tbsp |
| Miel | 2tbsp | 1tbsp |
| Nueces | 3/4cup | 1/5cup |
| Harina | 4+1/2cups | 2cups |
| Azúcar | 4tbsp | 2tbsp |
| Sal | 1+1/2tsp | 3/4tsp |
| Polvo de hornear | 1+1/2tsp | 1tsp |
In accordance with European Directives 2002/95/CE, 2002/96/CE and 2003/108/CE on the restriction of the use of dangerous substances in electric and electronic equipment as well as their waste disposal.
- The barred symbol of the rubbish bin shown on the equipment indicates that, at the end of its useful life, the product must be collected separately from other waste.
- Therefore, any products that have reached the end of their useful life must be given to waste disposal centres specialising in separate collection of waste electrical and electronic equipment, or given back to the retailer at the time of purchasing new similar equipment, on a one for one basis.
- The adequate separate collection for the subsequent start-up of the equipment sent to be recycled, treated and disposal of in an environmentally compatible way contributes to preventing possible negative effects on the environment and health and optimises the recycling and reuse of components making up the apparatus.
- Abusive disposal of the product by the user involves application of the administrative sanctions according to the laws in force.

Spain

- Fornarina2in1
- FORNARINA 2 IN 1
- DESCRIZIONE
- DESCRIPCIÓN
- WARNING! HOT SURFACE
- INSTRUCTIONS FOR USE
- USING THE APPLIANCE FOR THE FIRST TIME
- WARNING
- STARTING
- ADDING INGREDIENTS
- Do not use sharp implements such as metal spatulas, knives and forks. This may damage the non-stick surface of the baskets.
- SETTING THE PROGRAM
- BAKING
- END
- MENU SELECTION
- BASIC 3:20
- QUICK 1:58
- FRENCH 3:40
- SUPER RAPID 1:59
- WHOLE WHEAT 3:30
- SWEET 3:10
- DOUGH 1:50
- BAKE 1:00
- JAM 1:20
- SANDWICH 3:00
- HOME MADE
- HOME MADE Program
- TEMPERATURE SELECTION
- BREAD SIZE SELECTION
- TIMER
- The maximum time that can be set is 13 hours.
- TURNING OFF AND STORING THE APPLIANCE
- INGREDIENT SELECTION
- FLOUR
- 'Patent flour' or household flour
- Wheat flour and wheatmeal
- Whole wheat flour
- Flour mixes
- All-in-one mixes
- YEAST
- SALT
- LIQUIDS
- SUGAR
- FATS
- OTHER INGREDIENTS
- CURRANTS
- BRAN
- EGGS
- GARNISH
- MIXTURES AND JAMS
- SUGGESTIONS ON PREPARING THE BREAD
- Let the bread cool down on a grill
- Storing bread
- Freezing bread
- Darker bread
- Crispier crust
- If the bread rises out of the basket
- Small, compact bread
- Too dry bread
- Sunken bread
- SPECIAL SIGNALS ON THE DISPLAY
- CLEANING AND MAINTENANCE
- RECIPES
- The double basket
- SEE ET A DE G B H N G R E D I E A T L SEE ET A DE G B H N G R E D I E A T L SEE ET A DE G B H N G R E D I E A T L
- Spain
Brand : TERMOZETA
Model : Fornarina 2 IN 1 76002
Category : Bread maker