BXLRC100 - Alarm clock radio BASICXL - Free user manual and instructions
Find the device manual for free BXLRC100 BASICXL in PDF.
Frequently Asked Questions - BXLRC100 BASICXL
User questions about BXLRC100 BASICXL
0 question about this device. Answer the ones you know or ask your own.
Ask a new question about this device
Download the instructions for your Alarm clock radio in PDF format for free! Find your manual BXLRC100 - BASICXL and take your electronic device back in hand. On this page are published all the documents necessary for the use of your device. BXLRC100 by BASICXL.
USER MANUAL BXLRC100 BASICXL
natural_image
Black and white toy robot with two wheels and a digital display showing 12:08 (no text or symbols on the device itself)MANUAL (p. 2)
Alarm clock
MODE D'EMPLOI (p. 9)
Réveil
MANUALE (p. 17)
Orologio sveglia
HASZNÁLATI ÚTMUTATÓ (o. 25.)
Ébresztőóra
MANUAL DE USO (p. 21)
Reloj despertador
KÄYTTÖOHJE (s. 29)
Herätyskello
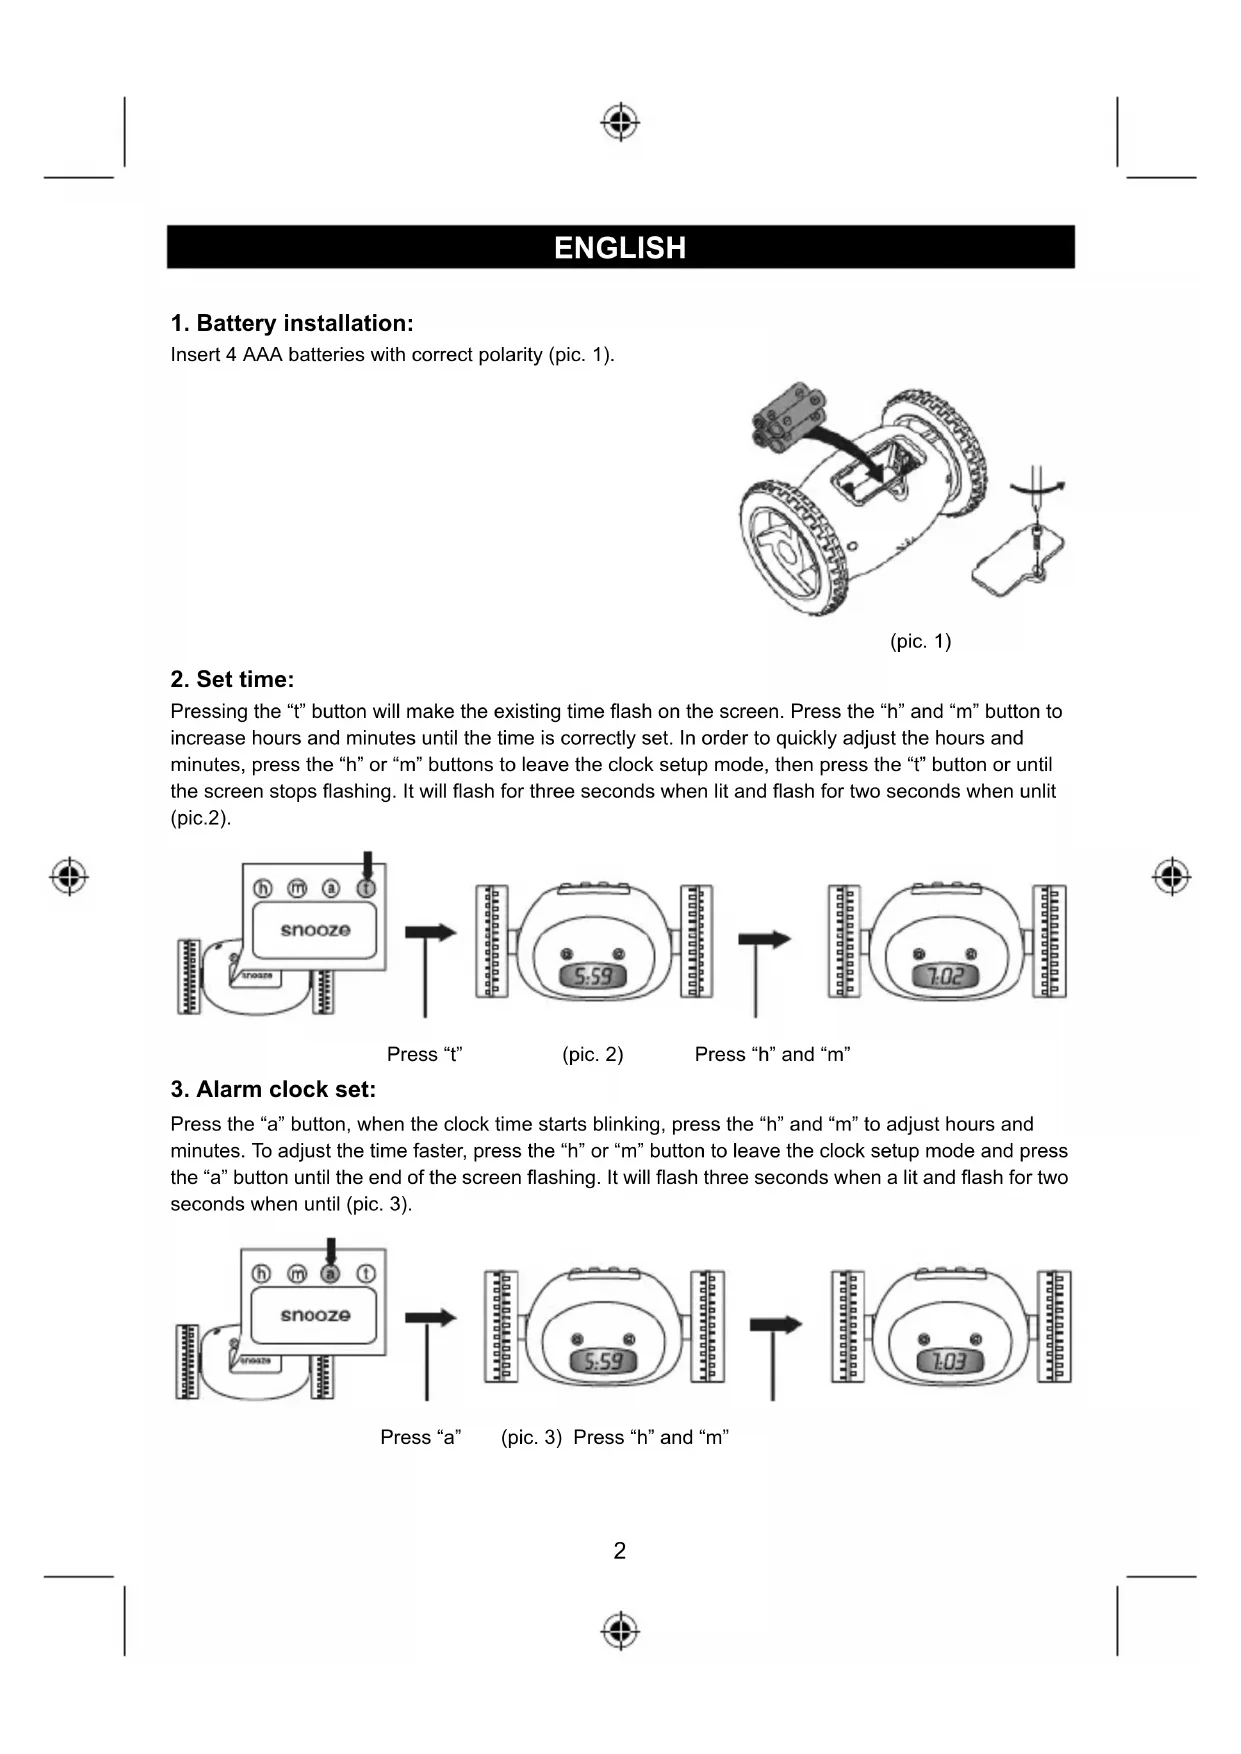
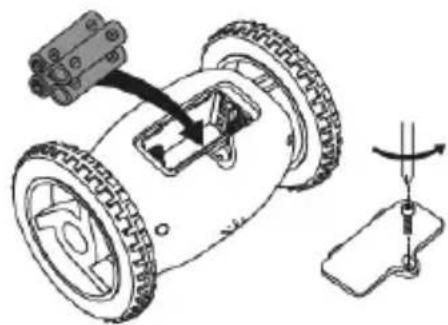
1. Battery installation:
Insert 4 AAA batteries with correct polarity (pic. 1).
natural_image
Diagram of a small wheeled robot with attached sensor and mechanical components, showing assembly and motion direction (no text or labels)(pic. 1)
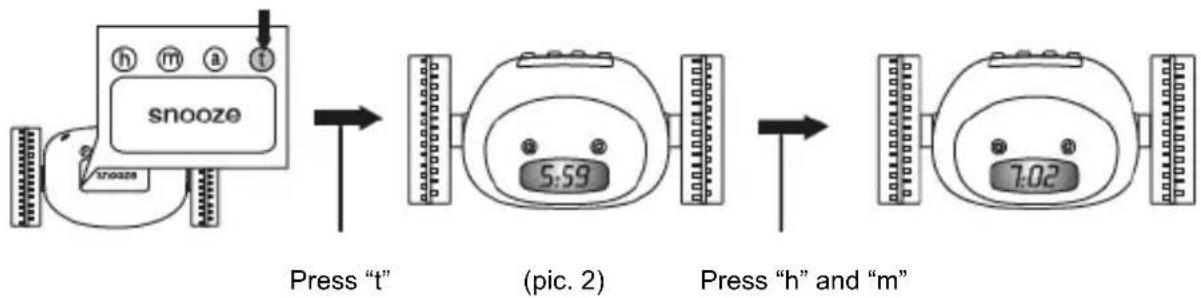
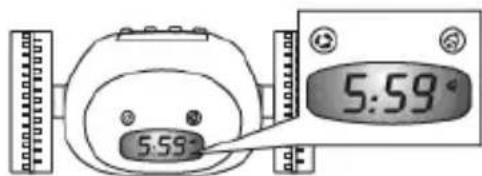
2. Set time:
Pressing the "t" button will make the existing time flash on the screen. Press the "h" and "m" button to increase hours and minutes until the time is correctly set. In order to quickly adjust the hours and minutes, press the "h" or "m" buttons to leave the clock setup mode, then press the "t" button or until the screen stops flashing. It will flash for three seconds when lit and flash for two seconds when unlit (pic.2).
flowchart
graph LR
    A["snooze"] -->|Press "t"| B["(pic. 2)"]
    B -->|Press "h" and "m"| C["End"]

3. Alarm clock set:
Press the "a" button, when the clock time starts blinking, press the "h" and "m" to adjust hours and minutes. To adjust the time faster, press the "h" or "m" button to leave the clock setup mode and press the "a" button until the end of the screen flashing. It will flash three seconds when a lit and flash for two seconds when until (pic. 3).

flowchart
graph LR
    A["Input Signal"] --> B["Signal Display"]
    B --> C["Write Off"]
    C --> D["Read/Write Display"]
    D --> E["Output Display"]
Press "a" (pic. 3) Press "h" and "m"
4. Snooze time set:
Press the "a" button. The snooze time is set to a 1 minute default. Press the "m" button to alter the snooze time for between 0-9 minutes. If 0 minutes is chosen, the snooze function is not activated (pic. 4).
To leave the snooze set mode, press the "a" button or until the clock time appears.

flowchart
graph LR
    A["Sensor Input Sensor"] --> B["Signal Processing"]
    B --> C["Device 1: Smart Home Interface"]
    C --> D["Output Display"]
Press "a" twice (pic. 4) Press "m"
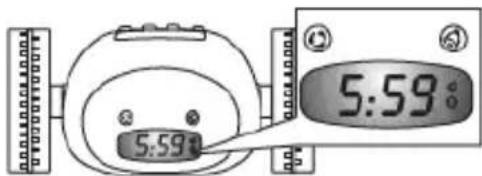
5. Setting the alarm clock:
Setting the alarm clock: Press the alarm clock button, the alarm sign will appear on the screen (pic. 5).
text_image
5:59 5:59(pic. 5)
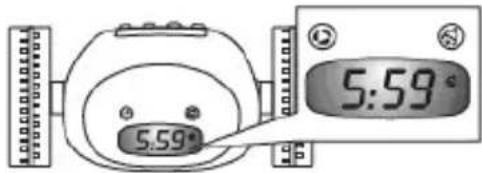
6. Open the bull wheel:
Open the bull wheel: Press the bull wheel button, the wheel sign will appear on the screen (pic. 6).
text_image
5:59(pic. 6)
The next alarm: snooze can be set to ring again, if the alarm is not turned off, the clock will begin to beep and run. If the snooze minute is set to 0, the clock will run when the bell rings.
Press the "snooze" button. The screen will appear the last snooze time. You need to setup snooze time before clock running, the alarm clock will ring again when it runs away.
7. Turning off the alarm clock:
Press the alarm button again to turn off the alarm clock, the alarm sign on the screen will disappear (pic. 7).
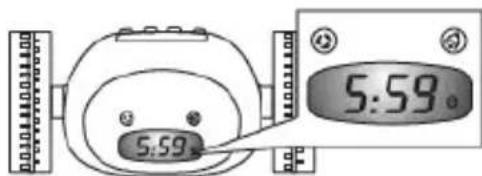
text_image
5:59.(pic. 7)
Remark: Once the alarm is turned off the wheel will not run.
8. Turn off the wheel:
If you would like to have the alarm clock sound but not have it run away, press the bull wheel button again. The wheel sign will disappear from the screen (pic. 8).
text_image
5:59°(pic. 8)
9. Game:
Continuously pressing the "t" button twice will display the No.1 of default. Pressing the "h" button will give you the choice of selecting the numbers between 1 and 5. Press the "t" button again hour after hour (twice) to confirm that the game has started. The game coverage: the alarm clock will rotate forwards, backwards, spin clockwise and counterclockwise; rotate through 360 degrees and irregularly (pic. 9).

flowchart
graph LR
    A["Input Signal"] --> B["Input Channel"]
    B --> C["Signal Processing"]
    C --> D["Output Channel"]
    D --> E["Output Signal"]
Press "t" two twice (pic. 9) Press "h"
The numbers used represent the duration of the game:
No.1, Game duration 20 seconds;
No.2, Game duration 40 seconds;
No.3, Game duration 1 minute;
No.4, Game duration 1 minute 20 seconds;
No.5, Game duration 1 minute 40 seconds.
The times above are the default times of the games and will automatically stop after that time. Press the bull wheel to finish the games early (do not press any other buttons before pressing the bull wheel).
-
In order to avoid the alarm clock from breaking, do not put it in a place more than one meter high.
-
The alarm clock works on a wooden floor or carpet, but we do not recommend using it on a thick rug.
-
The alarm clock will run in different directions for about 30 seconds until it finds somewhere to have a rest. The backlight will flash when the alarm clock rings and moves.
-
Sometimes the alarm clock will spin until it runs in to a solid object.
-
Put the alarm clock back to the bed stand when it is retrieved, do not place it on the ground.
-
You can start the backlighting for 3 seconds to tell the time in darkness by pressing any button.
-
The battery sign will appear and flash on the screen before alarm time when the battery power is low. The alarm clock needs new batteries.
Frequently Asked Questions
- When the alarm clock does not ring, please check the following: Check whether the alarm clock is set for am or pm and if the alarm clock sign is showing on the screen of the alarm clock and whether the alarm button has been pressed and if it is still showing on the screen.
- If the alarm clock has a blinking low power warning, please replace the batteries as soon as possible.
Safety precautions:

text_image
CAUTION RISK OF ELECTRIC SHOCK DO NOT OPENTo reduce risk of electric shock, this product should ONLY be opened by an authorized technician when service is required. Disconnect the product from mains and other equipment if a problem should occur. Do not expose the product to water or moisture.
Maintenance:
Clean only with a dry cloth. Do not use cleaning solvents or abrasives.
Warranty:
No guarantee or liability can be accepted for any changes and modifications of the product or damage caused due to incorrect use of this product.
General:
Designs and specifications are subject to change without notice.
All logos brands and product names are trademarks or registered trademarks of their respective holders and are hereby recognized as such.
Keep this manual and packaging for future reference.
Attention:
This product is marked with this symbol. It means that used electrical and electronic products should not be mixed with general household waste. There is a separate collections system for these products.
DEUTSCH
natural_image
Diagram of a small wheeled vehicle with wheels and a sensor attached, showing mechanical assembly (no text or symbols)(Abb. 1)
text_image
5:59' 5:59'(Abb. 5)
natural_image
Diagram of a small wheeled vehicle with wheels and a sensor, showing mechanical assembly (no text or symbols)(fig. 1)
text_image
5:59° 5:59°(fig. 5)
natural_image
Diagram of a small wheeled vehicle with wheels and a sensor, showing mechanical assembly (no text or symbols)(afb. 1)

2. Tijd instellen:
flowchart
graph LR
    A["snooze"] --> B["5:59"]
    B --> C["7:03"]
Druk op "a" (afb. 3) Druk "h" en "m"
text_image
5:59° 5:59°(afb. 5)
text_image
5:59° 5:59°(afb. 8)
9. Spel:
natural_image
Technical line drawing of a small wheeled vehicle with attached sensor and mechanical components (no text or symbols)(figura 1)
2. Impostare l'ora:
flowchart
graph LR
    A["snooze"] --> B["5:59"]
    B --> C["7:02"]
text_image
5:59° 5:59(figura 5)
6. Aprire la ruota:
text_image
5.59° 5.59°(figura 8)
9. Giochi:
natural_image
Technical line drawing of a small wheeled vehicle with attached sensor and mechanical components (no text or symbols)(figura 1)
text_image
5:59° 5:59(figura 5)

natural_image
Technical line drawing of a small wheeled vehicle with a sensor attached, showing mechanical components and a close-up view of the wheel (no text or symbols present)(1. ábra)
flowchart
graph LR
    A["snooze"] --> B["5:59"]
    B --> C["1:03"]
natural_image
Technical line drawing of a small wheeled vehicle with attached components and a mechanical assembly (no text or symbols)(kuva 1)
2. Ajan säätäminen:
flowchart
graph LR
    A["snooze"] --> B["5:59"]
    B --> C["7:03"]
text_image
5:59° 5:59°(kuva 8)
9. Peli:
natural_image
Diagram of a small wheeled robot with attached sensor and mechanical components, showing a rotation arrow (no text or symbols)(fig.1)
2 Ställa in tid:
text_image
5:59° 5:59°(fig. 5)
6 Öppna bull wheel:
flowchart
graph LR
    A["Input Image"] --> B["Snooze Application"]
    B --> C["Image Collection"]
    C --> D["Output Image with Mask Icon 5"]
natural_image
Diagram of a small wheeled robot with attached sensor and mechanical components, showing assembly and motion direction (no text or labels)(obr. 1)
2. Nastavení času:
text_image
5:59 5:59°(obr. 5)
6. Zapnutí koleček:
text_image
5:59° 5.59°(obr. 8)
9. Hra:
natural_image
Diagram of a small wheeled vehicle with wheels and a mechanical component, showing a rotation arrow (no text or symbols)(fig.1)
2. Setarea orei:
text_image
5:59° 5:59(fig. 5)
text_image
5:59° 5.59°(fig. 8)
9. Joc:
natural_image
Diagram of a small wheeled vehicle with wheels and a sensor, showing mechanical assembly (no text or symbols)(εικ.1)
2. Ρύθμιση ώρας:
text_image
5:59° 5:59(εικ. 5)
text_image
5:59 5:59.(εικ. 7)
text_image
5:59° 5:59°(εικ. 8)
9. Παιχνίδι:
natural_image
Diagram of a small wheeled vehicle with wheels and a mechanical component, showing assembly and rotation (no text or symbols)(bil. 1)
text_image
5:59° 5:59°(bil. 5)
natural_image
Diagram of a small wheeled robot with attached sensor and mechanical components, showing assembly and motion direction (no text or labels)(bilde 1)
2. Still tiden:
Description: Alarm clock