BXLFA11 - Alarm clock radio BASICXL - Free user manual and instructions
Find the device manual for free BXLFA11 BASICXL in PDF.

| Product type | Clock radio with rocket |
| Brand | basicXL |
| Model | BXLFA11 |
| Main power supply | 4 AA 1.5V batteries (not included) |
| Clock power supply | 1 LR44 1.5V battery (included) |
| Display | LCD, 12-hour format with AM/PM indicator |
| Functions | Clock setting, alarm, snooze, light, countdown, rocket launch, siren |
| Clock setting | CLOCK SET button + HOUR/MINUTE |
| Alarm setting | ALARM SET button + HOUR/MINUTE |
| Alarm on/off | ON/OFF button (rocket in place) |
| Snooze | SNOOZE/LIGHT button: extra 5 minutes |
| Light | SNOOZE/LIGHT button to illuminate LCD screen |
| Test function | TRY ME button: countdown and rocket launch, siren 40s |
| Stopping the siren | Replace the rocket on its base until it clicks |
| Rocket installation | Align the black line with the arrow, push until it clicks |
| Care and cleaning | Dry cloth only, no solvents or abrasive products |
| Safety | Do not open, do not expose to water or moisture; contains small parts, keep out of reach of children under 36 months |
| Repairability | Opening only by a qualified technician |
| Warranty | No warranty in case of modification or incorrect use |
| General information | Design and specifications subject to change; do not dispose of with household waste (WEEE symbol) |
Frequently Asked Questions - BXLFA11 BASICXL
User questions about BXLFA11 BASICXL
0 question about this device. Answer the ones you know or ask your own.
Ask a new question about this device
Download the instructions for your Alarm clock radio in PDF format for free! Find your manual BXLFA11 - BASICXL and take your electronic device back in hand. On this page are published all the documents necessary for the use of your device. BXLFA11 by BASICXL.
USER MANUAL BXLFA11 BASICXL
natural_image
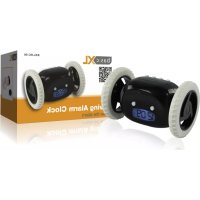
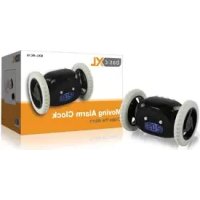
White rocket on a digital display stand with black buttons and a white top, no visible text or symbols.MANUAL (p. 2)
Flying Rocket Alarm Clock
MODE D'EMPLOI (p. 7)
Réveil fusée
MANUALE (p. 12)
MANUAL DE USO (p. 15)
Please make sure the adapter is correctly plugged into the clock. Check the polarity of both connections before connecting.
Rocket Alarm Clock

text_image
Technical diagram of a mechanical device with numbered components labeled 1 through 7(1) Clock set
(2) Alarm set
(3) Hour/Minute
(4) On/Off (Alarm)
(5) Try Me
(6) Snooze/Light
(7) Rocket
This alarm clock works on 12 hours AM/PM time
Time Set
Press the (1) "CLOCK SET" button twice.
The hours will flash. Press the (3) "HOUR/MINUTE" button to adjust the hour's value.
Press the (1) "CLOCK SET" button once to skip to the minute settings.
The minutes will flash. Press the (3) "HOUR/MINUTE" button to adjust the minute's value.
Press the (1) "CLOCK SET" button once to set the time.
Alarm Set
Press the (2) "ALARM SET" button twice.
The hours will flash. Press the (3) "HOUR/MINUTE" button to adjust the hour's value.
Press the (2) "ALARM SET" button once to skip to the minute settings.
The minutes will flash. Press the (3) "HOUR/MINUTE" button to adjust the minute's value.
Press the (2) "ALARM SET" button once to set the alarm time.
The indicator will be shown on the right side of the LCD when the alarm is set.
To deactivate the alarm, press the (4) "ON/OFF" button once (the rocket must be already placed in its cavity on the clock base). When the alarm sounds, you will hear a countdown from 10. After the countdown has completed, the rocket will launch. Then a beep will sound for approximately 1 minute or until either the alarm is switched off (see TURNING OFF THE ALARM below), or the snooze button is pressed.
When setting the clock or the alarm time, make sure you have set the time to the correct time of day, e.g. AM or PM (displayed on the left hand side of the screen).
Loading rocket
You can only insert the rocket in one direction. Align the black line on the rocket with the arrow on the base, and then insert the rocket into the cavity on the base of the clock. Gently push the rocket down against the spring until you hear it click.
Turning off the alarm
Please note you can only turn off the alarm once you have re-loaded the rocket onto the base. Insert the rocket into the cavity on the base of the clock. Gently push the rocket down against the spring until you hear it click.
Snooze
Delays alarm for 5 minutes, Press (6) "SNOOZE/LIGHT" button after alarm sounds.
You do not need to replace the rocket for the snooze function to be activated.
Light: press the (6) "SNOOZE/LIGHT" button to activate the LCD backlight.
Try me
Press the (5) "TRY ME" to activate the COUNTDOWN and ROCKET LAUNCH. After the rocket has launched, an alarm will beep for 40 seconds. It can be stopped by re-pressing the (5) "TRY ME" button.
Battery instructions
- Use a screwdriver to open the battery compartment
- For the main power compartment, use 4 x 1.5 V AA-batteries (not included)
- For the clock power compartment, use 1 x 1.5 V LR44-battery (included)
- Please read instructions before use
- Non-rechargeable batteries must not to be recharged
- Rechargeable batteries must be removed from the alarm clock before being charged
- Rechargeable batteries must only be charged under adult supervision
- Different types of batteries or new and used batteries should not be mixed
- Only batteries of the same or equivalent type as recommended should be used
- Batteries must be inserted according to the correct polarity
- Exhausted batteries must be removed from the product
- The supply terminals are not to be short – circuited
- Do not mix alkaline, standard (carbon-zinc) or rechargeable (nickel-cadmium) batteries
TROUBLESHOOTING:
If the alarm clock does not work after inserting batteries and removing the insulator tab, you need to reset the alarm clock. To do this, remove and replace the LR44 (button cell) battery.
WARNING:
Not suitable for children under 36 months due to small parts which can cause choking.
Do not stand in front of the rocket while it is loaded.
Safety precautions:

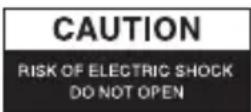

To reduce risk of electric shock, this product should ONLY be opened by an authorized technician when service is required. Disconnect the product from mains and other equipment if a problem should occur. Do not expose the product to water or moisture.


Maintenance:
Clean only with a dry cloth. Do not use cleaning solvents or abrasives.
Warranty:
No guarantee or liability can be accepted for any changes and modifications of the product or damage caused due to incorrect use of this product.
General:
Designs and specifications are subject to change without notice.
All logos brands and product names are trademarks or registered trademarks of their respective holders and are hereby recognized as such.
Keep this manual and packaging for future reference.
Attention:
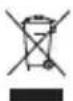
This product is marked with this symbol. It means that used electrical and electronic products should not be mixed with general household waste. There is a separate collections system for these products.
DEUTSCH
ACHTUNG!
text_image
Technical diagram of a missile launcher with numbered components labeled 1 through 7text_image
Technical diagram of a mechanical device with numbered components labeled 1 through 7text_image
Technical diagram of a missile launcher with numbered components labeled 1 through 7(1) Klokinstelling
(2) Alarminstelling
(3) Uur/Minuut
(4) Aan/Uit (Alarm)
(5) Probeer Maar Uit
(6) Snooze/Licht
(7) Raket
text_image
Technical diagram of a mechanical device with numbered components labeled ① through ⑦text_image
Technical diagram of a mechanical device with numbered components labeled ① through ⑦(1) Ajuste de reloj
(2) Ajuste de alarma
(3) Hora/minuto
(4) Enc./Apag. (alarma)
(5) Pruébame
(6) Repetición/luz
(7) Cohete