
Easy Fix - Car seat MAXI-COSI - Free user manual and instructions
Find the device manual for free Easy Fix MAXI-COSI in PDF.

| Product Type | Isofix base for car seat with support leg |
| Compatible age group | 0+ (up to 13 kg, about 17 months) with CabrioFix |
| Dimensions (approx.) | 40 x 50 x 30 cm |
| Weight (approx.) | 5 kg |
| Main installation | Isofix with support leg (floor support) or 3-point belt with support leg |
| Safety indicator | Green for correct installation, red for error |
| Installation orientation | Always rearward facing |
| Approval | ECE R44/04, semi-universal (Isofix) and universal (belt) |
| Materials | Plastic and metal |
| Maintenance and cleaning | Clean with a damp cloth and mild soap. Do not use harsh products or lubricants. |
| Spare parts and repairability | Use only accessories and parts approved by the manufacturer. Do not modify the product. |
| Warranty | 24 months against material and manufacturing defects |
| Recommended lifespan | 5 years after purchase date |
| Compatible seat type | CabrioFix (group 0+) |
| Use with airbag | Do not use on a seat with an active front airbag |
Frequently Asked Questions - Easy Fix MAXI-COSI
User questions about Easy Fix MAXI-COSI
0 question about this device. Answer the ones you know or ask your own.
Ask a new question about this device
Download the instructions for your Car seat in PDF format for free! Find your manual Easy Fix - MAXI-COSI and take your electronic device back in hand. On this page are published all the documents necessary for the use of your device. Easy Fix by MAXI-COSI.
USER MANUAL Easy Fix MAXI-COSI
m = 311

MAXI-COS)
1000
2013年/4月26日星期五
- 实验原理
DORIANTLY
100000000000000000000000000000000000000
[PDF]
1.2015年4月3日
1
品号:
GOIDI TALAN S.P.
$ git merge s:8:14
2.00元/份(含税)
0000.0000
POPT2AK
10000000000000000000000000000000
= , = , = , = ,


MAXI-COSI
EN Instructions for use/Warranty 7-20
FR Mode d'emploi / Garantie 21-34
DE Gebrauchsneinwusung / Garantie 35-48
NL Gebruksaanwizig/Garantie 49-62
15 Mode de empeo / Garantia 03-78
IT. Istruzioniper Use (Saranzin 77-90
PT Moded emprego:Garantia 91-104


MAXI-COSI
Dear parents
Congratulations on your purchase of the EasyFix.
Safety, user-friendliness, comfort and design played an important role in developing the EasyFix. This product meets the most stringent safety requirements.
Studies have shown that a large percentage of car seats are not used correctly. Therefore, please take the time to read through this manual carefully. Your child's safety can only be guaranteed if this product is used according to these instructions.
Continuous research by our product development department, supported by intensive contact and consultation with test people and consumers ensure that we kept fully up-to-date in the field of child safety. If you have any questions or comments on the use of the EasyFix, please do not hesitate to contact us.
Dorel (see the back of the instruction manual for address and telephone number)
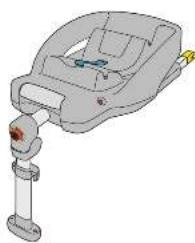
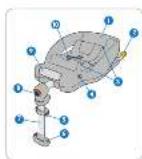
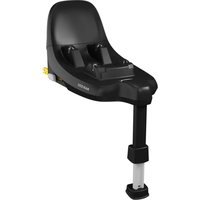
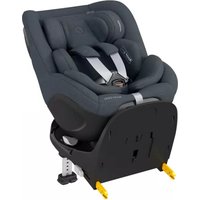
1 Base
Isofix connector
Anchor point
Colour indicator for the CabrioFix
Support leg control button
Support leg colour indicator
Support leg
Central button on the support leg with colour indicator
9 Release lever for CabrioFix
Blue belt clamp


CONTENTS
- Important read first! 8
2.Approved car use 10
3.1.1.2.1.1.1.1.1.1.1.1.1.1.1.1.1.1.1.1.1.1.1.1.1.1.1.1.1.1.1.1.1.1.1.1.1.1.1.1.1.1.1.1.1.1.1.1.1.1.1.1.1.1.
3.2 Using a 3-point safety belt (blue marking on product) and support (eg, 13 - Installing and removing the CabrioFix 15
- Maintenance 15
- General instructions 16
- Waste separation 1
- Next stage can be 10
10 - Questions 20
1. IMPORTANT: READ FIRST!
Read this instruction manual carefully and save it for future reference. Failure to follow the instructions in this manual could result in serious injury to your child
Use original accessories and manufacturer-approved parts only. Do not make any changes to the product if you have any problems or complaints, contact your retailer or importer.
Always check car fitting list before installation.
IMPORTANT!
The EasyFix is a safety product and is only safe if
IMPORTANT!
The EasyFix may only be used in combination with the CabrioFix. The CabrioFix can be recognised by the type indication on the belt protector and the two steel spindles underneath the CabrioFix. If you are in any doubt, contact the manufacturer
| Suitability according to ECE R 44/04 | ||||
| Group | Body weight of child | Age | ||
| EasyFix + CabrioFix | 0+ | 0 - 13 kg | 0 - 12 months | Semi-universal* |
| CabrioFix | 0+ | 0 - 13 kg | 0 - 12 months | Universal |
Never leave a child unsupervised in the seat, either in the car or outside of the car.
Do not use the EasyAir in a place where a frontal airbag is installed as this can be dangerous. This does not apply to side airbags.
The EasyFix may be used either on the passenger seat or on the back seat, but it should always face backwards. Lock the rear seats that fold down.
The EasyFix has been approved according to the most recent guidelines of the ECE R 44/04, the European standard for car safety seats, and can be used in combination with the CabrioFix, suitable for children from birth to approximately 12 months (group C+O; C to 13 kg).
The use of the support leg and/or bolix, which ensure optimum safety and easy installation, mean that the EasyFix is not suitable for all types of cars. The EasyFix is designated as "semi-universal" and therefore suitable for installation in certain types of cars. See the enclosed car fitting list (See Section 9 Car fitting list).

2. APPROVED CAR USE
The EasyFix is approved for 2 types of car use:
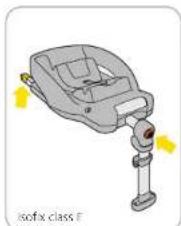
Installation with Isofix and support leg (see section 3.1). For use in cars with approved Isofix anchor points (see Section 9: Car fitting list). Recognisable by the yellow marking on the product and the yellow marking in the Instruction manual.
Installation using 3-point safety belt and support leg (see section 3.2); for use in cars "fitted" with an automatic 3-point safety belt approved in accordance with ICF R16 or equivalent standard (see Section 9: Car fitting list). Recognisable by the blue marking on the product and the blue marking in the instruction manual.
3. INSTALLING AND REMOVING THE EASYFIX
3.1 Using Isofix (yellow marking on the product) and support leg
If your car is equipped with Isofi anchor points, you can install the EasyFix using the Isofi connectors in combination with the support leg. To check whether your car is suitable for Isofi attachment and the support leg, see Section 9. Car fitting list.
| ● Installed on seats fitted with isofix anchor points (located between seat and seat back) & with room for the support leg | Yes* |
| ● Isofix installation marking | Yellow |
| ● Frumtl airbag ● Side airbag | No Yes |
Check car fitting list
10
MAXI-COS

Only use the EasyFix on a forward-facing seat equipped with Isolac anchor points. Record the car manufacturer's handbook before use.
Correct attachment to the Isofix anchor points is essential for the safety of your child. Also see the yellow outlined sticker on the side of the Tasyfix
Never use a different installation method than the one described here!
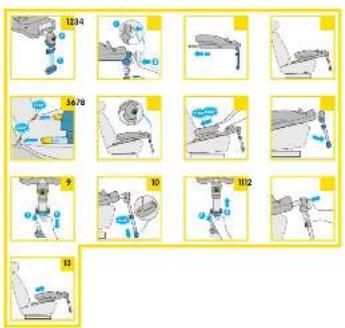
A. Installing with Isofix
IMPORTANT!
Secure any fold-down seats.
IMPORTANT!
Make sure the support leg is fully folded out and that the indicator on the central button is red.
- Press the central button on the support leg and push the support leg backward as far as possible.
- The Isofix connectors are now exended as far as possible and the Isofix is ready to be installed.
Place the EasyFix on the seat of the car.
Line up the Isofix connectors with the Isofix. Click both Isofix connectors into the Isofix anchor points.
IMPORTANT!
Make sure that both Isofix connectors are securely attached to Isofix anchor points. There should be two audible clicks.
Check to make sure the EasyFix is securely installed by pulling on the EasyFix. The indicator on the central button should now be green.
Place both hands on the EasyFix and push it back as far as possible until it is situated firmly against the seat back (you'll hear a 'falling' sound).
- Check again to make sure the seat is secure by pulling on the EasyFix.
11

EN

B. Adjusting the length of the support leg
IMPORTANT!
Always use the support leg to ensure the safe use of the EasyFix.
IMPORTANT!
Make sure the support leg is fully folded out and locked at the hinge point.
- Keep the silver control button on the support leg pressed and move the support leg downwards until it reaches the floor of the car.
IMPORTANT!
Make sure the indicator at the base of the support leg is green.
- In some cases the EasyFix may not be fully supported by the car seat, but entirely by the support loop.
- Release the control button and "click" the support icon into the locked position.
Check to make sure the support leg is securely locked and stays in position by trying to move it up or down without pressing the control button.
Checklist...
To ensure the optimum safety of your child, check the following after installation:
Both Isofa connectors are securely attached to the Isofa anchor points: the indicator on the central
button on the support leg should be green. - The support leg is fully folded out.
The indicator on the base of the support leg is green.
- The entire EasyFix is installed securely and firmly in the car (check by pulling on the EasyFix).
C. Removing the EasyFix
- Restore the support leg to its start position by pressing the control button and sliding the support leg upwards.
- Disconnect the Isofix connectors by pressing the central button on the support leg. The indicator on the central button on the support leg should be red. Considerable force may sometimes be needed in order to release the buckle. If this is the case, try pushing the EasyFix into the back of the vehicle seat while pressing the release button.
- Remove the EasyFix from the isofix anchor points
- Remove the EasyFix from the car.
3.2 Using a 3-point safety belt (blue marking on product) and support leg
If your car is not equipped with Kofix anchor points, you can install the EasyFix using a 3-point safety belt in combination with the support leg. To check whether your car is suitable for installation using a 3-point safety belt and support leg, see Section 9-Car fitting list.
Provided there is a 3-point safety belt in the middle position of the back seat and there is enough room for properly installing the support leg (see Section 9: Car fitting list).
Only install the Easyfix on a forward-facing seat fitted with an automatic 3-point safety belt approved in accordance with ECF R15 or equivalent standard.
The proper threading of the seat belt is essential to your child's safety. The seat belt must be threaded along the blue markings on the EasyFix. See the sticker outlined in blue on the topside of the EasyFix.
WARNING!
Never thread the belt in any other way!


A. Installing
IMPORTANT!
Make sure the Isofix connectors are retracted.
1 Press the central button on the support: leg and pull the support leg forward as far as possible.
IMPORTANT!
Secure any fold-down seats.
IMPORTANT!
On some seats, the belts are fitted so far forward
that proper installation is not possible.
If this is the case, try another seat (see section 95).
Cer hing lsc
- Place the EasyFix on the seat of the car with the support leg folded out.
- Open the blue belt clamp by pulling the lever up. Pass the shoulder and lap belt together through the belt opening.
Pass the seat belts between the base and the blue belt clamp and then through the second belt opening.
17 - Insert the seat belt into the belt buckle of the car
NOTE!
Make sure that the seat belt is pulled tight.
and is not twisted.
- • Fasten the belt clamp by pushing the lever down.
Check that it is fastened correctly by pulling on
the EasyFix
B. Adjusting the length of the support leg
- See section 3.1, point B: "Adjusting the length of the support leg".
Checklist ...
To ensure the optimum safety of your child, check
the following after installation:
The seat belt is as tight as possible and not twisted.
The two belt parts pass through the belt openings
in the base and under the blue belt clamp.
The support leg is fully folded out.
The indicator at the base of the support leg is
completely green.
In some cases the EasyFix may not be fully
supported by the car seat, but entirely by the
support leg.
The EasyFix as a whole has been installed in the
car in a secure and stable manner by pulling on the EasyFix.
C. Removing the EasyFix
19 Restore the support leg to its start position by pressing the control button and sliding the support leg upwards.
- Loosen the seat belt and open the blue belt clamp.
- Take the seat belt out from between the base and the blue belt clamp and fasten the belt clamp.
- Remove the EasyFix from the car.
4. INSTALLING AND REMOVIDING
THE CABRIOFIX
A. Installing the CabrioFix
- Position the CabroFix facing backwards (with the back facing the direction of driving) on top of the EasyFix. The carrying handle should be in the upright position.
- Click the CabroFix with its 2 spindles onto the anchor points of the EasyFix.
NOTE!
A clear click should be audible and the indicators should now be completely on green.
NOTE!
Under no circumstances should this product
be used if the indicator remains on red
Carry out the above actions again. In case of doubt, please have any questions refer
of doubt or if you have any questions, contact the manufacturer.
- Check that Cahnofix has been installed correctly by pulling on IL.
To install the child in the CabrioFix or to remove him/her, see the CabrioFix user instructions. The optimum safety of your child is only guaranteed if the CabrioFix is used correctly. It is therefore important that you take the time to read these instructions through carefully. However, if you do not have these instructions, contact our service point in your country or download the necessary information from our internet site: www.maxi-cosi.com.

B. Removing the CabrioFix
29 26 Unlock the Cabrio fix by pulling the release lever forward, and at the same time forward.
This relapses the spinless from the anchor
This releases the spins from the anchor points and take the Cabriofix out of the LasFig.
5. MAINTENANCE
IMPORTANT!
Always remove the EasyFix from the car before
carrying out any of the following
Use lukewarm water, soap and a rag to clean the
plastic parts of the EasyFix. Do not use abrasive
IMPORTANT!
Never use lubricants, not even for the moving parts on the EasyFix.


6. GENERAL INSTRUCTIONS
Always pay close attention to the following...
Prior to purchase check that the seal Hs in your car must properly (see Section 15.4 for further details).
Always use the seat, even on short trips, as this is when most accidents occur.
- Never use the EasyFix on seats equipped with frontal airbags, as this can be extremely dangerous. This does not apply to side airbags
- The EasyFix must always be secured with the seat belt 1 / 2 to fix and support leg, even when not in use. A loose EasyFix could injure other passengers in a sudden stop or crash.
Make sure the EasyFix does not become wedged by adjustable seals or slumming the car door of overloaded with heavy luggage.
Always cover up the EasyFix when the car is parked in the sun, as plastic and metal parts may become extremely hot.
Make sure that all luggage and objects likely to cause injury in the event of an accident (on the rear windshield shell) for insurance are properly secured.
Take short breaks on longer trips to give your child some freedom of movement.
- Never leave your child unattended in the car
- Save the instruction manual for future reference in the space provided on the back of the KayFix.
- Never use a second-hand product, as you can never be certain what has happened to it.
The safety of the car seat can only be guaranteed by the manufacturer when used by the original owner.
- Replace the Fasix after an accident, as the Fasix may become unsafe due to damage that is not readily apparent.
The manufacturer has taken into consideration the fact that car scabs may cause indentations in car upholstery. This is unavoidable, however, due to the prescribed safety standards and because the car seat must be installed tightly in order to protect your child. The manufacturer is not liable for any damage that may occur to the car upholstery as a result of this.
And it goes without saying...
Set a good example and always wear your seat belt!


7. WASTE SEPARATION
For the effective and safe use of a car seat, it should not be used for more than 5 years from the date of purchase. Aging of the plastic (due to sunlight, for instance) could result in deterioration of the product's quality. Once your child has outgrown the seat, we recommend that you discontinue using it and discard it as waste. For reasons of environmental protection, we ask that you separate the waste generated by the EasyFix from the purchase (packaging) to the moment of discarding (product parts), and dispose of it properly.
Keep all plastic packaging away from children to avoid the risk of suffocation.
| Packaging | Cardboard box Paper waste |
| Plastic bag Household waste | |
| Product parts | Plastic parts Appropriate recycling container |
| Metal parts Container for metal |


- NEXT STAGE CAR SEAT
| Type of car seat | Approved according to ECE R 44/04 | ||
| Group | Body Weight of child | Age | |
| Total | 1 | 9 to 18 kg | 9 months in 3.5 years |
| Roof AirProtect | 2+3 | 15 to 36 kg | 3,5 to 12 years |
9.CAR FITTING LIST
The use of Isofix anchor points and the support leg or 3-point safety belt and the support leg, which ensure optimum safety and easy installation, mean that the EasyFix is not suitable for all types of cars. The EasyFix is designated as "semi-universal" and therefore suitable for installation on the seats of specific cars only.
These cars have been compiled in a car fitting list. However, this list is subject to change and additions. For an up-to-date version of the car fitting list, visit the website at www.mai-cosi.com and / or retail outlet for the EasyFix, where you can inquire about the suitability of the EasyFix for your specific car. An up-to-date car fitting list is included with the purchase of the EasyFix.
10. WARRANTY
Our 24 months warranty reflects our confidence in the high quality of our design, engineering, production and product performance. We confirm that this product was manufactured in accordance with the current European safety requirements and quality standards which are applicable to this product, and that this product is free from defects on materials and workmanship at the time of purchase.
Our 24 months warranty covers all manufacturing defects in materials and workmanship when used in normal conditions and in accordance with our user manual. To request repairs or spare parts under warranty for defects in materials and workmanship you must present your proof of purchase, made within the 24 months preceding the service request.
Our 24 months warranty does not cover damage caused by normal wear and tear, accidents, abusive use, negligence or the consequence of failing to comply with the user manual. Examples of normal wear and tear include wheels and fabric worn down by regular use and the natural breakdown of colors and materials over extended period of time and use.
What to do in case of defects:
Should problems or defects arise, your first point of contact is your Bebe Contact dealer or retailer. Your 24 months Warranty is recognized by them (1). You must present your proof of purchase, make within the 24 months preceding the service request. It is easiest if you get your service request pre-approved by Bebe Contact Service. In principle, we pay for shipment and for return freight connected to service requests under the warranty. Damage not covered by our warranty or on products outside of warranty can be handled at a reasonable fee.
This Warranty is in compliance with to European Directive 99/44/EG of 25 May 1999.
1 Products purchased from retailers or dealers that remove or change labels or identification numbers are considered unauthorized. Products purchased from unauthorized retailers are also considered unauthorized. No warranty applies to these products since the authenticity of these products cannot be ascertained.

EN FR

11. QUESTIONS
If you have any questions, call your retailer or importer (see back of instruction manual). Please have the
Serial number of the bottom of the orange-white orange sticker (on the back of the jar).
Mark and type of car and seat on which the EasyFix is installed
- Your child's age (height) and weight
Chers parents

- Dear parents
- CONTENTS
- IMPORTANT: READ FIRST!
- IMPORTANT!
- APPROVED CAR USE
- INSTALLING AND REMOVING THE EASYFIX
- Installing with Isofix
- Adjusting the length of the support leg
- Checklist...
- Removing the EasyFix
- Using a 3-point safety belt (blue marking on product) and support leg
- WARNING!
- Installing
- NOTE!
- Checklist ...
- INSTALLING AND REMOVIDING
- THE CABRIOFIX
- Installing the CabrioFix
- Under no circumstances should this product
- MAINTENANCE
- GENERAL INSTRUCTIONS
- WASTE SEPARATION
- 9.CAR FITTING LIST
- WARRANTY
- What to do in case of defects:
- QUESTIONS
- Chers parents
Brand : MAXI-COSI
Model : Easy Fix
Category : Car seat