
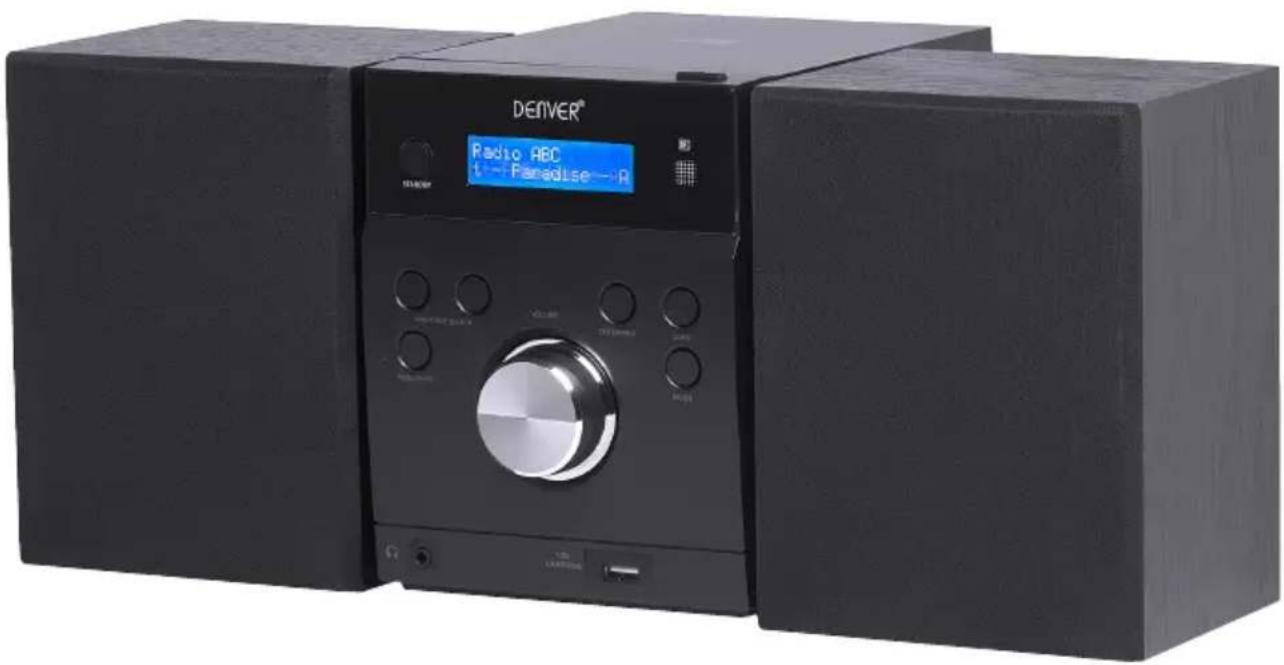
MDA240 - Hi-fi system DENVER - Free user manual and instructions
Find the device manual for free MDA240 DENVER in PDF.
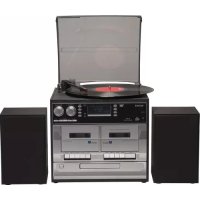
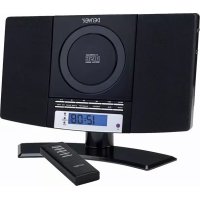
| Product type | Hi-fi system with CD player, DAB+/FM radio, Bluetooth |
| Power supply | Mains 230 V~, 50 Hz (power cord included) |
| Power consumption | Standby: < 1 W, operation: approx. 15 W |
| Dimensions (W × H × D) | Approx. 200 × 100 × 150 mm |
| Weight | Approx. 0.8 kg |
| Radio | DAB+ (Band III), FM (stereo/mono) with wire antenna |
| CD player | Audio CD, CD-R/RW compatible |
| Bluetooth | Version 2.1+EDR, A2DP profile, range approx. 10 m, password 8888 |
| Auxiliary input | 3.5 mm jack socket |
| Speakers | 2 detachable speakers with cables |
| Remote control | Infrared, CR2025 battery included |
| Display | Backlit LCD screen |
| Clock | Automatic DAB synchronization or manual setting |
| Timer | Programmable on/off (FM, CD or DAB) |
| Station presets | 30 FM and 30 DAB |
| Volume | Programmable on/off (FM, CD or DAB) |
| Auto standby | After 15 min in CD mode with no signal |
| Speaker connection | Screw terminals |
| Safety | High sound level: risk of hearing damage; battery: CR2025 type only |
| Remote control battery | CR2025 (replaceable) |
| Maintenance | Clean with a soft dry cloth; do not use abrasive cleaners |
Frequently Asked Questions - MDA240 DENVER
User questions about MDA240 DENVER
0 question about this device. Answer the ones you know or ask your own.
Ask a new question about this device
Download the instructions for your Hi-fi system in PDF format for free! Find your manual MDA240 - DENVER and take your electronic device back in hand. On this page are published all the documents necessary for the use of your device. MDA240 by DENVER.
USER MANUAL MDA240 DENVER
- This unit will become warm when used for a long period of time. This is normal and does not indicate a problem with the unit.
- The CD player includes micro-processors which may malfunction as a result of external electrical interference or noise. If the CD player is not working properly, disconnect the power source and then reconnect it.
- Excessive sound pressure from earphones and headphones can cause hearing loss.
- If an unusual conditions occurs in the display window or key button, switch the unit off, then turn on the unit again.
- The normal function of the product may be disturbed by strong Electro-Magnetic Interference. If so, simply reset the product to resume normal operation by following the instruction manual. In case the function could not resume, please use the product in other location
FEATURES AND CONTROLS
natural_image
Simple geometric diagram showing a rectangle with a vertical line labeled '1' above it (no text or symbols within the shape)
11

- SPEAKER
- STANDBY LED INDICATOR
- LCD DISPLAY WINDOW
- CD DOOR
- OPEN/CLOSE BUTTON
- STANDBY BUTTON
- SKIP/TUN SEARCH UP BUTTON
- SKIP/TUN SEARCH DOWN BUTTON
- MENU/INFO BUTTON
-
EARPHONES JACK
-
VOLUME(+ or -) KONB
- USB CHARGING JACK
- MODE BUTTON
- PLAY/PAUSE/SCAN BUTTON
- STOP/PAIR BUTTON
- IR SENSOR
- SPEAKER TERMINALS
- DAB/FM ANTENNA
- AUX IN JACK
- AC CORD
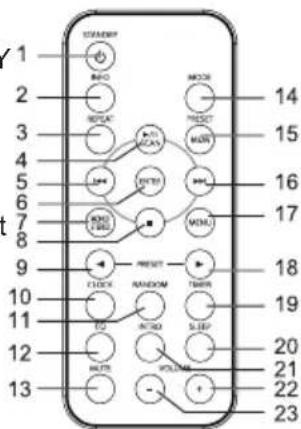
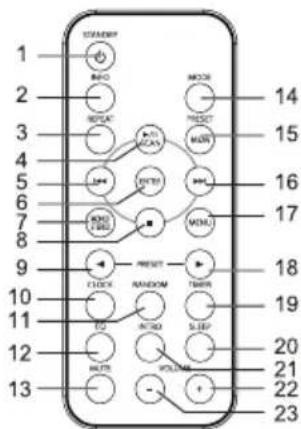
REMOTE CONTROL
- STANDBY BUTTON
- INFO BUTTON
- REPEAT BUTTON
- PLAY/PAUSE/SCAN BUTTON
- SKIP/TUNE SEARCH DOWN BUTTON
- ENTER BUTTON
- MONO/STEREO BUTTON
- STOP/PAIR BUTTON
- PRESET UP BUTTON
- CLOCK BUTTON
- RANDOM BUTTON
- EQ BUTTON
-
MUTE BUTTON
-
MODE BUTTON
- PRESET/MEMORY BUTTON
- SKIP/TUNE SEARCH UP BUTTON
- MENU BUTTON
- PRESET DOWN BUTTON
- TIMER BUTTON
- SLEEP BUTTON
- INTRO BUTTON
- VOLUME + BUTTON
- VOLUME - BUTTON

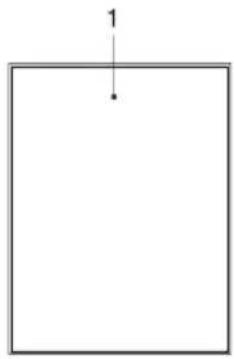
PUTTING THE BATTERIES INTO THE REMOTE CONTROL UNIT
Press down on the compartment cover, and slide the cover off to open the compartment. Place the one CR2025 battery in the remote control according to the polarity markings ("+" and "-") inside the compartment and on the battery.
Place the cover into the compartment, press down lightly, and push it inside until it snaps on.
Note:
-
If the remote control is not in use for long periods, the battery will become weak and the remote control will not function, please replace with a new one if the above happens
-
The battery of remote control shall not be exposed to excessive heat such as sunshine, fire or the like.
CAUTION
Danger of explosion if battery is incorrectly replaced. Replace only with the same or equivalent type.
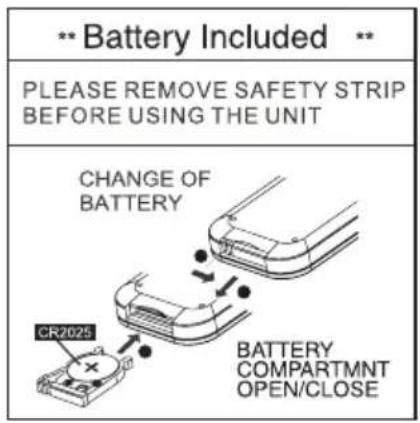
INSTALLING THE SPEAKER WIRE TO THE SPEAKER TERMINALS
- Speakers Connection
Extend the SPEAKER WIRES and connect them to the SPEAKER TERMINALS.
- Power Cord Connection
Before using, connect the AC Power Cord to the AC outlet.
Standby indicator will light on.
- Supplied DAB/FM aerial:
Connect the DAB/FM aerial wire to the ANT socket and position the DAB/FM aerial wire in the direction where the strongest signal can be received.
Note:
Placing the aerial on the unit or near the AC power lead may cause noise pickup. Place the aerial away from the unit for better reception.
COMPACT DISC
-
Always use a compact discs bearing the mark as shown.
-
Notes on handling discs
Removing the disc from its storage case and loading it.
* Do not touch the reflective recorded surface.
* Do not stick paper or write anything on the surface.
* Do not bend the disc.
- Storage
* Store the disc in its case.
* Do not expose discs to direct sunlight or high temperatures, high humidity or dusty places.
- Cleaning a disc
* Should the disc become soiled, wipe off dust, dirt and fingerprints with a soft cloth.
* The disc should be cleaned from the center to the edge.
* Never use benzene, thinners, record cleaner fluid or anti static spray.
* Be sure to close the CD door so the lens is not contaminated by dust.
* Do not touch the lens.
OPERATING THE UNIT
When you first plug the unit into the AC outlet, the unit will be in standby mode, the black light of standby is red. You can now press the STANDBY button on the unit or on the remote control to switch the unit ON. Pull the AC plug out of the wall socket if you want to switch off completely
POWER/STANDBY
- Press the STANDBY button on the unit or on the remote control to switch the unit on.
- Select the MODE (DAB, FM, CD, AUX-IN,BT) by pressing the MODE button repeatedly on the unit (or remote control). the corresponding will be displayed.
- Adjust the volume with the VOLUME (+ or -) control knob on the unit (or remote control).
- Press the STANDBY button on the unit (or remote control) again to return in standby mode.
Note:
- If there is no signal under the CD mode, the main unit will be in standby mode within 15 minutes automatically.
- Please turn the disconnect the mains plug to save energy, when you do not use the unit.
CLOCK SETTING(on the remote control)
The clock will be automatically synchronized to the DAB clock if you can receive DAB signals in your location. If you can only receive FM, then you have to set the clock manually. The manual clock setting must be done in standby mode.
Manual clock setting
- When the unit is first connected to the AC mains outlet, it will be in standby mode, and the display will show "--:--" and flash.
- During standby, press the CLOCK button on the remote control, the hour digits flash in the display, press the SKIP/TUNE SEARCH (UP or DOWN) button on the unit or the remote control to set the correct hour, then press the CLOCK button again to confirm.
- After the hour is set, the minute digits will then flash, press the SKIP/TUNE SEARCH (UP or DOWN) button (or remote control) to set the correct minute.
- When the display shows the correct time, press the CLOCK button again to confirm, the manual clock setting is now completed.
Note:
Turn on the unit and press the CLOCK button in any mode, the display will show the time and disappear about 5 seconds, then return to the original condition.
Synchronise the clock to DAB local time
- Press the STANDBY button on the unit(or remote control) once to switch the unit on.
- Press the MODE button on the unit(or remote control) repeatedly to select DAB mode.
- Tune to a DAB station and the clock will be automatically synchronized to the DAB local time.
TIMER SETTING(on the remote control)
This function allows you to switch on and off the system at your desired time and mode:
-
Press the TIMER button on the remote control to toggle the timer function between on and off, the display will show "Timer on" or "Timer Off". The display will show "☐" to indicate timer function on.
-
To set the On Timer clock, press and hold the TIMER button on the remote control until the display shows "On Timer" and the "hour" digit of the timer clock will flash.
-
Press the SKIP/TUNE SEARCH (UP or DOWN) button to set to the desired hour, then press the TIMER button on the remote control to confirm, first set the hour and finally the minute, the On Timer clock is set.
-
Then you will enter into the Off Timer clock setting, the display will show "Off Timer" and the "hour" digit will flash. Press the SKIP/TUNE SEARCH (UP or DOWN) button to set to the desired hour, then press the TIMER button on the remote control to confirm, first set the hour and finally the minute, the Off Timer clock is set.
-
Finally press the SKIP/TUNE SEARCH (UP or DOWN) button to select the timer on mode - FM, CD or DAB then press the TIMER button to confirm. The timer setting is now completed.
-
Press the TIMER button again, the timer "VOL 15" indicator appears on the display and flashes, adjust the timer volume high or low by pressing the SKIP/TUNE SEARCH (UP or DOWN) button.
Hints for better reception
This unit carries a single lead wire DAB/FM antenna, to obtain the best performance, you should fully extend the wire antenna and adjust the position as well as the direction until you find the best reception. For ideal DAB+ reception, always maintain the lead wire antenna in a vertical position (holding it upward or downward behind the unit) is highly recommended.
DAB mode
When the unit is powered up for the first time, it will be in standby mode, and the display will show "Welcome to Digital Radio", Press the STANDBY button on the unit (or remote control) to turn the radio on, it will automatically enter into the DAB+ mode and perform Autotune Quick scan function.
During scan, the display will show “Searching …” together with a slide bar that indicates the progress of the scan and the amount of stations that have been found so far.
Once the scan has finished, the radio will select the first alphanumerically found station. To explore the found stations, Press the SKIP/TUNE SEARCH (UP or DOWN) button to your desired station.
DAB Autotune Full scan modes
Full scan will search for all DAB+Band III channels. After the scan has finished, the first alphanumerically found station will be automatically selected.
- To activate autotune full scan, press and hold the PLAY/PAUSE/SCAN button on the unit (or remote control) to enter into the "Autotune Full scan" mode, the display will show "Searching..." and a slower progressing slide bar.
- All the stations that have been found will be stored automatically, to explore the stations that have been found, the SKIP/TUNE SEARCH (UP or DOWN) button for selection.
DAB manual tune
- To select manual tune, press and hold the INFO/MENU button on the unit (or remote control) to enter into the "Manual tune" mode.
- Press the SKIP/TUNE SEARCH (UP or DOWN) button to scroll through the DAB+ channels, the display will show "5A to 13F" and their associated frequencies.
- When your desired frequency appears in the display, press the SELECT/FM MONO/ST. button to confirm. The name of the station group (ensemble/multiplex) will be displayed.
- Press the INFO/MENU button to see what stations are present on the found ensemble/multiplex.
FM mode
- To select FM, press the MODE button on the unit (or remote control), the display will show FM and the frequency.
- To activate frequency auto search, press the PLAY/PAUSE/SCAN button once, the frequency band will scan from down to up; press and hold the PLAY/PAUSE/SCAN button, the frequency band will scan form up to down; it will stop automatically once a station has been found.
- You can also press the SKIP/TUNE SEARCH(UP or DOWN) button on the unit (or remote control) to select your desired frequency.
- Press the STEREO/MONO button on the unit (or remote control) to toggle select between the FM "STEREO" and "MONO" reception.
STORING AND RECALLING STORED PRESET STATIONS
In either DAB or FM mode, you can store up to 30 stations to the favourite presets for FM and 30 stations for DAB; this
will enable you to get direct access to your favourite stations.
- To store a preset, first tune to your desired station, then press and hold the PRESET/MEMORY button on the remote control, the display will show frequency and the “#” flash.
- Press the PRESET (UP or DOWN) button, until the display will show "Preset Empty #" and the "#" flash to select your desired station preset number, then press the PRESET/MEMORY button on the remote control to confirm your selection; the display will show "Preset # stored" in DAB/FM mode.
- To recall a preset station, press the PRESET/MEMORY button once and then press the PRESET(UP or DOWN) button to select the stations that you have stored, then press the PRESET/MEMORY button to confirm your selection.
Note:
- The stored stations will be saved into its memory and power off will not erase it. Storing a new station into a preset location will erase the previously stored station in that location.
- Turn on the unit and press and hold the MODE button until the display show" Press SELECT Key to reset", then press the SELECT/FM MONO/ST. button to erase all preset memory and the product in standby mode.
LISTENING TO MUSIC OF A BLUETOOTH MOBILE PHONE OR BLUETOOTH DEVICE
Pairing this system with a Bluetooth device
Pairing is an operation where Bluetooth devicesregister with each other beforehand. Use the procedure below to pair the system with your Bluetooth device. Once a pairing operation is performed, it does not need to be performed again.
Bluetooth pairing
- Place the Bluetooth device to be connected to this system within 1 meter of the system.
- Select the "Bluetooth" function.
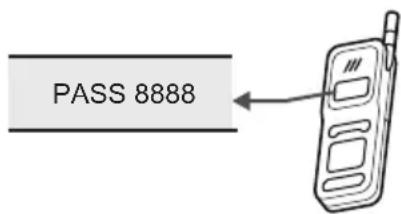
- Operate the Bluetooth device and perform the pairing operation. For details about the operations of the Bluetooth device, refer to the operation manual supplied with your Bluetooth device. When searching for this system with the Bluetooth device, a list of the devices found may appear in the Bluetooth device display depending on the type of Bluetooth device. This system appears as "DMS1702". When establishing a connection with this system, select the audio profile (A2DP, at the Bluetooth device. you may require enter "8888" for the password (if your phone software version is 2.1 or above is not require password) accept your device's prompt until the display "BT LINK" is not flashing. The connection is completed successfully.
BT LINK
ALL RIGHTS RESERVED, COPYRIGHT DENVER ELECTRONICS A/S
DENVER®
www.denver-electronics.com
Electric and electronic equipment and included batteries contains materials, components and substances that can be hazardous to your health and the environment, if the waste material (discarded electric and electronic equipment and batteries) is not handled correctly.
Electric and electronic equipment and batteries is marked with the crossed out trash can symbol, seen below. This symbol signifies that electric and electronic equipment and batteries should not be disposed of with other household waste, but should be disposed of separately.
As the end user it is important that you submit your used batteries to the appropriate and designated facility. In this manner you make sure that the batteries are recycled in accordance with legislature and will not harm the environment.
All cities have established collection points, where electric and electronic equipment and batteries can either be submitted free of charge at recycling stations and other collection sites, or be collected from the households. Additional information is available at the technical department of your city.
Hereby, Inter Sales A/S declares that the radio equipment type MDA-240 is in compliance with Directive 2014/53/EU. The full text of the EU Declaration of conformity is available at the following internet address: http://www.denver-electronics.com/denver-mda-240/
Imported by:
DENVER ELECTRONICS A/S
Omega 5A, Soeften
DK-8382 Hinnerup
Denmark
www.facebook.com/denverelectronics
DENVER®
natural_image
Simple geometric diagram showing a rectangle with a vertical line labeled '1' above it (no text or symbols within the shape)

11
natural_image
Simple geometric diagram showing a rectangle with a vertical line labeled '1' above it (no text or symbols within the shape)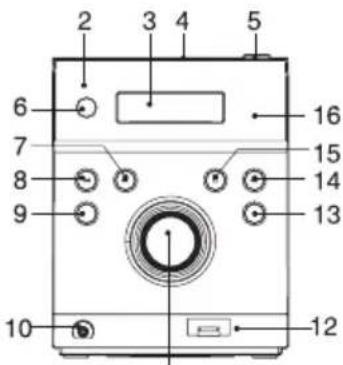

11
- LUIDSPREKER
- STAND-BY LED-INDICATOR
- LCD-SCHERM
- CD-KLEPJE
- OPEN/SLUIT-TOETS
- STAND-BYTOETS
- OVERSLAAN/TUNER OMHOOG-TOETS
- OVERSLAAN/TUNER OMLAAG-TOETS
- MENU/INFO-TOETS
-
HOOFDTELEFOONAANSLUITING
-
VOLUME (+ of -) KNOP
- USB-LAADAANSLUITING
- MODUSTOETS
- AFSPELEN/PAUSE/SCAN-TOETS
- STOP/KOPPELING-TOETS
- IR-SENSOR
- LUIDSPREKERTERMINALS
- DAB/FM-ANTENNE
- AUX-INGANG
- AC-NETSNOER
AFSTANDSBEDIENING
- STAND-BYTOETS
- INFO-TOETS
- HERHAALTOETS
- AFSPELEN/PAUSE/SCAN-TOETS
- OVERSLAAN/TUNER OMLAAG-TOETS
- ENTERTOETS
- MONO/STEREO-TOETS
- STOP/KOPPELING-TOETS
- VOORKEUR OMHOOG-TOETS
- KLOKTOETS
- WILLEKEURIG-TOETS
- EQ-TOETS
- DEMPTOETS
-
MODUSTOETS
-
VOORKEUR/GEHEUGEN- TOETS
- OVERSLAAN/TUNER OMHOOG-TOETS
- MENUTOETS
- VOORKEUR OMLAAG-TOETS
- TIJDTOETS
- SLAAPTOETS
- AAN/UITTOETS
- VOLUME + TOETS
- VOLUME - TOETS

DE BATTERIJEN IN DE AFSTANDSBEDIENING PLAATSEN
natural_image
Simple geometric diagram showing a rectangle with a vertical line labeled '1' above it (no text or symbols within the shape)

11
- HAUT-PARLEUR
- TÉMOIN VEILLE
- ÉCRAN LCD
- PORTE CD
- TOUCHE OUVRIR/FERMER
- TOUCHE VEILLE
- TOUCHE SAUT/RECHERCHE AVANT
- TOUCHE SAUT/RECHERCHE ARRIÈRE
- TOUCHE MENU/INFO
- SORTIE CASQUE
-
BOUTON AUGMENTER/DIMINUER LE VOLUME
-
PORT DE CHARGE USB
- TOUCHE MODE
- TOUCHE LECTURE/PAUSE/RECHERCHE
- TOUCHE ARRÊT/COUPLAGE
- CAPTEUR IR
- BORNES DES ENCEINTES
- ANTENNE FM/DAB
- ENTREE AUXILIAIRE
- CORDON D'ALIMENTATION SECTEUR
TÉLÉCOMMANDE
- TOUCHE VEILLE
- TOUCHE INFO
- TOUCHE REPETER
- TOUCHE LECTURE/PAUSE/RECHERCHE
- TOUCHE SAUT/RECHERCHE ARRIÈRE
- TOUCHE ENTRER
- TOUCHE MONO/STÉRÉO.
- TOUCHE ARRÊT/COUPLAGE
- TOUCHE PRÉRÉGLAGE SUIVANT
- TOUCHE HORLOGE
- TOUCHE LECTURE ALEATOIRE
- TOUCHE EQ
- TOUCHE MODE
- TOUCHE COPER LE SON
-
TOUCHE PRÉRÉGLAGE/MÉMOIRE
-
TOUCHE SAUT/ RECHERCHE AVANT
- TOUCHE MENU
- TOUCHE PRÉRÉGLAGE PRÉCÉDENT
- TOUCHE MINUTEUR
- TOUCHE VEILLE AUTOMATIQUE
- TOUCHE INTRO
- TOUCHE AUGMENTER LE VOLUME
- TOUCHE DIMINUER LE VOLUME

INSTALLATION DE LA PILE DE LA TÉLÉCOMMANDE
natural_image
Simple geometric diagram showing a rectangle with a vertical line and a numbered arrow (no text or symbols)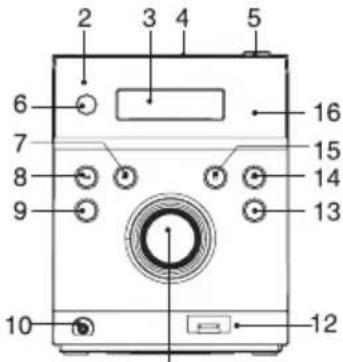

11
natural_image
Simple geometric diagram showing a rectangle with a vertical line labeled '1' above it (no text or symbols within the shape)

TODOS OS DIREITOS RESERVADOS, COPYRIGHT DENVER ELECTRONICS A/S
DENVER®
www.denver-electronics.com

natural_image
Simple geometric diagram showing a rectangle with a vertical line labeled '1' above it (no text or symbols within the shape)

11
- H∅JTTALER
- STANDBY LED-INDIKATOR
- LCD-DISPLAY
- LÅG OVER CD-RUM
- UDL∅SER TIL CD-RUM
- KNAPPEN STANDBY
- KNAPPEN SPRING/ S∅G FREMAD
- KNAPPEN SPRING/ S∅G TILBAGE
- KNAPPEN MENU/INFO
-
STIK TIL HOVEDTELEFONER
-
VOLUMENKNAP (+ ELLER -)
- USB LADETERMINAL
- KNAPPEN MODE (funktion)
- KNAPPEN AFSPIL/ PAUSE/ SCAN
- KNAPPEN STOP/PAIR (parring)
- INFRAR∅D SENSOR
- H∅JTTALERTERMINALER
- DAB-/ FM-ANTENNE
- AUX-IN-TERMINAL
- NETLEDNING
DALJINSKI UPRAVLJAČ
- H∅JTTALER
- STANDBY LED-INDIKATOR
- LCD-DISPLAY
- KNAPPEN AFSPIL/PAUSE/SCAN
- KNAPPEN SPRING / S∅G TILBAGE
- KNAPPEN ENTER
- KNAPPEN MONO/STEREO
- KNAPPEN STOP/PAIR (parring)
- KNAPPEN PRESET UP (fast st. op)
- KNAPPEN CLOCK (ur)
- KNAPPEN RANDOM (villkärlig)
- KNAPPEN EQ (equalizer)
-
KNAPPEN MUTE (lydløs)
-
KNAPPEN MODE (funktion)
- KNAPPEN PRESET/MEMORY (fast st./ hukommelse)
- KNAPPEN SPRING / S∅G FREM
- KNAPPEN MENU
- KNAPPEN PRESET NED (fast st. ned)
- KNAPPEN TIMER
- KNAPPEN SLEEP (autosluk)
- KNAPPEN INTRO
- KNAPPEN VOLUME "+"
- KNAPPEN VOLUME "-"
ILÆGNING AF BATTERI I FJERNBETJENINGEN
natural_image
Simple geometric diagram showing a rectangle with a vertical line labeled '1' above it (no text or symbols within the shape)

11
- HÖGTALARE
- STANDBY-LED INDIKATOR
- LCD-FÖNSTER
- CD-LUCKA
- ÖPPNA/STÄNG-KNAPP
- STANDBY KNAPP
- HOPPA ÖVER/ INSTÄLLNING SÖKKNAPP UPP
- HOPPA ÖVER/ INSTÄLLNING SÖKKNAPP NED
- MENY/INFOKNAPP
-
HÖRLURARUTTAG
-
VOLYM (+ eller -) KONB
- UTTAG FÖR LADDNING AV USB
- LÄGESKNAPP
- PLAY / PAUSE / SCAN KNAPP
- STOPP/IHOPPARA-KNAPP
- INFRARÖD SENSOR
- HÖGTALARKONTAKTER
- DAB/FM-ANTENN
- AUX IN-UTTAG
- AC-KABEL
FJÄRRKONTROLL
- STANDBY KNAPP
- INFOKNAPP
- UPPREPNINGSKNAPP
- PLAY / PAUSE / SCAN KNAPP
- HOPPA ÖVER/ INSTÄLLNING SÖKKNAPP NED
- ENTER KNAPP
- MONO/STEREO KNAPP
- STOPP/IHOPPARA-KNAPP
- FÖRINSTÄLL KNAPP UPP
- KLOCKA
- KNAPPEN SLUMPVIS
-
EQ-KNAPP
-
TYST KNAPPEN
- LÄGESKNAPP
- FÖRINSTÄLL/MINNE
- HOPPA ÖVER/ INSTÄLLNING SÖKKNAPPEN
- MENYKNAPP
- FÖRINSTÄLL KNAPP NED
- TIMER-KNAPP
- SLEEP-KNAPP
- STRÖMKNAPP
- VOLYM+ KNAPP
- VOLUYM -KNAPP

SÄTTA I BATTERIERNA I FJÄRRKONTROLLENHETEN
INSTALLERA HÖGTALARKABLARNA TILL HÖGTALARKONTAKTERNA
OBS:
ATT LYSSNA PÅ RADION
natural_image
Simple geometric diagram showing a rectangle with a vertical line labeled '1' above it (no text or symbols within the shape)
11

-
KAIUTIN
-
VALMIUSTILAN MERKKIVALO
-
LCD-NÄYTTÖ
-
CD-LUUKKU
-
AVAA/SULJE-PAINIKE
-
VALMIUSTILA-PAINIKE
-
OHITA/VIRITYS, ETSI YLÖS -PAINIKE
-
OHITA/VIRITÄ, ETSI ALAS -PAINIKE
-
VALIKKO/INFO-PAINIKE
-
KUULOKELIITIN
-
ÄÄNENVOIMAKKUUS (+ tai -) -NUPPI
-
USB-LATAUKSEN LIITIN
-
TILAPAINIKE
-
TOISTA/KESKEYTÄ/ETSI-PAINIKE
-
PYSÄYTÄ/MUODOSTA LAITEPARI -PAINIKE
-
IR-ANTURI
-
KAIUTINLIITTIMET
-
DAB/FM-ANTENNI
-
AUX IN -LIITÄNTÄ
-
VIRTAJOHTO
KAUKO-OHJAIN
-
VALMIUSTILA-PAINIKE
-
INFO-PAINIKE
-
TOISTOPAINIKE
-
TOISTA/KESKEYTÄ/ETSI-PAINIKE
-
OHITA/VIRITÄ, ETSI ALAS -PAINIKE
-
ENTER-PAINIKE
-
MONO/STEREO-PAINIKE
-
PYSÄYTÄ/MUODOSTA LAITEPARI -PAINIKE
-
ESIASETUS YLÖS -PAINIKE
-
KELLO-PAINIKE
-
SATUNNAISTOISTO-PAINIKE
-
EQ-PAINIKE
-
MYKISTYSPAINIKE
-
TILAPAINIKE
-
ESIASETUS/MUISTI- PAINIKE
-
OHITA/VIRITÄ, ETSI YLÖS -PAINIKE
-
VALIKKO-PAINIKE
-
ESIASETUS ALAS -PAINIKE
-
AJASTIN-PAINIKE
-
LEPOTILA-painike
-
VIRTAPAINIKE
-
ÄÄNENVOIMAKKUUS+ -PAINIKE
-
ÄÄNENVOIMAKKUUS – -PAINIKE

natural_image
Simple geometric diagram showing a rectangle with a vertical line labeled '1' above it (no text or symbols within the shape)

11
- ALTOPARLANTE
- INDICATORE LED DI STANDBY
- FINESTRA DISPLAY LCD
- VANO CD
- PULSANTE APRI/CHIUDI
- PULSANTE STANDBY
- PULSANTE SALTA/SINTONIZZAZIONE+
- PULSANTE SALTA/SINTONIZZAZIONE-
- PULSANTE MENU/INFO
-
PRESA AURICOLARE
-
MANOPOLA VOLUME (+ o -)
- PRESA DI CARICA USB
- PULSANTE MODALITÀ
- PULSANTE PLAY/PAUSA/SCAN
- PULSANTE STOP/ACCOPPIA
- SENSORE IR
- TERMINALI ALTOPARLANTE
- ANTENNA DAB/FM
- JACK INGRESSO AUSILIARIO (AUX IN)
- CAVO AC
TELECOMANDO
- PULSANTE STANDBY
- PULSANTE INFO
- PULSANTE RIPETI
- PULSANTE PLAY/PAUSA/SCAN
- PULSANTE SALTA/SINTONIZZAZIONE-
- PULSANTE INVIO
- PULSANTE MONO/STEREO
- PULSANTE STOP/ACCOPPIA
- PULSANTE PREIMPOSTATA+
- PULSANTE OROLOGIO
- PULSANTE RANDOM
- PULSANTE EQUALIZZATORE
-
PULSANTE SILENZIOSO
-
PULSANTE MODALITÀ
- PULSANTE PREIMPOSTATA/MEMORIA
- PULSANTE SALTA/ SINTONIZZAZIONE+
- PULSANTE MENU
- PULSANTE PREIMPOSTATA-
- PULSANTE TIMER
- PULSANTE SLEEP
- PULSANTE ACCENSIONE
- PULSANTE VOLUME+
- PULSANTE VOLUME-

INSERIRE LE BATTERIE NEL TELECOMANDO
TUTTI I DIRITTI RISERVATI, COPYRIGHT DENVER ELECTRONICS A/S
DENVER®
www.denver-electronics.com
natural_image
Simple geometric diagram showing a rectangle with a vertical line labeled '1' above it (no text or symbols within the shape)
11

- ZVUČNIK
- LED INDIKATOR ČEKANJA
- LCD ZASLON
- POKLOPAC CD-a
- TIPKA OTVORI/ZATVORI
- TIPKA ČEKANJE
- TIPKA PRESKOČI/PRETRAŽIVANJE GORE
- TIPKA PRESKOČI/PRETRAŽIVANJE DOLJE
- TIPKA IZBORNIK/INFO
-
PRIKLJUČAK ZA SLUŠALICE
-
KORAČIĆ GLASNOĆE (+ ili -)
- 1PRIKLJUČAK USB PUNJAČA
- TIPKA MODUS
- TIPKA PLAY/PAUZA/PRETRAŽIVANJE
- TIPKA STOP/UPARIVANJE
- INFRACRVENI SENZOR
- PRIKLJUČCI ZA ZVUČNIKE
- DAB/FM ANTENA
- PRIKLJUČAK AUX IN
- KABEL IZMJENIČNE STRUJE
DALJINSKI UPRAVLJAČ
- TIPKA ČEKANJE
- TIPKA INFO
- TIPKA PONAVLJANJE
- TIPKA PLAY/PAUZA/PRETRAŽIVANJE
- TIPKA PRESKOČI/PRETRAŽIVANJE DOLJE
- TIPKA UNESI
- TIPKA MONO/STEREO
- TIPKA STOP/UPARIVANJE
-
TIPKA PRETHODNA MEMORIRANA POSTAJA
-
TIPKA SAT
-
TIPKA NASUMIČNO
-
TIPKA EKVILIZATOR
-
TIPKA NEČUJNO
- TIPKA MODUS
- TIPKA MEMORIRANA POSTAJA/MEMORIRANJE
- TIPKA PRESKOČI/ PRETRAŽIVANJE GORE
- TIPKA IZBORNIK
- TIPKA SLJEDEĆA MEMORIRANA POSTAJA
- TIPKA TAJMER
- TIPKA DRIJEMANJE
- TIPKA INTRO
- TIPKA GLASNOĆA +
- TIPKA GLASNOĆA -

natural_image
Simple geometric diagram showing a rectangle with a vertical line labeled '1' above it (no text or symbols within the shape)

11
- GŁOŚNIK
- WSKAŻNIK LED TRYBU GOTOWOŚCI
- WYŚWIETLACZ LCD
- KLAPA CD
- PRZYCISK OTWÓRZ/ZAMKNIJ
- PRZYCISK GOTOWOŚCI
- PRZYCISK POMIŃ/WYSZUKIWANIE W GÓRĘ
- PRZYCISK POMIŃ/WYSZUKIWANIE W DÓŁ
- PRZYCISK MENU/INFO
- GNIAZDO NA SŁUCHAWKI
-
POKRETŁO GŁOŚNOŚCI (+ lub -)
-
GNIAZDO LADOWANIA USB
- PRZYCISK TRYBU
- PRZYCISK ODTWARZANIE/PAUZA/WYSZUKIWANIE
- PRZYCISK STOP/PAROWANIE
- CZUJNIK PODCZERWIENI
- TERMINALE GŁOŚNIKÓW
- ANTENA DAB/FM
- GNIAZDO WEJŚCIA POMOCNICZEGO
- SZNUR ZASILANIA AC
TELECOMANDO
- PRZYCISK GOTOWOŚCI
- PRZYCISK INFORMACJI
- PRZYCISK POWTÓRZENIA
- PRZYCISK ODTWARZANIE/PAUZA/WYSZUKIWANIE
- PRZYCISK POMIŃ/WYSZUKIWANIE W DÓŁ
- PRZYCISK ENTER
- PRZYCISK MONO/STEREO
- PRZYCISK STOP/PAROWANIE
- PRZYCISK PROGRAM W GÓRĘ
- PRZYCISK ZEGARA
- PRZYCISK ODTWARZANIA LOSOWEGO
- PRZYCISK KOREKTORA
-
PRZYCISK ŚCISZENIA
-
PRZYCISK TRYBU
- PRZYCISK PROGRAMOWANIA/ PAMIĘCI
- PRZYCISK POMIŃ/ WYSZUKIWANIE W GÓRĘ
- PRZYCISK MENU
- PRZYCISK PROGRAM W DÓŁ
- PRZYCISK TIMERA
- PRZYCISK ZASYPIANIA
- PRZYCISK ZASILANIA
- PRZYCISK GŁOŚNOŚĆ+
- PRZYCISK GŁOŚNOŚĆ-
WKŁADANIE BATERII DO PILOTA ZDALNEGO STEROWANIA
- FEATURES AND CONTROLS
- REMOTE CONTROL
- PUTTING THE BATTERIES INTO THE REMOTE CONTROL UNIT
- Note:
- CAUTION
- INSTALLING THE SPEAKER WIRE TO THE SPEAKER TERMINALS
- COMPACT DISC
- OPERATING THE UNIT
- POWER/STANDBY
- CLOCK SETTING(on the remote control)
- Manual clock setting
- Synchronise the clock to DAB local time
- TIMER SETTING(on the remote control)
- Hints for better reception
- DAB mode
- DAB Autotune Full scan modes
- DAB manual tune
- FM mode
- STORING AND RECALLING STORED PRESET STATIONS
- LISTENING TO MUSIC OF A BLUETOOTH MOBILE PHONE OR BLUETOOTH DEVICE
- Bluetooth pairing
- DENVER®
- AFSTANDSBEDIENING
- DE BATTERIJEN IN DE AFSTANDSBEDIENING PLAATSEN
- TÉLÉCOMMANDE
- INSTALLATION DE LA PILE DE LA TÉLÉCOMMANDE
- DALJINSKI UPRAVLJAČ
- ILÆGNING AF BATTERI I FJERNBETJENINGEN
- FJÄRRKONTROLL
- SÄTTA I BATTERIERNA I FJÄRRKONTROLLENHETEN
- INSTALLERA HÖGTALARKABLARNA TILL HÖGTALARKONTAKTERNA
- OBS:
- ATT LYSSNA PÅ RADION
- KAUKO-OHJAIN
- TELECOMANDO
- INSERIRE LE BATTERIE NEL TELECOMANDO
- WKŁADANIE BATERII DO PILOTA ZDALNEGO STEROWANIA
Brand : DENVER
Model : MDA240
Category : Hi-fi system