Cardio Explorer - Exercise bike Bremshey - Free user manual and instructions
Find the device manual for free Cardio Explorer Bremshey in PDF.

| Type de produit | Vélo d'appartement |
| Marque | Bremshey |
| Modèle | Cardio Explorer |
| Dimensions (L x l x H) | 99 x 55 x 134 cm |
| Poids | 38 kg |
| Alimentation | 230 V ou 115 V (selon modèle), prise de terre |
| Poids maximal utilisateur | 135 kg |
| Résistance | Électronique, réglable via programmes |
| Programmes d'entraînement | Manuel, 12 préenregistrés, Utilisateur, Contrôle cardiaque (HRC), Watt constant |
| Mesure de la fréquence cardiaque | Capteurs aux poignées et ceinture thoracique sans fil (optionnelle) |
| Fonctions supplémentaires | Calcul IMC, mesure de masse grasse, indice de récupération |
| Affichage | Écran LCD : temps, vitesse, RPM, distance, calories, fréquence cardiaque, puissance |
| Conformité | CE, EN-957 |
| Garantie | 24 mois usage domestique |
| Maintenance | Vérification régulière des vis, nettoyage avec chiffon doux |
| Sécurité | Arrêt automatique en fin de programme, alarme si fréquence cardiaque dépasse limite |
| Transport | Roulettes de transport |
| Température d'utilisation | 10°C à 35°C |
| Humidité max | 90% |
| Pièces détachées | Disponibles via revendeur, liste en fin de manuel |
Frequently Asked Questions - Cardio Explorer Bremshey
User questions about Cardio Explorer Bremshey
0 question about this device. Answer the ones you know or ask your own.
Ask a new question about this device
Download the instructions for your Exercise bike in PDF format for free! Find your manual Cardio Explorer - Bremshey and take your electronic device back in hand. On this page are published all the documents necessary for the use of your device. Cardio Explorer by Bremshey.
USER MANUAL Cardio Explorer Bremshey
OWNER'S MANUAL P. 2-8
IMPORTATNT SAFETY INSTRUCTIONS
Read this guide carefully before assembling, using or servicing your fitness equipment. Please keep the guide somewhere safe; it will provide you now and in the future with the information you need to use and maintain your equipment. Always follow these instructions with care. Please note that the warranty does not cover damage due to transportation or not following of adjustment or maintenance instructions described in this manual.
NOTE ABOUT YOUR HEALTH
- Before you start any training, consult a physician to check your health condition.
- If you experience nausea, dizziness or other abnormal symptoms while exercising, stop your workout immediately and consult a physician.
- To avoid muscular pain and strain, begin each workout by warming up and end it by cooling down (slow pedalling at low resistance). Don't forget to stretch at the end of the workout.
NOTE ABOUT THE EXERCISE ENVIRONMENT
- The equipment is not to be used outdoors.
- Place the equipment on a firm, level surface. Place the equipment on a protective base to avoid any damages to the floor beneath the equipment.
-
Make sure that the exercise environment has adequate ventilation. To avoid catching cold, do not exercise in a draughty place.
-
In training, the equipment tolerates an environment measuring +10^ to +35^ . The equipment can be stored in temperatures ranging between -15^ and +40^ . Air humidity in the training or storage environment must never exceed 90% .
NOTE ABOUT USING THE EQUIPMENT
- If children are allowed to use the equipment, they should be supervised and taught how to use the equipment properly, keeping in mind the child's physical and mental development and their personality. Also make sure that pet animals keep a safe distance to the product when it is transporting or used for training.
- Before you start using the equipment, make sure that it functions correctly in every way. Do not use a defective piece of equipment.
- Press the keys with the tip of the finger; your nails may damage the key membrane.
- Never lean on the meter.
- Never remove the side covers. Do not step on the frame casing.
- Only one person may use the equipment at a time.
- Wear appropriate clothing and shoes when exercising.
- Protect the meter from sunlight and always dry the surface of the meter if there are drops of sweat on it.
The equipment must not be used by persons weighing over 135kg / 298 lbs. - The equipment has been designed for home use. The Bremshey Sport warranty applies only to defects and malfunctions in home use (24 months). Further information on warranty terms can be obtained from your national Bremshey Sport distributor. Please note that the warranty terms may vary from one country to another.
- Do not attempt any servicing or adjustments other than those described in this guide. Everything else must be left to someone familiar with the maintenance of electromechanical equipments and authorised under the laws of the country in question to carry out maintenance and repair work.
NOTE ABOUT SAFETY FOR UNITS WITH ELECTRICAL POWER
Before connecting the equipment to a power source, make sure that the local voltage matches that indicated on the type plate: the equipment operates at either 230V or 115V (North American version). NOTE! The equipment must be connected to a grounded wall socket. Do not use extension wires when connecting the equipment to the power source. Always switch off the power and unplug the equipment from the electrical outlet immediately after using!
To reduce the risk of burns, fire, electric shock or injury to persons:
- The equipment should never be left unattended when plugged in. Unplug the equipment from the outlet when not in use, before carrying out any maintenance or repair procedures, and before moving the unit.
- Do not operate the equipment under a blanket or other combustive material. Excessive heating can occur and cause fire, electric shock or injury to persons.
- Do not connect the equipment to a power source, or operate the equipment if there is any sort of damage to the power cord or the unit itself.
- Do not connect the equipment to a power source or operate the equipment outdoors or in damp locations.
- Keep the power cord away from hot objects.
- Do not route the power cord beneath a carper or place any objects on the cord. Also make sure that the power cord does not run underneath the equipment.
- Do not alter (for example lengthen) the cord between the transformer and the unit.
NOTE ABOUT ASSEMBLING THE EQUIPMENT
Start by unpacking the equipment. The detailed assembly instructions can be found at the back of this guide. Follow the instructions in given order.
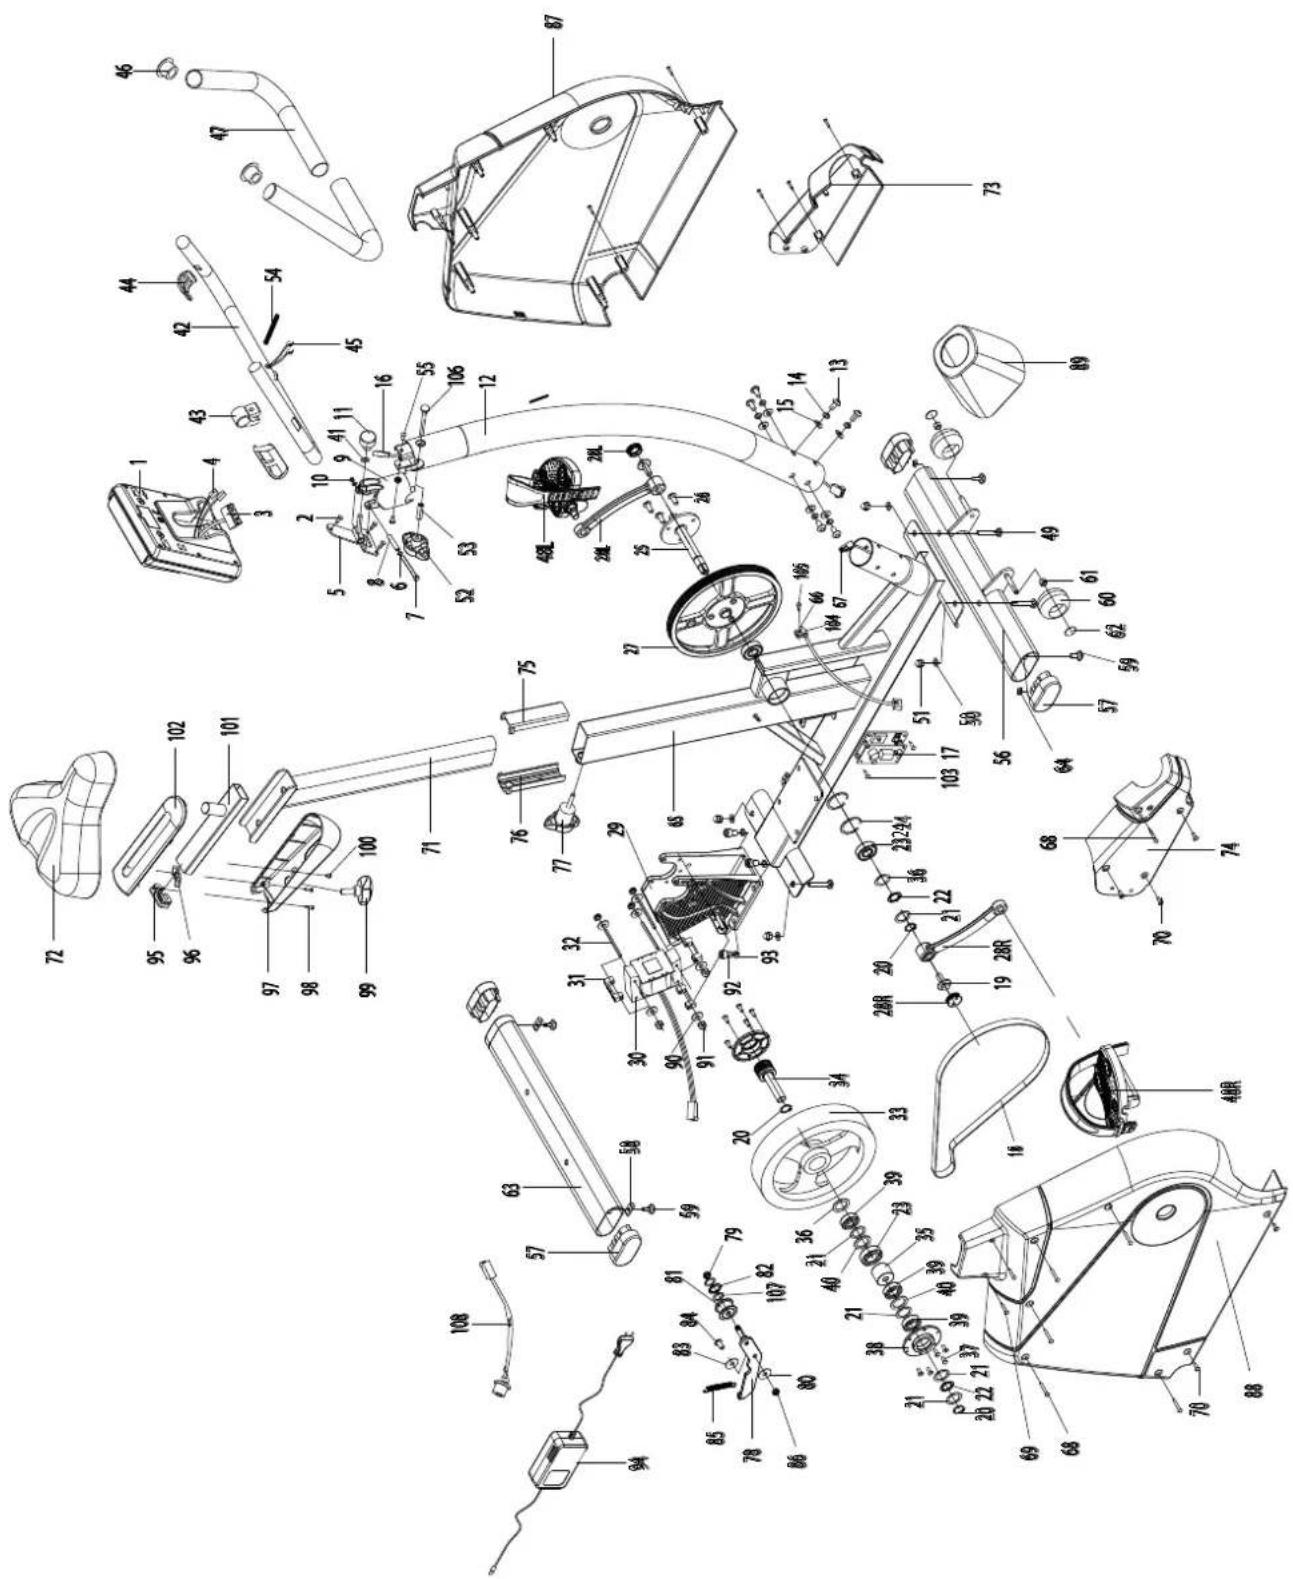
Before assembly, check the contents of the package. If a part is missing, please contact your dealer with the model, equipment serial no. and spare part no. of the missing part. You'll find a spare part list at the back of this guide. The hardware kit contents are marked with * in the spare parts list. The directions left, right, front and back are defined as seen from the exercising position. Keep the assembly tools, as you may need them e.g. for adjusting the equipment. Note that two people are needed for the assembly.
The packaging includes a silicate bag for absorbing moisture during storage and transportation. Please dispose of the bag once you have unpacked the equipment. Allow at least 100cm of clearance around the equipment. We also recommend opening the package and assembling the product on a protective base.
SAVE THIS INSTRUCTION MANUAL
ADJUSTMENTS
SEAT ADJUSTMENT
Set the right height for you; the basic rule is that the arch of the foot reaches reaches the the pedal at its lowest point with the leg almost straight. Adjust the seat height by loosening the seat locking knob. Hold on to the seat with one hand and, using your other hand, pull the locking knob outwards in order to enable free seat tube movement upwards and downwards. Once the height is right, let go of the knob and the seat locks into place. Turn the locking knob clockwise to tighten.
NOTE! Always make sure that the locking knob is properly fastened before starting to exercise!
To adjust horizontal seat position forward and back, loosen the locking knob under the seat by turning it clockwise. Adjust the seat to the desired position and tighten the locking knob by turning it counter-clockwise.
NOTE! Always make sure that the locking knob is properly fastened before starting to exercise!
HANDLEBAR SETUP
Loosen the locking knob on the front of the handlebar support and find the right angle at which to position the handlebar. Tighten the locking knob. The design of the handlebar allows you to exercise either in an upright position or with the upper body leaning forward. Remember, however, always to keep your back straight.
NOTE! Always make sure that the locking knob is properly fastened before starting to exercise!
CONSOLE INCLINATION ADJUSTMENT
Set the inclination of the meter so that it corresponds to your height and exercise position.
ADJUSTMENT OF SUPPORT FEET
If the equipment is not stable, adjust the adjustment screws below the support feet as necessary.
EXERCISING
If the product is not stable, adjust the stabilizing screws under the rear support appropriately.
EXERCISE LEVEL
Working out with this device is excellent aerobic exercise, the principle being that the exercise should be suitably light, but of long duration. Aerobic exercise is based on improving the body's maximum oxygen uptake, which in turn improves endurance and fitness. The ability of the body to burn fat as a fuel is directly dependent on its oxygen-uptake capacity. Aerobic exercise should be above all pleasant. You should work up a light sweat but you should not get out of breath during the workout.
You should exercise at least three times a week, 30 minutes at a time, to reach a basic fitness level. Maintaining this level requires a few exercise sessions each week. Once the basic condition has been reached, it is easily improved, simply by increasing the number of exercise sessions. You should start slowly at a low pedaling speed and low resistance, because for an overweight person strenuous exercise may subject the heart and circulatory system to excessive strain. As fitness improves, resistance and pedaling speed can be increased gradually.
HEART RATE
No matter what your goal, you'll get the best results by training at the right level of effort, and the best measure is your own heart rate.
HEART RATE MEASUREMENT WITH HANDGRIP SENSORS
Heart rate is measured from the hands using the sensors located on the handlebars. The sensors measure electric impulses, which are formed when a person's heart beats. Measurement is started by touching both handlebar sensors simultaneously. To ensure reliable heart rate measurement, skin must be slightly moist and skin contact with sensors must be continuous. If skin is too dry or too wet, the heart rate measurement operation from the hands is less reliable. Try to keep your upper body and palms relaxed and still.
TELEMETRIC HEART RATE MEASUREMENT
The most reliable heart rate measurement is achieved with a telemetric device, in which the electrodes of the transmitter fastened to the chest transmit the pulses from the heart to the console by means of an electromagnetic field.
NOTE! If you are fitted with a pacemaker, please consult a physician before using a wireless heart rate monitor.
If you want to measure your heart rate this way during your workout, moisten the grooved electrodes on the transmitter belt with saliva or water. Fasten the transmitter just below the chest with the elastic belt, firmly enough so that the electrodes remain in contact with the skin while exercising, but not so tight that normal breathing is prevented. If you wear the transmitter and belt over a light shirt, moisten the shirt slightly at the points where the electrodes touch the shirt. The transmitter automatically transmits the heart rate reading to the console up to a distance of about 1 m.
If the electrode surfaces are not moist, the heart-rate reading will not appear on the display. If the electrodes are dry, they must be moistened again. Allow the electrodes warm up properly to ensure accurate heart rate measurement. If there are several telemetric heart rate measurement devices next to each other, the distance between them should be at least 1.5m . Similarly, if there is only one receiver and several transmitters in use, only one person with a transmitter should be within transmission range. The transmitter is switched to an active state only when it is being used
for measurement. Sweat and other moisture can, however, keep the transmitter in an active state and waste battery energy. Therefore it is important to dry the electrodes carefully after use.
When selecting training attire, please note that some fibres used in clothes (e.g. polyester, polyamide) create static electricity, which may prevent reliable heart rate measurement. Please note that a mobile phone, television and other electrical appliances form an electromagnetic field around them, which will cause problems in heart rate measurement.
First find your maximum heart rate i.e. where the rate doesn't increase with added effort. If you don't know your maximum heart rate, please use the following formula as a guide:
220 - AGE
These are average values and the maximum varies from person to person. The maximum heart-rate diminishes on average by one point per year. If you belong to a risk group, ask a doctor to measure your maximum heart rate for you.
We have defined three different heart-rate zones to help you with targeted training.
BEGINNER: 50-60 % of maximum heart-rate
Also suitable for weight-watchers, convalescents and those who haven't exercised for a long time. Three sessions a week of at least a half-hour each is recommended. Regular exercise considerably improves beginners' respiratory and circulatory performance and you will quickly feel your improvement.
TRAINER: 60-70% of maximum heart-rate
Perfect for improving and maintaining fitness. Even reasonable effort develops the heart and lungs effectively, training for a minimum of 30 minutes at least three times a week. To improve your condition still further, increase either frequency or effort, but not both at the same time!
ACTIVE TRAINER: 70 - 80% of maximum heart-rate
Exercise at this level suits only the fittest and presupposes long-endurance workouts
CONSOLE
BUTTONS
1. SELECTION DIAL
The selection dial functions in two ways:
A) Rotating the dial (+ / -) . By rotating the dial clockwise, you can scroll the menus to the right, and increase values or resistance. By rotating the dial counter-clockwise, you can scroll the menus to the left, and decrease values or resistance.
B) Pressing the dial (ENTER). By pressing the dial, you can accept the selection you made when rotating the dial.
2. START/STOP
Starts, pauses, and stops training. During training, pressing this button once activates the pause mode. Pressing the button again starts the program again.
3. RESET
Single push: return to the program menu. Long push: restarts the meter.
4. RECOVERY
Calculates your recovery heart rate index.
5.BODY FAT
Calculates your body mass index (BMI) and shows your body fat %
DISPLAY
Small window: Time (mm:ss), speed (km/h or ml/h), RPM (revolutions per min), distance (km or ml), energy consumption (kcal), heart rate (bpm) and power (W) are displayed.
Big window: Starts to automatically scan between the values of time - speed - RPM - distance - energy - heart rate - power every 6 seconds. Scanning can be stopped by pressing ENTER button. By pressing ENTER again you can change the big window to display information for the next value.
PROGRAMS
1. MANUAL PROGRAM
Set target time and/or distance and/or energy consumption and/or upper heart rate limit by using the SELECTION DIAL.
Start training by pressing START/STOP button.
If you have set target/targets, the target/targets start to count down. Adjust resistance with SELECTION DIAL.
2. PRESET PROGRAMS
Preset program profile is shown for two seconds while programs are browsed. Select desired preset program by using the SELECTION DIAL.
Set time for training and/or target distance and/or energy and/or upper heart rate limit by SELECTION DIAL.
Start training by pressing START/STOP button.
If you have set target/targets, the target/targets start to count down. During training you can scale the load by SELECTION DIAL.
3. USER PROGRAM
The program profile used last time is displayed. You can either start training with your personal memorized training targets by pressing START/ STOP or modify the program. The program profile bar (1/20) that can now be modified blinks. If you want to change, modify the blinking bar and confirm. Next bar will blink. After the last bar, the display switches back to the first bar. By pressing the ENTER button for 2 seconds you can finish the profile modifying. Now program is ready with your memorized personal training data (time, distance, energy targets and heart rate limit). Modify your targets if needed. Start training by pressing START/STOP button.
If you have set target/targets, the target/targets start to count down. During training you can scale the load by SELECTION DIAL
4. HEART RATE CONTROL (H.R.C.)
Select between four different training intensities (55%, 75%, 90% or TARGET.) By selecting TARGET you can insert target heart rate.
Start training by pressing START/STOP button. If you have set target/targets, the target/targets start to count down.
During the training the equipment will automatically adjust the resistance so that your heart rate target will be reached and maintained.
5. CONSTANT WATT
Set target power in watts and target time and/or distance and/or energy consumption and/or upper heart rate limit by SELECTION DIAL.
Start training by pressing START/STOP button.
If you have set target/targets, the target/ targets start to count down. During training the
equipment will adjust resistance dependently on your pedaling speed, so that target power level is achieved and maintained. You can change the target power by SELECTION DIAL.
6. RECOVERY
Start the recovery calculation after training by pressing RECOVERY button. Recovery heart rate calculation can be started only if the heart rate measurement is activated and the heart rate value is shown on the display The measurement takes 60 seconds. After 60 seconds, the display shows your recovery index F1-F6 (F1 = best result). To get back to main menu, press RECOVERY button once again.
7. BODY FAT
Press BODY FAT button to start measurement. Hold both hands on the handgrips and wait for 8 seconds. The meter will show body fat advice symbol, body fat % and BMI for 30 seconds.
SETTING USER DATA
Right after restarting the meter or reset (long push) you can enter to the user menu. Select the user and confirm. Set your sex, age, height and weight. Confirm by selection dial. Personal exercise target data (time, distance, energy, heart rate limit) will be memorized and recalled as defaults every time when the user is selected. If you modify your personal training data, it will automatically be memorized.
ADDITIONAL NOTES
- For speed and distance you can choose either metric or English units by using the KM/ML switch located on the back cover of the meter. The power cord has to be unplugged and replugged to apply the change.
- If you are not training and buttons are not pressed, the meter switches into the Sleep mode after about four minutes. Room temperature is displayed.
- Training is paused for a maximum of 4 minutes by pressing the START/STOP button. Pressing the button again allows you to continue the paused training session using the previous training data.
- Entering training targets (time, distance, energy, heart rate limit) is possible only in the STOP mode (not during training).
- This equipment cannot be used for therapeutic purposes.
- Energy consumption is calculated based
on average values. The energy expenditure is displayed in kilocalories. To convert this into joules, use the formula: 1Kcal = 4.187KJ
-
If you are training with heart rate measurement (either chest belt or handgrip heart rate) you can set maximum heart rate limit. When limit is exceeded while training meter will give alarm beeps.
-
Preset programs are divided into 20 steps. Duration of the one step depends on the time set for the whole training. If time is not set, duration of one step will be 100m in distance.
-
If you have set targets to count down, a signal sounds and training automatically stops when any of target reaches zero. You can restart training by pressing START/STOP
-
Note that recovery index is in relation to the heart rate frequency in both the beginning and the end of the measurement.
-
In H.R.C program heart rate target ranges (55%, 75% and 90%) are calculated as percent from your age predicted maximum heart rate (calculation formula: maximum heart rate = 220 - age).
-
Automatic adjustment of the resistance during H.R.C program occurs upwards every 30 seconds and downwards every 15 seconds, if needed.
-
BODY FAT is a personal measurement and the result is based on average European population values.
B.M.I. (Body Mass Index) table:
LOW<20
LOW/MEDIUM20-24
MEDIUM 24-26,5
MEDIUM / HIGH > 26,5
Formula for BMI = weight (kg) / height^2 (m)
BODY FAT % (average european population) table:
Male:
LOW < 13
LOW/MEDIUM13-26
MEDIUM 26-30
MEDIUM / HIGH > 30
Female:
LOW<23
LOW/MEDIUM 23-3
MEDIUM 36-40
MEDIUM / HIGH > 40
TRANSPORT AND STORAGE
Please follow these instructions when carrying and moving the equipment, because lifting it incorrectly may strain your back or risk other accidents:
Standing in front of the device, tilt the device slowly towards you, and push from the front and push along the floor on the wheels at the front support. We recommend that you use a protective base when transporting the equipment.
To prevent the equipment malfunctioning, store in a dry place with as little temperature variation as possible and protected from dust.
MAINTENANCE
The equipment requires very little maintenance. Check, however, from time-to-time that all screws and nuts are tight.
After exercising, clean the equipment with a soft, absorbent cloth. Do not use solvents.
- Never remove the equipment's protective casing.
MALFUNCTIONS
NOTE! Despite continuous quality control, defects and malfunctions caused by individual components may occur in the equipment. In most cases it's unnecessary to take the whole device in for repair, as it's usually sufficient to replace the defective part. Always give the model, serial number of your equipment and in case of malfunctions also conditions of use, nature of malfunction and any error code.
When you encounter unusual behavior from the device, contact your local Bremshey Sport dealer for service.
If you require spare parts, always give the model, serial number of your equipment and the spare part number for the part you need. The spare part list is at the back of this manual. Use only spare parts mentioned in the spare part list.
TECHNICAL SPECIFICATIONS
Length 99 cm
Width .55 cm
Height 134 cm
Weight 38 kg
The Cardio-Explorer meets the requirements of the EU's EMC Directives on electromagnetic compatibility (89/336/EEC). This product therefore carries the CE label.
The Cardio-Explorer meets EN precision and safety standards (EN-957).
Due to our continuous policy of product development, Bremshey Sport reserves the right to change specifications without notice.
NOTE! The instructions must be followed carefully in the assembly, use and maintenance of your equipment. The warranty does not cover damage due to negligence of the assembly, adjustment and maintenance instructions described herein. Changes or modifications not expressly approved by Bremshey Sport will void the user's authority to operate the equipment and any warranty!
WE WISH YOU MANY ENJOYABLE TRAININGS!
INHALT
MIT HANDGRIFFSENSOREN
| 73 | Front cover (L) | 1 | |
| 74 | Front cover (R) | 1 | |
| 75 | Seat post sleeve (front) (incl. 76) | 1 | |
| 76 | Seat post sleeve (rear) | 1 | |
| 77 | Seat post locking knob | 1 | |
| 78 | Belt tighener frame set (incl. part 79-86,107) | 1 | |
| 79 | M8 DIN 985 Nylon nut | 1 | |
| 80 | M8 DIN 9021 Flat washer | 1 | |
| 81 | Pulley for belt tighener | 1 | |
| 82 | Curve washer | 1 | |
| 83 | M8 DIN 125 Flat washer | 1 | |
| 84 | M8x20 ISO 7380 Screw | 1 | |
| 85 | Spring | 1 | |
| 86 | M8 DIN 934 Screw nut (4T) | 1 | |
| 87 | Side cover (L) | 1 | |
| 88 | Side cover (R) | 1 | |
| 89 | Handlebar post cover | 1 | |
| 90 | 5 DIN 125 A Flat washer | 6 | |
| 91 | M5 DIN 934 Screw | 6 | |
| 92 | M10xP1,5X20L DIN 912 Screw | 4 | |
| 93 | 10 DIN 127 Spring washer | 4 | |
| 94 | Adaptor, EU (18V) | 1 | |
| 95 | End plug of seat slider (incl. 96,100,101) | 1 | |
| 96 | Screw fixing base | 1 | |
| 97 | Seat slider cover (lower) (incl. 98,102) | 1 | |
| 98 | Screw | 2 | |
| 99 | Seat locking knob | 1 | |
| 100 | Cross head screw | 1 | |
| 101 | Seat horizontal adjusting tube (incl. 95,96,100,) | 1 | |
| 102 | Seat sliding tube cover (upper) | 1 | |
| 103 | Screw | 2 | |
| 104 | Sensor fixed base | 1 | |
| 105 | M4x10 DIN 7985 Screw | 1 | |
| 106 | Carriage bolt | 1 | |
| 107 | Ø10x13.5X1t DIN 7603 Flat washer | 2 | |
| 108 | DC wire | ||
| 109 | Center Assembly kit (incl. part 20-24,36) | ||
| 110 | Flywheel assembly kit (incl. 20-23,35,36,39,40) | ||
| 111 | Hardware kit (incl.*) | 1 | |
| 112 | Owner's Manual | 1 | |
| 113 | Warranty booklet | 1 | |
| 114 | Label set | 1 |
BREMSHEY
Benelux
Accell Fitness Benelux
Koningsbeltweg 51
1329 AE ALMERE
The Netherlands
Tel: +31 36 5460050
Fax: +31 36 5460055
Scandinavia
Accell Fitness Scandinavia
Varusmestarintie 26
20361 TURKU
Finland
Tel: +358 10 2733 200
Fax: +358 2513 313
Germany
Accell Fitness United Kingdom
Boland House
Nottingham South Industrial Estate
Ruddington Lane
Wilford
Nottingham NG11 7EP
United Kingdom
Tel: +44 115 9822844
Fax: +44 115 9817784
North America
Accell Fitness North America Inc.
130 Hayward Ave, Suite 2
N2C 2E4
Kitchener, ON Canada
Tel. 1-888-388-6887
Fax: 1-519-576-2521
www.accellfitness.com