
ELM3310 - Lawn mower MAKITA - Free user manual and instructions
Find the device manual for free ELM3310 MAKITA in PDF.

| Product Type | Electric wheeled lawn mower |
| Brand | Makita |
| Model | ELM3310 |
| Rated Power | 1 100 W |
| Rated Voltage | 230 V ~ 50 Hz |
| Cutting Width | 330 mm |
| Cutting Height Adjustment | 3 positions: 20 mm, 40 mm, 55 mm |
| Grass Bag Capacity | 27 L |
| No-load Speed | 2 900 rpm |
| Sound Pressure Level (LpA) | 80 dB(A) |
| Sound Power Level (LwA) | 87,2 dB(A) |
| Vibration Emission (ah) | ≤ 2,5 m/s² |
| Net Weight | 13,1 kg |
| Liquid Ingress Protection | IPX4 |
| Double Insulation | Yes |
| Power Supply | Mains powered (electric cable) |
| Blade Type | Stamped steel, sharpenable |
| Safety Device | Switch handle with lock button |
| Maintenance | Clean with a cloth; check and sharpen the blade regularly |
| Repairability | Spare parts available from Makita; replacement blade ref. 263001422 |
Frequently Asked Questions - ELM3310 MAKITA
User questions about ELM3310 MAKITA
0 question about this device. Answer the ones you know or ask your own.
Ask a new question about this device
Download the instructions for your Lawn mower in PDF format for free! Find your manual ELM3310 - MAKITA and take your electronic device back in hand. On this page are published all the documents necessary for the use of your device. ELM3310 by MAKITA.
USER MANUAL ELM3310 MAKITA
natural_image
Line drawing of a lawn mower with handle and wheels (no text or symbols)
1
2
natural_image
Line drawing of a lawn mower with adjustable handle and wheels (no text or symbols)3
natural_image
Line drawing of a hand using a tool to lift a tire on a vehicle (no text or symbols)4
natural_image
Line drawing of a hand holding a tool, possibly a medical or laboratory instrument (no text or symbols present)5
natural_image
Line drawing of a hand holding a cable or cable with a spring, no text or symbols present6
natural_image
Three diagrams showing three types of cable or wire structures with no text or symbols, including a circle and crossed-out brackets (no text or symbols present)7
natural_image
Line drawing of a lawn mower being adjusted using a tool (no text or symbols)8
natural_image
Technical line drawing of a mechanical assembly with no visible text or symbols9
natural_image
Line drawing of a car's side gear mechanism with no text or symbols10
natural_image
Line drawing of a lawn mower with grass blades and no text or symbols11 12
natural_image
Two identical lawn lawns on a grassy slope, one with a flat blade and the other with a flat blade, both enclosed in a circular frame (no text or symbols)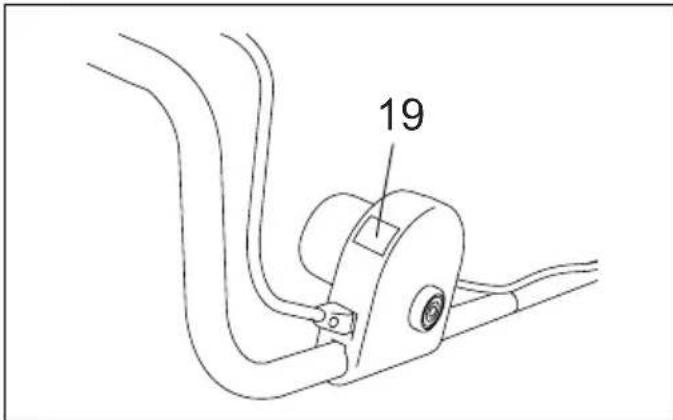
natural_image
Two identical line drawings of a lawn mower with no visible text, numbers, or symbols.13 14

15 16
natural_image
Line drawing of a hand using a tool to tighten a metal tool (no text or symbols present)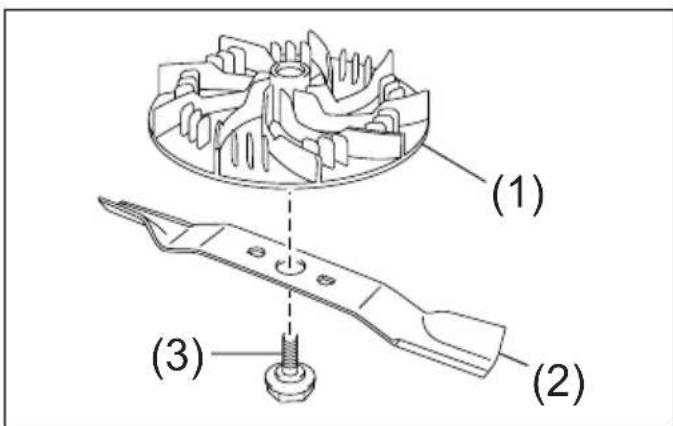
natural_image
Line drawing of hands using a tool to clean or store items, no text or symbols present17 18
19 20
CONTENTS
ENGLISH....7
DEUTSCH....11
FRANÇAIS 16
ITALIANO 21
NEDERLANDS 26
ESPAÑOL....31
PORTUGUÊS....36
ΕΛΛΗΝΙΚΑ 41
TÜRKÇE......46
SVENSKA....51
DANSK 55
SUOMI....60
ČESKY 64
POLSKI....68
MAGYAR....73
РУССКИЙ ....78
HRVATSKI....83
SLOVENŠČINA 87
SLOVENČINA 91
ROMÂNĂ....96
LIETUVIŲ KALBA....101
LATVIEŠU 106
EESTI 111
SRPSKI 116
۴۲۱۶۰۵۰۱۳۱۲۴
ENGLISH
Explanation of general view
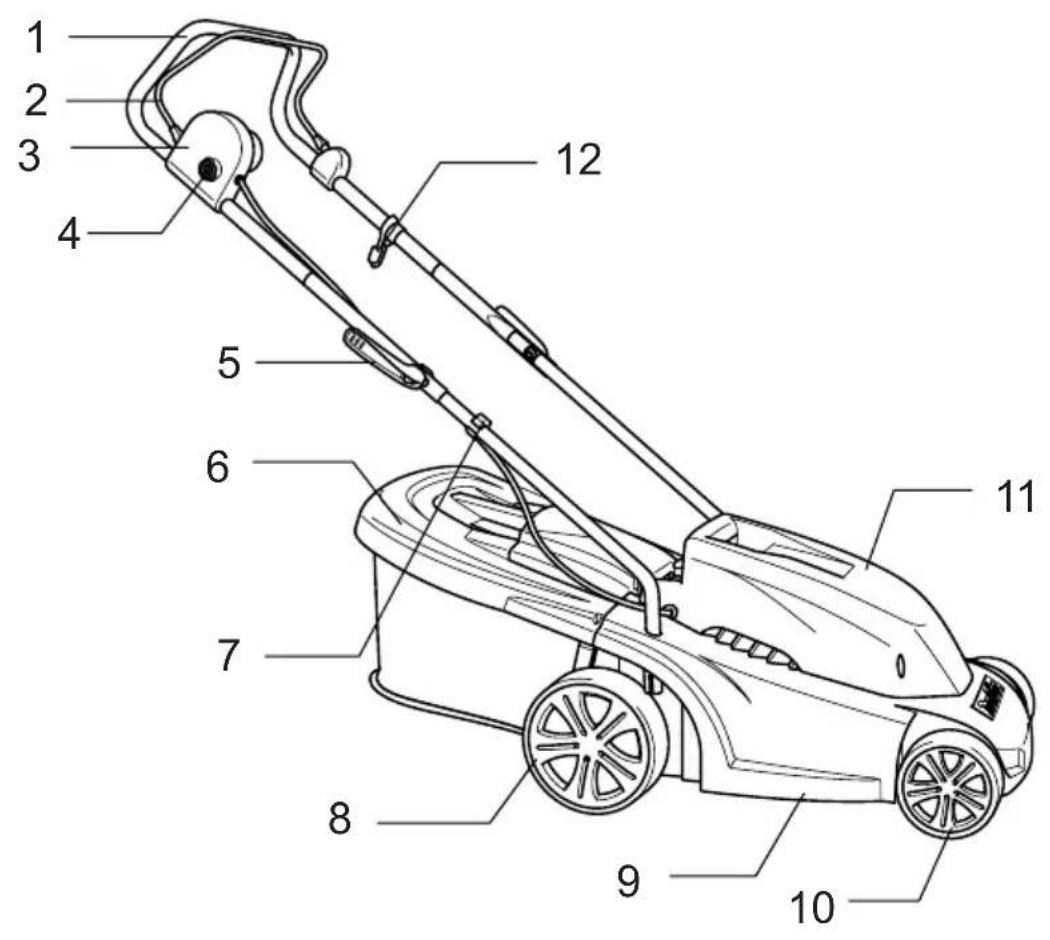
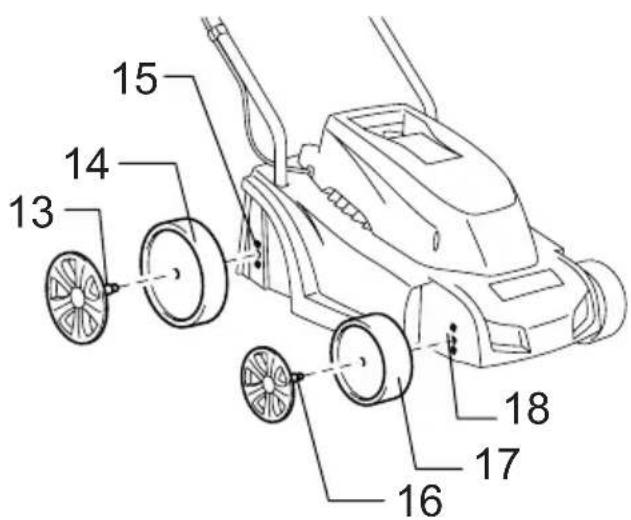
| 1. Upper handle | 8. Rear wheel | 15. Rear wheel support |
| 2. Switch handle | 9. Underpan | 16. Small wheel cover |
| 3. Switch box | 10. Front wheel | 17. Small wheel |
| 4. Safety push-button | 11. Motor cover | 18. Front wheel support |
| 5. Locking lever | 12. Cable hook | 19. Indicator light |
| 6. Grass catcher | 13. Big wheel cover | |
| 7. Cable clamp | 14. Big wheel |
KNOW YOUR LAWN MOWER
Read this manual carefully, observing the recommended safety instructions before, during and after using your lawn mower. Following these simple instructions will also maintain your lawn mower in good working order. Familiarize yourself with the controls on your mower before attempting to operate it, but above all, be sure you know how to stop your mower in an emergency. Retain this user manual and all other literature with your mower for future reference.
1. SYMBOLS MARKED ON THE PRODUCT

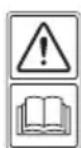
Read this instruction book carefully before using the lawn mower and keep it in a safe place for future reference.
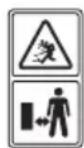
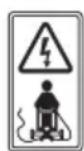
Keep bystanders away.
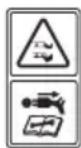
Beware of sharp blades.
Remove the plug from the machine before maintenance or if cord damaged.
Keep the supply flexible cord away from the cutting blades.

Release switch handle to stop the motor.

SAFETY ALERT SYMBOL: Indicates caution or warning may be used in conjunction with other symbols or pictures.
DOUBLE INSULATED

Your mower is double insulated.
This means that all external parts are electrically isolated from the power supply. This is achieved by placing an
extra insulation barrier between the electrical and mechanical parts.
2. GENERAL SAFETY RULES
The purpose of the safety rules is to attract your attention to possible dangers. The safety symbols and the explanations with them, require your careful attention and understanding. The safety warnings do not by themselves eliminate any danger. The instruction or warnings they give are not substitutes for proper accident prevention measures.

WARNING: Failure to obey a safety warning can be serious injury to yourself or to others. Always the safety precautions to reduce the risk of fire, shock and personal injury. Save owners manual now frequently for continuing safe operation and among others who may use this tool.

WARNING: The operation of any tool can result in objects being thrown into your eyes, which can eyes severely damaged. Before beginning power iteration, always wears safety goggles or safety with side shields and a full face shield when We recommend Wide Vision Safety Mask for use of glasses or standard safety glasses with side
1) Read the instructions carefully. Be familiar with the controls and the proper use of the equipment.
2) Never allow children or people unfamiliar with these instructions to use the lawn mower. Local regulations can restrict the age of the operator.
3) Never mow while people, especially children, or pets are nearby.
4) Keep in mind that the operator or user is responsible for accidents or hazards occurring to other people or their property.
5) While mowing, always wear substantial footwear and long trousers. Do not operate the equipment when barefoot or wearing open sandals.
6) Thoroughly inspect the area where the equipment is to be used and remove all objects which can be thrown by the machine.
7) Before using, always visually inspect to see that the blades, blade bolts and cutter assembly are not worn or damaged. Replace worn or damaged blades and bolts in sets to preserve balance.
8) Mow only in daylight or in good artificial light.
9) Avoid operating the equipment in wet grass, where feasible.
10) Always be sure of your footing on slopes.
11) Walk, never run.
12) For wheeled rotary machines, mow across the face of slopes, never up and down.
13) Exercise extreme caution when changing direction on slopes.
14) Do not mow excessively steep slopes.
15) Use extreme caution when reversing or pulling the lawn mower towards you.
16) Stop the blade if the lawn mower has to be tilted for transportation when crossing surfaces other than grass, and when transporting the lawn mower to and from the area to be mowed.
17) Never operate the lawn mower with defective guards, or without safety devices, for example deflectors and/or grass catchers, in place.
18) Start or switch on the motor carefully according to instructions and with feet well away from the blades.
19) Do not tilt the lawn mower when starting switching on the motor, except if the lawn mower has to be tilted for starting. In this case, do not tilt it more than absolutely necessary and lift only the part which is away from the operator.
20) Do not start the motor when standing in front of the discharge chute.
21) Do not put hands or feet near or under rotating parts. Keep clear of the discharge opening at all times.
22) Never pick up or carry a lawn mower while the motor is running.
23) Stop the motor and disconnect the plug:
- before clearing blockages or unclogging chute;
- before checking, cleaning or working on the lawn mower;
- after striking a foreign object. Inspect the lawn mower for damage and make repairs before restarting and operating the lawn mower;
- if lawn mower starts to vibrate abnormally (check immediately).
24) Keep all nuts, blots and screws tight to be sure the equipment is in safe working condition.
- TECHNICAL DATA
25) Check the grass catcher frequently for wear or deterioration.
26) Replace worn or damaged parts for safety.
27) No to use the lawn mower if the cords are damaged or worn.
28) Not to connect a damaged cord to the supply or touch a damaged cord before it is disconnected from the supply. A damaged cord can lead to contact with live parts.
29) Not to touch the blade before the machine is disconnected from the supply and the blade have come to a complete stop.
30) To keep extension cords away from the blade. The blade can cause damage to the cords and lead to contact with live parts.
31) To disconnect the supply(i.e. pulling the plug from the socket):
- whenever leaving the machine unattended;
- before clearing a blockage;
- before checking, cleaning or working on the machine -after striking a foreign object;
- whenever the machine starts vibrating abnormally.
32) Children should be supervised to ensure that they do not play with the appliance.
33) This appliance is not intended for use by persons (including children) with reduced physical, sensory or mental capabilities, or lack of experience and knowledge, unless they have been given supervision or instruction concerning use of the appliance by a person responsible for their safety.
34) If the supply cord is damaged, it must be replaced by a special cord or assembly available from the manufacturer or its service agent.
35) Instructions for the safe operation of the appliance, including a recommendation that the appliance should be supplied via a Residual Current Device (RCD) with a tripping current of not more than 30 mA.
36) Only use the lawn mower for the purpose for which it is designed, for cutting and collecting grass. Any other use can be hazardous, causing damage to the machine.
3. PARTS DESCRIPTION (Fig. 1)
| Model: ELM3310 ELM3710 | ||
| Rated Voltage: 230 V~ 230 V~ | ||
| Rated Frequency: 50 Hz 50 Hz | ||
| Rated Power: 1100 W 1300 W | ||
| No Load Speed: | 2900/min | 2900/min |
| Cutting Width: | 330 mm | 370 mm |
| Noise according to EN60335 | ||
| Sound pressure level ( L_pA ): | 80 dB (A) | 83 dB (A) |
| Sound power level ( L_wA ): | 87.2 dB (A) | 88.7 dB (A) |
| Uncertainty (K): | 2.42 dB (A) | 2.35 dB (A) |
| Vibration according to EN60335 | ||
| Vibration emission ( a_h ): | 2.5 m/s ^2 or less | 2.5 m/s ^2 or less |
| Uncertainty (K): | 1.5 m/s ^2 | 1.5 m/s ^2 |
| Model: | ELM3310 | ELM3710 |
| Grass catcher: 27 L 35 L | ||
| Net weight: 13.1 kg 14.8 kg | ||
| Degree of protection against liquid: IPX4 IPX4 | ||
| Height adjustment: | 20/40/55 mm, 3 adjustment | 20/40/55 mm, 3 adjustment |
5. ASSEMBLY
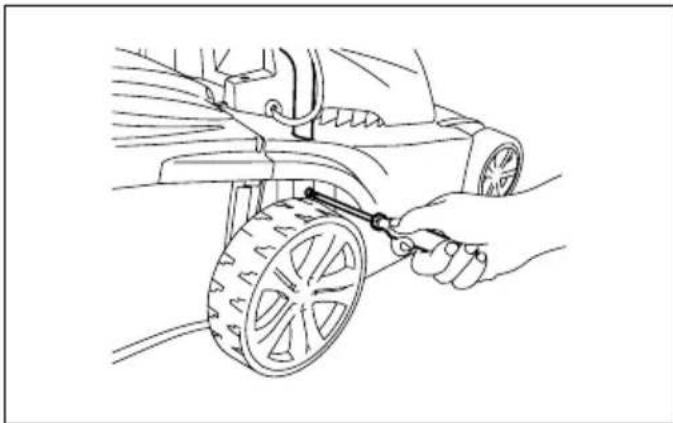
5-1 ASSEMBLY THE WHEEL (Fig. 2)
Put the axle of the rear wheel cover (the bigger one) insert the wheel and screw into the hole of the rear wheel support. Fix the small wheel in the same way.

WARNING: All wheels must be at the same
height.
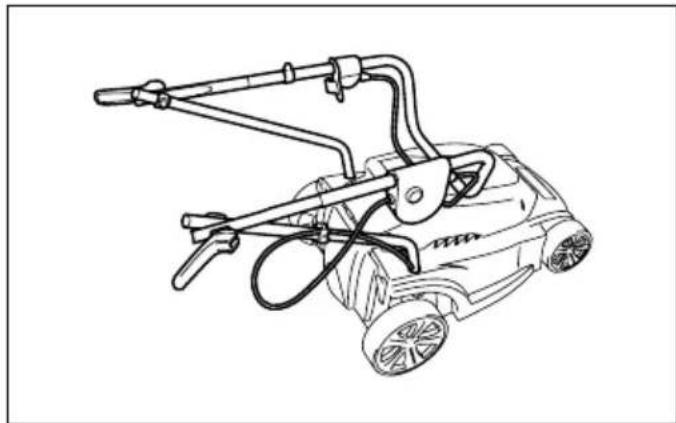
5-2 ASSEMBLY THE FOLDING HANDLE
A) Insert the lower handlebars into the fixed holes of the underpan, and then fix them with supplied screw by a screwdriver. (Fig. 3 & 4)
B) Release the upper handlebars for folding. Connect the upper handle and the lower handle with the locking lever. (Fig. 5 & 6)
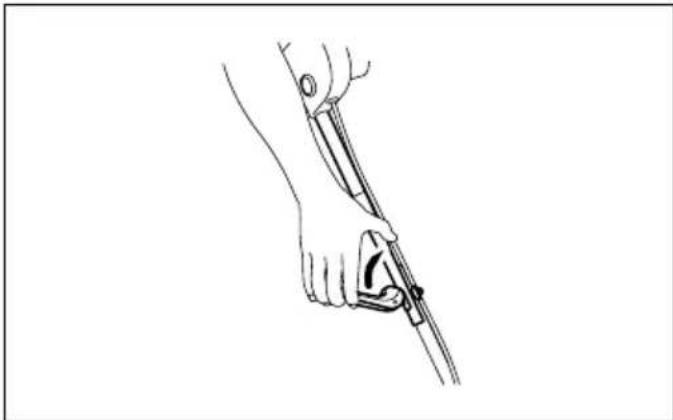
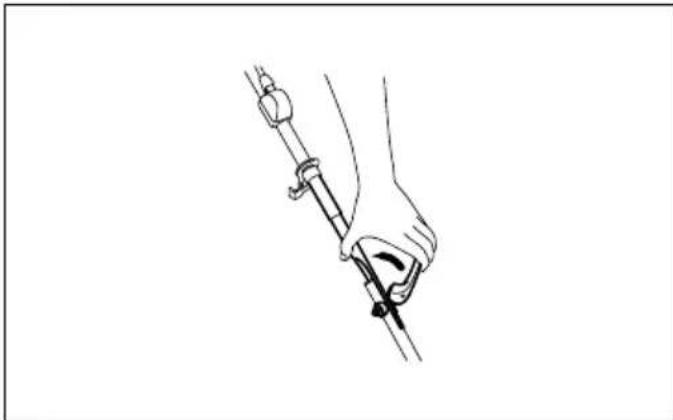
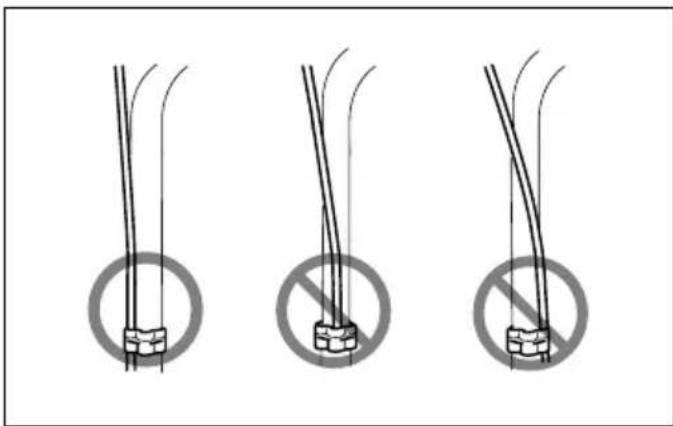
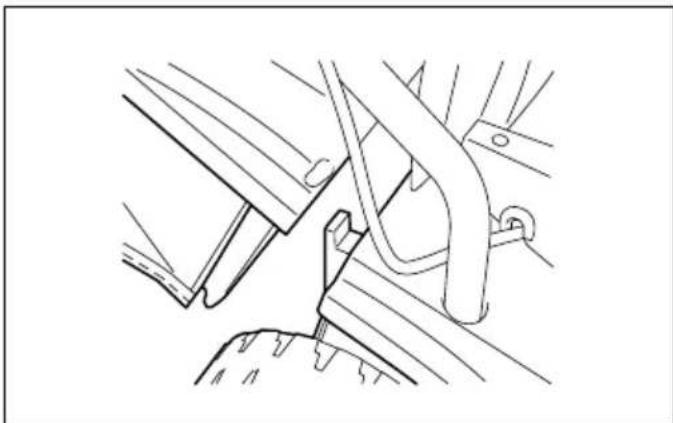
C) Position the cable over the handle shaft. Clamp it around the middle of lower handle by the cable clamp so that the cable is fixed on the outside of the machine. Otherwise the cable may be pinched by opening/closing the rear cover. (Fig. 7)
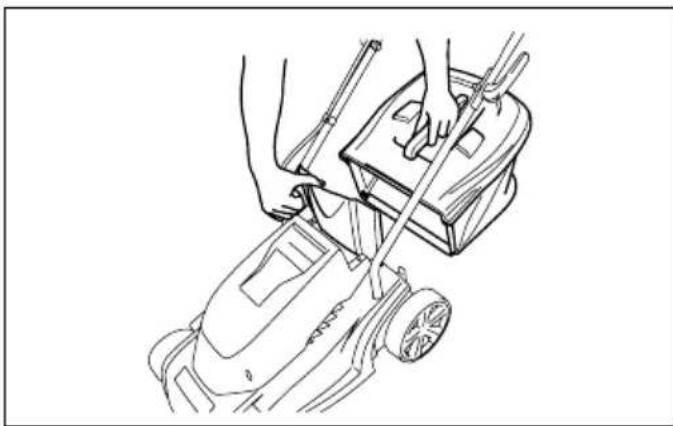
5-3 ASSEMBLY THE GRASS CATCHER
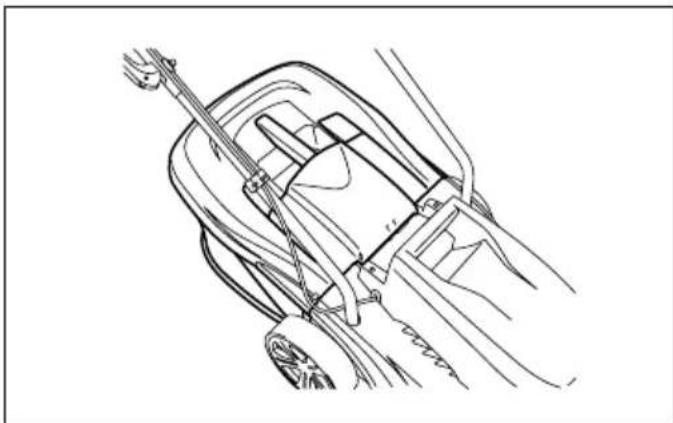
- To fit: Raise the rear cover and hitch the grass catcher on rear of mower. (Fig. 8 - 10)
- To remove: Grasp and lift the rear cover, remove grass catcher.
5-4 ADJUSTMENT OF CUTTING HEIGHT
The cutting height is adjusted by attaching the wheels to the required hole.
All wheels must be at the same height.
The height (the blade to the ground) can be adjusted from 20 mm (the lowest position) to 55 mm (the highest position), 3 height positions (20 mm/40 mm/55 mm).

WARNING: Make this adjustment only when the
blade is stopped.
6. SAFETY PRECAUTIONS
a) Always operate with the deflector or grass catcher in the correct position.
b) Always stop the motor before removing the grass catcher or adjusting the height of cutting position.
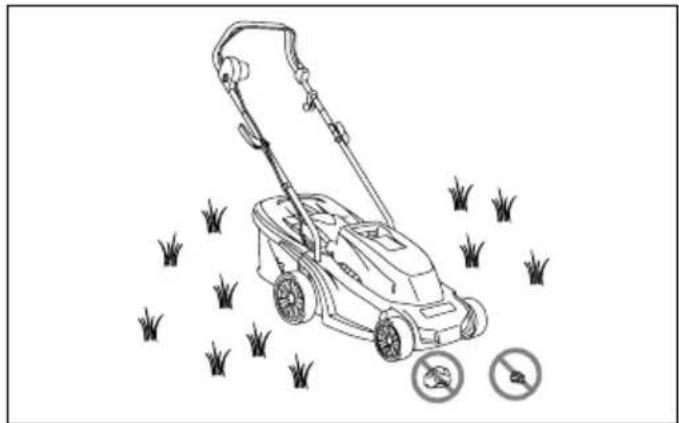
c) Before mowing, remove all foreign objects from the lawn which may be thrown by the machine. While mowing, stay alert for any foreign objects which may have been missed. (Fig. 11)
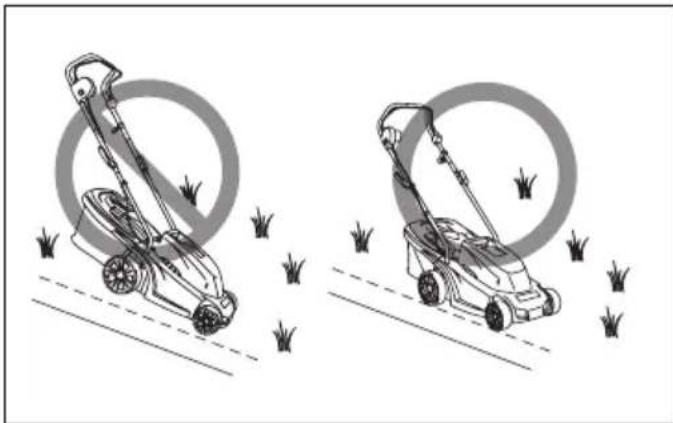
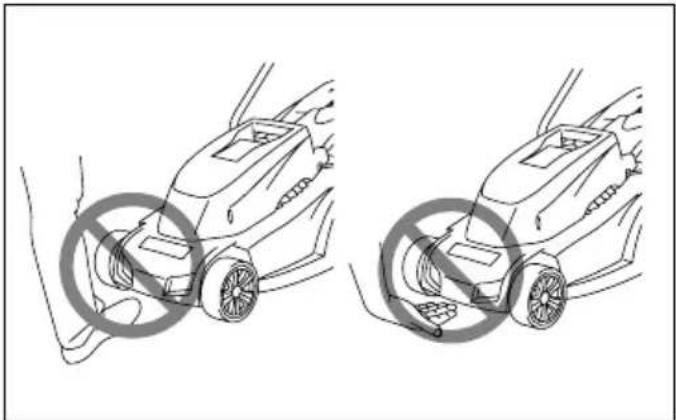
d) Never lift the rear of the mower while starting the motor or during normal operation. (Fig. 12)
e) Always ensure that the ventilation openings are kept clear of debris.
f) Never place your hands or feet underneath the underpan or into the rear discharge chute while the motor is running. (Fig. 13)
7. STARTING
Before connecting up the lawn mower to the electric power supply, make sure that the mains supply voltage is 230 V – 50 Hz. When the lawn mower power on, the indicator light will turn on (Fig. 14). Start the motor as follows (Fig. 15).
a) Press the safety push-button (1).
b) And meanwhile, pull the switch handle (2), and keep it in grasp.
Push the lawn mower manually when the motor is running.
If you release the switch handle, the motor will stop.

CAUTION: The blade starts turning as soon as
the motor is started.

WARNING: Cutting elements continue to rotate
after the motor is switch off.
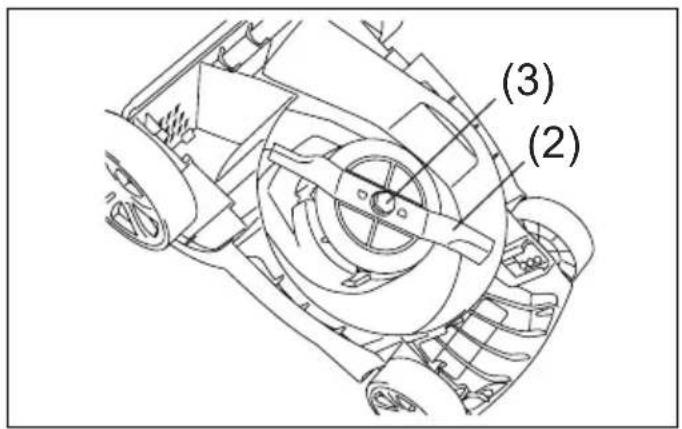
8. BLADE
The blade is made of pressed steel. It will be necessary to reshape it frequently (with a grind wheel).
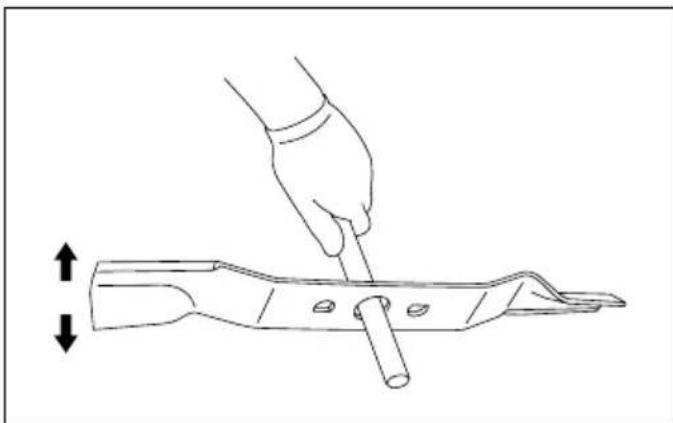
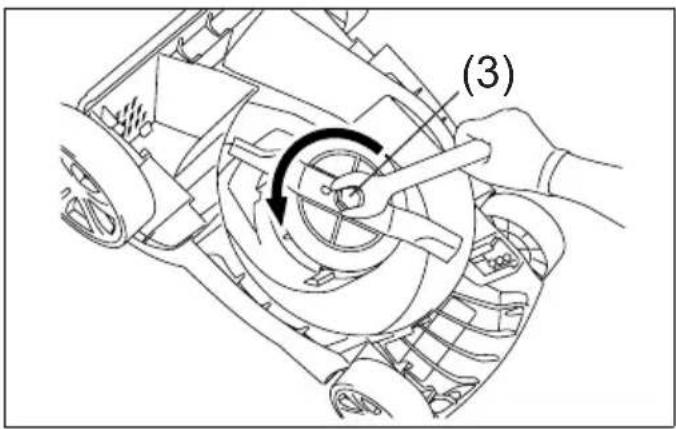
Ensure that it is always balanced (an unbalanced blade will cause dangerous vibrations). To check for balance, insert a round rod through the central hole and support the blade horizontally. (Fig. 16) A balance blade will remain horizontal. If the blade is not balanced the heavy end will rotate downwards. Reshape the heavy end until the blade is currently balanced. (Fig. 17) To remove the blade (2), unscrew the blade screw (3). (Fig. 18 - 20)
Check the conditions of the fan(1), and replace any parts, which are damaged. (Fig. 18)
When reassembling, make sure that the cutting edges face in the direction of the motor rotation. The blade screw (3) must be tightened to 20 -25 Nm torque.

WARNING: For service, replace the blade with:
MAKITA 263001422 (for ELM3310) and MAKITA 263001414 (for ELM3710) only.
9. EXTENSION CORDS
You should only use extension cords for outdoor use, PVC (H05VV-F) or rubber cord (H05RN-F) ordinary duty with a cross sectional area not less than 1.5 mm ^4 .
Before using, check the supply and extension cords for signs of damaged during use, disconnect the cord for signs of damage or aging. If the cord becomes damaged
during use, disconnect the cord from the supply immediately. DO NOT TOUCH THE CORD BEFORE DISCONNECTING THE SUPPLY. Do not use the appliance if the cord is damaged or worn. Keep extension cord away from cutting elements.
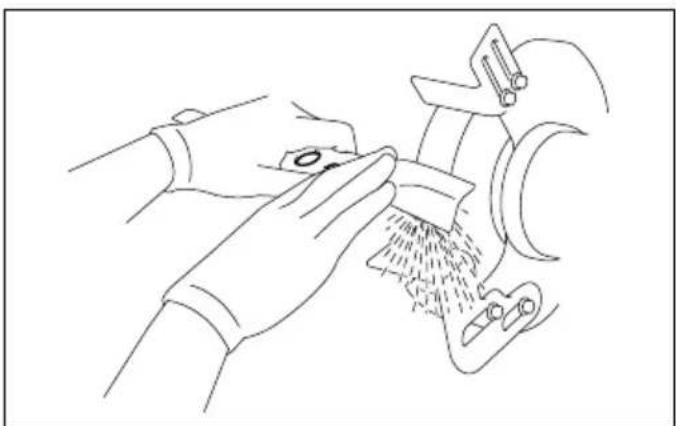
10. MAINTENANCE AND CARE

WARNING: Before performing any Maintenance or cleaning work, always pull out the mains plug!
Do not spray the unit with water. Ingress of water may destroy the switch-plug combination unit and the electric motor. Clean the unit with a cloth, hand brush, etc.
Expert inspection is required, do not make any adjustment by yourself, must contact to Makita authorized service centre:
a) If the lawn mower strikes an object.
b) If the motor stops suddenly.
c) If the blade is bent (do not align!).
d) If the motor shaft is bent (do not align!).
e) If a short-circuit occurs when the cable is connected.
f) If the gears are damaged.
g) If the V-belt is defective.
11. TROUBLE SHOOTING

WARNING: Before performing any maintenance or cleaning work, always pull out the mains plug and wait until the cutter has come to a standstill.
| Fault Remedial | action |
| Motor does not run | Check mains connection cable.Start on short grass or on an area which has already been mown.Clean discharge channel/housing-the mowing blade must rotate freely.Correct the cutting height. |
| Motor power drops | Correct the cutting height.Clean discharge channel/housing.Have mowing blade resharpened/replaced →authorized service centre. |
| Grass catcher is not filled | Correct the cutting height.Allow the lawn to dry.Have mowing blade resharpened/replaced →authorized service centre.Clean the grille on the grass catcher.Clean the discharge channel/housing. |

CAUTION: Faults which cannot be rectified with the aid of this table may be rectified by Makita authorized service centre only.
12. ENVIRONMENTALLY FRIENDLY DISPOSAL
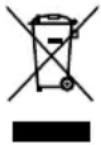
According to EU directive 2002/96/EC on electric and electronic equipment and its implementation into national law, all electric tools must be separately collected and environmentally friendly recycled.
Alternative disposal: If the owner of the power tool does not return the tool to the manufacturer, he is responsible for proper disposal at a designated collection point that prepares the device for recycling according to national recycling laws and regulations.
This does not include accessories and tools without electric or electronic components.
For European countries only
EC Declaration of Conformity
We Makita Corporation as the responsible manufacturer declare that the following Makita machine(s):
Designation of Machine: Electric Lawn Mower
Model No./ Type: ELM3310, ELM3710
Specifications: See "4. Technical Data"
are of series production and
Conforms to the following European Directives:
2006/42/EC, 2006/95/EC, 2004/108/EC, 2000/14/EC
And are manufactured in accordance with the following standards or standardised documents:
The technical documentation is kept by our authorised representative in Europe who is:
Makita International Europe Ltd.,
Michigan, Drive, Tongwell,
Milton Keynes, MK15 8JD, England
The conformity assessment procedure required by
Directive 2000/14/EC was in Accordance with annex VI.
Notified Body:
Measured Sound Power Level: 87.2 dB
Guaranteed Sound Power Level: 96 dB
Model ELM3710
Measured Sound Power Level: 88.7 dB
Guaranteed Sound Power Level: 96 dB
25th November 2009

Tomoyasu Kato
Director
Makita Corporation
3-11-8, Sumiyoshi-cho,
Anjo, Aichi, JAPAN
DEUTSCH
1. SYMBOLE AM PRODUKT
3-11-8, Sumiyoshi-cho,
Anjo, Aichi, JAPAN
FRANÇAIS
Descriptif
CE 2006/42, CE 2006/95, CE 2004/108, CE 2000/14
Michigan, Drive, Tongwell,
Milton Keynes, MK15 8JD, Angleterre
3-11-8, Sumiyoshi-cho,
Anjo, Aichi, JAPAN
ITALIANO
2006/42/EC, 2006/95/EC, 2004/108/EC, 2000/14/EC
Michigan, Drive, Tongwell,
Milton Keynes, MK15 8JD, Inghilterra
3-11-8, Sumiyoshi-cho,
Anjo, Aichi, JAPAN
NEDERLANDS
5-2 DE INKLAPBARE HANDGREEP MONTEREN
Michigan Drive, Tongwell,
Milton Keynes, MK15 8JD, Engeland
Richtlijn 2000/14/EC was is Overeenstemming met annex VI.
3-11-8, Sumiyoshi-cho,
Anjo, Aichi, JAPAN
ESPAÑOL
Michigan, Drive, Tongwell,
Milton Keynes, MK15 8JD, Inglaterra
3-11-8, Sumiyoshi-cho,
Anjo, Aichi, JAPAN
PORTUGUÊS
Descrição geral
Michigan, Drive, Tongwell,
Milton Keynes, MK15 8JD, Inglaterra
3-11-8, Sumiyoshi-cho,
Anjo, Aichi, JAPAN
ΕΛΛΗΝΙΚΑ
Γενική περιγραφή
2006/42/EK, 2006/95/EK, 2004/108/EK, 2000/14/EK
Michigan, Drive, Tongwell,
Milton Keynes, MK15 8JD, England
3-11-8, Sumiyoshi-cho,
Anjo, Aichi, JAPAN
TÜRKÇE
Genel görünüm
2006/42/EC, 2006/95/EC, 2004/108/EC, 2000/14/EC
Michigan, Drive, Tongwell,
Milton Keynes, MK15 8JD, Ingiltere
3-11-8, Sumiyoshi-cho,
Anjo, Aichi, JAPAN
SVENSKA
5-2 MONTERA DET FÄLLBARA HANDTAGET
2006/42/EC, 2006/95/EC, 2004/108/EC, 2000/14/EC
Michigan, Drive, Tongwell,
Milton Keynes, MK15 8JD, England
3-11-8, Sumiyoshi-cho,
Anjo, Aichi, JAPAN
DANSK
2006/42/EC, 2006/95/EC, 2004/108/EC, 2000/14/EC
Og er produceret i overensstemmelse med følgende standarder eller standardiserede dokumenter:
Michigan, Drive, Tongwell,
Milton Keynes, MK15 8JD, England
3-11-8, Sumiyoshi-cho,
Anjo, Aichi, JAPAN
SUOMI
Michigan, Drive, Tongwell,
Milton Keynes, MK15 8JD, England
3-11-8, Sumiyoshi-cho,
Anjo, Aichi, JAPAN
ČESKY
5-1 MONTÁŽ KOL (Obr. 2)
5-2 MONTÁŽ SKLÁPĚCÍHO DRŽADLA
5-3 MONTÁŽ SBĚRACÍHO KOŠE
Michigan, Drive, Tongwell,
Milton Keynes, MK15 8JD, England
3-11-8, Sumiyoshi-cho,
Anjo, Aichi, JAPAN
POLSKI
2006/42/WE, 2006/95/WE, 2004/108/WE, 2000/14/WE
Michigan, Drive, Tongwell,
3-11-8, Sumiyoshi-cho,
Anjo, Aichi, JAPAN
MAGYAR
2006/42/EK, 2006/95/EK, 2004/108/EK, 2000/14/EK
Michigan, Drive, Tongwell,
Milton Keynes, MK15 8JD, Anglia.
3-11-8, Sumiyoshi-cho,
Anjo, Aichi, JAPAN
Michigan, Drive, Tongwell,
Milton Keynes, MK15 8JD, England
3-11-8, Sumiyoshi-cho,
Anjo, Aichi, JAPAN
HRVATSKI
Michigan, Drive, Tongwell,
Milton Keynes, MK15 8JD, Engleska
3-11-8, Sumiyoshi-cho,
Anjo, Aichi, JAPAN
Splošna razlaga
Michigan, Drive, Tongwell,
Milton Keynes, MK15 8JD, England
3-11-8, Sumiyoshi-cho,
Anjo, Aichi, JAPAN
SLOVENČINA
5-1 MONTÁŽ KOLESA (Obr. 2)
Michigan, Drive, Tongwell,
Milton Keynes, MK15 8JD, Anglicko
3-11-8, Sumiyoshi-cho,
Anjo, Aichi, JAPONSKO
2006/42/EC, 2006/95/EC, 2004/108/EC, 2000/14/EC
Michigan, Drive, Tongwell,
Milton Keynes, MK15 8JD, Anglia
3-11-8, Sumiyoshi-cho,
Anjo, Aichi, JAPAN
Bendrasis aprašymas
Michigan, Drive, Tongwell,
Milton Keynes, MK15 8JD, England (Anglija)
3-11-8, Sumiyoshi-cho,
Anjo, Aichi, JAPAN
LATVIEŠU
2006/42/EK, 2006/95/EK, 2004/108/EK, 2000/14/EK
Michigan, Drive, Tongwell
Milton Keynes, MK15 8JD, England
3-11-8, Sumiyoshi-cho,
Anjo, Aichi, JAPAN
EESTI
Üldvaate selgitus
Michigan, Drive, Tongwell,
Milton Keynes, MK15 8JD, Inglismaa
3-11-8, Sumiyoshi-cho,
Anjo, Aichi, JAPAN
SRPSKI
2006/42/EC, 2006/95/EC, 2004/108/EC, 2000/14/EC
Michigan, Drive, Tongwell,
Milton Keynes, MK15 8JD, Engleska
Procedura procene usklađenosti koju zahteva Odredba 2000/14/EC bila je u skladu sa aneksom VI.
Obaveštena strana:
3-11-8, Sumiyoshi-cho,
Anjo, Aichi, JAPAN