
DTD7500 - Phone DAEWOO - Free user manual and instructions
Find the device manual for free DTD7500 DAEWOO in PDF.
| Product type | Amplified DECT cordless telephone |
| Brand | Daewoo |
| Model | DTD7500 |
| Handset dimensions | 17.7 x 5.3 x 3 cm |
| Base dimensions | 17 x 7.8 x 12.7 cm |
| Handset weight | 140 g |
| Base weight | 510 g |
| Handset power supply | 2 NiMH AAA rechargeable batteries (included) |
| Base power supply | AC adapter 7.5 V DC, 500 mA; 4 optional AA NiMH batteries for backup |
| Standby time | Up to 80 hours |
| Talk time | Up to 8 hours |
| Range | Up to 50 meters indoors (typical) |
| Phonebook | 150 entries |
| Speed dial memories | 3 keys + 10 photo memories |
| Incoming call list | 40 entries |
| Outgoing call list | 10 entries |
| Main features | Amplification (50 dB), speakerphone, answering machine, intercom, three-way conference, caller ID voice, talking keypad, Do Not Disturb function |
| Display | LCD with white backlight |
| Operating temperature | 0 to 30 °C |
| Maintenance and cleaning | Disconnect before cleaning; use a dry cloth |
| Safety | Do not use non-rechargeable batteries; disconnect before changing batteries; keep away from water |
| Warranty | 2 years against manufacturing defects |
Frequently Asked Questions - DTD7500 DAEWOO
User questions about DTD7500 DAEWOO
0 question about this device. Answer the ones you know or ask your own.
Ask a new question about this device
Download the instructions for your Phone in PDF format for free! Find your manual DTD7500 - DAEWOO and take your electronic device back in hand. On this page are published all the documents necessary for the use of your device. DTD7500 by DAEWOO.
USER MANUAL DTD7500 DAEWOO
natural_image
Line drawing of a mobile phone with keypad and display panel (no text or symbols)natural_image
Line drawing of a mobile phone with a tower and keypad (no text or symbols)Terminal y base

natural_image
Coiled cable with a small connector attached, no visible text or symbolsCable telefónico

natural_image
Black-and-white photo of a charging plug connected to a coiled cable (no text or symbols visible)natural_image
Diagram of a device with a cylindrical component inserted into a housing (no text or symbols visible)
natural_image
Hand placing four cylindrical batteries into a battery pack (no text or symbols visible)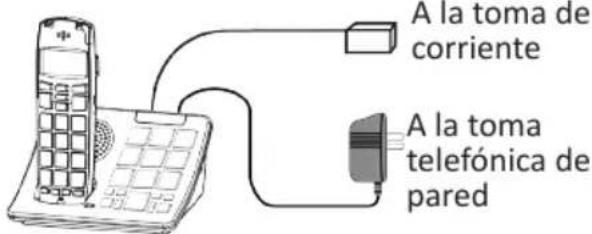
Amplified DECT Cordless Telephone with Photo Memories and Talking CID
natural_image
Line drawing of a mobile phone with a keypad and front panel (no text or symbols)USER MANUAL
CONTENT 26
- Product Features 28
- Important safety instructions 29
- Battery and AC Power Adapter 30
- Package content 31
- Installation 31
- Detailed features and controls 32
- Handset screen icons 33
- Handset menu flow chart 34
Handset Basic Operations
- Answering a call 35
- Speakerphone 35
- Making a call 35
- Handset mute 35
- Volume control (receiver and speakerphone) 35
- Amplify function AMP 35
- Automatic & Talking function switches AMP 35
- Handset tone control 35
- Programming one-touch memories 36
- Dialing from a one-touch memory 36
- Outgoing call list (Redial / copy / delete) 36
- Incoming call list (Call back / copy / delete) 36
- Create phone book 36
- List and search a phone-book entry 36
- Edit a phone-book entry. 37
- Delete / Delete All Phone-Book Entries 37
- Review memory status (phone-book) 37
Base operations
- Making a Call 37
- Mute a Call 37
- Page Handsets 38
- Program a number into a photo memory 38
- Dialing from a Photo Memory 38
- Base Ringer Tone and Volume Setting 38
- In-Use Indicator 38
- Line Indicator (optional feature) 38
- Register a New Handset to the Base 38
- Handset De-Register 39
- De-Register All Handsets 39
- Dialing Mode Setting (Tone or Pulse) 39
- Auto-Answer when Lifting Handset 40
- Handset Name Setting 40
- Language Selection 40
- Modify PIN (Changing the Password) 40
- Time Format Setting (12 / 24 hr) 41
- Date & Time Setting 41
- Restore Factory Default Settings for Handset 41
- Restore Factory Default Settings for Base 42
- Call log review (received calls 42
- Call back to an incoming call 42
- Save an Incoming Call to the Phone-Book 42
-
Delete an Incoming Call Record from Call Log 43
-
Delete All Incoming Call Records from Call Log 43
- Call Log Review (Dialed Calls) 43
- Save from Call List to Phone-Book 43
- Delete a Call from the Called List 44
- Intercom Between Handsets 44
- Handset Ring Tone & Volume Setting 45
- Keypad Tone and Warning Tone Setting 45
- Call Waiting 45
- Forward an Incoming Call from Handset 1 to Handset 2 46
- Conference Call 46
- Non-Disturb Function (Do-Not-Disturb) 46
- Pause unction 46
- Barring (Toll Restriction) 47
- Handset Power On / Off 47
- Technical Information 47
- Trouble shooting 47
- Statement of compliance 48
- Garantee 48
1. PRODUCT FEATURES
- DECT 6.0 Technology ensures crystal clear conversation.
- Photo Memory Keys on base.
- Make / receive calls from base
- Handset receiver amplification (Model 60P = 50 dB).
- “AMPLIFY” key that automatically returns to the last receiver volume setting.
- Emergency one-touch memory (dials number and turns on speakerphone).
- Talking CID & Talking keypad (English, French) – can be switched off.
- Extra-large keypad keys.
• 150 Phone Book Memories Capacity. - Four (4) digital tone control settings.
- Low battery voice warning; Out-of-range alarm.
- Max link up to 5 handsets.
- 40 Incoming call list memories; 10 Out-going call list.
- Handset flasher also serves as voice-mail and new-call indicator.
-
Three one-touch memory.
-
Inter-changeable battery between handset and base that eliminates handset recharge time.
- High performance speakerphone in handset and base.
- Large LCD display with white backlight.
- Keyboard non-disturb function.
- Auto-answer when lifting handset off the base.
- 10 handset ring tones and 5 base ring tones.
- Intercom function.
- Three-way conference.
- Compatible with FSK CID (Type II) and voice mail signals.
2. IMPORTANT SAFETY INSTRUCTIONS
nstructions pertaining to a risk of fire, electric shock or injury to persons. Privacy of communications may not be ensured when using a cordless phone.
Caution: To maintain compliance with the FCC's RF exposure guideline, place the base unit 20 cm from nearby persons.
WARNING – When using electric appliances, basic precautions should always be followed, including the following:
- Read all the instructions before using the appliance.
- This product uses rechargeable batteries. Do not use any non-rechargeable battery as charging of this type can cause battery leakage.
- Always disconnect phone cord to wall jack before changing or installing batteries.
- To reduce the risk of injury, close supervision is necessary when an appliance is used near children.
- Do not contact moving parts or any exposed metal surface.
- Only use attachments recommended or sold by the manufacturer.
-
Do not use outdoors. Do not use near water.
-
To disconnect, turn all controls to the off position, then remove plug from outlet.
- Do not unplug by pulling on cord. To unplug, grasp the plug, not the cord.
- Unplug from outlet when not in use and before servicing or cleaning.
- Do not operate any appliance with a damaged cord or plug, or after the appliance malfunctions or is dropped or damaged in any manner. Return appliance to the nearest authorized service facility for examination, repair, or electrical or
- Avoid using any telephone product during an electrical storm. There may be a remote risk of electric shock from lightning.
- Do not use the telephone to report a gas leak in the vicinity of the leak.
- Specifications of this product are subjected to change without notice.
3. BATTERY AND AC POWER ADAPTER
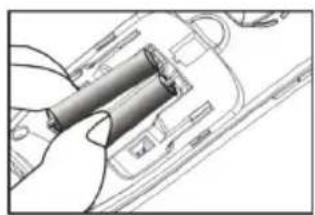
Handset: Requires 2 AAA size NiMH rechargeable batteries (included). Fully charged handset batteries can provide 80 hours of standby or 8 hours of talk time.
WARNING: Do not use any non-rechargeable battery as charging of this type can cause battery leakage.
Base: Can accept four (4) user provided AAA size NiMH rechargeable batteries for AC power outage backup purpose. Therefore, installation of base batteries is optional. Do not use any non-rechargeable battery as charging of this type can cause battery leakage. Fully charged base batteries can provide \~3 hours of AC power outage backup.
Please care for the environment by disposing any used batteries through your local community recycle center. Do not dispose any used battery in trash bin.
Swapping Handset Battery with Base Battery
Handset and base batteries are inter-changeable. In the event that handset batteries are running low, it is acceptable to swap handset batteries with two from the base. This eliminates handset battery recharge time.
WARNING: For safety consideration, always disconnect phone cord to wall jack before swapping batteries.
AC Power Adapter
For your safety, please plug the provided AC power adapter into the nearest AC outlet. Use only Class 2 power adapter, 7.5VDC, 500 MA.
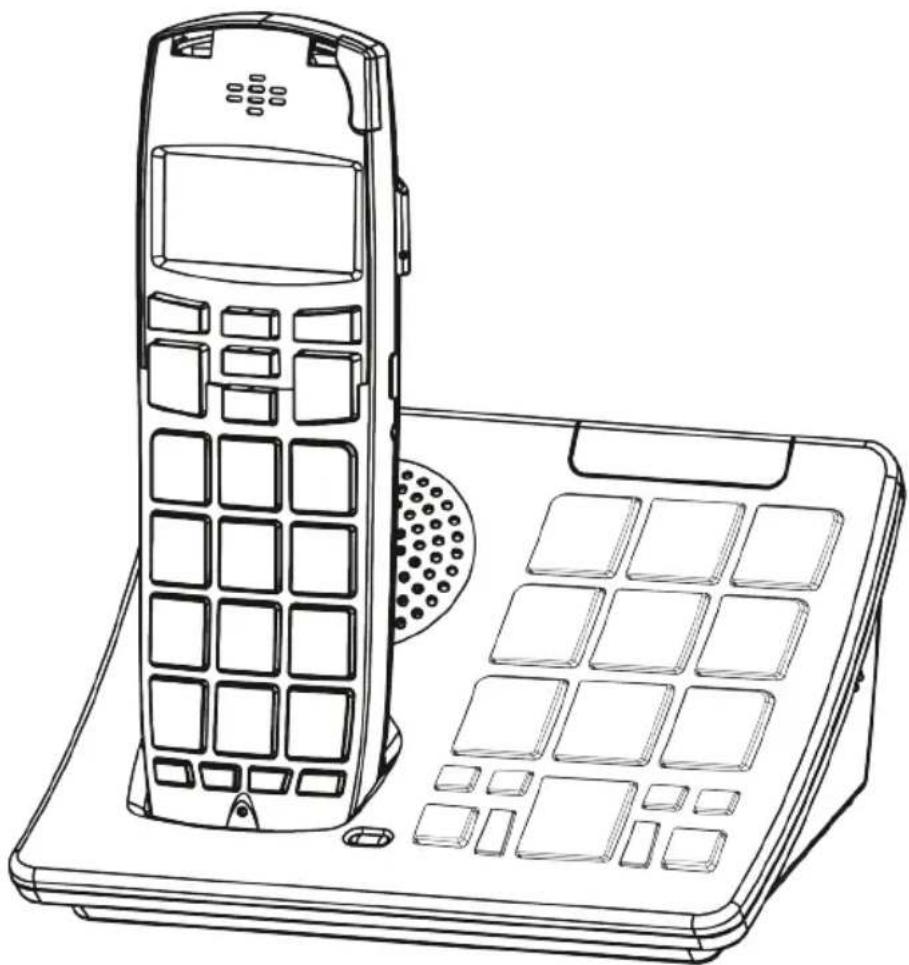
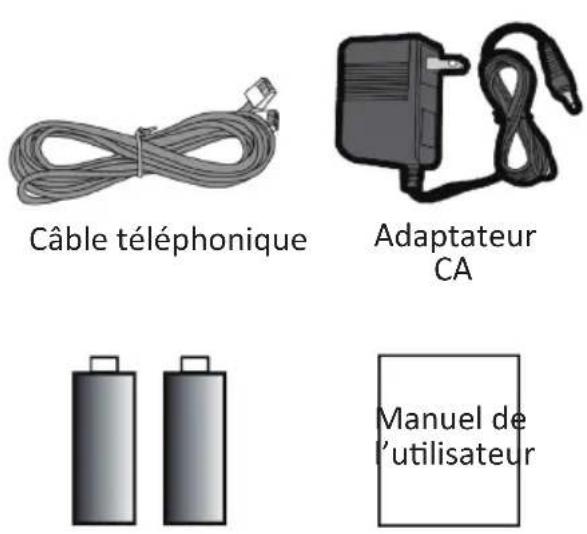
4. PACKAGE CONTENT
natural_image
Line drawing of a mobile phone with a tower and keypad (no text or symbols)Handset and Base

natural_image
Coiled cable with a small connector attached, no visible text or symbolsPhone Cord

natural_image
Black-and-white photo of a charging plug connected to a coiled cable (no text or symbols visible)AC Power Adapter

2 Rechargeable Batteries
Users manual
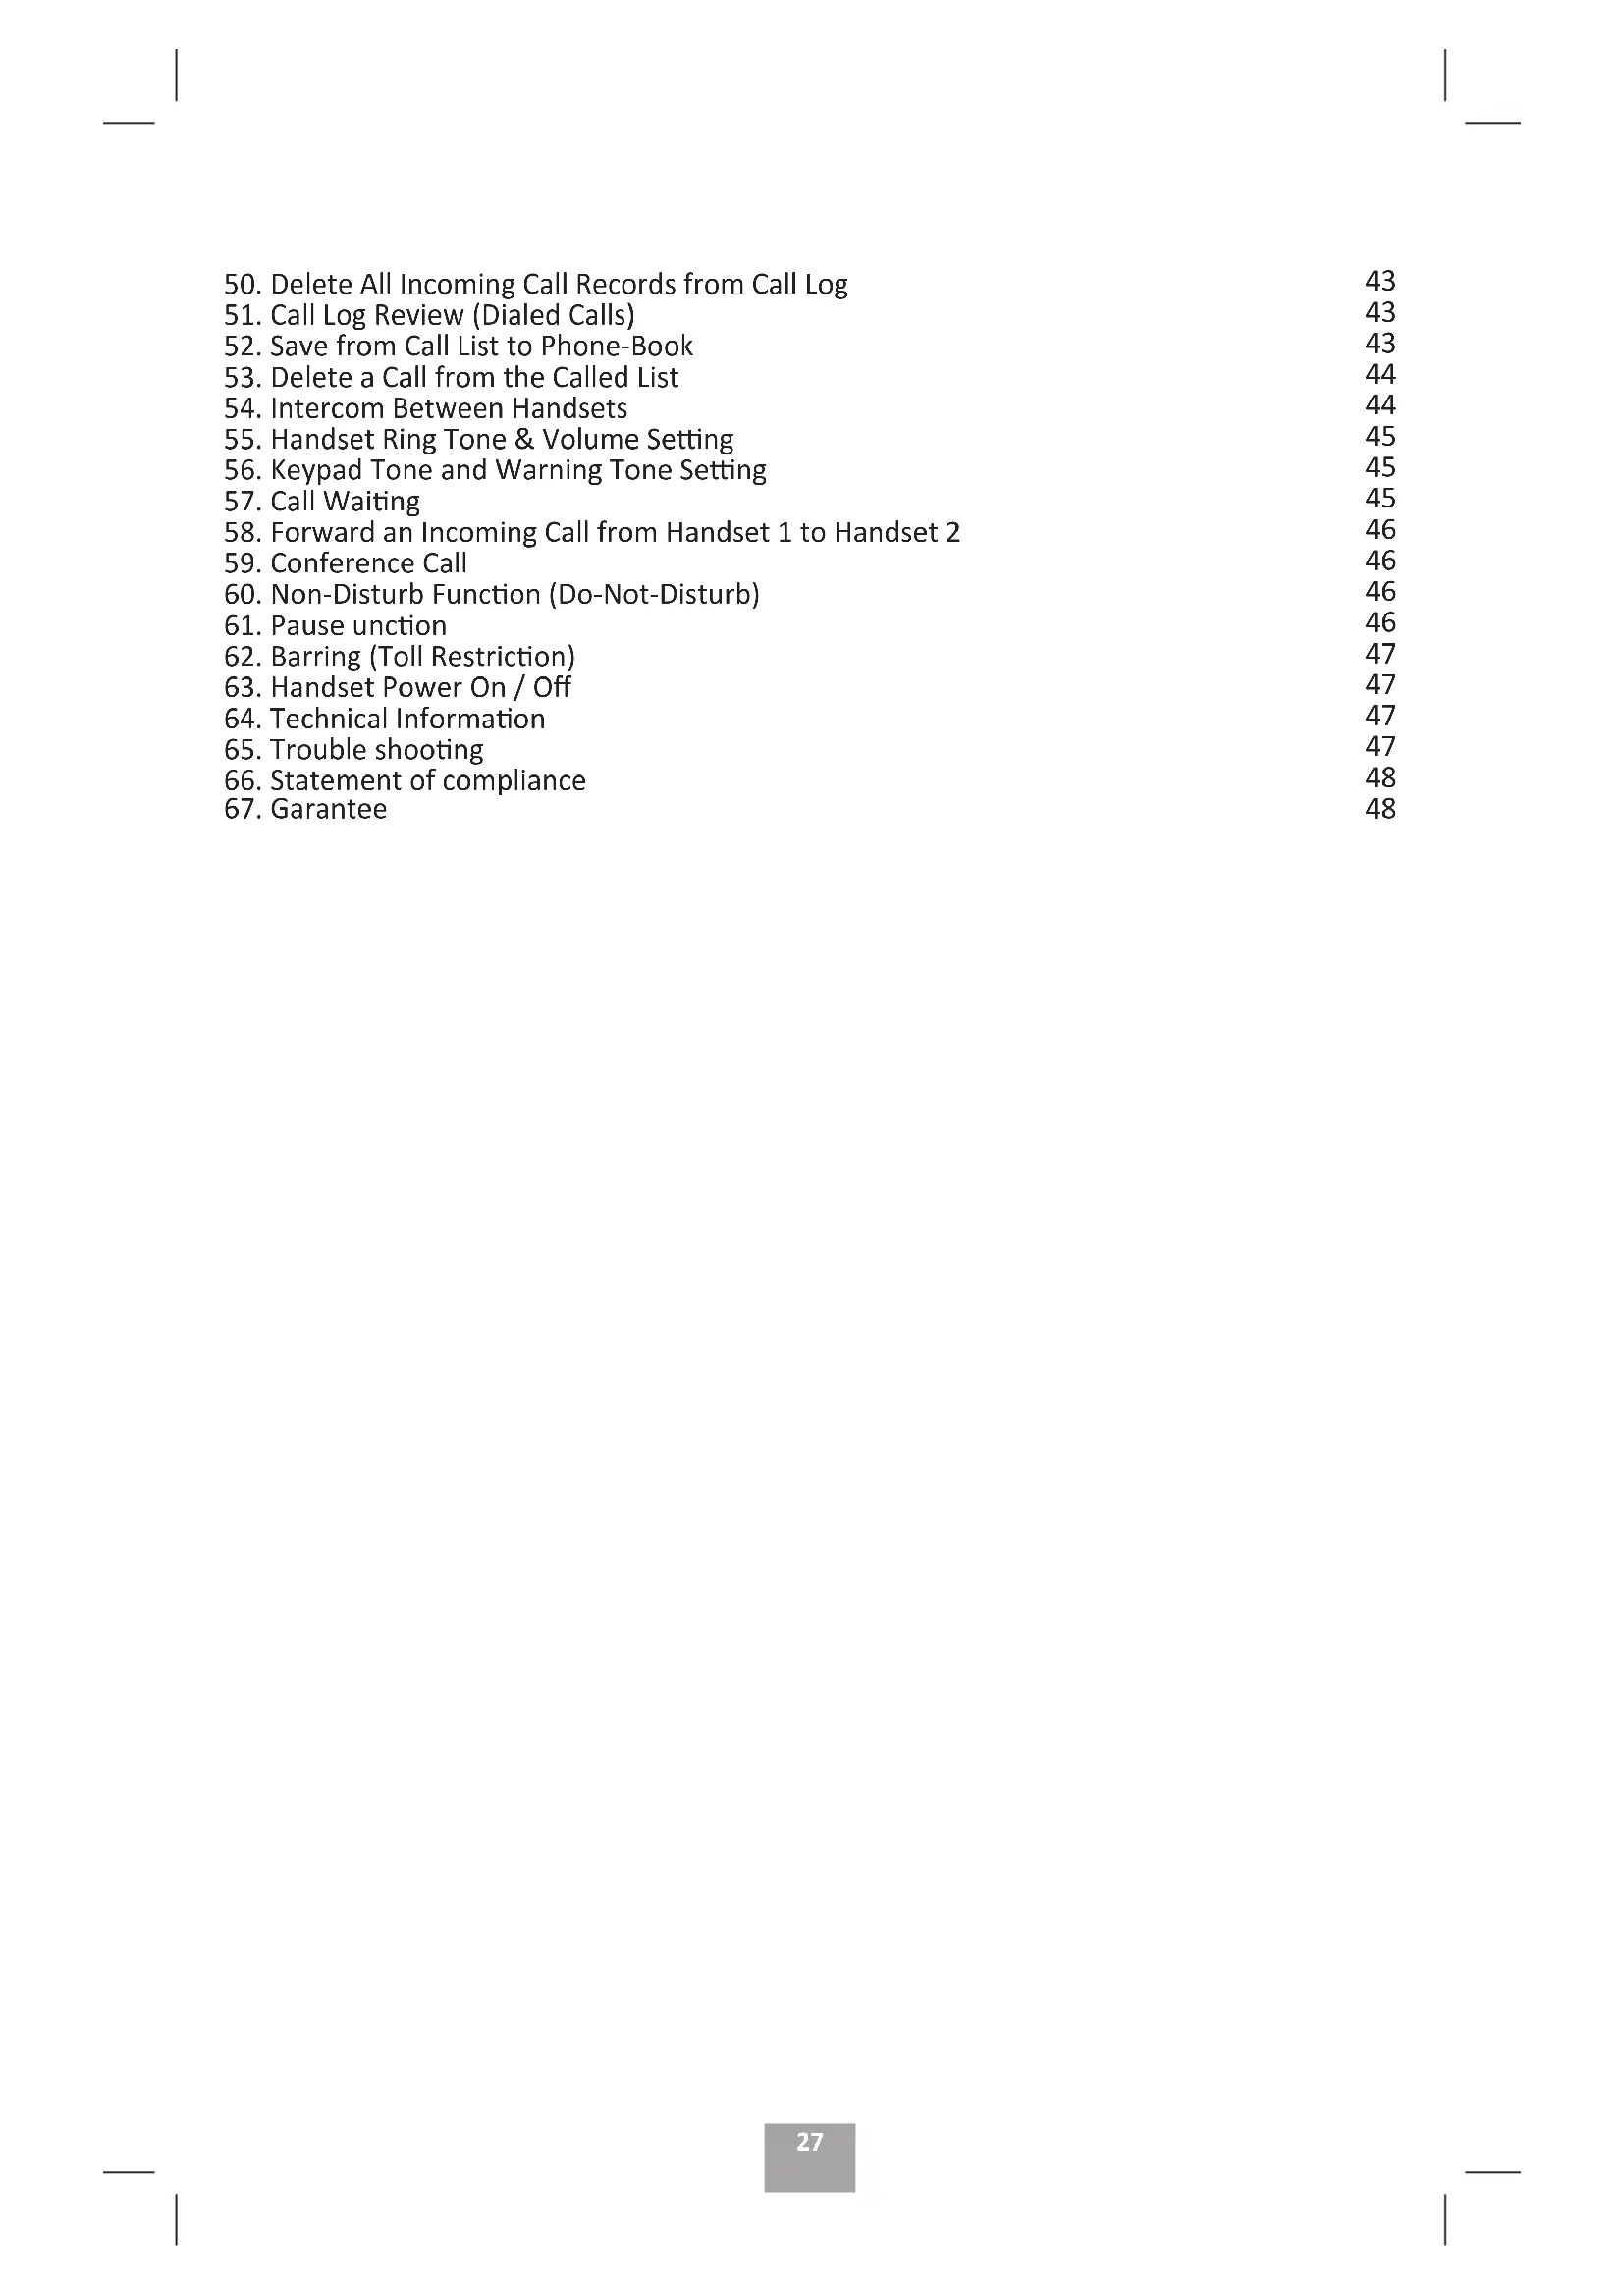
5. INSTALLATION
- Install rechargeable batteries in handset (included). Base batteries (not included) are optional for back up power.
WARNING: Do not use any non-rechargeable batteries as charging of this type can cause battery leakage and voids warranty. - Connect AC adapter and phone cord to the base as shown.
- Charge the handset in the base 10 hours or overnight before initial use.
natural_image
Technical line drawing of a mechanical component with no visible text or symbols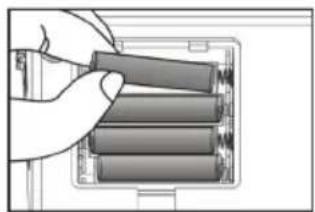
natural_image
Hand placing four cylindrical batteries into a battery pack (no text or symbols visible)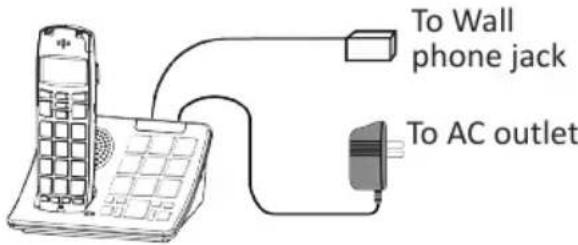
6. DETAILED FEATURES AND CONTROLS
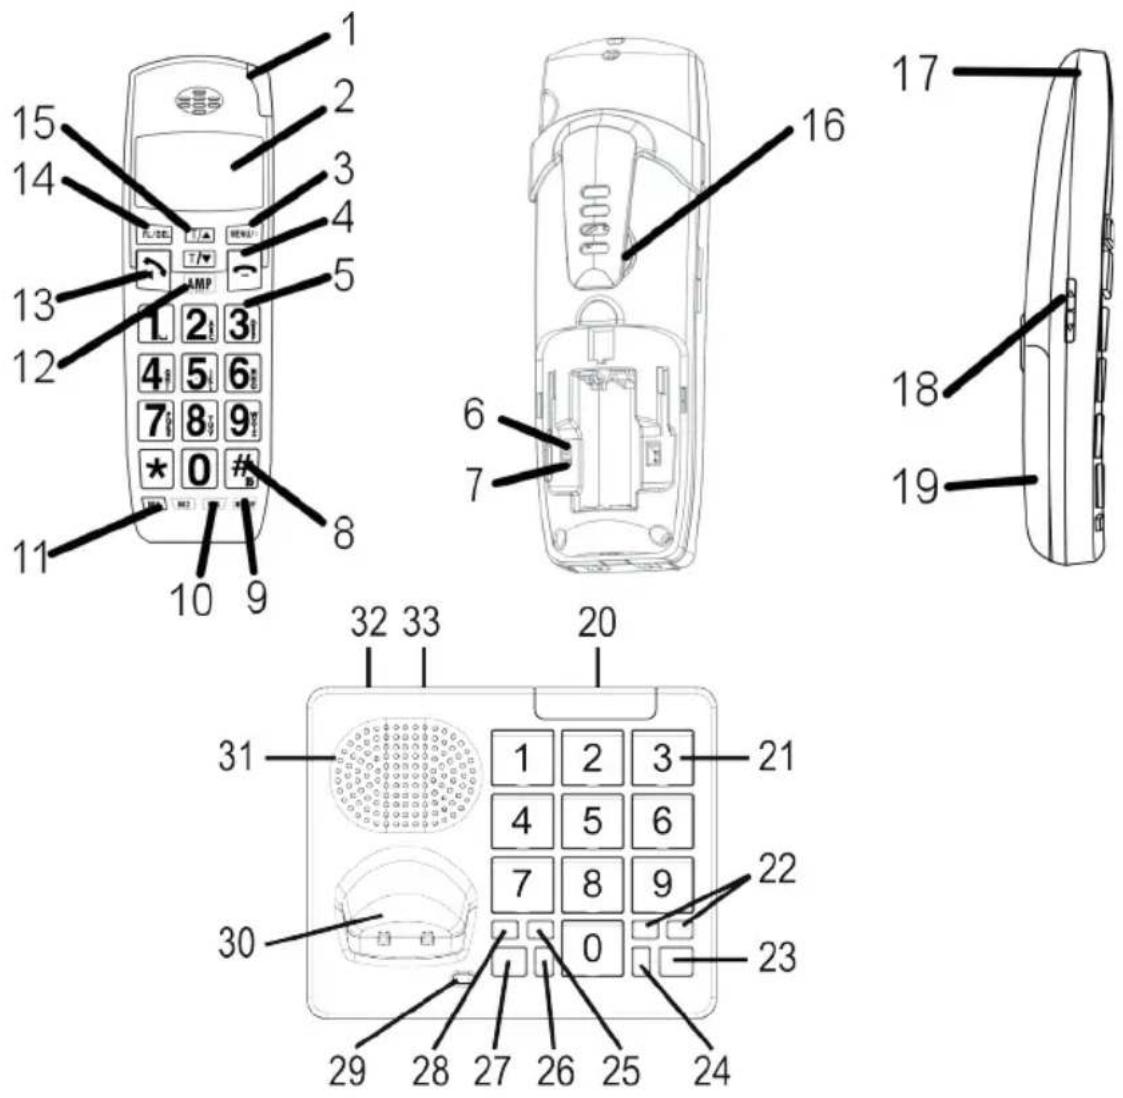
Handset Keys:
- In-Use / Ring Flasher / Voice mail / Missed Call indicator
- LCD display
- MENU/01 key: Access menu or sub-menu option / Mute
- key: End Key / Power Off
- Keypad
- Auto-Amplifier Switch: Enables automatic AMP function.
- Talking CID/ Talking Keypad Switch: (6 & 7 are in battery compartment).
-
key: Hold it for 5 sec. enables "Do-Not-Disturb".
- RD/P key: Redial / Pause key.
- M2 M3 keys: One-touch memory
- M1 key: One-touch M. that activates speakerphone.
- AMP (Amplify) key with indicator:
-
↗ key: Press to make or answer a call / Speakerphone
-
FL/DEL key: (Flash / Delete)
- T/▲ and T/▼ keys: Tone control / Scroll menu options.
- Speaker
- Hole for lanyard (lanyard not included).
- VOLUME Up/Down (side)
- Battery Compartment Cover
Base Keys:
- Base Flasher: In-Use Indicator & Line connection indicator (optional)
- Keypad & two-touch Memory keys:
- Volume Keys: Adjust base speakerphone volume
- Talk Key: Press to activate base speakerphone
-
key
- Mute key: Mutes base microphone
- * key
- Memory key: Two-touch memory control
- Page key: Press to intercom or paging handsets
- Battery Charge indicator
- Handset charging cradle
- Speaker: for speakerphone and ringer
- AC Adapter jack (rear): For connecting to power
- Phone Jack: For connecting phone line
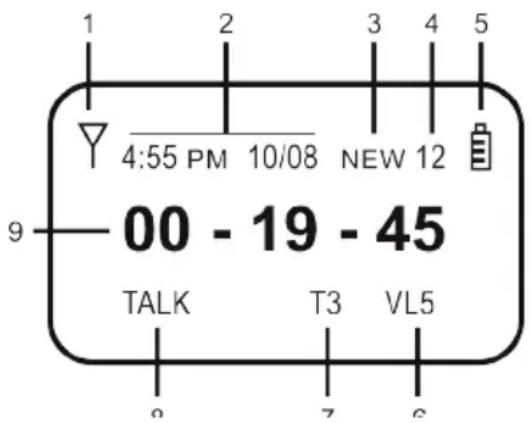
7. HANDSET SCREEN ICONS
- Antenna strength
- Time & Date
- New call icon
-
of new calls or old calls
- Battery strength indicator
- Volume level - VL1 to VL5
- Tone setting - T1 to T4 (effective when AMP is on)
- TALK (or SPEAKER)
- Call timer (HH:MM:SS)
8. HANDSET MENU FLOW CHART
Call log Received Dialed
Phone book New entry Edit record Delete record Delete all Memory status
BS settings (base) Delete HS Ring set-up Melody & Volume Dail mode Tone or Pulse Flash time 300 o-600 milliseconds Modify PIN (Default PIN = «0000») BS default setting
Audio set-up Speaker Volume (1, 2, 3, 4, 5) Receiver Volume (1, 2, 3, 4, 5) Auto-Amplify (ON / OFF) Talking Keypad (ON / OFF) Talking CID (ON / OFF)
Ring setup Int ring --- (Melody & Volume) Ext ring --- (Melody & Volume)
HS settings Tone setup Key tone, battery Low tone (hand set) Range Alarm tone (ON / OFF)
Language English, French, Spanish
HS name —
Auto answer (On / Off) —
Barring (Toff restriction) IEnter «####» to block Date & Time Time format (12/24), Set time Set date
HS default setting
Select (Base1, Base2, Base3, Base4)
Registration Base 1 Base 2 Base 3 Base 4
Handset Basic Functions
9. ANSWERING A CALL
- Press ↗ key when phone rings.
- (Press 📋 again to engage speakerphone if need).
- Press ☐ key to end the call.
10. SPEAKERPHONE
- Press ↗ key twice to turn on the speaker.
- Press ↗ key again to toggle back to handset receiver.
11. MAKING A CALL
- Enter phone number and confirm on display.
- Press ↗ key to go on-line and dial.
- (Press 📋 again to engage speakerphone if need).
- Press ☐ key to end the call.
12. HANDSET MUTE
- While on a call, press MENU/68 to mute the handset for privacy.
- Press MENU/8 again to un-mute.
13. VOLUME CONTROL (RECEIVER AND SPEAKERPHONE)
While on a call, press ◀▶ key on the handset (side) to change volume setting. Volume setting is indicated as VL1 to VL5 on screen.
14. AMPLIFY FUNCTION AMP
- While on a call, press AMP key to add an extra level of amplification (35 dB) to the receiver volume.
This is indicated by an illuminated key.
- Press AMP key again to disable the extra lever of amplification (35 dB).
15. AUTOMATIC AMP & TALKING FUNCTION SWITCHES
The AMP function can be set to ON automatically each time the phone is being used. This automatic setting can be selected via a slide switch and is recommended for a single user household.
Warning: If there are both normal and hard-of-hearing users, please do not use the automatic ON setting. This protects normal hearing users from sudden acoustic shock due to loud volume setting.
Talking CID and Talking Keypad feature can also be set to ON / OFF via a second slide switch.
- Open battery compartment cover to expose two small slide switches as shown.
- Slide Switch 1 to ON if you want AMP to get the Automatic AMP.
- Slide Switch 2 to ON for talking CID and talking keypad.
(Note: Both switch functions can be altered by changes made in "HS SETTINGS" sub-menu and vice-versa).
16. HANDSET TONE CONTROL
-
While on a call and AMP is active (illuminated), digital tone control becomes active.
-
Press T/▲ or T/▼ key to select one of four tone settings for best voice clarity. Digital tone setting is indicated on screen as T1 to T4.
- If necessary, re-adjust receiver volume in order to further enhance voice clarity.
17. Programming One-Touch MEMORIES
While off-line, enter phone number and confirm on screen.
- Press M3 and hold (or M1, M2) for 5 seconds to save. You will hear a beep sound that confirms that it has been done successful.
18. DIALING FROM A ONE-TOUCH MEMORY
- While off-line, press to confirm number.
- Press ☐ to go on-line and dial.
19. OUTGOING CALL LIST (CALL BACK / COPY / DELETE)
- While off-line, press □ first to see the last call made.
- Press □/▲ or □/▼ to review the last 10 calls made.
- To redial the number on display, just press ↗.
4.(To delete or add to Phone-Book, press MENU/00 and then scroll to appropriate submenu option. Press to MENU/00 confirm).
20. Incoming Call List (Call Back/ Copy / Delete)
(Must subscribe to phone company CID service in order to see caller information)
- While off-line, press T/▲ key first to view the latest incoming caller
info.
2. Press □/▼ to scroll the incoming call list.
3. To dial the number on display, just press ↗.
4. (To delete or copy to Phone-Book, press MENU/10 and then scroll to appropriate submenu option. Press to MENU/10 confirm).
21. CREATE PHONE-BOOK ENTRIES
While off-line, press MENU/38 and then T/▼ to scroll to "PHONE -BOOK".
-
Press MENU/10 to confirm.
-
Press T/▼ to scroll to "NEW ENTRY".
-
Press MENU/10 to confirm. Screen displays "NAME ?".
-
Type in name and then press MENU/03 to save.
-
Screen displays "NUMBER ?".
-
Type in phone number and press MENU/01 to save.
-
Screen displays "MELODY 1" and auto-plays the melody.
-
Press MENU/180 to save. Screen displays "NEW ENTRY".
-
Press ☐ to end, or go to Step 4 to create another entry.
22. LIST AND SEARCH A PHONE-BOOK ENTRY
- While off-line, press MENU/01 and T/T then to scroll to "PHONE -BOOK".
- Press MENU/50 to confirm. Screen displays "LIST".
- Press MENU/68 to confirm and screen displays the first phone-book entry.
- Press □/▲ or □/▼ to search phonebook.
- To call the number shown on the screen at any time, just press key ↗.
23. EDIT A PHONE-BOOK ENTRY
-
While off-line, press MENU/80 and then T/▼ to scroll to "PHONE -BOOK".
-
Press MENU/91 to confirm. Screen displays "LIST".
-
Press T/▼ to scroll to "EDIT RECORD".
-
Press MENU/01 to confirm. Screen displays first phone-book entry.
-
Press □ or □ to search the phone-book and select an entry for editing.
-
Press MENU/10 to confirm.
-
To change name, press FL/DEL to delete one letter at a time; type in a new name.
-
Press MENU/10 to save the new name.
-
Press T/▲ or T/▼ to move the blinking cursor to the appropriate digit and then press FL/DEL to delete that digit.
-
Type in a new digit if appropriate.
-
Press MENU/03 to save the phone number.
-
Screen displays "MELODY" and sounds a ring tone.
-
Press MENU/01 to save the ring tone; screen displays "EDIT RECORD" again.
-
Press ↗ to end editing, or go to Step 4 above and repeat on another entry.
24. DELETE / DELETE ALL PHONE-BOOK ENTRYES
-
While off-line, press key MENU/40 and then key T/▼ to scroll to "PHONE -BOOK".
-
Press MENU/01 key to confirm. Screen displays "LIST".
-
Press key T/▼ to scroll to "DEL RECORD" (or "DELETE ALL").
-
Press MENU/01 key to confirm. Screen displays first phonebook
entry.
-
Press T/▲ or T/▼ to search the entire phone-book and select an entry to delete.
-
Press MENU/10 to confirm a selection. Screen displays "CONFIRM ?".
-
Press MENU/0 again to confirm.
-
Press ☐ to end.
25. REVIEW MEMORY STATUS (PHONE-BOOK)
While off-line, press MENU/00 and then T/▼ to scroll to "PHONE -BOOK".
-
Press MENU/08 key to confirm. Screen displays "LIST".
-
Press □/▼ a key a few times to display "MEM STATUS".
-
Press MENU/01 key to confirm. Screen displays memory status as (xxx / 150).
-
Where 150 is the maximum number of entries and xxx represents the actual entries.
-
Press ☐ to end.
BASE OPERATIONS
26. MAKING A CALL
-
Press the TALK key and dial the number using the key pad. Press TALK again to end call.
-
Press Vol + or Vol - to adjust your desired volume level.
27. MUTE A CALL
-
While on a call, press MUTE key to mute the speakerphone.
-
Press MUTE again to un-mute.
28. PAGE HANDSETS
- Press the PAGE key to make the base call your handset.
The base will make a deep loud sound calling for the handset. Your handset will start ringing to help you locate it. - Press the key ↗ on the handset or the PAGE key on the base to stop the paging.
29. PROGRAM A NUMBER INTO A PHOTO MEMORY
- While off line, enter the phone number on the key pad.
- Press and hold MEMORY for 3 seconds, then press any key (1 to 0) you wish to store the number.
You will hear a "du du" sounds as a confirmation. - If you wish to replace any number, repeat steps 1-2.
- You can customize each button with your own picture.
Use our cutting guide template to help you guide cutting out pictures.
30. DIALING FROM PHOTO MEMORY
- Press MEMORY key and then press the desired memory number on the keypad. Then the DTD-7500 will go on-line and dial out within 2 seconds.
- Press TALK to end the call.
31. BASE RINGER TONE AND VOLUME SETTING
- While off-line, press MENU/98 key on handset and it displays "CALL LOG".
- Press □/▲ or □/▼ key to scroll to "BS SETTINGS".
-
Press MENU/10 key and it displays "Delete HS".
-
Press T/▲ or T/▼ key and scroll to "RING SETUP".
- Press MENU/8 key and the screen displays "Melody 1". Base ringer should ring. Press T/▲ or key T/▼ to listen to different ring melodies (5).
- Press Vol + or Vol - on base to adjust ringer volume or to shut it off.
- Press MENU/10 key to save the ringer tone and volume settings.
Note: While off-line or during an incoming call, you may also press either Vol + or Vol - key to adjust the ringer volume.
32. IN-USE INDICATOR
- This is a multi-purpose indicator. If it shows a steady light, that means you are online and using the phone.
- It flashes (fast) on an incoming call.
- This indicator also flashes when someone is using an extension phone on the same line.
33. LINE INDICATOR (OPTIONAL FEATURE)
- This indicator is available on some models and it indicates the status of the phone line connection. It should be normally off.
- If it shows a steady light, this indicates the phone line is not connected, Please verify phone line connection, or try a different phone cord / phone jack.
34. REGISTER A NEW HANDSET TO THE BASE
(Note: Each DTD-7500 is preregistered in the factory is ready to use out of the box. You only
need to do this step if you bought an extra handset for the system. A maximum of five handsets is allowed)
- Press PAGE key on the base for about 6 seconds while offline, the base starts flashing followed by a loud beep. This indicates the base is ready for handset registration. (Please complete the following steps in less than 120 seconds).
- While off-line, press and hold the PAGE key on the side of the handset for about 5 seconds. It will beep once and the screen displays "SEARCHING 1".
- Wait about 10 seconds for registration to take place. A long “du di du” sound indicates success.
(Note: After registering the handset to base, the antenna symbol will appear steady on the top left corner of the LCD. If handset and base aren't registered, the antenna symbol ▼ and handset name will be flashing.)
35. HANDSET DE-REGISTER
Note: This function is used when there is a need to free up a handset registration, so a new handset may be added to the base.
- Press MENU/9 key while off-line, and the screen displays "CALL LOG".
- Press T/▲ or T/▼ key to scroll to "BS SETTINGS"
- Press MENU/18 key and the screen displays "DELETE HS"
- Press MENU/98 key and it displays PIN? Then press number keys to input password to confirm. (factory default PIN = "0000")
- Press MENU/00 key and it displays the
handset for de-register, or press T/▲ or T/▼ to select other handset to de-register.
- Press MENU/01 key with a sound of "di du" meaning successful de-register, if sounds of "di...", it means failed deregister. (Note: The handset on which this step is being performed can not be deregistered)
- Press ☐ key to transfer to offline.
36. DE-REGISTER ALL HANDSETS
- Press PAGE key of base for 5 seconds and the base red light starts flashing.
- Press the PAGE key again of base seven more times at a normal pace, the ringer flasher indicator should flash at a faster speed than before indicating de-register process is in progress.
- De-register is complete when the indicator light goes out followed by a beep.
- All previously registered handsets are now deregistered.
- You must register the handsets you want again.
37. DIALING MODE SETTING (TONE OR PULSE)
(DTD-7500 is factory preset for tone dialing)
- While off-line, press MENU/80 key and it displays "CALL LOG".
- Press T/▲ or T/▼ key to scroll to "BS SETTINGS" function
- Press MENU/01 key, then it displays "DELETE HS"
- Press T/▲ or T/▼ key to scroll to "DIAL MODE"
- Press MENU/01 key and it displays "TONE" or "PULSE"
-
Press T/▲ or T/▼ key to select "TONE" or "PULSE" mode.
-
Press MENU/08 key to confirm. A sound of "Du" indicating successful setting.
- Press ☐ key to quit setting and to exit to off-line mode,
38. AUTO-ANSWER WHEN LIFTING HANDSET
(If this function is ON, lifting the handset from the base automatically answers the incoming call. There is no need to press the key. Factory default is "OFF".)
- While off-line, press MENU/00 key and it displays "CALL LOG".
- Press □/▲ or □/▼ key to scroll to English
- Press MENU/08 key and it displays "AUDIO SETUP".
- Press T/▲ or T/▼ key to scroll to "AUTO ANSWER".
- Press MENU/10 key to confirm, and it displays "ON" or "OFF".
- Press □/▲ or □/▼ key to select OFF or ON.
- Press MENU/10 key to confirm. A sound of "di du" indicates success.
- Press ☐ to exit to off-line mode.
39. HANDSET NAME SETTING
This function allows you to display a favorite NAME on the handset screen. A name like “Study”, “Kevin” or “Living Rm” suggests where it belongs.
- While off-line, press MENU/98 key and it displays "CALL LOG".
- Press □/▲ or □/▼ key to scroll to "HS SETTINGS" function
- Press MENU/01 key and it displays "AUDIO SETTING".
- Press □/▲ or □/▼ to scroll to "HS NAME".
- Press MENU/03 key to select and a
cursor is flashing.
- Use keypad to input name.
- Press MENU/01 key to confirm. A sound of "di du" indicates success.
- Press key to exit to off-line mode "HS SETTINGS" function.
40. LANGUAGE SELECTION
Sixteen languages are supported on the LCD display.
The DTD-7500 only support Spanish on the Talking CID & Talking Keypad.
- While off-line, press MENU/10 key and it displays "CALL LOG".
- Press T/▲ or T/▼ key to scroll to "HS SETTING" function
- Press MENU/88 key to confirm and it displays "AUDIO SETUP".
- Press T/▲ or T/▼ key to scroll to "LANGUAGE" function
- Press MENU/10 and it displays "ENGLISH".
- Press T/▲ or T/▼ to select "FRENCH" or "SPANISH".
- Press MENU/10 key to confirm. A sound of "di du" indicates success.
- Press ☐ key to exit to off-line mode
41. MODIFY PIN (CHANGING THE PASSWORD)
Certain important function changes require the user to enter a PIN number so that accidental change can not happen. Factory default PIN is "0000".
- While off-line, press MENU/98 key and it displays "CALL LOG".
- Press T/▲ or T/▼ key to scroll to "BS SETTING" function
- Press MENU/81 to confirm.
- Press □ or □ key to scroll to
"MODIFY PIN" function
-
Press MENU/18 key to confirm and the screen displays "PIN?"
-
Input the old or default PIN number "xxxx" and it display NEW PIN? (Note: factory default PIN = "0000")
-
Input your favorite new PIN number with 4 digits. In case of a wrong input, press FL/DEL key to delete and then re-enter.
-
Press MENU/01 key for confirmation, the screen displays "REPEAT",
-
Input new PIN again. (Record your new PIN for future use, as it cannot be recovered)
-
Press MENU/98 key to confirm. A sound of "di du" indicates success.
-
Press ☐ key to exit to off-line mode.
42. TIME FORMAT SETTING (12/24 H)
-
While off-line, press key MENU/40 and it displays "CALL LOG".
-
Press T/▲ or T/▼ key to scroll to "HS SETTINGS"
-
Press MENU/10 key to confirm.
-
Press T/▲ or T/▼ key to scroll to "DATE & TIME" and press MENU/68 to confirm.
-
Press MENU/10 key and then the screen displays "TIME FORM"
-
Press MENU/80 key and the screen displays "12H"
-
Press T/▲ or T/▼ key to select either "12H" or "24H" format.
-
Press MENU/08 key to confirm. A sound of "di du" indicates success. Screen displays "TIME FORM" again.
-
Press ☐ key to exit to off-line mode.
43. DATE & TIME SETTING
If you subscribe to Caller ID (CID) service from your local phone
company, the date and time information within the CID data will update this automatically.
Otherwise, user must set time in "24" hour format mode and then change to the 12 hour format later for the proper display of AM or PM.
(Note: "AM / PM" indication can not be set in the 12 hour mode.)
-
While off-line, press MENU/00 key and it displays "CALL LOG".
-
Press T/▲ or T/▼ key to scroll to "HS SETTINGS"
-
Press MENU/00 key for confirmation
-
Press T/▲ or T/▼ key to scroll to "SET TIME" and press MENU/01 for confirmation.
-
Use the number keys to input new time in (HH / MM) format,
-
Press MENU/01 key for confirmation. A sound of “di du” indicating successfully setting. The screen displays “SET TIME” again.
-
Press T/▲ or T/▼ key to scroll to "SET DATE" and press MENU/8 for confirmation.
-
Use the number keys to English input new date in (MM / DD) format.
-
Press MENU/01 key for confirmation. A sound of "di du" indicating successfully setting. The screen displays "SET DATE" again.
-
Press ☐ key to quit and go back to standby mode
44. RESTORE FACTORY DEFAULT SETTINGS FOR HANDSET
Note: This setting restores handset factory default settings. All custom settings will be lost. All phone book entries are not affected.
-
While off-line, press MENU/88 key and screen displays "CALL LOG".
-
Press T/▲ or T/▼ to scroll to "HS SETTINGS".
- Press MENU/10 key to confirm.
- Press T/▲ or T/▼ key to scroll to "HS DEFAULT".
- Press MENU/68 key for confirmation and it displays "PIN ?".
- Input PIN number xxxx (factory default PIN = "0000").
- Press MENU/10 key for confirmation. A sound of "di du" indicates success. However, a sound of "di", indicates the wrong PIN inputting. Re-enter the PIN again.
- Press ☐ key to quit and return to standby mode. Please allow 10 seconds for the handset to re-establish handshaking with base.
45. RESTORE FACTORY DEFAULT SETTINGS FOR BASE
Note: This setting restores base factory default settings. All custom settings will be lost. All messages and time will be affected.
- While off-line, press MENU/10 key and screen displays "CALL LOG".
- Press □/▲ or □/▼ to scroll to "BS SETTINGS".
- Press MENU/10 key to confirm.
- Press □/▲ or □/▼ key to scroll to "BS DEFAULT".
- Press MENU/88 key for confirmation and it displays "PIN ?". Input PIN number xxxx (factory default PIN = "0000").
- Press MENU/8 key for confirmation; a sound of "di du" indicates success. However, a sound of "di" indicates the wrong PIN input. Re-enter again.
- Press ☐ key to quit and return to standby mode. Please allow 10 seconds for the handset to re-establish handshaking with the base.
46. CALL LOG REVIEW (RECEIVED CALLS)
- Press MENU/91 key while off-line and it displays "CALL LOG".
- Press MENU/08 key and it displays "RECEIVED".
- Press MENU/01 key and it displays the latest group of incoming calls.
- Press T/▲ or T/▼ key to scroll to the number for call back or to save.
Note: Press the key T/▲ while in off-line mode is a short-cut to the incoming call List.)
47. CALL BACK TO AN INCOMING CALL
-
After reviewing the incoming call and while that number is still showing on LCD screen.
-
Press the ↗ key to dial it out.
48. SAVE AN INCOMING CALL TO THE PHONE-BOOK
- After reviewing the incoming call and while that number is still showing on LCD screen.
- Press MENU/88 key for confirmation, then the screen displays "COPY TO PB ?"
- Press □▼ key once and screen displays "ADD TO PB ?"
- Press MENU/100 key and it displays the name?
- Enter the name using the keypad.
- When finish, press MENU/00 key and it displays phone number again for editing.
- Press T/▲, T/▼ or FL/DEL key to revise phone number.
- Press MENU/10 key to save and back to incoming call review mode.
- Press ☐ key to exit to off-line mode.
49. DELETE AN INCOMING CALL RECORD FROM CALL LOG
- After reviewing the incoming call and while that number is still showing on LCD screen:
- Press MENU/8 key and the screen displays "COPY TO PB ?".
- Press T/▲ or T/▼ key to scroll to "DELETE".
- Press MENU/01 key and it displays "CONFIRM?", then press MENU/01 again for confirmation.
- Press ☐ key to exit to off-line mode.
50. DELETE ALL INCOMING CALL RECORD FROM CALL LOG
- While reviewing an incoming number:
- Press MENU/10 key and the screen displays "COPY TO PB ?".
- Press T/▲ or T/▼ key to scroll to "DELETE ALL".
- Press MENU/08 key and it displays "CONFIRM?", then press MENU/08 again for confirmation.
- Press ☐ key to exit to off-line mode.
51. CALL LOG REVIEW (DIALED CALLS)
- While off-line, press MENU/98 key and screen displays "CALL LOG".
- Press MENU/91 key and screen displays "RECEIVED".
- Press □/▼ key to scroll to "DIALED".
- Press MENU/01 key and it displays the most recent dialed call.
- Press □/▲ or □/▼ key to review the most recent ten (10) dialed calls.
- Press ☐ key to redial the number shown on the display.
a short cut to the "Dialed Calls" or the outgoing called List.).
52. SAVE FROM CALL LIST TO PHONE-BOOK
- Review and select a phone number from the Called List as above.
- Press MENU/8 key and the screen displays "ADD TO PB ?".
- Press MENU/8 key and the screen displays NAME?
- Use the keypad to input the name.
- Press MENU/8 key and the screen
RDSplays the number to save, press T/▲, T/▼ or FL/DEL key to revise number if necessary. - Press MENU/10 key and it displays "MELODY 1".
- Press □/▲ or □/▼ key to select ringer tone as VIP ringer.
- Press MENU/01 key to save and then return to the review mode.
- Press ☐ key to exit to off-line mode.
53. DELETE A CALL FROM THE CALLED LIST
- Review and select a phone number from the Called List as above.
- Press MENU/68 key for confirmation and the screen displays "ADD TO PB ?".
- Press T/▼ key to scroll to either "DELETE" or "DELETE ALL"
- Press MENU/60 key to confirm. Screen displays "CONFIRM?" again.
- Press MENU/03 key to confirm.
- Press ☐ key to exit to off-line mode.
(Note: Press the key while in standby is
54. INTERCOM BETWEEN HANDSETS
- This function is available when two or more handsets are registered to the same base.
- Base must be powered up in order for the intercom function to work. Intercom from Handset 1 to Handset 2.
- While in the standby mode, press PAGE key on handset 1, the LCD will display "HS ?".
- Input "2" and the display shows "CALLING HS 2".
Handset 2 will ring. - The user on Handset 2 activates key of Handset 2 to enter talking mode.
- Press key of any of the two handsets to end the intercom mode and returns to the standby mode.
55. HANDSET RING TONE & VOLUME SETTING
- While off-line, press MENU/03 key and it displays "CALL LOG".
- Press T/▲ or T/▼ key to scroll to "HS SETTINGS".
- Press MENU/10 key and it displays "AUDIO SETTING".
- Press T/▲ or T/▼ key and to scroll to "RING SETUP".
- Press MENU/08 key and the screen displays "INT RING".
- Press □/▲ or □/▼ to display either "INT RING" or "EXT RING".
(INT RING means setting the internal intercom ringer.)
(EXT RING means setting the external incoming call ringer.)
External incoming call ringer
- While "EXT RING" is shown, press to select.
- Press MENU/03 key and the screen
displays "MELODY".
-
Press MENU/10 key and the screen displays the current ringer and sound the current ringer, such as "MELODY 1".
-
Press □/▲ or □/▼ key to scroll to different ringer melody (ten different ringer sounds are available)
-
After selecting the ringer sound, press MENU/10 key to confirm and the screen displays "MELODY" again.
-
Press □/▲ or □/▼ to display "VOLUME".
-
Press MENU/00 key and the screen displays current volume of ring tone, such as "VOLUME 3"
-
Press T/▲ or T/▼ to scroll to different ring volume (5 levels)
-
Press MENU/98 key to confirm the new selection on display. A sound of “di du” indicates a successful selection.
-
Press ☐ key to exit to standby mode
INTERNAL INTERCOM RINGER
- While off-line, press MENU/68 key and it displays "CALL LOG".
- Press T/▲ or T/▼ key to scroll to "HS SETTINGS.
- Press MENU/01 key to confirm and it displays "AUDIO SETTING"
- Press T/▲ or T/▼ key to scroll to "RING SETUP".
- Press MENU/68 key and the screen displays "INT RING".
- Press MENU/88 key to confirm and the screen displays "MELODY".
- Press MENU/81 key and the screen displays the current ringer and sound the current ringer, such as "MELODY 1"
- Press T/▲ or T/▼ key to select different ringer (five different internal ringer sounds)
- After selecting the ringer sound, press MENU/18 key to confirm and the
screen displays "MELODY" again.
- Press T/▲ or T/▼ to scroll to "VOLUME".
- Press MENU/01 key and the screen displays current volume of ring tone, such as "VOLUME 3"
- Press T/▲ or T/▼ to select the proper ring volume (5 levels)
- Press MENU/03 key to confirm the new selection and a sound of "di du" indicates a successful selection.
- Press ☐ key to exit to standby mode
56. KEYPAD TONE AND WARNING TONE SETTING
- While off-line, press MENU/8 key and the screen displays "CALL LOG".
- Press T/▲ or T/▼ key to scroll to "HS SETTINGS".
- Press MENU/80 key to confirm.
- Press T/▲ or T/▼ key to scroll to "TONE SETUP".
- Press MENU/10 key to confirm.
- Press T/▲ or T/▼ to display either "KEY TONE", "BATTERY LOW" or "RANGE ALARM"
KEY TONE SELECT
- While "KEY TONE" is shown, press MENU/703 key and the screen displays either "ON" or "OFF".
- Press □/▲ or □/▼ to display "ON"
- Press MENU/10 key to confirm and the screen displays "KEY TONE" again.
- Press 🔔 key to exit to off-line.
BATTERY LOW WARNING TONE
Detailed setting step is similar to that of setting the KEY TONE.
(Note: While talking, there will be a "di" sound when the battery is low if the ALARM is set to
ON. While off-line, there will be no
alarm sound; only battery capacity symbol is displaying on screen.)
OUT-OF-RANGE WARNING TONE
Detailed setting step is similar to that of setting the KEY TONE.
(Note: While talking, there will be a long "di" sound when the handset is out-of-range from the base if the RANGE ALARM is set to ON.)
57. CALL WAITING
You must subscribe to Call Waiting service from your local phone company in order to enjoy this convenience.
- While on a call and there is a new call coming in, you will hear a short beep tone in your receiver signifies a new call is waiting.
- Press the FL/DEL key once and it will switch you to the second party and place the first party on hold.
- If you want to go back to the first party, press the key FL/DEL again.
TO END THE FIRST CALL BUT KEEP THE SECOND (NEW) CALL
- Press ☐ key while on the first call ends that call.
- Press FL/DEL key jumps back to the second (new) call.
- Press 🔔 key to end the call.
58. FORWARD AN INCOMING CALL FROM HANDSET 1 TO HANDSET 2
- On Handset 1, press the PAGE key and then press "2" on the keypad. This pages Handset 2 while putting the outside call on HOLD.
- When Handset 2 rings, press key on Handset 2 to answer the
page.
- Over the intercom, tell Handset 2 that an outside call is waiting.
- Press ☒ key on Handset 1 to transfer the call and then press ☐ key on Handset 1 to exit.
(Note: If within 30 seconds there is no answer, the call will ring handset 1.)
59. CONFERENCE CALL
This allows two handsets conferencing with the incoming caller.
- On Handset 1, press ↗ key to answer the incoming call.
- On Handset 1, press PAGE key and then press "2" on the keypad to page Handset 2.
(This also places the caller on HOLD.) - On Handset 2, press ↗ key to answer the page.
- On Handset 1, press key ☐ to initiate conferencing. Both Handset
1 and Handset 2 are now connected to the outside caller. - On either handset, press 🔍 key to end the call and return to off-line.
60. NON-DISTURB FUNCTION (DONOT-DISTURB)
This function turns off the handset ringer and allows the user to ignore all incoming calls (except intercom calls).
- Press ☐ and hold key for five seconds to enter non-disturb function and the screen displays "NON-DISTURB".
- To turn-off "NON-DISTURB", press and hold ☐ key again for five seconds.
61. PAUSE FUNCTION
During pre-dialing or one-touch memory programming, press the RD/P key, it will insert a 2-second pause into the dialing sequence.
62. BARRING (TOLL RESTRICTION)
This function allows the user to prevent certain phone number prefix from dialing out. For example:
1 900 xxx xxxx numbers can be restricted.
- While off-line, press MENU/08 key and screen displays "CALL LOG".
- Press T/▲ key to scroll to "HS SETTING". Press MENU/08 to select.
- Press T/▲ key to scroll to "BARRING". Press MENU/10 to select.
- Handset screen displays "PIN?".
- Enter PIN on keypad and then press MENU/01 to confirm (default PIN is "0000").
- Handset screen displays "SELECT NUM". Press MENU/98 to confirm.
- Handset screen displays "NUMBER 1". Press MENU/01 to confirm.
- Handset screen displays "NUMBER ?".
- Enter the prefix for toll restricting (up to 4-digits is allowed).
- Press MENU/01 to confirm.
- Press □/▲ or □/▼ key to enter another prefix (4 prefixes are allowed).
Note: On Step 6, you may also select “OFF” or “EXTERNAL” options. “OFF” means no barring or blocking. “EXTERNAL” means block all outgoing calls.
- Powering down a handset disregards all calls and conserves battery power.
- Press and hold the ☐ key for five seconds, then the handset will turn off. There will be no display and no keypad backlight.
- To turn on the handset, Press and hold the key ☐ for five seconds, and the handset powers up again. Please wait 10-25 seconds for a "di-du" sound which confirms that the handset has established handshaking with the base.
64. TECHNICAL INFORMATION
DIMENSIONS
- Handset size: 7.0" x 2.1" x 1.2"
- Base size: 6.7" x 3.1" x 5.0"
WEIGHT
- Handset weight: 5.7 oz.
- Base weight: 18 oz.
TEMPERATURE RANGE:
- Operating: 0 to 30^ C
- Storage: -10 to 40°C
POWER REQUIREMENTS:
- AC Adapter: UL listed 7.5vdc, 500 ma
- Base battery: 4 x AAA size NIMH (optional and are provided by user)
- Handset battery: 2 x AAA size NIMH (included)
Note: Specifications are subject to change without any notice.
65. TROUBLE SHOOTING
Q1: Base Charging Indicator is not on when handset is placed on the base.
Ans: Move the handset slightly to make better contact.
Q2: No CID information on an incoming call.
Ans: Check your subscription with your phone company.
Q3: No Dial tone.
Ans: Check AC adapter and phone cord connection. Make sure you're not too far from the base. If this is a new handset, you must register it to the base before using.
Q4: When I press the key, the handset just beeps but there is no dial tone.
Ans: The handset probably lost sync with the base. Press and hold the key for 5 seconds to turn off the handset power, and then repeat to turn back on the power. They should sync up in about 5 – 30 seconds.
Q5: No display on handset.
Ans: Verify battery is OK; make sure the handset is not power-off.
Q6: Handset flasher works but handset does not ring.
Ans: Verify handset ringer volume is not set at minimum; verify “Non-Disturb” is not active.
Q7: Why is the red flasher always blinking?
Ans: This indicates you have voice mail waiting in your provider's voice mail server.
Or, you have missed a call; reviewing incoming call list clears this indicator.
Q8: Static noise on the line.
Ans: Your phone may be located near a touch lamp, microwave, or other appliance, If you have a DSL computer modem service, make
sure you have installed a DSL filter to block the DSL noise.
Q9: How do I turn off the talking keypad feature?
Ans: Open the battery compartment and slide the lower switch to its left or OFF.
Q10: My phone display says "HS locked" when I try to dial or press any key.
Ans: Your phone is locked because * key was pressed and held too long. To unlock phone, press and hold * key down for about 5 seconds.
Q11: My handset flashes "Base 1" and I can't use it.
Ans: Your handset is not to the base. Please go to page 17 to do the procedure.
If the care advice and instructions contained in this manual are not followed the guarantee will be automatically void.
For this guarantee to be valid, it is necessary to present the original receipt or invoice. Flamagas S.A. exclusive importer.
66. STATEMENT OF COMPLIANCE:
Flamagas SA hereby declares that the DTD-7500 product complies with the requisites and basic safety requirements of Directive 1999/5/EC on Radio and Telecommunications Terminal Equipment.

For a full copy of the statement of compliance please see:
www.electronicaflamagas.com
67. GARANTEE
This product is guaranteed against all manufacturing defects for 2 years from the date of purchase.
DAEWOO
INTERNATIONAL
natural_image
Line drawing of a mobile phone with a keypad and front panel (no text or symbols)MANUEL D'INSTRUCTIONS
CONTENT 50
natural_image
Line drawing of a mobile phone with a tower and keypad (no text or symbols)Combiné et base
2 piles (AAA
5. INSTALLATION
natural_image
Diagram of a mechanical assembly with a cylindrical component inserted into a housing (no text or symbols visible)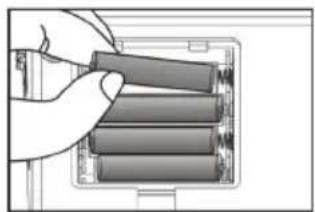
natural_image
Hand placing four cylindrical batteries into a battery pack (no text or symbols visible)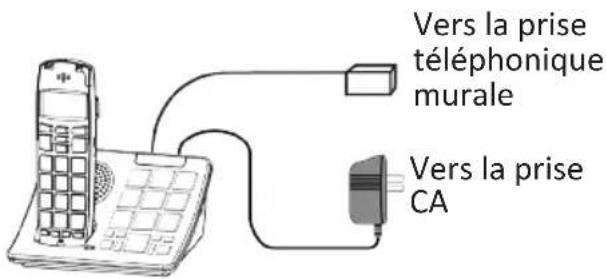
natural_image
Line drawing of a mobile phone with a keypad and front panel (no text or symbols)MANUAL DE INSTRUÇÕES
ÍNDICE 77
natural_image
Line drawing of a mobile phone with keypad and front panel (no text or symbols)Terminal e base

natural_image
Coiled cable with a small connector attached, no visible text or symbolsCabo telefónico

natural_image
Black-and-white photo of a charging plug connected to a coiled cable (no text or symbols visible)natural_image
Diagram of a hand holding a cylindrical object inserted into a device (no text or symbols visible)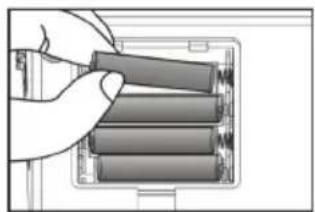
natural_image
Hand placing four cylindrical batteries into a battery pack (no text or symbols visible)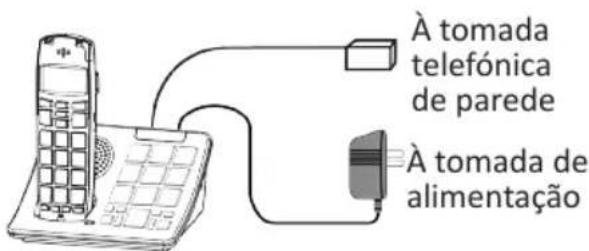
Def. chamada Chamada int.—(Melodia e Volume)
Chamada int. -- (Melodia e Volume)