
HC FWC 1000 - Mincer RTC - Free user manual and instructions
Find the device manual for free HC FWC 1000 RTC in PDF.
| Product Type | Meat Grinder with Accessories |
| Brand | RTC |
| Model | HC FWC 1000 |
| Power Supply | Electric, mains voltage (check nameplate) |
| Main Functions | Grind meat, reverse rotation, vegetable cutter attachment, sausage (Kebbe) attachment |
| Tray Capacity | Feeding tray included |
| Grinding Plates | Fine, medium, coarse |
| Speeds | Forward (ON) and reverse (R) |
| Automatic Shut-off | No, manual stop via selector ON/0/R |
| Continuous Use Duration | Maximum 10 minutes, then 10 minutes cooling |
| Safety System | Safety circuit breaker, unlock button |
| Housing Material | Plastic and metal (aluminum grinder head) |
| Included Accessories | Food pusher, vegetable pusher, worm screw, cross knife, vegetable cutter set, drums (cutting, grating, slicing), sausage funnel, Kebbe attachment |
| Maintenance and Cleaning | Clean with warm soapy water (except motor unit), wipe cutting parts with vegetable oil |
| Dishwasher | No, do not put in dishwasher |
| Safety Instructions | Do not grind bones, nuts, ginger; use pusher; disconnect during assembly; supervise children |
| Estimated Dimensions | Approximately 30 x 20 x 30 cm (without accessories) |
| Estimated Weight | Approximately 4.5 kg |
| Repairability | Do not repair yourself, contact the manufacturer or a professional |
| Warranty | Not specified in the manual |
Frequently Asked Questions - HC FWC 1000 RTC
User questions about HC FWC 1000 RTC
0 question about this device. Answer the ones you know or ask your own.
Ask a new question about this device
Download the instructions for your Mincer in PDF format for free! Find your manual HC FWC 1000 - RTC and take your electronic device back in hand. On this page are published all the documents necessary for the use of your device. HC FWC 1000 by RTC.
USER MANUAL HC FWC 1000 RTC
natural_image
White kitchen grater with stainless steel handle and control panel (no visible text or symbols)HC FWC 1000
BESCHREIBUNG

natural_image
Illustration of a hand pressing down on a small mechanical component with an arrow indicating motion (no text or symbols)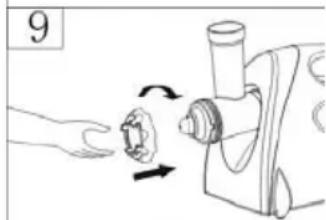
natural_image
Illustration of a hand turning a small mechanical component with directional arrows (no text or symbols)
natural_image
Line drawing of a hand using a food grater to press or feed into a bowl (no text or symbols)D
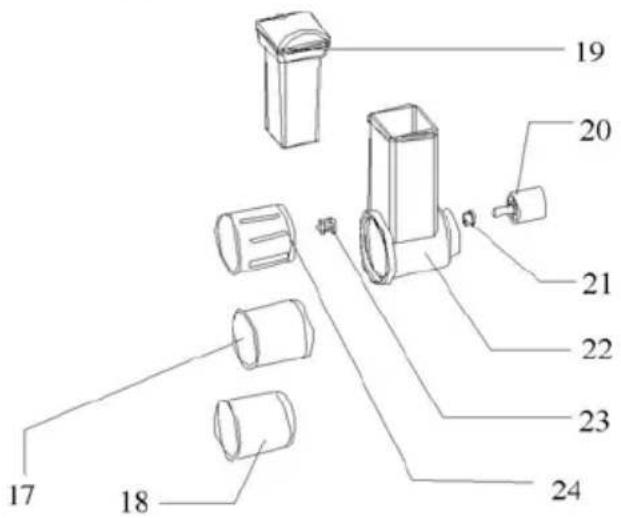
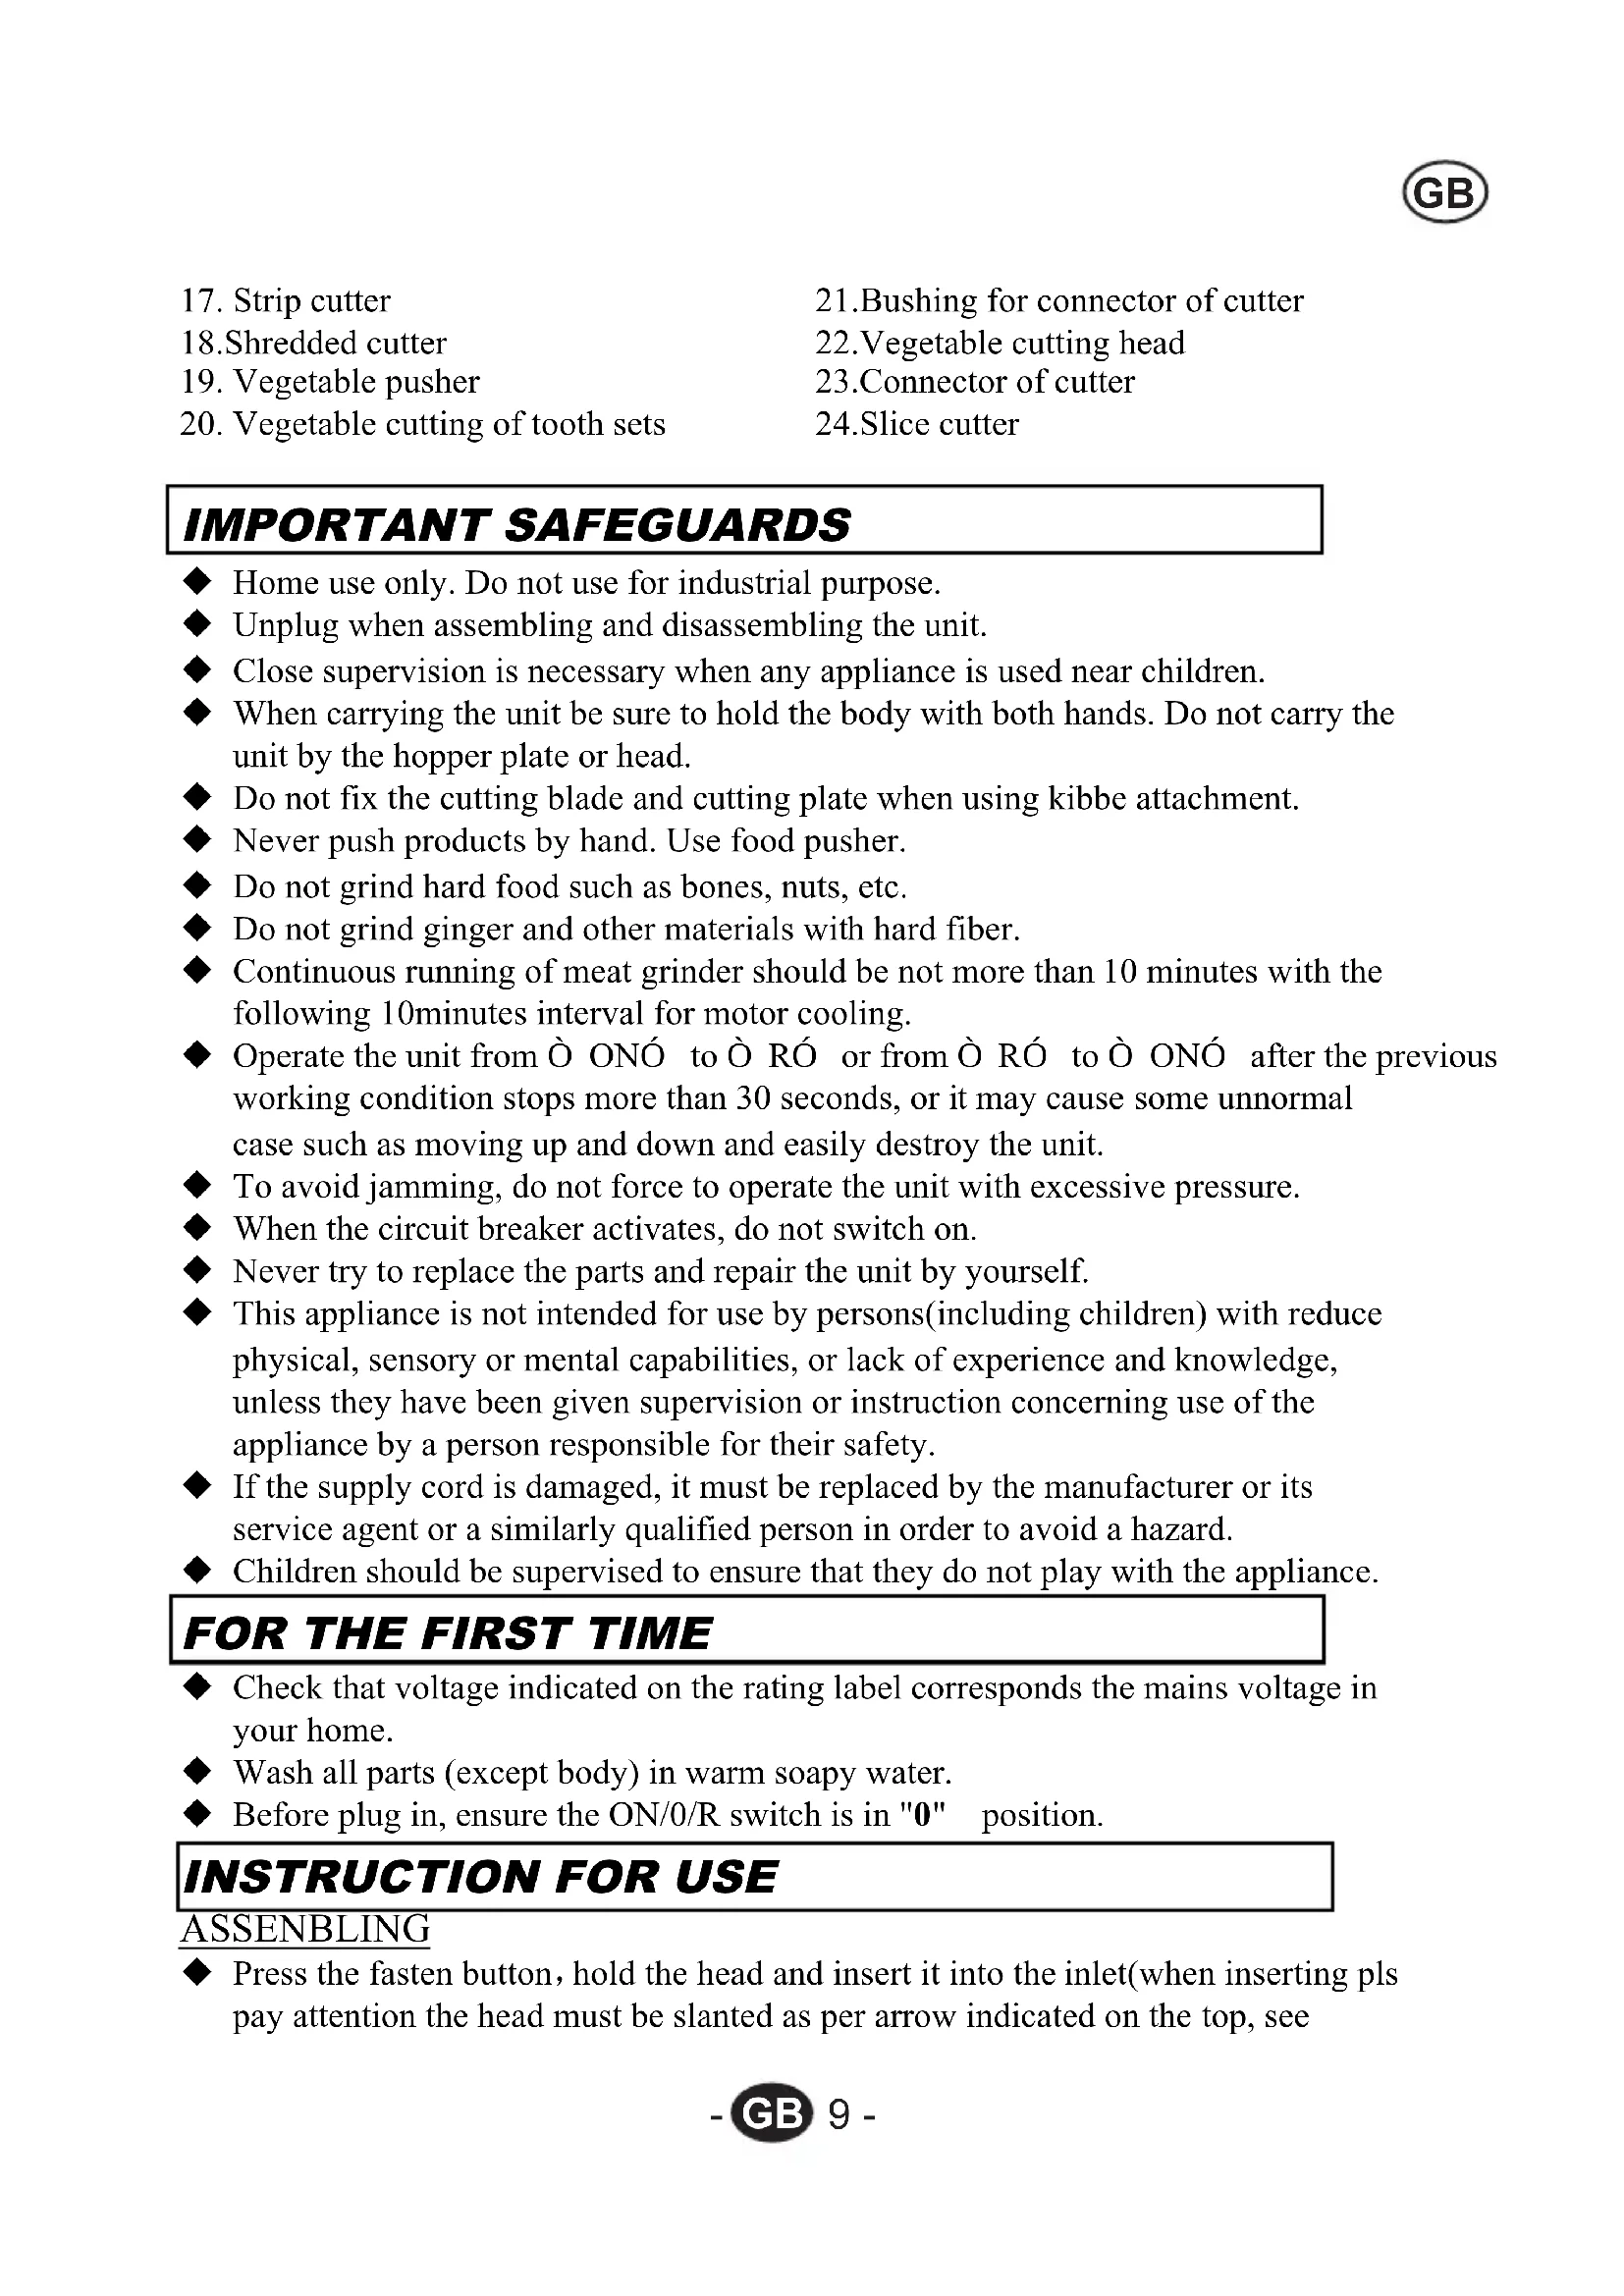
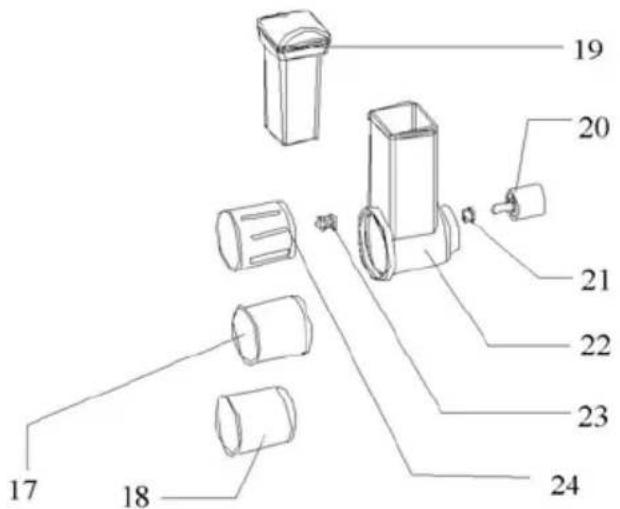
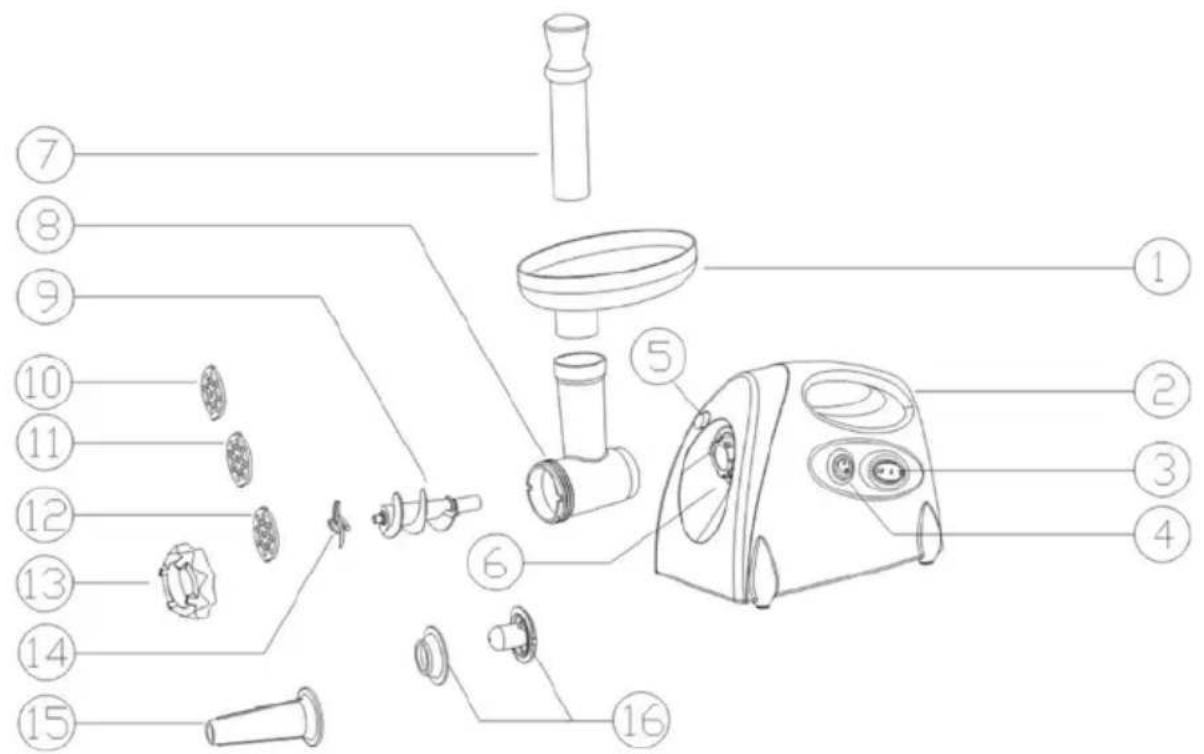
- Hopper plate
- Motor housing
- ON/0/R (ON/OFF/Reverse) switch
- ON / R switch
- Unlock button
- Head inlet
- Food pusher
-
Head
-
Feed screw
- Cutting plate (fine)
- Cutting plate (medium)
- Cutting plate (coarse)
- Fixing ring
- Cutting blade
- Sausage attachment
-
Kibbe attachment
-
Strip cutter
18.Shredded cutter
-
Vegetable pusher
-
Vegetable cutting of tooth sets
21.Bushing for connector of cutter
-
Vegetable cutting head
-
Connector of cutter
24.Slice cutter
IMPORTANT SAFEGUARDS
◆ Home use only. Do not use for industrial purpose.
◆ Unplug when assembling and disassembling the unit.
◆ Close supervision is necessary when any appliance is used near children.
When carrying the unit be sure to hold the body with both hands. Do not carry the unit by the hopper plate or head.
◆ Do not fix the cutting blade and cutting plate when using kibbe attachment.
◆ Never push products by hand. Use food pusher.
◆ Do not grind hard food such as bones, nuts, etc.
◆ Do not grind ginger and other materials with hard fiber.
◆ Continuous running of meat grinder should be not more than 10 minutes with the following 10minutes interval for motor cooling.
◆ Operate the unit from Ô ONÓ to Ô RÓ or from Ô RÓ to Ô ONÓ after the previous working condition stops more than 30 seconds, or it may cause some unnormal case such as moving up and down and easily destroy the unit.
◆ To avoid jamming, do not force to operate the unit with excessive pressure.
◆ When the circuit breaker activates, do not switch on.
◆ Never try to replace the parts and repair the unit by yourself.
This appliance is not intended for use by persons(including children) with reduce physical, sensory or mental capabilities, or lack of experience and knowledge, unless they have been given supervision or instruction concerning use of the appliance by a person responsible for their safety.
◆ If the supply cord is damaged, it must be replaced by the manufacturer or its service agent or a similarly qualified person in order to avoid a hazard.
◆ Children should be supervised to ensure that they do not play with the appliance.
FOR THE FIRST TIME
◆ Check that voltage indicated on the rating label corresponds the mains voltage in your home.
◆ Wash all parts (except body) in warm soapy water.
◆ Before plug in, ensure the ON/0/R switch is in "0" position.
INSTRUCTION FOR USE
ASSENBLING
◆ Press the fasten button, hold the head and insert it into the inlet (when inserting pls pay attention the head must be slanted as per arrow indicated on the top, see
fig.1), then move the head anticlockwise so that the head being fastened tightly. There will be locked when you heard a voice of ò KAÓ. (fig.2)
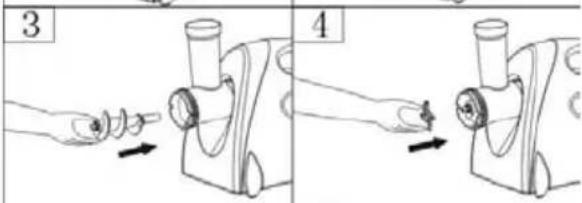
◆ Place the snake into the head, long end first, and turn to feed the screw slightly until it is set into the motor housing (fig.3).
◆ Place the cutting blade onto the snake shaft with the blade facing the front as illustrated (fig.4). If it is not fitted properly, meat will not be grinded.
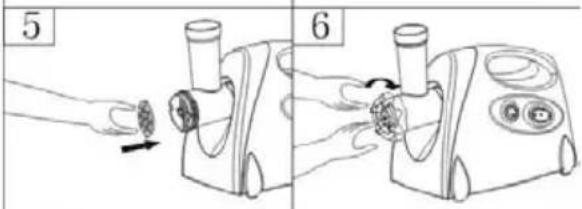
◆ Place the desired cutting plate next to the cutting blade, fitting protrusions in the slot (fig.5).
◆ Support or press the centre of the cutting plate with one finger then screw the fixing ring tight with another hand (fig.6). Do not over tighten.
◆ Place the hopper plate on the head and fix it into position.
◆ Locate the unit on a firm place.
◆ The air passage at the bottom and the side of the motor housing should be kept free and not blocked.
MINCING MEAT
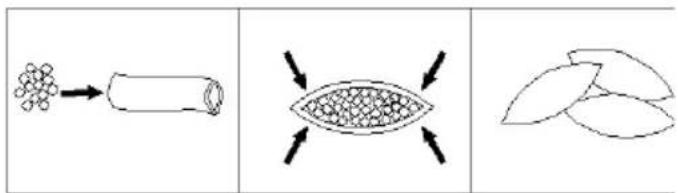
◆ Cut all foods into pieces (Sinewless, boneless and fatless meat is recommended, approximate size :20 mm x 20 mm x 60 mm) so that they fit easily into the hopper opening.
◆ Plug the unit on and switch ON/O knob to "ON", then switch ON/0/R knob to "ON" position.
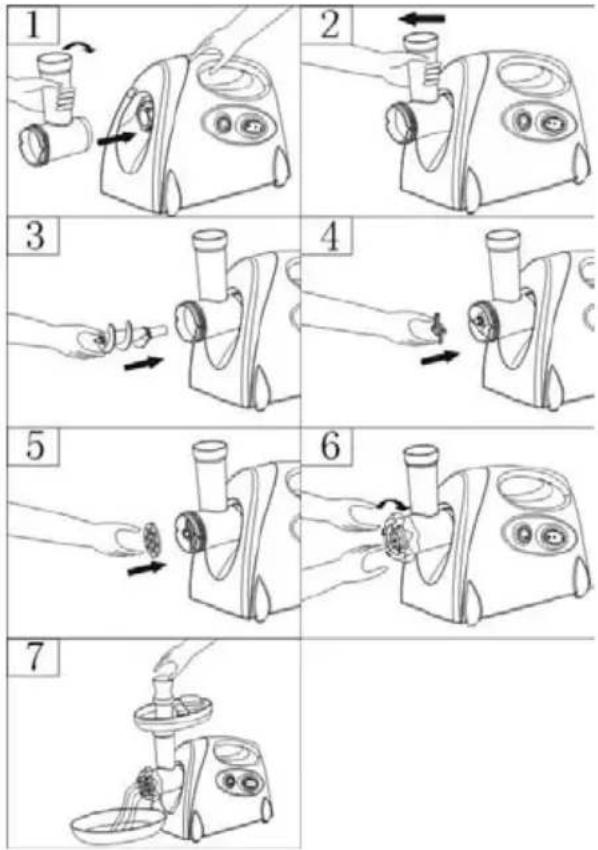
◆ Feed foods into the hopper plate. Use for it only the food pusher (fig.7).
◆ After use switch the unit off and unplug it from the power supply.
REVERSE FUNCTION
◆ In case of jamming switch off the appliance by pressing the ON/ O knob to "O" position and ON/0/R switch to "R" position..
◆ Snake will be rotating in the opposite direction, and the head will get empty.
◆ If it doesn't work, switch off the unit and clean it.
MAKING KIBBE
RECIPE
STUFFING
Mutton
100g
Olive oil
1 1/tablespoons
Onion (cut finely) 1 1/tablespoons
Spices to your taste
Salt to your taste
Flour 1 1/tablespoons
◆ Mince mutton once or twice.
◆ Fry onion until brown and add minces mutton, all spice, salt and flour.
OUTLET COUVER
Lean meat 450g
Flour 150-200g
Spices to your taste
Nutmeg (cut finely) 1
Powdered red pepper to your taste
Pepper to your taste
◆ Mince meat three times and mix all ingredients together in a bowl. More meat and less flour for outlet cover create better consistency and taste.
◆ Grind the mixture three times.
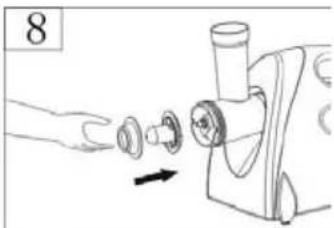
◆ Disassemble by reversing the steps from 5-3 to remove the cutting plate and cutting blade.
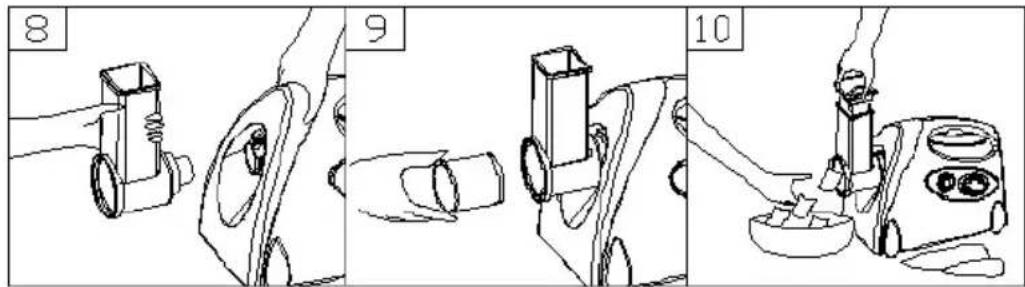
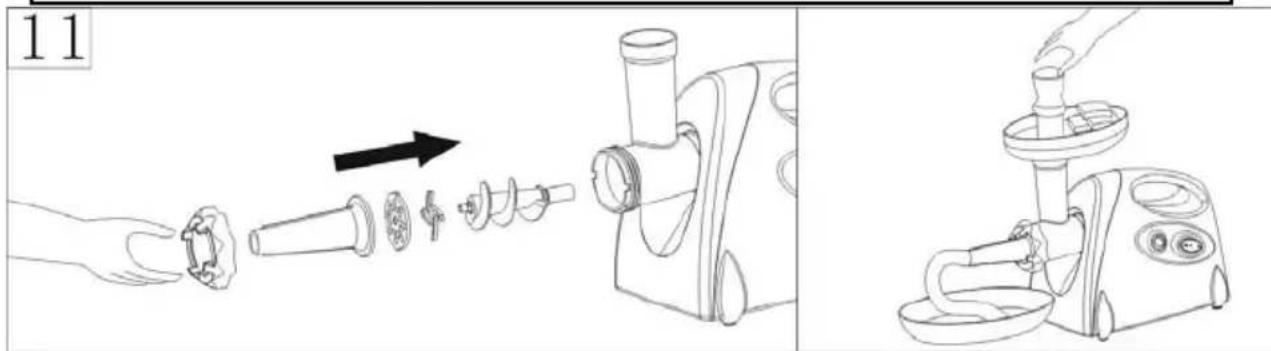
◆ Place kibbe attachments A and B onto the feed screw shaft together, fitting protrusions in the slots (fig.8).
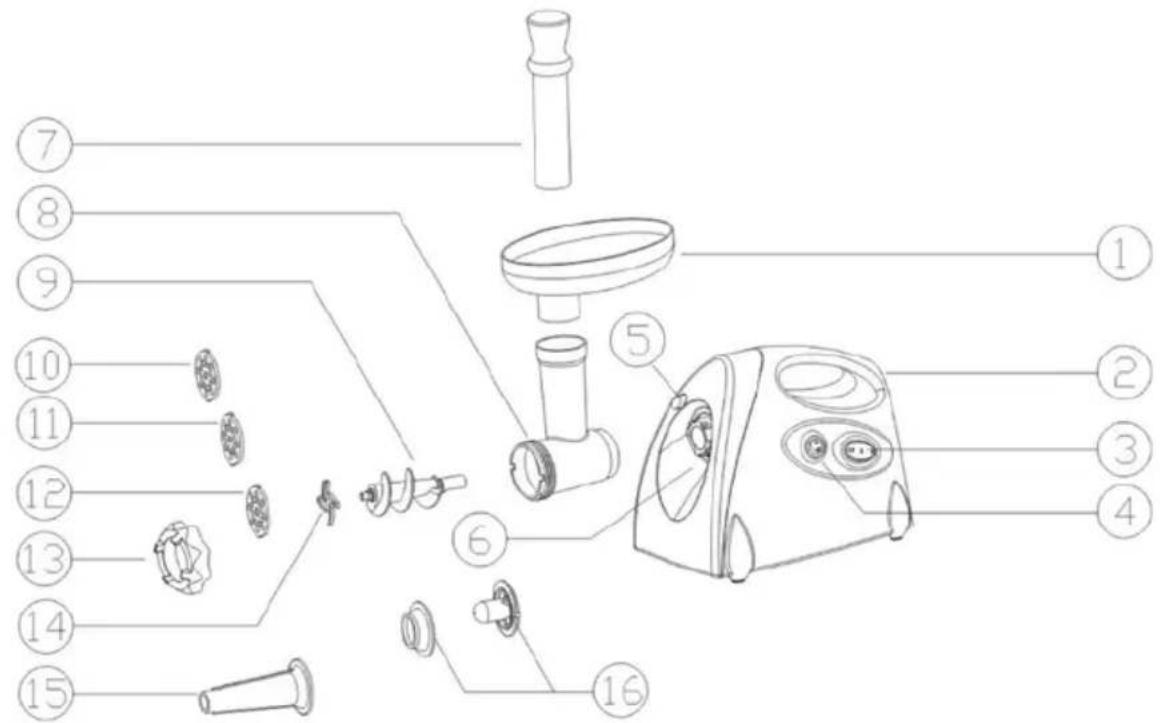
◆ Screw cap into place until tight. Do not over tighten (fig.9).
◆ Make the cylindrical outlet cover (fig.10).
◆ Form kibbe ad illustrated below and deep fry.
natural_image
Illustration of a hand turning a small mechanical component with an arrow indicating rotation (no text or symbols)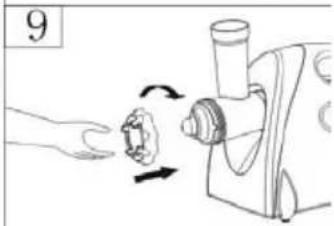
natural_image
Illustration of a hand turning a small mechanical component with rotation arrows (no text or symbols)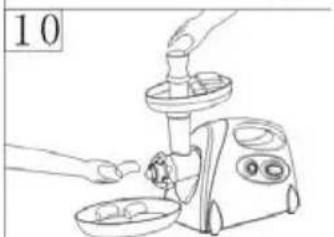
natural_image
Line drawing of a hand using a food grater to press or feed into a bowl (no text or symbols)
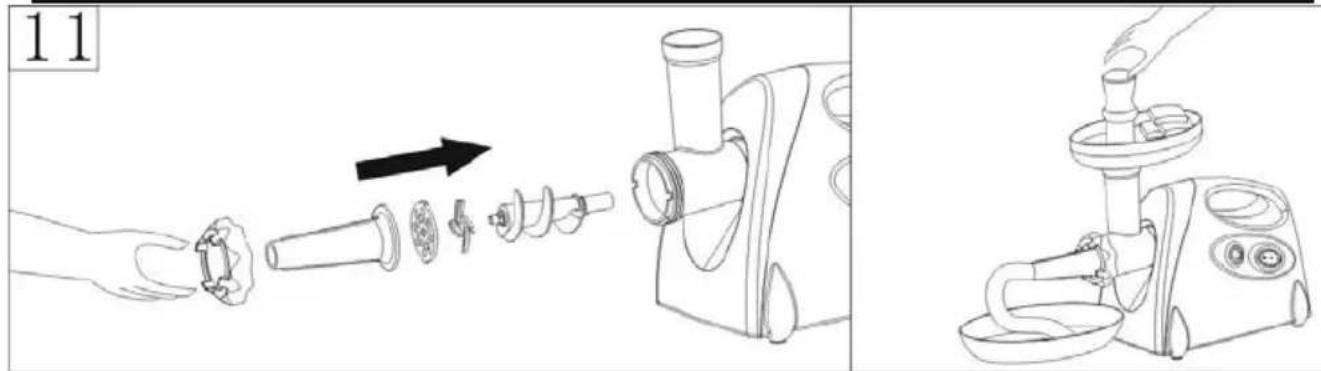
CUTTING SLICE/SHRED/STRIP
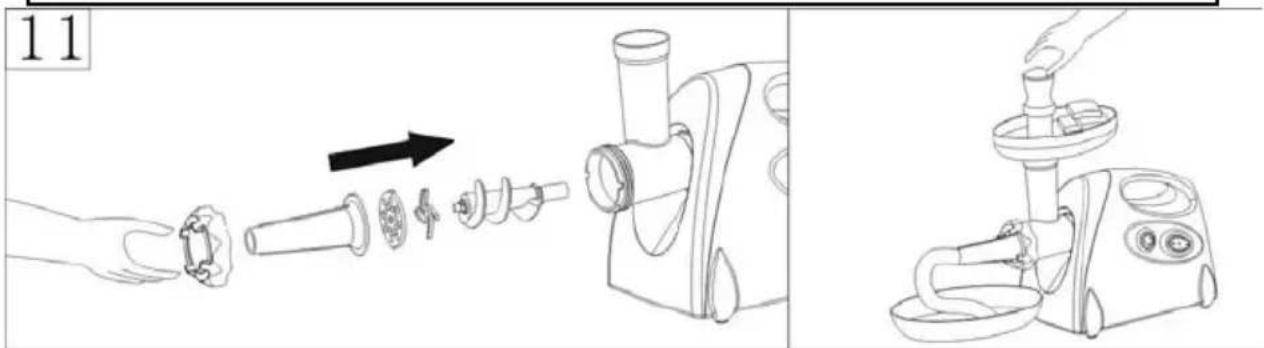
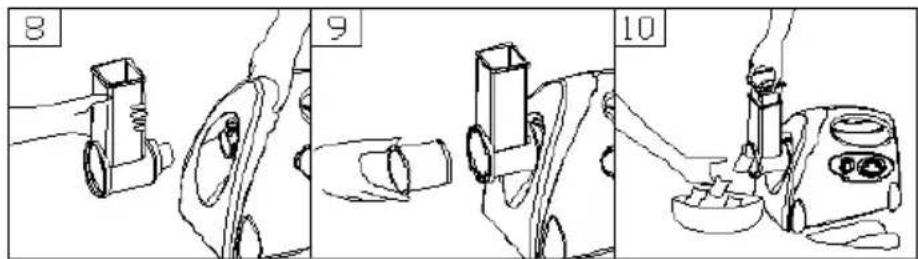
◆ Press the fasten button, hold the head and insert it into the inlet (when inserting please pay attention the head must be slanted as per arrow indicated on the top, see fig.8), then move the head anticlockwise so that the head being fastened tightly. There will be locked when you heard a voice of Ô KAÓ. (fig.2)
◆ Put the cutting attachments Ô slice cutterÓ or Ô Shredded cutterÓ or Ô strip cutterÓ into the cutting head. Note: Must be on place.(fig.9)
◆ The switch ON/OFF knob to Ô ONÓ, the switch ON/0/R knob to Ô ONÓ position when you cutting. Put the vegetable into vegetable cutting head, and then push down the vegetable pusher with 5N power.(fig.10)
GB
◆ After use switch the unit off and unplug it from the power supply.
MAKING SAUSAGE
CLEANING AND MAINTENACE
DISADDEMBLING
◆ Make sure that the motor has stopped completely.
◆ Disconnect the plug from the power outlet.
◆ Disassemble by reversing the steps from 1-6 pictures.
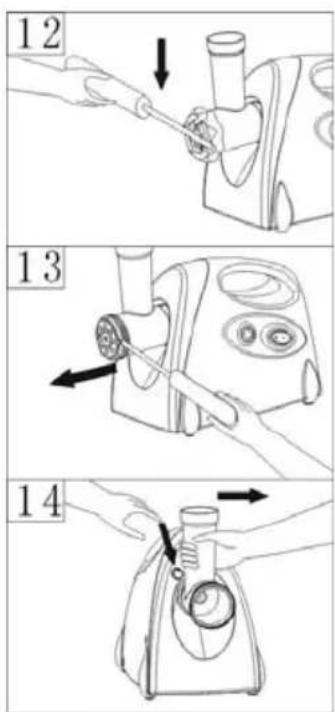
◆ To remove the cutting plate easily, place a screwdriver between the cutting plate and the head as illustrated and lift it up (fig.12).
◆ Press the fasten knob, move the head as per direction illustrated on fig 13, then you can take out the head.
CLEANING
◆ Never clean the unit by a dishwasher.
◆ Remove meat, etc. Wash each part in warm soapy water.
◆ A bleaching solution containing chlorine will discolor aluminum surfaces.
◆ Do not immerse the motor housing in water, but only wipe it with a damp cloth.
◆ Thinners and petrol will crack or change the color of the unit.
◆ Wipe all the cutting parts by vegetable oil -wet cloth.
DESCRIPTION

natural_image
Illustration of a hand turning a small mechanical component with an arrow indicating rotation (no text or symbols)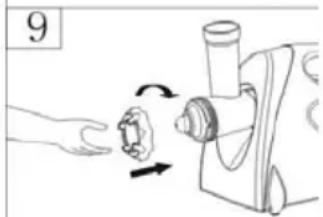
natural_image
Illustration of a hand pressing down on a mechanical component with motion arrows (no text or symbols)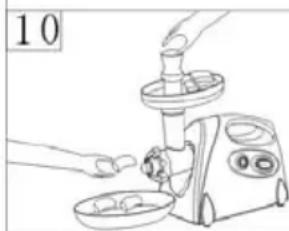
natural_image
Line drawing of a hand using a hairdryer to press food into a bowl (no text or symbols)3
encoches et fentes (fig. 8).
TAMBOUR É COUPER/Rå PER/TRANCHER
Rf ALISATION DE SAUCISSE
NETTOYAGE ET ENTRETIEN
Df SASSEMBLAGE

flowchart
graph TD
    A["1: Cover and lid"] --> B["2: Stopping and lifting"]
    B --> C["3: Hand holding a brush, moving into a bowl"]
    C --> D["4: Stopping and lifting with a brush, moving into a bowl"]
    D --> E["5: Hand holding a brush, moving into a bowl"]
    E --> F["6: Cover and pressing down"]
    F --> G["7: Packaging with lid and container"]
FARE KIBBE
RICETTA
IMBOTTITURA
Montone 100g
natural_image
Illustration of a hand turning a small mechanical component with an arrow indicating motion (no text or symbols)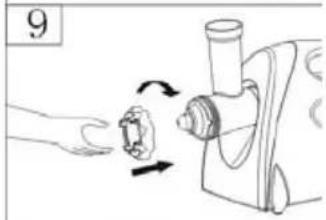
natural_image
Illustration of a hand holding a small object with an arrow indicating rotation, next to a mechanical device (no text or symbols)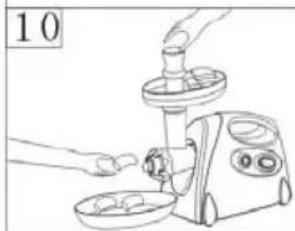
natural_image
Line drawing of a hand using a hairdryer to press food into a bowl (no text or symbols)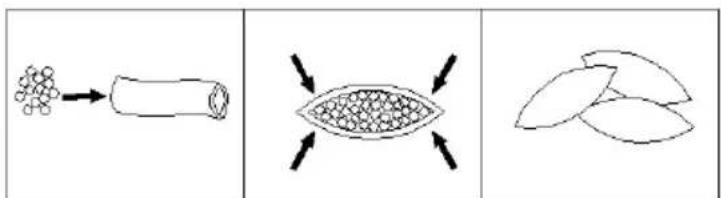
TAGLIARE A FETTE/BRANDELLI/STRISCE

flowchart
graph TD
    A["1: fejre"] --> B["2: Washing Machine"]
    B --> C["3: Hand Stopping with Bag"]
    C --> D["4: Stopping with Bag"]
    D --> E["5: Hand Stopping with Bag"]
    E --> F["6: Stopping with Bag"]
    F --> G["7: Washing Machine"]
natural_image
Illustration of a hand pressing down on a mechanical component with an arrow indicating motion (no text or symbols)
natural_image
Illustration of a hand turning a small mechanical component with arrows indicating rotation (no text or symbols)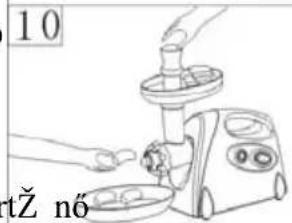
SZELETELf S/APRê Tç S/CSê KOZç S

natural_image
Illustration of a hand turning a small mechanical component with rotation arrows (no text or symbols)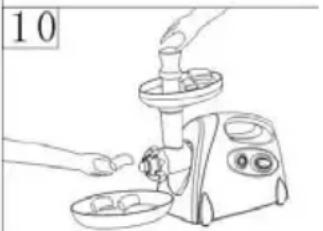
natural_image
Line drawing of a hand using a food grater machine with a bowl of food (no text or symbols)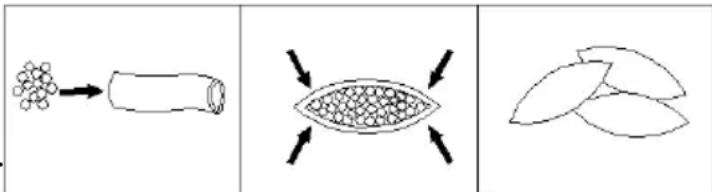
KRÁJENÍ PLÁTK□/KOUSK□/PROU□K□
VÝROBA KLOB\\_ζ\ S
□ IŠT □ NÍ A ÚDR □ BA
DEMONTç Ž

- Ploča lijevka
- Kućište motora
- ON/0/R (Uklj./0/Unatrag) (ON/OFF
(Uklj./isklj.) / unatrag) sklopka - ON / R (Uklj./unatrag) sklopka
- Gumb za deblokadu
- Ulaz u glavu
-
Potisnik za hranu
-
Glava
- Vijak dovoda
- Ploča za rezanje (fina)
- Ploča za rezanje (srednja)
- Ploča za rezanje (gruba)
- Prsten za učvršćenje
- Nož za rezanje
-
Nastavak za kobasice
-
Nastavak za sjeckanje
- Rezač na trake
- Rezač za drobljenje
- Potiskivač povrća
-
Komplet zubaca za rezanje povrća
-
Uvodnica za priključak rezača
- Glava za rezanje povrća
- Priključak rezača
- Rezač na kriške
VA NE MJERE SIGURNOSTI
◆ Koristite samo u kućanstvu. Ne koristiti za industrijsku namjenu.
◆ Uređaj isključite iz utičnice prije sastavljanja i rastavljanja.
◆ Kad se uređaj koristi u blizini djece, neophodan je strogi nadzor.
◆ Uređaj prilikom prenošenja držite za kućište objema rukama. Uređaj nemojte prenositi držeći ga za ploču lijevka ili glavu.
◆ Nemojte popravljati nož i ploču za rezanje kada koristite nastavak za sjeckanje.
◆ Uređaj nikada nemojte gurati rukama. Koristite potiskivač hrane.
◆ Nemojte mljeti tvrdu hranu kao što su kosti, oraščići i sl.
◆ Nemojte mljeti dumbir i druge sastojke s tvrdim vlaknima.
◆ Stroj za mljevenje mesa ne smije raditi bez prekida dulje od 10 minuta uz sljedeće intervale od 10 minuta za hlađenje motora.
◆ Prebacite uređaj iz režima Ô ONÓ (Uklj.) u Ô RÓ (Unatrag) ili iz režima Ô RÓ (Unatrag) u Ô ONÓ (Uklj.) ako je prethodni režim rada stao prije više od 30 sekundi, u suprotnom može doći do nenormalnih pojava kao što je pomicanje gore-dolje koje može uništiti uređaj.
◆ Da biste izbjegli zaglavljivanje, uređajem nemojte rukovati uz prekomjerno pritiskanje.
Kad se aktivira prekidač strujnog kruga, nemoj uključivati uređaj.
♦ Nikad ne pokušavajte sami mijenjati dijelove ili popravljati uređaj.
◆ Ovaj uređaj nije predviđen da ga koriste osobe sa smanjenim fizičkim ili mentalnim sposobnostima, neiskusne i neuke osobe (kao i djeca), osim ako to čine pod nadzorom ili na temelju uputa osoba koje su odgovorne za njihovu sigurnost.
Ako je kabel za napajanje oštećen, mora ga zamijeniti proizvođač, ovlašteni serviser ili osoba sličnih kvalifikacija kako biste izbjegli opasnost od električnog udara.
◆ Djeca moraju biti pod stalnim nadzorom kako se ne bi igrala aparatom.
PRVA UPOTREBA
flowchart
graph TD
    A["Step 1: Stacking with a brush and lid"] --> B["Step 2: Stopping with a spoon and bulb"]
    B --> C["Step 3: Stopping with a spoon and bulb"]
    C --> D["Step 4: Stopping with a spoon and bulb"]
    D --> E["Step 5: Stopping with a spoon and bulb"]
    E --> F["Step 6: Stopping with a spoon and bulb"]
    F --> G["Step 7: Stopping with a spoon and bulb"]
natural_image
Illustration of a hand turning a small mechanical component with an arrow indicating rotation (no text or symbols)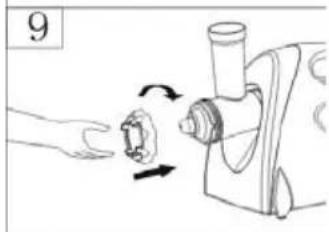
natural_image
Illustration of a hand pressing a small component with directional arrows indicating motion (no text or symbols)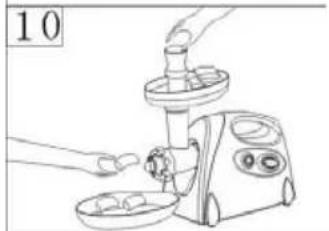
natural_image
Line drawing of a hand using a food grater machine with a bowl of food nearby (no text or symbols)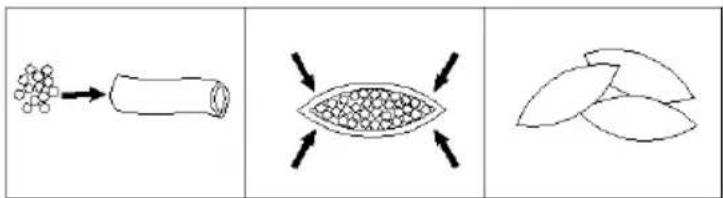
vodite računa da je glava nakošena sukladno položaju strelice u vrhu, pogledajte sliku 8), zatim je pomaknite u smjeru suprotnom od kazaljke na satu tako da se čvrsto pritegne. Blokada će se dogoditi kada začujete zvuk O KAÓ . (sl. 2)
◆ U glavu za retanje stavite jedan od nastavaka za rezanje Ó rezač na kriškeÓ , Ó rezač za drobljenjeÓ ili Ó rezač na trakeÓ . Napomena: Mora biti na mjestu.(sl. 9)
◆ Prije rezanja pomaknite sklopku ON/OFF (Uklj./isklj.) u položaj O ONÓ (Uklj.), a sklopku ON/0/R (Uklj./0/Unatrag) pomaknite u položaj O ONÓ (Uklj. stavite povrće u glavu za rezanje pa gurnite potiskivač povrća silom od 5 N.(sl.10)
♦ Nakon korištenja isključite uređaj i izvucite utikač iz zidne utičnice.
PRIPREMA KOBASICA

□ IŠ □ ENJE I ODR □ AVANJE
RASTAVLJANJE
◆ Pobrinite se da je motor sasvim zaustavljen.
◆ Izvucite utikač iz zidne utičnice.
◆ Rastavljanje izvedite izvršavajući upute sa slika 1-6 prema obrnutom redoslijedu.
◆ Da biste mogli lako ukloniti ploču za rezanje, između nje i glave postavite odvijač kako je ilustrirano pa je podignite (sl.12-13).
ČIŠĆENJE
◆ Uređaj nikada nemojte čistiti u perilici posuđa.
◆ Izvadite meso i ostalu hranu. Svaki dio operite u toploj vodi sa sapunom.
◆ Otopina za izbjeljivanje na bazi klora će skinuti boju s aluminijskih površina.
◆ Kućište motora nemojte uranjati u vodu, već ga samo prebrišite vlažnom krpom.
◆ Razrjeđivači i benzin će skinuti ili promijeniti boju uređaja.
◆ Prebrišite sve rezne dijelove biljnim uljem pomoću vlažne krpe.
BESCHRIJVING


natural_image
Line drawing of a hand using a manual electric shaver (no text or symbols)natural_image
Illustration of a hand turning a small mechanical component with an arrow indicating rotation (no text or symbols)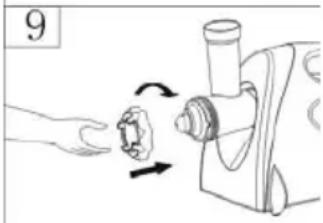
natural_image
Illustration of a hand pressing down on a small mechanical component with arrows indicating motion (no text or symbols)
natural_image
Line drawing of a hand using a hairdryer machine with food containers (no text or symbols)PLAKKEN SNIJDEN/VERSNIPPEREN/STRIPPEN
This appliance is not intended for use by persons (including children) with reduced physical, sensory or mental capabilities, or lack of experience and knowledge, unless they have been given supervision or instruction concerning use of the appliance by a person responsible for their safety. Children should be supervised to ensure that they do not play with the appliance.