HIC 64403 T - Cooker BEKO - Free user manual and instructions
Find the device manual for free HIC 64403 T BEKO in PDF.
Frequently Asked Questions - HIC 64403 T BEKO
Download the instructions for your Cooker in PDF format for free! Find your manual HIC 64403 T - BEKO and take your electronic device back in hand. On this page are published all the documents necessary for the use of your device. HIC 64403 T by BEKO.
USER MANUAL HIC 64403 T BEKO
ELEN / 2 Welcome! Dear Customer, Thank you for choosing the Beko product. We want your product, manufactured with high quality and technology, to offer you the best efficiency. Therefore, carefully read this manual and any other documentation provided before using the product. Keep in mind all the information and warnings stated in the user’s manual. This way, you will protect yourself and your product against the dangers that may occur. Keep the user’s manual. If you give the product to someone else, give the manual with it. The warranty conditions, usage and troubleshooting methods for your product are provided in this manual. The symbols and their descriptions in the user’s manual: Hazard that may result in death or injury. Important information or useful usage tips. Read the user’s manual. Hot surface warning. NOTICE Hazard that may result in material damage to the product or its environment.EN / 3 Table of Contents 1 Safety Instructions......................... 4
1.9 Maintenance and Cleaning Safety 9
2.1.1 Compliance with the WEEE Dir-
2.3 Recommendations for Energy
7.1 General warnings about cooking
8 Maintenance and Cleaning ............. 21
- This section includes the safety instructions necessary to prevent the risk of personal injury or material damage.
- If the product is handed over to someone else for personal use or second-hand use pur- poses, the user’s manual, product labels and other relev- ant documents and parts should also be given.
- Our company shall not be held responsible for damages that may occur if these instructions are not observed.
- Failure to follow these instruc- tions shall void any warranty.
- Always have the installation and repair works made by the manufacturer, the authorised service or a person that the im- porter company shall desig- nate.
- Use original spare parts and accessories only.
- Do not repair or replace any component of the product un- less it is clearly specified in the user’s manual.
- Do not make technical modific- ations on the product.
- This product is designed to be used at home. It is not suitable for commercial use.
- Do not use the product in gar- dens, balconies or other out- doors. This product is intended to be used in households and in the staff kitchens of shops, offices and other working en- vironments.
- CAUTION: This product should be used for cooking purposes only. It should not be used for different purposes, such as heating the room.
1.2 Child, Vulnerable
Person and Pet Safety
- This product can be used by children 8 years of age and older, and people who are un- derdeveloped in physical, sens- ory or mental skills, or who have lack of experience and knowledge, as long as they are supervised or trained about the safe use and hazards of the product.
- Children should not play with the product. Cleaning and user maintenance should not be performed by children unless there is someone overseeing them.
- This product should not be used by people with limited physical, sensory or mental ca- pacity (including children), un- less they are kept under super- vision or receive the necessary instructions.
- Children should be supervised to ensure that they do not play with the product.
- Electrical products are danger- ous for children and pets. Chil- dren and pets must not play with, climb on, or enter the product.
- Do not put objects that chil- dren may reach on the product.
- Turn the handle of the pots and pans to the side of the counter so that children can- not grab and burn.
- CAUTION: During use, the ac- cessible surfaces of the product are hot. Keep children away from the product.
- Keep the packaging materials out of the reach of children. There is a hazard of injury and suffocation.
- Before discarding worn out and useless products:
1. Unplug the power plug and
remove it from the socket.
2. Cut off the power cable and
disconnect it with the plug from the product.
3. Take precautions to prevent
children from entering the product.
4. Do not allow children to play
with product when it is in idle mode.
1.3 Electrical Safety
- Plug the product into a groun- ded outlet protected by a fuse that matches the current rat- ings indicated on the type la- bel. Have the grounding install- ation made by a qualified elec- trician. Do not use the product without grounding in accord- ance with local / national regu- lations.
- The plug or the electrical con- nection of the appliance shall be in an easily accessible place. If this is not possible, there should be a mechanism (fuse, switch, key switch, etc.) on the electrical installation to which the product is connec- ted, in compliance with the electrical regulations and sep- arating all poles from the net- work.
- Unplug the product or switch off the fuse before repair, maintenance and cleaning.
- Plug the product into an outlet that meets the voltage and fre- quency values specified on the type label.
- (If your product does not have a mains cable) only use the connecting cable described in the "Technical specifications" section.
- Do not jam the power cable un- der and behind the product. Do not put a heavy object on the power cable. The power cable should not be bent, crushed, and come into contact with any heat source.
- Make sure that the power cable is not jammed while put- ting the product to its place after assembly or cleaning.
- Use original cable only. Do not use cut or damaged cables.
- Do not use an extension cord or multi-plug to operate your product.
- Contact the authorized service centre or importer to use the approved adapter in cases where the use of a converter adapter (for plug type) is ne- cessary.
- Contact the importer or the au- thorized service centre if the length of the power line is in- adequate.
- Portable power sources or multiple plugs may overheat and catch fire. Keep multiple plugs and portable power sources away from the product.
- If the power cable is damaged, it must be replaced by the manufacturer, an authorized service or a person to be spe- cified by the importer company in order to prevent possible dangers. If your product has a power cable and plug:
- Never put the product plug into a broken, loose, or out-of- socket plug. Make sure the plug is fully inserted into the socket. Otherwise the connec- tions may overheat and cause a fire.
- Avoid inserting the device into plugs that are greasy, unclean, or potentially exposed to water (such as those near a worktop where water may escape). Oth- erwise there is a risk of short circuit and electrocution.
- Never touch the plug with wet hands!
- Pull the plug out of the socket using the plug's body rather than the cord itself.
- Disconnect the product from the mains before transporting the product.
- When you need to transport the product, wrap it with bubble wrap packaging mater-
ELEN / 7 ial or thick cardboard and tape it tightly. Secure the moving parts of the product firmly to prevent damage.
- Before the product is installed, check the product for any dam- age after transport. Contact the importer or the authorized service centre if damaged.
1.5 Installation Safety
- Before beginning the installa- tion, de-energize the power line to which the product will be connected by turning off the fuse.
- Always wear protective gloves during transport and installa- tion. Otherwise there is a risk of injury from sharp edges!
- Before the product is installed, check the product for any dam- age. Do not have it installed if the product is damaged.
- Avoid using any heat-insulating materials to cover the interior of the furniture that will be in- stalled.
- Direct sunlight and heat sources, such as electric or gas heaters, must not be present in the area where the product is installed.
- Keep the surroundings of all ventilation ducts of the product open.
- Do not install the product near a window. There is a risk that the hob flame will ignite cur- tains and flammable materials around the hob. When you open the window, hot cook- ware may tip over.
- Do not install the product near a window. When you open the window, hot cookware may tip over.
- If there is a socket behind the place where the product will be installed, it must be ensured that the product does not come into contact with the socket nor with the plug plugged into the socket.
- There should be no gas hose, plastic water pipe and socket on the back or side wall of the place where the product will be installed. Otherwise, they may be deformed by the heat effect when the hob is operated and may create a safety risk.
- Ensure that the appliance is switched off after every use.
- If you will not use the product for a long time, unplug it or turn off the power from the fuse box.
- Don't use the product if it breaks down or gets damaged while being used. Disconnect
ELEN / 8 the product from the electri- city. Contact the importer or the authorized service centre.
- CAUTION: If the hob surface is cracked, disconnect the product from the mains to avoid the risk of electric shock.
- CAUTION: If the hob glass sur- face is broken: Switch off all gas and (if applic- able) electric hotplates. Discon- nect the product from the elec- tricity. - Do not touch the appliance sur- face. - Do not use the appliance.
- Do not step on the appliance for any reason.
- Never use the product when your judgement or coordina- tion is impaired by the use of alcohol and/or drugs.
- Flammable objects must not be kept in and around the cooking area. Otherwise, these may lead to fire.
- This product is not suitable for use with a remote control or an external clock.
- CAUTION: When the product is in use, the product and its ac- cessible parts will be hot. Care should be taken to avoid touching the product and heat- ing elements. Children under 8 years of age should be kept away from the product unless constantly supervised.
- Do not place flammable / ex- plosive materials near the product, as the surfaces will be hot while it is operating.
- CAUTION: Danger of fire: Do not store items on the cooking surfaces.
- CAUTION: The cooking pro- cess must be observed. Short- term cooking processes must be constantly observed.
- CAUTION: In solid or liquid oil cooking, it is dangerous to leave the hob unattended, which may cause a fire. NEVER try to extinguish the fire with water; disconnect the product from the mains, and then cover the flames with a cover or fire cloth (etc.).
- Be careful when using alco- holic drinks in your dishes. Al- cohol evaporates at high tem- peratures and may cause fire since it can ignite when it comes into contact with hot surfaces.
- Wait for the product to cool be- fore cleaning the product. Hot surfaces may cause burns!
- Never wash the product by spraying or pouring water on it! There is the risk of electric shock!
- Do not use steam cleaners to clean the product as this may cause an electric shock. 2 Environmental Instructions
2.1.1 Compliance with the WEEE Dir-
ective and Disposing of the Waste Product This product complies with EU WEEE Dir- ective (2012/19/EU). This product bears a classification symbol for waste electrical and electronic equipment (WEEE). This product has been manu- factured with high quality parts and materials which can be re- used and are suitable for recyc- ling. Therefore, do not dispose of the waste product with nor- mal domestic and other wastes at the end of its service life. Take it to a collection point for the recycling of electrical and elec- tronic equipment. You can ask your local administration about these collection points. Disposing of the appliance properly helps prevent negative consequences for the environment and human health. Compliance with RoHS Directive: The product you have purchased complies with EU RoHS Directive (2011/65/EU). It does not contain harmful and prohibited materials specified in the Directive.
2.2 Package Information
Packaging materials of the product are manufactured from recyclable materials in accordance with our National Environment Regulations. Do not dispose of the pack- aging waste with the household or other wastes, take it to the packaging material collection points designated by the local authorities.
2.3 Recommendations for Energy
Saving According to EU 66/2014, information on energy efficiency can be found on the product receipt supplied with the product. The following suggestions will help you use your product in an ecological and energy-ef- ficient way:
- Defrost frozen food before baking.
- Use pots / pans with a size and lid suit- able for the hob zone. Always choose the right size pot for your meals. More than necessary energy is needed for contain- ers of the wrong size.
- Keep hob baking areas and pot bases clean. Dirt reduces the heat transfer between the baking area and the pot base.
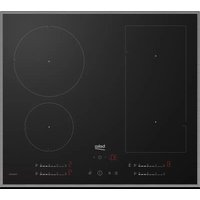
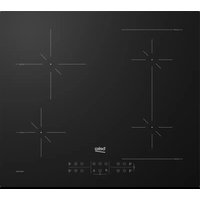
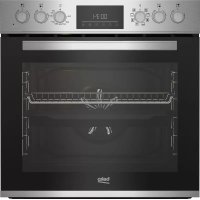
ELEN / 10 3 Your product
1 Glass cooking surface 2 Lower housing 3 Multiple cooking zone 4 Single cooking zone 5 Single cooking zone 6 Multiple cooking zone
- The height of the hob specified in the technical table is the base cover height of the product. Technical specifications may be changed without prior notice to improve the qual- ity of the product. Figures in this manual are schematic and may not exactly match your product. Values stated on the product labels or in the documentation accompanying it are obtained in laboratory conditions in accordance with relevant standards. Depend- ing on operational and environmental conditions of the product, these values may vary.
ELEN / 12 4 First Use Before you start using your product, it is re- commended to do the following stated in the following sections respectively.
4.1 Initial Cleaning
1. Remove all packaging materials.
2. Wipe the surfaces of the product with a
wet cloth or sponge and dry with a cloth. NOTICE: Some detergents or cleaning agents may cause damage to the surface. Do not use abrasive detergents, cleaning powders, cleaning creams or sharp objects during cleaning. NOTICE: During the first use, smoke and odour may come up for several hours. This is normal and you just need good ventila- tion to remove it. Avoid directly inhaling the smoke and odours that form. 5 Installation General warnings
- Refer to the nearest Authorised Service Agent for installation of the product. Make sure that the electric and gas in- stallations are in place before calling the Authorised Service Agent to have the product ready for operation. If not, call a qualified electrician and fitter to have the required arrangements made. The manu- facturer shall not be held responsible for damages arising from procedures carried out by unauthorized persons which may also void the warranty.
- It is customer's responsibility to prepare the location the product shall be placed on and also have power and/or gas utility prepared.
- The rules specified in local standards about electrical and/or gas installations (legal rules on installation) shall be fol- lowed during product installation./Para- graph
- Check for any damage on the appliance before the installation. Do not have it in- stalled if the appliance is damaged. Dam- aged products cause risks for your safety.
5.1 Right place for installation
- The hob is designed for installation into commercially available work tops. A safety distance must be left between the appliance and the kitchen walls and fur- niture. See figure (values in mm).
- The worktop must be aligned and fixed horizontally.
- Cut aperture for the hob in worktop as per installation dimensions.
- This product is a class 3 device accord- ing to EN 30-1-1standard.
- Allow a minimum distance of 750 mm above the hob surface.
- If a cooker hood is to be installed above the cooker, refer to cooker hood manu- facturer instructions regarding installa- tion height. If not defined any size in the hood manual, this height should be at least 650 mm.
- Any kitchen furniture next to the appli- ance must be heat-resistant (100 °C min.).
- Minimum height to extractor as recommend in hood instruction manual. If not recommended in the hood instruction manual, this height should be at least 650 mm. ** Minimum distance between cabinetry must be equal to width of hob
5.2 Electrical connection
- Disconnect the product from the electric connection before starting any work on the electrical installation. There is an electric shock hazard.
- Connect the product to a grounded out- let/line protected by a miniature circuit breaker of suitable capacity as stated in the "Technical specifications" table. Have the grounding installation made by a qualified electrician while using the product with or without a transformer. Our company shall not be liable for any damages that will arise due to using the product without a grounding installation in accordance with the local regulations.
- The product can only be connected to the mains electricity connection by an au- thorized and qualified person, and the warranty of the product starts only after correct installation. The manufacturer cannot be held responsible for any dam- ages that may arise due to operations by unauthorized persons.
- The electric cable must not be crushed, folded, jammed or touch hot parts of the product. If the electric cable is damaged, it must be replaced by a qualified electri- cian. Otherwise there is an electric shock, short circuit or fire hazard!
- The mains supply data must correspond to the data specified on the type label of the product. Type label is at the rear housing of the product. Power cable of your product must comply with the val- ues in "Technical specifications" table.
- Power cable plug must be within easy reach after installation (do not route it above the hob). Do not use extension or multi sockets in power connection.
- and must use the appropriate socket out- let/line and plug for oven. In case of the product's power limits are out of current carrying capability of plug and socket outlet/line, the product must be connec- ted through fixed electrical installation directly without using plug and socket outlet/line.
- If the product will be connected directly to the supply power: If it is not possible to disconnect all poles in the supply power, a disconnection unit with at least
ELEN / 14 3 mm contact clearance (fuses, line safety switches, contactors) must be connected and all the poles of this dis- connection unit must be adjacent to (not above) the product in accordance with IEE directives. Failure to obey this in- struction may cause operational prob- lems and invalidate the product warranty.
- Additional protection by a residual cur- rent circuit breaker is recommended. If the product is produced with cable and without plug: Connect the cord of product to supply power as identified below: If your supply cord type is 3-conductor type, for 1-phase connection: - Brown = L (Phase) - Blue = N (Neutral) - Green/Yellow wire = (E) (Earthing) If your supply cord type is 5-conductor type, for 1-phase connection: - Black/Grey = L (Phase) - Blue = N (Neutral) - Green/Yellow wire = (E) (Earthing) If your supply cord type is 5-conductor type, for 2-phase connection: - Black = L1 (Phase) - Grey = L2 (Phase) - Blue = N (Neutral) - Green/Yellow wire= (E) (Earthing)
5.3 Installing the product
1. Remove burners, burner caps and grills
on the hob from the product.
2. Turning the hob upside down, place it on
ing gasket, which was provided in the packaging, around the hob as shown in the following picture, ensuring that it re- mains 1 to 2 mm inside from the outer edge of the glass.
5. Using the installation clamps secure the
hob by fitting through the holes on the lower casing. Rear view (connection holes) Location of the connection holes shown in the below figure are schematic,may vary depending on the product model. Fix them according to connection holes on your product. Making connections to different holes is not a good practice in terms of safety since it can dam- age the gas and electrical system. There are gas and electrical com- ponents contained within this hob, therefore when fitting the mounting springs/clamps only attach the supplied fixings to the connection holes shown in this manual. Failure to observe this advise may lead to life and property safety. If there is an built-in oven under the hob; When installing the hob on an built-in oven, a distance should be left between the upper wall of the oven and the lower housing of the hob, as shown in the figure.
ELEN / 15 A min. 15 mm If there is a drawer/cabinet under the hob; When installing the hob onto a cabinet, a shelf must be installed in order to separate the cabinet from the hob as illustrated in the above figure. This is not required when installing onto a built-under oven. For example, if it is possible to touch the bottom of the product since it is installed onto a drawer, this section must be covered with a wooden plate. B min. 15 mm Final check
1. Reconnect the product to the mains.
2. Check electrical functions.
6 How to use the hob
- Do not let any objects to fall on the hob. Even small objects such as saltshakers may damage the hob. Do not use cracked hobs. Water may seep through these cracks and cause a short circuit. If the surface is damaged in any way (e.g. vis- ible cracks), turn off the fuse first, then call the authorized service to unplug the product to reduce the risk of electric shock.
- Do not use unbalanced and easily tilting pots/pans on the hob.
- Do not heat the pots/pans and pots empty. The pots and the appliance may be damaged.
- Always turn off the hob’s burners after each use.
- You shall damage the appliance if you operate the hobs without any pot or pots/ pans. Always turn off the hobs after each operation.
- After each use the cooking surface will be hot, so do not put the plastic pots/ pans on the cooking surface. Clean such material on the surface immediately.
- Sudden temperature changes on the glass cooking surface may cause dam- age, be careful not to spill cold liquids during cooking.
- Put a sufficient amount of food in pots and pans. Thus, you can prevent food from pouring forth out of the pots/pans and will not need to clean unnecessarily.
- Do not place the covers of pots and pans on burners/zones.
- Place the pots by centering them on the burners/zones. If you wish to place a pot on a different burner/zone, do not slide it towards the desired burner; rather, lift it first and then put it on the other burner. Tips for hobs with vitro-ceramic surfaces
- Vitro-ceramic surface is heat resistant and it is not affected by high temperature differences.
- Do not use vitro-ceramic surface as a surface where you can place something on it or as a cutting surface.
- Use pots and pans with processed bases only. Sharp edges may cause scratches on the surface.
- Do not use aluminium pots/pans and pots. Aluminium deteriorates the hob sur- face.
- Splashes may damage the hob surface and may cause fire.
- Do not use pots/pans with convex or con- cave bases.
- Use pots and pans with flat bases only. These provide easier heat transfer.
- Energy is wasted if the pot diameter is too small. Recommended cooking pots/pans sizes Cooking zone diameter - mm Pot diameter - cm 120 12 – 14 140 14 – 16 180 18 - 20 210 21 - 23 170x265 17 – 19 / 26 - 28
6.2 Hob control unit
Keys : On/off key Increase key Decrease key Timer key * Key lock key * Warming zone key * Rear left cooking zone selection key Front left cooking zone selection key Front right cooking zone selection key * Rear right cooking zone selection key It varies depending on the product model. It may not be available on your product.
- It varies depending on the product model. It may not be available on your product. General warnings for the control panel
- The graphics and figures are for illustrat- ive purposes only. Actual images or func- tions may differ depending on your hob model.
- This product is controlled by a touch con- trol panel. Every operation you make on the touch control panel is confirmed by an audible signal.
- Always keep the control panel clean and dry. If the surface is damp and dirty, it may cause problems in operating the functions.
1. Turn on the hob by touching the key.
ð The " " symbol appears on all cooking zone displays. If no operation is performed within 10 seconds, the hob automatically returns to Standby mode. Turning off the hob
1. Touch the key for more than 2
seconds. ð The hob turns off and returns to Standby mode. Turning on the cooking zones (Cooking Section)
1. Turn on the hob by touching the key.
2. Touch the selection key of the cooking
zone you want to turn on. ð On cooking zone display “ ” sym- bol appears and the display of the relevant zone lights up brighter.
3. Touch the key to activate the temper-
ature level setting. Touch the / keys to adjust between 1 and 9. If you directly touch the key for temperature level setting, the high power setting will be activated. The high power setting is described in the next section. If no operation is performed within 10 seconds, the hob automatically returns to Standby mode. Turning off the cooking zones: A selected cooking zone can be turned off in 3 different ways:
1. By reducing the temperature to “0” level:
You can turn off the zone by reducing the temperature setting to “0” level.
2. By touching the and keys simul-
taneously: Select the zone you want to turn off. To turn the zone off, touch the and keys simultaneously.
3. Using the timer off function for the de-
sired zone: When the time is up, the timer turns off the zone connected to it. The relevant displays show “0” or “00”. When the time is up, the audible alarm sounds. To silence the audible alarm, touch any key on the control panel. Residual heat indicator If the " " symbol is on the hob display, it means the hob is still hot and is used to keep a small amount of food warm. After a certain period of time, the symbol changes to the "0" symbol, meaning less hot. If the “ ” or “0” symbol lights up on the cooking zone display when the hob is turned off, it means the cooking zone is still hot. Do not touch the hotplate. When there is a power outage, the residual heat indicator does not light up and does not warn the user about hot cooking zones. When your hob overheats;
- If the active cooking zones are set to a level higher than level 7, the hob lowers the level of the active cooking zones to level 7 and the cooking zones cannot be set higher than this level.
- If overheating continues; if the zone is set to a level higher than level 5, the zone will decrease to level 5 and the zone will not be allowed to operate at a level higher than this level. If your zone over- heats, it will turn itself off for protection and the zones will not work. High power setting (Quick heating - Booster) You can use the high power setting to heat quickly. If fast heating is enabled, the cook- ing will operate at maximum power for a certain period of time. The fast heating time depends on the selected heat level. However, it is not recommended to cook for a long time in this position. The high power setting may not be available on every zone. Turning on the high power setting:
1. Turn on the hob by touching the key.
2. Select the desired zone by touching the
cooking selection key.
3. Set it to level “9” by touching the key.
ð The display will show “9” and “A” alternately. At temperature level “9” the high power setting is activ- ated.
4. If you want to set a high power setting
at a different temperature level, you can change it by touching the / keys. The set temperature level and “A” ap- pear on the display respectively. For ex- ample, when the temperature level is re- duced to 6, “6” and “A” appear respect- ively. If your hob overheats, the high power setting may not be ad- justable. Turning off the high power setting: When the high power setting time is com- pleted, the cooking zone continues to oper- ate at the set temperature and only the temperature level appears on the display. If you want to turn off the cooking zone be- forehand, touch the key or set the tem- perature level to "0". Temperature level Turn off time - seconds
Table1: Table-1: High power setting turn- ing off times Turning on multiple (double and triple) cooking zone Opening the dual cooking zone:
1. Turn on the hob by touching the key.
2. Select the dual cooking zone by touch-
ing the cooking zone selection keys.
3. Touch the key to activate the temper-
ature level setting. Touch the / keys to adjust between 1 and 9.
4. Touch the key to activate the second
outer section of the dual zone. When you touch the key again, the outer section will turn off. The inner section will continue to operate. The outer sections of multiple cooking zones are only activated if a temperature level between 1 and 9 is set for the zone. Opening the triple cooking zone:
1. Turn on the hob by touching the key.
2. Select the triple hotplate by touching the
hotplate selection keys.
3. Activate the temperature level setting by
touching the key. Adjust between 1 and 9 by touching the / keys.
4. Touch the key to activate the second
outer section of the cooking zone.
5. Touching the key again will activate
6. When working effectively in three sec-
tions, each time the key is touched, one of the outer rings closes. Key Lock You can activate the key lock to prevent ac- cidental changes to functions while the hob is operating. Activating the key lock:
1. Turn on the hob by touching the key.
2. Touch the key and activate the key
lock. ð The key lock function is activated and the led on the key lights up. If you turn off the hob while the keys are locked, the key lock will be active when you turn the hob back on. In order to operate the hob in such a case, the key lock must be deactivated. Deactivating the key lock:
1. Touch the key while the key lock is
active. ð The Led on the key turns off and the key lock is deactivated. Timer function The timer can be used in two different ways, as an alarm and as a cooking zone timer. When used as a cooking zone timer; this function makes cooking easier for you. You do not have to stand by the hob continu- ously during the cooking process. The cooking zone automatically turns off after the time you select. When used as an alarm, it has no effect on the cooking zones. It is used as a warning. When the time you set is completed, the timer gives an audible signal. Timer function as alarm:
1. Turn on the hob by touching the key.
2. Activate the alarm timer by touching the
key. “00” appears on the timer dis- play and the timer is activated.
3. Set the desired time value by touching
the and keys. After setting the time, the timer starts counting down.
4. When the time is up, the audible alarm
will sound. To silence the audible alarm, touch any key on the touch control panel.
ELEN / 20 The dot leds around the clock dis- play represent each cooking zone. If onel ed is flashing, you can set the timer for that cooking zone. If none of the leds are on or flashing, the alarm function is active. Cooking zone timer function:
1. Turn on the hob by touching the key.
2. Select the desired zone by touching the
cooking selection key.
3. Touch the key to activate the temper-
ature level setting. Touch the / keys to adjust between 1 and 9.
4. Activate the cooking zone timer by
touching the key. “00” appears on the timer display and the dot led around the display for the relevant cooking zone starts flashing.
5. Set the desired time value by touching
the and keys. The setting is con- firmed after a few seconds. The timer can only be set for zones that are being operated. Repeat the above steps for other zones whose timers you want to set. The timer cannot be set without se- lecting the cooking zone and the zone temperature level. When the timer is selected, you can see the remaining time by touching the key again. The set times are shown in order with each touch. If an alarm is set, it is shown during this time. Turning off the timer When the set time is up, the hob will auto- matically turn off and give an audible warn- ing. Press any key to turn off the audible warning. Turning off the timer early If the timer is turned off early, the hob will continue to operate at the set temperature until it is turned off. When the timer for the cooking zone is turned off early, it continues to operate at the set temperature level.
1. Select the cooking zone you want to
2. Touch the key to activate the timer.
3. Touch the key until “00” appears on
the timer display. The point light and timer display of the rel- evant cooking zone flash for a certain period of time and then go out completely and the timer is cancelled. Automatic turnoff (working time limita- tions) The control unit has an automatic turn-off feature. If one or more of the cooking zones are left on, the cooking zone will automatically shut down after a certain period of time. (See Table-2) If there is a timer assigned to the cooking zone, then the timer display will also turn off. The automatic turn-off time depends on the selected temperature level. The cooking zone can be turned on again by the user after it has been automatically turned off as described above.
ELEN / 21 If errors such as AF10, AF20, AF30 appear on the control panel, consult the service. Temperature level Automatic turn-off time - hours
Table2: Table-2: Automatic turn-off times 7 General Information About Baking You can find tips on preparing and cooking your food in this section.
7.1 General warnings about cooking
with hob General warnings about cooking with hob
- Never fill the pan with oil more than one third of it. Do not leave the hob unatten- ded when heating oil. Overheated oils bring risk of fire. Never attempt to extin- guish a possible fire with water! When oil catches fire, cover it with a fire blanket or damp cloth. Turn off the hob if it is safe to do so and call the fire department.
- Before frying foods, always remove their excess water and put them inside the heated oil slowly. Make sure that frozen foods are defrosted before frying.
- When heating oil, make sure that the pot you use is dry and keep its lid open.
- For recommendations on cooking with power saving, refer to the “Environmental Instructions” section. 8 Maintenance and Cleaning
8.1 General Cleaning Information
- Wait for the product to cool before clean- ing the product. Hot surfaces may cause burns!
- Do not apply the detergents directly on the hot surfaces. This may cause per- manent stains.
- The product should be thoroughly cleaned and dried after each operation. Thus, food residues shall be easily cleaned and these residues shall be pre- vented from burning when the product is used again later. Thus, the service life of the appliance extends and frequently faced problems are decreased.
- Do not use steam cleaning products for cleaning.
- Some detergents or cleaning agents cause damage to the surface. Unsuitable cleaning agents are: bleach, cleaning products containing ammonia, acid or chloride, steam cleaning products, de- scaling agents, stain and rust removers, abrasive cleaning products (cream clean- ers, scouring powder, scouring cream, abrasive and scratching scrubber, wire, sponges, cleaning cloths containing dirt and detergent residues).
- No special cleaning material is needed in the cleaning made after each use. Clean the appliance using dishwashing deter- gent, warm water and a soft cloth or sponge and dry it with a dry cloth.
- Be sure to completely wipe off any re- maining liquid after cleaning and immedi- ately clean any food splashing around during cooking.
- Do not wash any component of your ap- pliance in a dishwasher unless otherwise stated in the user’s manual. For the hobs:
- Acidic dirt such as milk, tomato paste and oil may cause permanent stains on the hobs and components of the hob zones, clean any overflown fluids imme- diately after cooling down the hob by turning it off. Inox - stainless surfaces
- Do not use acid or chlorine-containing cleaning agents to clean stainless-inox surfaces and handles.
- Stainless-inox surface may change col- our in time. This is normal. After each op- eration, clean with a detergent suitable for the stainless or inox surface.
- Clean with a soft soapy cloth and liquid (non-scratching) detergent suitable for inox surfaces, taking care to wipe in one direction.
- Remove lime, oil, starch, milk and protein stains on the glass and inox surfaces im- mediately without waiting. Stains may rust under long periods of time.
- Cleaners sprayed/applied to the surface should be cleaned immediately. Abrasive cleaners left on the surface cause the surface to turn white. Glass surfaces
- When cleaning glass surfaces, do not use hard metal scrapers and abrasive clean- ing materials. They can damage the glass surface.
- Clean the appliance using dishwashing detergent, warm water and a microfiber cloth specific for glass surfaces and dry it with a dry microfiber cloth.
- If there is residual detergent after clean- ing, wipe it with cold water and dry with a clean and dry microfiber cloth. Residual detergent may damage the glass surface next time.
- Under no circumstances should the dried-up residue on the glass surface be cleaned off with serrated knives, wire wool or similar scratching tools.
- You can remove the calcium stains (yel- low stains) on the glass surface with the commercially available descaling agent, with a descaling agent such as vinegar or lemon juice.
- If the surface is heavily soiled, apply the cleaning agent on the stain with a sponge and wait a long time for it to work prop- erly. Then clean the glass surface with a wet cloth.
- Discolorations and stains on the glass surface are normal and not defects. Plastic parts and painted surfaces
- Clean plastic parts and painted surfaces using dishwashing detergent, warm wa- ter and a soft cloth or sponge and dry them with a dry cloth.
- Do not use hard metal scrapers and ab- rasive cleaners. They may damage the surfaces.
- Ensure that the joints of the components of the product are not left damp and with detergent. Otherwise, corrosion may oc- cur on these joints.
8.2 Cleaning the hob
Glass cooking surface Follow the cleaning steps described for the glass surfaces in the “General cleaning in- formation” section for the cleaning of glass cooking surface. You may complete your cleaning as per the information below for special cases.
- Sugar-based foods such as dark cream, starch and syrup should be cleaned im- mediately, without waiting for the surface to cool. Otherwise, the glass cooking sur- face may be permanently damaged.
- Do not use cleaning agents for cleaning operations you perform while the hob is hot, otherwise permanent stains may oc- cur.
8.3 Cleaning the Control Panel
- When cleaning the panels with knob-con- trol, wipe the panel and knobs with a damp soft cloth and dry with a dry cloth. Do not remove the knobs and gaskets un- derneath to clean the panel. The control panel and knobs may be damaged.
- While cleaning the inox panels with knob control, do not use inox cleaning agents around the knob. The indicators around the knob can be erased.
- Clean the touch control panels with a damp soft cloth and dry with a dry cloth. If your product has a key lock feature, set the key lock before performing control panel cleaning. Otherwise, incorrect de- tection may occur on the keys. 9 Troubleshooting If the problem persists after following the instructions in this section, contact your vendor or an Authorized Service. Never try to repair your product yourself. The product does not work.
- Fuse may be faulty or blown. >>> Check the fuses in the fuse box. Change them if necessary or reactivate them.
- The appliance may not be plugged to the (grounded) outlet. >>> Check if the appli- ance is plugged in to the outlet.
- (If there is timer on your appliance) Keys on the control panel do not work. >>> If your product has a key lock, the key lock may be enabled, disable the key lock.
- If the hob does not turn on when the on/ off key is pushed >>> Unplug it and wait at least 20 seconds before plugging it in. Arcelik A.S. Karaağaç Caddesi No:2-6 Sütlüce, 34445, Turkey Made in TURKEY Importer in Russia: «BEKO LLC» Address: Selskaya street, 49, Fedorovskoe village, Pershinskoe rural settlement, Kirzhach district, Vladimir region, Russian Federation 601021 The manufacture date is included in the serial number of a product specified on rating label, which is located on a product, namely: first two figures of serial number indicate the year of manufacture, and last two – the month. For example, ”10- 100001-05» indicates that the product was produced in May, 2010. You can ask for certification number from our Call Center 8-800-200-23-56 The manufacturer reserves the right for making changes in modification, design and specification of an electric device.