80370 - Coffee grinder HAMILTON BEACH - Free user manual and instructions
Find the device manual for free 80370 HAMILTON BEACH in PDF.

Frequently Asked Questions - 80370 HAMILTON BEACH
User questions about 80370 HAMILTON BEACH
0 question about this device. Answer the ones you know or ask your own.
Ask a new question about this device
Download the instructions for your Coffee grinder in PDF format for free! Find your manual 80370 - HAMILTON BEACH and take your electronic device back in hand. On this page are published all the documents necessary for the use of your device. 80370 by HAMILTON BEACH.
USER MANUAL 80370 HAMILTON BEACH
Visit www.hamiltonbeach.com for our complete line of products and Use and Care Guides - as well as deli-cious recipes, tips, and to register your product online!
Francais 11
Canada:1-800-267-2826
When using electrical appliances, basic safety precautions should always be followed, including the following:
1. Read all instructions.
2. To protect against risk of electric shock, do not put unit, cord, or plug in water or other liquid.
3. Close supervision is necessary when any appliance is used by or near children.
4. Unplug from outlet when not in use, before putting on or taking off parts, and before cleaning.
5. Avoid contacting moving parts
6. Do not operate any appliance with a damaged cord or plug or after the appliance malfunctions, or is dropped or damaged in any manner. Call our toll-free customer service number on the front cover for information on examination, repair, or electrical or mechanical adjustment.
7. The use of attachments not recommended or sold by the manufacturer may cause fire, electric shock, or injury.
8. Do not use outdoors.
9. Do not let cord hang over edge of table or counter or touch hot surfaces, including stove.
10. Check removable grinding chamber for presence of foreign objects before using.
11. Do not use appliance for other than intended purpose.
12. Do not remove grinding cover until blade has completely stopped rotating.
13. To disconnect, turn the control to OFF and then remove plug from wall outlet.
OTHER CONSUMER SAFETY INFORMATION
This appliance is intended for household use only.
WARNING! Shock Hazard: This appliance has a polarized plug (one wide blade) that reduces the risk of electric shock. The plug fits only one way into a polarized outlet. Do not defeat the safety purpose of the plug by modifying the plug in any way or by using an adapter. If the plug does not fit fully into the outlet, reverse the plug. If it still does not fit, have an electrician replace the outlet.
The length of the cord used on this appliance was selected to reduce the hazards of becoming tangled in or tripping over a longer cord. If a longer cord is necessary, an approved extension cord may be used. The electrical rating of the extension cord must be equal to or greater than the rating of the appliance. Care must be taken to arrange the extension cord so that it will not drape over the countertop or tabletop where it can be pulled on by children or accidentally tripped over.
SAVE THESE INSTRUCTIONS!
840202900 ENv02.qxd:840154400 ENv01.qxd 4/19/11 10:22 AM Page 4
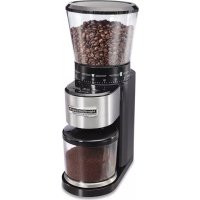
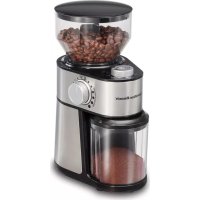
Parts and Features
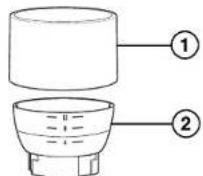
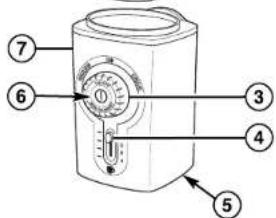
- Grinding Cover
- Removable Grinding Chamber
- Grind Setting Dial
- Cup Selector Switch
- Cord Wrap (located on bottom of unit)
-
ON/OFF Button
-
Base
- Coffee Brush (located in back of unit)
NOTE:
- Do not attempt to defeat the cover interlock mechanism.
How to Use
- BEFORE FIRST USE: Clean coffee grinder.
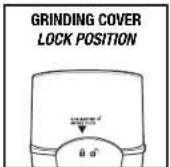
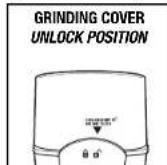
- Remove grinding cover. If locked in place, turn counterclockwise to UNLOCK position; then lift straight up.
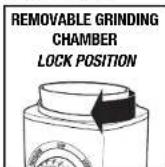
- Twist grinding chamber clockwise to LOCK position. Make sure that the grinding chamber is FIRMLY locked into position.
- Pour whole coffee beans directly into grinding chamber and fill to desired level. Use the convenient cup markings, which correspond to cups of brewed coffee.
- Place grinding cover onto grinder. Make sure the arrow on cover is aligned with the unlock symbol on back of grinder. Turn lid clockwise to LOCK position. Grinding cover will "click" when locked into position.
How to Use (cont.) How to Use (cont.)
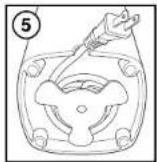
- Unwrap cord from cord wrap located under base. Plug into outlet.
- Rotate grind setting dial to select desired fineness of grind.
PERCOLATOR: Coarse grind for French Press or percolators DRIP: Medium grind for automatic drip coffeemakers
ESPRESSO: Fine grind for steam or pump espresso machines NOTE: There are two additional settings that will yield results in between the three shown.
- Move cup selector switch to total number of cups to be ground.
NOTE: Grinding cover can become etched or cloudy as a result of grinding. This is normal.
| SELECT | CUPS |
| 4 | 1-4 (250 ml-1 L) |
| 8 | 5-8 (1.25-2 L) |
| 10 | 9-10 (2.25-2.5 L) |
| 12 | 11-12 (2.75-3 L) |
- Press ON/OFF (I/O) button and release once grinding has begun. The coffee grinder will stop automatically when grinding is complete. To stop grinding cycle at any time, push ON/OFF button. If ON/OFF button is pressed again, grinder will start from beginning of timed cycle.
If unit does not turn on, make sure BOTH removable grinding chamber AND grinding cover are firmly in the LOCK position.
- Unplug grinder. Remove cover and grinding chamber from base. Pour ground coffee into paper or permanent filter. The brush can be used to remove remaining grounds from chamber.
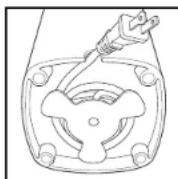
- When finished, clean grinding chamber. Wrap cord around cord wrap located under base. Secure cord in notch.
Grinding Whole Spices
Follow "How to Use" instructions using guidelines in this chart for amounts and settings when grinding whole spices.
| IF GRINDING ... | USE ... | GRIND SETTING |
| Peppercorns | up to 4 tablespoons (60 ml) | ESPRESSO |
| Cinnamon Sticks | up to 3 tablespoons (45 ml) (broken into thirds) | ESPRESSO |
| Whole Cloves | up to 4 tablespoons (60 ml) | ESPRESSO |
| Coriander Seeds | up to 4 tablespoons (60 ml) | ESPRESSO |
| Flaxseed | up to 4 tablespoons (60 ml) | ESPRESSO |
NOTE: Always move cup selector switch to 12 cups for maximum grinding time. When desired fineness of grind is reached, press ON/OFF button to stop grinder.
Tips for Best Results
- For best flavor, store coffee beans in an airtight container.
Grind beans immediately before brewing. - Grinding times will vary by amount and fineness se
- To ensure optimal grinding performance, allow coffee grinder to cool for at least one minute between uses.
- Coffee flavor and strength is a personal preference. Vary the type of coffee beans, amount of coffee, and fineness of grind to find the flavor you prefer.
- Grinding should be cleaned between coffee and spice grinding to help prevent taste and odor transfer.
- Grinding is not recommended for fresh herbs.
How to Clean
WARNING
Electrical Shock Hazard. Disconnect power before cleaning. Do not immerse cord, plug, or base in any liquid.
- Unplug from outlet before cleaning.
- Remove cover by turning counterclockwise to UNLOCK position; then lift straight up.
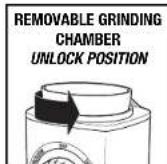
- Remove grinding chamber by turning counterclockwise until it comes loose from base. Lift grinding chamber straight up out of base.
- WARNING! Cut Hazard: Blade is sharp. Use caution when handling.
Grinding chamber and cover can be washed in sink. Grinding chamber may also be washed on top shelf of dishwasher.
- Wipe base with a damp cloth.
- Wrap cord around cord wrap located under base. Secure cord in notch.
- If water becomes trapped under the metal liner in the removable grinding chamber, allow to sit upside down on a paper towel overnight.
LIMITED WARRANTY
This warranty applies to products purchased in the U.S. and Canada. This is the only express warranty for this product and is in lieu of any other warranty or condition.
This product is warranted to be free from defects in material and workmanship for a period of one (1) year from the date of original purchase. During this period, your exclusive remedy is repair or replacement of this product or any component found to be defective, at our option; however, you are responsible for all costs associated with returning the product to us and our returning a product or component under this warranty to you. If the product or component is no longer available, we will replace with a similar one of equal or greater value.
This warranty does not cover glass, filters, wear from normal use, use not in conformity with the printed directions, or damage to the product resulting from accident, alteration, abuse, or misuse. This warranty extends only to the original consumer purchaser or gift recipient. Keep the original sales receipt, as proof of purchase is required to make a warranty claim. This warranty is void if the product is used for other than single-family household use or subjected to any voltage and waveform other than as specified on the rating label (e.g., 120V 60Hz
We exclude all claims for special, incidental, and consequential damages caused by breach of express or implied warranty. All liability is limited to the amount of the purchase price. Every implied warranty, including any statutory warranty or condition of merchantability or fitness for a particular purpose, is disclaimed except to the extent prohibited by law, in which case such warranty or condition is limited to the duration of this written warranty. This warranty gives you specific legal rights. You may have other legal rights that vary depending on where you live. Some states or provinces do not allow limitations on implied warranties or special, incidental, or consequential damages, so the foregoing limitations may not apply to you.
To make a warranty claim, do not return this appliance to the store. Please call 1,800,851,8900 in the U.S. or 1,800,267,2826 in Canada or visit hamiltonbeach.com in the U.S. or hamiltonbeach.ca in Canada. For faster service, locate the model, type, and series numbers on your appliance.
PRECAUTIONS IMPORTANTES
CONSERVEZ CES INSTRUCTIONS!
AUTRES RENSEIGNEMENTS DE SECURITE AU CONSOMMATEUR
Col. Palmitas Polanco
Mexico, D.F. C.P. 11560
018007116100