
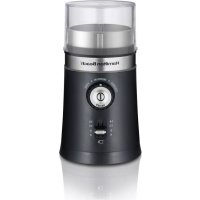
80405 - Coffee grinder HAMILTON BEACH - Free user manual and instructions
Find the device manual for free 80405 HAMILTON BEACH in PDF.

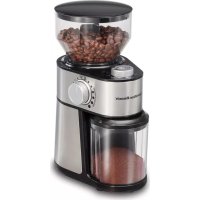
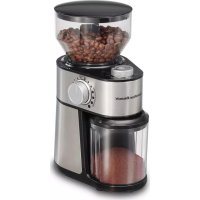
| Product Type | Burr Coffee Grinder |
| Brand | Hamilton Beach |
| Model | 80405 |
| Power | 120 V ~ 60 Hz |
| Dimensions (L × W × H) | Approx. 20 × 15 × 30 cm |
| Weight | Approx. 1.5 kg |
| Max. Scale Capacity | 3 kg |
| Number of Grind Settings | 0.1 (fine) to 39 (coarse) |
| Grind Modes | Cups (1 to 12), Grams (3 to 100), Ounces (0.1 to 3.5), Manual (0 to 60 seconds) |
| Auto Shut-off Function | Yes, beep sound at end of grinding |
| Energy Saving Screen | Goes into sleep mode after 2 minutes of inactivity |
| Burr Material | Stainless Steel |
| Removable Parts | Hopper with lid, ground coffee container with lid, silver cover, cleaning brush |
| Care and Cleaning | Wash removable parts in warm soapy water; do not immerse base; clean burr with brush |
| Safety | Polarized plug, safety lock, auto shut-off, protective cover |
| Warranty | 5 years limited (defects in materials and workmanship) |
| Intended Use | Household use only |
Frequently Asked Questions - 80405 HAMILTON BEACH
User questions about 80405 HAMILTON BEACH
0 question about this device. Answer the ones you know or ask your own.
Ask a new question about this device
Download the instructions for your Coffee grinder in PDF format for free! Find your manual 80405 - HAMILTON BEACH and take your electronic device back in hand. On this page are published all the documents necessary for the use of your device. 80405 by HAMILTON BEACH.
USER MANUAL 80405 HAMILTON BEACH
Visit www.hamiltonbeach.com for our complete line of products and Use and Care Guides - as well as delicious recipes, tips, and to register your product online.
For Questions: 1.800.851.8900 For recipes, tips, product information and registration: www.hamiltonbeach.com
When using electrical appliances, basic safety precautions should always be followed to reduce the risk of fire, electric shock, and/or injury to persons, including the following:
- Read all instructions.
- This appliance is not intended for use by persons with reduced physical, sensory, or mental capabilities, or lack of experience and knowledge, unless they are closely supervised and instructed concerning use of the appliance by a person responsible for their safety.
- This appliance shall not be used by children. Keep the appliance and its cord out of reach of children.
- Close supervision is necessary when any appliance is used near children. Children should be supervised to ensure that they do not play with the appliance.
- To protect against risk of electrical shock, do not put cord, plug, base, or motor in water or other liquid.
- Turn the appliance OFF ( then unplug from outlet when not in use, before putting on or taking off parts, and before cleaning. To unplug, grasp the plug and pull from the outlet. Never pull from the power cord.
- Avoid contact with moving parts.
-
Do not operate any appliance with a damaged supply cord or plug, or after the appliance malfunctions or has been dropped or damaged in any manner. Supply cord replacement and repairs must be conducted by the manufacturer, its service agent, or similarly qualified persons in order to avoid a hazard. Call the provided customer service number for information on examination, repair, or adjustment.
-
The use of attachments not recommended or sold by the appliance manufacturer may cause fire, electric shock, or injury.
- Do not use outdoors.
- Do not let cord hang over edge of table or counter or touch hot surfaces, including stove.
- Do not place on or near a hot gas or electric burner, or in a heated oven.
- Check hopper and removable grinding chamber for presence of foreign objects before using.
- Do not use appliance for other than intended purpose.
- Do not attempt to defeat any interlock mechanism.
- Check that the appliance is OFF ( before plugging cord into wall outlet. To disconnect, turn the control to OFF ( then remove plug from wall outlet. To unplug, grasp the plug and pull from the outlet. Never pull from the power cord.
- Do not remove cover until blade has completely stopped rotating.
- CAUTION! In order to avoid a hazard due to inadvertent resetting of thermal cut-out, this appliance must not be supplied through an external switching device, such as a timer, or connected to a circuit that is regularly switched on and off by the utility.
SAVE THESE INSTRUCTIONS
Other Consumer Safety Information
This appliance is intended for household use only.
A WARNING Electrical Shock Hazard: This appliance is provided with a polarized plug (one wide blade) to reduce the risk of electric shock. The plug fits only one way into a polarized outlet. Do not defeat the safety purpose of the plug by modifying the plug in any way or by using an adapter. If the plug does not fit fully into the outlet, reverse the plug. If it still does not fit, have an electrician replace the outlet.
The length of the cord used on this appliance was selected to reduce the hazards of becoming tangled in or tripping over a longer cord. If a longer cord is necessary, an approved extension cord may be used. The electrical rating of the extension cord must be equal to or greater than the rating of the appliance. Care must be taken to arrange the extension cord so that it will not drape over the countertop or tabletop where it can be pulled on by children or accidentally tripped over.
To avoid an electrical circuit overload, do not use another high-wattage appliance on the same circuit with this appliance.
Parts and Features
Before first use: Wash all removable parts in hot, soapy water. Rinse and dry.
To order parts:
US:1.800.851.8900
www.hamiltonbeach.com
Canada: 1.800.267.2826
Mexico:8007116100

How to Use the Burr Grinding
- Place Silver Cover on Scale. Slide Removable Coffee Grounds Container with Lid into place over Silver Cover.
- Place Bean Hopper in Grinding Chamber and turn clockwise to until it clicks into place.
- Plug into outlet. Press Zero Button to return scale to 0. Remove Bean Hopper Lid and add whole coffee beans to the Bean Hopper. Place Lid securely on top of Hopper and press into place.
- Press Menu Button to select desired function. Functions are Cups (O), Ounces, Grams or Manual (T). Then press - or + Button to select desired amounts. Place hand around base of Bean Hopper and turn clockwise or counterclockwise to select desired grind from .1 (fine) to 39 (coarse). When manually grinding beans, the Display will show time counting up. Press ON (I)/ OFF (O) Button once desired grind is reached. Pull Coffee Grounds Container straight out, and remove Lid. Empty grounds into a paper filter or store in an airtight container.
- Press ON (I)/OFF (O) button to grind beans. Burr Grindler will beep and stop grinding at the end of selected grinding. Unplug.
- Pull Grounds Container straight out and turn Lid counterclockwise to remove.
- Pour grounds into paper filter of coffee maker or into an airtight container for storage.
NOTES:
- This Burr Grinding has a Power Save Function, which automatically turns off Display if left unused for more than 2 minutes.
- If (1) appears in Display, check to make sure the Grounds Container and Silver Cover for Scale is in place. This will not appear when manually grinding.
The Scale can only hold up to 3kg.
TIPS:
- For best flavor, store coffee beans in an airtight container.
Grind beans immediately before brewing. - Grinding times will vary by amount and fineness setting.
- To ensure optimal grinding performance, allow Burr Grinding to cool for at least 1 minute between uses.
- Coffee flavor and strength are personal preferences. Vary the type of coffee beans, amount of coffee, and fineness of grind to find the flavor you prefer.
COFFEE GRINDING CHART
| IF GRINDING: ICON GRIND | SETTING | |
| Percolator/French Press 27 to C | par | |
| Drip Coffee Maker 14 to 26 (Meat m) | ||
| Steam or Pump Espresso Maker Fine to T5 | ||
To Install Portafilter Holder (used only when manually grinding):
Place Holder Inserts into Holder openings and press down until Holder clicks into place.
To Remove Portafilter Holder:
Slide Unlocking Tab toward you and pull up and out.
Care and Cleaning
WARNING Electrical Shock Hazard. Disconnect power before cleaning. Do not immerse cord, plug, or base in any liquid.
- Unplug.
- Wash Removable Bean Hopper with Lid and Removable Coffee Grounds container with Lid in hot, soapy water. Rinse and dry.
- Wipe the outside of Burr Grinderr with a soft, damp cloth.
- Clean Grinding Wheel using Cleaning Brush. Do not immerse in water or place in dishwasher. All parts must be dried thoroughly before next grind.
To Remove Bean Hopper and Grinding Wheel (not dishwasher-safe)
- Unplug. Press down on lock and turn Bean Hopper counterclockwise to remove.
- Lift Handle of Grinding Wheel and turn counterclockwise. Pull up to remove.
- Clean with Cleaning Brush.
- Place Grinding Wheel into center of Grinding Chamber. Tum clockwise to lock.
To Install Bean Hopper and Grinding Wheel (not dishwasher-safe)
- Unplug.
- Place Grinding Wheel into Grinding Chamber and turn clockwise until it clicks into place. Push Handle to left or right to lay flat.
- Add Bean Hopper to Chamber and turn clockwise until it clicks.
Troubleshooting
Grinder will not turn on.
- Make sure Bean Hopper with Lid and Grounds Container with Lid are in place.
Grind is too fine. - Turn Adjustable Grind Setting counterclockwise to a coarser setting.
Coffee is too weak.
- Increase Cup Selector + / - Buttons amount for a stronger-tasting coffee.
ON (I)/OFF (Button is flashing
Make sure Grounds Container with Lid and Silver Scale Cover are in place. Press Zero Button to clear and begin grinding.
Error Codes
- E01: Bean Hopper is not installed on Base. Follow "How to Use the Burr Grinding".
- E02: Motor has overheated. Unplug and let cool 1 hour.
b0: No beans in Bean Hopper or beans not feeding into Grinding Wheel. If needed, add beans or tap Bean Hopper to allow beans to feed into Grinding Wheel.
Limited Warranty
This warranty applies to products purchased and used in the U.S. and Canada. This is the only express warranty for this product and is in lieu of any other warranty or condition.
This product is warranted to be free from defects in material and workmanship for a period of five (5) years from the date of original purchase in Canada and the U.S. During this period, your exclusive remedy is repair or replacement of this product or any component found to be defective, at our option; however, you are responsible for all costs associated with returning the product to us and our returning a product or component under this warranty to you. If the product or component is no longer available, we will replace with a similar one of equal or greater value.
This warranty does not cover glass, filters, wear from normal use, use not in conformity with the printed directions, or damage to the product resulting from accident, alteration, abuse, or misuse. This warranty extends only to the original consumer purchaser or gift recipient. Keep the original sales receipt, as proof of purchase is required to make a warranty claim. This warranty is void if the product is used for other than single-family household use or subjected to any voltage and waveform other than as specified on the rating label (e.g., 120V 60Hz ).
We exclude all claims for special, incidental, and consequential damages caused by breach of express or implied warranty. All liability is limited to the amount of the purchase price. Every implied warranty, including any statutory warranty or condition of merchantability or fitness for a particular purpose, is disclaimed except to the extent prohibited by law, in which case such warranty or condition is limited to the duration of this written warranty. This warranty gives you specific legal rights. You may have other legal rights that vary depending on where you live. Some states or provinces do not allow limitations on implied warranties or special, incidental, or consequential damages, so the foregoing limitations may not apply to you.
To make a warranty claim, do not return this appliance to the store. Please call 1.800.851.8900 in the U.S. or 1.800.267.2826 in Canada or visit hamiltonbeach.com in the U.S. or hamiltonbeach.ca in Canada. For faster service, locate the model, type, and series numbers on your appliance.
Notes
PRECAUTIONS IMPORTANTES
Col. Polanco V Seccion,
Miguel Hidalgo


- SAVE THESE INSTRUCTIONS
- This appliance is intended for household use only.
- Parts and Features
- How to Use the Burr Grinding
- NOTES:
- TIPS:
- Care and Cleaning
- To Remove Bean Hopper and Grinding Wheel (not dishwasher-safe)
- To Install Bean Hopper and Grinding Wheel (not dishwasher-safe)
- Troubleshooting
- Limited Warranty
- PRECAUTIONS IMPORTANTES
Brand : HAMILTON BEACH
Model : 80405
Category : Coffee grinder