WS 8118 - Clock TECHNOLINE - Free user manual and instructions
Find the device manual for free WS 8118 TECHNOLINE in PDF.
| Product Type | Wall clock with moon phases and wireless indoor/outdoor thermometer |
| Brand | TECHNOLINE |
| Model | WS 8118 |
| Clock Dimensions (W x H x D) | 255.6 x 242.5 x 29.5 mm |
| Outdoor Transmitter Dimensions (W x H x D) | 38.2 x 128.3 x 21.2 mm |
| Clock Power Supply | 2 AA (LR6) 1.5 V batteries |
| Transmitter Power Supply | 2 AA (LR6) 1.5 V batteries |
| Transmission Frequency | 868 MHz |
| Maximum Range | 100 m in open field |
| Main Functions | Radio-controlled clock DCF-77, alarm with snooze, 12/24 h display, calendar, moon phases, indoor and outdoor temperature, °C/°F selection, 4 languages for days |
| Indoor Temperature Measurement Range | -9.9 °C to +39.9 °C |
| Outdoor Temperature Measurement Range | -39.9 °C to +59.9 °C |
| Care and Cleaning | Clean with a soft, damp cloth. Do not use abrasive products or solvents. Do not immerse in water. |
| Safety | Use only alkaline batteries. Do not open the device. Do not expose to extreme temperatures or humidity. Keep out of reach of children. |
| Spare Parts and Repairability | Not specified by the manufacturer. In case of malfunction, return to the point of sale. |
| General Information | Complies with Directive 2014/53/EU. Do not dispose of with household waste. |
Frequently Asked Questions - WS 8118 TECHNOLINE
User questions about WS 8118 TECHNOLINE
0 question about this device. Answer the ones you know or ask your own.
Ask a new question about this device
Download the instructions for your Clock in PDF format for free! Find your manual WS 8118 - TECHNOLINE and take your electronic device back in hand. On this page are published all the documents necessary for the use of your device. WS 8118 by TECHNOLINE.
USER MANUAL WS 8118 TECHNOLINE
natural_image
Two technical line drawings of vertical structural components, one with a base and the other with a horizontal shelf (no text or symbols)natural_image
Technical line drawing of a vertical mechanical device with a side view showing internal components (no text or symbols)natural_image
Pure mechanical diagram showing a vertical component with a rectangular element and a diagonal hatched surface, no text or symbols present.text_image
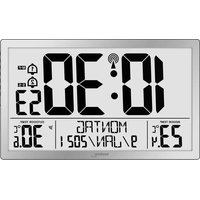
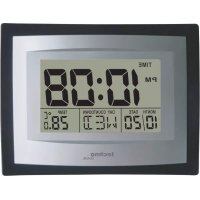
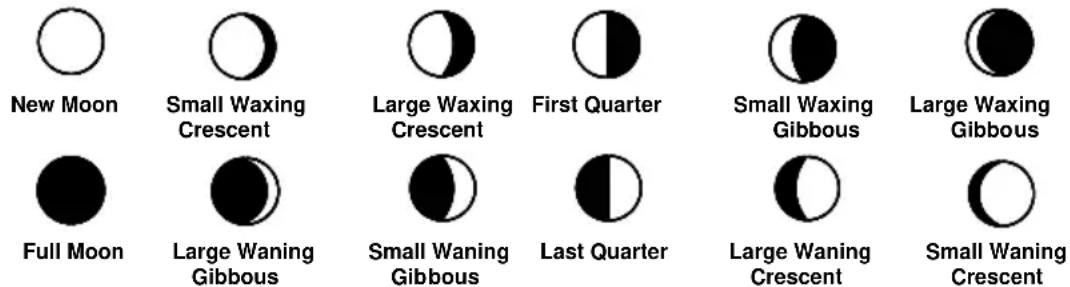
Hanging holes Battery cover Foldable stand- DCF-77 Radio controlled time with manual setting option
• 12/24 hour time display
• Time display: hour, minute, second - Alarm setting with snooze function
- Calendar display
- Weekday display (4 languages to choose from: German, English, French, and Spanish)
• Display 12 Moon phases throughout the year - Time zone setting
- °C or °F temperature display selectable
-
Indoor temperature display
• Outdoor temperature display
• Wireless transmission at 868MHz
• Signal reception intervals at 4 seconds -
Low battery indicator
• Wall mount or table standing
OUTDOOR TEMPERATURE TRANSMITTER:
natural_image
Two technical line drawings of vertical structures: a tall tower with a side panel and a multi-tiered tower with horizontal dividers (no text or symbols)- Remote transmission of outdoor temperature to Moonphrase Wall Clock by 868 MHz
- Wall mounting case
- Mounting at a sheltered place. Avoid direct rain and sunshine
TO INSTALL AND REPLACE BATTERIES IN THE MOONPHASE WALL CLOCK
The Moonphase wall clock uses 2 x AA, IEC LR6, 1.5V batteries. To install and replace the batteries, please follow the steps below:
- Insert finger or other solid object in the space at the bottom center of the battery compartment and lift up to remove the cover.
- Insert batteries observing the correct polarity (see marking inside battery compartment).
- Replace compartment cover.
DO NOT SET THE CLOCK.
TO INSTALL AND REPLACE BATTERIES IN THE TEMPERATURE TRANSMITTER
The transmitter uses 2 x AA, IEC LR6, 1.5V batteries. To install and replace the batteries, please follow the steps below:
- Remove the cover.
- Insert the batteries, observing the correct polarity (see battery compartment marking).
- Replace the battery cover on the unit.
Alkaline batteries are recommended for use in both units. Avoid using rechargeable batteries.
SETTING UP:
- Insert the 2 x AA, IEC LR6, 1.5V batteries into the transmitter (See "To install and replace batteries in the Temperature Transmitter" above).
- Within 3 minutes, insert 2 x AA, IEC LR6, 1.5V batteries into the Moonphase wall clock as indicated above (see "To install and replace batteries in the Moonphase wall clock" above).
- Once the batteries are in place, all segments of the LCD will light up briefly. Then the indoor and outdoor temperature - -.°C, the time as 0:00, the date as 1/1, and weekday will be displayed.
- Do not press any buttons for 10 minutes
- The Moonphase wall clock will start receiving data from the transmitter. The remote temperature will then be displayed on the Moonphase wall clock. If the outdoor temperature is not displayed 90 seconds after inserting the batteries into the receiver, all batteries are needed to be removed and wait for at least 1 minute for reset from step 1.
- The DCF time code reception will automatically start. This takes typically between 3 - 5 minutes in good conditions. This time period is an excellent opportunity to locate the transmitter in suitable location outdoors. In order to ensure sufficient 868MHz transmission however, this should under good conditions be no more than 100 meters from where the Moonphase wall clock will be finally positioned (see notes on "Positioning" and "868MHz Reception").
- If after 10 minutes the DCF time has not been received, use the SET key to manually enter the set mode and change either the time or date in order to activate the DCF reception. When this is successful, the received time will override the manually set time. The date is also updated with the received time (Please refers to notes on "DCF Radio controlled time" and "Manual time setting").
Note:
In the event of changing batteries of the unit ensure that the batteries do not spring free from the contacts. Always wait at least 1 minute after removing the batteries before reinserting, otherwise start up and transmission problems may occur.
FUNCTION KEYS
The Moonphase wall clock has four easy to use keys:
SET key : To enter into the set mode for the following functions: time zone, language, hour, minute, year, month, day, weekday, 12/24 hour, °C or °F temperature display
+ key : To toggle between the second, indoor/outdoor temperature, date or weekday display
To change the values in manual set mode
ALM key : To enter into the alarm set mode
To set the alarm ON/OFF
SNZ key : To activate the snooze function during alarm
To exit any setting modes
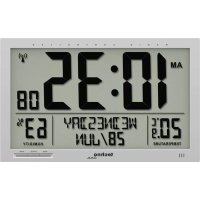
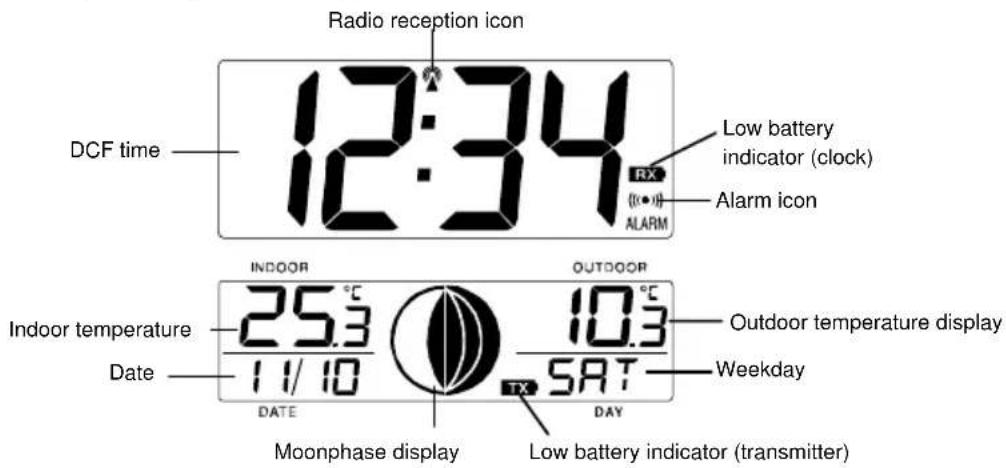
MOONPHASE WALL CLOCK LCD SCREEN DESCRIPTIONS
The Moonphase wall clock's LCD is divided into 2 sections and once the batteries are inserted, all the segments will light up briefly before displaying the information for time, date, indoor and outdoor temperatures, and weekday.
text_image
Radio reception icon DCF time 12:34 RX Low battery indicator (clock) Alarm icon INDOOR OUTDOOR Indoor temperature 25.3 10.3 Outdoor temperature display Date 11/10 5AT Weekday DATE DAY Moonphase display Low battery indicator (transmitter)MANUAL SETTINGS
Note:
If the Moonphase wall clock has already successfully received the DCF time signal and displays the correct time and date, then the Manual settings can be skipped.
After completion of the above described procedures in "Setting up" the manual setting modes can be entered by pressing the SET key. The following settings can now be programmed:
-
Time zone setting
• Language display setting -
Manual time setting
- Year setting
- Month setting
- Day setting
- Weekday setting
• 12/24 hour time display setting - ^ C or ^ F setting
RADIO CONTROLLED TIME:
The time base for the radio controlled time is a Cesium Atomic clock operated by the Physikalisch Technische Bundesanstalt Braunschweig, which has a time deviation of less than one second in one million years. The time is coded and transmitted from Mainflingen near Frankfurt via frequency signal DCF-77 (77.5 kHz) and has a transmitting range of approximately 1,500 km. Your radio-controlled Moonphase wall clock receives this signal and converts it to show the precise time in summer or winter time.
The quality of the reception depends greatly on the geographic location. In normal cases, there should be no reception problems within a 1500km radius of Frankfurt.
Once the outdoor temperature is displayed on the Moonphase wall clock, the DCF tower icon in the clock display will start flashing. This indicates that the clock has detected that there is a radio signal present and is trying to receive it. When the time code is received, the DCF tower becomes permanently lit and the time will be displayed.
If the tower icon flashes, but does not set the time or the DCF tower does not appear at all, then please take note of the following:
- Recommended distance to any interfering sources like computer monitors or TV sets is a minimum of 1.5 - 2 metres.
- Within ferro-concrete rooms (basements, superstructures), the received signal is naturally weakened. In extreme cases, please place the unit close to a window and/or point its front or back towards the Frankfurt transmitter.
- During night time, the atmospheric disturbances are usually less severe and reception is possible in most cases. A single daily reception is adequate to keep the accuracy deviation below 1 second.
TIME ZONE SETTING
After entering the manual setting mode as described above, the time zone can be set between the 0 to -12 hour and then runs from 12 back to 0 in consecutive 1-hour interval. To do this:
- The current time zone value starts flashing.
- Use the + key to set the time zone. The range runs from 0 to -12 and then runs from 12 back to 0 in consecutive 1-hour interval.
- Press and release the SET key to enter the "Language Setting".
LANGUAGE SETTING
The weekdays can be displayed in LCD1 with the pre-set languages: German = d, English = US, French = F, and Spanish = E.
- Set the desired language for the weekday display in LCD1 by use of the + key.
- Press and release the SET key to enter the mode "Manual Time Setting".
MANUAL TIME SETTING
In case the Moonphase wall clock is not able to detect the DCF-signal (disturbances, transmitting distance, etc.), the time can be manually set. The clock will then work as a normal Quartz clock.
- The hour digits will start flashing on LCD1.
- Set the desired hours by pressing and releasing the + key followed by pressing the SET key.
- Now the minute digits will start flashing.
- Set the desired minutes by pressing and releasing the + key. If the + key is held, the units will increase by 5.
- Press and release the SET key to move to the "Year Setting".
YEAR SETTING
The year can be selected sequentially from 2001 to 2029 and will then start over again (default setting 2006). Only the last 2 digits of the year will be visible on LCD2.
- The year digits will start flashing on LCD2. Select the desired year by use of the + key.
- Press and release the SET key to switch to the "Month Setting".
MONTH SETTING
- The month digits on LCD2 will start flashing (Default setting 1). Set the desired month by use of the + key.
- Press and release the SET key to move to the mode "Date Setting".
DAY SETTING
- The digits for the day will start flashing on LCD2 (Default setting 1). Set the desired day by use of the + key.
Note: The day can only be set in conjunction with the selected month. For example, it is not possible to set the data 30 if the months of February is selected.
- Press and release the SET key to enter the "Weekday Setting".
WEEKDAY SETTING
- The weekday symbols will be displayed on LCD2 in the pre-set language and flashing. Set the desired weekday by use of the + key.
- Press and release the SET key to enter the mode "12/24 Hours Time Display Setting".
12/24 HOURS TIME DISPLAY SETTING
- The “12h” or “24h” will start flashing in LCD1 (Default setting 24h). Select the desired time display mode by use of the + key.
- Press and release the SET key to enter the “°C/°F Temperature Setting”.
°C OR °F TEMPERATURE SETTING
- The characters “°C” or “°F” will start flashing on LCD1 (Default setting °C). By use of the + key select “°C” for temperature display in degrees Celsius or “°F” for degrees Fahrenheit.
- Press and release the SET key to exit the setting mode and switch back to the normal display mode.
EXIT THE MANUAL SETTING MODES
- To return to the normal display mode from anywhere in manual setting mode simply press the SNZ key anytime.
- If no keys are pressed for about 15 seconds in setting mode, the Moonphase wall clock will automatically switch back to normal display mode.
ALARM SETTING
To enter into the alarm setting mode:
- Hold the ALM key for 2 seconds. The hour digits start flashing.
- Press the + key to set the hour.
- Press and release the ALM key to set the minutes. The minute digits start flashing.
- Press and release the + key to set the minutes. If the + key is held, the unit will increase by 5.
- Press and release again the ALM key to exit the Alarm setting mode or wait for 15 seconds automatic timeout or press the SNZ key.
Note: the alarm duration is about 85 seconds
TO DEACTIVATE THE ALARM:

text_image
AM 6:34 D*0 ALARM Alarm icon ((•)) (ON) AM 6:34The alarm will be automatically ON when the alarm time is set. To deactivate the alarm (OFF), press and release once the ALM key in normal mode display. The alarm icon will disappear, the alarm is now off.
SNOOZE SETTING
The snooze can only be activated during alarm time for a snooze duration of 10 minutes by pressing the SNZ key in the front of the Moonphase wall clock
MOON PHASE
The Moonphase wall clock will also display all 12 Moon phases throughout the year accordingly to the set calendar:
text_image
New Moon Small Waxing Crescent Large Waxing Crescent First Quarter Small Waxing Gibbous Large Waxing Gibbous Full Moon Large Waning Gibbous Small Waning Gibbous Last Quarter Large Waning Crescent Small Waning CrescentOUTDOOR TEMPERATURE TRANSMITTER:
The temperature is measured and transmitted to the Moonphase wall clock every 4 seconds. The range of the outdoor temperature transmitter may be affected by the temperature. At cold temperatures the transmitting distance may be decreased. Please bear this in mind when positioning the transmitter. Also the batteries may be reduced in power during periods of extreme cold temperatures.
868MHz RECEPTION CHECK FOR OUTDOOR TEMPERATURE TRANSMITTER
The Moonphase wall clock will receive the temperature data within 4 seconds. If the temperature data is not being received 2 minutes after setting up (or the display shows “- - -”), then please check the following points:
- The distance of the Moonphase wall clock or outdoor temperature transmitter should be at least 2 meters away from any interfering sources such as computer monitors or TV sets.
- Avoid placing the receiver onto or in the immediate proximity of metal window frames.
- Using other electrical products such as headphones or speakers operating on the same signal frequency (868MHz) may prevent correct signal transmission and reception.
- Neighbors using electrical devices operating on the 868MHz signal frequency can also cause interference.
Note:
When the 868 MHz signal is received correctly, do not re-open the battery cover of either the outdoor temperature transmitter or moonphase wall clock, as the batteries may spring free from the contacts and force a false reset. Should this happen accidentally then reset all units (see
Setting up above) otherwise transmission problems may occur.
The maximum transmission range is 100 meters from the outdoor temperature transmitter to the moonphase wall clock (in open space). However, this depends on the surrounding environment and interference levels. If no reception is possible despite the observation of these factors, all system units have to be reset (see Setting up).
CHANGING THE DISPLAY MODE (DATE, SECONDS, AND TEMPERATURES)
There are four possible display modes to view the day, seconds, and temperatures.
The indoor temperature/outdoor temperature/date/weekday is the default.
To change the display:
- Press the + key. The display should now show the seconds/outdoor temperature/date/weekday.
- Press the + key second time and the display will now show the indoor temperature/seconds/ date/weekday.
- Press the + key third time and the display will now show the indoor temperature/outdoor temperature/date/seconds.
- Press the + key a fourth time and the display will return to the normal display of indoor temperature/outdoor temperature/date/weekday.
POSITIONING
Before permanently mounting ensure that the Moonphase wall clock is able to receive DCF signals from the desired location. Also, extreme and sudden changes in temperature will decrease the accuracy of the weather wall clock.
To achieve a true temperature reading, avoid mounting where direct sunlight can reach the outdoor temperature transmitter. It is recommended to mount the outdoor temperature transmitter on a North-facing wall or in any well shaded area. The maximum transmitting range is 100 meters; obstacles such as walls, concrete, and large metal objects can reduce the range.
Place both units in their desired location, and wait approximately 10 minutes before permanently mounting to ensure that there is proper reception. The outdoor temperature transmitter is not waterproof and should not be placed anywhere it will become submerged in water or be directly in the rain.
There are two possible ways to mount the Moonphase wall clock:
- use of the foldout table stand, or
- wall mounting
FOLDOUT TABLE STAND
Simply unfold the stand at the back of the clock and place on a flat surface.
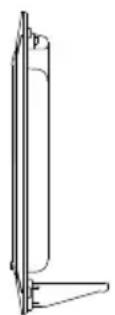
WALL MOUNTING
natural_image
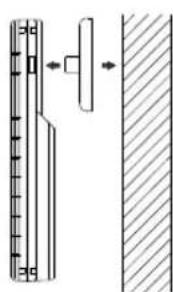
Diagram showing a vertical panel mounted on a wall with an arrow pointing to a side, next to a hatched surface (no text or symbols)1) Using a straightedge, horizontally space at 60 mm three screw positions on a wall.
2) Install three mounting screws (not included) into a wall within transmission range—leaving approximately 5mm extended from the wall.
3) Place the Moonphase wall clock onto the screws, using the hanging holes on the backside. Gently pull the Moonphase wall clock down to lock the screws into place.
Note: Always ensure that the Moonphase wall clock locks onto the screws before releasing.
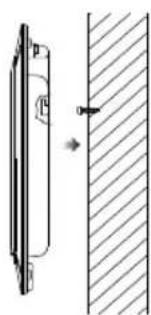
POSITIONING THE OUTDOOR TEMPERATURE TRANSMITTER
natural_image
Technical line drawing of a mechanical device with a spring scale and a vertical stack (no text or symbols)The remote temperature transmitter can be placed onto any flat surface or wall mounted using the bracket which doubles as a stand or wall mount base.
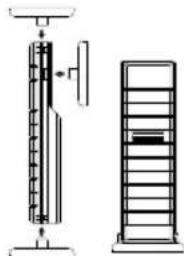
natural_image
Pure mechanical diagram showing a vertical rod and a rectangular component with an arrow, no text or symbols present.To wall mount:
- Secure the bracket onto a desired wall using the screws and plastic anchors.
- Clip the remote temperature transmitter onto the bracket.
Note:
The mounting surface can affect the transmission range. If, for instance, the unit is attached to a piece of metal, it may then either reduce or increase the transmitting range. For this reason, we recommend not to place the unit on any metal surfaces or in any position where a large metal or highly polished surface is in the immediate vicinity (garage doors, double glazing, etc.). Before securing in place, please ensure that the
Moonphrase Wall Clock can receive the 868MHz signal from the temperature transmitter at the positions that you wish to place them.
CARE AND MAINTENANCE:
- Extreme temperatures, vibrations and shocks should be avoided as these may cause damage to the unit and give inaccurate forecasts and readings.
- When cleaning the display and casings, use a soft damp cloth only. Do not use solvents or scouring agents as they may mark the LCD and casings.
- Do not submerge the units in water. Furthermore, fix all parts in place where the units are adequately protected against moisture and rain.
- Immediately remove all low powered batteries to avoid leakage and damage. Replace only with new batteries of the recommended type.
- Do not make any repair attempts to the unit. Return them to their original point of purchase for repair by a qualified engineer. Opening and tampering with the unit may invalidate their guarantee.
- Do not expose the units to extreme and sudden temperature changes, this may lead to rapid changes in forecasts and readings and thereby reduce their accuracy.
Hereby, Technotrade declares that this product WS 8118-IT is in compliance with the essential requirements and other relevant provisions of Directive 2014/53/EU and ROHS 2011/65/EC. The original EU declaration of conformity may be found at: www.technoline.de/doc/4029665081182
SPECIFICATIONS:
Temperature measuring range
Indoor : -9.9°C to +39.9°C with 0.1°C resolution
+14.1°F to +103.8°F with 0.2°F resolution
("OF.L" displayed if outside this range)
Outdoor : -39.9°C to +59.9°C with 0.1°C resolution
-39.8°F to +139.8°F with 0.2°F resolution
("OF.L" displayed if outside this range)
Temperature checking interval
Indoor : every 20 seconds
Outdoor : every 4 seconds
Transmission distance : maximum 100 meters in open field, depending upon surrounding structures, mounting location and possible interfering sources
Transmission frequency : 868 MHz
Maximum transmission power : 5.66 dBm
Power source (Alkaline batteries recommended)
Moonphase wall clock : 2 x AA, IEC LR6, 1.5V batteries
Transmitter : 2 x AA, IEC LR6, 1.5V batteries
Battery life : about 24 months
Dimensions (L x W x H)
Moonphase wall clock : 255,6 x 29,5 x 242,5mm
Transmitter : 38,2 x 21,2 x 128,3mm
LIABILITY DISCLAIMER
- The electrical and electronic wastes contain hazardous substances. Disposal of electronic waste in wild country and/or in unauthorized grounds strongly damages the environment
- Please contact your local or/and regional authorities to retrieve the addresses of legal dumping grounds with selective collection
- All electronic instruments must from now on be recycled. User shall take an active part in the reuse, recycling and recovery of the electrical and electronic waste.
- The unrestricted disposal of electronic waste may do harm on public health and the quality of environment.
- This product must however not be thrown in general rubbish collection points.
- As stated on the gift box and labeled on the product, reading the "User manual" is highly recommended for the benefit of the user.
- The manufacturer and supplier cannot accept any responsibility for any incorrect readings and any consequences that occur should an inaccurate reading take place.
- This product is not to be used for medical purposes or for public information.
- The specifications of this product may change without prior notice.
- This product is not a toy. Keep out of the reach of children.
- No part of this manual may be reproduced without written consent of the manufactur
Environmental reception effects
The clock obtains the accurate time with wireless technology. Same as all wireless devices, the reception is maybe affected by the following circumstances:
-
long transmitting distance
• nearby mountains and valleys -
near freeway, railway, airports, high voltage cable etc.
- near construction site
- among tall buildings
• inside concrete buildings - near electrical appliances (computers, TV's, etc) and metallic structures
• inside moving vehicles
Place the clock at a location with optimal signal, i.e. close to a window and away from metal surfaces or electrical appliances.
Precautions
- This main unit is intended to be used only indoors.
- Do not subject the unit to excessive force or shock.
- Do not expose the unit to extreme temperatures, direct sunlight, dust or humidity.
- Do not immerse in water.
- Avoid contact with any corrosive materials.
- Do not dispose this unit in a fire as it may explode.
- Do not open the inner back case or tamper with any components of this unit.
Batteries safety warnings
- Use only alkaline batteries, not rechargeable batteries.
• Install batteries correctly by matching the polarities (+/-).
• Always replace a complete set of batteries. - Never mix used and new batteries.
- Remove exhausted batteries immediately.
- Remove batteries when not in use.
- Do not recharge and do not dispose of batteries in fire as the batteries may explode.
- Ensure batteries are stored away from metal objects as contact may cause a short circuit.
- Avoid exposing batteries to extreme temperature or humidity or direct sunlight.
- Keep all batteries out of reach from children. They are a choking hazard.
Use the product only for its intended purpose!
Consideration of duty according to the battery law
Old batteries do not belong to domestic waste because they could cause damages of health and environment. You can return used batteries free of charge to your dealer and collection points. As end-user you are committed by law to bring back needed batteries to distributors and other collecting points!
Consideration of duty according to the law of electrical devices
This symbol means that you must dispose of electrical devices separated from the General household waste when it reaches the end of its useful life. Take your unit to your local waste collection point or recycling centre. This applies to all countries of the European Union, and to other European countries with a separate waste collection system.
PENDULE AVEC PHASES LUNAIRES WS 8118-IT
natural_image
Two technical diagrams showing vertical measurement scales with no visible text or symbolsnatural_image
Technical line drawing of a vertical spring scale and its side view (no text or symbols)natural_image
Pure mechanical diagram showing a vertical rod and a rectangular block with directional arrows, no text or symbols present.Fixation murale
Dimensions (L x P x H)