
38EV - Lawn mower SABO - Free user manual and instructions
Find the device manual for free 38EV SABO in PDF.
| Product Type | Electric Scarifier (Lawn Mower) |
| Brand | SABO |
| Model | 38EV |
| Connection Voltage | 230 V AC, 50 Hz |
| Recommended Fuse | 16 A, time-delay |
| Motor Power | Not specified (see rating plate) |
| Weight | Approx. 14 kg (according to rating plate) |
| Scarification Depth | 0 to 5 mm (adjustment by rotation, 1 turn = 1.5 mm) |
| Maximum Operating Slope | 25° (recommended 15°) |
| Collection Bag | Optional (accessory) |
| Blade Type | Original scarifier blades (replacement by approved workshop) |
| Emergency Stop | Release the safety control handle |
| Electrical Protection | Residual current circuit breaker 30 mA recommended |
| Maximum Cable Length | 25 m with cable 3x1 mm², 40 m with 3x1.5 mm² |
| Power Cable Quality | H05 RN-F or H07 RN-F according to DIN/VDE |
| Wheel Maintenance | Lubricate bearings once a year |
| Handlebar Folding | Yes, for storage/transport |
| Area of Use | Gardens, parks, sports fields (domestic use) |
| Storage Temperature | Dry and closed place, out of reach of children |
Frequently Asked Questions - 38EV SABO
User questions about 38EV SABO
0 question about this device. Answer the ones you know or ask your own.
Ask a new question about this device
Download the instructions for your Lawn mower in PDF format for free! Find your manual 38EV - SABO and take your electronic device back in hand. On this page are published all the documents necessary for the use of your device. 38EV by SABO.
USER MANUAL 38EV SABO
When you are reading the operator's manual, please unfold the front and back page.

Nederlandss
Original Instruction
Nederlands NL
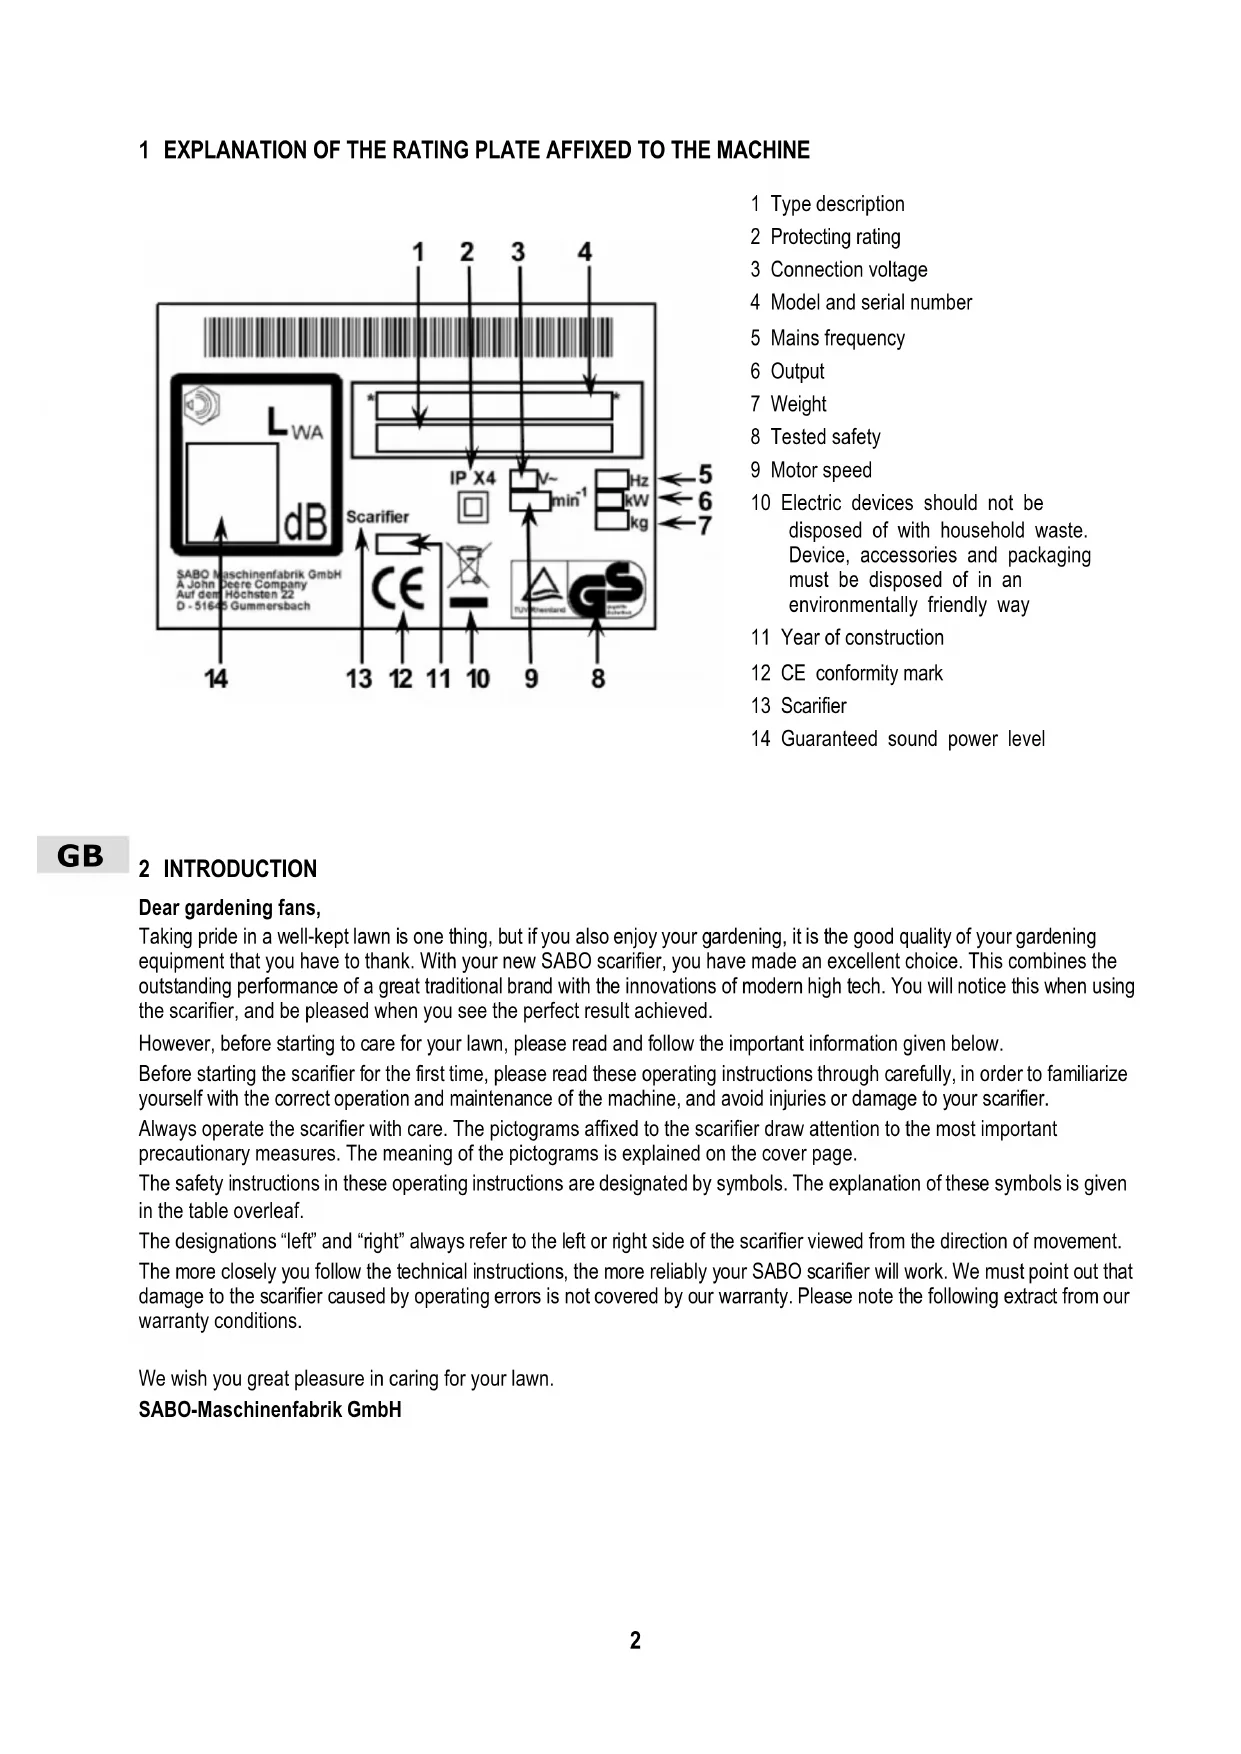
GB Explanation of the pictograms

GB Read the operator's manual!
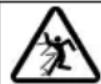
Risk caused by thrown elements when the motor is running - Maintain the safety gap / Keep others away! Wear protective goggles!
GB Keep supply flexible cord away from cutting tines.
GB Explanation of the pictograms
A John Deere Company
Auf dem Höchsten 22
D-51645 Gummersbach
Tel. +49 (0) 22 61 704-0
1 Explanation of the rating plate affixed to the machine .2
2 Introduction 13
3 Explanation of the symbols. 3
4 Proper use 4
5 General safety guidelines for the electric scarifier ....4
General safety instructions 4
Preparatory measures 5
Handling. 5
Maintenance and storage 7
6 Description of components. 7
7 Preparation 8
Assembling the handlebar upper section 15
(Illustration C3 + E3) 8
8 Before using the scarifier for the first time. 8
9 Starting the machine. 8
Attaching the connecting cable (Illustration C2)......8
Attaching the connecting cable to the strain relief fitting (Illustration D2) 9
Starting the motor (Illustration A2) 16
10 Switching off the Motor (Illustration F) .Technical data .. see rear inner cover
11 Emergency stopping. Declaration of conformity .Before Technical Data
Technical data .. see rear inner cover
Iaration of conformity .Before Technical Data
12 Adjusting the scarifying depth. 10
Setting (Illustration T2 + V2 + Z2) 10
Grass collector. 11
Operation with grass collector (accessory) 11
Attaching the grass collector to the scarifier (Illustration S1) 11
Emptying the grass collector. 11
Operation without grass collector 11
Scarifier operation. 11
Using the machine on slopes. 11
Handling the cable during use 11
Checking operating safety 11
Time restrictions. 12
Tips on caring for your lawn (Illustration M) 12
Care and servicing of your scarifier 13
Cleaning (Illustration N3) 13
Storage 13
Collapsing the handle (Illustration A1) 13
Transporting and securing the equipment. 13
Maintenance of the blade shaft. 13
Servicing the wheels. 14
Troubleshooting 14
GB
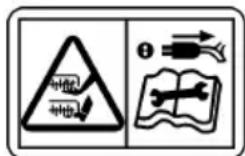
1 EXPLANATION OF THE RATING PLATE AFFIXED TO THE MACHINE
1 Type description
2 Protecting rating
3 Connection voltage
4 Model and serial number
5 Mains frequency
6 Output
7 Weight
8 Tested safety
9 Motor speed
10 Electric devices should not be disposed of with household waste. Device, accessories and packaging must be disposed of in an environmentally friendly way
11 Year of construction
12 CE conformity mark
13 Scarifier
14 Guaranteed sound power level
GB
2 INTRODUCTION
Dear gardening fans,
Taking pride in a well-kept lawn is one thing, but if you also enjoy your gardening, it is the good quality of your gardening equipment that you have to thank. With your new SABO scarifier, you have made an excellent choice. This combines the outstanding performance of a great traditional brand with the innovations of modern high tech. You will notice this when using the scarifier, and be pleased when you see the perfect result achieved.
However, before starting to care for your lawn, please read and follow the important information given below.
Before starting the scarifier for the first time, please read these operating instructions through carefully, in order to familiarize yourself with the correct operation and maintenance of the machine, and avoid injuries or damage to your scarifier.
Always operate the scarifier with care. The pictograms affixed to the scarifier draw attention to the most important precautionary measures. The meaning of the pictograms is explained on the cover page.
The safety instructions in these operating instructions are designated by symbols. The explanation of these symbols is given in the table overleaf.
The designations "left" and "right" always refer to the left or right side of the scarifier viewed from the direction of movement. The more closely you follow the technical instructions, the more reliably your SABO scarifier will work. We must point out that damage to the scarifier caused by operating errors is not covered by our warranty. Please note the following extract from our warranty conditions.
We wish you great pleasure in caring for your lawn.
| WARNING Please read and observe the operating instructions and general safety instructions. Proper use of the machine also includes the observation of the operating, maintenance and servicing requirements specified by the manufacturer. | |
| WARNING Keep all persons outside the danger area! Contact with the rotating cutters can cause severe injury. Objects ejected at high speed can cause severe injury. You must never scarify the lawn if there are other persons nearby, especially children or animals. | |
| WARNING Electric shock can cause severe injuries. The electrical equipment must not be modified. Check the connecting cable regularly for signs of damage and ageing. Ensure that the cable is free at all times, and not kinked, abraded or trapped. Faulty connecting cables must be replaced. Do not spray the machine down with water. This could damage the electrical system. Always have the replacement of the blades carried out by an authorized workshop, since an insulation protection test to DIN EN 60335 must be carried out after repair and maintenance work to insulation components (e.g. blade shaft, attachment fittings). | |
| WARNING Watch out for sharp blades! Contact with the rotating cutters can cause severe foot injuries. Only start the motor when standing behind the machine. Ensure that your feet do not get under the housing. | |
| WARNING Watch out for sharp blades! Contact with the rotating cutters can cause severe hand and foot injuries. When the motor/blade shaft is running, always observe the safety distance to the machine which is maintained by the handlebar. Ensure that your hands and feet do not get under the housing. | |
| WARNING Objects ejected at high speed can cause severe injury. Before using the scarifier, and especially in areas covered by leaves and foliage, remove all stones, sticks, wires and other foreign objects from the lawn. Never operate the machine with damaged or missing safety devices. Check the cutters regularly for firm seating, wear and damage. Have worn or damaged blades replaced by an authorized workshop. | |
| WARNING Electric shock can cause serious injuries. Keep the connecting cable away from the cutters. Ensure when starting that the connecting cable is safely away from the housing. Do not run over the connecting cable when operating the machine. In case of damage, switch the machine off, wait until the cutters have come to a standstill and remove the plug from the socket. Faulty connecting cables must be replaced. | |
| WARNING If the plug is not removed from the power supply before working on the machine, the motor could be started accidentally, resulting in serious injury. Always switch off the motor and remove the plug before maintenance and repair work. Refer to the operating instructions for relevant cleaning and maintenance instructions. | |
| WARNING Contact with the rotating cutters can cause serious hand and foot injuries. Objects ejected at high speed can cause severe injury. Switch the motor off, and wait until the cutters come to a standstill: - if the machine has to be lifted or tilted, e.g. in order to transport it; - when moving the machine of the lawn on paths or roads; - if the machine is left unsupervised for any time; - before setting the scarifying depth; - before removing the grass collector. | |
| CAUTION Contact with the sharp edges of the scarifier cutters can cause severe injury. Protective gloves must be worn at all times during maintenance and cleaning work. | |
| WARNING Wear protective goggles! Objects thrown upwards can cause serious injuries. Never do any scarifying without wearing protective goggles. |
4 PROPER USE
The machine is intended solely for scarily grass and lawn surfaces in the course of normal garden and landscaping care ("Proper use"). Any further form of use constitutes improper use; the manufacturer accepts no liability for any resulting damage; the risk is borne solely by the user. Proper use of the machine also includes the observation of the operating, maintenance and servicing requirements specified by the manufacturer.
If used in public areas, parks, sports grounds, on roads and in agricultural and forest areas, special care must be taken.
The scarifier must not be used in particular for the removal of weeds between stones or paving stones, on terraces or paths, as a rotavator or for levelling uneven areas of ground, such as molehills.
The use of any additional devices not approved by SABO is prohibited. If such additional devices are used, this invalidates the CE conformity and any warranty claims. Unauthorized modifications to this machine rule out any liability on the part of the manufacturer for resulting damages.
5 GENERAL SAFETY GUIDELINES FOR THE ELECTRIC SCARIFIER
General safety instructions

For your own safety and in order to ensure that the machine functions correctly, please read this operator's manual carefully. Acquaint yourself with the controls and the correct use of the machine.
Please remember that the person operating or using the machine bears full responsibility not only for possible risks to other people or their property, but also for accidents which occur whilst using the machine.
This operator's manual is part of the scope of supply of the machine and must be handed over to the purchaser of the machine in the event of resale.
- Never allow children or persons under the age of 16 or other persons who are not familiar with the operator's manual to use the machine. Local regulations can determine the minimum age of the person allowed to use the machine.
Please explain the possible dangers and how to prevent accidents to every person who is supposed to work with this machine. This machine may only be used, maintained or serviced by persons who are familiar with the machine, and who are aware of the possible dangers.
This equipment is not meant to be used by persons (including children) with restricted physical, sensory or mental capabilities or lacking in experience and/or knowledge, unless they are accompanied by a person responsible for their safety and unless they received instructions from the person on how the equipment is to be used. This responsible person must decide in advance, whether the person with restricted physical, sensory or mental capabilities is suitable for this activity.

You must never scarify the lawn if there are other persons nearby, especially children or animals.
Please keep your machine in a safe place! Machines which are not being used should be kept in a dry, locked room out of reach of children.
Preparatory measures
- When scarifying you must always wear a strong pair of shoes or safety shoes and long trousers. Do not scarify whilst you are barefooted or wearing sandles. To protect the eyes, wear protective goggles.

Always check the area where you intend to use the machine completely for stones, sticks, wires and other foreign objects which might be picked up and ejected, before and during scarifying.
If you also use an auto mower for lawn care, the following safety instructions must be heeded with regard to the working area of the auto mower:
Before working on these areas (mowing, scarifying etc.) always check the range of the boundary wire.
If the wires are laid in the ground they must be checked, no wires may be visible, with particular attention necessary at the charging station.
If the boundary wires are laid above ground they should be routed tight directly on the ground and not lie loose in the grass. The wires must be sufficiently fixed using boundary staples, see the operating manual.
The boundary staples must not project, if this is the case push them firmly in place.
- Remove any residual wires that are lying around before starting to mow.
In the cases described above, there is a risk of the wire being pulled in and wound up by the tool; this can lead to serious injury.
- Low-hanging branches and similar obstacles can injure the operator or interfere with the scairifying operation. Before scairifying, identify potential obstacles such as low-hanging branches, and trim back or remove those obstacles.
In order to ensure the proper and safe use of a garden appliance, a connection cable should be used of a minimum quality H 05 RN-F to DIN/VDE 0282/4, with a cross-section of 3 × 1 ~mm^2 and a rubber or rubber-sheathed DIN/VDE 0620 connection coupling. The lawnmower must be connected to an earthed socket rated for 230 ~V a.c. - When using a cable with a child safety device, smooth operation of the safety device must be ensured, since otherwise the connection plug of the appliance may be damaged.
The plug must be fitted with a 16 amp slow fuse.
We recommend that a residual current operated device with a maximum breaking current of maximum 30mA or equivalent safety equipment be used.

The electric equipment must not be modified. The connecting cable must be checked at regular intervals for signs of damage or ageing and must only be used if it is in proper order.
If the unit is to be operated via a generator, an authorised specialist workshop should first be consulted with regard to a suitable generator.
Before using the scarifier and to avoid danger, check the machine for firm seating of screw fittings, correct assembly and the condition of the blade shaft. Worn or damaged blades and attachment screws must be replaced.
Handling
The machine must not be operated in potentially explosive surroundings.

The connecting cable must kept away from the cutters. Whilst you are scarifying the lawn, do not drive over the connecting cable with the machine; when guiding the connecting cable, always make sure that you are keeping a safe distance.

If the connecting cable is damaged, turn off the machine immediately and wait until the cutters have come to a standstill, then remove the plug fromthe socket. Faulty connecting cables must be replaced. Always ensure that the cable can move freely, make sure it does not get kinked, abraded or trapped.
Do not wear radio or music headphones. Safe service and operation requires your full attention.
Only use the scarifier during daylight or if the lighting is good. Always push the machine at walking pace.
Use care when approaching blind corners, shrubs, trees, or other obstacles that may obscure vision.
- Do not move too closely to compound steps, trenches and banks. The equipment can suddenly topple over when a wheel suddenly gives way over the edge of a cliff or trench or when an edge suddenly yields.
Do not operate the equipment when you are sick, tired or under the influence of alcohol, medicine or drugs.
- Avoid using the machine if possible on wet grass, in order to avoid the danger of slipping.
Always make sure that you are standing securely whilst using the scarifier on slopes. Always work at right angles to the slope, never straight up or down. Please be especially careful when you change direction when using the scarifier on a slope.
- Do not scarify on extremely steep slopes! Scaring on slopes always involves risks. Your scarifier is powerful enough to scarify slopes up to a gradient of 25^ . For reasons of safety, however, we urgently recommend that you do not attempt to exploit this theoretical potential capacity to the full. Hand-held scarifiers should never be used on slopes steeper than 15^ .
Please be especially careful when turning the machine or pulling it towards yourself.
If you walk backwards whilst using the machine, you can easily stumble so this should be avoided. Avoid unnatural body positions. Ensure that you are standing securely and keep your balance at all times.
Always observe the safety distance to the machine which is maintained by the handlebar.
In order to avoid the machine slipping when being carried, always hold the machine by the grip devices provided (carrying handle, housing, handlebar ends or transverse bar of the lower handlebar section). Do not grasp the machine by the ejection flap!
Note the weight of the machine before lifting or carrying it (see technical data). Lifting heavy weights can lead to health problems. - Never lift or carry the machine when the engine is running.
- Never operate the machine with damaged or missing safety or protective devices.
Safety devices include:

Safety grip
In case of danger, release the safety grip: the motor will be switched off and the cutters will come to a standstill. Warning! The cutters may take a few seconds to stop!
The function of the safety grip must not be deactivated.
It is important to make sure that the safety grip functions correctly. If it does not, have it repaired by an authorised specialist workshop.
Protective devices include:

Housing, grass collecting bag, ejection flap.
The protective devices protect the user against objects being ejected at high speed.
The machine must not be operated with a damaged housing or without a properly fitted collecting bag or ejection flap on the housing.

Housing
This protection unit protects against injuries through contact with the rotating cutting tool.
The equipment must not be operated with a damaged housing. Please make sure that hands and feet are not placed underneath the housing.

- Cover hose at upper part of bar, engine hood and engine bracket, covers, mounting parts, switch-plug combination with cable, connection cable,
This protection unit protects against injuries through contact with electrical power carrying parts. The electrical equipment must not be modified.
Damaged connection cables must be replaced. Please use a connection cable with a minimum quality of H 07 RN-F in accordance with DIN/VDE 0282/4.
In accordance with the existing standard DIN EN 60335, an insulation protection test must be made after repair and maintenance work at insulation parts.
The safety devices must not be modified.
Start or operate the starter switch with great care and according to the manufacturer's instructions.

When you start the machine, make sure that your feet are at a sufficiently safe distance away from the cutting blades.

When you start the engine, the machine must not be lying on its side or in a slanting position. If it is necessary to hold the machine at a slant, always ensure that the cutting tools are pointing away from the person using the machine, although only as far as absolutely necessary.

Never put your hands or feet near or under revolving parts. Always make sure that your hands or feet do not get under the housing.

Stop the motor, pull the plug, check that all moving parts have come to a complete standstill:
- when leaving the machine;
- before checking the power connection;
before you check, clean or carry out any work on the machine;
before you eliminate jams or blockages in the ejection channel;
- when you hit a foreign body;
- if the machine starts to vibrate strangely.
If a foreign object has been encountered or if the machine becomes blocked, e.g. by driving onto an obstacle, a specialist dealer must check whether parts of the machine have been damaged or deformed. Any necessary repairs must also be carried out by an authorized specialist workshop.
If you notice unusually strong vibrations in your machine, you must have it checked by an authorized dealer.

Switch the motor off and ensure that all moving parts have come to a complete standstill,
- when lifting or tilting the machine, e.g. for transport;
when transporting the machine to and from the working area; - when moving the machine off the lawn;
- if leaving the machine for any time;
- when setting the scarifying depth;
before removing the collector bag.
Maintenance and storage
Ensure that all screws have been tightened securely and that the machine is in a safe working condition.

The ejection flap must only be opened and the grass collector removed when the motor is turned off.
Always check the grass collector at regular intervals for wear and tear or loss of function.
Check the condition and firm seating of the blade shaft before using the machine. Worn or damaged blades must be replaced immediately.
Always have the replacement of the blades carried out by an authorized workshop, since an insulation protection test to DIN EN 60335 must be carried out after repair and maintenance work to insulation components (e.g. blade shaft, attachment fittings).
- For reasons of safety, always replace worn or damaged parts.

Protective gloves must be worn at all times during maintenance and cleaning work.

Maintenance and cleaning work must only be performed when the motor has been switched off and the plug has been pulled out of the socket.

Do not clean the machine with running water or pressure cleaners. This could damage the electrical system.
For warranty and safety reasons, original replacement parts must be used at all times.
Notes for Switzerland:
Electric appliances must only be operated if a residual current operated device with a maximum breaking current of 30 mA is also integrated into the circuit.
Notes for Austria:
The socket coupler of the connecting cable must be splashproof.
6 DESCRIPTION OF COMPONENTS
1 Cable connection plug
2 Actuating grip for motor (safety grip)
3 Cover for electric motor
4 Belt cover
5 Adjusting screw scarifying depth
6 Ejection flap
7 Strain relief device for electric cable
8 Adjusting rod
9 Lever for lowering/raising the blade shaft
10 Locking button (red)
7 PREPARATION
The following parts are included in the packaging for assembly of the scarifier:
- Scarifier
Pre-assembled handlebar upper section - Tool bag with the following contents:
Operator's manual with Declaration of Conformity
Warranty conditions and Warranty card
- Various fixing parts
In the unlikely event of a missing part, please contact your dealer.
Assembling the handlebar upper section (Illustration C3 + E3)
Push the upper part of the handle onto the lower part of the handle so that the two saucer-head screws M6x45 (1) can be pushed through the holes in the handle from the inside C3.
From the outside, place the curved washer (2) on the screws on both sides; screw on the two wing nuts (3) and tighten C3.
Insert the central adjusting rod (4) into the two connecting pieces (6) mounted on the adjusting rods (5) E3.
Push a hexagonal bolt (7) through from the outside and tighten with a wing nut (9) after fitting a split washer (8) E3.
- Fasten the cable to the upper and lower part of the handle with the aid of cable ties from the tool bag.
8 BEFORE USING THE SCARIFIER FOR THE FIRST TIME
Safety instruction!
See table for explanation of symbols page 3
Check all screw fittings for firm seating. Tighten screws if necessary! Check in particular the correct assembly and condition of the blade shaft (see Chapter "Maintenance of the blade shaft").
Always have work on the blade shaft carried out by an authorized workshop, since an insulation protection test to DIN EN 60335 must be carried out after repair and maintenance work to insulation components (e.g. blade shaft, attachment fittings). Make sure that all safety devices are fitted properly and are not damaged.
9 STARTING THE MACHINE


Safety instruction!
See table for explanation of symbols page 3
IMPORTANT
If the unit is to be operated via a generator, an authorised specialist workshop should first be consulted with regard to a suitable generator.
Attaching the connecting cable (Illustration C2)
ATTENTION
In order to ensure the proper and safe use of a garden appliance, a connection cable should be used of a minimum quality H 05 RN-F to DIN/VDE 0282/4, with a cross-section of 3 × 1 ~mm^2 and a rubber or rubber-sheathed DIN/VDE 0620 connection coupling. The lawnmower must be connected to an earthed socket rated for 230V AC with a 16 amp slow fuse.
When using a cable with a child safety device, smooth operation of the safety device must be ensured, since otherwise the connection plug of the appliance may be damaged.
IMPORTANT
Cables with a cross-section of 3 × 1 mm^2 should only be used up to a length of 25 metres. If a connection cable with a cross-section of 3 × 1.5 mm^2 is used, the length of the connection cable can be up to 40 metres.
- Plug the cable into the switch/plug combination on the upper handle.
Only then should the connecting cable be connected to the mains. - When removing the cable always disconnect the cable plug from the mains first.
Attaching the connecting cable to the strain relief fitting (Illustration D2)
ATTENTION
The unit may not be used without the cable relief in order to prevent damages to the switch/plug combination and to the cable. The cable must be hung in the cable relief on the unit to ensure that it is fixed safely. This prevents the cable socket from being pulled off the unit. Moreover, the cable aligns itself automatically on the other side when cornering.
Form a semi-circular loop in the cable, keep a distance of approx. 80~cm from the connection cable coupling.
Insert the cable from the bottom into the cable relief and loop it around the fastening post.
Hold the cable by both ends and pull it firmly into the cable relief.
Starting the motor (Illustration A2)
Before starting the motor, ensure that the blade shaft is in the lifting position (1) Z2.
Only start the motor when standing behind the machine. Always place the machine on a level surface where the grass is not too high (too high grass will impede the starting of the blade shaft and make starting more difficult). Where this is not possible, starting can be aided by tilting the machine, with the cutters pointing away from the user, but only as far as absolutely necessary.
- To switch on the motor, first press and hold the red button (1).
- With the other hand, pull the safety grip (2) on the upper handlebar section. The grip must be held in this position during operation.
- The red button can then be released.
IMPORTANT
If the motor does not start up within 5 seconds of the device being switched on, then
- Release the control handle again
- Remove the mains plug!
- Check the connection lead
- Check the voltage supply in the house (fuse)
- Check device for blockage of the cutter blade shaft
- Have it checked by an authorised workshop.
10 SWITCHING OFF THE MOTOR (Illustration F)
To switch off the motor, release the safety grip (1). The motor will be switched off and the cutters will come to a standstill. Warning! The cutters may take a few seconds to stop!
11 EMERGENCY STOPPING
ATTENTION
Avoid injury! Motor and cutters must stop. If not, please contact the nearest authorized dealer.
Release the safety grip.
- The cutters will stop.
The motor will stop.
12 ADJUSTING THE SCARIFYING DEPTH


Safety instruction!
See table for explanation of symbols page 3
The scarifying depth must only be adjusted with the motor switched off!
To work with the scarifier, the scarifier lever is pushed forward into the "scarify" position T2. This lowers the cutter shaft and the blades penetrate the turf.
The working depth depends on the blade wear, and must also be set taking into account the relevant grass and ground conditions.
Always check and adjust the scarifying depth on a level area of lawn.
With the blade shaft lowered, the blades should just be in contact with the turf. A working depth of up to 3 - 5mm is recommended. In the case of a well-tended lawn with soft ground, the working depth can be set slightly deeper. In case of a very mossy lawn surface, the initial working depth should be slightly less.
Setting (Illustration T2 + V2 + Z2)
On a new machine, the cutter shaft is in the uppermost position. The scarifying depth is adjusted as follows:
Tip the scarifier lever forwards in order to lower the cutter shaft T2.
Turn the rotary knob (1) to the left until the cutter shaft is just scratching the surface of the lawn V2.
Align the pointer (2) with the arrow on the housing (zero adjustment) V2.
Now turn the rotary knob to the left so that the cutter shaft cuts into the ground. The pointer is automatically turned as well V2.
A complete revolution (360^) to the left will lower the cutter shaft by 1.5mm
The scarifying depth should initially be approx. 3 - 5mm in other words, 2-3 revolutions of the rotary knob to the left.
The lever is set vertically to raise the cutter shaft from the set working position. The adjusted scarifying depth is not altered by this V2!
After a few operating hours, the cutter shaft may need to be re-adjusted because of wear. The more intensive the use, the greater the wear to the blades. Hard or very dry ground will increase the wear to the blades.
Then carry out the working depth adjustment as described above.
GB
13 GRASS COLLECTOR


Safety instruction!
See table for explanation of symbols page 3
Operation with grass collector (accessory)
The scarifier can also be operated with a grass collector (Order no. - see Original replacement parts and accessories).
Attaching the grass collector to the scarifier (Illustration S1)
- Open the ejection flap of the scarifier upwards.
Pick up the collecting sack by the carrying strap and hang it in the scarifier casing with its two side hooks upwards. - Attach ejection flap to collector.
When using the machine, ensure that the collector is emptied in good time. The grass collector will only collect grass properly if air can pass through it freely. If the cutter is set too low the grass collection is impaired.
IMPORTANT
Do not clean the grass collector with hot water!
Emptying the grass collector
- Switch of the motor and wait until the cutters come to a stop.
- Lift the ejection flap.
- Remove the full grass bag from the scarifier by the carrying strap - the ejection flap closes automatically.
Shake out of the grass bag thoroughly, holding it by the carrying strap and the moulded handle on the bottom.
Operation without grass collector
WARNING
When scarifying without grass collector the ejection flap on the scarifier housing must always be closed (flap down).
See table for explanation of symbols page 3
GB
Using the machine on slopes
ATTENTION
The machine can be operated on slopes and inclines up to an angle of 25^ .
For reasons of safety, however, we urgently recommend that you do not attempt to exploit this theoretical potential capacity to the full. Hand-held scarifiers should never be used on slopes steeper than 15^
Handling the cable during use
Position the cable in such a way that the machine can pull it along easily over the lawn surface that has already been worked. When the machine turns the cable grip automatically positions the cable to the other handle side. Ensure that the cable is kept well away from the cutters and that no loops are formed. Check the mains cable regularly for signs of damage and only use it in proper condition.
Checking operating safety
Before using the machine, always ensure that the safety grip is functioning correctly. When the grip is released, the engine must switch off and the cutters come to a standstill. Warning! The cutters may take a few seconds to stop!
Make sure that all safety devices are fitted properly and are not damaged.
Check the upper part of the bar (insulation) for damage. If the casing should be damaged, contact the nearest authorised workshop without delay, since otherwise injuries (electric shock) can occur through touching the live parts.
After the first few operating hours, and at regular intervals thereafter, check and tighten all screws and nuts. Before using the machine, and to avoid danger, always check the condition and firm seating of the blades (see Chapter "Maintenance of the blade shaft").
WARNING
Work on the blade shaft, or opening or removing any covers connected to the machine must be carried out only by an authorised specialist workshop, since an insulation protection test to DIN EN 60335 must be carried out after repair and maintenance work to insulation components (e.g. blade shaft, attachment fittings, covers).
If the blade shaft becomes jammed, e.g. by encountering an obstacle or foreign bodies, have an authorised specialist workshop check whether any parts of the machine have been damaged or deformed. Always have any necessary repairs carried out by an authorised specialist workshop.
Time restrictions
The time at which scarifiers may be used varies from region to region. Please ask the relevant authorities before using your scarifier.
Tips on caring for your lawn (Illustration M)
When using the machine, always guide it in straight lines at medium walking speed. Due to the forward direction of rotation of the blade shaft, only a slight pushing force is required. Depending on the properties of the surface, it may be necessary to hold the machine back against the working direction. Avoid moving in tight curves.
On very mossy and weedy lawns, it is advisable to apply the scarifier a second time, at right-angles to the first working direction. When using the machine without a grass collector, removes the loose grass from the lawn before the second run. Loose grass lying on the lawn will have an adverse effect on the result, put an additional strain on the machine and make the work unnecessarily difficult for the user (stronger pushing forces).
Loose materials can best be removed by vacuuming with a TurboStar lawn mower or manual raking.
GB
15 CARE AND SERVICING OF YOUR SCARIFIER
Regular care is the best guarantee of long working life and trouble-free operation! Only use original spare parts because only those guarantee safety and qua


Safety instruction!
See table for explanation of symbols page 3
Cleaning (Illustration N3)
Remove all dirt and grass directly after scarifying. Turn the machine over onto its side and use a brush or cloth to clean it. The air slits for the cooling of the electric motor (1) must be free from dirt and grass cuttings.
IMPORTANT
Never spray the machine with water since this could damage the electrical system.
Storage
Always keep the machine in a clean condition in a closed, dry room out of reach of children. Always allow the engine to cool down before you store the machine in a closed room.
Collapsing the handle (Illustration A1)
For storage to save space or for transportation, the top tube can be swivelled over the engine A1.
To fold down the top guide tube as desired, loosen the top or bottom adjustment bar from the connecting piece.
- Swivel the top guide tube forward after loosening the wing nuts.
Ensure that the cable for engine operation is not kinked nor squeezed!
CAUTION
When folding the bar for transport and storage purposes, when loosening the wing nuts it is possible that unintentional upsetting of the bar may occur. In addition, this may result in crushed points between the top and bottom of the bar. This may result in a risk of injury!
Transporting and securing the equipment
If the equipment has to be carried, do not hold the ejection flap! Hold the front part on the wheel axle and at the rear on the cross tube of the bottom guide tube.
Pay attention to the weight of the equipment before you lift or carry it (see Technical data). Lifting heavy loads can cause health problems.
We recommend that the equipment be always lifted or carried by at least two people.
Transport the equipment in the upright posture.
Park the means of transport on level ground so that the equipment cannot roll away before it is secured
Hang out the collection bag and secure it separately during transport
Secure the equipment with approved load-strapping means (e.g. tie-down straps with clamping elements) on or inside the vehicle. Tie-down straps are belt bands made of synthetic fibres. Every tie-down strap is designated. The label contains important details for application
For loaded goods that can roll, it is recommended to use direct strapping with four belts. Secure the equipment on the wheels so that it does not move during transportation.
ATTENTION
Do not tighten the belts too firmly. Fixing the equipment too firmly can cause damages.
Maintenance of the blade shaft
Before using the machine, always check the condition and firm seating of the blades. Worn or damaged blades should be replaced immediately.
WARNING
Always have replacement of the blade shaft carried out by an authorized workshop, since an insulation protection test to DIN EN 60335 must be carried out after repair and maintenance work to insulation components (e.g. blade shaft, attachment fittings).
An incorrectly assembled blade shaft can also cause parts to become detached, possibly leading to serious injury.
Only use original scarifier blades for replacement purposes.
Replacement scarifier blades must be indelibly marked with name and/or trademark of the manufacturer or supplier and with the parts number.
Servicing the wheels
Oil the bearings of the wheels once a year.
- To do this, remove the wheel caps, unscrew the wheel axles and remove the wheels.
After oiling the bearings, push on the wheels and tighten the wheel axle again so that the wheels still turn easily but without any play.
16 TROUBLESHOOTING
| Fault | Possible cause | Remedy |
| Motor does not start up within 5 seconds of the device being switched on | No mains voltage. | Connect the mains plug C2 . Check the fuse. |
| Connection cable damaged. | Have it checked by an authorized workshop. | |
| Cutter blade shaft blocked | Have scarifying depth checked. Clean the cutter blade shaft (remove the mains plug first!) Tilt the machine during start-up. | |
| Have it checked by an authorized workshop. | ||
| Motor stops | Grass is too high | Mow the lawn first. |
| Blockage by foreign bodies | Have machine checked by an authorized specialist workshop. | |
| Working depth to deep | Re-adjust the working depth V2 . | |
| Unsatisfactory result | Grass is too high | Mow the lawn first. |
| Blades are worn | Adjust the working depth V2 . Have the blade shaft replaced by an authorized specialist workshop | |
| Working depth not suitable for grass and ground conditions | Re-adjust the working depth V2 . | |
| Extreme vibration | Have it checked by an authorized dealer | |
| Blade shaft will not turn | Ribbed V-belt defective | Have it checked and replaced if necessary by an authorized specialist workshop. |
Repairs to electrical machines must always be performed only by qualified electricians. Please do not repair them yourself. In the case of faults and defects which have not been listed here, please contact the nearest authorized dealer. This applies in particular to appliances with electrical motors, as when these are repaired they must always undergo an insulation protection test.
Your authorized dealer will also help you if you do not wish to perform any of the maintenance work described here yourself.
He BkHIOuATb a3pATOp B HENOCpeDCTBeHHoB 6n3OcTN DpyrNx IIOJe (ocObeHo DeTeN) nnXKINBOTbIX.
ObecneuNbHaJeKHOCTb XpaHEnMaunH! B Mek3KnpyaTuOnHHbIe nepnoDbMaunHa DonxHa xpaHtbcB C yXOM, 3akpblom H HeOCTynHom dner DeTei NOMEueHN.
PnroToBnteIbHbIe pa6oTbI
Bo Bpempa60tbI 63aTeBHO HOweHHe 3akpbToI ObyBn NIN 3auNTHO 6bHK.3appeaetcpa60ta 6ockOM INN B caHaJnx.

Ipeed BKluyeHem a3paTopa I BO Bpemra pa6oTb He06xOIMO NOHocTbIO pOBepNTb pa6oH yactok u YdaNtB BCE KaMn, NaK, npOBoa I npOue NocToPOHHne PpeDMeTb, KOTOpbE MOrY T nOaCTb BHyTpB MaunHbI INI OTCKOHTb OT ee Kopnyca.

Ecnn dIy yXoJa 3a ra3OHom TaKKe IcNoJIb3YeTc aBTOHOMHa r3OHOKOcNJa, Heo6xOJIMo yuHTbIBaTb npUBeDeHHbIe HnKe yKa3AHnI NO TexHnke 6e3OnaCHOCTn Ipy pa6Oey NOBepxHOCTn ABTOHOMHr Ra3OHOKOCINKn:
- Ipeed Naayamop paobtHa 3Tnx yactkax (ckaunBaHne TpaBbl, aepaunn T.d.) Heo6xOIMo Bcerda npOBepaTb 30Hy orpaunuBaUx KabeJe.
- Ecni Ka6eHn npoJoxHeI no3emne, Heo6xOIMO npOBepuTb nx. Ka6eHn He DoJnxHbI 6bITb BnHbI. CneNyET co6HnOaTaB oc6yIO octopoxHoCTb praOM c 3apAHO CTaHcnei.
- Ecnn orpaHnHTeNbHbIe Ka6eN npOIOKeHbI HAd 3emJIeN, OHn DOJXHbI 6bITb HAraHyTb I NO NOBepxHOCTn rpyHTa n He DoJXHbI CBO6oHbIO JExKaTb B TpaBe. Heo6xoDmO 3aФHKcnpoBaTb Ka6eN c NOMOu bTOB, CM. pyKOBODCTBO no 3KcNlyatauMn.
- 1nTbI He dJxHb BbICTyNaTb HAD NOBepxHOCTbO, pN HEO6xoDMOCtN CNe dyEe TBaABNTb TnTbI.
- Ipeed hauanom ckaunBaHnCneyetyd aJntb ocTaKn KaBeJe.
BOnncbIbAembix BblIe ycNoBnX cyueCTByeT onaCHOctb BTaRnBaHnHa HAMOTKn Ka6JIb R pa6Ooee yCtpoiCTBO, YTO MOKeT npuBeCTN K TjKeJIbIM TeLeChbIM NOBpeKdEHnM.
Cbncaoune BnH3 BeTkn DepeBbeB n npOue npenrTcBnM oryT cTaB npuHnHO TneChbIX NOBpeKdHn nn nomeaTb paBoTe. Ipeed hauanom pa60tbl Heo6xOIMO o6paTntb BHIMAHne Ha BO3MOXHbIe npenrTcBnA (HaPnMep, Cbncaoune BnH3 BeTkn DepeBbeB) n 6pe3aTb nn NOnHocTbU ydaNTb IX.
B ueJx obecneueHnHaIeXaSei H63oNacHOn 3KcNpyatauCaoBOO o6OpyOBaHn Heo6xmo IcnoMb30BaTb Ira NpKIOUeHn CoeHNHTbHb KabeIb, IMeOuM MInHMaJIbHOe KaeeCTBO H 05 RN-F corNaCHO DIN/VDE 0282/4, npepeHoe ceHHe 3 x 1 MM², a TaKke peHOBbI INI POKpbITb PeHOB coeHNHTbI b corNaCHO DIN/VDE 0620. YcTpoCTBO pOKnIOuaeTcK 3a3eMNEHNO po3Etke c nepemHHbIM HAnPjaKeHnEM 230 B.
- Ipn nncnoB3OBaHn Ka6eIc 3aunToT OT DeTe HneOxOIMO y6eNtbc B noHOn NcnpaBHOCTn (JeKOCnXo) 3aunTHoro 6bokpaTopa, T.K. B npOTUBHom Cnyae BO3MOXHO NOpeXHeNE COeINHTeJIra3OHOKOINIK.
UcTpoIcTBo IOnkJIouaTeC K Po3eTKe, OChauSeHHO INHePzIOHNbIM npedoxpaHITeMe 16 A.
- PekomeHdyetc npimHeHne cxem ndphipeepuHaJIbHO 3aunTbI C HOMHaJIbHbIM TOKOM yTeKn He 60Jee 30 mA nPi paBHOeHHbIe 3aunTHbIe npncnocobHeHra.

3aPpeaaetcBHOCTbH3MeHeHHB 3JIeKTPnueckyIO KOHCTpyKUIO.
Heo6xOIMOpeyIpyHO npOBepaTb coeHNHTeHbHbKabeHbHa HauNue BnIMbIX NOBpeKdHn np3NaKOB cTapeHHa. Ka6eMb MoKeT npImeHbTc TaIbKO b63ynpeHOM COCTOHH.
Ecn Tpe6yeTcnoKnHueHne yCtpoiCTBa K 3eKtpnueckomy rehepatopy, cJeDyET npedBapntbHO obaatntbcB ynonHomoueHHyo MaTepcKyIO nIPOnueyHnHfOpMaunO nOxOJuaux rehepatopax.
Bo n36eXaHne NOBpeXeHn a3paTopa nepei NaJOM pa60bI Heo6xOIMo npOBepNTb IIOTHOCb pe3b6OBbIX coeHNHeHni, npABInbHocTb c6OpKn i COCToHnE Bala peKyuIero MexAHN3Ma. N3HOWeHHbI e JIN IOBpeXeHHbIe HOXn IN KpeENeXhIe BVHTb IIOJIeXaT 3aMeHe.
3Kcnnyataun
3anpeuaeTc8cknnyatauny yCtpoNCTBa BO B3pbBOOnaCho cpeJe.

He donyckatb nonadaHnna CoeHHntelhBix ka6eJe B pa6oyu 3ohy pekyuero MexaHn3Ma.
Bo Bpempa60bI He Hae3kaTb KoJecamn Ha Ka6enb, npi pa3MeueHm Ka6eY co6IIOaTb 6e3oNachoe pacCTOHNHe.

B clyuae IOBpeKdEHHa6eIbIKNIOHTb yCTPOINCTBO ndoJdaTbcra OCTaHOBa peKyuero MexAHn3Ma.
BbHytB bNkIy NITAHnI INo3 Po3ETKn. IOBpeKdEHHbIe 3JIeKTpueckne Ka6eIIN NOJNeKAT 3aMeHe. Ka6eIb DOnJKe H pOJIeRaT CBO6OAnHO, 6e3 INr6OB, 3axmIOB IMecT IIepTeHpaHnI.
Bo Bpemra6oTb3aPpeaaetc HooHHe HayuHKnOB dIy npocJyunBaHnpaDIO uN My3bIK. IJIy oecneueHn 6e30nachoctn BO Bpem 3Kcnnyaataunu n TexO6cnyukBaHn Tpe6yeTcMAKcImaNbHoe BHMaHne.
Pa60Ta BbINOHNIEcTOnBko npn DHeBHom CBeTe Nn npn HauNCHXopoOwero ocBeueHna. MaunHy cneDyET nepemuaTb Ha MNHMajbHOckoPocn.
Co6JIIOaTb OOC6yO OCTOPOXHOCTB TOM CNYuae, eCIN HAIINHne yrIIOB, KycTOB, DepeBBeB IN IPOUHX IpENATCTBIM MOKeT HApYUNITb BUDIMOCtB.
Co6nIouaTb octopoxhoctb np pa6ote B6n3n ctyneH, pBOB n CKnoHO. MaunHa MOKeT HeoxuHaHNO nepeBepHytbcra, ecn Ondo H3 KOnc nonadet Ha KpOMky BO3BbIeHHOCTn IIMЯMbI NIO eCnn KpOMka HeoxuHaH0 ocblIJIETcra.
3anpeuaeTcpa6oTaCycTroBOMIOBnHnemAnKOrOJI,MeINHcknx npepaTOB HApKOTIKOB.
- 10 Bo3MOxHocTn 36eRaTb 3KcNJIyatauIN yCTpoiCTBa Ha MOKpo TpaB E C8r3N C ONaCHOCTbIO NocKaJIb3bIBaHIn.
ObecneuYcToHBOe H63oNaCHOe NOJXHe Ha HAKnHOHBIX NOBepxHOCTaX. A3paun BbIOJIaTc nonpeK cKIOHa, a3paun BdoB cKIOHa BBepx ININ BHN3 HeOnyctMa. CneNyET co6IIOaTb OC6byO octopoxHOCTb npn 13MeHnn HapabNeHn DvHexn Ha cKIOHe.
He BbIIOJIHЯt b aepaunHO Ha Ype3MepHO KpybIX cKnOHa! Pa6oTa Ha HAKIOHHbIX NOBepxHOCTX BCERda CB83aHa C pIckOM. KoHcTpyKUIN aapatopa dOnyckaet pa60Tu HA cKnOHaX Do 25^ . B ceJax 6e3OJaCHocTN HactoTeNbHO peKOMeHNyETcH He NcIOJIb3OBaTb 3n TEOpEtueCKne BO3MOxHOCTN yCtpoiCTBa. B O6Uem cnyae 3KcNIIyatauHr HeCaMOxOJIbIX a3patoPob BblIOJIHReTcH Ha cKnOHaX He 6oJee 15^
Co6nOaTb Oco6yIO OCTOPOXHOCTB pI IOBOpTe MaunHb IIN ee np6bnKeHN K TeNy.
- ObpaTHoe DbIXeHHe BmecTe C MaIHHo MOKet npBecTn K NaIeHNo. N36erTa b ObaTHoro XOJa. N36erTa b Heydo6HOro IIOXeHn Tela. OBeCneHTb yCTOuHBOe IOIOXeHne n BcERda CoxpaHrTa paBHObecne.
Co6IIOaTb 6e3oNaChoe pacCToHne, onpeJeIeMoE dInHoI pyKn.
- YTO6bI He IOnyCTnTb NaDeHnY ycTpoiC7Ba npri erO nepeHocKe, Bcerda nCNoB3oBaTb npedymOTpeHHbIe dIra 3ToR0 3axBaTHbIe npicnoocBHeHn (pyka dIpyneHocKn, Kopnyc, KOHcI pyueK nnI nnonepeHna nepeKlaDnHa B HnxKHe qactn pyuKn). He 6paTbcra 3a OTknDHyU KpbIshky!
- Ipeep noIbemom nIepeHocm MaunHbI o6paTntb BHMaHne Ha ee BEc (CM. TexHnueckne xapaKTePncTn). IoIbem TReKeBIX npEIMetOB MOkET OTPuTaTeNbHO NOBnAraTb Ha 3DopOBBe.
3anpeaetcnoDbemnnnepeHocMaunHbICBKNHoeHHbIMDnIraTeJIeM.
3anpeuaeTc8kCnpyataaMaHbBcLyaeOTcyTCTBnaNNnoBpeXeHna 3aHTbix yctpoiCTB npeoXpaHntbHbIX npncnocobHeHH.
3aunTHbIe yctpoiCTBa:

-3aunTHbIpbUar
B cnyuae onachoctn otnyctntb 3auuHTbI pyuar: 3TO doJHXHO npNBecT N BbIKIOyeHIO DBNrAteJI NO octahOBy pexkyoero mexAHN3Ma. BHIMAHNE! PexkyuM mexAHN3M pa60tae T no HepuIN!
3anpeaaetcBbBOIDnI3 cTPOaunTHbI pyiar.
Heo6xOIMo CneIb3a IcnpabHocTbIO 3aunTHoro pbyara. B cnyae HapyueneB pa6ote 3aunTHoro pbyara CneJeT BbINONHTb peMOHT B yNONHOMOeHHo MaCTepcko.
PpeoXpaHntBhIe npncnoc6neHn:

Kopnyc, TpaBoc6OpHNK, OTKnHna KpbIuKa
3tn npedoxpaHnteIbHbe npncnoc6JeHnue oecneuBaOT 3aunTy OT TpaBM BCNECTBne no6paCsbHnR BBePx npedMeTOB.
3anpeaetc 3Kcnlyatauny yctpoinCTBa c nobpekdeHHbIM KOpnycom, 6e3 3akpenJIeHHoro HaJIeKaIIM o6pa3OM TpaBoc6OpHnka nIN 6e3 npIneraIOUe K Kopnycy OTKnIDHO Kn.

Kopnyc
To npedoxpaHntelbHOe npucno6neHne oecneuBaet 3aunTy OT TpaBM BCnEcdTBne npNKOCHOBHeK BpaaohoucpekuyseMy MexAHN3My.
3anpeaetc3kcnnyataunyyctpoictba c nobpejdeHHbIMkopnycom.Cneintb 3a Tem,HTobI pykn HnH He nonadann noKopnyc yctpOCTBA.

- POKpbTHe B BepxHeuactn pyuK, KAnOT DnurateJIn XoObaa YacTb, KpbIuK, KpeEnXHbIe 3JeMeHTbl, KOM6HHPOBaHHbY BbIKNIOATEJB-CoeINHNTeJIc Ka6eJEM, COeINHNTeJIbHbIy Ka6eJb
3Tn npedoxpaHntelhBie npncnoocbIeHnO obeCneuBaHT 3aunTy OT TpaBM BCJeCTBHe npNKoCHOBENK TOKOpBOJAAUM qactm KOHCTpykUIN.
3aIpeaaeTcB HOCnTB n3MeHHeB 3JIeKtpueckyIO KOHCTpyKuio.
IobpeKdHbIe KabeNIOaHe CoeHNHTbHbIKabeJb DOJIKeH OTBeaTb MInHMaNbHbIM Tpe6oBaHm H 07 RN-F cornacho DIN/VDE 0282/4.
Iocne npoBeHnpa60ntno pemOnTy nnnTexO6cnyKnBaHnIO n30JnpyuOxN xAcTeKoHCTpyKUHeo6xoDnma npoBepka HadexHoCTn 30JnCn corNaCHO deJeCTbYIOUeMy cTaHdApTy DIN EN 60335.
3anpeaaetcB HOCNTb n3meHnB KOKCTpyKuH npedoxpAHnteHbix npncnoc6neHm.
CobIIOaTb octopoxHocTb np3anycke MaunHbI IIN HaxaTN Ha NyckoBb BIKIOaTeJIb. DeNCTBOBaT b corlaCHO yka3aHnM npo3BODnteJ.

Pn BBOe B 3KcNlIyatauHIO y6eINbC8 B TOM, YTO HOrn HaxOJrTc8 Ha 6e3OnaHOM pacCToHm OT peKyuIero MEXAH3Ma.

Pn 3anycke Dbrateta nIIN NOCE erO BKNIOyeHna 3anpeaaetc nepeBOd MaunHbIBBepTNKaJIbHOe noJoxHe. Pn Heo6xoDmocTn MaunHy MoXHO HAKNOHrToNbKO TaKIM o6pa3OM, YTO6bl pexyui MexaHn3M 6bl HnpanBaHn B CTOPOHy, IpOTNBONIOxHHy OJb3OBaTeJIHO, N TObKO B ToI Mepe, HACKOJIbKO 3TO DeNCTBnTeJIbHO Tpe6yETc.

He np6nkaB pyK u HOr K BpaiaoumcaaTm KOHCTpyKu. CJeNTb 3a Tem, TTo6bI pyK u HOr He nonadann noKopnyc yctpoiCTBa.

BbIKIOHTb DnIraTeIb, BbIHytb BNJIky NITaHna I3 po3eTKN Uy6eINTbcR B NIOHOM OCTaHOBE BCEX NOdBHXbIX YacteK KOHCTpyKcun:
ecnH He6xOJIMo OCTaBtMaunHy 6e3 npncMOTpa;
- npeed npOBepKo coeHNHTJIbHOrO Ka6eJra;
- npeed npoBepko, ouncKoH nn npoBeHeHem pa60T cMaunHO;
- nepeoocbo6oxdeHnem 6IOKpOBOK nIyCTpaHHeHem 3aTOpOB pa3py3OHTORO OTBepCTNIA;
B Cnyae CTOnKHOBeHnC NocToPOHHm PpeMeTOM;
Bcnyae HeHOpMaIbHoB Bn6paun MaIINHbI.
B cnlyae cToKHOBEHnC nocTOPOHHm IpEIMeTOM Hn6IokpOBKn MaunHbI (HaPImep, npn Hae3de Ha npenrTCTBne) Heo6xOJIMO o6paNTbcra B yIOJIHOMOeHHyO MaCTepckyO C zelby IPOBepKn KOHCTpyKUnMaUNHbHa HAnuHne NOBpeXdEHN mN DEΦOpMaui. Bce Heo6xOJMBie peMOHTbIe pa60tbl TaKxe BblONHJOTcR cOTpydNHkAMn yIOJIHOMOeHHo Mactepckoi.
B cnlyae ype3mepHO Bn6paun MaunHbI Heo6xOIMo HemeJeHHO o6paTITbcra BynoHOMOeHHyIO MaTepckyIO C 1enbIO npOBepKu NcnpaBHOCTMaunHbI.

BbIKIOHTb DnuratJIb N y6eINtbcra B nonHOM OCTaHOBe BCex NOdBHXhIX YacteK KOHCTpyKUIN:
ecnn Tpe6yetcnoBem HnHaknoh a3patopa (HaPnPmep, nraero TpaHCnOptnpOBKn);
ecn TpebyetraHcnpTupOBka MaunHbHa NyTu MeKd MecTom XpaHeHn rA3OHOM;
- npi nepeDbNKeHn BHe npedeNoB ra3OHa;
ecn Tpe6yetcHa KOpOTKoe Bpem OCTaBtB MaunHy 6e3 npncmToPa;
- nepei n3meHHeHem rny6nHb aapuN;
- npeed CHaTneM TpaBoc6OpHnka.
RU
TexobcnyxmbaHne xpaheHne
- y6eIITbcB B TOM, yTO BCE pe3b6OBBie CoedHHeHn IIOTHo 3aTMyTbI, a yCTpoIcTBO HaxoIITcB H naEkhOM pa6ohem COCTOHHN.

He OTKpbIbAtb OTKnIDHyO KpbIshky He CHIMaTb TpaBoc6OpHn np BKNIOeHHOM DBNrAteJe.

PeryIpaHIO npOBepaTb MexaHn3M c6opa TpaBbHa Ha HauNue npu3HaKOB u3HocA uIN IOTepu pa6oTOcNOc6HOCTN.

KaKbI pa3 nepei Hauanom pa60tI npOBepaTb COCToHne i HaedKHOCTb Bana peKyuIero MexAHn3Ma.
N3HOweHHie INI NOBpeKDeHHbe HOXn NOJLeKAt O6ra3aTeJbHoi 3ameHe.
3aMeHa HOKeI DOJXHa BbINONHrTbC8 COTpydNtKAMn yNoHOMOeHHo MaCTepCKo, T.K. NocIe npOBedeHn pa60T no peMOHTy IIN TexO6cnyKuBaHnIO Heo6xOaMa npOBepKa HAdexKHocTN 3OJIaCm (HapPIMep, BaI pExyUero MEXAHn3Ma n KpeNXhIbe 3neMeHtbl) cornaCHO DeiCTByIoUeMy cTaHdpTy DIN EN 60335.
Buejx 6e30nacHocTn BCE u3HOweHHbI e nnIOBpeXdeHHbIe DetaJIIN NOJnxKAT 3ameHe.

Bo Bpempa6oT no Texo6cnykmbaHnIO npMOHTy o63aTeNbHO HOweHne 3auNTbIX nepuAtok.

Ipeed hauanom pa6oT no Texo6cnyxuBaHnIO npMOHTy Heo6xoDIMO BbIKHOHTb DBrTaTeJIb OTOeHNHTb BNky nITaHn.

3aIpeaetcA ONUCTKa MaunHb IpoTOUHO BODO IN C NOMOuB yCTPOJCTB DJIa ONUCTKIOB BBICOKIM DaBJIeHnEM.
3To MoKeT npBecTeK NOBpeXeHnIO 3NeKtpueecko OobopyoBaHna.
I3 coo6paekhen rapaHTn n 6e3onacHocTn donyckaetc npImHeHne ToJbKO opuHaJIbHbIX 3anactei.
-Приимechашидяшевцари:
3aHTHO BIKHouTeIc MaKcMaJIbHbIM TokOM cpa6aTbHaHn 30 mA.
YcTpoIcTBOppeDyCMAtpnBaet pa6Oty Ha cKJHOHax Do 25^
B ceJx 6e3onacHocTn HactoTJeBHO peKomeHdyetc He NcNoJIb3OBaTb 3TN TeOpTeUeCKHe BO3MOXHOCTn yctpoIcTb. B o6IeM cIyae 3KcIIpyatauHa HecamoxOHBIX a3paTOPOB BBINOJIHReTc Ha CKIOHax He 60Jee 15^
06paueHnecKa6eJem BO BpeMa a3paun
Ka6eNb CneDyET paCnONoXnTb TaKIM O6pa3OM, YTO6bl OH HeNpepbIBHO N 6e3 HaTJKeHnA CneDobAn 3a MaunHO No yKe o6pa6oTaHHo NOBepxHocn ra30Ha. PpN NOBOpTe MaunHbI MexAHn3M pa3rpy3Kn Ka6eNt OT HaTJKeHnA ABTomAtueckn nepeKnadBaet Ka6eNb Ha npTyIO CTOpOHy puKN.
He donyckaTb nonadaHnKa6eB B pa6oyu 30Hy peKyuIero MexaHn3Ma N O6pa3OBaHn Ka6eJIbHbIX PeTeJb. PeryIaprno npOBepaRb Ka6eB Ha HAnuue BnIMbIX NobpeXdEHN I NCNoJIb3OBaTb Ka6eJIb TOnbKO B NOINHOcTBIO nCnpabHOM coCToHn.
PpOBepka 6e3oNaChOCTN B 3KcNJIyatauIN
Kakdbi pa3 neped hauanom pa60tbipobepaBHO 3aunTHoro pbuara. OtnyckaHne 3aunTHoro pbuara doJXHO npBODHT K BbIKIOueHIO dBIRatela n ocTaHOby pexyuero MexaHn3Ma. BHIMAHne! Pexyuim MexaHn3M pa6oTaET no Hnepuhi!
Y6eIbBcR B TOM, YTO BOE 3aunTHbIe yCTpoiCtBA yCTaHOBHeHbI HaJIeXaUIM Oba3OM n He IMeHT NOBpeKdHn!
Поберпь Ворхючсь рун (изогаю) на habоче nobpeжден.В сучae NOBpeжден nokpbITя Heo6xodmo 6ратьсь в 6лнkaшуо унOLHOMOeHHyMoMaTePcKyo, T.K.В npOTNBHom cnyae NMeETcR pNcK TeJIeChbIX NOBpeJdEN (ydap 3eKtpnueckm TOKOM) пи пИКОСHOBeHm K TOKONpOBoDAm qaCTaM KOHCTpyKun.
Iocne nepBbIX HeckonbKx YacOB 3cKnpyatauH N B daJIbHeMpeyJrpho NOITraIBaTb BCE BNHTb I raIKN. B cIeJX 6e3OpacnOCTn nepei KaXdbIM 3aNyCKOM MaunHbI CNeDyET TAKKe npOBeprTa COCTOHaHne H aDeXHOCTb KpeJIeHnA HOKe (cm. pa3dEi "TexobcnyKBaHne BaIa peXyUeTo MexAHn3Ma").
PENYPNPEXDEHNE
Pa6oTbI cpeKyuIm MexaHn3MOM, a TaKxHe OTKpbIBaHne HIN CHrTHe IIO6bIX KpbIweK MaunHbI DOJXHBblINOJIbTaCOTpydHnKaMn yONHMOUeHHo MaCTepcKo, T.K. NocNe npOBedeHnpa60 nO peMOHTy HINTexo6cnyKuBaHnO Heo6xOdima npOBepka HaedKHOCTn 3OJraHn (HaNPmep, BAN pExyUero MexaHn3Ma, KpeJeKbIe 3IemeHTbI, KpbIuKn) corNaCHO DeicTBYooemy cTaHdapTy DIN EN 60335.
B cnyuae 6IOKUPOBKN peKyuJero MEXAHIN3Ma (HApnMep, npn Hae3Ne Ha npenTCTBne INI nonaHNN BHytpb NOCTOPOHNX npedMeTOB) cIeDyET o6pATnTBcR B yNOHOMOeHHyIO MaCTepCKyIO C CEJIbIO pOBEPK KOHCTpyKUN a3paTopaHa HAHNue NOBpeXdEHN INI DeOpMaun. BCE Heo6xOIMMbIe peMOHTbIe pa60TbI TAKKe BblONHJOTcCOTpyHNIKAmN yNoIHOMOeHHo MaCTepCKoN.
OrpanuyeHnnoBpeMeHn
Pn3KcNpyataun a3paTopa BO3MOXhbl OrpaHueHb NO BpeMeHN pa60tbi COJIaCHO MeCThIM npabINam. Ipeed BBODOM a3paTopa B 3KcNpyatauHIO CneJyET 3anpocNTb COOTBECTBHyUO HΦopMaHIO B MecTHbIX MyHUNaJIbHBIX OpraHax.
CoBeTbI no yxOdy 3a ra3OHom (pnc. M)
Bo Bpemra p60tbl cneyET nepemeaTb a3paTOp c MaIOI CKOPoCTbIO NO pIpyMbIM IINHm. BlaOJapr TOMy, YTO BaIpeKyuTeO MexAHn3Ma BpaAaetcBpeEd, dIJI npEmeueHnMaUHb Tpe6yOTcI NsB He6OnbWe ycInn. B3aBNCUMocTn OT oc6eHHocTeI rpyHTa MoKeT nOpTe6oBaTcYdepXnBAHHe a3paTopaB HAnpaBJeHn, npOTUBONOJoxHOMHaPabLeHnIO DvIXeHn. CneyEt n36eRaTb y3kNx KPNbix.
Pn 6b0ke 3aMneIoro nIN NOKpIToRO copHO TpaBO rA3OHa peKOMeHdyETc BblONHtB DOnONHTeJIbHyIO a3paHIO nepEnkUyApHO hCXoHOMy HnPaBHeHIO dBXKeH.N. B cnyae a3paun 6e3 TpaBoc6OpHnka nepeBTOpbIM pa6OUM cNeDyET ydaNTb OTxOdbI a3paun. DOnONHteJIbHO hKaNlaDbIAeMbIE OTxOdbI a3paun yxduAOT KaueCTBO a3paun, npIBoT K dOnONHteJIbHO Harpz3Ke MaunHbI N 3aTpynrJrT pa6Otu Ipn OepaTopa (T.K. dnn PepMeuHnmaHNbI Tpe6yIOT NOBIIeHHbIye cInn).
IydaJIeHn/60pa OTxOIOB a3paun MOxHO nCNOJb3OBaTb Ra3OHOKoNkY C cnCTeMOB BCacbHaHnra TurboStar nnpyHbIe rpa5nn.
15 YXODI N TEXO6CJYKINBAHNE A3PATOPA
PeryIpaHb yXoD 3a raoHOKOcNIOK RAJIeTcra rapaHTne dINTEbHO n 6ecnepe6oHO HO kCNpyatau! TOnbKO opRnHaBHe 3anactn cnoc6HbI o6ecneHTb 6eONacHOCTb N KaueCTBO!


Yka3aHHe No TEXHNke 6e3onacHOCTn!
PacuippoBky CmBOIOB cm. B Ta6nue Ha cTp.3
OuNcTka (pnc. N3)
YdaNTb rpa3b n octaTkn TpaBbl HenocpeDCTBeHHo nocne 3aBepseHn pa6Otbl. NIOXHTb MaunHy h6OK n BbINOHTb OCHTKy C NOMOuBHO uETKn nn JockyTa.
BeHTnJrOHHbE OTBepCTN 3JIeKTPoDBBURAteTEn (1) DOnXHbI 6bITb OUYIeHbI OT 3aRpa3HeHIn N OCTaTKOB TpaBbl.
BAKHO
He 6pbI3rBaTb yCTpoCTBO BOo! 3To MoXeT npNBecTn K NOBpeKJeHIO 3JeKtpuYeCKOrO 6OpuyoBaHn.
XpaHeHne
XpaHntb yctpoCTBO B OCHUeHHOM COCTOHN B 3akpbITOM, CxOM N HeIOCTyHOM DJIa DeTeI NOMEUeHN. IpeD TEM, KAK NOMeCTNTb MaunHy Ha XpaHeHne B 3akpbITOM NOMEUeHN, DoKDaTbC4 OCTbIBAHN DBNrAteJRA.
CknaDbIbAHne pyKn (pnc. A1)
- ⅡЯ зкOHOMm MeCTa npx xpaHeHm nI INn dIЯ TpaHCnOpTnpOBKn MaunHbI MoXHO cNoXHTb BepXHIO YacTb pyKn HaI KpbIshKoДBnIraTeJI A1.
- Ⅱя cklaadbHaHnBepxHne yactn pyKn BbyHyTb BepxHIO NIN HNKHIO YacTb peyIpOBOHoi WtAHn N3 coeHNHTbHOro 3JemeHTa.
Ocna6ntb 6apaaKOBbIe raiKn n HAKIOHHTb BnpeEd BepxHOU qacTb pyKn.
He donyckaTb crnbHnna nIIN 3axmHaHnKa6eI dny npaBneHn DbrarateJeM!
OCTOPOKHO
PnCKnaIbAHnpyKnCzJIbTO TpaHcnpTupOBKn Hnn XpaHeHnOcna6JeHne 6apaWkoBbIX raeK MoXeT npNBecTN K HeKeJaTeJbHomy CKnaIbBaHnIO pyKn. TaKx MeetcOnaHocTb 3aUeMLeHn MExy HnxHeN BepxHeN YacTAMpyKn, YTO MOKeT pNBecTN K TeJeChbIM NOBpeXDeHnA!
TpaHcnpTnpoBka n 3akpenJIeHne ycTpoNCTBa
- Ecni Tpe6yeTcnapeHocKa MaunHbI, He 6paTbcra 3a OTKnHyIO KpbIuKy! IJI na nepeHoca MaunHbI NcNoJIb3yIOTcnapeDnHra Ocb KOJec n peeknauHa B HnKHeu Yactn pyKn.
Ipeep noDbemom mnnnepehocm Maunnbi opaTntb BHHMaHHe Ha ee BEc (CM. TexHnueckne XapaKTePncTNKn).
TaeBem TaeKeJIbIX PpeMeTO BoMeTeO TPOUaTeIbHO NOBIMrTa H a 3DOpOBBe.
B cnuyae OTCyTCTBnRA BCNOMORAteIbHbIX CpeIcTB peKOMeHdyeTcra NIOHNMaTb IIN NpeHOCHTb MaUNHy KaK MNHMMyM BDOEM.
BoBpemrTpaHcnpTnpOBMaunHaOnkHaXoUbCBAVeTpKaJIbHOMIIOXeHN.
- py30Oe TpaHcnpTHe CpeICTBO DOJXHO HaxoINTbCra Ha POBHO IOBepxHOCTN, YTO6bl He DOnyCTNTb BbIKaTBBaHnMaunHbI Do ee 3akpenHeHn.
HaBpeMnpeBo3KnCJIeDyETCHrTbTrpAboc6OpHnK 3aKpeNtBeroOTDeJIbHO.
HaJeXHO 3aKePntb MaunHy C NOMOu bpa3peHHeHX K PnmuHenIO npncoc6neH INI KpeJIeHr Ipy3OB (HapnpEep, KpeNEXHbIX pemHe C HATKHeIM 3neMeHTAM) Ha NOBepxHOCTN ABTOMO6nI INI BHYTpH Hero.
KpeeHbIe pemn npedctabnT coboi neHTouhble pemn n3 CNHTeTuCeKnx BONOKOH. KaJbI KpeeXhI peMeHb IMeET MapKnpoBky, codepkauB BaxHbIe yKa3aHnK PpImHeHIO.
Iy3OB, IMeOuIX Koneca, peKOMeHdyeTcHNoCpeCDBeHHoe 3aKePJIeHne YeTbIPbMHaTAAKHBIM pemHMy. 3aKePENtB KOJeca MaunHbI TaKIM Oba30M, YTO6bl BO BpEmpeBo3KN OHa OCTaBaIacb HnODBHXHOI.
BHIMAHNE
He donyckaTb ype3mepHoro HataKeHHaPmeH. 3To MoKTe npBecTn K nobpeXdEHHo MaunHbI.
Texo6cnyxmbHne Bana pexyceo MexaHn3Ma
Kaekdbi pa3 nepeH naHajom pa60bI npOBepaTb coCToHne Hn HAdexHocTb KpeJIeHnHa HOKe. N3HOseHHbIe nIN NOBpeKJeHHBe HOKn noJleKaT o63aTeMbHOn 3ameHe.
PNEyPPEKDEHNE
3aMeHa HOKei DOJIxHa BbIIOJHrTbC8 COTpydHnKamN yOJHOMoYeHHoM MacTepCKoN, T.K. NOcNe IpoBeDeHnpa601 no peMOHTy INI TeXo6cIyXnBaHnIO Heo6xOIMa IpoBepKa HAdEeKHOCTn I3OJIauIN (HanpImep, BaI pExyUeRo MEXAHn3Ma n KpeENKhBi e 3JeMeENTbI) corlacNo DeIcTBYIOSeMy cTAndapTy DIN EN 60335.
Kpome toro, HenpaBnBna c6opka pexyuzero MexaH3Ma MOKeT npNBecTN K OTcoeINHeHIO HOKeN, TTO MOKeT CTaT npuHHoT JxKeJbIX yBeuN.
- Pn 3aeme He nCnoJb3ObaT bToJIbKO opuHaJIbHbe HOx Ia aapaun!
HaNoBepxHocTn CMeHHoro HOxa DoJIKHa 6bITb HaHeceHa HecMbIbaeMa r MapKnIpOBKa c HAnMeHOBaHNEM n/nn 06o3HaueHem npOn3BODnteJr nn NoCTaBUnka, a TAKKe C HomepOM DeTaN.
Texo6cnyxmbHne konec
Cma3ka IoIuINHnKOB KOJec BbINOnHReTcOdIH pa3B rOId.
- ⅡIЯ 3TOrO ChrTb 3aJIyUskIN KOJc, BbIBnHTnTb OCN KOJIeC IN CHrTb KOJcA.
Cma3aTb noDunHnKn, HadeTb KOleca n 3aTaryTb ocn KOlec taqim o6pa3om, TTo6bl o6ceuHTb JerKocTB XoJa KOlec 6e3 IIOΦTa.
16 HENCPABHOCTN, INIPIUHbI N YCTPAHEHNE

- Nederlandss
- EXPLANATION OF THE RATING PLATE AFFIXED TO THE MACHINE
- GB
- INTRODUCTION
- Dear gardening fans,
- PROPER USE
- GENERAL SAFETY GUIDELINES FOR THE ELECTRIC SCARIFIER
- General safety instructions
- Preparatory measures
- Handling
- Safety devices include:
- Protective devices include:
- Maintenance and storage
- DESCRIPTION OF COMPONENTS
- PREPARATION
- Assembling the handlebar upper section (Illustration C3 + E3)
- BEFORE USING THE SCARIFIER FOR THE FIRST TIME
- STARTING THE MACHINE
- IMPORTANT
- Attaching the connecting cable (Illustration C2)
- ATTENTION
- Attaching the connecting cable to the strain relief fitting (Illustration D2)
- Starting the motor (Illustration A2)
- SWITCHING OFF THE MOTOR (Illustration F)
- EMERGENCY STOPPING
- ADJUSTING THE SCARIFYING DEPTH
- Safety instruction!
- The scarifying depth must only be adjusted with the motor switched off!
- Setting (Illustration T2 + V2 + Z2)
- GRASS COLLECTOR
- Operation with grass collector (accessory)
- Attaching the grass collector to the scarifier (Illustration S1)
- Emptying the grass collector
- Operation without grass collector
- WARNING
- Using the machine on slopes
- Handling the cable during use
- Checking operating safety
- Time restrictions
- Tips on caring for your lawn (Illustration M)
- CARE AND SERVICING OF YOUR SCARIFIER
- Cleaning (Illustration N3)
- Storage
- Collapsing the handle (Illustration A1)
- CAUTION
- Transporting and securing the equipment
- Maintenance of the blade shaft
- Servicing the wheels
- PnroToBnteIbHbIe pa6oTbI
- 3Kcnnyataun
- 3aunTHbIe yctpoiCTBa:
- PpeoXpaHntBhIe npncnoc6neHn:
- TexobcnyxmbaHne xpaheHne
- 06paueHnecKa6eJem BO BpeMa a3paun
- PpOBepka 6e3oNaChOCTN B 3KcNJIyatauIN
- PENYPNPEXDEHNE
- OrpanuyeHnnoBpeMeHn
- CoBeTbI no yxOdy 3a ra3OHom (pnc. M)
- YXODI N TEXO6CJYKINBAHNE A3PATOPA
- OuNcTka (pnc. N3)
- BAKHO
- XpaHeHne
- CknaDbIbAHne pyKn (pnc. A1)
- OCTOPOKHO
- TpaHcnpTnpoBka n 3akpenJIeHne ycTpoNCTBa
- BHIMAHNE
- Texo6cnyxmbHne Bana pexyceo MexaHn3Ma
- PNEyPPEKDEHNE
- Texo6cnyxmbHne konec
Brand : SABO
Model : 38EV
Category : Lawn mower